In tech, caching is ubiquitous. CPUs use L1, L2, and L3 caches, and mobile phones cache app data locally. Streaming services cache content on the edge, browsers cache images, and more.
The same is true for databases.
Imagine if, on a gaming site, every time a leaderboard was displayed, a query had to do a summation and sort all of the players of a game. Or if, every time you went to an ecommerce site, the price for a particular product had to be read from disk for each customer. The performance would be unacceptable and the amount of compute would be cost-prohibitive.
In databases, two of the main motivations for caching are performance and cost savings. Either you want microsecond performance where milliseconds do not suffice, or you want to offload expensive operations from the database by caching commonly used data.
Solution overview
In this post, I show you how to integrate Amazon DocumentDB (with MongoDB compatibility) and Amazon ElastiCache to achieve microsecond response times and reduce your overall cost. The following diagram shows the architecture for the solutions in this post.
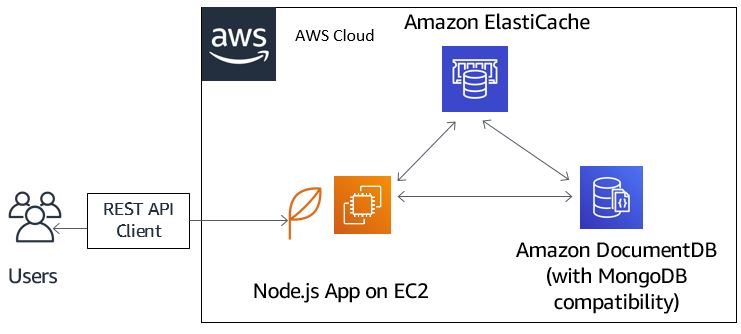
The operational database in this example is Amazon DocumentDB—a fast, reliable, and fully managed database service that makes it easy to set up, operate, and scale MongoDB-compatible databases in the cloud. With Amazon DocumentDB, you can run the same application code and use the same drivers and tools that you use with MongoDB.
Using Amazon DocumentDB’s flexible document model, data types, and indexing, you can store and query content quickly and intuitively. For example, user reviews and demo videos for shopping sites and catalogs, inventory lists for point-of-sale terminals, and financial trades for trading platforms.
For the caching layer, use Amazon ElastiCache, which makes it easy to set up, manage, and scale distributed in-memory cache environments in the AWS. ElastiCache provides a high performance, resizable, and cost-effective in-memory cache, while removing complexity associated with deploying and managing a distributed cache environment. ElastiCache is compatible with both the Redis and Memcached engines.
I demonstrate how to integrate these two services by building an application that allows users to find their favorite song. They submit the song title using a REST API client to the application engine.
The application engine processes the API request by retrieving the document containing the singer’s name and lyrics of the requested song from the ElastiCache layer. If there has been a prior request for that song already, the read is served by ElastiCache. If not, the application engine queries Amazon DocumentDB and returns the requested document to the application as a JSON document.
The application caches a copy in ElastiCache to speed up the response time of any subsequent request for the same song. For this example, I use Amazon ElastiCache for Redis as the caching layer and Postman as the REST API client. Postman app is an open source tool for testing REST API.
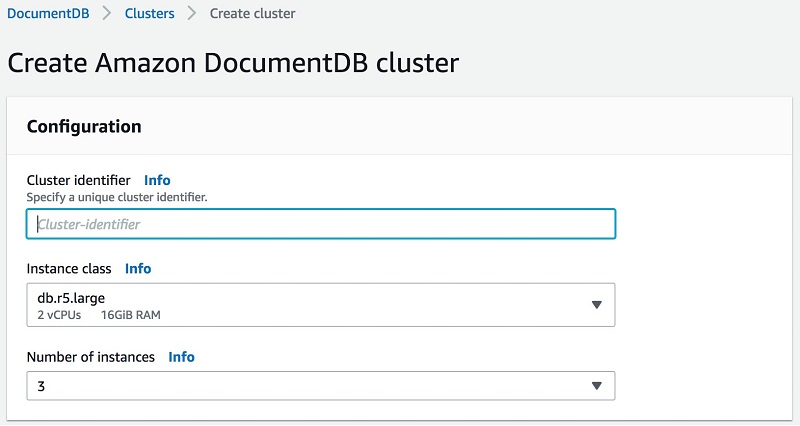
Create an Amazon DocumentDB cluster
For more information about creating a cluster, see Getting Started:
- Open the Amazon DocumentDB console.
- Create a new cluster.
- Enter the cluster identifier.
- Choose the appropriate instance.
- Leave the default value for the number of instances.
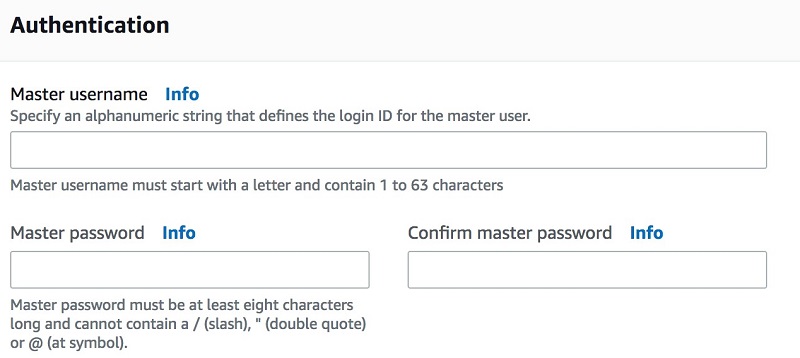
- Define the master user name and password.
- Select Create cluster, as shown in the following screenshots.
Create the ElastiCache for Redis cluster
Create the Amazon ElastiCache for Redis cluster using the following steps, as shown in the following screenshot.
- From the AWS Management Console, search for ElastiCache under Services.
- From the ElastiCache dashboard, select Redis and choose Create.
- Fill out the Redis settings. For this example, use the default port 6379.

Create an EC2 instance
I host the song application on an Amazon EC2 instance.
- Create an EC2 Linux instance. Ensure that it has a public IP address.
- Launch the instance with a key pair.
Download your key pair file (.pem), which stores the private keys associated with your newly created instance, and connect to it using the following command:
ssh -i ~/<path_to_instance_keypair_file>/<keypair_file>.pem ec2-user@<your_ec2_instance_public_dns_or_IP>
For example, if you named your key pair file my-key-pair.pem and your EC2 instance DNS is ec2-198-51-100-1.compute-1.amazonaws.com, the command would be:
ssh -i /<path>/my-key-pair.pem ec2-user@ec2-198-51-100-1.compute-1.amazonaws.com
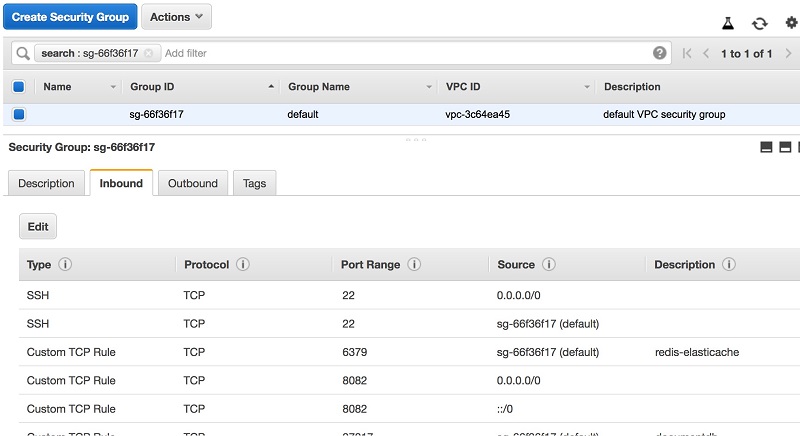
Connect to the clusters
To connect to your Amazon DocumentDB and ElastiCache clusters, update the security groups for the two clusters to allow inbound traffic for TCP ports 27017 and 6379, respectively.
Also enable inbound connections on the security group for the EC2 instance on TCP port 8082, which the demo application is listening on as shown in the following screenshot.
Install the MongoDB shell
Next, install the MongoDB shell on the EC2 instance. Instructions for installing the MongoDB shell can be found on YouTube or in the Getting Started guide.
Verify the connection
Verify that you’re able to connect to the Amazon DocumentDB cluster from the EC2 instance, using the following command:
[ec2-user@ip-172-31-83-136 ~]$ mongo --ssl --host docdb-2019-06-16-22-03-10.cluster-c9di9qmu8xqw.us-east-1.docdb.amazonaws.com:27017 --sslCAFile rds-combined-ca-bundle.pem --username docdbadmin --password <###########>
MongoDB shell version v3.6.13
connecting to: mongodb://docdb-2019-06-16-22-03-10.cluster-c9di9qmu8xqw.us-east-1.docdb.amazonaws.com:27017/?gssapiServiceName=mongodb
Implicit session: session { "id" : UUID("1fe7a152-8340-4d8e-b329-09c722b53b10") }
MongoDB server version: 3.6.0
rs0:PRIMARY>
Next, verify that you’re able to connect to the Amazon ElastiCache cluster. To do that, install the Redis command line interface (CLI) using the following steps on the same EC2 instance hosting the song application:
sudo yum install gcc
wget http://download.redis.io/redis-stable.tar.gz
tar xvzf redis-stable.tar.gz
cd redis-stable
make
To verify, connect to the ElastiCache for Redis cluster by running the following command:
src/redis-cli -h myredis.obpmqw.ng.0001.use1.cache.amazonaws.com -p 6379
You should get the following ElastiCache prompt, confirming that you’re connected to the cluster.
myredis.obpmqw.ng.0001.use1.cache.amazonaws.com:6379>
Now, run the following keys * command to see what is currently in your cache.
myredis.obpmqw.ng.0001.use1.cache.amazonaws.com:6379> keys *
(empty list or set)
The output confirms that the cache is empty.
Build the app engine
Now that you can successfully connect to both the Amazon DocumentDB database and ElastiCache, you can start building the Node.js app engine on a separate EC2 instance.
Use the same Node.js application running on the EC2 instance to populate the Amazon DocumentDB cluster with data containing singer, title, and text lyrics details.
First, ensure that Node.js is installed on the EC2 instance.
After Node.js is installed on the EC2 instance, check that Node Package Manager (npm) is installed by running the following commands:
       __|  __|_  )
       _|  (     /   Amazon Linux 2 AMI
      ___|\___|___|

https://aws.amazon.com/amazon-linux-2/
16 package(s) needed for security, out of 23 available
Run "sudo yum update" to apply all updates.
[ec2-user@ip-172-31-34-254 ~]$ npm --version
6.9.0
[ec2-user@ip-172-31-34-254 ~]$ which node
~/.nvm/versions/node/v10.16.0/bin/node
[ec2-user@ip-172-31-34-254 ~]$
Create an application directory
Next, create a directory for the application and change to that directory using the commands below:
The following command generates the package.json file:
You may select the default index.js value, but for main, enter cdstore.js instead of index.js.
Install dependencies
Next, install all the dependencies needed for the application to work. These include MongoDB driver that allows the application to connect to Amazon DocumentDB, a Node.js web application framework, a Node.js Redis client, and a body-parser that is Node.js body parsing middleware. Install them by running the following commands:
npm install express --save
npm install mongodb --save
npm install redis –save
npm install body-parser –save
The contents of the package.json file are as follows:
{
  "name": "cdstore",
  "version": "1.0.0",
  "description": "songs search engine app to showcase Amazon DocumentDB and Elasticache integration",
  "main": "cdstore.js",
  "scripts": {
    "test": "echo \"Error: no test specified\" && exit 1"
  },
  "author": "GL",
  "license": "ISC",
  "dependencies": {
    "body-parser": "^1.19.0",
    "express": "^4.17.1",
    "mongodb": "^3.2.7",
    "mongoose": "^5.6.0",
    "redis": "^2.8.0"
  }
}
Create the functions
Create two functions:
A SaveSong () function used for sending a /POST request to insert data into the Amazon DocumentDB instance. You could also write a script to insert data in bulk using the command db.<collection_name>.insert().
SearchSongByTitle() is used by the /GET method to perform the actual search.
Store the two functions in a file called cache.js. Create that file:
Use your favorite editor (vim, vi, etc.) and copy the following code to paste into the cache.js file:
module.exports.SaveSong = function (db, title, singer, text, callback) {
    db.collection('text').insertOne({
        title: title,
        singer: singer,
        text: text
    }, callback);
};

module.exports.SearchSongByTitle = function (db, redis, title, callback) {
    redis.get(title, function (err, reply) {
        if (err) callback(null);
        else if (reply) //Song does not exist in cache
        callback(JSON.parse(reply));
        else {
            //Song doesn't exist in cache so need to query the database
            db.collection('text').findOne({
                title: title
            }, function (err, doc) {
                if (err || !doc) callback(null);
                else {//Song found in database,return to client and save to cache and return to client
                    redis.set(title, JSON.stringify(doc), function () {
                        callback(doc);
                    });
                }
            });
        }
    });
};
Create the endpoint
Now, create the endpoint cdstore.js as follows:
Copy the code below and paste into the cdstore.js file:
var mongoose = require("mongoose");
var redisClient = require('redis').createClient;
var redis = redisClient(6379, 'myredis.obpmqw.ng.0001.use1.cache.amazonaws.com');
var express = require('express'),
    MongoClient = require('mongodb').MongoClient,
    app = express(),
    mongoUrl = 'mongodb://docdbadmin:docdbadmin@docdb-2019-06-16-22-03-10.cluster-c9di9qmu8xqw.us-east-1.docdb.amazonaws.com:27017/?ssl=true&ssl_ca_certs=rds-combined-ca-bundle.pem&replicaSet=rs0';
var db;
MongoClient.connect(mongoUrl, { useNewUrlParser: true }, function (err, client) {
    if (err) throw 'Error connecting to database - ' + err;
 db = client.db('cd')
});

var cache = require('./cache.js');
var cdSchema = new mongoose.Schema({
  title: String,
  singer: String,
  text: String
});

var Song = mongoose.model("Song", cdSchema);
var bodyParser = require('body-parser');

app.use(bodyParser.json());
app.use(bodyParser.urlencoded({ extended: true }));

 app.post('/cd', function (req, res) {
        if (!req.body.title || !req.body.singer) res.status(400).send("Please send a title and an singer of the song”);
        else if (!req.body.text) res.status(400).send("Please send some text lyrics of the song”);
        else {
            cache.SaveSong(db, req.body.title, req.body.singer, req.body.text, function (err) {
                if (err) res.status(500).send("Server error");
                else res.status(201).send("Saved");
            });
        }
    });

app.get('/cd/:title', function (req, res) {
    if (!req.params.title) res.status(400).send("Please send a proper song
title");
    else {
        cache.SearchSongByTitle(db, redis, req.params.title, function (cd) {
            if (!req.params.title) res.status(500).send("Server error");
            else res.status(200).send(cd);
        });
    }
});
    app.listen(8082, function () {
        console.log('Listening on port 8082');
    });
Start the application
Next, start the application, which, in this example, is set to run on port 8082 on the EC2 instance. To do that, use the following command:
If everything is running correctly, you should see the following message on the console:
Test the application
To test the application, use Postman (a REST API client) to make POST and GET requests. For GET requests, compare response times between the first request (when data is fetched from Amazon DocumentDB) and subsequent requests (when it is served from Redis ElastiCache).
- Populate the Amazon DocumentDB with the song dataset using the
POST
- Search for with a
GET
For simplicity, this example shows only the process for entering a single song, though it has been repeated several times for subsequent steps.
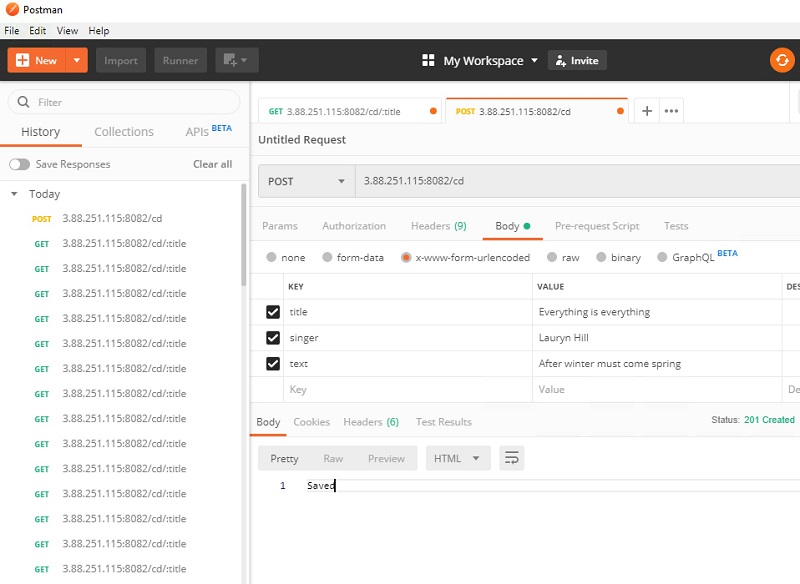
Open Postman and select the POST method then enter the application URL (in this example, http://<ec2-dns-or-IP>:8082/).
Ensure x-www-form-urlencoded is selected under Body.
- Enter the song details as key-value pairs:
Title: Everything is everything
Singer: Lauryn Hill
Text: After winter must come spring
- Choose Send.
You should see Saved and Status 201 created on the Postman screen, as shown in the following screenshot:
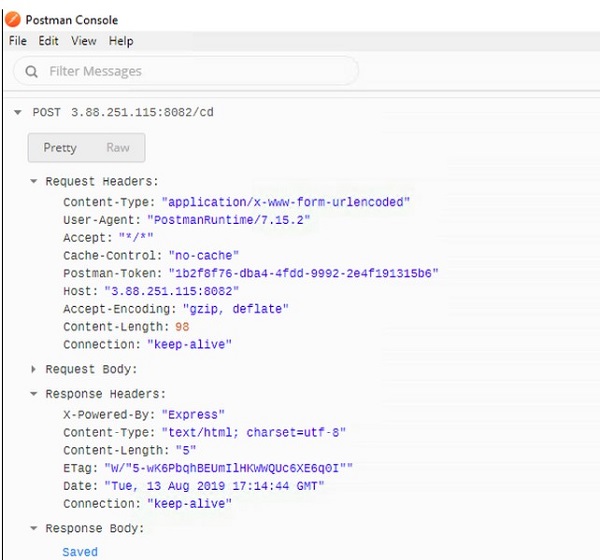
Check the details of the POST request from the Postman console and ensure that you have the same result, as shown in the following screenshot:
Checking the Amazon DocumentDB cluster
Use the same command from the previous step to connect to Amazon DocumentDB and check that the data has been saved into the database:
[ec2-user@ip-172-31-83-136 ~]$ mongo --ssl --host docdb-2019-06-16-22-03-10.cluster-c9di9qmu8xqw.us-east-1.docdb.amazonaws.com:27017 --sslCAFile rds-combined-ca-bundle.pem --username docdbadmin --password <###########>
MongoDB shell version v3.6.13
connecting to: mongodb://docdb-2019-06-16-22-03-10.cluster-c9di9qmu8xqw.us-east-1.docdb.amazonaws.com:27017/?gssapiServiceName=mongodb
Implicit session: session { "id" : UUID("1fe7a152-8340-4d8e-b329-09c722b53b10") }
MongoDB server version: 3.6.0
rs0:PRIMARY>
Switch to the Amazon DocumentDB prompt on choosing Enter. From the prompt, enter the following commands to check that the data sent from Postman has been saved successfully, as shown in the following code example.
- show db—Lists the available database instances in Amazon DocumentDB.
- use cd—Instructs the interpreter to use the instance called cd.
- show collections—Displays the available collections (which you could think of as tables equivalent in relational DB)
- db.text.find()—Lists all the documents inside the text collection
rs0:PRIMARY> show dbs
admin  0.000GB
cd     0.000GB
db     0.000GB
test   0.000GB
rs0:PRIMARY> use cd
switched to db cd
rs0:PRIMARY> show collections
cd
text
rs0:PRIMARY> db.text.find()
{ "_id" : ObjectId("5d0f694039709606b4193ff0"), "title" : "Bad", "singer" : "Michael Jackson", "text" : "Who's bad" }
{ "_id" : ObjectId("5d1287933bfba9381eb38aec"), "title" : "7 days", "singer" : "Craig David", "text" : "I met this girl on monday" }
{ "_id" : ObjectId("5d129c793bfba9381eb38aed"), "title" : "I'm alive", "singer" : "Celine Dion", "text" : "A new day has come" }
{ "_id" : ObjectId("5d1367d3d31268442cc9a68f"), "title" : "Love", "singer" : "Madonna", "text" : "Love is great" }
{ "_id" : ObjectId("5d136d2c808560468a8207a2"), "title" : "I will always love you", "singer" : "Whitney Houston", "text" : "I will always love you darling" }
{ "_id" : ObjectId("5d13724f606c0046f5b630ca"), "title" : "Sunshine", "singer" : "Fancis Cabrel", "text" : "Sunny days" }
{ "_id" : ObjectId("5d13dfd40cc0f94daaeca560"), "title" : "Jamming", "singer" : "Bob Marley", "text" : "I wanna jamming with" }
{ "_id" : ObjectId("5d13ef5e03b8825ee9747754"), "title" : "I don't care", "singer" : "Justin Bieber", "text" : "I don't really care" }
{ "_id" : ObjectId("5d13efa503b8825ee9747755"), "title" : "Vossi Bop", "singer" : "Stormzy", "text" : "Vossi bop vossi bop" }
{ "_id" : ObjectId("5d13efe403b8825ee9747756"), "title" : "Bad guy", "singer" : "Billie Eilish", "text" : "There is the bad guy" }
{ "_id" : ObjectId("5d13f02203b8825ee9747757"), "title" : "Hold Me While You Wait ", "singer" : "Lewis Capaldi", "text" : "Can you hold me while you wait" }
{ "_id" : ObjectId("5d13f06703b8825ee9747758"), "title" : "You Need To Calm Down", "singer" : "Taylor Swift", "text" : "You just need to calm down" }
{ "_id" : ObjectId("5d16a8f6044bc93008a71fa3"), "title" : "Happy", "singer" : "Farrell Willams", "text" : "Because I'm happy" }
{ "_id" : ObjectId("5d16a981044bc93008a71fa4"), "title" : "I will always love you", "singer" : "Whitney Houston", "text" : "I would only be in your way" }
{ "_id" : ObjectId("5d16ab3f044bc93008a71fa5"), "title" : "I don't care", "singer" : "Justin Bieber", "text" : "I don't care" }
{ "_id" : ObjectId("5d16ab88044bc93008a71fa6"), "title" : "Dangerously in love", "singer" : "Beyonce Knowles", "text" : "Crazy in love" }
{ "_id" : ObjectId("5d16ac793410943035513dad"), "title" : "Good girl gone bad", "singer" : "Rihanna", "text" : "Umbrella" }
{ "_id" : ObjectId("5d173033aba3723895b7ba0a"), "title" : "Cry me a river", "singer" : "Justin Timberlake", "text" : "Cry me a river" }
{ "_id" : ObjectId("5d1a1ecfb031a963201c0632"), "title" : "Waka waka", "singer" : "Shakira", "text" : "Zaminamina waka waka" }
{ "_id" : ObjectId("5d1b74bf7e0f7c1c45a48e67"), "title" : "Let it be", "singer" : "Beatles", "text" : "Let it be" }
Type "it" for more
rs0:PRIMARY> it
{ "_id" : ObjectId("5d1b794773328e1ca5f12edc"), "title" : "Abbey road", "singer" : "Beatles", "text" : "Here comes the sun" }
{ "_id" : ObjectId("5d1b7b5473328e1ca5f12edd"), "title" : "Nikita", "singer" : "Beatles", "text" : "Here comes the sun" }
{ "_id" : ObjectId("5d49a8e40d2e08281417eef6"), "title" : "Time to grow", "singer" : "Lemar", "text" : "If there is any justice in the world" }
{ "_id" : ObjectId("5d4ace76534b934149e43d3f"), "title" : "River", "singer" : "Luis", "text" : "Beautiful river" }
{ "_id" : ObjectId("5d51bc6217d7183869dce115"), "title" : "Ghetto Gospel", "singer" : "Tupac Shakur", "text" : "my ghetto gospel" }
{ "_id" : ObjectId("5d52f004042b1b4b0e9b1477"), "title" : "Everything is everything", "singer" : "Lauryn Hill", "text" : "After winter must come spring" }
rs0:PRIMARY>
Bulk insert data
The output from the command db.text.find() also shows that there were a few song entries in the Amazon DocumentDB instance already. They were added by sending a POST command from Postman while testing the application.
It’s also possible to bulk insert songs to Amazon DocumentDB using the following command:
For example:
db.text.insertMany(
    [
        {
            “title”: “your favorite song’s title number 1“,
            “singer”:”you favorite singer number 1”,
            “text”: “your favorite song lyrics number 1“
        },
        {
            “title”: “your favorite song’s title number 2”,
            “singer”:” you favorite singer number 2”,
            “text”: “your favorite song lyrics number 3“
        },
        {
            “title”: “your favorite song’s title number 3”,
            “singer”:" you favorite singer number 3”,
            “text”: “your favorite song lyrics number 3”
        }
    ]
)
If you run the db.text.find() command again, you can see the three entries inserted using db.text.insertMany() using the MongoDB API. This only shows the output displaying the newly added entries.
Type "it" for more
rs0:PRIMARY> it
{ "_id" : ObjectId("5d1b794773328e1ca5f12edc"), "title" : "Abbey road", "singer" : "Beatles", "text" : "Here comes the sun" }
{ "_id" : ObjectId("5d1b7b5473328e1ca5f12edd"), "title" : "Nikita", "singer" : "Beatles", "text" : "Here comes the sun" }
{ "_id" : ObjectId("5d49a8e40d2e08281417eef6"), "title" : "Time to grow", "singer" : "Lemar", "text" : "If there is any justice in the world" }
{ "_id" : ObjectId("5d4ace76534b934149e43d3f"), "title" : "River", "singer" : "Luis", "text" : "Beautiful river" }
{ "_id" : ObjectId("5d51bc6217d7183869dce115"), "title" : "Ghetto Gospel", "singer" : "Tupac Shakur", "text" : "my ghetto gospel" }
{ "_id" : ObjectId("5d52f004042b1b4b0e9b1477"), "title" : "Everything is everything", "singer" : "Lauryn Hill", "text" : "After winter must come spring" }

{ "_id" : ObjectId("5d6281c29c2cb6eeccb83927"), "title" : "your favorite song’s title number 1", "singer" : "you favorite singer number 1", "text" : "your favorite song lyrics number 1" }
{ "_id" : ObjectId("5d6281c29c2cb6eeccb83928"), "title" : "your favorite song’s title number 2", "singer" : "you favorite singer number 2", "text" : "your favorite song lyrics number 3" }
{ "_id" : ObjectId("5d6281c29c2cb6eeccb83929"), "title" : "your favorite song’s title number 3", "singer" : "you favorite singer number 3", "text" : "your favorite song lyrics number 3" }
Retrieve an entry using only the title
Run a GET request from Postman.
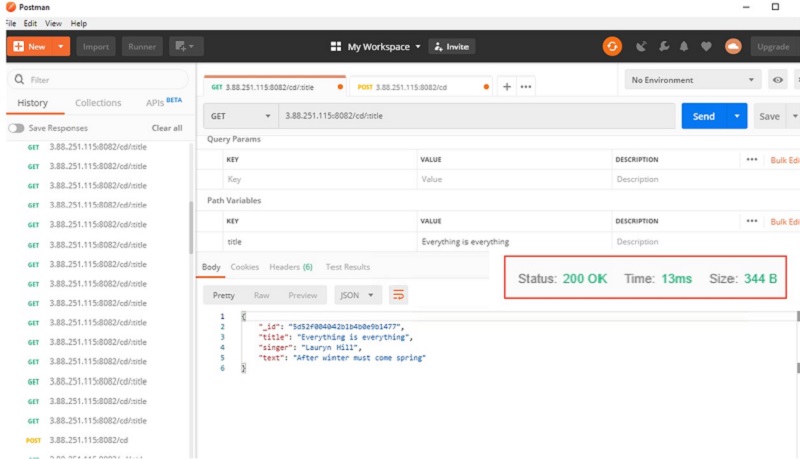
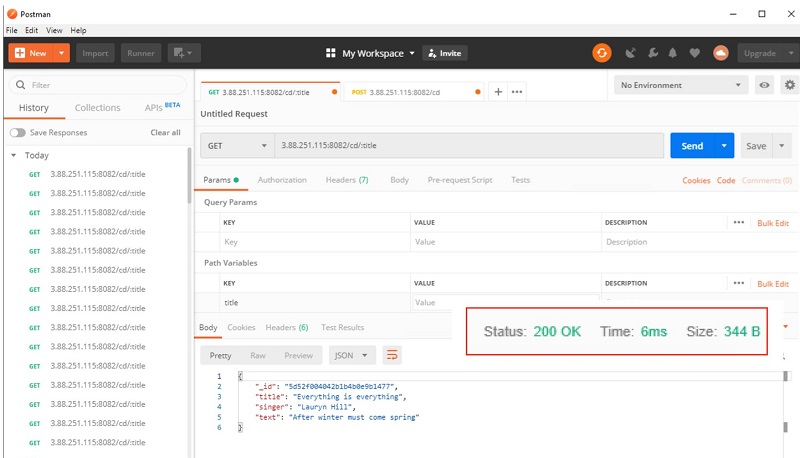
Go back to Postman screen and select the GET method with the following URL:
http://<ec2-dns-or-IP>:8082/cd/:title
Enter the path variable key value to try to retrieve the song previously saved in Amazon DocumentDB using only the title of the song (Everything is everything).
Choose Send.
You should receive details of the Lauryn Hill song in JSON format, as shown in the following screenshot:
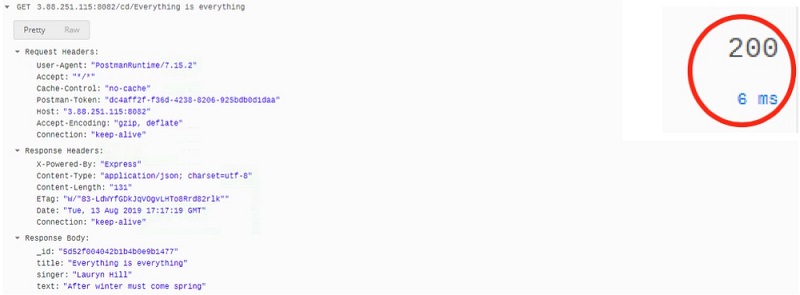
From the Postman console, you can see the actual GET request details, as shown in the following screenshot:
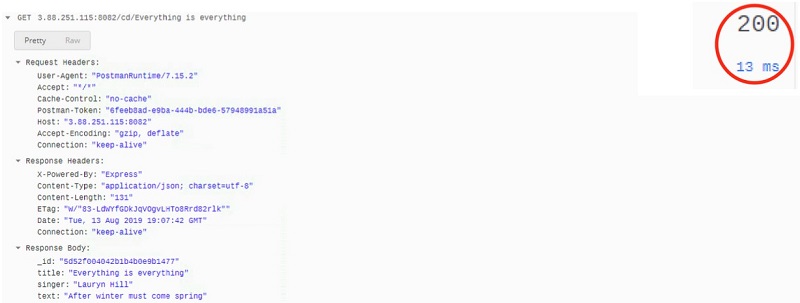
Overall, the request was served in 13 milliseconds.
Check that the data is saved in ElastiCache
The Node.js application is designed (as in the following code extract) to send each client request to Redis to check if the requested document has already been cached. If not, the request is then sent to Amazon DocumentDB to retrieve the requested document, which is sent back to the client with a copy saved in Amazon ElastiCache.
Check that the data is saved in Amazon ElastiCache.
module.exports.SearchSongByTitle = function (db, redis, title, callback) {
    redis.get(title, function (err, reply) {
        if (err) callback(null);
        else if (reply) //Song does not exist in cache
        callback(JSON.parse(reply));
        else {
            //Song doesn't exist in cache so need to query the database
            db.collection('text').findOne({
                title: title
            }, function (err, doc) {
                if (err || !doc) callback(null);
                else {//Song found in database,return to client and save to cache and return to client
                    redis.set(title, JSON.stringify(doc), function () {
                        callback(doc);
                    });
                }
            });
        }
    });
};
To verify, connect to the ElastiCache for Redis cluster and verify that the data is being cached:
src/redis-cli -h myredis.obpmqw.ng.0001.use1.cache.amazonaws.com -p 6379
Run the keys * command to list all the keys and see the key for the song’s title, Everything is everything, from the singer Lauryn Hill. You sent it as a POST request in the previous step. It’s now cached in the Amazon ElastiCache instance as the ninth entry in the list.
myredis.obpmqw.ng.0001.use1.cache.amazonaws.com:6379> keys *
 1) "Dangerously in love"
 2) "Good girl gone bad"
 3) "Sun"
 4) "Bad"
 5) "Happy"
 6) "Ghetto Gospel"
 7) "7 days"
 8) "Cry me a river"
 9) "Everything is everything"
10) "Jamming"
11) "River"
12) "Love"
myredis.obpmqw.ng.0001.use1.cache.amazonaws.com:6379>
You can run the get <key> command to see details of that particular key. For instance, to see details for the song Everything is everything, run the command get Everything is everything, as shown in the following code example:
myredis.obpmqw.ng.0001.use1.cache.amazonaws.com:6379> get "Everything is everything"
"{\"_id\":\"5d52f004042b1b4b0e9b1477\",\"title\":\"Everything is everything\",\"singer\":\"Lauryn Hill\",\"text\":\"After winter must come spring\"}"
myredis.obpmqw.ng.0001.use1.cache.amazonaws.com:6379>
Having confirmed that the data has been saved in Amazon ElastiCache, run another GET request to fetch the cached data, which should be delivered much faster.
As you can see from the following screenshot, the response time for the GET request was reduced to 6 milliseconds, which clearly demonstrates the performance improvement provided by Redis ElastiCache.
Conclusion
In this post, I demonstrated the integration between Amazon DocumentDB and Amazon ElastiCache using an application that enables users to find their favorite song based on the title provided. I also demonstrated the use of a caching layer like Amazon ElastiCache for Redis in front of Amazon DocumentDB to improve request response times for data stored in Amazon DocumentDB. It also potentially reduces costs by reducing serving data from a cache versus having to run a larger database cluster.
About the Author

Georges Leschener is a Sr. Partner Solutions Architect in the Global System Integrator (GSI) team at Amazon Web Services. He works with our GSIs partners to help migrate customers’s workloads to AWS cloud, design and architect innovative solutions on AWS by applying our best practices.