AWS Database Blog
Configuring Microsoft SQL Server Reporting Services on Amazon RDS for SQL Server
This post was last reviewed and updated August 2022 to include updates from recent launch.
You can now run Microsoft SQL Server Reporting Services (SSRS) directly on an Amazon Relational Database Service (RDS) for SQL Server DB instance. You can activate SSRS on Single-AZ or Multi-AZ instances on the Standard or Enterprise editions of SQL Server 2016 or 2017. If you run SSRS on Amazon Elastic Compute Cloud (Amazon EC2), you can now save costs by running SSRS directly on an Amazon RDS for SQL Server, which hosts the report server web portal on the same RDS DB instance as your SQL Server database. You get benefits such as management of SSRS encryption keys, modifying SSRS configurations at the click of a button, software patching, and Amazon Relational Database Service (Amazon RDS) Multi-AZ configurations, which provide high availability for SSRS.
SSRS is a tool for report generation and distribution. The interface of SSRS is a web portal that you can interact with to create, view, edit, and delete reports. Reports allow you to visualize and make sense of your data in order to make decisions.
This post covers how to do the following tasks with SSRS:
- Enable the service on your Amazon RDS SQL Server DB instance
- Configure the port, memory and email of the service
- Grant and revoke permissions
- Connect to the web portal
- Deploy reports
- Disable the service
Prerequisites
To configure SSRS on Amazon RDS for SQL Server, your RDS instance must meet the following requirements:
- Be SQL Server 2016, 2017 or 2019 Standard or Enterprise editions (13.0058220.21.v1 and above for 2016, 14.00.3223.3.v1 and above for 2017 or 15.00.4043.16.v1 and above for 2019)
- Be connected to AWS Directory Service for Microsoft Active Directory
Creating and associating an option group
SSRS is activated on an RDS instance through an option group. You must use an existing option group for SQL Server 2016/2017/2019 based on the edition of your RDS instance. For more information, see Working with Option Groups. To activate SSRS through an option group, complete the following steps:
- On the Amazon RDS console, choose Option groups.
- Choose Add option.

- For Option name, choose SSRS.

- The following option settings appear:
- Port – Set to any value in between 1150 to 49152 as long as it doesn’t conflict with a reserved port. Typical SSRS ports such as 443 and 80 are reserved and not allowed in Amazon RDS.
- VpcSecurityGroupMembership – Select a security group associated with the DB instance. This security group should have a rule to allow inbound access to SSRS for the port configured.
- MAX_MEMORY – Configure maximum memory for the SSRS service. If the SSRS service reaches the max memory configured, it attempts to free up memory or refuse requests so it doesn’t exceed the limit. Depending on your usage of SSRS, consider a value that isn’t intrusive to other applications on the same instance, such as the SQL Server database engine. Valid values are between 10–80%.
- (Optional) To use SSRS Email to send reports, choose the Configure email delivery options check box under Email delivery in reporting services, and then do the following:
- For Sender email address, enter the email address to use in the From: field of messages sent by SSRS Email. Specify a user account that has permission to send mail from the SMTP server.
- For SMTP server, specify the SMTP server or gateway to use. It can be an IP address, the NetBIOS name of a computer on your corporate intranet, or a fully qualified domain name.
- For SMTP port, enter the port to use to connect to the mail server.
- Choose the Use authentication check box to specify a user name and password to connect to the mail server.
- SSRS integrates with AWS Secrets to use email subscriptions, see SSRS Email on how to setup a secret for email. For Secret Amazon Resource Name (ARN), enter a secret ARN that contains your SMTP credentials (username and password).
- Choose the Use Secure Sockets Layer (SSL) check box to encrypt email messages using SSL.
- Choose Add option to associate the SSRS option with the option group.
You can now associate this option group with an RDS instance to activate SSRS.
Report Server databases
When you add the SSRS option for the first time, you see two new databases in your RDS instance: rdsadmin_ReportServer and rdsadmin_ReportServerTempDB.
SSRS is configured to use these databases. If you’re on a Multi-AZ RDS instance, you can see that rdsadmin_ReportServerTempDB isn’t mirrored or part of the availability group, which is normal. RDS automation manages these databases during failover or hosts replacements so the SSRS service isn’t impacted.
Connecting to the Report Server web portal
After you add SSRS to an option group and associated with an RDS instance, you can connect to the Report Server web portal. You can access the web portal in your browser through any computer that’s also joined to the domain of the RDS instance.
Before you can view the web portal, you must give a domain user access. To do that, complete the following steps:
- Launch SSMS.
- Connect to the SQL Server engine of the RDS instance that SSRS is activated for.
- Execute the stored procedure, filling in the appropriate arguments:
AD is the name of your domain and user is the name of the user or group that you access the web portal with.
- Track the status of the stored procedure with the following code:
The task_id value is the ID of the task. Entering 0 for task_id shows all tasks.
The following image shows the result of the stored procedure call. task_id refers to the customer task ID, task_type is the type of the task, lifecycle is the state the task is in, and task_info gives additional information about the state of the task.

When the task lifecycle is SUCCESS, the task is complete and you can advance to the next step.
SSRS uses HTTPS SSL for its connections to the report server so you must import an Amazon RDS certificate on the client instance. For more information about using SSL with SQL Server, see Using SSL with a Microsoft SQL Server DB Instance.
Using your preferred browser, you can connect to the web portal. The URL of the web portal is https:// <rds-endpoint>:<port>/Reports, where <rds-endpoint> is the endpoint of the RDS instance and <port> is the port configured for SSRS when adding the option.
Managing SSRS permissions
After connecting to the portal with your domain user, you can configure and manage item-level permissions.
- Open the web portal in your browser.
- On the portal main page, choose Manage Folder.

- On the Security tab, add, edit, and remove role assignments.
The user you granted portal permissions to should have the Content Manager role already. The following screenshot shows the result after the stored procedure for granting permission to the portal ran for the user msbiDomain\Admin.

Adding additional users or groups no longer requires the stored procedure because you can do it here directly.
Removing system-level permissions
You can’t see the system-level permissions of SSRS through the web portal. Only those users or groups who are granted portal access through the stored procedure have a system-level assignment. If you need to remove them, you must do so using the following code:
Make sure that the task lifecycle shows SUCCESS for the user’s system-level permission. This also deletes the item-level role assignments of the user.
Working with reports
After you have portal permission, you can deploy reports through the web portal. You can choose the Upload tool in the web portal, as seen in the following screenshot.

You can also deploy reports with SQL Server Data Tools (SSDT). To create a report server project and deploy the report directly to SSRS running on the RDS instance, complete the following steps:
- Open SSDT and choose or create a new Report Server project as shown in the screenshot below.
Make sure that you open SSDT as the Windows login that was granted permission to SSRS through the stored procedure. This is to ensure deployment of the report doesn’t fail, because a user must have sufficient permissions to deploy a report directly. Additionally, any user assigned the Content Manager role should also be able to deploy a report.

After you design the report, you can make the target of the deployment the endpoint of the RDS instance. - Choose File.
- Choose SSRSProject Properties (For this post, the project is called
SSRSProject).

- Set the
TargetServerURLto the HTTPS endpoint of the RDS instance suffixed with the port SSRS is listening on and/ReportServer(for example,https://my-instance-endpoint.amazonaws.com:8443/ReportServer).

Now when you deploy the solution, it directly uploads your report to SSRS on the RDS instance.
Working with data sources
In a report, you might have a data source that is a database on the same RDS instance that SSRS is running on. If you use Windows authentication for the report’s credentials to log in to the data source, you might encounter authentication issues.
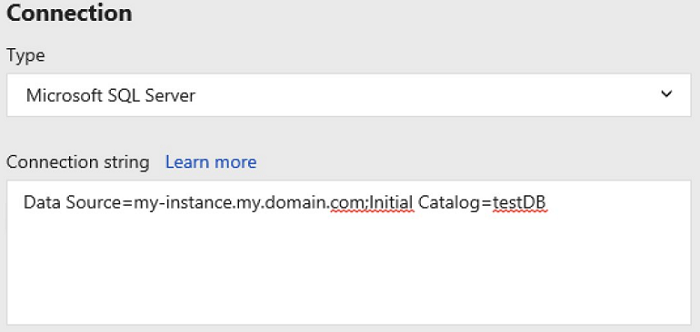
You can resolve this by making sure the data source in the connection string is set to the loopback interface (for example, localhost or .) or the fully qualified domain name (FQDN) of the RDS instance. The FQDN of an RDS instance is the instance name suffixed by the FQDN of the domain (for example, my-instance.my.domain.com, where my-instance is the instance name and my.domain.com is the name of the domain). The following screenshot shows a data source connection using the FQDN of an RDS DB instance to the database testDB.
Working with Email Subscriptions
If you’ve configured SSRS with email delivery, you can create subscriptions for your reports allowing you to send reports out to intended recipients via email.
To create a subscription with email delivery for a report, complete the following steps:
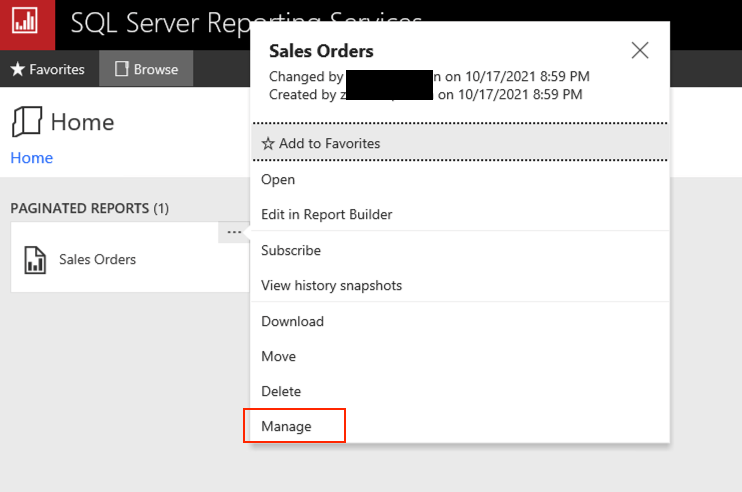
- On any of your existing reports choose “…” → Manage.
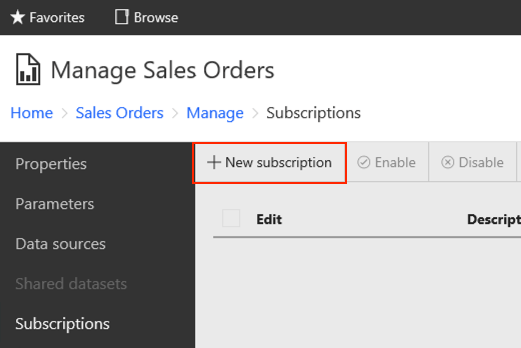
- Choose Subscriptions → New Subscriptions.
- Under Destination choose E-Mail.
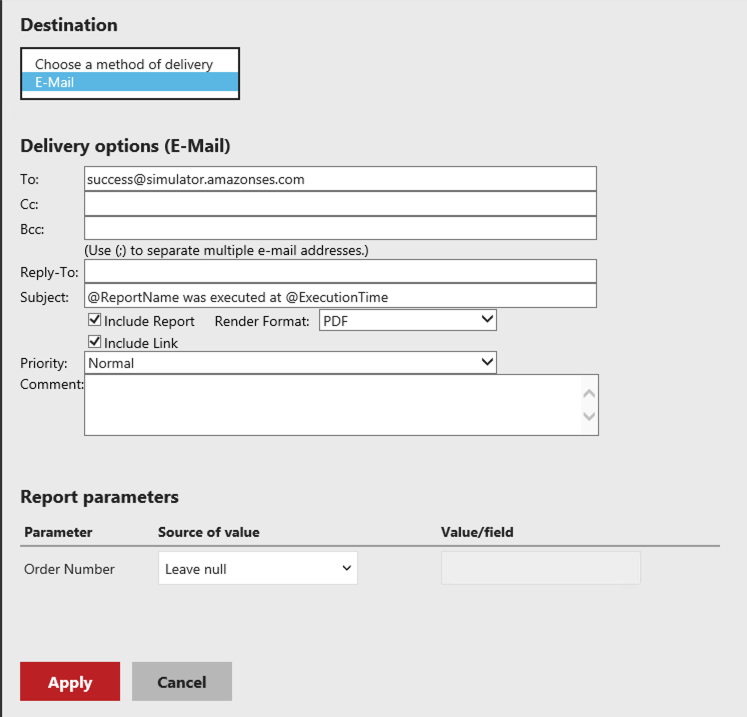
- Fill in the rest of the fields to your preference and choose Apply to save your subscription.
Send a Test Email
Now that we have created our subscription, let’s verify that our newly created subscription works
- Under Subscriptions, choose our created subscription → Run Now.

- Verify in the results column that mail was successfully sent.

Disabling SSRS
If you no longer require SSRS to be running on the RDS instance, you can remove the option to deactivate the service.
Removing the option doesn’t delete the Report Server databases, so you can safely remove the option without losing the reports saved in SSRS. Adding the SSRS option after removal reactivates the SSRS service, and you can access all the reports you previously uploaded.
You might also want to drop the Report Server databases if you have no use for SSRS anymore and don’t want the databases to take up space. In this case, after option removal, you can use a stored procedure that drops the rdsadmin_ReportServer and rdsadmin_ReportServerTempDB databases. See the following code:
Summary
This post showed you how to configure SSRS on Amazon RDS for SQL Server. If you run SSRS on Amazon EC2, you can save costs by consolidating those workloads to run on the same RDS instance as your SQL Server database. You can easily deploy, store, and download reports using the report server web portal after activation on an RDS instance.
Try out SSRS today on the AWS Management Console, and share your thoughts and experiences in the comments.
About the Authors
 Christian Imbrogno is a Software Development Engineer with Amazon Web Services.
 Andrew Zhou is a Software Development Engineer at Amazon Web Services. He works with the AWS RDS team, focusing on commercial database engines and SQL Server. He enjoys working on technical challenges and is passionate about learning new technologies.