AWS Database Blog
Connect to Amazon RDS for Db2 from your laptop
When you work with Amazon Relational Database Service (Amazon RDS for Db2) instances deployed in private subnets, connecting directly from your laptop requires a secure, manageable approach that doesn’t expose your database to the Internet. AWS Systems Manager Session Manager (SSM) solves this by acting as an encrypted tunnel—no public IP addresses, no SSH key management, and a full audit trail through AWS CloudTrail. In this post, we demonstrate how to connect to Amazon RDS for Db2 from your laptop using AWS SSM, covering infrastructure deployment with Terraform, port forwarding configuration, SSL connections, and verification steps.
Solution overview
You can establish secure connections without managing SSH keys or exposing public endpoints using AWS SSM. The solution provisions an Amazon Elastic Compute Cloud (Amazon EC2) bastion host in the same Amazon Virtual Private Cloud (Amazon VPC) as your Amazon RDS for Db2 instance. Session Manager communicates with the bastion host through the AWS SSM agent, forwarding your local database port directly to the RDS for Db2 endpoint. This approach delivers meaningful advantages for your team:
- Removes security risks associated with public-facing database instances—no inbound ports need to be opened on your VPC.
- Removes the operational burden of SSH key rotation and bastion host access management.
- Provides a complete audit trail of all session activity through AWS CloudTrail.
- Works consistently across macOS, Linux, and Windows without client-side configuration differences.
Architecture
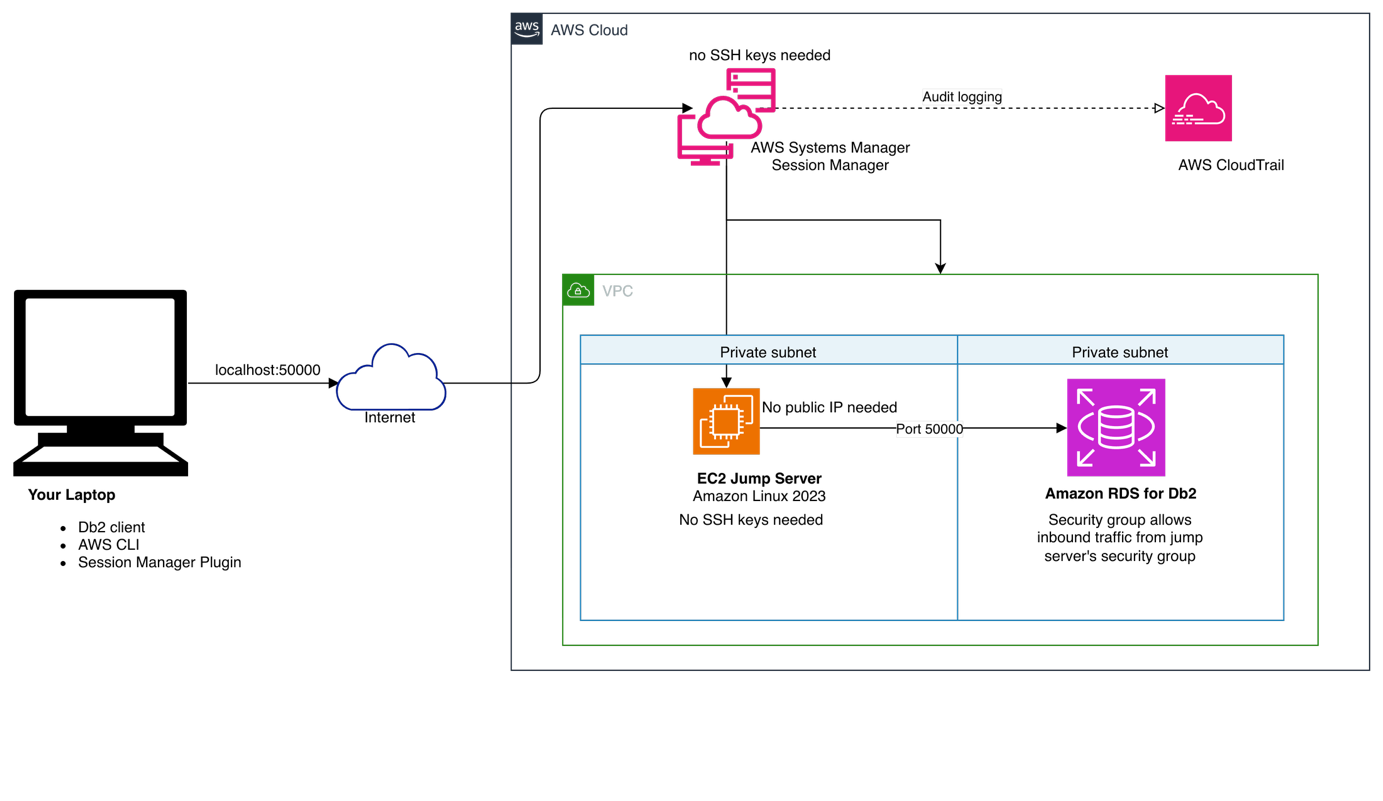
The following diagram illustrates the data flow. Your laptop initiates a Session Manager port-forwarding session to the EC2 bastion host. Session Manager routes this traffic over HTTPS through the AWS Systems Manager service endpoint—no inbound security group rules are required on the bastion host. The bastion host then forwards the connection to your Amazon RDS for Db2 endpoint within the private subnet. All traffic stays within the AWS network after leaving your laptop.
Prerequisites
Before you begin, make sure the following tools are installed and configured:
- AWS Command Line Interface (AWS CLI) — used to authenticate and interact with AWS services. See the AWS CLI installation guide.
- Session Manager plugin for the AWS CLI — required to start port-forwarding sessions from your terminal. See the plugin installation guide.
- Db2 client — the command-line or GUI client you use to connect to Db2 databases. See this guide for installation steps.
- Terraform — used to deploy the EC2 bastion host and associated infrastructure. See the Terraform installation guide.
Download and deploy infrastructure
Download the Terraform templates and scripts:
The package contains:
main.tf– Terraform configuration that provisions the Amazon EC2 bastion host, IAM instance profile, and security group rulesterraform.tfvars.example– template for your environment-specific valueconnect-db2.sh– port-forwarding script for macOS and Linuxconnect-db2.ps1– port-forwarding script for Windows PowerShell
Copy the example configuration and update it with your environment values:
Set the following variables in terraform.tfvars:
vpc_id– the ID of the VPC where your Amazon RDS for Db2 instance residessubnet_id– a private subnet ID in the same VPC (or one with routing to the RDS subnet)rds_security_group_id– the security group ID attached to your RDS instance IDrds_port– the port your RDS for Db2 instance listens on (default:50000)
Deploy the infrastructure:
Note the instance_id from the Terraform output. You will use it in the connection script.
Set up port forwarding
With the bastion host running, start a port-forwarding session to create the tunnel between your laptop and the Amazon RDS for Db2 endpoint.
On macOS or Linux, open connect-db2.sh and set these three variables:
INSTANCE_ID– the EC2 instance ID from the Terraform outputRDS_ENDPOINT– your RDS for Db2 endpoint hostnameRDS_PORT– your RDS for Db2 port
Then run the script:
On Windows, open connect-db2.ps1, set the same three variables, and run:
Maintain this terminal session to keep the tunnel active. Open a new terminal window for the next steps.
Security considerations
This solution is designed around the principle of least privilege. Consider the following practices as you deploy and operate it:
- The EC2 bastion host IAM role should grant only the
ssmmessages,ec2messages, andssmpermissions required for Session Manager—no broader EC2 or RDS permissions are needed. - The bastion host security group requires no inbound rules. Session Manager communicates outbound over HTTPS (port 443) to the Systems Manager service endpoint.
- The RDS security group should allow inbound traffic on the database port only from the bastion host’s security group, not from 0.0.0.0/0.
- All session activity is logged to AWS CloudTrail automatically, giving you a full audit trail of who connected and when.
Connect to RDS for Db2
With the tunnel running, open a new terminal and connect using the Db2 CLI:
You can also point any Db2 client tool to these local connection details:
Parameter Value
Host localhost
Port50000
DatabaseSAMPLE
Userdb2admin
Password <YourPassword>
Verify the connection with the following query:
A successful result confirms the tunnel is working and your client can reach the database.
SSL connections
Session Manager forwards raw TCP traffic, so SSL connections work through the same tunnel. To connect over SSL, start the port-forwarding session using your RDS SSL port (for example, 50006):
Then catalog the SSL connection in your Db2 client:
Note: Verify that your RDS security group allows inbound traffic on the SSL port from the bastion host’s security group.
Best practices
Following these practices helps you avoid the most common issues before they occur:
- Always confirm that the EC2 bastion host is in a running state before starting a Session Manager session.
- Make sure that the bastion host’s IAM instance profile is attached and the Systems Manager agent is running. You can check this with
aws ssm describe-instance-information --instance-ids i-xxxxx. - If you rotate your AWS credentials, restart the port-forwarding script so it picks up the new session token.
- Stop the EC2 instance when it’s not in use to reduce costs.
Troubleshooting
Session Manager session fails to start
Verify that the instance is registered with Systems Manager:
If the instance doesn’t appear, check that the IAM instance profile is attached and the Systems Manager agent is running on the instance.
Can’t connect to Amazon RDS for Db2
Verify that the security group rules allow traffic from the bastion host to the RDS port:
Test connectivity directly from the bastion host:
Port already in use locally
Change LOCAL_PORT to an available port (e.g., 50001) in your connection script.
Cleanup
To remove all created resources, use the following command:
Cost considerations
- Amazon EC2 t3.micro: approximately $7.50/month (price vary AWS Region by AWS Region) if running continuously
- Session Manager:No additional charge
- Data transfer: Standard AWS data transfer rates apply
Use the AWS Pricing Calculator to estimate costs based on your expected usage. Stopping the EC2 instance when it’s not needed is the most effective way to reduce costs.
Conclusion
AWS Systems Manager Session Manager provides a secure, auditable way to connect to Amazon RDS for Db2 from your laptop without exposing your database to the internet or managing SSH keys. The approach works across macOS, Linux, and Windows, and integrates naturally with existing AWS security controls.
From here, you can extend this pattern in several directions: automate the tunnel setup as part of a continuous integration and continuous delivery (CI/CD) pipeline, apply the same approach to other database engines supported by Amazon RDS, or use AWS IAM Identity Center to manage team-wide access to the bastion host without shared credentials. Get started today by downloading the Terraform templates from the artifacts bucket, or visit the AWS Database Blog for related content.
About the authors
Acknowledgement
Our sincere thanks to Rajib Sarkar and Umair Hussain for technically reviewing this blog post.