AWS Database Blog
Improve AWS DMS continuous replication performance by using column filters to parallelize high-volume tables
Database migration can be challenging, particularly when handling huge tables with billions of entries that are subject to frequent updates. Although AWS Database Migration Service (AWS DMS) offers useful features like parallel loading and filtering capabilities, which can significantly expedite the initial bulk data transfer process, certain challenges persist in high-frequency change data capture (CDC) scenarios, where the source database undergoes rapid and continuous changes. In these scenarios, the target database frequently encounters several obstacles, including:
- High latency – The CDC process might struggle to keep pace with the rate of changes. Large volumes of ongoing changes can create significant delays between source and target databases and affect CDC performance.
- Data loss risk – For databases like Oracle, redo or archive logs can be purged before AWS DMS can process them, potentially leading to data loss.
- Retention limitations – Extending retention periods might not always be feasible due to storage constraints or organizational policies.
- Resource strain – High-frequency CDC can stress both the target database and AWS DMS replication instance, resulting in increased latency, reduced throughput, and higher resource consumption.
Addressing these challenges typically requires a multi-faceted approach, including choosing the right-sized replication instance, task parallelization, using the AWS DMS batch apply feature, optimizing AWS DMS task settings, efficient filtering, and sometimes custom solutions.
For relational database management system targets, unlike full load parallel settings, there’s no option to employ parallel CDC threads for performance improvement. Each task uses a single thread. When an AWS DMS replication task needs to apply millions of change events, it’s recommended to use multiple CDC tasks for logically independent groups of tables, enabling the use of multiple CDC threads. Taking this a step further, you can even split a large table into multiple CDC tasks using appropriate column filters.
In this post, we explore how you can use column filters to divide a high-activity table into multiple tasks during the CDC phase. This approach can accelerate the migration process and reduce target latency.
Solution overview
AWS DMS tasks are central to the migration process, defining specific tables, views, and schemas for migration through table mappings. These mappings offer filtering capabilities, allowing you to restrict the number of rows and divide large tables into smaller, manageable segments by applying WHERE clauses. Although this functionality has traditionally been applied to full load operations, this solution explores its potential in optimizing CDC task.
In this post, we implement this solution for an Oracle to PostgreSQL migration. The same approach can be adapted for migrations between other relational databases as well.
The steps to implement this solution are as follows:
- Create a sample table in the Oracle database (for this post, we use Amazon Relational Database Service (Amazon RDS) for Oracle) and populate it with representative data.
- Verify and enable supplemental logging at database and table levels.
- Identify an immutable column suitable for evenly distributing rows across tasks. For more information on immutable columns, see the next section. If no such column exists, complete the following steps, otherwise skip to Step 4:
- Add a temporary immutable column of NUMBER(1) data type.
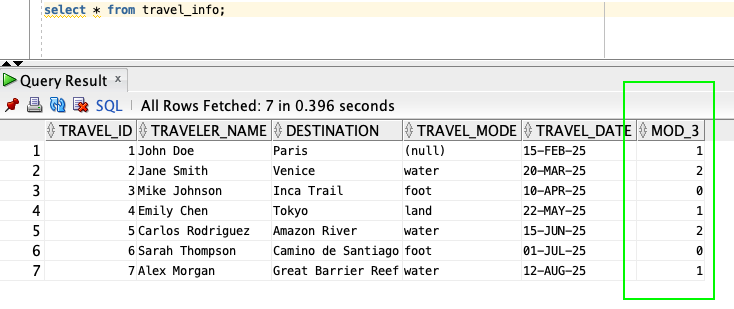
- For existing data, populate the newly created immutable column using a modulus operation on the primary key. In this post, we demonstrate using a modulus of 3. This operation will effectively divide the data into three distinct groups, each identified by the remainder when the primary key is divided by 3.
- Enable supplemental logging for the new immutable column.
- Create a trigger to automatically populate the modulus column for new inserts.
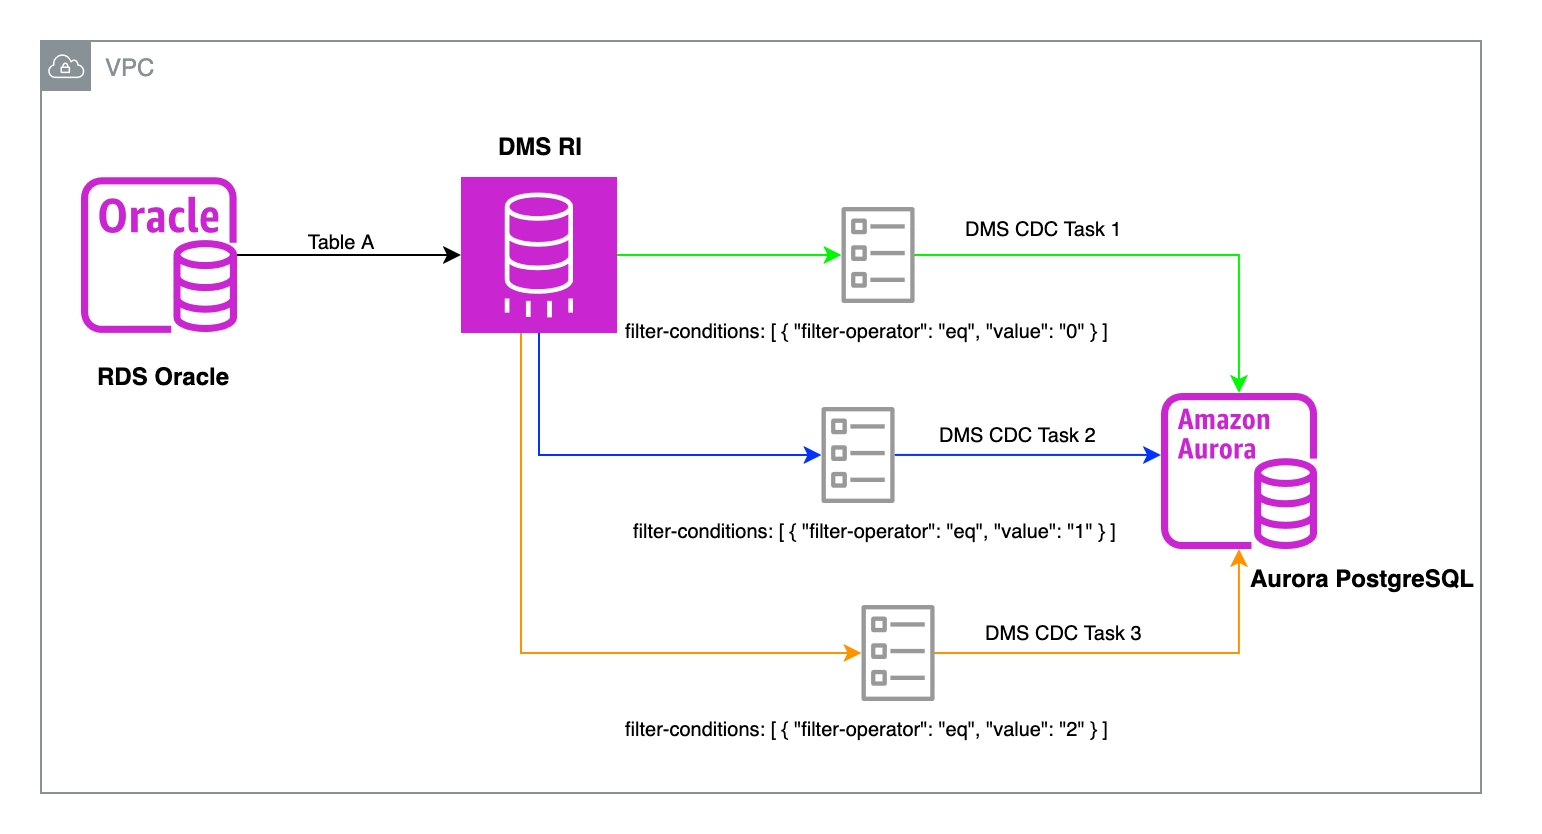
- Create multiple AWS DMS tasks using column filters, based on the modulus operation results. These can be either full load and CDC tasks or CDC-only tasks, depending on your specific requirements. For this post, we create three CDC-only tasks to match our modulus of 3.
- Make sure to add an exclude column filter in the AWS DMS task to omit the temporary immutable column at the target during migration.
- Validate the migrated data to the target database of your choice (in this post, we use Amazon Aurora PostgreSQL-Compatible Edition as the database).
- Monitor the performance of the AWS DMS tasks using Amazon CloudWatch
The following diagram illustrates the solution architecture.
How to identify an immutable column in a database
Immutable columns are those whose values can’t be changed after they are set, and mutable columns are those whose values can be changed after initial insertion.
Although primary keys are immutable, they’re unique to each row. Our focus, however, is to identify immutable columns that can have the same value across multiple rows. This allows for balanced data partitioning, making sure the load is distributed as evenly as possible across AWS DMS tasks. Examples might include creation timestamps, category codes, area codes or department identifiers, and more. By using such columns, you can divide data more evenly, facilitating efficient replication and maintaining data integrity.
The key is to identify columns that remain constant and are related to numerous records, yet allow for a balanced distribution of data when used as partitioning criteria.
Prerequisites
To get started, you must have the following prerequisites:
- An active AWS account.
- An Oracle instance (for this post, we use Amazon RDS for Oracle) or an on-premises Oracle database.
- An Aurora PostgreSQL or RDS for PostgreSQL database (for this post, we use Aurora PostgreSQL-Compatible). If you don’t already have an Aurora cluster for the PostgreSQL instance, you can create one. For instructions, refer to Creating an Amazon Aurora DB cluster.
- AWS DMS set up with a replication instance having access to both source and target databases. Refer to Getting started with AWS Database Migration Service for more information.
Build a sample table on the source
For this post, we use an RDS for Oracle database and create a sample table called TRAVEL_INFO using the following DDL:
- Create the table
TRAVEL_INFO: - Insert representative data for the
TRAVEL_INFOtable:
Set up your source Oracle database
Complete the following steps to set up the source Oracle database:
- AWS DMS requires database-level supplemental logging to be enabled. Check supplemental logging at the database level by running the following query:
- If minimal database supplemental log is
NO, run the following query to enable it: - Check if table-level supplemental logging is enabled for tables in the schema that will be involved in CDC replication:
- Enable supplemental logging for tables with a primary key either using the following query or adding the extra connection attribute in the AWS DMS endpoint setting described later in this post:
- The table used in this example doesn’t have any immutable columns. Therefore, add a temporary immutable column that will be used in AWS DMS tasks with WHERE clauses:
- Update the table to populate this new column with the result of the modulus operation on the primary key:
- Query the table to verify the new column have the values populated successfully.
- Add supplemental logging to this new column. If the supplemental logging is not enabled, the AWS DMS task will fail.
- Create a trigger to populate the modulus column every time a new row is inserted:
Build a sample table at the target
For this post, we mapped the travel_id column’s Oracle data type NUMBER to the PostgreSQL data type INTEGER in order to keep the right precision at the target. To perform accurate data type mapping for the Oracle NUMBER column to the ideal data type column in PostgreSQL, refer to Convert the NUMBER data type from Oracle to PostgreSQL.
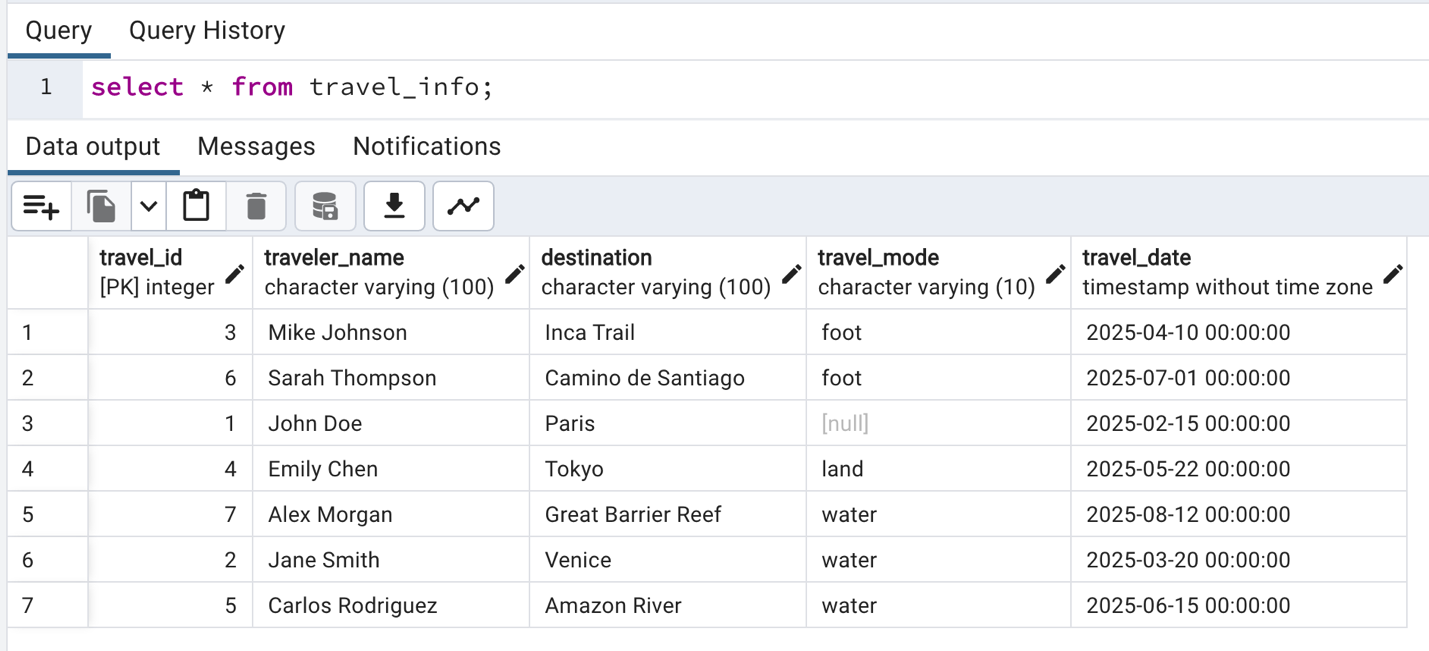
Run the following query to create the table structure at the target. Notice how we haven’t included the mod_3 column, which we have created at the source.
If the table isn’t present in the target, AWS DMS creates the target table, irrespective of the table preparation mode selected in AWS DMS task. It’s important to note that this would cause DMS to create the table with the unwanted extra column (in this case, the mod_3 column).
Migrate data using AWS DMS
In this section, we walk through the steps to migrate your data.
Create the AWS DMS endpoints
Create AWS DMS endpoints for the source and target database. AWS DMS endpoints provide the connection, data store type, and location information about your data store.
For instructions to create your Oracle source endpoint, refer to Using an Oracle database as a source for AWS DMS.
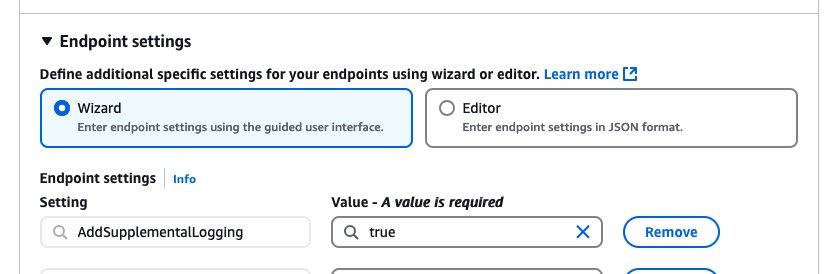
Apart from default connection configurations, you can optionally add the AddSupplementalLogging=true endpoint setting to allow AWS DMS to set up table-level supplemental logging for the Oracle database if you haven’t explicitly added supplemental logging by running the query described earlier in the post.
For instructions to create your PostgreSQL target endpoint, refer to Using a PostgreSQL database as a target for AWS Database Migration Service.
Create the AWS DMS tasks
Note that we first performed the initial data migration using a separate full load task from RDS Oracle to Aurora PostgreSQL-Compatible Database. After completing the full load, we added a new column at the source to be used for filtering as mentioned in the Set up your source Oracle database section of this blog.
As a next step for this post, we use mod_3 as the filter to split the table into three tasks. Create three separate CDC tasks with the following JSON, which shows an example of the mapping rules for the AWS DMS task. Remember to add the remove-column filter to exclude the modulus column from the target.
Use the following settings for the replication task:
- For Task identifier, enter an identifiable name.
- For Source database endpoint, choose the Oracle endpoint you created.
- For Target database endpoint, choose the Aurora PostgreSQL endpoint you created.
- For Task mode, select Provisioned.
- For Replication instance, select the provisioned instance you created.
- Set replication type as Replicate only.
- Set target table preparation mode as Do nothing.
- Enable Amazon CloudWatch Logs under the task settings so you can debug issues.
- Under Table mappings, for Editing mode, select JSON editor.
- Use the following JSON for the mapping rules for the DMS task. Replace the schema name with the name under which the table is created.
- Uncheck the Premigration assessment checkbox
- For Migration task startup configuration, select Manually Later
- Leave everything else as default and choose Create task.
- Create the other two tasks using the same settings. For each task, make sure to replace the
filter-conditionsvalue for themod_3column to 0, 1, and 2. - Run all the 3 tasks concurrently.
- Verify the migrated data in Aurora PostgreSQL by running the select query.
- Perform some DML operations on the source database and monitor how these changes are reflected in the target table and how DMS tasks picks up the row corresponding to the modulus filters.
It’s important to understand that while each individual task maintains the sequential integrity of its transactions, the overall sequence of transactions across the three tasks may not always be preserved. This potential discrepancy in order arises from the independent nature of task initiation and execution. Consequently, the timing of when each CDC-only task begins can influence the final sequence of transactions as they appear in the target table, even though they all pertain to the same source table.
When migrating from Oracle, you can also leverage Oracle materialized views to migrate to PostgreSQL by creating filtered materialized views based on the column of your choice that capture only the required data subset. While convenient for data transformation, materialized views create refresh overhead on the source and maybe impact migration performance.
Observation if a mutable column was used to split the table
Suppose that instead of introducing an immutable column to the table, the existing travel_mode column would be used as a filter in the AWS DMS task. In this scenario, we would still create three CDC tasks, each corresponding to land, air, and water modes of travel.
For testing this scenario, you must enable supplemental logging for the travel_mode column. This can be done using the following SQL command:
After setting up the tasks, start the task and attempt to update the column used in the filter at the source:
You will observe that AWS DMS fails to detect this change, resulting in the update not being propagated to the target database (in this case, Aurora PostgreSQL-Compatible). Although updates to this column might be infrequent, any such updates that do occur will be missed. This behavior, though expected, can lead to data inconsistencies.
Therefore, for effective data replication, it’s important to apply filters on immutable columns—those that don’t change after creation.
Performance comparison
In this post, we will evaluate the performance of AWS DMS under high-volume CDC scenarios for busy tables. AWS DMS offers two approaches for reading redo logs during CDC operations with Oracle as the source: Oracle LogMiner and AWS DMS Binary Reader. For this particular experiment, we opted to use LogMiner, an Oracle API designed to read online and archived redo log files. This solution is also compatible with Binary Reader. Our testing process was divided into two distinct phases: we began by evaluating a single CDC task, and then proceeded to split the task into multiple CDC tasks using column filters.
We used the following infrastructure:
- Source: RDS for Oracle instance
- Instance class: db.r6i.xlarge
- Storage: 50 GB (gp3 with 3000 IOPS)
- Oracle version: 19 (19.0.0.0.ru-2024-10.rur-2024-10.r1)
- Target: Aurora PostgreSQL-Compatible
- Instance class: db.r6i.xlarge
- Aurora PostgreSQL-Compatible version: 16.1
- AWS DMS replication instance
- Instance class: dms.c5.xlarge
- Allocated storage: 50 GB
- Engine version: 3.5.4
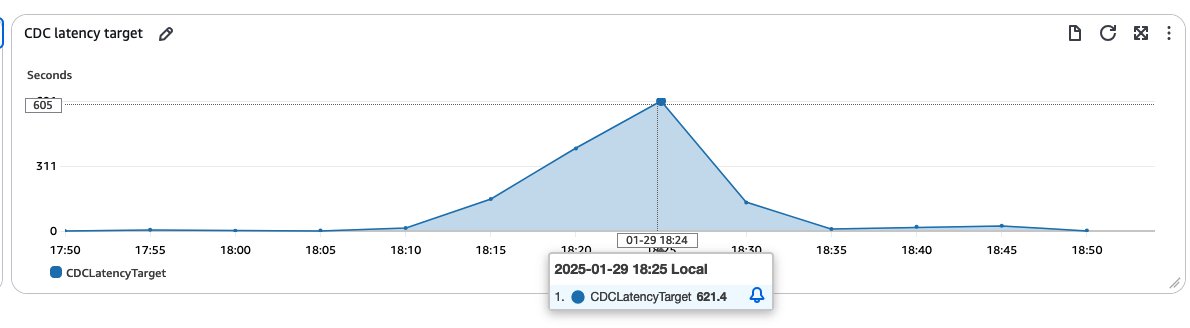
We created a sample table with 50 columns and 20 indexes. The table was initially populated with 50,000 rows on both source and target sides. We then set up a single CDC-only task to replicate ongoing changes. To simulate a busy production environment, we ran a series of DML operations: inserting 1 million new records, simultaneously updating 100,000 existing rows, then running a 100,000-update script twice, and finally generating CDC traffic for 10,000 randomly selected rows. This test helped mimic scenarios where tables undergo rapid and significant changes. The entire process resulted in the generation of approximately 5GB of archive logs within a one-hour period. Because the rate of change is high on the source database, this process can take time. You might see a spike in CDC target latency metrics when AWS DMS receives high incoming workloads from the source database. In our test scenario, we witnessed the CDC latency at the target peaking at approximately 600 seconds during periods of intense activity, as shown in the following screenshot.
This initial test highlighted the potential performance impact in high-volume, rapid-change scenarios when using a single CDC task. It set the stage for our subsequent experiment involving task splitting using column filters, which aimed to distribute the workload and potentially reduce latency.The following graphs shows the target latency when we split the task into three CDC-only tasks processing the same workload as the single CDC task.
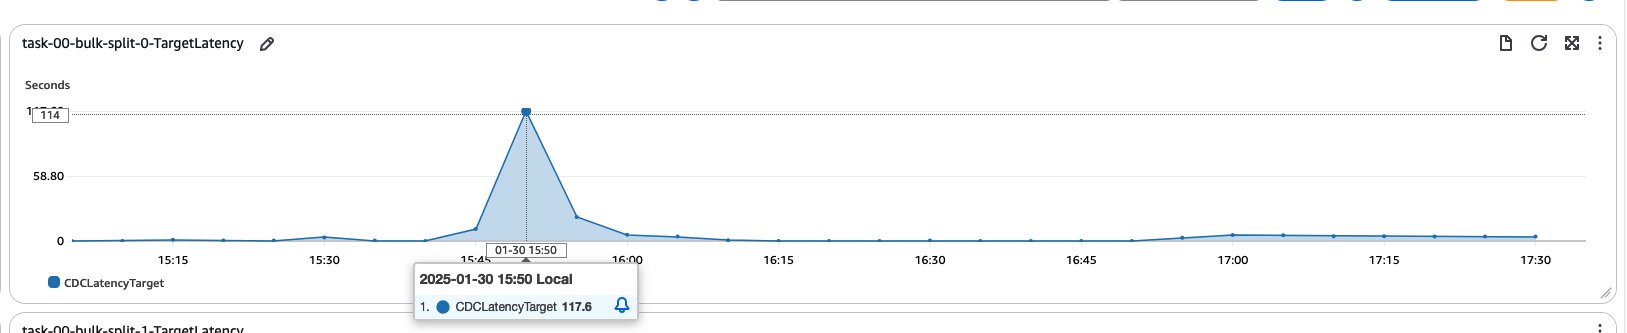

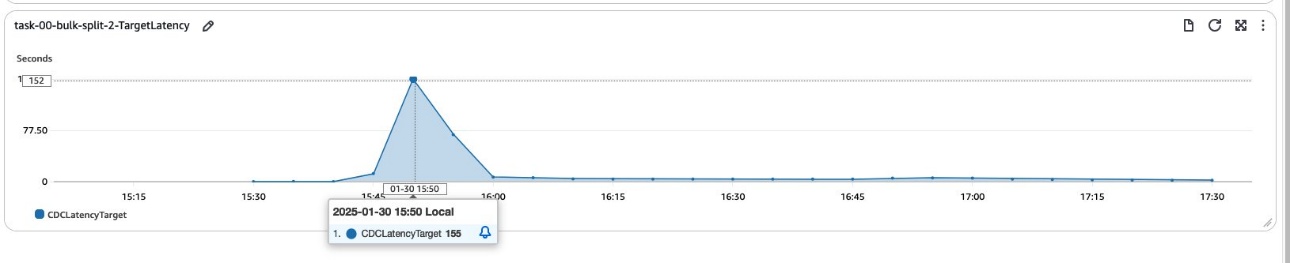
Results show that the latency at the target is reduced. This improvement demonstrates that the migration process has become faster because now in the CDC phase, we have been able to create multiple threads to migrate data from source to target, instead of traditionally CDC being a single threaded operation.
While the data volume used in the experiment may not be representative of real-world scenarios, it effectively illustrates the potential benefits of using column filters in CDC operations. Specifically, it shows that the migration process can be accelerated, which is essential for high-volume migrations.
Considerations
When implementing this approach, several key considerations should be kept in mind:
- Overhead of adding new columns – If you can’t identify a suitable immutable column in your existing table structure, adding a new column specifically for this purpose might introduce some overhead. This change impacts your database schema and may require modifications to application logic, especially if your code fetches entire tables. You’ll need to implement filtering for this new column in queries, potentially affecting client applications. If you decide to proceed, ensure you schedule these changes during a designated maintenance window to minimize disruption to your operations.
- Potential increase in source latency – As the number of concurrent threads increases, you might observe an increase in source latency. This is due to the additional load placed on the source system by multiple parallel read operations.
- Proper sizing of replication instance – Make sure that the AWS DMS replication instance is appropriately sized in terms of instance class and storage capacity. Each task will need to read all redo logs from the source database and store them until they can be applied, so adequate resources are crucial.
- Balanced load distribution – When selecting a column for task splitting, choose one that will distribute the workload as evenly as possible among the tasks you create. This balanced distribution is key to maximizing the efficiency gains from parallel processing during the CDC phase.
By carefully considering these points, you can optimize your AWS DMS configuration for high-volume scenarios while minimizing potential drawbacks or unexpected side effects.
Clean up
To avoid unnecessary charges, clean up any resources that you built as part of this architecture that are no longer in use:
- Delete the Aurora PostgreSQL cluster.
- Delete the RDS for Oracle database.
- Delete the AWS DMS replication instance, along with source and target endpoints and tasks.
- If you’ve conducted this test on your existing database and plan to keep it operational, make sure to explicitly drop the test tables from both the source and target databases after you’ve completed this experiment.
Conclusion
In this post, we demonstrated how to migrate large, heavily-used active tables using DMS column filters to distribute the workload across multiple CDC tasks based on an immutable column. By leveraging this approach, we’ve demonstrated how to reduce migration time while maintaining data consistency. This strategy optimizes both full load and CDC processes, making it adaptable for various large-scale migrations facing similar constraints.
For more information on AWS DMS and its capabilities, refer to AWS DMS documentation. For best practices to improve AWS DMS full load performance, see Speed up database migration by using AWS DMS with parallel load and filter options.