AWS Database Blog
Native SQL Server replication options on Amazon RDS Custom for SQL Server
Modern applications require reliable data distribution and high availability across multiple databases to support critical business operations. SQL Server replication helps database administrators (DBAs) meet these requirements by automatically distributing data between databases in near real-time. With SQL Server replication, you can create data copies that enable analysts to run complex reports without impacting production workloads. You can also synchronize data across remote locations and maintain copies in different AWS Regions to meet compliance requirements and support disaster recovery strategies.
Amazon RDS Custom for SQL Server combines the flexibility of self-managed databases with the automation of managed services. It handles routine tasks like high availability setup, backups, and patching, freeing you to focus on database design and replication architecture. With RDS Custom, you can use native SQL Server replication features while AWS manages the underlying infrastructure. This approach reduces operational overhead, allowing you to concentrate on optimizing your replication topology, monitoring performance, and ensuring data consistency across your distributed environment.
In this post, we explore SQL Server replication implementation on Amazon RDS Custom. You’ll learn about different replication types supported on RDS Custom SQL Server, including snapshot, transactional, peer-to-peer, and merge replication. Finally, we provide a step-by-step guide to setting up replication, from configuring the distributor to creating publications and subscriptions.
SQL Server Replication Support Matrix: Components and Roles
| Role | RDS for SQL Server | RDS Custom for SQL Server |
| Publisher | No | Yes |
| Distributor | No | Yes |
| Pull Subscriber | No | Yes |
| Push Subscriber | Yes | Yes |
SQL Server Replication Support Matrix: Replication Types
| Replication type | RDS for SQL Server | RDS Custom for SQL Server |
| Transactional replication | Yes (subscriber) | Yes |
| Snapshot replication | Yes (subscriber) | Yes |
| Merge replication | No | Yes with limitation * |
| Peer-to-peer or bidirectional | No | Yes with limitation * |
* Merge and peer-to-peer or bidirectional replication can be configured on RDS Custom using host names instead of CNAME. This dependency would require a reconfiguration of your replication in case of host replacement event.
Solution overview
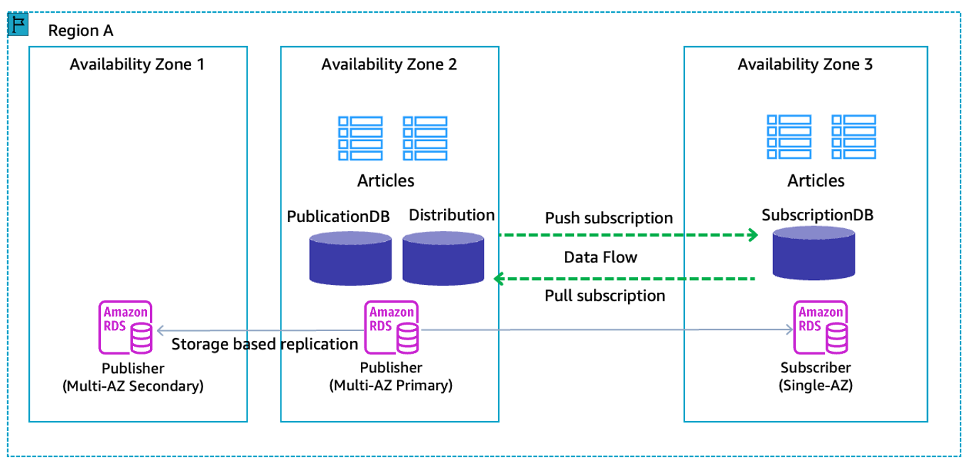
The following architecture diagram illustrates a replication configuration between two RDS Custom for SQL Server instances within a Region.
Prerequisites
Before you begin, ensure you meet the following prerequisites:
- Two Amazon RDS Custom for SQL Server instances in your AWS account. If you don’t have existing RDS Custom for SQL Server instances, refer to Setting up your environment for Amazon RDS Custom for SQL Server.
The following table highlights the demo environment we provisioned to demonstrate the configuration.
RDS Custom instance 1 RDS Custom instance 2 DB identifier Publisher Subscriber DB instance class r6i.2xlarge r6i.xlarge Multi-AZ Yes No Domain joined Yes Yes Domain name example.com example.com RDS Custom endpoint publisher.c9ccxxx.us-east-1.rds.amazonaws.com subscriber.c9ccxxx.us-east-1.rds.amazonaws.com Kerberos endpoint publisher.c9ccxxx.us-east-1.awsrds.example.com subscriber.c9ccxxx.us-east-1.awsrds.example.com Role Publisher, distributor Subscriber SQL Server Agent Startup type changed to Automatic Startup type changed to Automatic Databases Distribution, PublicationDB SubscriptionDB - SQL Server Management Studio (SSMS) installed on a bastion host.
- Make sure that name resolution and network connectivity are properly configured between all servers.
- Configure the security group rules to allow SQL Server traffic (port 1433) between publisher and subscriber instances.
- Make sure that the RDS Custom DB instances are joined to the domain to enable Kerberos authentication. For more information, refer to RDS Custom for SQL Server now supports Windows Authentication.
Configure transactional replication
This section covers the configuration of transactional replication between your publisher and subscriber databases. We’ll set up the publication, add the required articles, and create a push subscription using T-SQL scripts.
Follow these steps:
- Open SQL Server Management Studio (SSMS)
- Connect to the publisher instance and open a new query window.
- Paste the following script in a new query window and update @@servername to match your publisher CNAME.
The Kerberos-based endpoint follows a specific format. You should replace the command to match your RDS Custom environment:
- Repeat steps 2 and 3 on the subscriber instance.
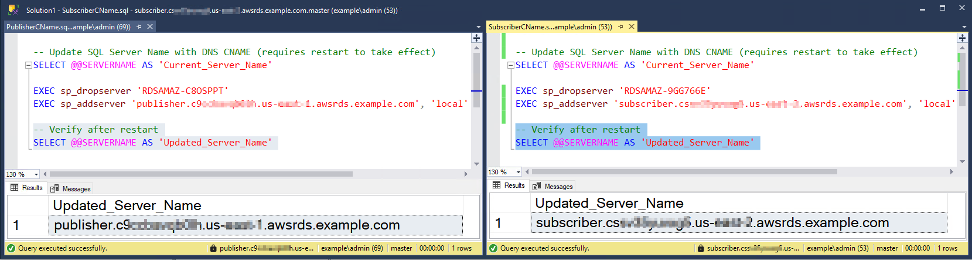
The following screenshot shows @@servername value for both DB instances.
- Create sample database and table on the publisher and subscriber DB instances:
- Configure the distributor and enable publication. Update the script with your database name.
- Execute the following script to configure transactional replication, create publication, add articles, and set up push subscription. Ensure to replace the placeholder values (YourDatabaseName, YourPublicationName, YourTableName, YourSubscriberServerName, YourDestinationDatabaseName) with your actual server and database information:
NOTE: Make sure the Domain user is created in the Publisher instance.
NOTE: Make sure the Domain user is created in the Publisher instance.
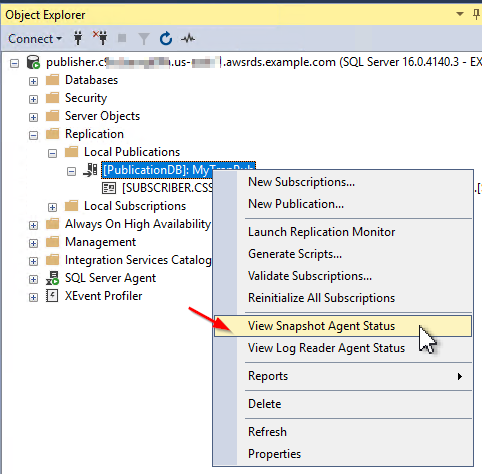
- After executing the script successfully in SSMS, refresh and expand the Replication > Local Publications folders in Object Explorer to verify that your new publication appears there.
- Right-click on the newly created publication and choose View Snapshot Agent Status, as shown in the following screenshot.
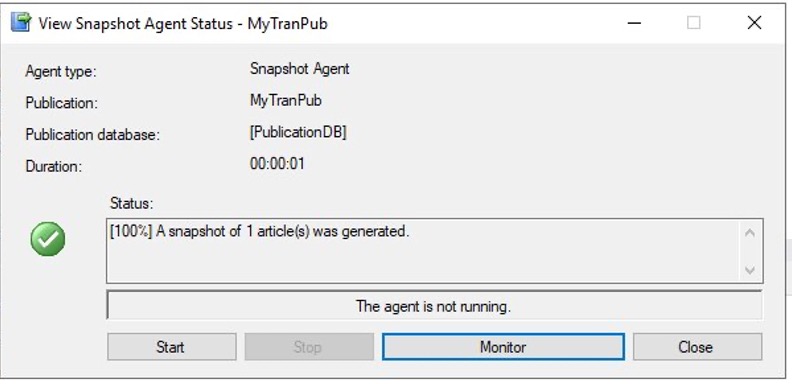
- In the View Snapshot Agent Status window, choose Start to initialize the subscriber
Generate test load and validate the replication in near real-time
Once the replication setup is complete, it’s crucial to validate its functionality by generating test data and monitoring the replication process. The following steps will help you verify that data changes are properly propagating from the publisher to the subscriber in near real-time.
- Connect to the publisher DB instance and run the following script to generate some load:
- Check the number of rows being inserted in the publisher database:
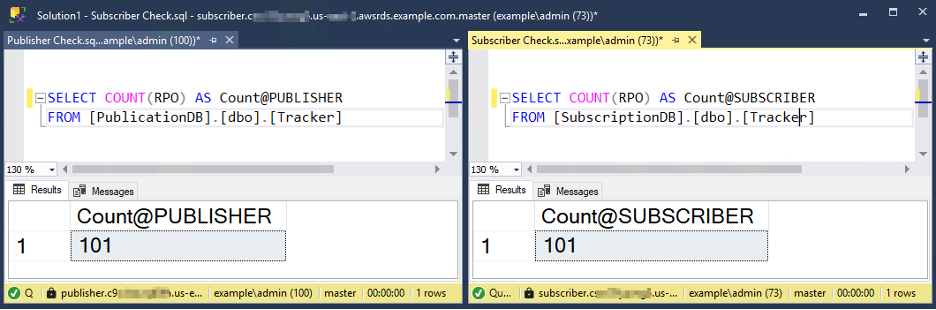
- Verify data synchronization in the subscriber database in near real-time:
The following image is the side-by-side comparison of the row count on Publisher and Subscriber. This confirms that the replication is working and changes are propagating as expected.
Best practices and Considerations
Consider the following best practices to optimize your replication setup:
- Monitor replication latency regularly using built-in SQL Server replication monitors.
- For a Single-AZ instances, make sure the SQL Server Agent service startup type is set to ‘Automatic’ for all DB instances involved.
NOTE: SQL Server Agent service startup type on a Multi-AZ instances should be left as ‘Manual’. Setting it to Automatic will not be persisted. RDS Custom automation will revert the change back to ‘Manual’. - Make sure the distribution database is configured with full recovery model to allow point-in-time recovery (PITR).
- For large-sized databases, consider using a backup restore method to initialize the subscriber.
- Choose push or pull subscription type based on your needs, as this determines how the publication will be received and where the Distribution Agent runs. Push subscription makes it easier to administer the synchronization of subscriptions centrally.
- Choose the replication topology to meet your specific use case, such as transactional replication for near real-time reporting, disaster recovery, data integration and consolidation.
- Consider using a dedicated login for each replication agent to improve security and simplify troubleshooting. Follow the principle of least privilege when assigning permissions to replication logins.
Clean Up
The resources deployed in this post incur costs in your account. To avoid incurring future charges, delete the resources you created for testing the use case described in this post.
To remove the replication setup, complete the steps below:
- To delete the subscription, execute the following command on the subscriber instance:
- To disable publication on a database and delete the publication execute the following command on the publisher instance:
- To disable the distributor and drop all publications, execute the following command on the publisher and distributor instance:
NOTE: Run with Caution as the below command will perform a FORCE CLEANUP operation that removes the Distributor and all dependent components.
To delete environment:
- On the Amazon RDS console, select the database you set up. On the Actions menu, choose Delete.
- On the Amazon Elastic Compute Cloud (Amazon EC2) console, select the EC2 instance that you used for SSMS. On the Actions menu, choose Terminate.
Conclusion
In this post, we demonstrated how to implement native SQL Server replication on Amazon RDS Custom for SQL Server, combining the flexibility of self-managed databases with the automation benefits of managed services. We walked through setting up transactional replication between publisher and subscriber databases, including detailed configuration steps, validation procedures, and operational best practices. This solution enables you to maintain data consistency across distributed environments while reducing administrative overhead.
For more information about Amazon RDS Custom for SQL Server, visit the RDS Custom for SQL Server User Guide. If you have questions or want to share your experience with SQL Server replication on RDS Custom, please leave them in the comments section below.