AWS Developer Tools Blog
Reimagining the AWS .NET deployment experience
In 2012, AWS launched .NET support for AWS Elastic Beanstalk – AWS’s first deployment service. At the same time, we also released Visual Studio support via the AWS Toolkit for Visual Studio to help developers deploy their ASP.NET applications to AWS. In the 9 years since that release, the world has changed a lot. AWS has grown to over 200 services with many deployment options for .NET applications. And the entire .NET ecosystem continues to grow. NET Core, Docker, and serverless technologies have changed the way .NET applications are built. Over the years, we’ve created numerous new tools and features to help support these changes.
For the past year, we’ve been exploring ways to help .NET developers get their applications running on AWS beyond our existing toolset. We love talking to our customers about their experience on AWS, and we’re fortunate to have many customers share their stories. During such conversations, the most common questions we usually hear are:
- What’s the right service for my application? AWS has an abundance of compute services, and, if you are new to AWS, sometimes it’s hard to know which one to use.
- How do I reduce the learning curve? Once you select a compute service, there is still a lot to learn in order to build, package, and deploy your application. It’s often both overwhelming and time consuming.
- How do I promote the best deployment practices within my team? Deploying from Visual Studio is great for prototyping and initial testing. However, once customers move beyond that phase, they want to promote their organization’s best practices across the teams by using automated deployments.
Using this feedback, we decided to reverse the way we think about .NET developers deploying to AWS. Instead of providing a plethora of tooling for each of our compute services, we want to have a single tool that starts with the .NET application; a tool that provides an opinion and guides you to the right service for your application. Today, we’re releasing the first preview of this new vision. We’re still early in our journey, but we hope that you’ll help us make this new deployment experience right for you.
What’s in the preview?
Today, we’re launching the first preview version of our new AWS .NET deployment tool for the .NET CLI. The tool contains the new deployment framework that we intend to integrate with IDEs like Visual Studio in the future.
The tool deploys .NET Core/.NET 5 web applications, backend services, and Blazor WebAssembly applications to AWS with minimal steps. This includes applications written in C# or F#. When you run the deployment tool on a .NET project, the tool’s recommendation engine inspects the project and suggests the right deployment service to use. It also explains the logic behind the recommendations to help you better understand AWS.
The tool is intended for “Cloud Native” .NET applications. This is a vague term, but in essence it means that the tool supports deployments of .NET Core/.NET 5 applications to a virtualized compute service on a Linux environment. The tool does not support .NET Framework, Desktop, Xamarin, or other Windows-native applications. If you have .NET Framework applications, we recommend checking out AWS Porting Assistant for .NET to help with the transition to .NET Core.
.NET AWS Lambda functions are also not supported yet. In the future, we plan to merge the existing .NET AWS Lambda experience with our new tooling. This is a great opportunity for our .NET AWS Lambda customers to provide feedback on what that merge should look like.
AWS Cloud Development Kit (AWS CDK)
In this first preview, we are mainly focusing on the first two questions we heard from our customers: providing opinionated guidance and simplifying the “Getting started” experience.
We haven’t forgotten about the 3rd and possibly the most critical part – how to build out a mature deployment experience for teams. To tackle this challenge, we are using the AWS Cloud Development Kit (CDK). The AWS CDK allows teams to define their infrastructure as code (IaC); in our case .NET code. The tool generates a CDK project. Using the CDK project, the application and all of its deployment infrastructure are deployed as a single unit called a CloudFormation stack. This makes it easy to spin up and tear down all of the AWS resources for an application.
In our first developer preview, the usage of the CDK is completely managed – you don’t need to learn the CDK to run the tool. In the future, we plan to expose the CDK’s usage so that you can learn how it works and take advantage of its great features. Once you are comfortable with AWS, you will be able to easily modify CDK projects to fit your specific use case. We also plan to use the CDK to help you set up CI/CD for your .NET projects.
The CDK itself is written in Node.js with bindings to many languages including .NET. To use our new deployment tool, you’ll need to install Node.js 10.13 or later, since it’s a pre-requisite for the CDK.
Installation
Installing the new AWS .NET deployment tool is straight forward; open your favorite shell and install the tool by using the following dotnet command: dotnet tool install --global aws.deploy.tools
First, you’ll need to take care of a few pre-requisites:
- An AWS account with a local credential profile configured in the shared AWS config and credentials files.
- The local credential profile can be configured by a variety of tools. For example, the credential profile can be configured with the AWS Toolkit for Visual Studio or the AWS CLI, among others. For additional information about setting up credentials, see Setting up credentials in the AWS SDK for .NET Developer Guide.
- Node.js 10.3 or later.
- As mentioned above, the deployment tool makes use of the AWS CDK, which requires Node.js. You can install Node.js for Windows, macOS, or Linux from https://nodejs.org/en/download/
- Docker (running in Linux mode).
- This is optional, but several deployment options won’t be available unless you have Docker installed, running and configured for Linux containers. Docker can be installed from https://docs.docker.com/engine/install/
Walkthrough
The goal for the new deployment tool is to deploy your application to AWS using as few steps as possible. We hope many of you can get an application deployed with just a few confirmation prompts.
To get started, open a command-line shell and navigate to a project that you want to deploy. For this walkthrough, we’ll use a project called “WebApplicationNoDocker”. Then run the command, dotnet aws deploy. The tool will walk you through configuration for AWS credentials and Region (if necessary), and then ask you for the name of the AWS stack for the application.
Next, the tool’s recommendation engine examines your project to determine the best deployment option. In the following screenshot, we have run the command on an ASP.NET Core project. The tool has recommended deploying to AWS Elastic Beanstalk. This makes sense because this project doesn’t have a Dockerfile and we have never attempted to turn this application into a container, so we are more comfortable deploying it to virtual servers.
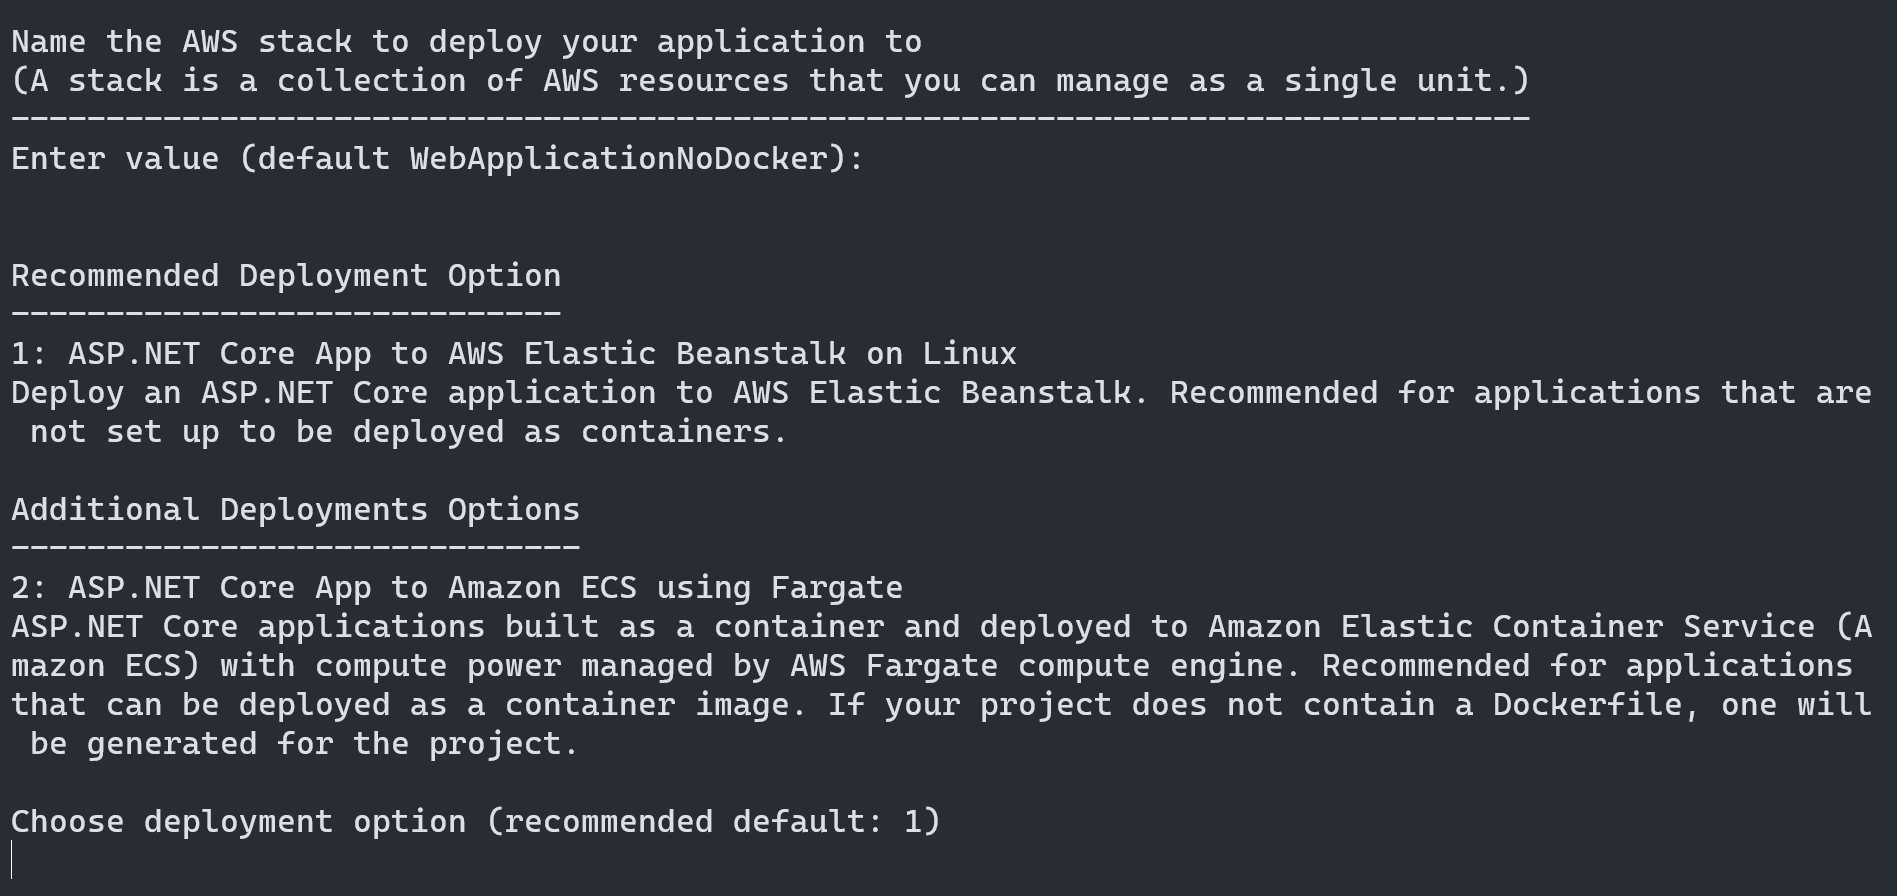
You can choose to override the recommendation and use another compatible deployment option. In this case, we could choose to deploy to Amazon Elastic Container Service (Amazon ECS). The project doesn’t have a Dockerfile, so the tool would attempt to generate a Dockerfile for the project. But we just want to get our application deployed to AWS so we’ll press the Enter key to use the recommended deployment option of Elastic Beanstalk.
The tool will provide default values for the deployment settings whenever possible. Here you can see the settings that are preset for the AWS Elastic Beanstalk deployment option.
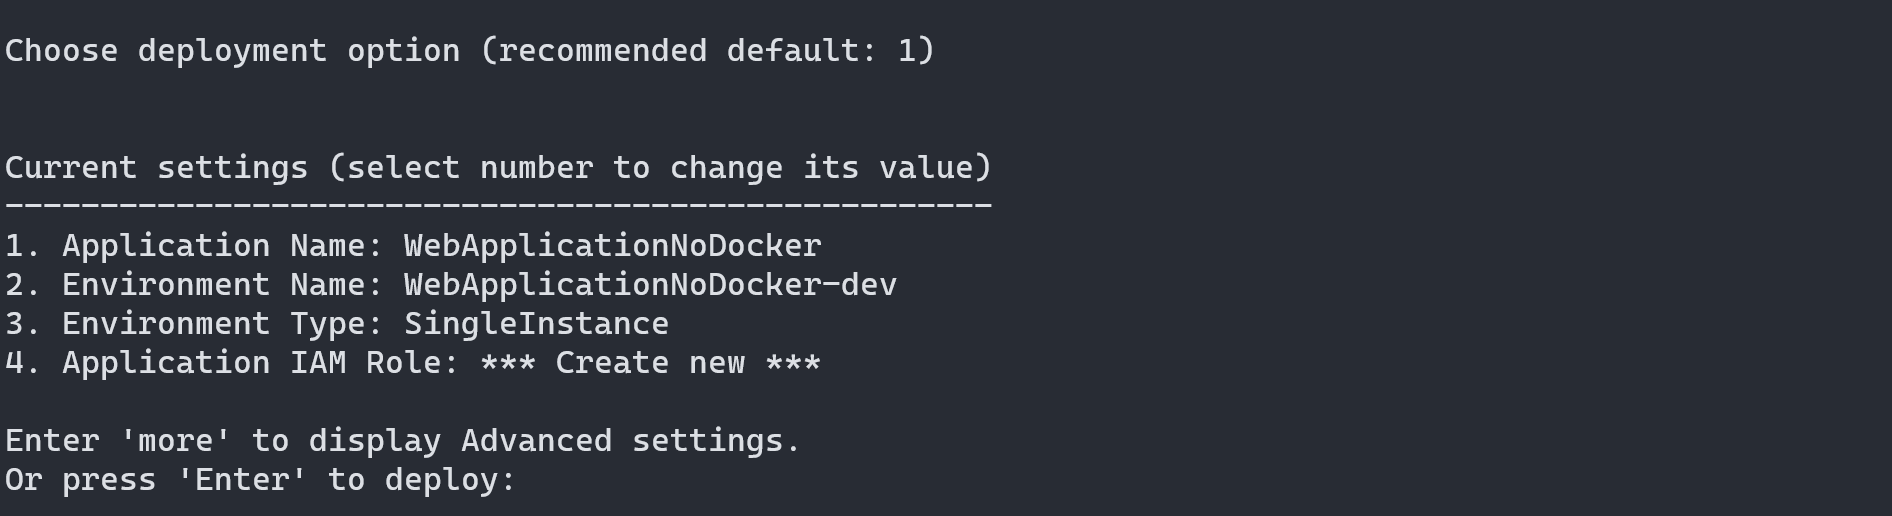
The defaults are generally configured for getting a quick development environment setup for the application. You can deploy your application using the defaults or you can configure your own settings. Advanced settings can be changed by typing more. For example, if you want to configure a production-like environment you can change the Environment Type setting to be “load balanced”. With load balanced set, an Elastic Load Balancer is created along with running the application across multiple Amazon EC2 instances.
Once you’re happy with the settings, press the enter key to kick off the deployment, and then watch the tool go to work on your behalf.
To recap, deployment to AWS using the new deployment tool can be accomplished in three quick steps:
- Configure AWS credentials profile, AWS Region, and stack name.
- Pick the deployment option from the sorted list of recommendations.
- Confirm or modify the deployment settings.
And, as you’ve seen from the preceding example, if you’re OK with the recommended deployment option and settings, your application can be deployed to AWS with just a few presses of the Enter key – how awesome is that!
To wrap up this walkthrough, the following screen capture shows the whole deployment process from start to finish. In our environment we’ve configured a default AWS credentials profile and AWS region, so we aren’t prompted for those values. We could choose to override this behavior by using the --profile and --region command-line switches.
This walkthrough was for a project that wasn’t configured to be containerized. If you do have a Dockerfile in your project, the tool will recommend deployment to AWS as a containerized application, and it will guide you through the deployment. The containerized experience will follow the same three basic steps of deployment that we just saw.
Redeployment
To redeploy a new version of your application, use the same dotnet aws deploy command from the project directory. You can select an existing AWS stack and deploy your new application binaries to it. During the redeployment, you won’t be able to change the deployment type. If you want to switch from an Elastic Beanstalk deployment to an Amazon ECS deployment or vice versa, you will need to create a new AWS stack. In the next section “Clean up” we’ll show you how you can delete the old stack.
The following screenshot illustrates a redeployment of our earlier walkthrough:

Clean up
The deployment tool also includes an easy way to remove your application from AWS. If you run dotnet aws list-deployments, you’ll see the list of AWS stacks that have been created using the deployment tool. You can then run dotnet aws delete-deployment <stack-name> to delete a particular AWS stack. This is a major benefit of using AWS CloudFormation stacks as the deployment container because, in one simple command, all of the AWS resources created for the application can be deleted.
Try the new deployment-tool preview today
We encourage you to try out this new tool and let us know what you think. In this post, we talked about how you can deploy your ASP.NET Core applications to AWS. Try deploying some of your backend services – our tool will help you push them to Amazon ECS, either as a long running process or as an application that should execute on a schedule.
You can also deploy Blazor WebAssembly applications using the same unified deployment experience. The following screen capture gives you a peek into what this would look like.
Help us build the new .NET deployment experience
It’s still early days for our new .NET deployment experience. This is a great time to try out the tool and give us feedback. We want to better understand the types of applications you want to deploy and the features that are most important to you. Our new deployment experience is being developed in the open on our new GitHub repository. You can get involved by opening issues and features requests or even by contributing your own ideas.
You can also follow our .NET AWS twitter handle, @dotnetonaws, for future announcements about our progress.