.NET on AWS Blog
Implement Role-based Access Control for .NET applications with Amazon Cognito
Ulili Nhaga contributed to this article.
When building applications, ensuring proper security and access control is crucial. One way to achieve this is by implementing a Role-Based Access Control (RBAC) authorization system. This blog post will discuss implementing RBAC for .NET applications using Amazon Cognito with OpenID Connect (OIDC). We will guide you on how to build a robust access control system that scales with your application.
Use Amazon Cognito to implement secure customer identity and access management. It provides a secure identity store and federation options that scale to millions of users. It also lets users login with social media identity providers, SAML or OIDC-based identity providers, and standards such as OAuth 2.0, SAML 2.0, and OpenID Connect.
Scenario
Consider a scenario with two users, Bob and Sarah. Bob works for a team that must have read-only access to items in an Amazon Simple Storage Service (S3) bucket. Sarah’s team must have access to read and write items in the same S3 bucket. To implement RBAC for this scenario in .NET applications with Amazon Cognito, we will:
- Create the roles “read-only-role” and “read-write-role” using AWS Identity and Access Management (IAM).
- Grant these roles the respective permissions to read and read-write items on the S3 bucket.
- Create two Cognito user groups, “read-only group” and “read-write group,” and map each to its corresponding IAM role.
- Set up the .NET application to map each Cognito user group to a .NET Policy-based role check.
- And finally, add users Bob and Sarah to the Cognito user groups according to their permissions.
When Bob or Sarah authenticates, the .NET application enforces authentication and authorization according to their roles. To allow users to read or write items on the S3 bucket, the front-end uses Cognito’s SDK to trade the ID Token with a temporary IAM credential. The temporary IAM credential limits Bob or Sarah’s access to the S3 Bucket according to the IAM role mapped to their Cognito user groups.
Architecture overview
For our scenario, the .NET application works as shown in Figure 1. It has two .NET components: a front-end interface (UI) built with Razor pages and a back-end built with .NET 8 Web API. We implement OIDC Authorization Grant Code Flow for authentication and authorization. We are using Cognito’s built-in UI for user sign-in. When a user like Bob or Sarah attempts to access a restricted page to read or write items on the S3 bucket, the following will happen:
- The front-end redirects them to the Cognito UI for login.
- The user enters their credentials.
- After validating the user’s credentials, Cognito generates an authorization code and redirects the user back to the front-end.
- The front-end uses the authorization code to request three JSON Web Token (JWT) tokens (ID Token, Access Token, and Refresh Token) from Cognito.
- Cognito emits the JWT tokens after validating the authorization code.
The front-end application stores the three JWT tokens encrypted inside cookies on the user’s browsers. Then it uses the ID Token in each subsequent HTTP request it sends to the back-end API. The back-end receives and validates the HTTP request with the ID Token. It then uses the Cognito SDK to trade that ID Token for temporary security credentials in AWS IAM. These credentials match the IAM roles with permissions to use the S3 bucket.
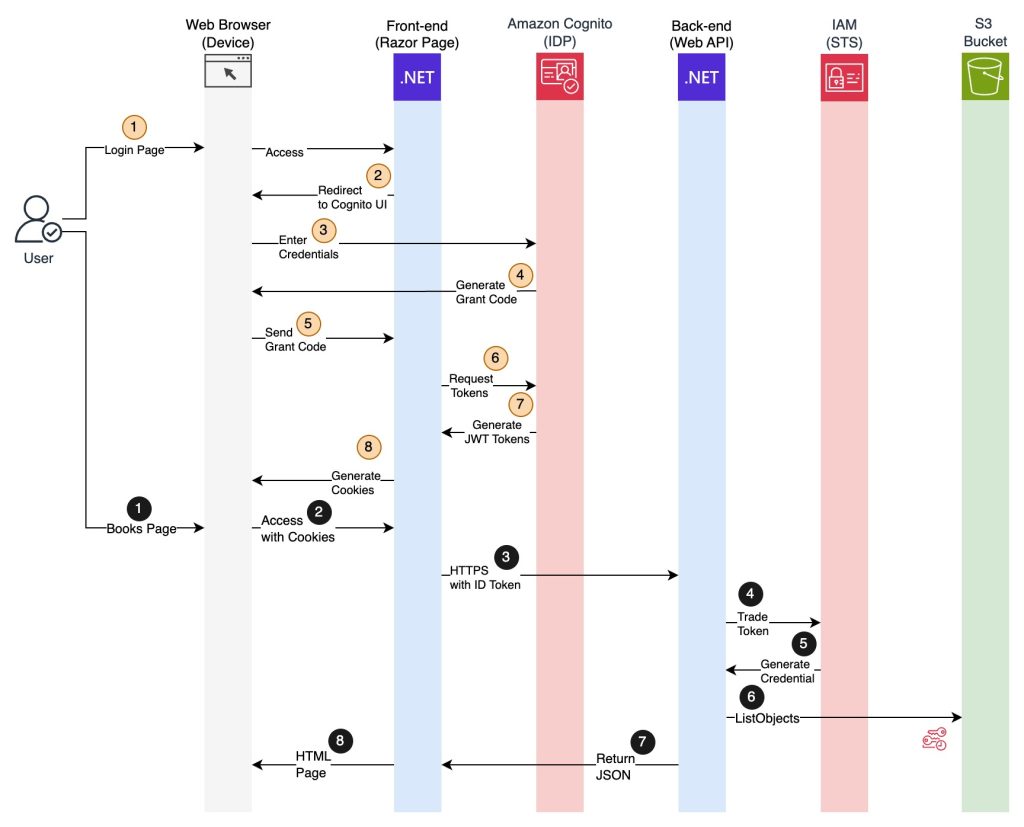
Figure 1 – Authentication flow
Prerequisites
For this example, use the GitHub repository aws-samples/sample-rbac-dotnet-amazon-cognito which contains the sample code for the .NET applications and the infrastructure as code (IaC) script to deploy Cognito. The IaC script uses the AWS Cloud Development Kit (CDK) with Typescript to define and deploy resources.
- .NET 8.0 Software Development Kit (SDK)
- Getting Started with Git CLI
- AWS Command Line Interface (AWS CLI)
- AWS CDK v2
- Amazon Cognito
- AWS Systems Manager Parameter Store
- AWS Secrets Manager
- Git downloads
- AWS credentials for your AWS account configured locally
- Visual Studio Code (or your favorite IDE)
- Jq, a lightweight and flexible command-line JSON processor
Code Walk Through
Clone the repository from the terminal with the following command:
git clone https://github.com/aws-samples/sample-rbac-dotnet-amazon-cognito.git
Open the solution in an IDE like Visual Studio Code to explore the implementation.
Mapping RBAC Roles
To implement RBAC on a .NET application for accessing AWS resources such as S3 buckets, start by creating the AWS IAM roles and grant them permissions following the least privilege access principle. This ensures users will perform the required actions on specific resources the application needs with minimal permissions. The following CDK code illustrates an IAM role with “read-write” permissions, and it allows Cognito authenticated user to assume this role:
const readWriteRole = new iam.Role(this, "s3-read-Write-role", {
  assumedBy: new iam.WebIdentityPrincipal(
    "cognito-identity.amazonaws.com",
    {
      StringEquals: {
        "cognito-identity.amazonaws.com:aud": `${props.IdentityPoolId}`,
      },
      "ForAnyValue:StringLike": {
        "cognito-identity.amazonaws.com:amr": "authenticated",
      },
    }
  ),
});

readWriteRole.addToPolicy(
  new iam.PolicyStatement({
    actions: [
      "s3:PutObject",
      "s3:GetObject",
      "s3:GetBucketLocation",
      "s3:ListBucket",
    ],
    resources: [
      props.SampleBucket.arnForObjects("*"),
      props.SampleBucket.bucketArn,
    ],
    effect: iam.Effect.ALLOW,
    sid: "AllowReadWrite",
  })
);
Next, we create a Cognito user group, associate it with the IAM role, then create the users and assign them to the groups. The following code illustrates the creation of the group “read-write-group” and the user “Sarah”.
const readWriteUser = new cognito.CfnUserPoolUser(this, "read-write-user", {
  userPoolId: props.UserPoolId,
  username: "sarah",
});

const readWriteGroup = new cognito.CfnUserPoolGroup(
  this,
  "read-write-group",
  {
    userPoolId: props.UserPoolId,
    description: "Illustrates read-write user groups",
    groupName: "read-write-group",
    precedence: 0,
    roleArn: props.IamReadWriteRoleArn,
  }
);

const readWriteAttach = new cognito.CfnUserPoolUserToGroupAttachment(
  this,
  "read-write-attach",
  {
    groupName: readWriteGroup.groupName as string,
    username: readWriteUser.username as string,
    userPoolId: props.UserPoolId,
  }
);
Then, set up the .NET application to map each Cognito user group with its roles. .NET has multiple ways to define roles. For our scenario, we will use Policy-based role checks to verify if users have a specific claim. In our case, Cognito’s user group will be on the claim key cognito:groups. The claim values are the names of the groups we create in Cognito, which are read-only-group or read-write-group.
builder.Services.AddAuthorization(options =>
{
    options.AddPolicy("ReadOnlyRole", policy => policy.RequireClaim("cognito:groups", "read-only-group", "read-write-group"));
    options.AddPolicy("ReadWriteRole", policy => policy.RequireClaim("cognito:groups", "read-write-group"));
});
Finally, after mapping the RBAC roles in all components, use these roles on the .NET applications to enforce that users with a specific role will access restricted pages or endpoints. The following are Razor Page and Web API code samples restricting pages and endpoints for authorized users with a particular role.
//Razor Page
[Authorize(Policy = "ReadWriteRole")]
public class CreatePage : PageModel
{
    ...
    public void OnGet()
    {
    }
    ...
}

//Web API
app.MapGet("/GetData", [Authorize(Policy = "ReadOnlyRole")] async Task<IResult> (...) =>
{
    ...
    return Results.Ok(result);
})
.WithName("GetData")
.WithOpenApi();
Set up Amazon Cognito to use OpenID Connect (OIDC) on the front-end Razor Page .NET application
To ensure a smooth user experience while navigating, the .NET application must persist the user’s session to avoid opening the login page every time a user opens a new page, window, or tab. You achieve a persistent user’s session by combining OIDC with an encrypted cookie. OIDC will handle the authentication flow using Cognito. After the authentication flow completes and generates JWT tokens, the application uses an encrypted cookie to persist the user’s session in the browser.
The following code exemplifies how to configure a .NET Razor Page to combine OIDC with an encrypted cookie. The code is setting DefaultAuthenticateScheme and DefaultSignInScheme as cookie and the DefaultChallengeScheme as OIDC. To set the .NET OIDC integration with Cognito, we use the .NET NuGet package Microsoft.AspNetCore.Authentication.OpenIdConnect. The code gets the “web-page-secrets” secret from AWS Secrets Manager. We created this secret during IaC deployment to store the Authority, Client ID, and Client Secret. OIDC needs this information to connect with Cognito, and we use the MetadataAddress to tell the OIDC where to discover Cognito’s endpoints and metadata dynamically.
builder.Services.AddAuthentication(options =>
    {
        options.DefaultAuthenticateScheme = CookieAuthenticationDefaults.AuthenticationScheme;
        options.DefaultSignInScheme = CookieAuthenticationDefaults.AuthenticationScheme;
        options.DefaultChallengeScheme = OpenIdConnectDefaults.AuthenticationScheme;
    })
    .AddCookie()
    .AddOpenIdConnect(options =>
    {
        SecretsManagerCache secretsManager = new();
        string clientSecret = secretsManager.GetSecretString("web-page-secrets").Result ?? "{}";
        var idConfig = JsonSerializer.Deserialize<RbacConfig>(clientSecret) ?? new();

        options.MetadataAddress = idConfig.Authority + "/.well-known/openid-configuration";
        options.ClientId = idConfig.ClientId;
        options.ClientSecret = idConfig.ClientSecret;
        options.Authority = idConfig.Authority;
        options.CallbackPath = "/signin-oidc";
        options.ResponseType = OpenIdConnectResponseType.Code;
        options.SignedOutCallbackPath = "/signedout-oidc";
        options.UseTokenLifetime = true;

        options.TokenValidationParameters = new TokenValidationParameters
        {
            ValidateIssuer = true,
        };
        options.SaveTokens = true;
        options.Events = new OpenIdConnectEvents
        {
            OnRedirectToIdentityProviderForSignOut = OnRedirectToIdentityProviderForSignOut
        };
    });

var app = builder.Build();
...
app.UseAuthentication();
app.UseAuthorization();
app.MapRazorPages();
...
await app.RunAsync();
Setting up Amazon Cognito for using JWT on the back-end Web API .NET application
The Web API .NET application requires a JWT token in each HTTP request header for the OIDC authentication protocol. Unlike Razor Pages, it doesn’t need to persist the user’s session. To implement authentication on the Web API .NET application, we need to use JWT. The following code sample shows how to set up the JWT to work with Cognito. Like the OIDC implementation we covered, the code also reads the secret from Secrets Manager and sets the parameters to integrate with Cognito.
builder.Services.AddAuthentication(options =>
{
    options.DefaultAuthenticateScheme = JwtBearerDefaults.AuthenticationScheme;
    options.DefaultChallengeScheme = JwtBearerDefaults.AuthenticationScheme;

}).AddJwtBearer(options =>
{
    SecretsManagerCache secretsManager = new();
    string clientSecret = secretsManager.GetSecretString("web-api-secrets").Result ?? "{}";
    var idConfig = JsonSerializer.Deserialize<RbacConfig>(clientSecret) ?? new();

    options.Authority = idConfig.Authority;
    options.MetadataAddress = idConfig.Authority + "/.well-known/openid-configuration";

    options.TokenValidationParameters = new TokenValidationParameters
    {
        ValidateIssuer = true,
        ValidIssuer = idConfig.Authority,
        ValidateLifetime = true,
        LifetimeValidator = (before, expires, token, param) => expires.HasValue && expires.Value > DateTime.UtcNow,
        ValidateAudience = false,
        ValidateIssuerSigningKey = true,
    };
});
...
var app = builder.Build();
...
app.UseAuthentication();
app.UseAuthorization();

await app.RunAsync();
Deployment and Demo
The GitHub repository aws-samples/sample-rbac-dotnet-amazon-cognito provides the entire demo. Deploy the IaC script for Cognito and AWS IAM roles and run the two .NET applications locally for the demo.
Deployment
Execute the following commands to deploy the CDK IaC project.
cd src/infra/cognito
npm install
cdk bootstrap --all
cdk synth --all
cdk deploy --require-approval never --all
Set users (Bob and Sarah) passwords by executing the following commands. Replace the placeholder REPLACE_THIS_PLACEHOLDER_PASSWORD with the password for each user.
export USER_POOL_ID=$(aws cognito-idp list-user-pools --max-results 10 | jq ".UserPools[] | select(.Name == \"rbacauthz\") | .Id" -r)
aws cognito-idp admin-set-user-password --user-pool-id $USER_POOL_ID --username bob --pass REPLACE_THIS_PLACEHOLDER_PASSWORD --permanent
aws cognito-idp admin-set-user-password --user-pool-id $USER_POOL_ID --username sarah --pass REPLACE_THIS_PLACEHOLDER_PASSWORD --permanent
Demo
When you complete the deployment, open two new terminals from the folder where the cloned sample solution is. Execute the following commands to navigate to the .NET projects and run them locally to test the solution. Run the back-end Web API application first and the front-end Razor Page second.
Terminal 1: run the back-end Web API .NET application
cd src/apps/SampleWebApi
dotnet dev-certs https
dotnet build
dotnet run
Terminal 2: run the front-end Razor Page .NET application
cd src/apps/WebPage
dotnet build
dotnet watch
After executing the commands from Terminal 2, a browser will open, requesting that you allow “localhost” TLS .NET dev certificates. Follow the instructions to accept it, and then you will access the demo application from the URL https://localhost:7016/. It has a page like in Figure 2.

Figure 2 – Home page
Figure 2 also shows selecting “Login” from the top right side of the Home page will redirect you to the Cognito UI for authentication, shown in Figure 3.
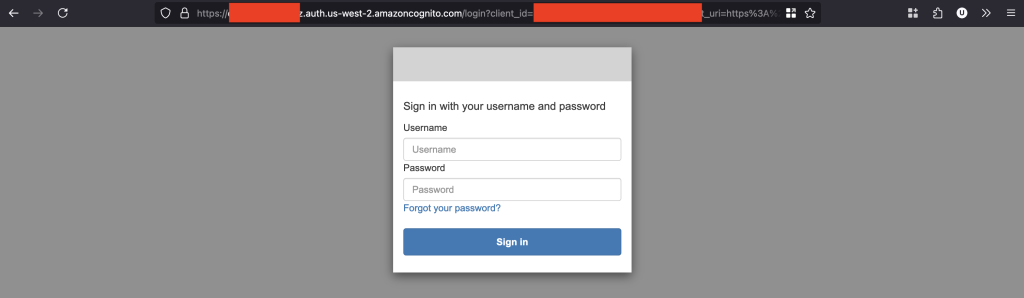
Figure 3 – Cognito UI
When you enter the username sarah and the password you defined, the application will redirect you to the front-end page with Sarah’s profile, as illustrated in Figure 4 . The user profile page contains Sarah’s claims extracted from the Cognito token. Select Books from the menu options at the top-left corner to simulate adding items to the S3 bucket.

Figure 4 – User profile page
The Book page will present an empty list. Select the button “Add new Book.” You will navigate to the “New Book” page to enter the Book’s information as illustrated in Figure 5. Fill out the form and select the button “Submit.” The application validates your information and invokes an HTTP request to the back-end. The request will have an ID Token from the current session to insert the book information as an item on the S3 bucket. Repeat the processes multiple times to have sample data.

Figure 5 – New Book form
After entering multiple book sample data, select the LogOut option at the top-right corner, as illustrated in Figure 6, to switch from Sarah to Bob.
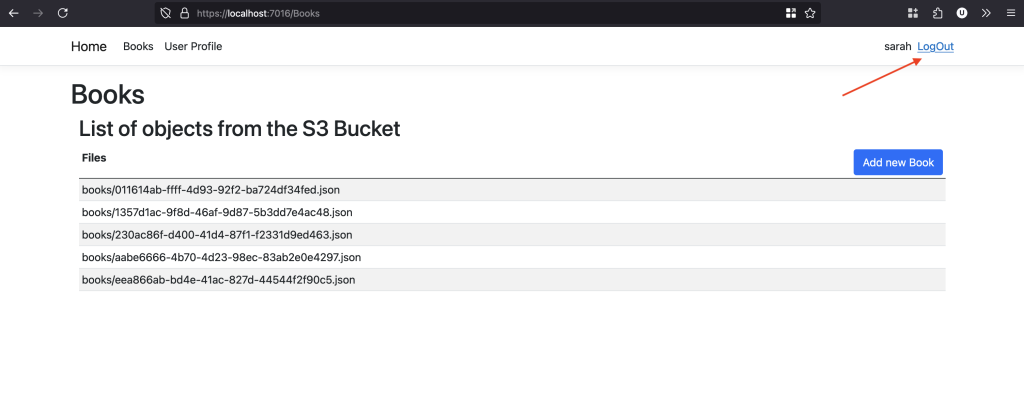
Figure 6 – LogOut option
Select Login again and enter Bob’s credentials to simulate a user with a read-only role. After entering Bob’s credentials, you will access Bob’s user profile. It has Bob’s claims showing the “read-only-group” Cognito user group, as illustrated in Figure 7.
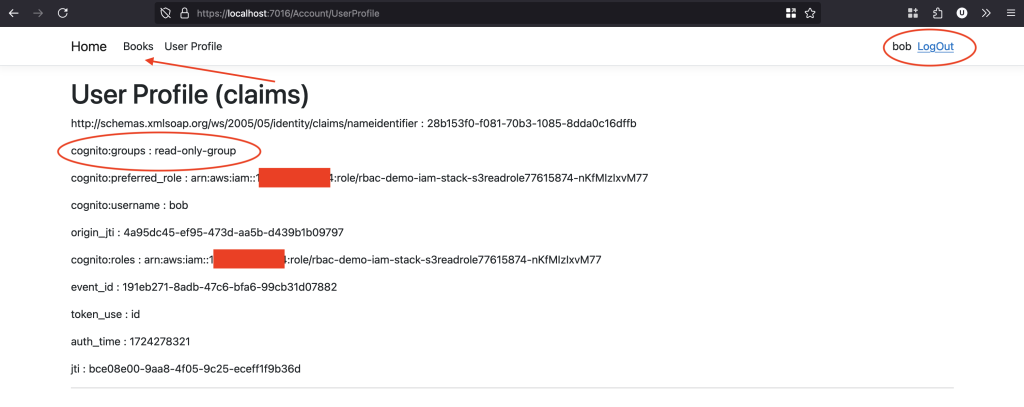
Figure 7 – Bob’s user profile
Select the Books menu option and attempt adding a new book. You will receive an access denied page, as illustrated in Figure 8, because Bob is part of the read-only group. His role prevents them from writing items to the S3 bucket.
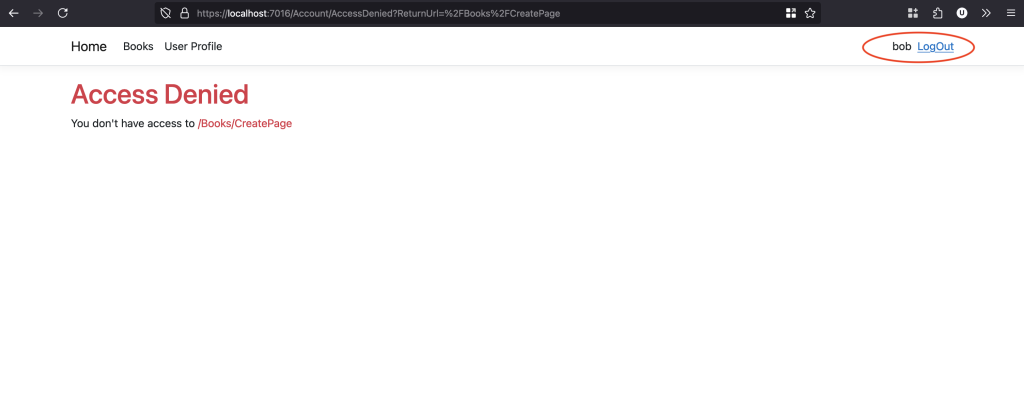
Figure 8 – Access Denied page
Cleanup
Delete the resources created by running this demo to avoid unnecessary charges. To do so, follow commands from the folder where you cloned the repository.
cd src/infra/cognito
cdk destroy --all
Conclusion
In this post, we showed how to create a robust and scalable access control system with Role-Based Access Control for .NET applications using Amazon Cognito and OpenID Connect. We created IAM roles, mapped them to Cognito user groups, and aligned them with .NET policy-based role checks to control access to AWS resources such as S3 buckets. The OIDC authorization grant code flow, Cognito’s built-in UI for user sign-in, and exchanging ID Tokens for temporary IAM security credentials demonstrate a secure and simple authentication and authorization process. You can leverage these same approaches to implement RBAC and enhance the security of your own .NET applications while ensuring least privileged access for your users. For more information on Amazon Cognito. refer to the Amazon Cognito Developer Guide.