.NET on AWS Blog
Migrate SQL Server Always Encrypted CMK to AWS Secrets Manager with .NET
Introduction
By migrating the SQL Server Always Encrypted column master key (CMK) from the Windows Certificate Store to AWS Secrets Manager, you can remove a Windows-only platform dependency from your .NET application. The default CMK store provider, MSSQL_CERTIFICATE_STORE, relies on the Windows Certificate Store. The CMK must move to a platform-agnostic store like AWS Secrets Manager before your application can run Linux container on Amazon Elastic Container Service (Amazon ECS), Amazon Elastic Kubernetes Service (Amazon EKS), or on Linux Amazon EC2 instances.
In this post, you will learn how to re-wrap each Column Encryption Key (CEK) with a new master key stored in Secrets Manager, leaving your encrypted data untouched with zero downtime.
By the end of this post, you can:
- Understand the Key Hierarchy, and how SQL Server Always Encrypted works
- Build a custom
SqlColumnEncryptionKeyStoreProviderbacked by Secrets Manager - Migrate the CMK from the Windows Certificate Store to the new provider by re-wrapping existing CEKs, no data re-encryption needed
- Register the provider during application startup in ASP.NET Core applications
Prerequisites
Before you begin, make sure you have the following:
- An AWS account with permissions to manage secrets in Secrets Manager. Refer to the AWS Identity and Access Management (IAM) policy examples in the AWS Secrets Manager documentation.
- AWS Command Line Interface (AWS CLI) installed and configured with credentials that have Secrets Manager read and write access.
- SQL Server instance with Always Encrypted configured and an existing CMK stored in the Windows Certificate Store.
- .NET 10 project with the Microsoft.Data.SqlClient and AWSSDK.SecretsManager NuGet packages installed. The one-time migration utility must run on Windows with access to the certificate store. You can use the old provider to unwrap the existing CEKs. After migration, the application does not require Windows.
- SQL Server Management Studio (SSMS) or equivalent, to run T-SQL against your database.
- Familiarity with C#, and the SQL Server Always Encrypted key hierarchy.
Understanding the Always Encrypted Key Hierarchy
Always Encrypted uses a two-tier key architecture that separates the key that encrypts data from the key that protects it:
| Component | Role |
| Column Master Key (CMK) | Stored in an external key store (for example, Windows Certificate Store or AWS Secrets Manager). Wraps and unwraps the CEK. Never sent to SQL Server |
| Column Encryption Key (CEK) | Stored in SQL Server in encrypted (wrapped) form. The SqlClient driver decrypts it at runtime using the CMK, then uses it to encrypt and decrypt column data |
| Encrypted column data | Sensitive values (for example, SSN, credit card numbers) stored as ciphertext in database tables. Decrypted client-side after the CEK is unwrapped. |
Figure 1 shows the Always Encrypted key hierarchy in SQL Server. When a client application queries an encrypted column, the application:
- Fetches the encrypted CEK from SQL Server.
- Decrypts the CEK using the CMK from the key store.
- Uses the decrypted CEK to decrypt the column data client side.
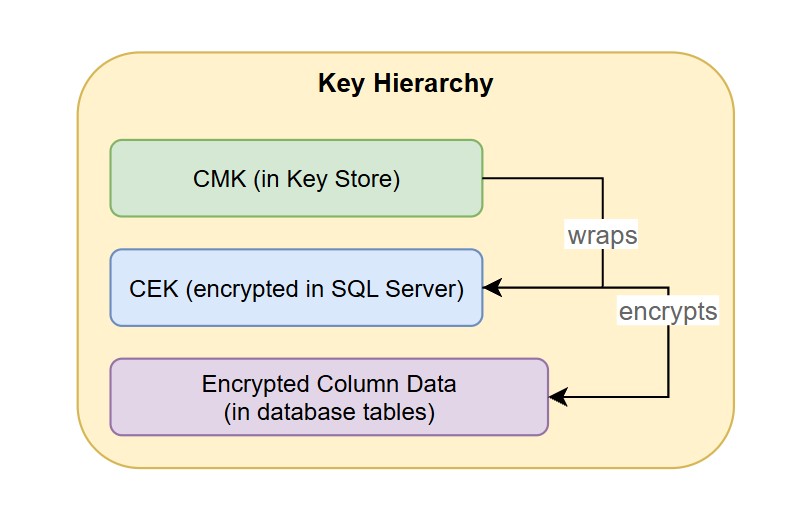
Figure 1: Always Encrypted key hierarchy in SQL Server
Figure 2 shows the existing architecture, which uses Windows Certificate Store to store CMK. With Microsoft.Data.SqlClient, you get built-in providers for MSSQL_CERTIFICATE_STORE and AZURE_KEY_VAULT. You can implement the SqlColumnEncryptionKeyStoreProvider abstract class to build custom providers for any other backend.
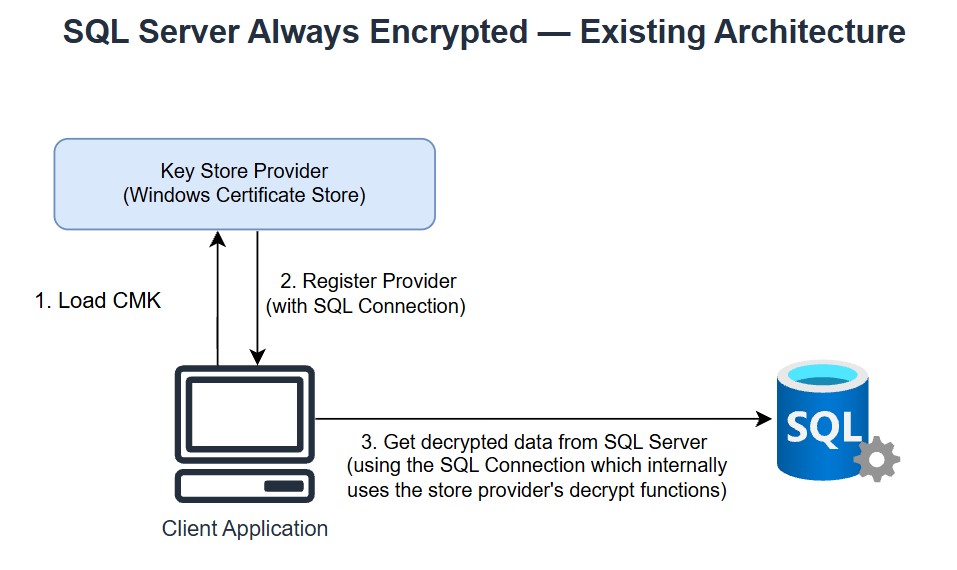
Figure 2: Existing Architecture
The Problem with MSSQL_CERTIFICATE_STORE
When you configure Always Encrypted with SSMS or PowerShell, the CMK is stored as a certificate in the Windows Certificate Store typically at Cert:\CurrentUser\My or Cert:\LocalMachine\My. This creates a hard dependency on Windows:
- No cross-platform support: The Windows Certificate Store only runs on Windows, blocking Linux, or containerized deployments.
- Machine-bound: The certificate is tied to a specific machine or user profile, making it difficult to scale across instances.
- Manual provisioning: You must install the certificate on every machine individually.
- No audit trail: No visibility into which processes accessed the key or when.
Architecture Overview
The goal is to move the CMK from the Windows Certificate Store to AWS Secrets Manager. The migration follows these steps:
- Export the certificate from the Windows Certificate Store as a PFX file and store it along with its private key to AWS Secrets Manager
- Implement a custom SqlColumnEncryptionKeyStoreProvider that reads the certificate from Secrets Manager
- Create a new CMK metadata entry in SQL Server pointing to the custom provider
- Re-wrap the existing CEKs with the new provider
- Register the provider in your application startup for further data access.
- (Optional) Drop the old CMK from SQL Server once all clients have been updated to use the custom provider.
Design consideration: If you choose to drop the old CMK (step 6), several tools can no longer decrypt the encrypted columns. These include SSMS, the SQL Server PowerShell module, and any client that does not register with the custom provider. This also includes ETL tools, reporting engines, and ad-hoc query utilities. If those tools need access, keep the old CMK in place alongside the new one. Alternatively, update every client to register the custom Secrets Manager provider before you move to production.
Why AWS Secrets Manager? Always Encrypted requires the client to hold the column master key’s private key locally, because the client driver uses it to unwrap (RSA-OAEP decrypt) the column encryption key. With AWS Secrets Manager, you can store the certificate and private key as a binary secret. You can relocate the column master key off the Windows Certificate Store while keeping the key material available.
Figure shows the migrated architecture, using AWS Secrets Manager to store CMK.
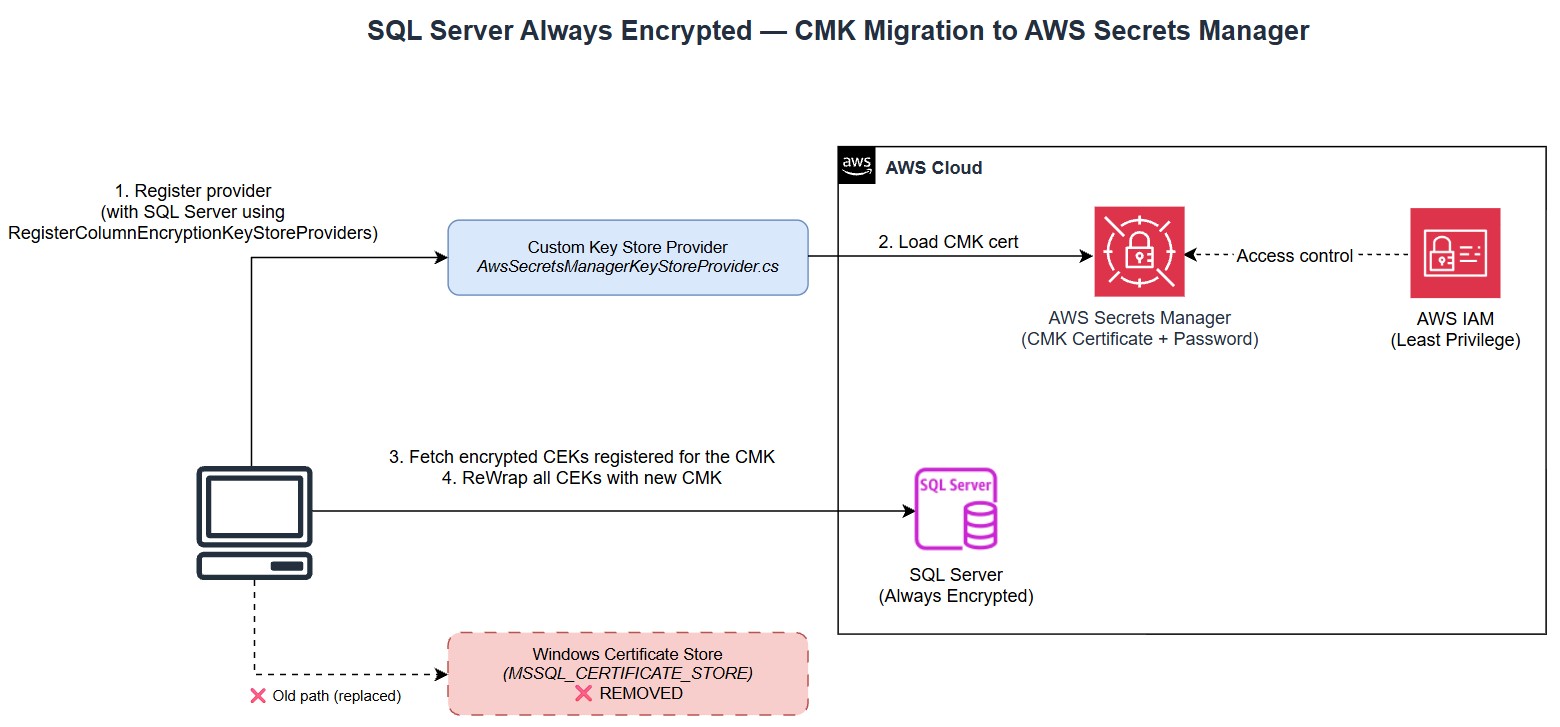
Figure 3: Migrated Architecture
Walkthrough
The following walkthrough covers the migration steps defined in the previous section in detail.
To export your certificate into AWS Secrets Manager
Your CMK currently lives in the Windows Certificate Store. Export it as a one-time migration step and store it in AWS Secrets Manager.
- To find and export the certificate
- Query sys.column_master_keys to find your CMK’s certificate thumbprint. The thumbprint is the last segment of the key_path column.
- Run the Export-PfxCertificate PowerShell command to export the certificate as a PFX file with a strong password. The export must include the private key to unwrap (decrypt) the CEK.
- To store the PFX as two secrets
- Upload the PFX file to Secrets Manager as a binary secret.
- Store the PFX password as a separate plaintext secret.
You can use the following commands to save the secrets from AWS CLI.
#1) Store the certificate itself (binary secret)
aws secretsmanager create-secret \
  --name          "always-encrypted/cmk-certificate" \
  --secret-binary fileb://c:/certs/always-encrypted-cmk.pfx \
  --description   "Always Encrypted CMK certificate"

#2) Store the PFX password (separate secret)
aws secretsmanager create-secret \
  --name          "always-encrypted/cmk-certificate-password" \
  --secret-string "<your-pfx-password>" \
  --description   "Password for the CMK PFX certificate"
To implement a custom key store provider that reads the key from Secrets Manager
- Create a .NET class library (or the project that opens encrypted connections) that uses the Microsoft.Data.SqlClient and AWSSDK.SecretsManager NuGet packages, and add a class named AwsSecretsManagerKeyStoreProvider that extends SqlColumnEncryptionKeyStoreProvider. Implement the class to read the certificate from AWS Secrets Manager instead of the Windows Certificate Store.
The provider has two responsibilities:
Load the CMK: fetch the PFX bytes and password from your two Secrets Manager secrets, then reconstruct the certificate (with its private key) in memory.
Validate the key: if the private key is missing, fail fast with a clear error, since the private key is required to unwrap the CEK.
- Override the key store methods. The abstract class requires four method overrides, but in practice only two do the heavy lifting:
| Operation | What it does |
| DecryptColumnEncryptionKey | Unwraps the encrypted CEK using the certificate’s private key. Microsoft.Data.SqlClient caches the decrypted CEK (for 2 hours by default), so this runs once per cache lifetime. |
| EncryptColumnEncryptionKey | Wraps a CEK with the certificate’s public key. Used during the one-time rotation in Step 3. |
| SignColumnMasterKeyMetadata | Signs the CMK metadata to protect against tampering. Optional for most setups. |
| VerifyColumnMasterKeyMetadata | Verifies that signature. Optional, and typically paired with signing. |
Both wrap and unwrap use RSA-OAEP padding, the same algorithm the built-in certificate provider uses. This is why the CEKs can be moved between providers without re-encryption.
// Unwrap the CEK — called once per cache lifetime (2 h default).
// SqlClient caches decrypted CEKs.
public override byte[] DecryptColumnEncryptionKey(
    string masterKeyPath, string encryptionAlgorithm, byte[] encryptedColumnEncryptionKey)
{
    ValidateAlgorithm(encryptionAlgorithm); // To check the RSA-OAEP padding

    int offset = 1;
    int keyPathLength = BitConverter.ToUInt16(encryptedColumnEncryptionKey, offset); offset += 2;
    int ciphertextLength = BitConverter.ToUInt16(encryptedColumnEncryptionKey, offset); offset += 2;
    offset += keyPathLength;

    byte[] ciphertext = new byte[ciphertextLength];
    Buffer.BlockCopy(encryptedColumnEncryptionKey, offset, ciphertext, 0, ciphertextLength);

    // Note: Signature verification is not implemented here. The blob integrity
    // is guaranteed by AWS Secrets Manager (KMS encryption + IAM access control).
    // If your threat model requires defense in depth, add signature validation
    // using the RSA public key before decrypting.

    using RSA rsa = _certificate.GetRSAPrivateKey()
        ?? throw new InvalidOperationException(“Cannot access RSA private key.”);
    return rsa.Decrypt(ciphertext, RSAEncryptionPadding.OaepSHA1);
}


// Wrap the CEK — used once, during rotation.
public override byte[] EncryptColumnEncryptionKey(
    string masterKeyPath, string encryptionAlgorithm, byte[] columnEncryptionKey)
{
    ValidateAlgorithm(encryptionAlgorithm); // To check the RSA-OAEP padding

    using RSA rsaPublic = _certificate.GetRSAPublicKey()
        ?? throw new InvalidOperationException(“Cannot access RSA public key.”);
    byte[] ciphertext = rsaPublic.Encrypt(columnEncryptionKey, RSAEncryptionPadding.OaepSHA1);

    byte[] keyPathBytes = Encoding.Unicode.GetBytes(masterKeyPath);
    byte[] signaturePayload = BuildSignaturePayload(keyPathBytes, ciphertext);

    byte[] signature;
    using (RSA rsaPrivate = _certificate.GetRSAPrivateKey()!)
        signature = rsaPrivate.SignData(signaturePayload, HashAlgorithmName.SHA256, RSASignaturePadding.Pkcs1);

    using var ms = new MemoryStream();
    using var writer = new BinaryWriter(ms);
    writer.Write((byte)0x01);                   // Version
    writer.Write((ushort)keyPathBytes.Length);   // Key path length
    writer.Write((ushort)ciphertext.Length);     // Ciphertext length
    writer.Write(keyPathBytes);                  // Key path
    writer.Write(ciphertext);                    // Encrypted CEK
    writer.Write(signature);                     // Integrity signature
    return ms.ToArray();
}
- Create a new CMK metadata entry in SQL Server that points to the provider. A CMK definition is just two values: the provider name and the key path. Set the provider name to AWS_SECRETS_MANAGER_CERT_PROVIDER and the key path to the Secrets Manager secret names your provider reads from.
CREATE COLUMN MASTER KEY [AwsSecretsCMK]WITH ( KEY_STORE_PROVIDER_NAME = 'AWS_SECRETS_MANAGER_CERT_PROVIDER', KEY_PATH = 'always-encrypted/cmk-certificate');
Note: The provider name in CREATE COLUMN MASTER KEY must exactly match the name you register in code. It’s case-sensitive. A mismatch is the most common “provider not found” error at runtime.Both CMKs now coexist in the database. Your data is unchanged, and the migration is reversible until you drop the old key.
Both CMKs now coexist in the database. Your data is unchanged, and the migration is reversible until you drop the old key.
To re-wrap the CEKs with the new CMK
For each CEK, unwrap it with the old master key and re-wrap it with the new one. The CEK plaintext never changes, so your table data stays intact. A two-step approach (add new wrapped values first, then drop old ones after validation) ensures zero downtime.
Run the following steps inside a short-lived migration utility:
- Register the provider: Register your Secrets Manager provider with SqlConnection so that it recognizes the new CMK. This registration is a mandatory one-time step during startup for any application that uses custom key store provider.
// Register the provider at application startupvar awsProvider = new AwsSecretsManagerKeyStoreProvider(“always-encrypted/cmk-certificate”, “always-encrypted/cmk-certificate-password”);
var providers = new Dictionary<string, SqlColumnEncryptionKeyStoreProvider>{ { AwsSecretsManagerKeyStoreProvider.ProviderName, awsProvider }};
SqlConnection.RegisterColumnEncryptionKeyStoreProviders(providers);
- List the CEKs: Query the catalog for every CEK currently wrapped by the old CMK. That list drives the loop.
- Re-wrap each CEK: Unwrap with the old Certificate Store provider, re-wrap with the new Secrets Manager provider, and add the new wrapped value alongside the old one. Clear the plaintext CEK from memory immediately after, for security purposes. At this point, both wrapped copies coexist in SQL Server.
- Validate: Query an encrypted column and confirm the plaintext is returned correctly through the new provider. This step is critical because both wrapped copies still exist, so you can rollback by simply removing the new wrapped values if validation fails.
- Drop old wrapped values: After successful validation, loop through the CEKs again and drop the old wrapped value for each one. This second step ensures you only remove the old values after confirming the new provider works correctly.
The following C# utility re-wraps every CEK registered against the old CMK:
static void ReWrapAllCeks()
{
    string oldKeyPath = GetCmkKeyPath(OLD_CMK); // Retrieve master key from SQL Server using CMK name
    string newKeyPath = GetCmkKeyPath(NEW_CMK);

    var oldProvider = new SqlColumnEncryptionCertificateStoreProvider();
    var newProvider = new AwsSecretsManagerKeyStoreProvider(
        AWS_PFX_SECRET_NAME, AWS_PFX_PASSWORD_SECRET_NAME);

    var cekList = GetCeksForCmk(OLD_CMK);
    if (cekList.Count == 0) { Console.WriteLine("Nothing to rotate."); return; }

    using var conn = new SqlConnection(ConnectionString);
    conn.Open();

    // ── Step 1: Add the new wrapped values ──
    foreach (var (cek, encryptedValue) in cekList)
    {
        // Unwrap with the OLD provider ...
        byte[] plainCek = oldProvider.DecryptColumnEncryptionKey(
            oldKeyPath, "RSA_OAEP", encryptedValue);

        // ... re-wrap with the NEW provider.
        byte[] reWrapped = newProvider.EncryptColumnEncryptionKey(
            newKeyPath, "RSA_OAEP", plainCek);

        // Scrub the plaintext CEK from memory immediately.
        Array.Clear(plainCek, 0, plainCek.Length);

        string hex = "0x" + BitConverter.ToString(reWrapped).Replace("-", "");

        // Add the value wrapped by the NEW CMK (old value is kept).
        new SqlCommand($@"
            ALTER COLUMN ENCRYPTION KEY [{cek}]
            ADD VALUE ( COLUMN_MASTER_KEY = [{NEW_CMK}],
                        ALGORITHM = 'RSA_OAEP', ENCRYPTED_VALUE = {hex} );",
            conn).ExecuteNonQuery();
    }

    // ── Validate: query an encrypted column through the new provider ──
    Console.WriteLine("Pass 1 complete. Validate encrypted queries before proceeding.");

}
In this step, Array.Clear() scrubs the plaintext CEK from memory immediately after re-wrapping. The encrypted value is written as a hex literal so SQL Server stores ciphertext verbatim and never sees the plaintext CEK. After this step, both the old and new wrapped copies coexist for every CEK .
Dropping the old CMK is optional (see the design consideration in Architecture Overview). If you choose to proceed, drop the old wrapped values, then run DROP COLUMN MASTER KEY. Confirm no CEK still references the old key.
(Optional) To drop the old CMK
- Run the following code to drop the old wrapped values from each CEK.
- Run DROP COLUMN MASTER KEY to remove the old key.
- Confirm that no CEK still references the old key.
- Read a few encrypted rows to validate that decryption works end to end.
// Drop the old wrapped values from each CEK foreach (var (cek, _) in cekList) { new SqlCommand($@" ALTER COLUMN ENCRYPTION KEY [{cek}] DROP VALUE ( COLUMN_MASTER_KEY = [{OLD_CMK}] );", conn).ExecuteNonQuery(); }
To wire the provider into your application
- Register the provider once at application startup, before any connection to an encrypted-column database is opened. In ASP.NET Core, add it to Program.cs before building the app, refer to the earlier registration step.
- Add Column Encryption Setting=Enabled to the connection string in appsettings.json. Without it, the SqlClient driver cannot invoke the provider.
{ "ConnectionStrings": { "Default": "Server=your-server;Database=Test;User Id=your-user;Password=your-password;TrustServerCertificate=True;Column Encryption Setting=Enabled;" }}
Note: The connection string above is for reference purposes only. As a best practice, do not hardcode usernames and passwords in appsettings.json. Instead, retrieve database credentials from AWS Secrets Manager at application startup to centralize credential management, support automatic rotation, and keep sensitive values out of source control.
Troubleshooting
The following table lists common issues you might encounter during or after the migration, along with steps to resolve them.
| Issue | Resolution |
| Certificate does not contain a private key | Re-export the PFX from the Windows Certificate Store and make sure to select “Include all certificates in the certification path” and “Export the private key”. |
| Operand type clash: varchar is incompatible with varchar(8000) encrypted | Add Column Encryption Setting=Enabled to the connection string for any operation that reads or writes encrypted columns. |
| Failed to decrypt column encryption key | Verify whether the custom provider is registered before the connection is opened. Registration must occur at process startup. |
| No credentials error from AWS SDK | Configure AWS credentials. |
| Secret not found | Verify that the secret name and AWS Region in your application match the values used when the secret was created. |
Cleanup
To avoid ongoing charges and reduce your attack surface after testing, complete the following cleanup steps:
- Delete the secrets from AWS Secrets Manager if they are unused.
- Delete the local PFX file from the export location to prevent unauthorized access.
- Remove the old CMK metadata from SQL Server if you no longer need it. Confirm it is removed using the following command.
-- Confirm the old CMK is no longer presentSELECT name, key_store_provider_name FROM sys.column_master_keys;
Conclusion
In this post, you learned how to migrate the Always Encrypted column master key from the Windows Certificate Store to AWS Secrets Manager. Your encrypted table data and CEKs remain untouched.
With AWS Secrets Manager as your key store, you get centralized key management, fine-grained IAM access control, and automatic rotation support.
For workloads where the key should never leave a hardware security boundary, you could instead write a provider backed by AWS Key Management Service (AWS KMS) that delegates wrap and unwrap calls to the AWS KMS API. The same SqlColumnEncryptionKeyStoreProvider abstract class supports either approach and other backends such as HashiCorp Vault.
Next Steps
- Turn on automatic rotation for your certificate secret in AWS Secrets Manager. Because every CEK is wrapped with this key, build custom AWS Lambda rotation function to refresh it on a schedule.
- Review the AWS Secrets Manager pricing page to understand the cost of storing and retrieving secrets at scale.
- Explore Always Encrypted with secure enclaves if your workload requires in-place encryption and query patterns on encrypted columns.
- If you are containerizing your .NET application, refer to Amazon ECS task IAM roles to provision AWS Secrets Manager access without managing static credentials.