IBM & Red Hat on AWS
Optimize Messaging with IBM MQ on Red Hat OpenShift Service on AWS
Businesses rely on multiple applications and data sources to keep their operations running smoothly. Effective messaging between these systems is an important aspect for keeping the business running, managing IT strategy, digital transformation, and application modernization.
As companies migrate and modernize on Amazon Web Services (AWS), they need to modernize their messaging infrastructure as well. IBM MQ is a popular choice among customers for messaging due to its support for various protocols and programming languages. To align with their modernization goals, businesses can leverage IBM MQ with Red Hat OpenShift Service on AWS (ROSA).
ROSA is a fully managed application platform that simplifies the deployment of applications by handling cluster lifecycle management. Integrated natively with the AWS console and other AWS services, ROSA supports IBM MQ without requiring customers to manage their own Red Hat OpenShift clusters. This setup allows businesses to focus on delivering value rather than managing infrastructure. ROSA offers efficient deployment, high availability across multiple AWS Availability Zones, and streamlined management with operators and common tooling.
Architecture overview
The architecture for the IBM MQ on ROSA hands-on is illustrated in Figure 1 below:
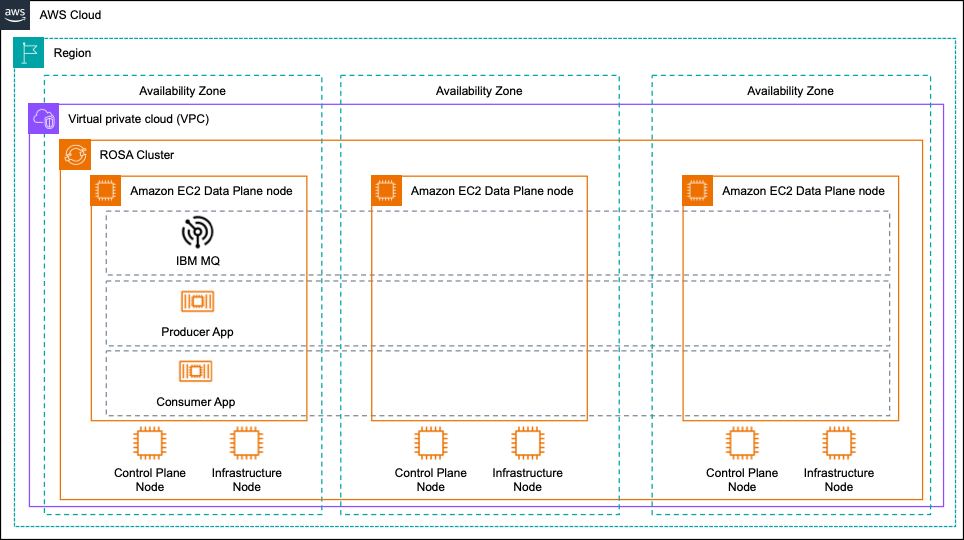
Figure 1. IBM MQ on ROSA hands-on architecture.
Pre-requisites
Follow the steps below to request a free trial of ROSA:
- Create a Red Hat account
- Request access to a ROSA hands-on experience cluster (figure 2).
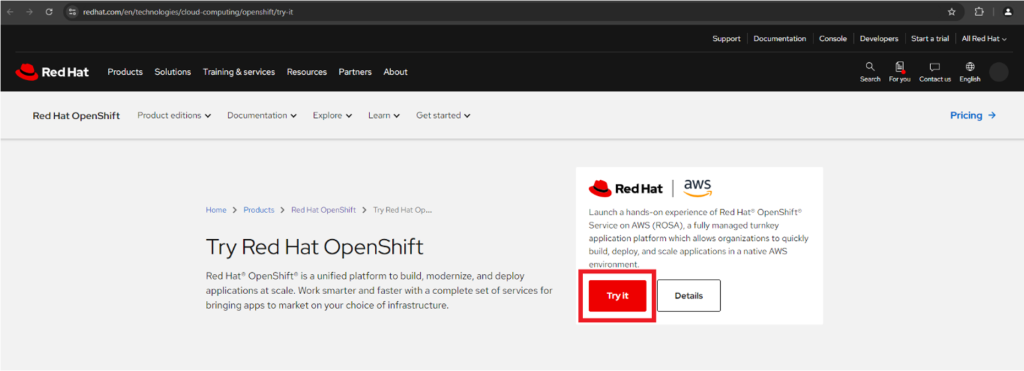
Figure 2. Try Red Hat OpenShift on AWS.
Implementation Steps
Provisioning a ROSA cluster
- You’ll be redirected to the Red Hat Hybrid Cloud Console and click Request experience as shown in figure 3. This will provision a ROSA cluster that will be available for 8 hours.
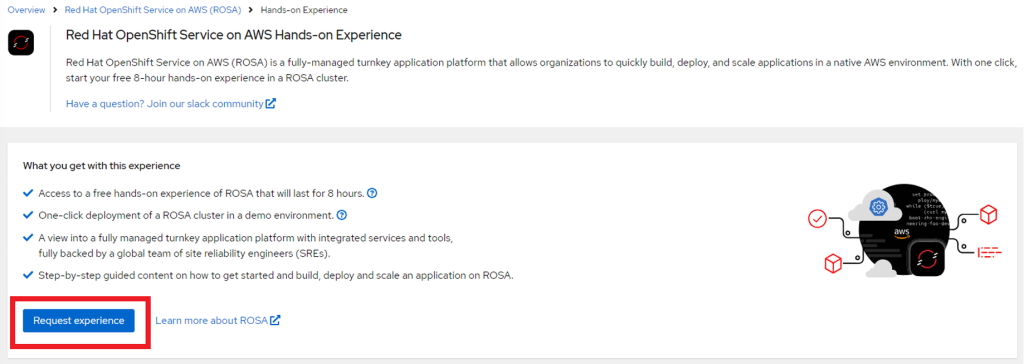
Figure 3. Requesting the AWS ROSA experience.
- When the cluster is ready you will get an email with a link to access the cluster (figure 4).
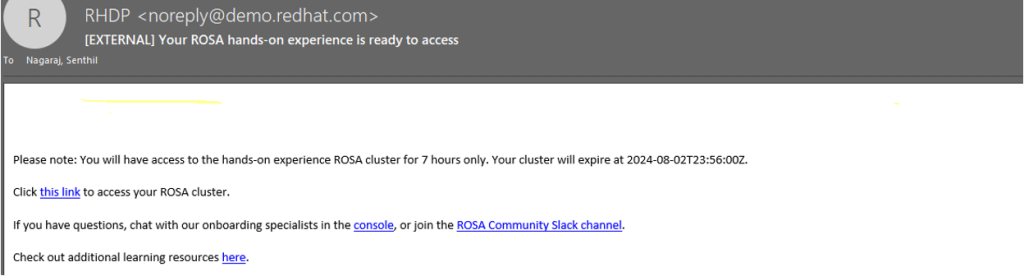
Figure 4. Confirmation of the ROSA cluster creation.
- Access the cluster experience website by clicking the link in the email. Then, select the Access experience button as shown in figure 5.
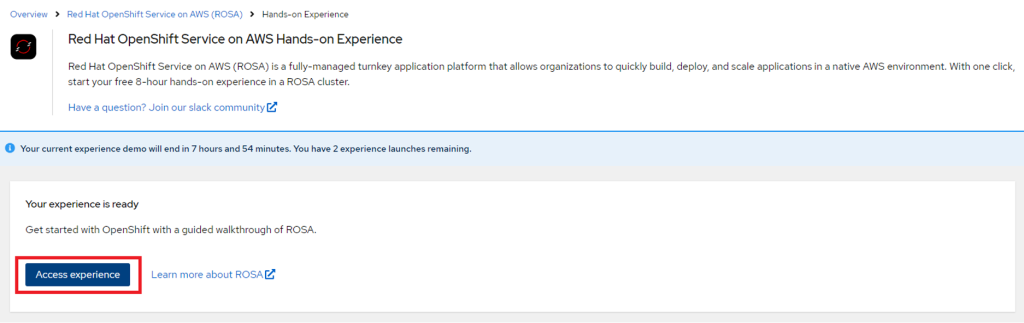
Figure 5. Accessing the trial ROSA cluster.
This opens with a split pane. The left-hand side shows a text panel with ROSA briefing information. The right-hand side displays a terminal window for logging into the ROSA cluster, as seen in figure 6.
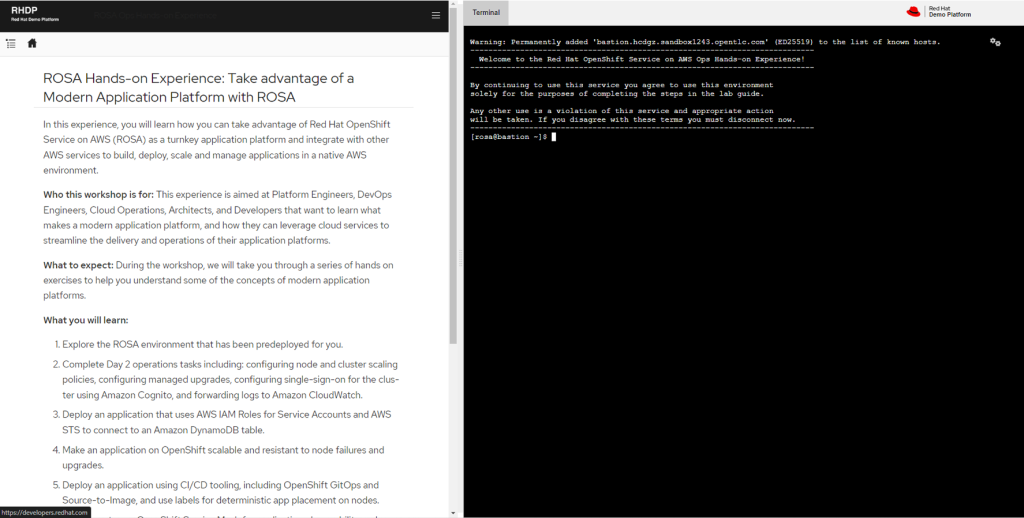
Figure 6. ROSA briefing and terminal.
- In the left-hand panel select Explore the ROSA environment as shown in figure 7.
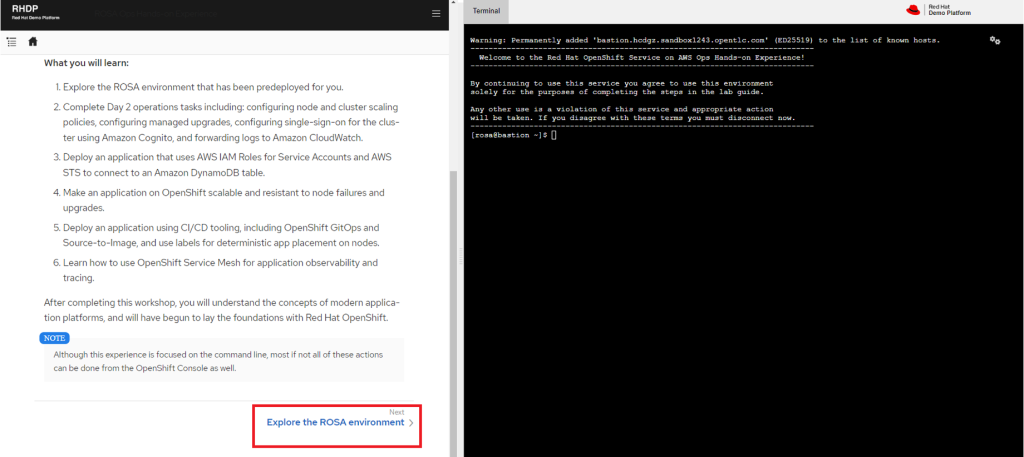
Figure 7. Getting to the instructions to access the ROSA cluster.
- To access the OpenShift console, you can follow steps 1-6 in the ensuing left-hand panel. For this exercise, you can go directly to step 4 to get the URL for the OpenShift console.
- Copy and paste the command into the terminal and hit enter. This will display the ROSA console URL, which may differ from the example shown in figure 8.
rosa describe cluster --cluster rosa-$GUID --output json | jq -r .console.url
Figure 8. Getting the ROSA console URL.
- Copy the console URL and paste it into the address bar in your browser. It should prompt you for a user name and password.
- The username is cluster-admin and the password can be found in step 5 from the instructions in the left-hand text panel as shown in figure 9.
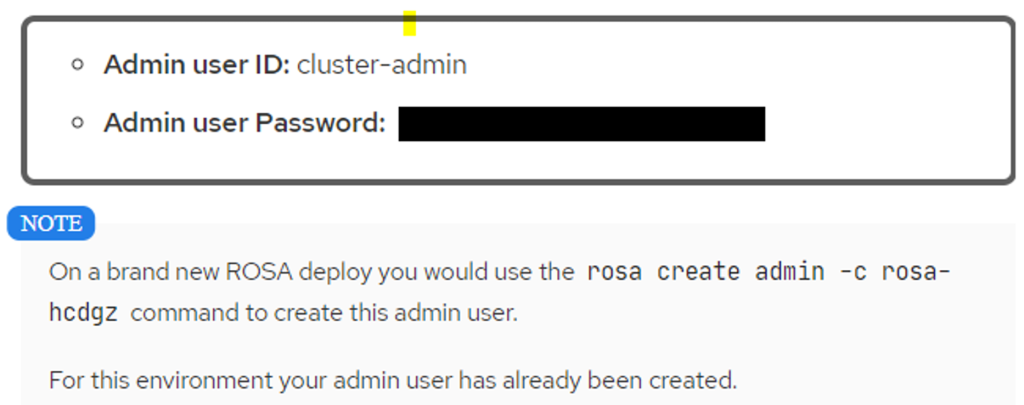
Figure 9. Getting the credentials to access the ROSA console.
You will now have access to your ROSA cluster console.
Deploying IBM MQ on to the ROSA cluster
- In the ROSA console, expand Operators in left navigation pane and select Operator Hub.
- Search for Web Terminal and click on it. Then click on Install as shown in figure 10.
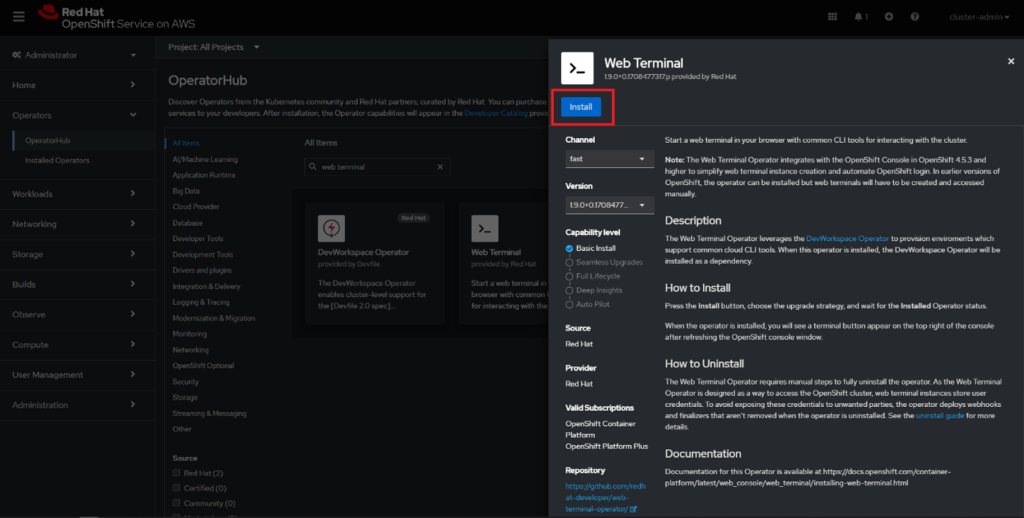
Figure 10. Installing the Web Terminal.
- In the next page leave the default options that are enabled and click Install.
- Add the IBM Operator Catalog to your ROSA cluster to deploy IBM MQ.
- As shown in figure 11, click the ‘+’ button in the top right section of the ROSA console
- Paste the YAML template below and click Create. This will take a few minutes to get added.
apiVersion: operators.coreos.com/v1alpha1
kind: CatalogSource
metadata:
  name: ibm-operator-catalog
  namespace: openshift-marketplace
spec:
  displayName: IBM Operator Catalog
  image: icr.io/cpopen/ibm-operator-catalog:latest
  publisher: IBM
  sourceType: grpc
  updateStrategy:
    registryPoll:
      interval: 45m
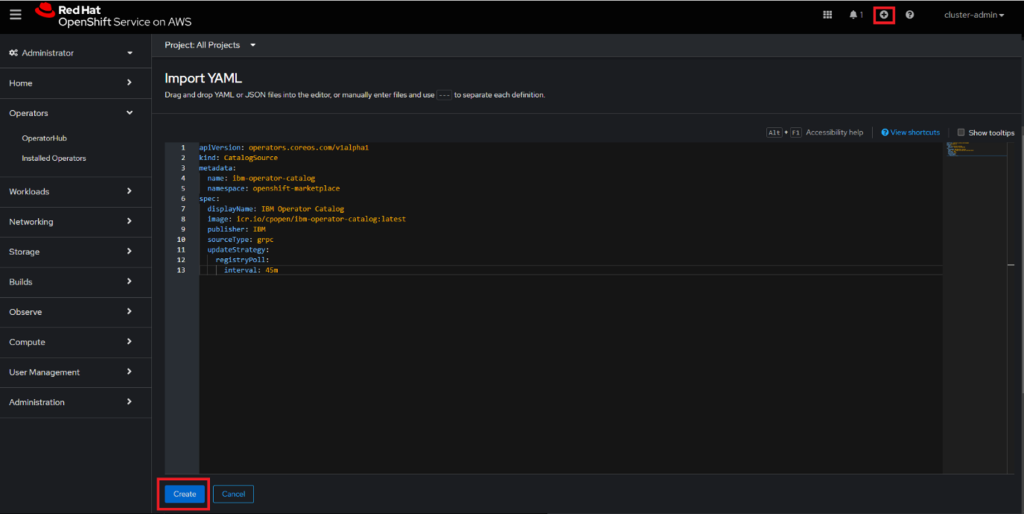
Figure 11. Add the IBM operator catalog to the ROSA cluster.
- Once again, in the ROSA console, select Operators and then select OperatorHub.
- Search for IBM MQ, select the IBM MQ tile and select Install.
- Accept the defaults in the next page and click Install (figure 12).

Figure 12. Install IBM MQ via the OperatorHub.
- Navigate again to Operators and OperatorHub and search for cert-manager
- Install the community supported cert-manager, accepting the defaults and select Install (figure 13).
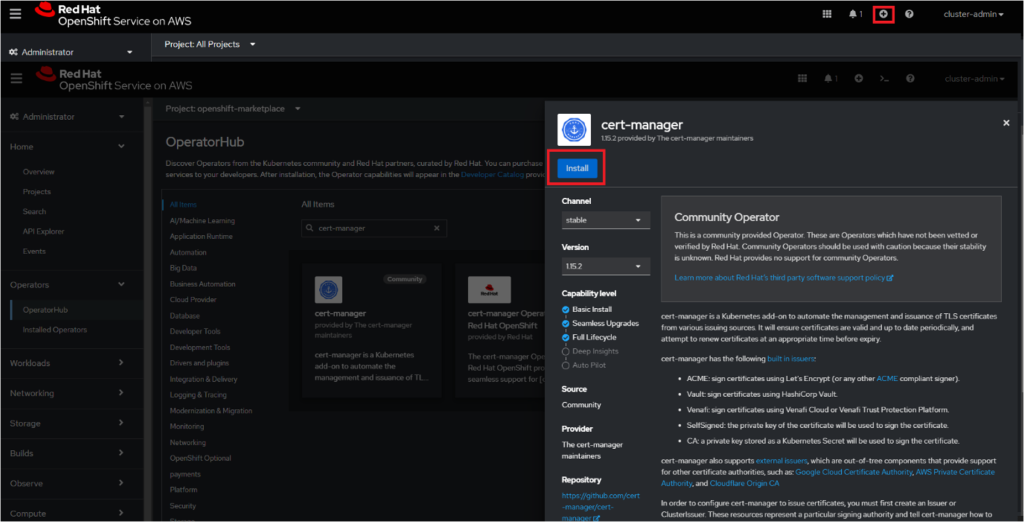
Figure 13. Installing cert-manager Operator via the OperatorHub.
- Create a cluster issuer for testing IBM MQ by clicking the ‘+’ button in the top right section of the ROSA console.
- Paste the YAML template below and click Create (figure 14).
Note: In a production environment make sure to use a valid certificate issuer.
apiVersion: cert-manager.io/v1
kind: ClusterIssuer
metadata:
  name: selfsigned-issuer
spec:
  selfSigned: {}
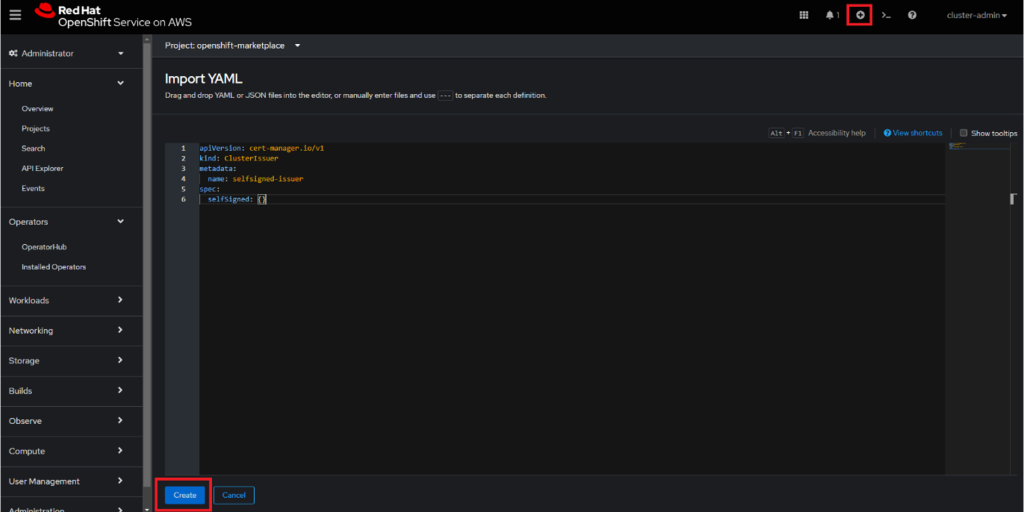
Figure 14. Creating a cluster issuer.
- Let’s create an OpenShift project to deploy IBM MQ runtime and sample applications.
- In the ROSA console (Figure 15), in the left pane, go to Home and select Projects.
- Click Create Project, name it mq-demo, then click Create.

Figure 15. Creating the mq-demo project in ROSA console.
- In your browser window with the ROSA terminal and instructions, copy the command from step 6 in the left pane and paste it into the terminal (see Figure 16).
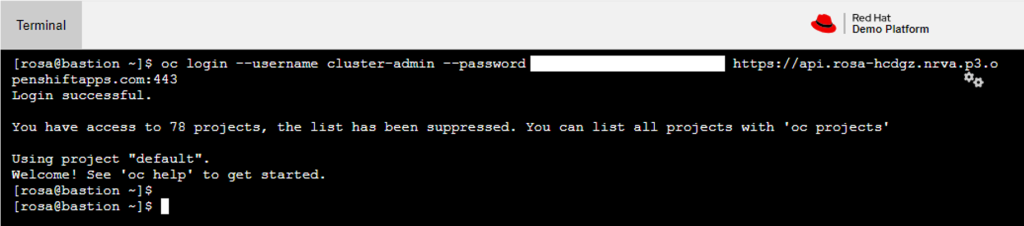
Figure 16. Logging into the ROSA cluster via terminal.
- Run the command below to create a secret for IBM MQ authentication. Specify values for mq-admin-password and mq-app-password with passwords of your choice. You will use these in the forthcoming steps.
oc create secret generic qmdemo-passwords --from-literal=dev-admin-password=<mq-admin-password> --from-literal=dev-app-password=<mq-app-password> -n mq-demoDisclaimer: Please note that the sample configuration and code provided in this blog post is for demonstration purposes only and isn’t intended for production use. The code is not hosted and managed by AWS. We encourage you to review the code to understand how it works. For help with third-party components, please refer to the vendor documentation and support channels.
- Copy the YAML file template from the IBM GitHub repository that defines a non-TLS developer channel and its authentication rules for an IBM MQ Queue Manager.
- In the ROSA console, click the ‘+’ button in the top right, paste the copied YAML content into the editor, and click Create.
- Copy the YAML file template from the IBM GitHub repository to create a self-signed TLS certificate in the mq-demo namespace.
- In the ROSA console, click the ‘+’ button in the top right, paste the copied YAML content into the editor, and click Create.
- Copy the YAML file template from the IBM GitHub repository to create a QueueManager resource , with a self-signed certificate, manual authentication, and ephemeral storage in the mq-demo namespace.
- In the ROSA console, click the ‘+’ button in the top right, paste the copied YAML content into the editor, and click Create.
- After a few minutes you should see a qmdemo pod with status running (figure 17).
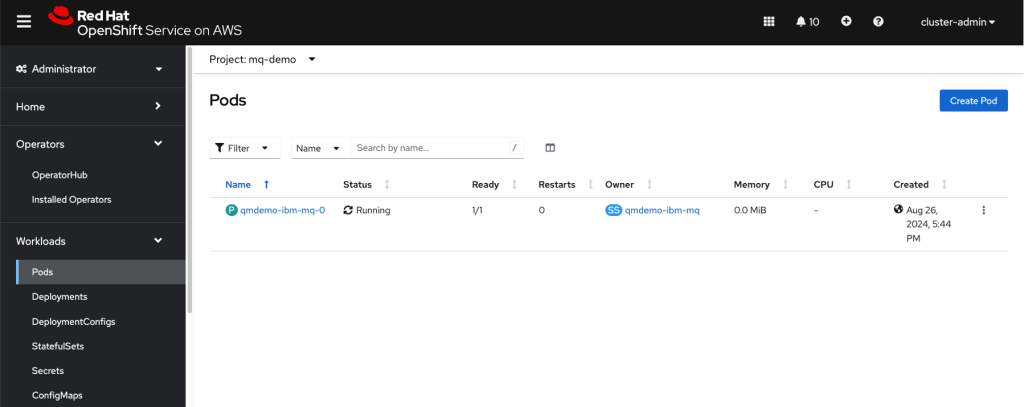
Figure 17. Validating IBM MQ pods.
- In the ROSA console, in the left pane select Operators, then select Installed Operators.
- Select Queue Manager then select the qmdemo Queue Manager deployment.
- The Admin UI value is your Queue Manager web console URL as shown in Figure 18.
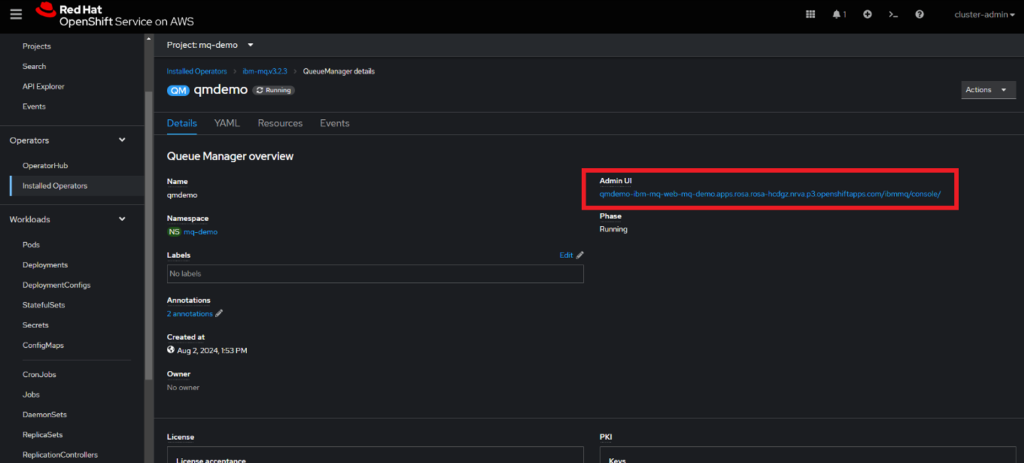
Figure 18. Getting the admin URL for the queue manager.
Deploying sample message producer and consumer applications
Note: The applications below are deployed in the trial ROSA environment hosted by Red Hat. This setup is for demonstration purposes only. It is not intended for use in a customer AWS account or for production use.
- Run the below command to create the sample message producer application. Replace <mq-app-password> with what you used in step 26.
oc new-app registry.redhat.io/redhat-openjdk-18/openjdk18-openshift~https://github.com/ibm-messaging/mq-gitops-samples#main --context-dir=/queue-manager-basic-deployment/code/qmdemo-producer --env='JAVA_APP_JAR=producer-1.0-SNAPSHOT-jar-with-dependencies.jar' --env="MQ_APP_PASSWORD=<mq-app-password>" --name=mq-producer -n mq-demo- Run the below command to create the sample message consumer application. Replace <mq-app-password> with what you used in step 26.
oc new-app registry.redhat.io/redhat-openjdk-18/openjdk18-openshift~https://github.com/ibm-messaging/mq-gitops-samples#main --context-dir=/queue-manager-basic-deployment/code/qmdemo-producer --env='JAVA_APP_JAR=producer-1.0-SNAPSHOT-jar-with-dependencies.jar' --env="MQ_APP_PASSWORD=<mq-app-password>" --name=mq-producer -n mq-demo- As shown in Figure 19, go to your ROSA console, select Workloads in the left pane and then select Pods. You should see running pods for both the producer and consumer applications.
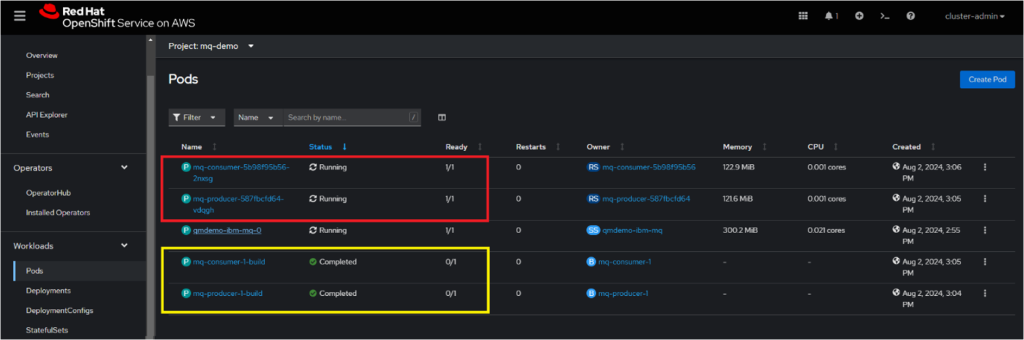
Figure 19. Producer and consumer application pods.
- Now go to your IBM MQ Admin UI that you obtained in step 36. The username is admin and the password is <mq-admin-password> that you entered in step 26.
- Click on Manage QMDEMO.
- As shown in Figure 20, you should see active queues and message counts since the producer and consumer applications have been communicating using the IBM MQ queues.
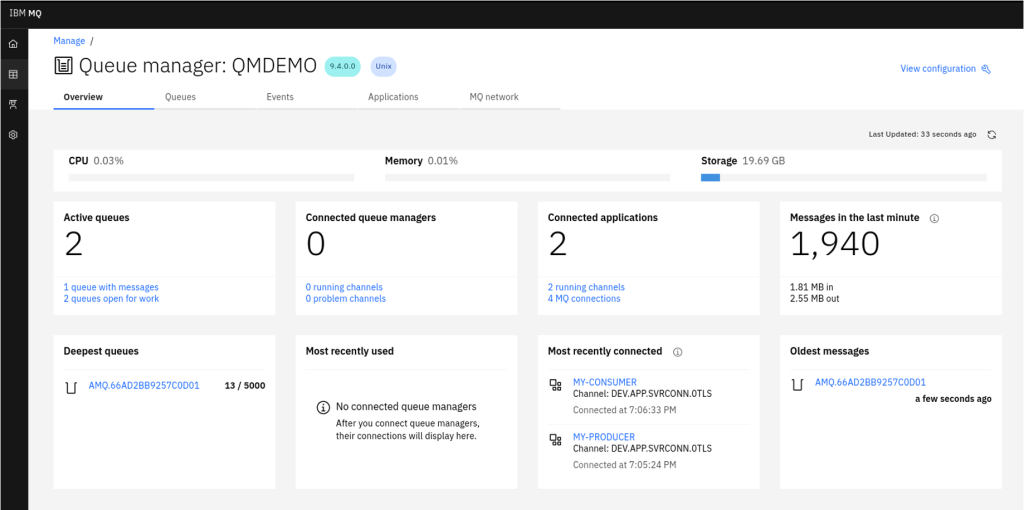
Figure 20. IBM MQ console showing queue activity.
Summary
We showed you how to deploy IBM MQ in ROSA and test it with sample message producer and consumer applications. These sample applications use the Source 2 Image (S2I) capability of Red Hat OpenShift. The S2I build takes the pom.xml and the source code from the repository, builds the container image and deploys it in the ROSA cluster.
If you want to run the producer and consumer applications from outside of the cluster you will need to compile them in your own environment and use TLS. To set certificate validation options see the IBM MQ documentation.
Visit AWS Marketplace to subscribe to IBM Integration solutions on AWS:
- IBM Cloud Pak for Integration
- IBM Cloud Pak for Integration (BYOL)
- IBM App Connect Enterprise (iPaaS)
- IBM App Connect Enterprise (Software)
- IBM MQ and IBM MQ Advanced (software)
- IBM API Connect – Full lifecycle API management
- IBM API Connect Enterprise (Software)
Further Content:
- Deploying IBM Cloud Pak for integration on Red Hat OpenShift Service on AWS
- Building an AWS CI/CD Pipeline for IBM API Connect Enterprise
- Running IBM MQ on AWS using High-performance Amazon FSx for NetApp ONTAP
- IBM MQ GitOps Samples
- IBM and Red Hat on AWS blogs
- What’s under the hood in CP4I
- IBM on AWS Partner Page
- IBM Cloud Pak for Integration on Red Hat Marketplace