AWS Architecture Blog
Deploying IBM Cloud Pak for integration on Red Hat OpenShift Service on AWS
Customers across many industries use IBM integration software, such as IBM MQ, DataPower, API Connect, and App Connect, as the backbone that integrates and orchestrates their business-critical workloads.
These customers often tell Amazon Web Services (AWS), they want to migrate their applications to AWS Cloud, as part of their business strategy: to lower costs, gain agility, and innovate faster.
In this blog, we will explore how customers, who are looking at ways to run IBM software on AWS, can use Red Hat OpenShift Service on AWS (ROSA) to deploy IBM Cloud Pak for Integration (CP4I) with modernized versions of IBM integration products.
As ROSA is a fully managed OpenShift service that is jointly supported by AWS and Red Hat, plus managed by Red Hat site reliability engineers, customers benefit from not having to manage the lifecycle of Red Hat OpenShift Container Platform (OCP) clusters.
This post explains the steps to:
- Create a ROSA cluster
- Configure persistent storage
- Install CP4I and the IBM MQ operator
Cloud Pak for integration architecture
In this blog, we are implementing a highly available ROSA cluster with three Availability Zones (AZ), three master nodes, three infrastructure nodes, and three worker nodes.
Review the AWS documentation for Regions and AZs and the regions where ROSA is available to choose the best region for your deployment.
Figure 1 demonstrates the solution’s architecture.

Figure 1. IBM Cloud Pak for Integration on ROSA architecture
In our scenario, we are building a public ROSA cluster, with an internet-facing Classic Load Balancer providing access to Ports 80 and 443. Consider using a ROSA private cluster when you are deploying CP4I in your AWS account.
We are using Amazon Elastic File System (Amazon EFS) and Amazon Elastic Block Store (Amazon EBS) for our cluster’s persistent storage. Review the IBM CP4I documentation for information about supported AWS storage options.
Review AWS prerequisites for ROSA and AWS Security best practices in IAM documentation, before deploying CP4I for production workloads, to protect your AWS account and resources.
Cost
You are responsible for the cost of the AWS services used when deploying CP4I in your AWS account. For cost estimates, see the pricing pages for each AWS service you use.
Prerequisites
Before getting started, review the following prerequisites:
- This blog assumes familiarity with: CP4I, ROSA, Amazon Elastic Compute Cloud (Amazon EC2), Amazon EBS, Amazon EFS, Amazon Virtual Private Cloud, AWS Cloud9, and AWS Identity and Access Management (IAM)
- Access to an AWS account, with permissions to create the resources described in the installation steps section
- Verification of the required AWS service quotas to deploy ROSA. If needed, you can request service quota increases from the AWS console
- Access to an IBM entitlement API key: either a 60-day trial or an existing entitlement
- Access to a Red Hat ROSA token; you can register on the Red Hat website to obtain one
- A bastion host to run the CP4I installation, we have used an AWS Cloud 9 workspace. You can use another device, provided it supports the required software packages:
Installation steps
To deploy CP4I on ROSA, complete the following steps:
-
-
-
- From the AWS ROSA console, click Enable ROSA to active the service on your AWS account (Figure 2).

Figure 2. Enable ROSA on your AWS account
- Create an AWS Cloud9 environment to run your CP4I installation. We used a t3.small instance type with Amazon Linux 2023.
- When it comes up, close the Welcome tab and open a new Terminal tab to install the required packages:
curl "https://awscli.amazonaws.com/awscli-exe-linux-x86_64.zip" -o "awscliv2.zip" unzip awscliv2.zip sudo ./aws/install wget https://mirror.openshift.com/pub/openshift-v4/clients/rosa/latest/rosa-linux.tar.gz sudo tar -xvzf rosa-linux.tar.gz -C /usr/local/bin/ rosa download oc sudo tar -xvzf openshift-client-linux.tar.gz -C /usr/local/bin/ sudo yum -y install jq gettext - Ensure the ELB service-linked role exists in your AWS account:
aws iam get-role --role-name "AWSServiceRoleForElasticLoadBalancing" || aws iam create-service-linked-role --aws-service-name "elasticloadbalancing.amazonaws.com" - Create an IAM policy named cp4i-installer-permissions with the following permissions:
{ { "Version": "2012-10-17", "Statement": [ { "Effect": "Allow", "Action": [ "autoscaling:*", "cloudformation:*", "cloudwatch:*", "ec2:*", "elasticfilesystem:*", "elasticloadbalancing:*", "events:*", "iam:*", "kms:*", "logs:*", "route53:*", "s3:*", "servicequotas:GetRequestedServiceQuotaChange", "servicequotas:GetServiceQuota", "servicequotas:ListServices", "servicequotas:ListServiceQuotas", "servicequotas:RequestServiceQuotaIncrease", "sts:*", "support:*", "tag:*" ], "Resource": "*" } ] } - Create an IAM role:
- Select AWS service and EC2, then click Next: Permissions.
- Select the cp4i-installer-permissions policy, and click Next.
- Name it cp4i-installer, and click Create role.
- From your AWS Cloud9 IDE, click the grey circle button on the top right, and select Manage EC2 Instance (Figure 3).

Figure 3. Manage the AWS Cloud9 EC2 instance
- On the Amazon EC2 console, select the AWS Cloud9 instance, then choose Actions / Security / Modify IAM Role.
- Choose cp4i-installer from the IAM Role drop down, and click Update IAM role (Figure 4).

Figure 4. Attach the IAM role to your workspace
- Update the IAM settings for your AWS Cloud9 workspace:
aws cloud9 update-environment --environment-id $C9_PID --managed-credentials-action DISABLE rm -vf ${HOME}/.aws/credentials - Configure the following environment variables:
export ACCOUNT_ID=$(aws sts get-caller-identity --query 'Account' --output text) TOKEN=$(curl -X PUT "http://169.254.169.254/latest/api/token" -H "X-aws-ec2-metadata-token-ttl-seconds: 21600") export AWS_REGION=$(curl -H "X-aws-ec2-metadata-token: $TOKEN" http://169.254.169.254/latest/meta-data/placement/region) export CLUSTER_NAME=cp4irosa export ROSA_VERSION=4.14.27 - Configure the aws cli default region:
aws configure set default.region ${AWS_REGION} - Navigate to the Red Hat Hybrid Cloud Console, and copy your OpenShift Cluster Manager API Token.
- Use the token and log in to your Red Hat account:
rosa login --token=<your_openshift_api_token> - Verify that your AWS account satisfies the quotas to deploy your cluster:
rosa verify quota - When deploying ROSA for the first time, create the account-wide roles:
rosa create account-roles --mode auto --yes - Create your ROSA cluster:
rosa create cluster --cluster-name $CLUSTER_NAME --sts \ --multi-az \ --region $AWS_REGION \ --version $ROSA_VERSION \ --compute-machine-type m6i.4xlarge \ --replicas 3 \ --availability-zones ${AWS_REGION}a,${AWS_REGION}b,${AWS_REGION}c \ --operator-roles-prefix $CLUSTER_NAME \ --mode auto --yes \ --watch - Once your cluster is ready, create a cluster-admin user (it takes approximately 5 minutes):
rosa create admin --cluster=$CLUSTER_NAME - Log in to your cluster using the cluster-admin credentials. You can copy the command from the output of the previous step. For example:
oc login https://<your_cluster_api_address>:6443 \ --username cluster-admin \ --password <your_cluster-admin_password> - Create an IAM policy allowing ROSA to use Amazon EFS:
cat << EOF > $PWD/efs-policy.json { "Version": "2012-10-17", "Statement": [ { "Effect": "Allow", "Action": [ "elasticfilesystem:DescribeAccessPoints", "elasticfilesystem:DescribeFileSystems", "elasticfilesystem:DescribeMountTargets", "elasticfilesystem:TagResource", "ec2:DescribeAvailabilityZones" ], "Resource": "*" }, { "Effect": "Allow", "Action": [ "elasticfilesystem:CreateAccessPoint" ], "Resource": "*", "Condition": { "StringLike": { "aws:RequestTag/efs.csi.aws.com/cluster": "true" } } }, { "Effect": "Allow", "Action": "elasticfilesystem:DeleteAccessPoint", "Resource": "*", "Condition": { "StringEquals": { "aws:ResourceTag/efs.csi.aws.com/cluster": "true" } } } ] } EOF POLICY=$(aws iam create-policy --policy-name "${CLUSTER_NAME}-rosa-efs-csi" \ --policy-document file://$PWD/efs-policy.json \ --query 'Policy.Arn' --output text) || \ POLICY=$(aws iam list-policies \ --query 'Policies[?PolicyName==`rosa-efs-csi`].Arn' \ --output text) - Create an IAM trust policy:
export OIDC_PROVIDER=$(oc get authentication.config.openshift.io cluster -o json | jq -r .spec.serviceAccountIssuer| sed -e "s/^https:\/\///") cat <<EOF > $PWD/TrustPolicy.json { "Version": "2012-10-17", "Statement": [ { "Effect": "Allow", "Principal": { "Federated": "arn:aws:iam::${ACCOUNT_ID}:oidc-provider/${OIDC_PROVIDER}" }, "Action": "sts:AssumeRoleWithWebIdentity", "Condition": { "StringEquals": { "${OIDC_PROVIDER}:sub": [ "system:serviceaccount:openshift-cluster-csi-drivers:aws-efs-csi-driver-operator", "system:serviceaccount:openshift-cluster-csi-drivers:aws-efs-csi-driver-controller-sa" ] } } } ] } EOF - Create an IAM role with the previously created policies:
ROLE=$(aws iam create-role \ --role-name "${CLUSTER_NAME}-aws-efs-csi-operator" \ --assume-role-policy-document file://$PWD/TrustPolicy.json \ --query "Role.Arn" --output text) aws iam attach-role-policy \ --role-name "${CLUSTER_NAME}-aws-efs-csi-operator" \ --policy-arn $POLICY - Create an OpenShift secret to store the AWS access keys:
cat <<EOF | oc apply -f - apiVersion: v1 kind: Secret metadata: name: aws-efs-cloud-credentials namespace: openshift-cluster-csi-drivers stringData: credentials: |- [default] role_arn = $ROLE web_identity_token_file = /var/run/secrets/openshift/serviceaccount/token EOF - Install the Amazon EFS CSI driver operator:
cat <<EOF | oc create -f - apiVersion: operators.coreos.com/v1 kind: OperatorGroup metadata: generateName: openshift-cluster-csi-drivers- namespace: openshift-cluster-csi-drivers --- apiVersion: operators.coreos.com/v1alpha1 kind: Subscription metadata: labels: operators.coreos.com/aws-efs-csi-driver-operator.openshift-cluster-csi-drivers: "" name: aws-efs-csi-driver-operator namespace: openshift-cluster-csi-drivers spec: channel: stable installPlanApproval: Automatic name: aws-efs-csi-driver-operator source: redhat-operators sourceNamespace: openshift-marketplace EOF - Track the operator installation:
watch oc get deployment aws-efs-csi-driver-operator \ -n openshift-cluster-csi-drivers - Install the AWS EFS CSI driver:
cat <<EOF | oc apply -f - apiVersion: operator.openshift.io/v1 kind: ClusterCSIDriver metadata: name: efs.csi.aws.com spec: managementState: Managed EOF - Wait until the CSI driver is running:
watch oc get daemonset aws-efs-csi-driver-node \ -n openshift-cluster-csi-drivers - Create a rule allowing inbound NFS traffic from your cluster’s VPC Classless Inter-Domain Routing (CIDR):
NODE=$(oc get nodes --selector=node-role.kubernetes.io/worker \ -o jsonpath='{.items[0].metadata.name}') VPC=$(aws ec2 describe-instances \ --filters "Name=private-dns-name,Values=$NODE" \ --query 'Reservations[*].Instances[*].{VpcId:VpcId}' \ --region $AWS_REGION \ | jq -r '.[0][0].VpcId') CIDR=$(aws ec2 describe-vpcs \ --filters "Name=vpc-id,Values=$VPC" \ --query 'Vpcs[*].CidrBlock' \ --region $AWS_REGION \ | jq -r '.[0]') SG=$(aws ec2 describe-instances --filters \ "Name=private-dns-name,Values=$NODE" \ --query 'Reservations[*].Instances[*].{SecurityGroups:SecurityGroups}' \ --region $AWS_REGION \ | jq -r '.[0][0].SecurityGroups[0].GroupId') aws ec2 authorize-security-group-ingress \ --group-id $SG \ --protocol tcp \ --port 2049 \ --cidr $CIDR | jq . - Create an Amazon EFS file system:
EFS=$(aws efs create-file-system --creation-token efs-token-1 \ --region ${AWS_REGION} \ --encrypted | jq -r '.FileSystemId') SUBNETS=$( aws ec2 describe-subnets \ --filters Name=vpc-id,Values=$VPC Name='tag:kubernetes.io/role/internal-elb',Values='*' \ --query 'Subnets[*].{SubnetId:SubnetId}' \ --region $AWS_REGION \ | jq -r '.[].SubnetId') for subnet in ${SUBNETS[@]}; do aws efs create-mount-target --file-system-id $EFS \ --subnet-id $subnet --security-groups $SG \ --region $AWS_REGION done - Create an Amazon EFS storage class:
cat <<EOF | oc apply -f - kind: StorageClass apiVersion: storage.k8s.io/v1 metadata: name: efs-sc provisioner: efs.csi.aws.com parameters: provisioningMode: efs-ap fileSystemId: $EFS directoryPerms: "777" gidRangeStart: "1000" gidRangeEnd: "7000000" basePath: "/cp4irosa" EOF - Create the following IAM Policy to install the cert-manager Operator for Red Hat OpenShift:
cat <<EOF > $PWD/cert-manager-policy.json { "Version": "2012-10-17", "Statement": [ { "Effect": "Allow", "Action": "route53:GetChange", "Resource": "arn:aws:route53:::change/*" }, { "Effect": "Allow", "Action": [ "route53:ChangeResourceRecordSets", "route53:ListResourceRecordSets" ], "Resource": "arn:aws:route53:::hostedzone/*" }, { "Effect": "Allow", "Action": "route53:ListHostedZonesByName", "Resource": "*" } ] } EOF CERTMANAGER_POLICY=$(aws iam create-policy --policy-name "${CLUSTER_NAME}-cert-manager-policy" \ --policy-document file://$PWD/cert-manager-policy.json \ --query 'Policy.Arn' --output text) - Create a trust policy:
cat <<EOF > $PWD/CertManagerTrustPolicy.json { "Version": "2012-10-17", "Statement": [ { "Effect": "Allow", "Principal": { "Federated": "arn:aws:iam::${ACCOUNT_ID}:oidc-provider/${OIDC_PROVIDER}" }, "Action": "sts:AssumeRoleWithWebIdentity", "Condition": { "StringEquals": { "${OIDC_PROVIDER}:sub": [ "system:serviceaccount:cert-manager:cert-manager" ] } } } ] } EOF - Create an IAM Role for the cert-manager Operator and attach the permissions policy created on step 31. Take note of the role ARN; you will use it on step 43.
CERTMANAGER_ROLE=$(aws iam create-role \ --role-name "${CLUSTER_NAME}-cert-manager-operator" \ --assume-role-policy-document file://$PWD/CertManagerTrustPolicy.json \ --query "Role.Arn" --output text) echo $CERTMANAGER_ROLE aws iam attach-role-policy \ --role-name "${CLUSTER_NAME}-cert-manager-operator" \ --policy-arn $CERTMANAGER_POLICY - Add the IBM catalog sources to OpenShift:
cat <<EOF | oc apply -f - apiVersion: operators.coreos.com/v1alpha1 kind: CatalogSource metadata: name: ibm-operator-catalog namespace: openshift-marketplace annotations: olm.catalogImageTemplate: "icr.io/cpopen/ibm-operator-catalog:v{kube_major_version}.{kube_minor_version}" spec: displayName: IBM Operator Catalog publisher: IBM sourceType: grpc image: icr.io/cpopen/ibm-operator-catalog:latest updateStrategy: registryPoll: interval: 45m EOF - Get the console URL of your ROSA cluster:
rosa describe cluster --cluster=CLUSTER_NAME | grep Console - Copy your entitlement key from the IBM container software library.
- Log in to your ROSA web console, navigate to Workloads > Secrets.
- Set the project to openshift-config; locate and click pull-secret (Figure 5).

Figure 5. Edit the pull-secret entry
- Expand Actions and click Edit Secret.
- Scroll to the end of the page, and click Add credentials (Figure 6):
- Registry server address: cp.icr.io
- Username field: cp
- Password: your_ibm_entitlement_key

Figure 6. Configure your IBM entitlement key secret
- Next, navigate to Operators > OperatorHub. On the OperatorHub page, use the search filter to locate the tile for the cert-manager Operator for Red Hat OpenShift.
- Choose cert-manager Operator for Red Hat OpenShift and choose Install.
- In the role ARN field, enter the ARN of the role create on step 33. Set the Update approval option to Automatic, leave all other values as the default, and choose Install.
- Next, install the operators in the following list, on all namespaces, leaving all default options. Figure 7 shows the installation of the IBM Cloud Pak for Integration Operator.
- IBM Cloud Pak foundational services – select Channel v4.6
- IBM Cloud Pak for Integration – select Channel v7.2
- IBM MQM – select Channel v3.1
Figure 7 shows the installation of the IBM Cloud Pak for Integration Operator.

Figure 7. Install CP4I operators
- Create the following namespaces for CP4I:
oc new-project ibm-common-services oc new-project integration - Review the IBM documentation to select the appropriate license for your deployment.
- Deploy the platform UI:
cat <<EOF | oc apply -f - apiVersion: integration.ibm.com/v1beta1 kind: PlatformNavigator metadata: name: integration-quickstart labels: backup.integration.ibm.com/component: platformnavigator namespace: integration spec: license: accept: true license: L-VTPK-22YZPK replicas: 1 version: 2023.4.1 EOF - Track the deployment status, which takes approximately 40 minutes:
watch oc get platformnavigator -n integration - Create an IBM MQ queue manager instance:
cat <<EOF | oc apply -f - apiVersion: mq.ibm.com/v1beta1 kind: QueueManager metadata: name: qmgr-inst01 namespace: ibm-mq spec: license: accept: true license: L-RJON-CD3JKX use: NonProduction web: enabled: true template: pod: containers: - env: - name: MQSNOAUT value: 'yes' name: qmgr queueManager: resources: limits: cpu: 500m requests: cpu: 500m availability: type: SingleInstance storage: queueManager: type: persistent-claim class: gp3 deleteClaim: true size: 2Gi defaultClass: gp3 name: CP4IQMGR version: 9.3.0.1-r1 EOF - Check the status of the queue manager:
oc describe queuemanager qmgr-inst01 -n ibm-mq
- From the AWS ROSA console, click Enable ROSA to active the service on your AWS account (Figure 2).
Validation steps
Let’s verify our installation!
- Run the commands to retrieve the CP4I URL and administrator password:
oc describe platformnavigator integration-quickstart \ -n integration | grep "^.*UI Endpoint" | xargs | cut -d ' ' -f3 oc get secret platform-auth-idp-credentials \ -n ibm-common-services -o jsonpath='{.data.admin_password}' \ | base64 -d && echo - Using the information from the previous step, access your CP4I web console.
- Select the option to authenticate with the IBM provided credentials (admin only) to login with your admin password.
- From the CP4I console, you can manage users and groups allowed to access the platform, install new operators, and view the components that are installed.
- Click qmgr-inst01 in the Messaging widget to bring up your IBM MQ setup (Figure 8).
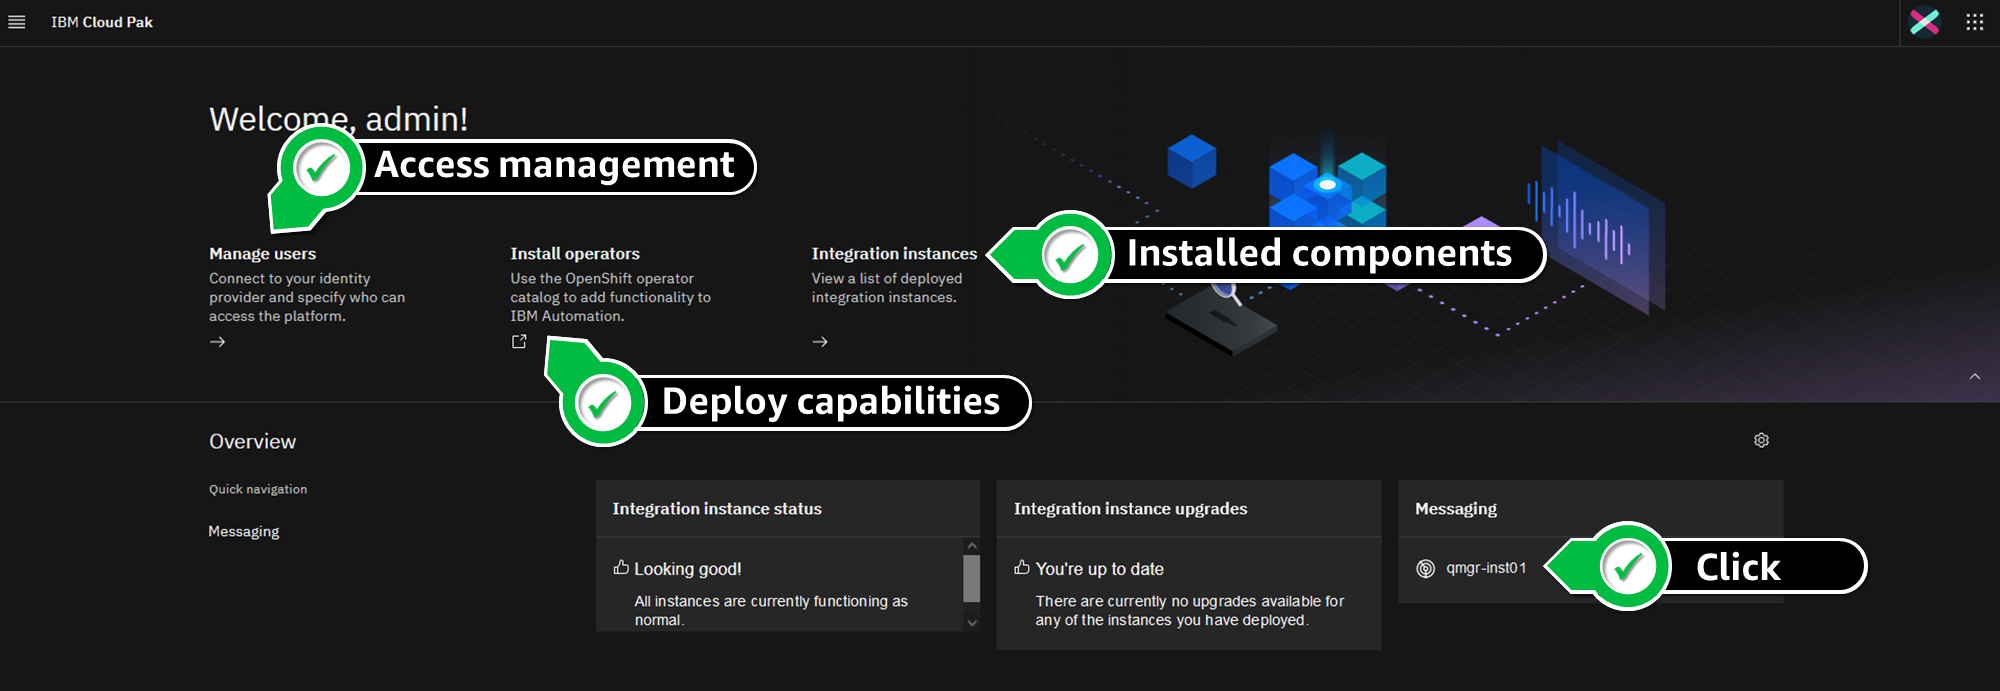
Figure 8. CP4I console features
- In the Welcome to IBM MQ panel, click the CP4IQMGR queue manager. This shows the state, resources, and allows you to configure your instances (Figure 9).

Figure 9. Queue manager details
Congratulations! You have successfully deployed IBM CP4I on Red Hat OpenShift on AWS.
Post installation
Review the following topics, when you are installing CP4I on production environments:
- Configuring identity providers on ROSA
- Configure identity and access management on CP4I
- Deploying instances of capabilities, like API Connect, App Connect, and DataPower
- Enable auto scaling for your ROSA cluster
- Configure logging and enable monitoring for your ROSA cluster
- Considerations for Amazon EFS to setup IBM MQ using Amazon EFS storage classes.
Cleanup
Connect to your Cloud9 workspace, and run the following steps to delete the CP4I installation, including ROSA. This avoids incurring future charges on your AWS account:
EFS_EF_ID=$(aws efs describe-file-systems \
  --query 'FileSystems[?Name==`ibm_cp4i_fs`].FileSystemId' \
  --output text)
MOUNT_TARGETS=$(aws efs describe-mount-targets --file-system-id $EFS_EF_ID --query 'MountTargets[*].MountTargetId' --output text)
for mt in ${MOUNT_TARGETS[@]}; do
  aws efs delete-mount-target --mount-target-id $mt
done
aws efs delete-file-system --file-system-id $EFS_EF_ID

rosa delete cluster -c $CLUSTER_NAME --yes --region $AWS_REGION
Monitor your cluster uninstallation logs, run:
rosa logs uninstall -c $CLUSTER_NAME --watchOnce the cluster is uninstalled, remove the operator-roles and oidc-provider, as informed in the output of the rosa delete command. For example:
rosa delete operator-roles -c 1vepskr2ms88ki76k870uflun2tjpvfs --mode auto –yes
rosa delete oidc-provider -c 1vepskr2ms88ki76k870uflun2tjpvfs --mode auto --yes
Conclusion
This post explored how to deploy CP4I on AWS ROSA. We also demonstrated how customers can take full advantage of managed OpenShift service, focusing on further modernizing application stacks by using AWS managed services (like ROSA) for their application deployments.
If you are interested in learning more about ROSA, take part in the AWS ROSA Immersion Workshop.
Check out the blog on Running IBM MQ on AWS using High-performance Amazon FSx for NetApp ONTAP to learn how to use Amazon FSx for NetApp ONTAP for distributed storage and high availability with IBM MQ.
For more information and getting started with IBM Cloud Pak deployments, visit the AWS Marketplace for new offerings.
Further reading
-
-