AWS Marketplace
Building an AWS CI/CD Pipeline for IBM API Connect Enterprise
Many Amazon Web Services (AWS) customers using cloud native services combined with a Partner SaaS product like IBM API Connect can benefit from having continuous integration and continuous delivery (CI/CD) pipelines. CI/CD pipelines can help you automate software processes throughout the development, testing, production, and monitoring phases of the software development lifecycle. CI/CD pipeline usages help developers reduce manual errors, ensure consistent processes, and enable fast product iterations.
IBM API Connect is a secure API management solution that helps you consistently create, manage, secure, socialize, and monetize APIs. The IBM API Connect developer toolkit provides a command-line tool, apic, that you can use to perform all API Connect tasks. You can also use the command-line tool to script tasks such as continuous integration and delivery.
Using a CI/CD pipeline with IBM API Connect can help simplify and streamline your API publishing and testing workflows. In this blog post, Senthil and I will show you how to set up AWS CodePipeline (CodePipeline) to build an API Connect CI/CD pipeline to publish and test APIs and product changes.
Solution overview
The following diagram shows the solution architecture.
- CodePipeline source stage pulls API and product files from the AWS CodeCommit (CodeCommit) repository.
- AWS CodeBuild (CodeBuild) build project pulls buildspec file from CodeCommit repository.
- CodePipeline source stage passes API and project files to build stage.
- CodePipeline build stage pulls the build project from CodeBuild.
- CodePipeline build stage connects and publishes Product to the API Connect Manager.
- API Manager pushes the APIs to the API Connect Gateway.
Refer to the following diagram.
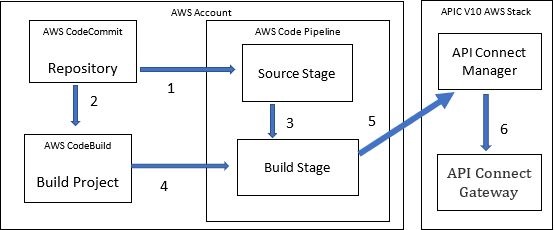
CI/CD Architecture
Prerequisites
In order to implement this solution, you must be familiar with the following AWS services:
- AWS CodeCommit: AWS CodeCommit is a secure, highly scalable, managed source control service for hosting private Git repositories. For more details, see AWS CodeCommit Documentation.
- AWS CodeBuild with CodeBuild projects: CodeBuild is an AWS managed build service. It is used to compile source code, run unit tests, and it produces artifacts that are ready to deploy. For more details using CodeBuild, see the CodeBuild User Guide. For more information on building a CodeBuild project, refer to Codebuild Create Project.
- Buildspec files: CodeBuild requires a buildspec file with default name as buildspec.yml. A buildspec is a collection of build commands and related settings, in YAML format, that CodeBuild uses to run a build. You can include a buildspec as part of the source code or you can define a buildspec when you create a build project. For more details how to create a buildspec, reference Build-Spec-Reference-Link.
- AWS CodePipeline: AWS CodePipeline is a continuous delivery service you can use to model, visualize, and automate the steps required to release your software.
- You also need an IBM API Connect deployment, available in AWS Marketplace.
Solution walkthrough: Building an AWS CI/CD pipeline for IBM API Connect Enterprise
There are three major steps in setting up the CI/CD pipeline in AWS:
- Creating a CodeCommit repository
- Building a CodeBuild project
- Putting it all together using CodePipeline
A. Create a CodeCommit repository
API Connect uses OpenAPI files to define APIs and products.
- To start building your CI/CD pipeline, you must create a CodeCommit repository. To do that, follow Step 1 here.
- When the new repository opens, you see information about how to add files directly from the CodeCommit console. Add the following OpenAPI files to your new repository (ours is named demorepo1) by following Step 2 in the documentation:
-
- API files that implement the invoke and proxy policies testinvokeapi.yml and testproxyapi.yml
- Product files which contain the invoke and proxy APIs and plans testinvokeproduct.yml and testproxyproduct.yml
- Project build file which will be used in CodeBuild project buildspec.yml (example in section B.3)
B. Build a CodeBuild project
To create a project in AWS CodeBuild, follow these steps:
- Project configuration, source, and environment Open the AWS CodeBuild console. Then follow the directions to create a build project listed here. Use the following parameters for Project configuration, Source, and Environment:
- Project configuration On the Project configuration section, under Project name, enter My_Project_Name. Leave the description field blank.
- Source On the Source section, under Source provider, choose AWS CodeCommit from the dropdown menu. For Repository, enter demorepo1. For Reference type, choose Branch.
- Environment On the Environment section, under Environment image, choose Managed image. For Operating system, choose Amazon Linux 2 from the dropdown. For Runtime(s), choose Standard. For Image, choose aws/codebuild/amazonlinux2-aarch64-standard:2. For Image version, choose Always use the latest image for this runtime version. For Service role, choose New service role. For Role name, enter codebuild-blog-service-role.
- Environment variables When you get to the Environment variables step, enter the following names and values to use in the following CodeBuild scripts. For each, choose a Type of Plaintext. We have provided a brief explanation of each, which should not be entered in your environment variables configuration.
Name Value Explanation SERVER_HOSTNAME api-manager.xxxxxxxx.xxxx.xxxx.cloud.xxxx.com The server hostname is the API Connect Enterprise Service Manager endpoint URL, which we use to log in to the API Connect instance. GW_HOSTNAME legacy.xxxx.xxxxx.xxxx.ibmappdomain.cloud This is the Gateway endpoint URL configured in the API Connect instance. CATALOG_NAME catalog2 This is the catalog name in the API Connect instance. ORG_NAME demo-provider-org-06 This is the provider org name in the API Connect instance. APIKEY 519ec3b6-xxxx-xxxx-xxxx-cad04b5f7fa4 This is the instance key, which we use to log in to the API Connect instance. Obtain this key using the toolkit command: $apic-slim login -s api-manager.xxxxxxxx.xxxx.xxx.xxxx.com –context provider –sso - Buildspec – Our buildspec has four phases:
-
- Install
- Prebuild
- Build
- Post build
To create a buildspec file for this build, you can use a code editor of your choice such as AWS Cloud 9 or VS Code, do the following:
-
- In the install phase, we get the API Connect Toolkit directly from the API Connect instance using Wget/cURL and then extract the .tar file and change the toolkit file permission for execution. To do that, in the code editor of your choice, enter the following commands:
wget  https://${SERVER_HOSTNAME}/client-downloads/toolkit-linux.tgz
tar -zxf toolkit-linux.tgz
chmod a+x apic-slim
-
- In the prebuild phase, we connect CodeBuild to the API Connect instance by logging into the instance using the toolkit login command. To do that, in the code editor, add the following command:
./apic-slim login --accept-license --live-help -s ${SERVER_HOSTNAME} --context provider --sso --apiKey ${APIKEY}-
- In the build phase, we issue toolkit draft-products:delete commands to delete the existing draft products testinvokeproduct, testproxyproduct. To do that, in the code editor, add the following commands:
./apic-slim -s ${SERVER_HOSTNAME} -o ${ORG_NAME} draft-products:delete testinvokeproduct:1.0.0
./apic-slim -s ${SERVER_HOSTNAME} -o ${ORG_NAME} draft-products:delete testproxyproduct:1.0.0
Then, we create new draft products using command draft-products:create and product definition YAML file. The product file testinvokeproduct.yaml refers to the APIs in the product via a reference. The reference($ref) points to an OpenAPI file, for example testinvokeapi.yaml. To do that, in the code editor, add the following commands:
./apic-slim -s ${SERVER_HOSTNAME} -o ${ORG_NAME} draft-products:create testinvokeproduct.yaml
./apic-slim -s ${SERVER_HOSTNAME} -o ${ORG_NAME} draft-products:create testproxyproduct.yaml
Then stage and publish the products using the products:publish command by adding the following commands:
./apic-slim -s ${SERVER_HOSTNAME} -o ${ORG_NAME} products:publish -c catalog2 --stage testinvokeproduct.yaml
./apic-slim -s ${SERVER_HOSTNAME} -o ${ORG_NAME} products:publish -c catalog2 testinvokeproduct.yaml
./apic-slim -s ${SERVER_HOSTNAME} -o ${ORG_NAME} products:publish -c catalog2 --stage testproxyproduct.yaml
./apic-slim -s ${SERVER_HOSTNAME} -o ${ORG_NAME} products:publish -c catalog2 testproxyproduct.yaml
-
- In the last phase, the post build phase, test the APIs using curl GET commands on the API Connect gateway, where the APIs were published. The API URL consists of the gateway hostname, Provider Org Name, the Catalog Name where the product is published, followed by the API basepath and API path in steps 3.a-c. To do that, add the following commands; you can see the basepath and path definition in the YAML files:
curl -ks https://${GW_HOSTNAME}/${ORG_NAME}/${CATALOG_NAME}/testinvokeapi/gettestinvokeapi
curl -ks https://${GW_HOSTNAME}/${ORG_NAME}/${CATALOG_NAME}/testproxyapi/getxml
At this point, the CodeBuild buildspec.yml should resemble this example:
version: 0.2

  env:
    variables:
       SERVER_HOSTNAME: 	"api-manager.xxxxxxxx.xxxx.xxxx.ibm.com"
       ORG_NAME: 		"demo-provider-org-06"
       GW_HOSTNAME:		"api.xxxx.xxxxx.xxxx.ibmappdomain.cloud "
       CATALOG_NAME: 		"catalog2"
       APIKEY: 			"519ec3b6-xxxx-xxxx-xxxx-cad04b5f7fa4"

  phases:
     install:
       commands:
         - wget  https://${SERVER_HOSTNAME}/client-downloads/toolkit-linux.tgz
         - tar -zxf toolkit-linux.tgz
         - chmod a+x apic-slim

     pre_build:
       commands:
         - ./apic-slim login --accept-license --live-help -s ${SERVER_HOSTNAME} --context provider --sso --apiKey ${APIKEY}

     build:
       commands:
         - ./apic-slim -s ${SERVER_HOSTNAME} -o ${ORG_NAME} draft-products:delete testinvokeproduct:1.0.0
         - ./apic-slim -s ${SERVER_HOSTNAME} -o ${ORG_NAME} draft-products:create testinvokeproduct.yaml
         - ./apic-slim -s ${SERVER_HOSTNAME} -o ${ORG_NAME} products:publish -c catalog2 --stage testinvokeproduct.yaml
         - ./apic-slim -s ${SERVER_HOSTNAME} -o ${ORG_NAME} products:publish -c catalog2 testinvokeproduct.yaml
         - ./apic-slim -s ${SERVER_HOSTNAME} -o ${ORG_NAME} draft-products:delete testproxyproduct:1.0.0
         - ./apic-slim -s ${SERVER_HOSTNAME} -o ${ORG_NAME} draft-products:create testproxyproduct.yaml
         - ./apic-slim -s ${SERVER_HOSTNAME} -o ${ORG_NAME} products:publish -c catalog2 --stage testproxyproduct.yaml
         - ./apic-slim -s ${SERVER_HOSTNAME} -o ${ORG_NAME} products:publish -c catalog2 testproxyproduct.yaml

     post_build:
       commands:
         - echo "Test APIs published"
         - curl -ks https://${GW_HOSTNAME}/${ORG_NAME}/${CATALOG_NAME}/testinvokeapi/gettestinvokeapi
         - curl -ks https://${GW_HOSTNAME}/${ORG_NAME}/${CATALOG_NAME}/testproxyapi/getxml
         - echo Build completed and tested on `date`
If the build failed, in the CodePipeline console, go to Projects and then demoproject1 to review the Build logs for detail on the issue.
We used the toolkit commands in the buildspec.yml to complete API lifecycle operations. For more details using the toolkit commands, refer to the IBM documentation ApiConnect/Toolkit-command-line-reference.
4. As an optional item, you can select Amazon CloudWatch logs and define a CloudWatch group name.
5. To start the CodeBuild project creation, choose Create project.
The next step is to validate that the CodeBuild project is functioning. It may take you multiple iterations to be able to successfully complete this step.
C. Putting it all together using CodePipeline
To put this solution together, you must create and test a code pipeline. To do that, do the following:
- To create a CodePipeline, navigate to the CodePipeline console. In the left panel, select Pipelines and then Create new pipeline.
- On Step 1 Choose pipeline settings, enter a Pipeline name. We entered demopipeline1. For Service role, choose New service role. Enter a name for the Role name; we entered AWSCodePipelineServiceRole-us-east-1-demopipeline1. Next to Allow AWS CodePipeline to create a service role so it can be used with this new pipeline, check the checkbox. Choose Next.
- On Step 2 Add source stage, for Source provider, choose AWS CodeCommit. For Repository name, chose demorepo1. For Branch name, choose batch. For Change detection options, choose amazon CloudWatch Events (recommended). For Output artifact format, choose CodePipeline default. In the lower right, choose Next.
- On the Add build stage step, For Build Provider, choose AWS CodeBuild. For Region, choose US East (N. Virginia). For the Project name, enter your project name; we entered demoproject 1. For Build type, choose Single build. In the lower right, choose Next.
- Next is the deploy stage. However, since the API Connect instance is already deployed, you can skip this stage.
- On the Step 5: Review page, review your pipeline configuration, and then choose Create pipeline.
On the success page, you’ll see that your CodePipeline execution has two stages. The Source stage gathers all the files from the CodeCommit repository created in step 1. The build stage executes the CodeBuild project created in step 2.
The following CodePipeline screenshot shows that both the Source and Build succeeded for demopipeline1.

In the CodePipeline console, you can also review the Pipelines list and see that demopipeline1’s most recent execution is listed as Succeeded, as shown in the following screenshot.

After the CodePipeline is executed successfully, the APIs and products are now published to your API Connect Gateway.
- To test the CodePipeline, do the following:
-
- In your testinvokeproduct, change the APIs and Product OpenAPI files as follows:
-
-
- In the testinvokeapi.yml, change the Invoke policy API target-url to point to a different URL.
- In the testproxyapi.yml, change the Proxy policy API target-url to point to a different URL.
- In the testinvokeproduct.yml, change the Plan rate-limit to 300/hour.
- In the testproxyproduct.yml, change the Plan rate-limit to 500/hour.
-
-
- Create a commit for these changes to the CodeCommit repository. This repository commit starts a CodePipeline execution, so in the CodePipeline console, the Orders-API-Pipeline Most recent execution status now shows as Succeeded. Additionally, demopipeline1’s Most recent execution status changed to In progress, which verifies the CI/CD process. Refer to the following screenshot.

-
- We also confirmed that the changes were published by invoking the APIs outside of the CodePipeline environment. In the API Connect Instance Swagger Source, we can see the modified URLs were invoked, and the Product Rate Plans were changed.
Cleanup
To delete the AWS resources that were created as part of this blog follow the steps in our documentation as below:
Conclusion
In this blog post, post Senthil and I showed how to simplify and streamline your API publishing and testing workflows. We showed how to build an AWS CI/CD pipeline for IBM API Connect Enterprise using IBM API Connect in the AWS CI/CD process to publish and test APIs and product changes. You can extend this pipeline to support more complex CI/CD CodePipelines with AWS Secrets Manager and other AWS services for more integration with the API Connect product to manage your API lifecycle. IBM API Connect is a security-rich API management solution that uses an intuitive experience to help consistently create, manage, secure, socialize and monetize APIs.
About the authors
Joaquim Zuzarte is a developer on the IBM API Connect team. He develops and supports all versions of API Connect Management Servers. He enjoys working in on premises, cloud, and hybrid cloud environments and demystifying new technology for customers and colleagues. In his spare time, he enjoys learning new technology and hiking.
 Senthil Nagaraj is a Partner Solutions Architect with Amazon Web Services and is based in Virginia. He enjoys providing creative solutions for customer problems, while still being fascinated by how cloud computing is driving the art of possible.