AWS for Industries
Achieving distinct IP identity with AWS for enhanced control and connectivity
How your IP addresses are perceived plays a critical role in ensuring reliable communication with external services. Whether you’re a telecom provider routing customer traffic, a software-as-a-service (SaaS) platform engaging with business partners, or an enterprise application reaching users across the internet, the perception of your IP space directly affects accessibility and service continuity.
Although often conflated with abuse, perception and abuse are distinct concerns. Abuse refers to malicious or undesirable activity from an IP, whereas perception is about how external systems classify and treat that IP, whether they accept, filter, or block its traffic.
For organizations that require consistent, broad reachability to services they don’t directly control, having a distinct IP identity on Amazon Web Services (AWS) is particularly relevant. AWS is vast and dynamic, and having a distinct IP identity allows for more control over how traffic is perceived. As a result, organizations can avoid the broad, cautious filtering policies some third parties apply to large, shared IP spaces in public clouds. With their own IP identity, organizations gain greater influence over how their traffic is treated, decoupling from generalized filtering and shaping their own experience with greater stability, predictability, and control.
Why IP perception matters
For businesses that depend on reliable internet reachability, how their IP traffic is perceived plays a crucial role in determining whether it’s accepted or rejected by critical external services. Without granular control over each service they interact with on the internet, businesses rely on external perception of their IP space to ensure their traffic is recognized correctly. If an organization’s IP space is associated with a negative posture or is grouped into a broader range that some services choose to filter, it can lead to blocked requests, degraded performance, or reduced service quality.
This challenge becomes more visible in cloud environments, where IP ranges are large and dynamic. Some third-party services apply broad filtering policies that can affect traffic merely because it originates from a shared IP space. These conservative approaches are driven by association, not by the actual intent or quality of the traffic. As a result, providing reliable, uninterrupted service requires organizations to differentiate their IP identity from the larger shared pool.
This issue affects multiple industries, especially those that need broad, unrestricted internet reachability to connect with numerous external services. These industries often lack control over each service they communicate with, making the perception and treatment of their IP space by others critically important. The following are a few examples:
- Telecom service providers that use AWS IP ranges and Autonomous System Number (ASN) to break out their subscribers’ internet traffic to the public internet (often referred to as Gi or N6 interface in mobile networks).
- Business-to-business (B2B) SaaS platforms that need to establish outbound connections with a wide range of business partners might face similar filtering challenges if their traffic appears to originate from dynamically assigned cloud IPs.
- Enterprises that need to connect to external APIs, financial institutions, or security-sensitive services might encounter restrictions if they rely on general-purpose cloud IPs.
For businesses requiring broad, unrestricted internet reachability, perception is not about being good or bad, it’s about clarity of ownership. With a distinct IP identity and ASN, organizations can say with certainty: this is us, not AWS. This clear ownership allows third parties to treat traffic based on its true origin, giving organizations the accountability and control they need. Instead of being subject to generalized filtering, they gain the ability to influence how their traffic is handled, which means their services are recognized, reachable, and aligned with the experience their users deserve.
Separating your IPs from general cloud traffic
For organizations that need greater control over how their traffic is perceived, a key strategy is decoupling their IP space from the general AWS IP space. Businesses can establish a distinct IP identity that isn’t affected by the broad filtering policies often applied to shared cloud traffic.
For example, telcos breaking out subscriber internet traffic over AWS benefit significantly from using their own IP space. This approach helps minimize the risk of generalized blocking and enhance service quality. Similarly, enterprises and SaaS providers interacting with sensitive external systems can achieve improved deliverability by maintaining distinct IP separation.
By actively shaping how their traffic is seen and making it stand apart from cloud-generated activity, organizations can mitigate filtering challenges and maintain reliable internet reachability.
Key steps to bring your own IP presence to AWS
So that their traffic is recognized as distinct from the broader AWS IP footprint, organizations should bring their own IP and bring their own ASN.
Bring your own IP (BYOIP)
Bringing your own public IPv4 addresses to AWS means that your IPs are reserved exclusively for your services and aren’t mixed with general AWS traffic. This process involves two parts:
- Bring IPv4 CIDR to IP Address Manager (IPAM) – Import existing public IPv4 CIDR blocks into Amazon Virtual Private Cloud (Amazon VPC) IPAM.
- Allocate elastic IP addresses – Use the imported CIDR blocks to allocate elastic IPs for the related AWS resources.
This method allows organizations to maintain consistency with their existing IP address space and can facilitate smoother integration with on-premises systems. For detailed instructions, check out this Tutorial: Bring your IP addresses to IPAM.
Bring your own ASN (BYOASN)
An ASN is a unique identifier assigned to an Autonomous System (AS) in the global internet routing system. An AS is a collection of IP networks and routers under a single administrative domain, such as an internet service provider (ISP) or a large enterprise network.
Organizations can use BYOASN in AWS to advertise their IP addresses brought to AWS using their own global unique ASN, instead of the AWS ASN, which is commonly associated with general Amazon Elastic Compute Cloud (Amazon EC2) traffic. With BYOASN, all traffic from the organization’s IP space carries its own ASN, making a clear distinction from the AWS shared ASN. This way, traffic is recognized as originating from the service provider’s network, not from the broader AWS infrastructure. Organizations then have greater control over their network’s identity and reduces the likelihood of external impacts targeting the AWS ASN.
For detailed instructions, visit Tutorial: Bring your ASN to IPAM. Additionally, AWS has now integrated the BYOIP and BYOASN processes, so both can be handled seamlessly from the same solution.
Solution overview: Separating your IPs from general AWS infrastructure
In this section, we walk through a practical guide to separate your IP space from AWS shared infrastructure. This walkthrough covers bringing your own IPs to AWS with IPAM, implementing BYOASN strategy, and handling multi-account and multi-Region environments. It includes AWS IPAM configurations for top-level and child-level pools and resource sharing using AWS RAM.
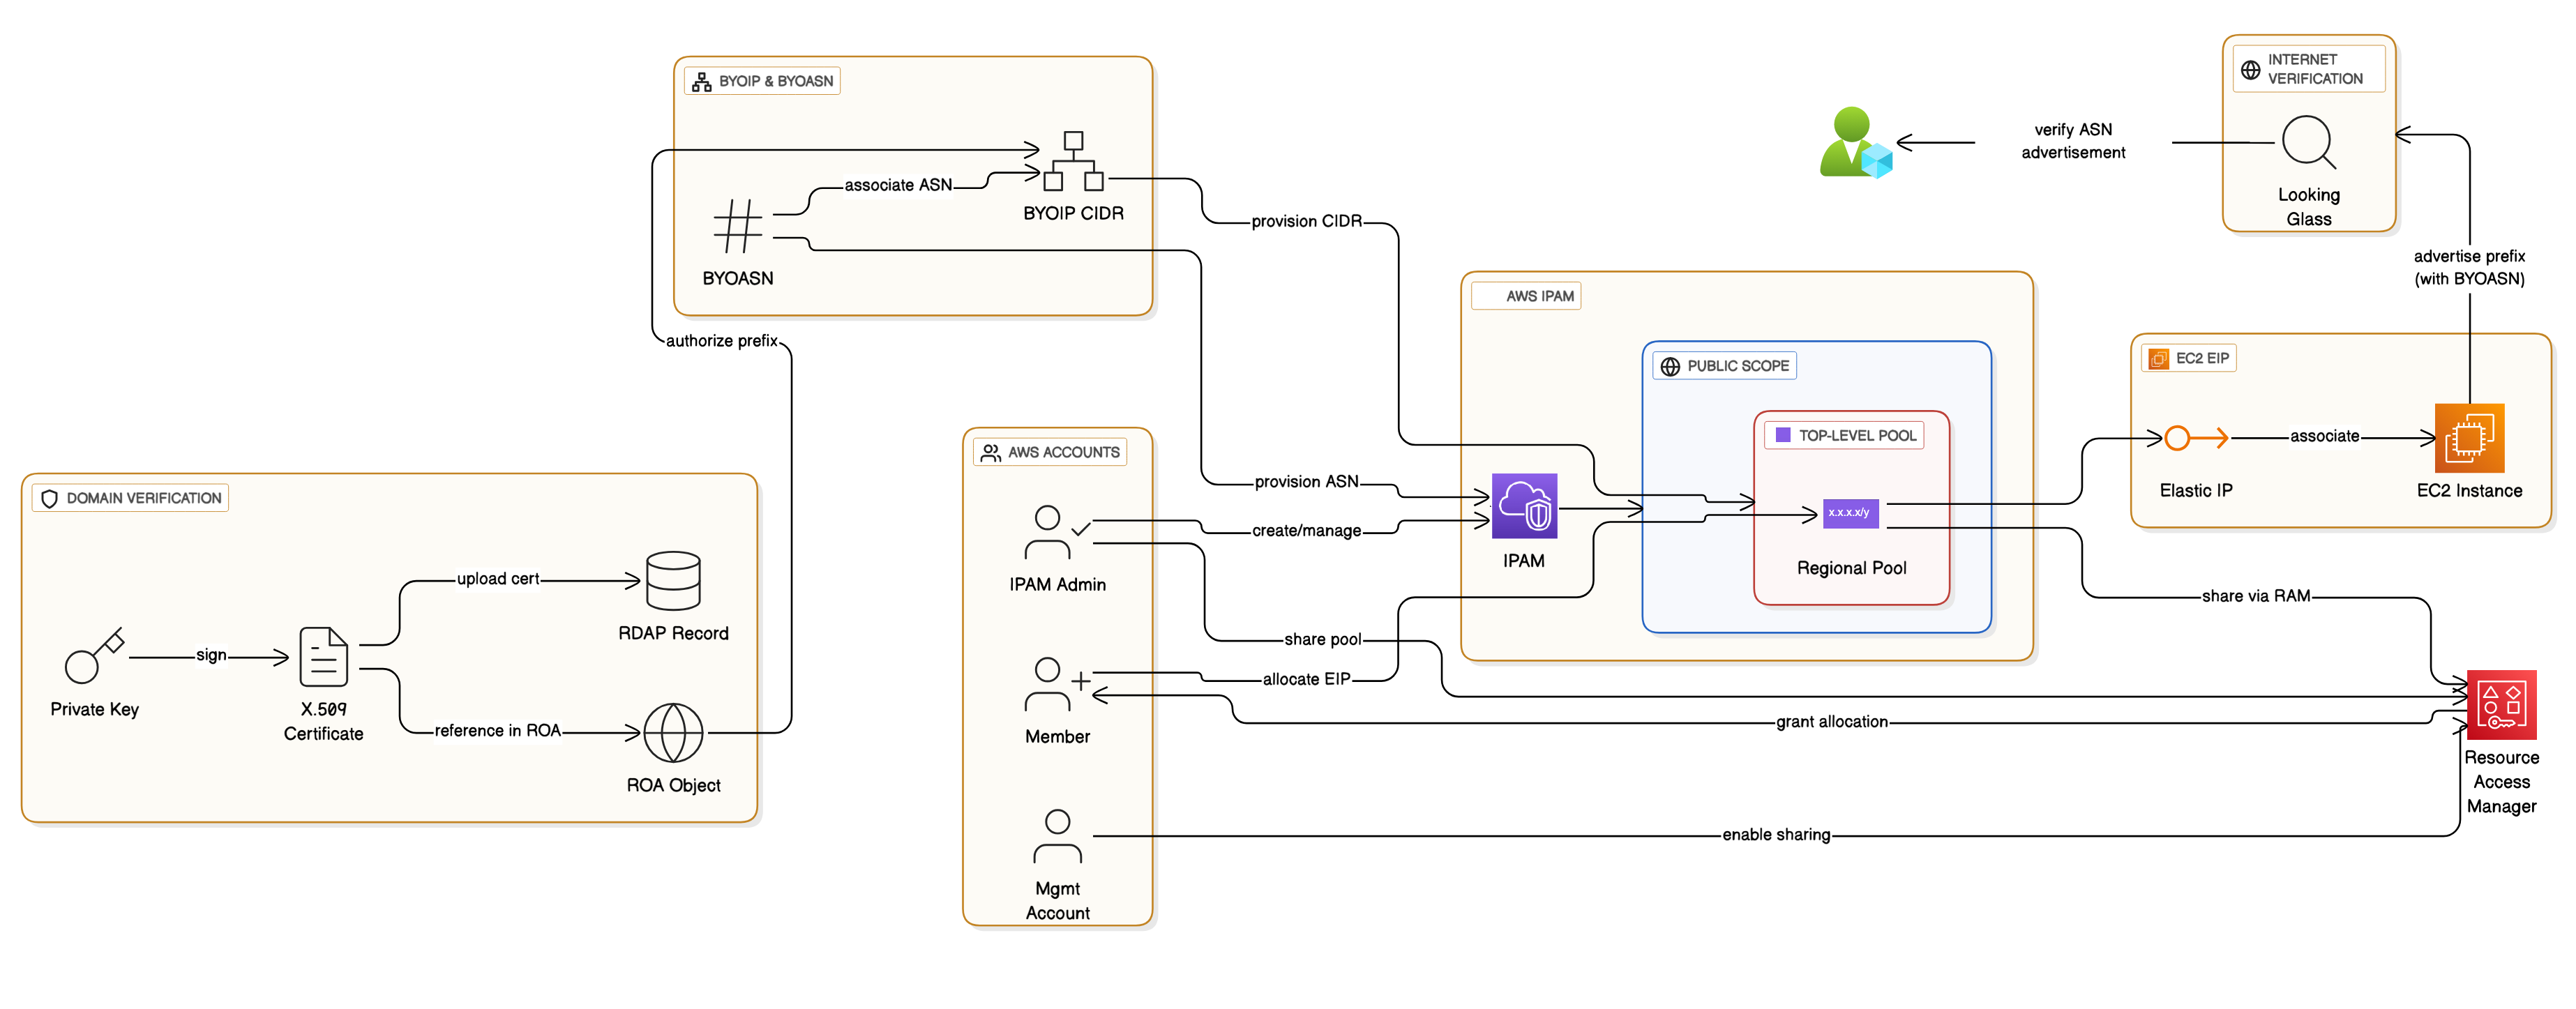 The solution involves eight high-level steps:
- Verify domain control
- Create an IPAM
- Bring your own Ipv4 CIDR to IPAM
- Bring your ASN to IPAM and advertise the BYOIP CIDR from the ASN
- Share the Regional pool
- Allocate an elastic IP address from the pool
- Associate the elastic IP address with an EC2 instance
- Verify prefix advertisement with your own ASN
Prerequisites
To complete this walkthrough, ensure you meet the BYOIP and BYOASN onboarding prerequisites. You must have clear ownership and administrative control of both the public IP address space and the ASN you plan to bring to AWS, including the ability to update registry records and sign AWS provisioning messages.
This includes a public ASN, a public IPv4 CIDR, a private key for message signing, verified ownership in your Regional Internet Registry (RIR) (including required RDAP updates with an X.509 certificate), and RPKI configuration with ROAs for both the IP range and the ASN. The walkthrough below uses and validates several of these prerequisites as part of the setup process.
Solution walkthrough:
Verify domain control
Before you bring an IP address range to AWS, you have to use one of the options described in the verify domain control tutorial to verify that you control the IP space. In this section, we demonstrate the first method to verify your domain with an X.509 certificate. Follow these steps:
- Create a private key and generate a self-signed X.509 certificate for authentication. Follow Create a private key in the Amazon EC2 User Guide.
- Upload the self-signed certificate to your Registry Data Access Protocol (RDAP) record comments. Follow Upload the X.509 certificate to the RDAP record in your RIR in the Amazon EC2 User Guide.
- Create a Route Origin Authorization (ROA) object in your Regional Internet Registry (RIR). Follow Create a ROA object in your RIR.
- Visit Provision a publicly advertisable address range in AWS and complete steps 1 and 2 only. Don’t provision the address range (step 3) yet. Save the
text_messageandsigned_message. You’ll need them later in this process.
Create an IPAM
In this step, you create an IPAM. When you create an IPAM, IPAM automatically creates two scopes for the IPAM: the private scope that’s intended for all private space and the public scope that’s intended for all public space. For more information, refer to How IPAM works in the Amazon VPC documentation. To create an IPAM, follow these steps:
- Open the IPAM console. Choose the AWS Region in which you want to create the IPAM.
- Choose Create IPAM.
- Select Allow Amazon VPC IP Address Manager to replicate data from source account(s) into the IPAM delegate account.
- Under Operating Regions, choose the AWS Regions in which this IPAM can manage and discover resources.
- Choose Create IPAM.
Optionally, you can follow the steps in Integrate IPAM with accounts in an AWS Organization in the Amazon VPC documentation to integrate IPAM with AWS Organizations. You can also check the detailed IPAM creation in Create an IPAM.
Bring your own IPv4 CIDR to IPAM
There are two parts to this step, create a top-level IPAM pool and create a Regional pool within the top-level pool.
Create a top-level IPAM pool
Complete the following steps by the IPAM account:
-
- Open the IPAM console, navigate to Pools.
- Choose the Public scope, then Create pool.
- Under Source, choose IPAM scope.
- Under Address family, choose IPv4.
- Under Locale, choose None.
- Under Public IP source, choose BYOIP.
- Under CIDRs to provision, include the CIDR and the BYOIP message and certificate signature that you created in step 1.
- Choose Create pool.
Confirm that this CIDR has been provisioned before you continue.
Create a Regional pool within the top-level pool
Create a Regional pool within the top-level pool. This step must be done by the IPAM account.
-
- Open the IPAM console, navigate to Pools.
- Choose the Public scope, then Create pool.
- Under Source, choose the top-level pool that you created in the previous section.
- Under Locale, choose the locale for the pool. The available options come from the operating Regions that you chose when you created your IPAM. For more information check the detailed steps in the Bring your own IPv4 CIDR to IPAM guide.
- Under Service, choose EC2 (EIP/VPC).
- Under CIDRs to provision, choose a CIDR to provision for the pool.
- Select Configure this pool’s allocation rule settings. You have the same allocation rule options here as you did when you created the top-level pool.
- When you’ve finished configuring your pool, choose Create pool.
Confirm that this CIDR has been provisioned before you continue.
Bring your ASN to IPAM and advertise the BYOIP CIDR from the ASN
Complete this walkthrough using the IPAM admin account in your IPAM’s home Region. You can find the detailed steps in Tutorial: Bring your ASN to IPAM.
1. Open the IPAM console, choose IPAMs, select your IPAM.
2. On the BYOASNs tab, choose Provision BYOASNs.
3. Enter the ASN. As a result, the Message field is automatically populated with the message you will need to sign in the next step. The format of the message is as follows, where ACCOUNT is your AWS account number, ASN is the ASN you’re bringing to IPAM, and YYYYMMDD is the expiry date of the message. For example:
text_message="1|aws|ACCOUNT|ASN|YYYYMMDD|SHA256|RSAPSS"
4. Copy the message and replace the expiry date with your own value if you want to.
5. Sign the message using the private key. For example:
6. Under Signature, enter the signature then choose Provision.
7. View the provisioning process on the BYOASNs tab. Wait for the State to change from Pending-provision to Provisioned. BYOASNs in a Failed-provision state are automatically removed after 7 days. After the ASN is successfully provisioned, you can associate it with a BYOIP CIDR.
8. Navigate to Pools, choose your public scope.
9. Choose a Regional pool that has a BYOIP CIDR provisioned to it.
10. On the CIDRs tab, select a BYOIP CIDR.
11. Choose Actions and then Manage BYOASN associations.
12. Under Associated BYOASNs, choose the ASN you brought to AWS. Then choose Associate.
13. Wait for the ASN association to complete. After the ASN is successfully associated with the BYOIP CIDR, you can advertise the BYOIP CIDR.
14. Choose the pool CIDRs tab.
15. Select the BYOIP CIDR and choose Actions and then Advertise. As a result, your ASN options are displayed: the Amazon ASN and any ASNs you’ve brought to IPAM.
16. Select the ASN you brought to IPAM and choose Advertise CIDR. As a result, the BYOIP CIDR is advertised and the value in the Advertising column changes from Withdrawn to Advertised. The Autonomous System Number column displays the ASN associated with the CIDR.
Share the Regional pool
Follow the steps in this section to share the IPAM pool using AWS RAM. You can find the detailed steps in the Share the Regional pool guide.
Enable resource sharing in AWS RAM
Complete the steps in this section to enable resource sharing with AWS RAM.
-
- Using the AWS Organizations management account, open the AWS RAM console.
- In the left navigation pane, choose Settings, select Enable sharing with AWS Organizations, then choose Save settings.
You can now share an IPAM pool with other members of the organization.
Share an IPAM pool using AWS RAM
In this step, you’ll share the Regional pool with another AWS Organizations member account so that the member account can allocate IP address CIDRs from the pool.
Using the IPAM admin account, create an AWS RAM resource share for the Regional IPAM pool and add the target member account as a principal. Grant the permissions required to import BYOIP CIDRs. To allow the member account to allocate IP address CIDRs from the pool, create a second resource share that grants allocation permissions for the same IPAM pool.
For the complete instructions and required permissions refer to Share an IPAM pool using AWS RAM in the Amazon VPC documentation.
Allocate an Elastic IP address from the pool
To allocate an Elastic IP address from the pool, follow the steps in Allocate an Elastic IP address in the Amazon EC2 User Guide, but note the following:
- This step must be done by the member account.
- Confirm that the AWS Region you’re in on the Amazon EC2 console matches the locale option you chose when you created the Regional pool.
- When you choose the address pool, choose the option to Allocate using an IPv4 IPAM pool and choose the Regional pool you created.
Associate the Elastic IP address with an EC2 instance
To allocate an Elastic IP address from the IPAM pool, follow the steps in Associate an Elastic IP address in the Amazon EC2 User Guide.
This step must be done by the member account.
Verify prefix advertisement with your own ASN
After completing the setup, the final step is to verify that your IP prefixes are being advertised on the internet from your own ASN, not from the AWS ASN. You can do this using any public Looking Glass tool. One example is the Route Views Looking Glass.
Follow these steps:
- Open the Looking Glass tool.
- Select bgp as the query type and IPv4 as the address family.
- Enter the IP prefix that you brought into IPAM.
- Run the query against different servers to check how your prefix is visible from multiple vantage points.
- Review the results. They should show your IP prefix being advertised with your ASN, not the AWS ASN.
This verification confirms that your BYOIP and BYOASN setup is functioning as intended and that your traffic is correctly recognized as originating from your own network identity.
Taking charge of your IP space and establishing a distinct IP identity
For service providers operating in AWS, the foundation of long-term reliability starts with taking charge of their IP space. By decoupling from AWS general infrastructure and establishing a distinct IP identity, through BYOIP and BYOASN, organizations can influence how their traffic is perceived by external services and avoid unintended filtering.
Separation is a key first step, but it is only the beginning. If the goal is to reduce unintended filtering or improve how external networks treat your traffic, taking charge of your IP space must be followed by steady day-to-day work. This includes understanding how your traffic is viewed on the internet, watching for issues, and managing incidents as they arise. This blog focuses on the initial step, achieving distinct IP identity through BYOIP and BYOASN, while the broader effort involves building and maintaining that trust over time.