The Internet of Things on AWS – Official Blog
Using Continuous Jobs with AWS IoT Device Management
In an earlier Using Over-the-Air Updates with AWS IoT Device Management blog post, we showed you how to create a simple AWS IoT snapshot job and track its progress. In this post, we will show you step-by-step how to configure and create an AWS IoT continuous job. A continuous job is a long running job that reacts to changes to your deployment targets by automatically deploying job executions. For example, a continuous job can be deployed to an initial group of 100 devices. When new devices are added to your deployment group, those new devices will automatically be notified about the continuous job.
A continuous job is useful when:
- A factory reset is performed on a device that resets its software to v1. A continuous job can automatically update a device’s software to the latest version after it is reset to v1.
- A device with an older firmware version is turned on after sitting in the warehouse for several months. A continuous job can update the device firmware to the latest version.
- A device is recycled. A continuous job can remove all pending job executions on the device.
In the next few sections, we are going to create a continuous job continuous-job-V1-to-V2 to update devices’ firmware version from V1 to V2. Devices with firmware version V1 are grouped by thing group FirmwareV1Group, and devices with firmware version V2 are grouped by thing group FirmwareV2Group. Once a device successfully updates to firmware V2, a pre-configured Lambda function will automatically remove this device from FirmwareV1Group and add to FirmwareV2Group. While continuous job continuous-job-V1-to-V2 is running, new devices that got added to FirmwareV1Group will also automatically get the V2 firmware update job. The steps are
- Create firmware deployment groups
- Add thing to the initial deployment group
- Configure and test a Lambda function to move device between deployment groups
- Create a continuous job for firmware V1 to V2 update
Configure Deployment Groups
First, we are going to create three thing groups, each with a different firmware version (V1, V2, V3).
$ aws iot create-thing-group --thing-group-name "FirmwareV1Group"
$ aws iot create-thing-group --thing-group-name "FirmwareV2Group"
$ aws iot create-thing-group --thing-group-name "FirmwareV3Group"
In this example, the device is registered with thing name MyRaspberryPi. Add MyRaspberryPi to thing group FirmwareV1Group.
$ aws iot add-thing-to-thing-group \
--thing-name "MyRaspberryPi" \
--thing-group-name "FirmwareV1Group"
In a real scenario when a device starts up, we recommend that you run a startup program to bring your device online and initialized its settings. In the startup program, you can add the device to corresponding deployment group. In addition, the program that resets the device to factory settings should also include a step to add the device to corresponding deployment group.
Configure a Lambda Function
We are going to write a Lambda function that is triggered whenever a device is successfully updated from firmware version V1 to V2. This Lambda function does the following:
- Removes the thing from thing group FirmwareV1Group.
- Adds the thing to ThingGroup FirmwareV2Group.
First, navigate to the IAM console to create a role, LambdaRoleForV1ToV2FirmwareUpdate, with the following policy. Replace AWS_REGION with your AWS region and <AWS_ACCOUNT_ID> with your AWS account ID.
{
	"Version": "2012-10-17",
	"Statement": [
		{
			"Effect": "Allow",
			"Action": [
				"logs:CreateLogGroup",
				"logs:CreateLogStream",
				"logs:PutLogEvents"
			],
			"Resource": "arn:aws:logs:*:*:*"
		},
		{
			"Effect": "Allow",
			"Action": [
				"iot:RemoveThingFromThingGroup"
			],
			"Resource": "arn:aws:iot:<AWS_REGION>:<AWS_ACCOUNT_ID>
:thinggroup/FirmwareV1Group"
		},
		{
			"Effect": "Allow",
			"Action": [
				"iot:RemoveThingFromThingGroup",
				"iot:AddThingToThingGroup"
			],
			"Resource": "arn:aws:iot:<AWS_REGION>:<AWS_ACCOUNT_ID>
:thing/*"
		},
		{
			"Effect": "Allow",
			"Action": [
				"iot:AddThingToThingGroup"
			],
			"Resource": "arn:aws:iot: <AWS_REGION>:<AWS_ACCOUNT_ID>
:thinggroup/FirmwareV2Group"
		}
	]
}
Navigate to the AWS Lambda console. On the Create function page, select Blueprints. Under Blueprints, choose hello-world, and then choose Configure.
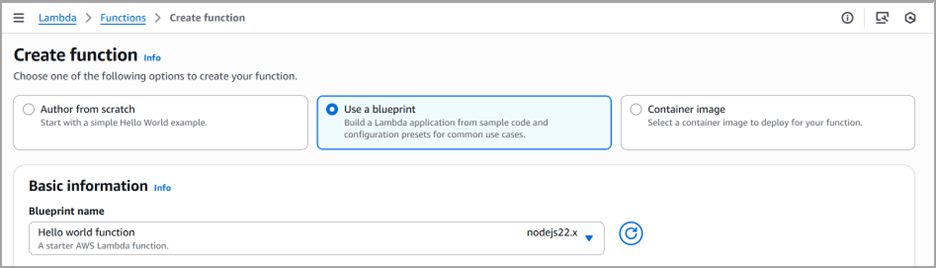
Under Basic information, type a name for this Lambda function. For Role, choose the role you created in the previous step (LambdaRoleForV1ToV2FirmwareUpdate), and then choose Create function.

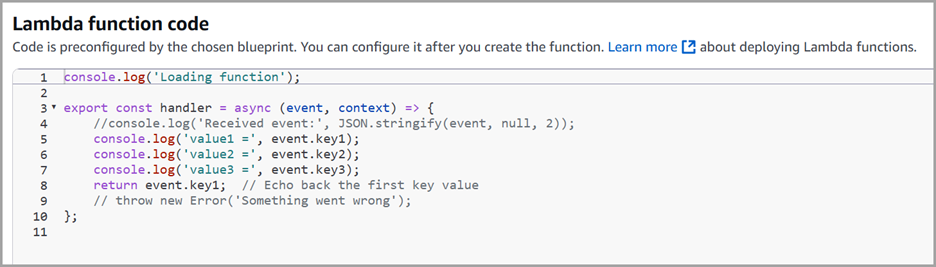
On the next page, update the function code with the following code snippet, and then choose Save.
// Log that the function is loading
console.log('Loading function');

// Import AWS SDK using ES modules instead of require
import { IoT } from "@aws-sdk/client-iot";

// Initialize IoT client
const iot = new IoT();

// Set up the code to call when the Lambda function is invoked
// Using async/await pattern instead of callbacks
export const handler = async (event, context) => {
    try {
        // Log the event and thing ARN to CloudWatch Logs
        console.log("Received event:", JSON.stringify(event, null, 2));
        console.log("Thing Arn is:", event.thingArn);

        // Parameters for removing the thing from V1 group
        const removeParams = {
            thingGroupName: "FirmwareV1Group",
            thingArn: event.thingArn
        };

        // Parameters for adding the thing to V2 Group
        const addParams = {
            thingGroupName: "FirmwareV2Group",
            thingArn: event.thingArn
        };

        // Remove the thing from V1 group using async/await
        const removeResult = await iot.removeThingFromThingGroup(removeParams);
        console.log('Remove result:', removeResult);

        // Add the thing to V2 Group using async/await
        const addResult = await iot.addThingToThingGroup(addParams);
        console.log('Add result:', addResult);

        // Return success response
        return {
            statusCode: 200,
            body: JSON.stringify({
                message: 'Thing group update successful',
                removeResult,
                addResult
            })
        };

    } catch (error) {
        // Log and re-throw any errors that occur
        console.error('Error:', error);
        throw error; // Lambda will handle the error appropriately
    }
};
To configure the trigger for this Lambda function, under Designer, choose AWS IoT. In the Configure triggers section, we will create a custom IoT rule to filter succeeded job executions events for a continuous job with the job ID continuous-job-V1-to-V2. To learn more about Job Events, see Job Events documentation in the AWS IoT Developer Guide. Create a new rule named “SucceededJobExecutionsForV1toV2Update”, and input the following SQL statement for the Rule query statement:
SELECT * FROM 'aws/events/jobExecution/continuous-job-V1-to-V2/succeeded'After you have configured the trigger, click Add and then click Save.

Test the Lambda Function
To test the Lambda function, configure a test event in the AWS Lambda console. From Select a test event, choose Configure test events.

Name the test event SucceededJobExecution, and replace the test event payload with the following job execution event payload. Replace AWS_REGION with your AWS region and <AWS_ACCOUNT_ID> with your AWS account ID. Choose Create to save your changes.
{
  "eventType": "JOB_EXECUTION",
  "eventId": "ba44f124-61fd-40c8-b747-f7f00a50515c",
  "timestamp": 1519870643,
  "operation": "succeeded",
  "jobId": "continuous-job-V1-to-V2",
  "thingArn": "arn:aws:iot:<AWS_REGION>:<AWS_ACCOUNT_ID>:thing/MyRaspberryPi",
  "status": "SUCCEEDED"
}
After you have created the test event, you are directed back to the AWS Lambda console. Select the SucceededJobExecution test event, and choose Test. You should see the thing MyRaspberryPi is removed from FirmwareV1Group and add to FirmwareV2Group from AWS IoT console. For information about creating a Lambda function and how to monitor and debug a Lambda function with CloudWatch, see Create a Simple Lambda Function in the AWS Lambda Developer Guide.

Create a Continuous Job to Update Firmware
Now create a continuous job, continuous-job-V1-to-V2, on thing group FirmwareV1Group.
$ aws iot create-job \
--job-id "continuous-job-V1-to-V2" \
--targets "arn:aws:iot:<AWS_REGION>:<AWS_ACCOUNT_ID>:thinggroup/FirmwareV1Group" \
--document file://<DIRECTORY_TO_JOB_DOCUMENT>/FirmwareUpdateV1ToV2.json \
--description "Continuous job to update firmware from V1 to V2" \
--target-selection CONTINUOUS
When the continuous-job-V1-to-V2 job is in progress, it will notify all target devices that belong to the FirmwareV1Group thing group about the job. Each device executes the job and reports its job execution status. For each successful job execution, the Jobs service sends a job execution event. The job execution event triggers the Lambda function, which removes devices from FirmwareV1Group and adds them to FirmwareV2Group.
Configure Continuous Deployments
We've walked through how to create a continuous job on deployment group FirmwareV1Group to update the firmware version on devices from V1 to V2. We've shown how to remove the device from FirmwareV1Group and add it to FirmwareV2Group after the device has successfully executed the job. So how about updating V2 devices to V3?
To bring device firmware up to date, you can create another continuous job, continuous-job-V2-to-V3, on the FirmwareV2Group deployment group, and configure a similar Lambda function to remove a device from FirmwareV2Group and add it to FirmwareV3Group.
Continuous jobs do not have to be incremental. Whether your update model is an incremental update or a direct update to a specific version, it is easy to create a continuous job to bring your devices to the desired state. For example, say you have 10 different firmware versions available: V1 -- V10. Due to a compatibility issue between some versions, V1, V2, and V3 can only be directly updated to V7, not to V10. All other versions can be directly updated to V10. With continuous jobs, you can easily set up one job for V1, V2, and V3 deployment groups and update devices to V7. You can set up another job for V4 -- V9 deployment groups and update devices to V10. By the time a newer version, V11, is released, you can easily create a third continuous job on the V10 deployment group and update devices to V11.

Conclusion
For more information about Jobs, see Jobs in the AWS IoT Developer Guide and Using Over-the-Air Updates with AWS IoT Device Management blog post.
Leave your feedback in the comments. If you have questions or issues implementing this solution, open a thread on the AWS IoT forum.