AWS Messaging Blog
Set up custom domains in Amazon Connect hosted with M365 Exchange Online or Google Workspace
Amazon Connect Email provides built-in capabilities that make it straightforward to prioritize, assign, and automate the resolution of customer service emails, improving customer satisfaction and agent productivity. With Amazon Connect Email, you can receive and respond to emails sent by customers to business addresses or submitted through web forms on your website or mobile app. You can configure auto-responses, prioritize emails, create or update cases, and route emails to the best available agent when agent assistance is required. Additionally, these capabilities work seamlessly with Amazon Connect outbound campaigns, helping you deliver proactive and personalized email communications.
Amazon Connect Email integrates with Amazon Simple Email Service to send, receive, and monitor emails for content marked as spam or containing viruses, delivery success rates, and sender reputation results.
This post guides you through setting up email in Amazon Connect by routing emails from your email server (Microsoft 365 or Google Workspace) to Amazon Simple Email Service (Amazon SES) SMTP endpoints using a custom email domain onboarded to Amazon SES. By configuring Amazon Connect with your custom email domain in Amazon SES, you can create a unified communication hub that enhances customer experience while simplifying agent workflows. The result is a more responsive, efficient contact center that meets customers where they are, whether they prefer speaking, chatting, or sending emails.
Use case overview
AnyCompany has invested heavily in its email infrastructure over the years, developing a robust and centralized email server that manages both internal and external email traffic. This unified system has become an integral part of their operations, streamlining communication across departments and with customers. AnyCompany has also established a public support email address that has gained significant recognition and trust among their customer base. This email address, featured prominently in all their product documentation, marketing materials, and customer communications, has become a cornerstone of their brand identity in customer support.
Now, AnyCompany faces the challenge of enhancing their customer support process by implementing an automated acknowledgment system for incoming support emails. However, they want to maintain their existing email setup due to its deep integration with internal workflows and the substantial investment it represents. Additionally, preserving their well-known support email address is crucial to protect the brand equity they’ve built over years of customer interactions.
By integrating Amazon Connect with their current email server, AnyCompany can create a seamless solution that addresses these complex requirements. With this integration, customers can continue sending emails to the familiar public support address (for example, connect-channels-sme@anycompanyemail.com), maintaining consistency in their customer experience. When new emails are received, Amazon Connect can trigger automated acknowledgment messages, providing immediate assurance to customers that their inquiries have been received and are being processed.
This approach offers multiple benefits. It improves customer satisfaction by providing prompt responses and reduces the volume of follow-up emails. It also preserves AnyCompany’s significant investment in their existing email infrastructure, so they can continue using the centralized system for both internal and external communications. Perhaps most importantly, it maintains the brand recognition associated with their long-standing support email address, so customers can continue to use the contact point they’ve grown to trust over the years.
Solution overview
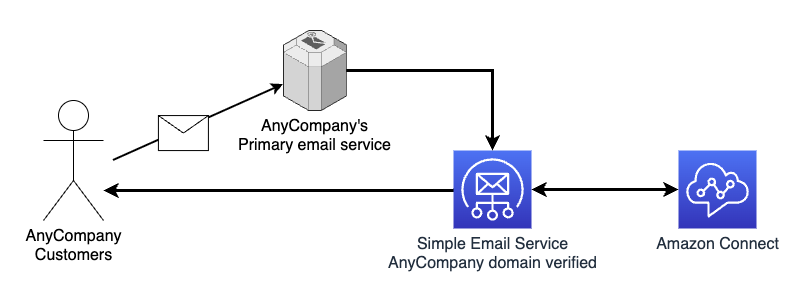
This post provides a contact center email solution with the following benefits:
- Customers continue to send emails to your custom domain
- Emails are routed through your primary email server to Amazon Connect (via Amazon SES)
- Agents receive and respond to emails within the Amazon Connect agent workspace
- Customers receive agent responses from your custom domain (via Amazon SES)
This solution involves three main steps:
- Configure Microsoft 365 or Google Workspace to route emails to Amazon Connect
- Verify your custom domain in Amazon SES to enable sending emails
- Onboard your email address in Amazon Connect to handle customer communications
Prerequisites
Before you begin, make sure you have the following prerequisites:
- Administrative access to modify your custom email domain’s DNS settings.
- Note – modifying MX records can impact email receiving for your primary domain (
example.com). It is highly recommended to create a subdomain (for example,testing.example.com) for testing to avoid impacting any email receiving on your primary domain or use the provided email domain that comes with the Amazon Connect instance (for example,@<instance-alias>.email.connect.aws).
- Note – modifying MX records can impact email receiving for your primary domain (
- Administrative access to modify your Microsoft 365 Exchange Online or Google Workspace Gmail configuration.
- AWS Identity and Access Management (IAM) access to Amazon SES and Amazon Connect on your AWS Management Console.
- An existing user in Amazon Connect with access to managing email flows, channels, and routing. For example, CallCenterManager can be used to perform actions related to user management, metrics, and routing. Or you can create a user with a custom scoped-down security profile.
- When setting up Amazon Simple Email Service for use with Amazon Connect your SES account will be in the sandbox mode, which works well for testing. You will need to request Amazon SES production access before you can fully utilize Amazon SES with Amazon Connect.
Configure Amazon SES
Part of creating a domain identity is configuring its DKIM-based verification. DomainKeys Identified Mail (DKIM) is an email authentication method that Amazon SES uses to verify domain ownership, and receiving mail servers use to validate email authenticity. To learn more, refer to Creating a domain identity.
Complete the following steps to configure your domain identity in Amazon SES:
- Open your AWS console and choose the AWS Region where your Amazon Connect instance is deployed.
- On the Amazon SES console, choose Identities under Configuration in the navigation pane.
- Choose Create identity and provide the following information:
- Choose Domain as the identity type.
- Enter your custom email domain name.
- Enable Use a custom MAIL FROM domain.
- Set MAIL FROM domain to
feedback. - Set Behavior on MX failure to Use default MAIL FROM domain.
- For DKIM verification, provide the following information (unless instructed otherwise):
- Choose Easy DKIM under Advanced DKIM settings.
- Choose RSA_2048_BIT for DKIM signing key length.
- Enable Publish DNS records to Route53 if applicable.
- Enable DKIM signatures.
- Choose Create identity.
Amazon SES will generate DNS records needed to verify the domain, including:
- DKIM CNAME records
- Custom MAIL FROM domain MX and TXT records
- DMARC TXT records
If the domain is hosted in Route 53, Amazon SES provides an option to automatically Publish DNS records to Route53. When your domain is hosted with Route 53, SES domain verification typically completes within a few minutes. You will see the status Verification pending, followed by Verified.
If the domain is not hosted in Route53, Amazon SES will present individual copy buttons per record as well as a CSV file download option. These records must be added to your DNS so Amazon SES can verify the domain.
After your externally managed DNS has been updated, return to the Amazon SES console and confirm that the identity status has changed to Verified. The time to complete this step is highly variable. You can choose to configure DKIM by using either Easy DKIM or Bring Your Own DKIM (BYODKIM), and depending on your choice, you will have to configure the signing key length of the private key. For detailed steps, refer to Creating a domain identity.
When you first setup Amazon SES, your account is placed in the SES sandbox which we use to prevent unauthorized or unintended sending. While in sandbox mode, you can only send mail to email addresses and domains you verify. After you receive Amazon SES production access for your custom domain, you can send and receive email to and from a valid email address without verification. For more information about the Amazon SES sandbox, refer to Request production access (Moving out of the Amazon SES sandbox).
For setup and testing purposes, complete the following steps to configure an email identity in Amazon SES:
- On the Amazon SES console, choose Identities under Configuration in the navigation pane.
- Choose Create identity and choose Email Address.
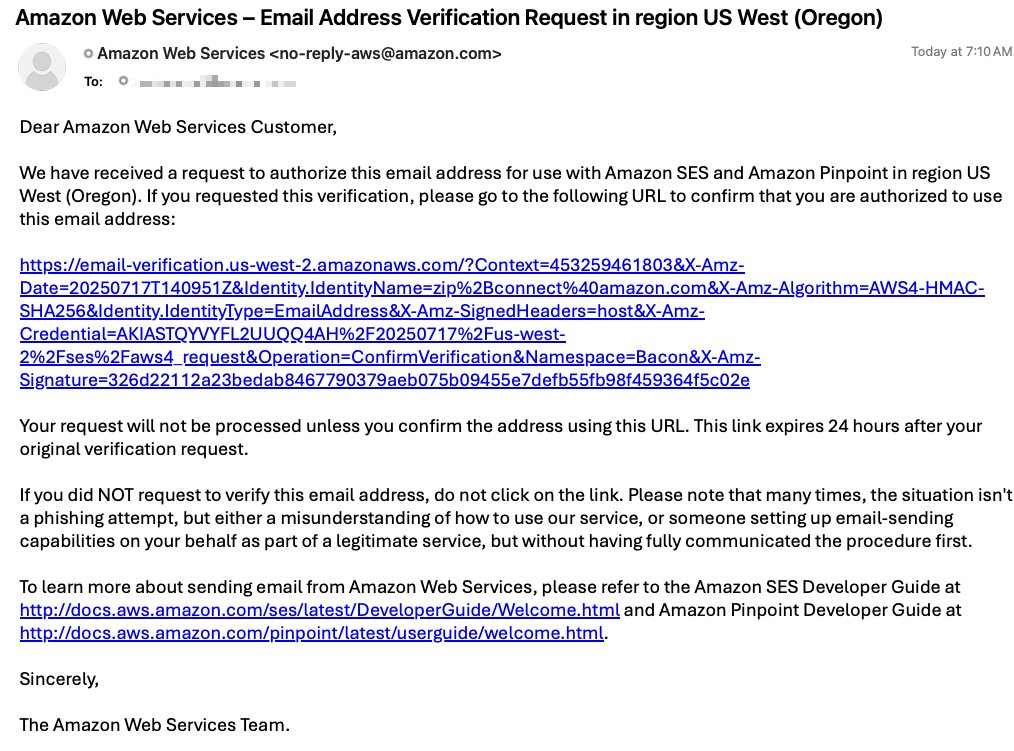
- Enter your work email address (you will need access to the inbox to verify ownership). This is the email address that Amazon Connect and Amazon SES will use to send and receive email while your SES account is in the sandbox.
- Click Create identity.
- Check your email inbox and click the link to verify this is an email address you control.
Configure Amazon Connect
Complete the following steps to configure Amazon Connect:
- On the Amazon Connect console, open your instance by clicking on Instance alias.
- Under Channels and communications, choose Email.
- Choose Add domain.
- Choose the domain you verified in Amazon SES.
- In your instance, choose Email addresses under Channels.
- Choose Create email address and provide the following information:
- Create an email address with the same name and domain as the inbound address your customers will use (
connect-channels-sme@anycompanyemail.com). - Provide a friendly sender name that will appear in customer inboxes.
- Create a new flow or attach an existing flow to the custom domain email address (this flow will route inbound emails).
- Choose Save.
- Create an email address with the same name and domain as the inbound address your customers will use (
- Configure Outbound email configuration in your outbound queue:
- For Default email address, provide the email address you created earlier.
- For Outbound email flow, provide the email flow for outbound emails (this flow will route outbound emails).
- Choose Save.
Configure Microsoft 365 Exchange or Google Workspace
In this section, we provide step-by-step guidance to configure your primary email service with a rule (Microsoft) or route (Google) that sends inbound email addressed to a specific address(s) to Amazon Connect.
Option A: Microsoft 365 Exchange configuration
Complete the following steps to configure Microsoft 365 Exchange:
- Find the email receiving endpoint for your Region. For example,
inbound-smtp.us-west-2.amazonaws.com. - Create a connector in Exchange:
- Navigate to the Exchange admin center.
- Under Mail flow, choose Connectors.
- Choose Add a connector.
- Set Connection from to Office 365
- Set Connection to to Your organization’s email server.
- Choose Next.
- Name the connector to identify the Region.
- Choose Next.
- For Use of connector, select Only when I have a transport rule set up that redirects messages to this connector.
- For Routing, enter the SES email receiving endpoint.
- Choose the plus sign, then choose Next.
- For Security restrictions, select Always use Transport Layer Security (TLS) to secure the connection.
- Follow your internal process for this step. In this example, we select Any digital certificate, including self-signed certificates.
- Choose Next.
- For Validation email, enter a valid email address currently used in your Amazon Connect instance.
- Choose the plus sign, then choose Next.
This will send a test email address to that email address. No action needs to be taken with the test email. You should see the email validated and receive the validation test email in the agent workspace. - Review your connector configuration and choose Create connector.
Validate that the connector status is set to On, then proceed to the next steps.
- Create a mail flow rule to send your inbound email to Amazon Connect:
- Under Mail flow, choose Rules.
- Choose Add a rule¸ then choose Create a new rule.
- Name the rule.
- Set conditions to apply if the recipient is this person and choose the email address for Amazon Connect.
- Set the action to Redirect the message to and the following connector and choose your new connector.
- Choose Next.
- Set Rule mode to Enforce.
- Activate the rule immediately by specifying the current time.
- Set Match sender address in message to Header or envelope.
- Choose Next.
- Review your rule configuration and choose Finish.
After you confirm your rule is enabled, you can test your configuration.
Option B: Google Workspace Gmail configuration
Complete the following steps to configure with Google Workspace:
- Log into your Google Workspace admin account.
- Navigate to Gmail.
- Choose Hosts and choose Add Route.
- Configure the mail route:
- Provide a name indicating the Region.
- Enter the SES email receiving endpoint and port 25.
- Enable security options:
- Select Require mail to be transmitted via a secure (TLS) connection.
- Select Require CA signed certificate.
- Select Validate certificate hostname.
- Choose Test TLS connection.
- If the connection is successful, choose SAVE.
- Configure default routing:
- Navigate to Default routing and choose Configure.
- Enter the email address that should route to Amazon Connect.
- Change the route to the mail route you created.
- Select Perform this action on non-recognized and recognized addresses.
- Save and confirm the route is enabled.
Test your configuration
After you have completed the appropriate steps above, test both inbound (to Amazon Connect) and outbound (from Amazon Connect) message-flows.
Test inbound (to Amazon Connect)
Test your inbound configuration:
- Open your email application.
- Send a test email to the email address you configured to be sent to Amazon Connect.
- In the Amazon Connect agent workspace, accept the incoming email.
- Confirm the email received in your agent workspace matches the email address you configured to be sent to Amazon Connect.
Test outbound (to external recipient from Amazon Connect)
Test your outbound configuration:
- Log in to your Amazon Connect instance.
- Choose New email.
- Enter To address (use your work email address), Subject & Body.
- Alternatively, To address (use your work email address) and choose a Template.
- Click Send.
- Check your work email inbox for the message. Verify the email’s From address is the email address you configured to be sent from Amazon Connect.
Request Amazon SES production access
Once you have successfully tested email receiving and sending within Amazon Connect, request Amazon SES production access (see Moving out of the Amazon SES sandbox) in the Amazon SES Developer Guide. Importantly, you will not be able to send email from your domain via Amazon Connect until your account is removed from the SES sandbox.
Conclusion
In this post, we showed how to configure Amazon Connect to handle emails using your custom domain through Microsoft 365 or Google Workspace. This setup provides a seamless email experience for your customers while giving your agents the powerful tools available in the Amazon Connect agent workspace.
To get started with Amazon Connect Email, refer to the Amazon Connect Administrator Guide. For hands-on learners, the Amazon Connect Email Enablement Workshop provides guidance and exercises to configure Amazon Connect Email, set up email queues and routing rules, and discusses best practices for delivering exceptional email-based customer service.
Additional resources
For additional guidance and information, refer to the following resources:
- Amazon Connect Administrator Guide
- Amazon SES Developer Guide
- How Amazon Connect email works
- Amazon Connect Email Enablement Workshop
- Flows in Amazon Connect