Front-End Web & Mobile
Create a Custom Map Style with Amazon Location Service
UX designers and web developers alike wish to have each component of their website meet the company’s branding requirements while providing a visual impact on its own. Web maps are no exception to this since they provide important visualizations for geographical data. The ability to customize is invaluable when a map is a big part of the user flow and needs to fit in with the rest of the site.
With Amazon Location Service, a managed AWS service for adding location data to applications, you can create a customized web map that will grab the interest of your users and increase engagement. At this time Amazon Location has two data providers, Esri and HERE, as well as six default map styles. So, how do you customize these map styles to meet your brand or visual design?
This post will walk you through the process of styling an existing map using Maputnik to help visualize the changes in real-time. Others may prefer to use another open-source tool called Fresco, however they are not required to make edits to the style descriptor. In order to style our existing map from Amazon Location Service using these tools we will also demonstrate how to run a local proxy that handles Signature Version 4 / AWS Authentication.
Related Post: Using MapLibre GL JS with Amazon Location Service
-
- Time to read – 10 minutes
- Time to Complete – 30 minutes
Overview of solution
The walkthrough uses a number of AWS services and tools:
- Amazon Location Service – Gives the flexibility to implement a map tile source through Esri and HERE
- AWS Identity and Access Management – AWS IAM lets you provide permissions to access the Amazon Location Service, Map resources and Place Index resource
- AWS CLI – For creating and updating resources in your AWS account
- Amazon Cognito – This allows the application to handle user sign-up and sign-in. The service returns an ID, access, and refresh token after a successful sign-in. You can exchange the access token for temporary AWS credentials to access AWS services, in this case Amazon Location Service
- AWS Amplify – You can use AWS Amplify CLI to setup the cloud infrastructure and back end including the hosting through Amazon S3 and Amazon CloudFront
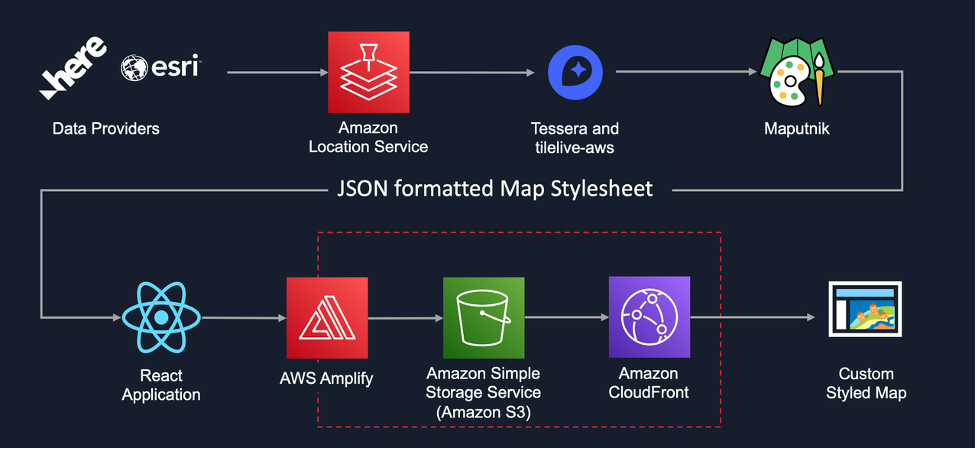
Figure 1: Architecture
Walkthrough
The walkthrough can be done through the terminal either on macOS or Linux and will require some setup locally to be able to style the map with Maputnik. Most importantly, you will need to set up the local proxy to Amazon Location Service that supports Signature Version 4 signing. Once that is configured, you are able to style and use the Map as you please.
The walkthrough is split into 2 parts as outlined below:
- Style an Existing Map from Amazon Location Service
- Integrate a Custom Map Style in a React App
GitHub repository: https://github.com/aws-samples/amazon-location-samples/tree/main/create-custom-map-style
Setup
As a prerequisite, you will need to install and configure the following:
- Git
- Node.js
- AWS CLI
- Amplify CLI
The AWS Samples repository listed above contains detailed steps on how to get started with this. From there you can follow along with this walkthrough.
Style an Existing Map from Amazon Location Service
If you have an existing Map in Amazon Location Service and would like to customize it you can accomplish that with a minimal number of dependencies as outlined below.
Install and Configure Tessera
To keep the walkthrough short, we have not included a detailed explanation of Tessera and Tilelive; you can read more about those two projects here. To sum it up, they provide a way to serve tiles from Amazon Location Service in a way that’s compatible with Maputnik. Start by creating a tile server workspace in your project where you can initialize a new node project and install the pertinent packages:
Presuming you have the standard AWS environment variables set correctly, this should be enough to get started using tessera. From your terminal run:
Install Maputnik and Style Your Map
With a tile server in place, you can use Maputnik to change the style descriptor and give your map a new customized look. The program can be run as a platform-specific binary. Follow the instructions to install and run Maputnik here.
Now you can open your browser to localhost:8000 to begin styling. Start by downloading the sample template we’ve included in the tileserver/ directory and upload it to Maputnik as shown below:

Figure 2: Uploading file to Maputnik
A list of map layers will appear on the left-hand side. Take a moment to scroll through and observe how each one is defined. For example, there are different types such as background, fill, line, symbol, and more. You can pick the “Land/Not ice” layer and change its fill color to “#EE84D9”. Notice how you can see the changes to the layer’s color in real time as shown below. Now you can see how the map’s style has changed a little, experiment some more by clicking on areas of the map and seeing the layer to which they correspond.
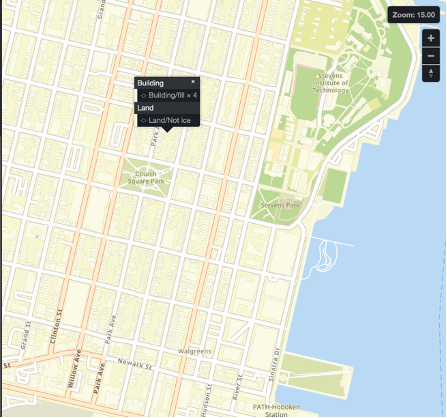
Figure 3: Map Style
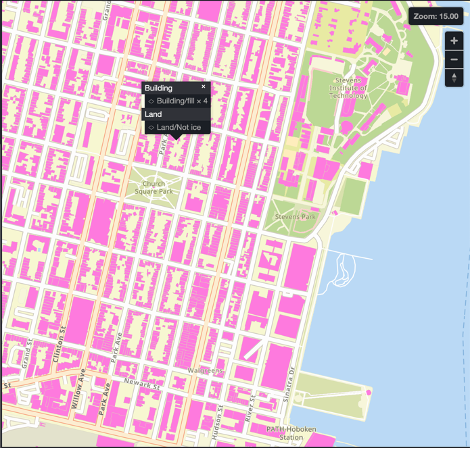
Figure 4: Map Style
To help you with your map design, here are some handy tips:
- Familiarize yourself with the MapLibre style document specification
- Learn hexadecimal color values and pick a palette of colors
- Follow web accessibility guidelines to ensure there are no impediments to users with disabilities
- Plan for adding map markers later on and choose a color that will contrast
- Use gradients and color transparency for greater detail
- Reserve blue colors for water layers only
- Ensure legible text values by choosing the best label background and text halo
Export Your Style
Once you’re satisfied with the edits you’ve made, you can export the stylesheet JSON from Maputnik by clicking on “Export” in the top navigation bar.

Figure 5: Export JSON from Maputnik
The exported JSON will still reference a local endpoint in the “sources” object and Maputnik in the “sprites” and “glyphs” attributes. Be sure to change these values to the ones provided by Amazon Location Service before bundling them in your front-end assets. They will look similar to this:
If you are not sure what the values are meant to be you can cross-reference the original stylesheet provided by Location Service by running:
Integrate a Custom Map Style in a React App
Now that your map style is ready, you can display it for your users to admire. Perhaps you want them to remember your site’s map for having a style that is different from the default style most sites use. Or maybe you would like to seasonally change the map’s colors. Integrating the new style can be done with the help of AWS Amplify using many types of mobile and frontend frameworks or just plain JavaScript. The following is a demonstration using React.js.
Set Up
Refer to the AWS Samples README for the complete steps. You will need to start by creating a workspace
Then clone the sample repo
We will use the Amplify CLI to create the necessary resources in AWS. When you configure the Amplify environment you will be prompted with the following:
Then you will need to initialize the Amplify application. The CLI will lead you through a series of questions that will help to create a configuration for connecting your React application to your AWS cloud resources.
Push Amplify Resources to the Cloud
The new resources have only been configured in your local environment so you will need to publish them to your AWS account next.
Wait for AWS Cloudformation to provision the necessary resources. You can follow the steps in the “How to style an existing Map from Amazon Location Service” section above to style the map created through Amplify. Once you are satisfied with your edits continue to the “Add the New Map Style to Your Application” section below.
Add the New Map Style to Your Application
Once you have a finished style descriptor you can place it in the src/ directory of your React application. Then you can use MapLibre GL in your code as shown below to display the map:
See the completed code here. The changes made with Maputnik will appear in your page now.
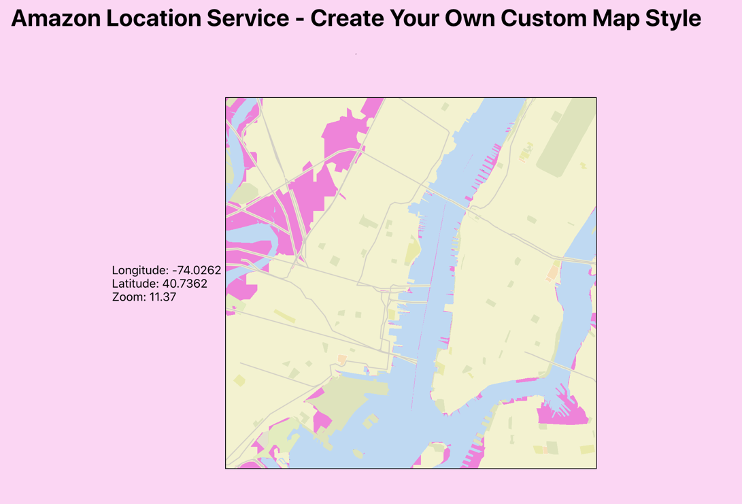
Figure 6: Custom Style Map
Clean up
To avoid incurring future charges, delete the resources used in this tutorial. In the CloudFormation console you can delete the root stack amplify-createcustommapstyle-<YOUR ENV NAME>-xxxxxx which includes:
S3AndCloudFront– The Hosting category of Amplifycreatecustommapstyle0000000x– The Auth category of AmplifyCreateCustomMapStyle– The Geo category of Amplify
Conclusion
Using Amazon Location Service with other AWS Services and open-source tools such as Maputnik and MapLibre, you can create a fully customizable Map style specially when maps is an integral part of your application and you want to give your map a personalized touch. Now, if you have an idea about how you can achieve the map customization, you can also try it with Fresco or other open-source tools for editing. To deploy the entire solution, check the GitHub Repository, and follow the instructions on how to create custom Map style using Amazon Location Service and AWS Amplify.