Microsoft Workloads on AWS
Reduce Storage Costs by setting up MetaCacheDatabase for Microsoft Exchange 2019 on AWS
Challenge
Microsoft Exchange is a storage-heavy application, so storage may become cost prohibitive for new deployments. Solid state drives and faster spinning disks are still costly options when multiple copies of the same data needs to be replicated across the global infrastructure. Storage costs have made offerings like Microsoft Office 365 an enticing alternative.
In this blog post, we will present an alternative storage approach using AWS’ lowest-cost hard disk drive (HDD) option with the Microsoft Exchange MetaCacheDatabase. This solution meets Microsoft preferred architecture hard drive performance while reducing storage costs. Using this approach, customers looking to deploy Exchange server infrastructure on AWS or migrate existing infrastructures to AWS can take advantage of AWS’ global footprint and bring Exchange closer to their end users while achieving significant storage cost savings.
Solution
Amazon Elastic Block Store (Amazon EBS) is an easy-to-use, high-performance, block storage service designed for use with Amazon Elastic Compute Cloud (Amazon EC2) for both throughput and transaction-intensive workloads at any scale. Amazon EBS offers six different volume types at various price and performance points, enabling you to optimize costs and invest in a precise level of storage for your application needs. Options range from highly-cost-effective, dollar-per-gigabyte volumes to high-performance volumes with high IOPS and high throughput designed for mission-critical workloads. Cold HDD (sc1) volumes offer the lowest cost of block storage in AWS. These volumes are backed by hard disk drives (HDDs) and are ideal for throughput-intensive workloads with large datasets and large I/O sizes.
Customers can achieve a cost-effective Microsoft Exchange deployment that uses sc1 EBS volumes to save costs while leveraging Exchange MetaCacheDatabase to improve performance. In this blog post, we will setup Exchange MetaCacheDatabase on Exchange 2019 on AWS. Highlighting the specific settings that need to be adhered to.
All Microsoft Exchange Servers need to have the same storage setup, which requires configuring the AutoReseed feature. The Amazon EBS volumes that you add for the Exchange databases should not be mounted with a drive letter. They should be mounted as folders, following the Microsoft best practice to Configure AutoReseed for a database availability group in Exchange Server.
The default Exchange configuration creates two folders on the root of the C drive:
C:\ExchangeDatabases
C:\ExchangeVolumes
Each EBS data volume attached to the Exchange instance will be mapped to a folder under C:\ExchangeVolumes. For example, if we attach 4 EBS data volumes to an Exchange instance, they will be mapped to four subfolders:
C:\ExchangeVolumes\Volume1
C:\ExchangeVolumes\Volume2
C:\ExchangeVolumes\Volume3
C:\ExchangeVolumes\Volume4
Then under C:\ExchangeDatabases, create a subfolder for each database (in a similar fashion as ExchangeVolumes). This Microsoft reference explains it fairly well. Mapping databases to folders can also be easily scripted to recreate mapping if needed.
Once you ensure that AutoReseed is properly configured, create your Database Availability Groups (DAG) by running the following command:
Get-DatabaseAvailabilityGroup -Identity DAG1 | fl *AutoDag*
Verify that the output of the command is as follows for both AutoDagAutoReseedEnabled and AutoDagDiskReclaimerEnabled. By default, they should both be set to True:
AutoDagAutoReseedEnabled : True
AutoDagDiskReclaimerEnabled : True
Once you have ensured that your DAG is created and that both DiskReclaimer and AutoReSeed are set to True, we can move forward with getting the Microsoft Exchange MetaCacheDatabase enabled.
Before continuing, let’s take a deeper look at the Microsoft Exchange MetaCacheDatabase. This feature allowed the last few versions of Exchange to work rather well with mechanical hard drives, removing the requirement for fast SSD drives. With Exchange 2019, the Microsoft preferred architecture says drives for your databases should be SAS 7.2K RPM. This means that we can deploy Exchange either on Throughput Optimized HDD (st1) or Cold HDD (sc1). Cold HDD (sc1) performance and throughput parameters are closer to Microsoft’s recommendations. MetaCacheDatabase adds an SSD layer to the mix in the form of a database, allowing you to cache data to the SSD drive for faster access. Losing the SSD will result in a performance degradation that will recover automatically once you replace the SSD.
Microsoft recommends a 1 to 3 ratio of SDD cache drives to HDD drives with cache allocated at 5-10% of the total storage. For example, if you have 3 sc1 HDD drives at 10TB each, you may employ a 1.5TB gp3 SSD drive for the MetaCacheDatabase at 5% ratio of cache ratio to total storage. Or you may go to 3TB for gp3 SSD cache drive for 10% ratio or anywhere in between.
When you add the SSD for cache, do not initialize the drive on the Windows OS. The MetaCacheDatabase setup process will do that for you. If, for some reason you do initialize it, no worries – just clean the drive using the DISKPART windows command-line utility and reboot.
Similar to creating the DAG above, you should create two more folders in the root of the C drive. Microsoft documentation says that DAG creation process will create these folders for you, but in my testing, this was not always the case. The default folders that need to be created are: C:\ExchangeMCDBVolumes and C:\ExchangeMetaCacheDBs. These folders will host the mountpoints that will be auto-created by the utility.
Now, let’s make sure that your environment is ready to continue. To check the environment, you may issue the following command. Make sure to replace abdb01 with your database name:
Get-MailboxDatabase abdb02 | fl *Meta*
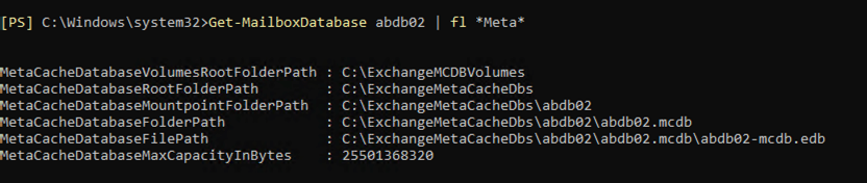
Figure 1. Output of the Get-MailboxDatabase command
With the folder structure confirmed (as seen in Figure 1), we can get started by importing the Exchange Management Shell. This should be done in the context of Administrator account.
Step 1:
Import-Module ‘C:\Program Files\Microsoft\Exchange Server\V15\Scripts\Manage-MetaCacheDatabase.ps1’
This command will load the Microsoft Exchange-specific PowerShell module to manage the MCDB (MetaCacheDatabase) and allow you to run subsequent commands.
Step 2: Run the following command and allow up to 20 minutes for AD replication to conclude once you run this command:
Manage-MCDB -DagName DAG1 -ConfigureMCDBPrerequisite -SSDSizeInBytes 1932735283 -SSDCountPerServer 1
Make a note of the -SSDCountPerServer parameter at the end of the command. We are using one here because, in our scenario, we are using 1 SSD cache drive for our 3 HDDs. You may change this to your specific requirements. For example, if you have 6 HDDs, it should be 2 SSDs, or if you have 9 HDDs, it should be 3 SDDs to maintain the recommended 1-to-3 ratio of SSD to HDD. If your numbers do not align, go with the next highest number.
-SSDSizeinBytes will be the size in kilobytes of the cache drives you are using. For example, if you allocate 1.8 terabytes SSD drive for cache, you would specify cache size as 1932735283 kilobytes.
After issuing this command, you may expect to receive results similar to Figure 2:
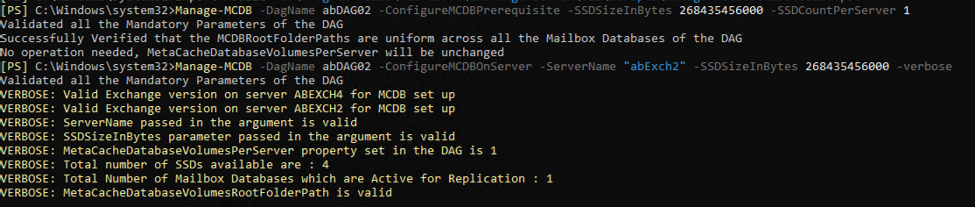
Figure 2. Manage-MCDB command output for configuring MCDB prerequisites
Step 3: The following command must be run on every server that is part of that DAG:
Manage-MCDB -DagName DAG1 -ConfigureMCDBOnServer -ServerName “ExchangeServerName” -SSDSizeInBytes 1932735283 -verbose
This is where it will actually take that uninitialized SSD drive and prep it to be used as cache. It will also mount the volume to one of the appropriate default folders created earlier.
See Figure 3 for expected output:
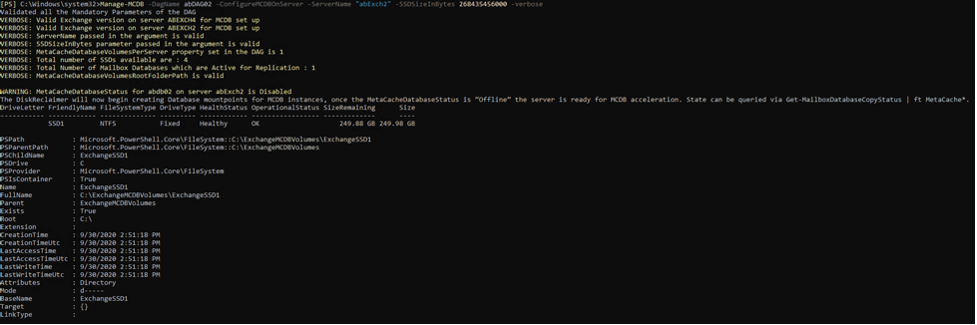
Figure 3. Sample output of Manage-MCDB command for configuring individual servers
If you go to Disk Management and Right-Click on the SSD in question and choose “Change Drive Letter and Paths” you will see results similar to those in Figure 4:
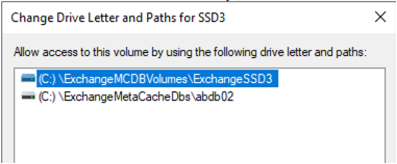
Figure 4. Mount points to the default folders
The two mount points are created to the default folders created when setting up your DAG. The second mount point, the one for the Database, will only be created on the server that has the active Database in the DAG.
Step 4: The following command must be run on every server that is part of the DAG:
Manage-MCDB -DagName DAG1 -ServerAllowMCDB:$true -Servername ExchangeServerName
This command enables MCDB on this server. See Figure 5 for expected output:
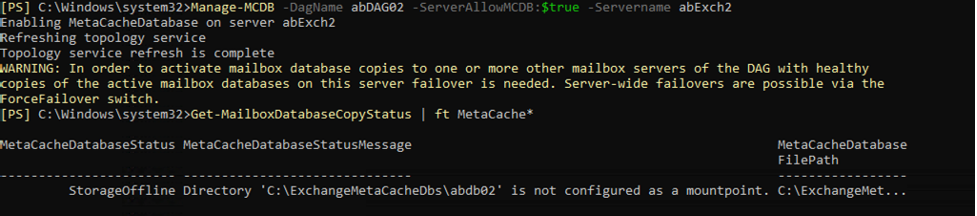
Figure 5. Output of the Manage-MCDB command to allow MCDB on the server.
As you can see, it says StorageOffline. This is because while we have Enabled it, the actual files are not created and mounted until we do a failover of the DAG from one server to the other. Please make sure that before you move to the next step, the above command has been run on all member servers of the DAG.
Step 5: This command will be run on the Active Server for the DAG. In Figure 6, abExch2 is the name of the active server:
Manage-MCDB -DagName DAG1 -Servername ExchangeServerName -ForceFailover:$true
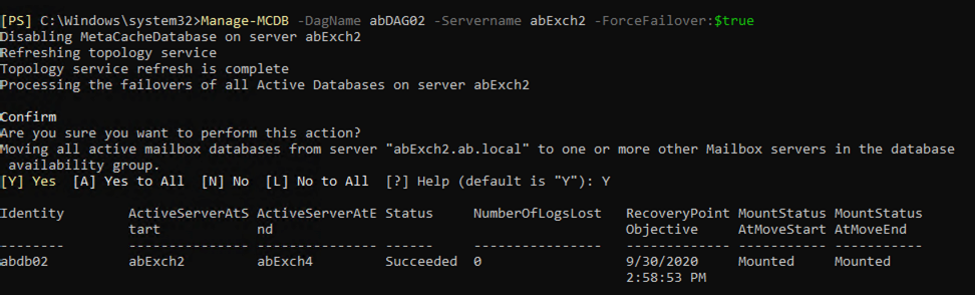
Figure 6. Output of the Manage-MCDB command forcing server failover
As you can see, this command will disable MetaCacheDatabase on the specified server and fail over to another server in the DAG, which is denoted in the ActiveServerAtEnd column in Figure 6. Please make sure that the above command succeeds and that you give MetaCacheDatabase a few minutes to spin up on the new Active Server before proceeding
Step 6: Run the following command, replacing ExchangeServerName with the name of your server:
Get-MailboxDatabaseCopyStatus -Server ExchangeServerName | ft MetaCache* -Server
In this command, ExchangeSevername is the server indicated at ActiveServerAtEnd column on Figure 6. This will verify if MCDB is actually running and healthy, as noted in Figure 7:

Figure 7. Sample output of the Get-MailboxDatabaseCopyStatus command
That’s it. The Microsoft Exchange MetaCacheDatabase is enabled and functioning for that DAG. You would follow these steps again for any other DAGs you may have.
Summary
The introduction of Microsoft Exchange MetaCacheDatabase allows you to use tiered storage to support the Exchange database while adhering to Microsoft’s preferred architecture. Deploying Exchange infrastructure on AWS allows you to leverage cost-efficient Cold HDDs (sc1) for your main Exchange storage utilizing the more expensive SSDs just for your cache. That is a savings of 533.333% compared to General Purpose SSD (gp3). If you require more performance, you can change the Cold HDD (sc1) to Throughput Optimized (st1) without interrupting your environment for still a 177.77% savings over General Purpose SSD (gp3). This solution allows for flexibility and utilization of AWS’ Global Footprint.
AWS can help you assess how your company can get the most out of cloud. Join the millions of AWS customers that trust us to migrate and modernize their most important applications in the cloud. To learn more on modernizing Windows Server or SQL Server, visit Windows on AWS. Contact us to start your migration journey today.