AWS Cloud Operations Blog
Application configuration deployment to container workloads using AWS AppConfig
UPDATE (15 Dec 22): AWS AppConfig released an Agent for containers (EKS, ECS, Docker, Kubernetes) in December 2022, which makes calling AppConfig much simpler from containerized applications. We recommend using the AppConfig Agent for containers instead of the method below. Read the Agent documentation.
AWS AppConfig is a capability of AWS Systems Manager that you can use to create, manage, and quickly deploy application configurations at runtime. With AWS AppConfig, you can validate your configuration data to check for any errors, and define deployment strategies to control the rate at which deployments occur. You can also set monitors to watch for any alarms during deployments. In case an error occurs, AWS AppConfig rolls back the deployment to the previous version to avoid application outages.
You can use AWS AppConfig to roll out application configurations across applications hosted on Amazon Elastic Compute Cloud (Amazon EC2) instances, containers, AWS Lambda, mobile apps, IoT devices, and on-premises servers in a validated, controlled, and monitored way.
In the last two posts, we showed you how to use AWS AppConfig in a serverless environment using an AWS AppConfig Lambda extension. We also showed you how to deploy configurations across environments using the AWS CodePipeline integration with AWS AppConfig. In this post, we explore how to use AWS AppConfig to deploy application configurations to complex containerized applications.
Specifically, we cover how to:
- Separate application configuration from application code for a containerized application.
- Use AWS AppConfig to manage and deploy the application configuration.
- Automate and efficiently manage application configurations in a containerized application.
Customers often use Amazon Elastic Container Service (Amazon ECS) or Amazon Elastic Kubernetes Service (Amazon EKS) to manage their application configurations running in container applications. A common practice is to either bake the configurations in the container image, or through the use of environment variables. Customers also retrieve the configuration dynamically using solutions like external key-value stores, Kubernetes ConfigMaps, or AWS Systems Manager Parameter Store. Managing application configuration externally not only allows you to store complex and dynamic configurations, but it allows makes the versioning of the configuration easier. Decoupling application configuration from code also means you can deploy changes without restarting the application or taking the application out of service. This is how AWS AppConfig improves configuration management.
AWS AppConfig lets you validate the configuration before you deploy it to make sure it is free of errors. As soon as the configuration is deployed, it is immediately available to the application and the updates can be consumed by the application at runtime. AWS AppConfig also allows you to use feedback loops using Amazon CloudWatch. It enables controlled rolling updates and automatic rollbacks of new configurations without degrading the application.
AWS AppConfig also provides rollout controls so you can apply advanced deployment techniques like feature toggling for fast, controlled launches of new features.
Solution architecture
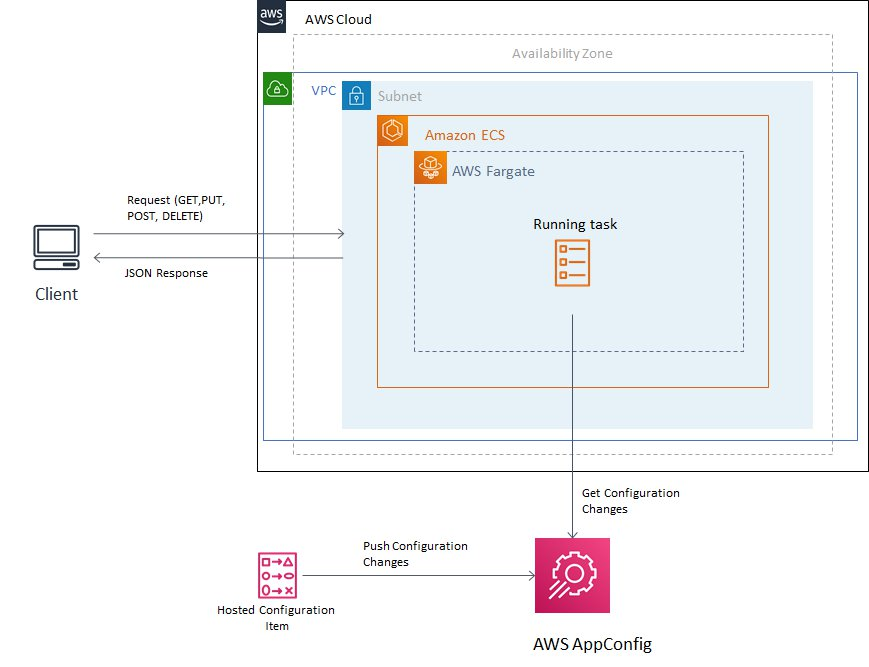
Figure 1: Architecture of the proposed solution
- To illustrate the integration between containers and AWS AppConfig, we work with a simple Java microservices application. It has a REST API that returns a limited number of movies based on the feature parameter and number of movies to be returned. This application is containerized, pushed to Amazon Elastic Container Registry (Amazon ECR), and deployed to AWS Fargate.
- The feature parameter and number of movies limit are stored as an AWS AppConfig hosted configuration in AWS AppConfig. The application code reads the application configuration from AWS AppConfig using AWS SDK API operations.
- The application has a built-in caching layer to cache the responses from AWS AppConfig. Subsequent calls to fetch the configuration check the cache first and return the response from the cache. If the cache is empty, the application calls the AWS AppConfig API to fetch the configuration. The cache expiry is based on the TTL set in the properties.
- We then change the movie limit in AWS AppConfig and deploy the configuration so that it is available for the container application to read. When we call the REST API to retrieve the list of movies, only the updated number of movies are returned based on the new number of results defined in the AWS AppConfig configuration profile.
Prerequisites
- The AWS CLI installed and configured. Use version 1.7 or later.
- IAM permissions to create resources in AWS AppConfig, Amazon ECR, and AWS Fargate.
- Familiarity with Java, Docker, containers, Amazon ECR, and Amazon ECS.
For the purposes of this post, we deployed a sample Java application in AWS Fargate. For additional information, check the prescriptive guidance for deploying Java microservices to AWS Fargate.
To implement this solution, we will:
- Create the application, environments, and configuration profile in AWS AppConfig.
- Set up the base application with Amazon ECS and Amazon ECR and the associated network components with AWS CloudFormation.
- Clone the code repository, create a Docker container, and publish to Amazon ECR.
- Create a Fargate task and deploy the container application into Amazon ECS on AWS Fargate using AWS CloudFormation.
- Verify the deployed application, update the AppConfig configuration data, and deploy the updated configuration.
Create application, environments, and configuration profile in AWS AppConfig
- Open the AWS Systems Manager console.
- In the left navigation pane, choose AWS AppConfig.
- If the AWS AppConfig welcome page appears, click Create configuration data. Otherwise, click Create application.
- For Name, enter a name for the application. (
MyContainerApplication) You can add an optional description and apply tags to the application. Choose Create application.
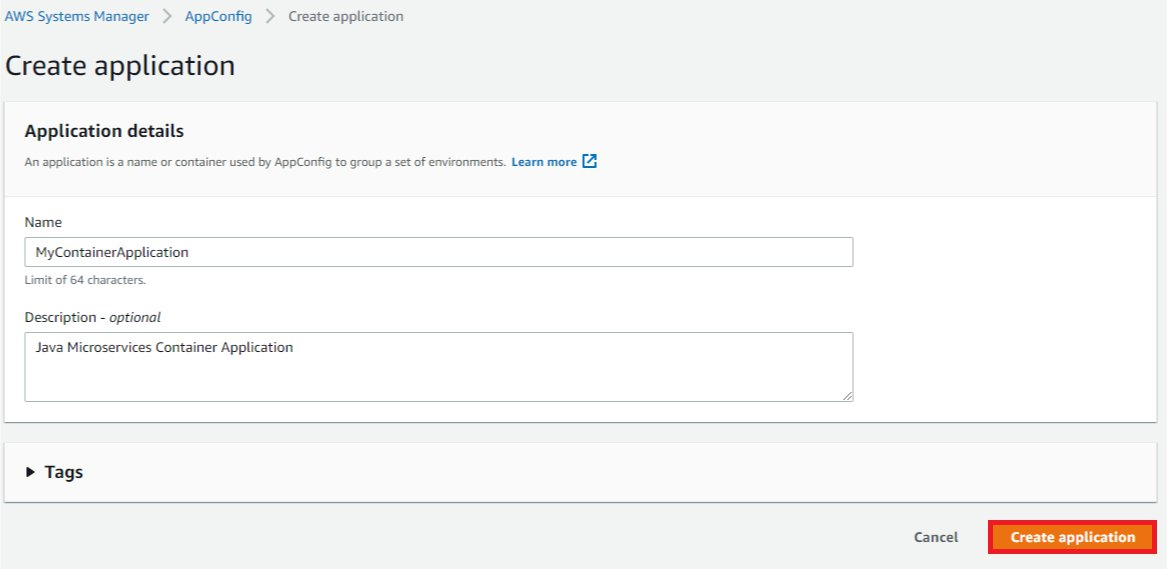
Figure 2: Create application in AWS AppConfig
- After the application is created, you are directed to a page with Environments and Configuration Profiles Choose Create environment, and then enter a name (
MyContainerApplicationProductionEnvironment) and optional description for the environment. You can also optionally add tags and configure Amazon CloudWatch alarms for this environment. - In the top navigation, choose the application name, and on the Configuration Profiles tab, choose Create configuration profile.
- Enter a name (
MyContainerApplicationConfigurationProfile) and optional description for the configuration profile. - Under Configuration source, choose AWS AppConfig hosted configuration.Under Content, choose JSON, paste the following content, and then choose Next.
{
  "boolEnableFeature": true,
  "intItemLimit": 5
}
Note: As we see in this snippet, we are controlling the number of movies that we display through the intItemLimit . We are controlling if that configuration is enabled or disabled through the boolEnableFeature . As a default, we keep this configuration enabled but limit the movies to 5.
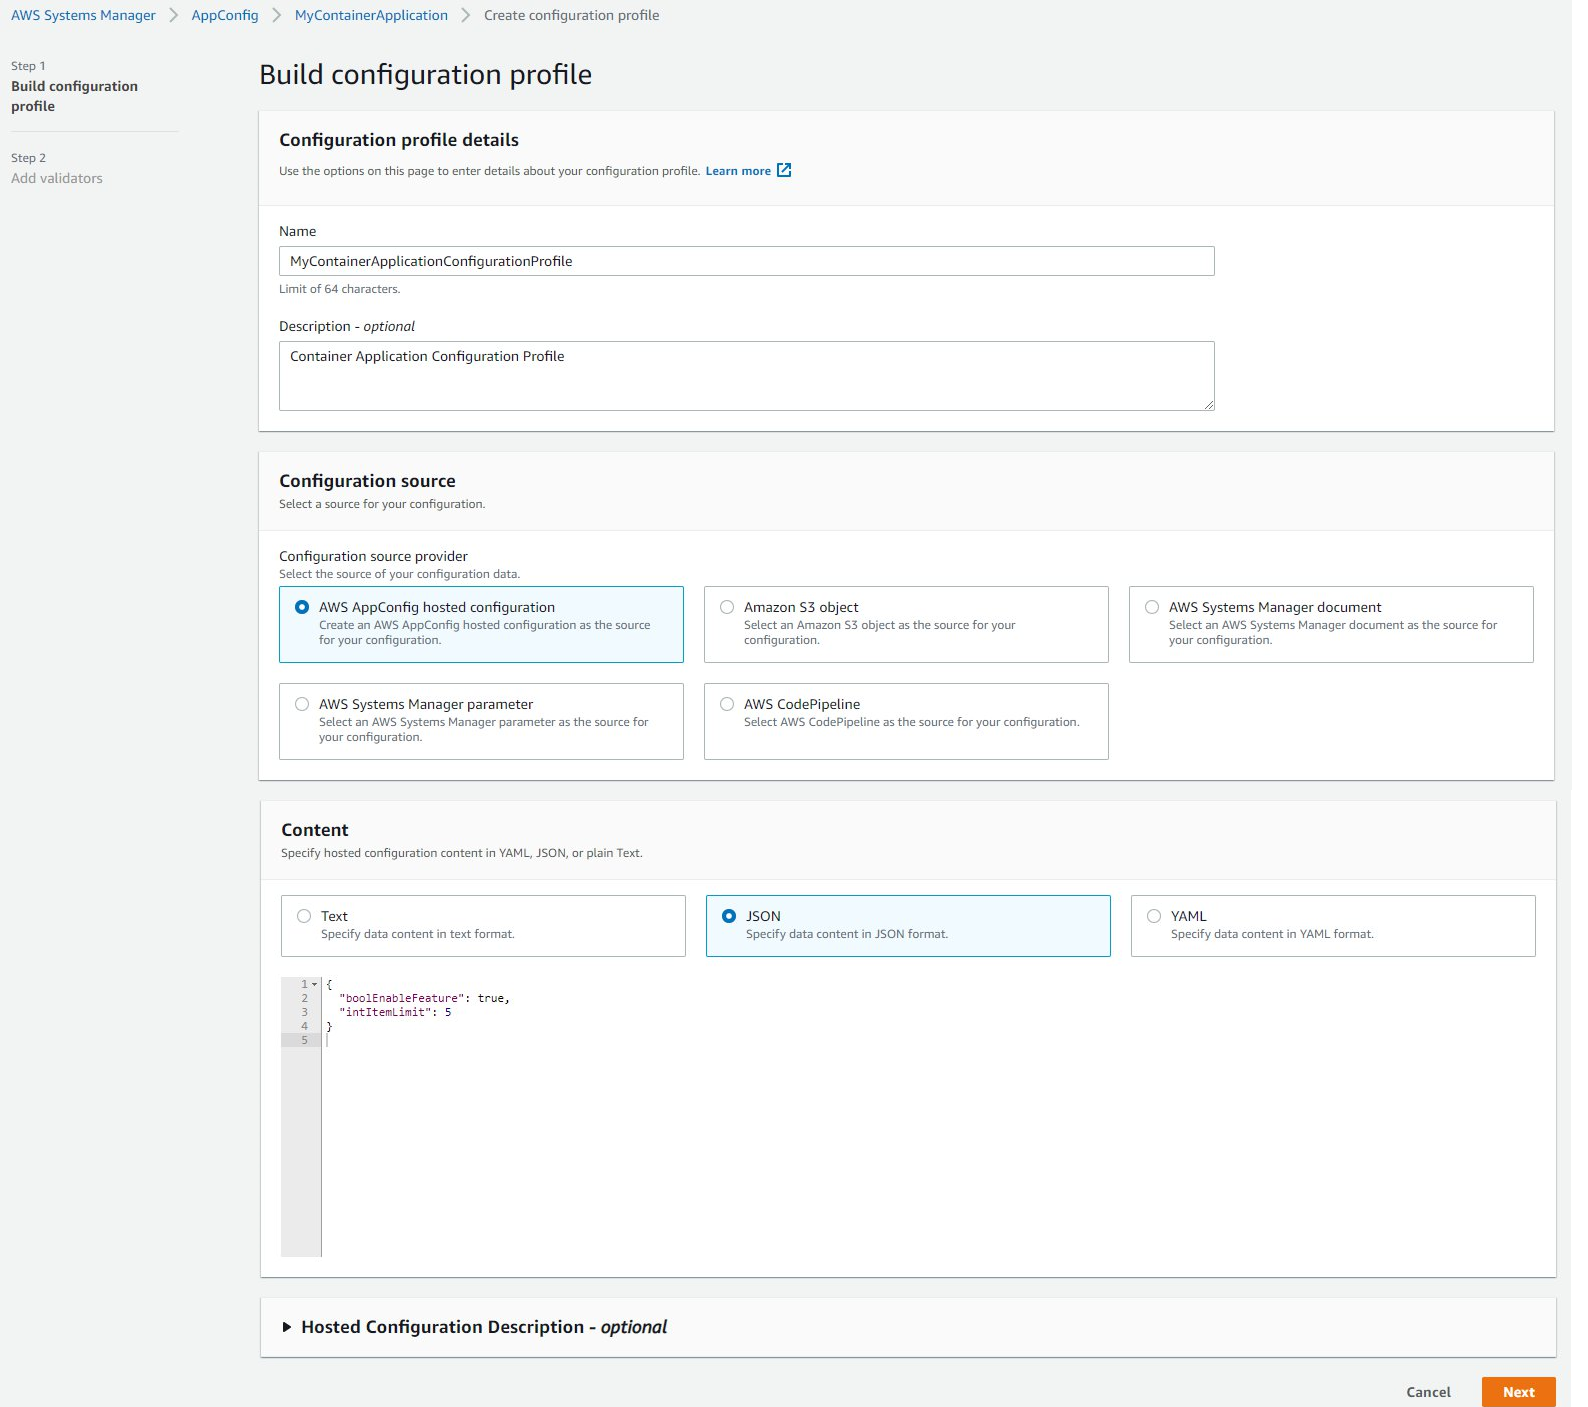
Figure 3: Build configuration profile in AWS AppConfig
- (Optional) You can add validators to validate the configuration. For information, check about validators in the AWS AppConfig documentation.
- Choose Create configuration profile.
- Choose Start deployment.
- Choose the environment, hosted configuration version, deployment strategy, and an optional description to start the deployment process.
- To create a custom deployment strategy, choose Create Deployment Strategy. Or choose one of the predefined deployment strategies provided by AWS AppConfig. For more information, check creating a deployment strategy in the AWS AppConfig documentation. For the purposes of this post, we chose the
AppConfig.Linear50PercentEvery30Secondsdeployment strategy.
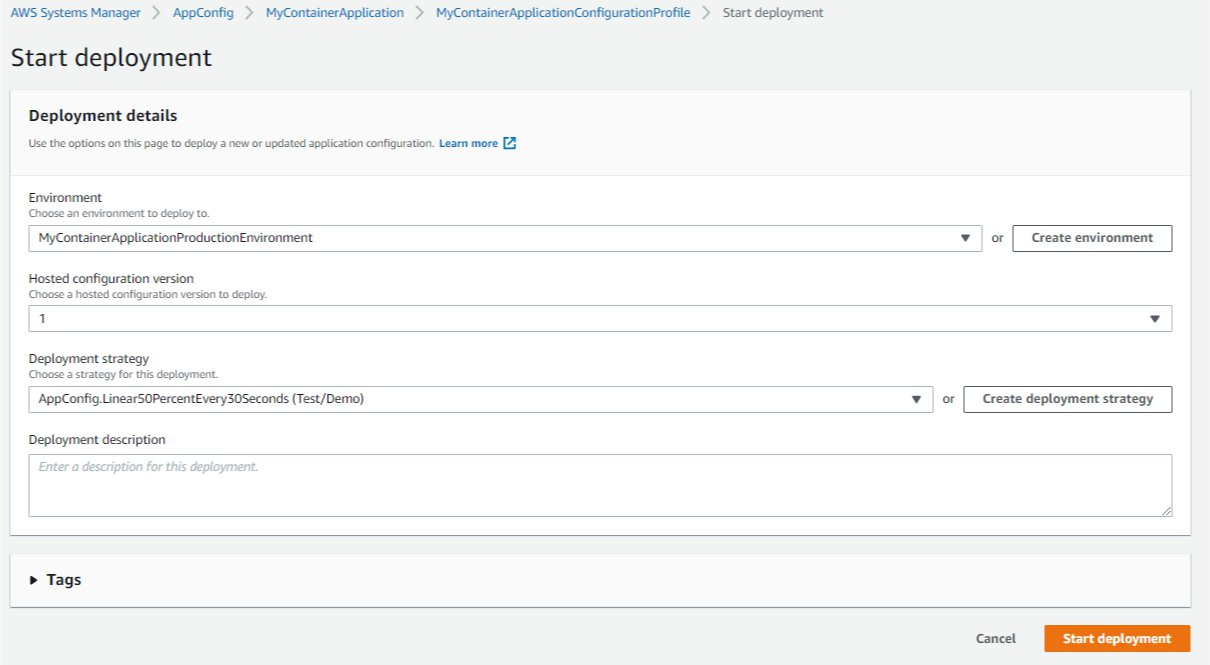
Figure 4: Deployment details in AWS AppConfig
Note: Depending on the deployment strategy you selected, this operation might take few minutes to complete. The configuration is available to the application as soon as the deployment state is Complete.
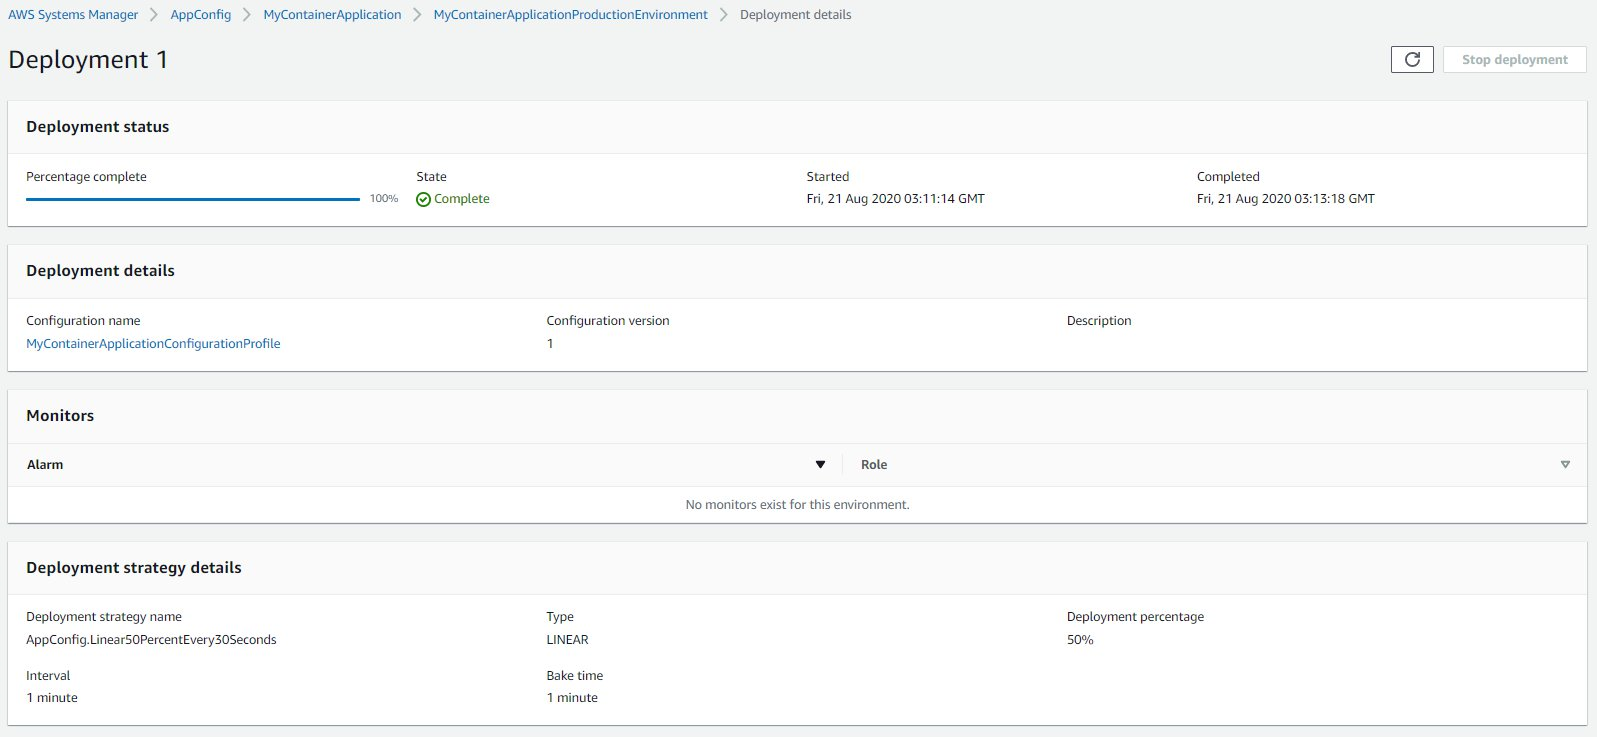
Figure 5: Completed deployment in AWS AppConfig
Set up the base application with Amazon ECS and Amazon ECR and associated network components using AWS CloudFormation
- We are using AWS CloudFormation to set up the base application. This includes an Amazon Elastic Container Service cluster, Amazon Elastic Container Registry, IAM roles, and required networking components like a VPC, subnets, and routes.
- Use the following code block to save a template as a local file (
.ymlfile extension) on your computer.
AWSTemplateFormatVersion: '2010-09-09'
Description: AWS Fargate cluster running containers in a public subnet.
Parameters:
  EnvironmentName:
    Type: String
    Default: dev
    Description: "Will be used for namespacing all cluster resources. Example: dev, test, pro, qa,... "
  ECRRepositoryName:
    Type: String
    Default: "appconfig-test"
    Description: "Name of the ECR repository."
Mappings:
  SubnetConfig:
    VPC:
      CIDR: '10.0.0.0/16'
    PublicOne:
      CIDR: '10.0.0.0/24'
    PublicTwo:
      CIDR: '10.0.1.0/24'
Resources:
  VPC:
    Type: AWS::EC2::VPC
    Properties:
      EnableDnsSupport: true
      EnableDnsHostnames: true
      CidrBlock: !FindInMap ['SubnetConfig', 'VPC', 'CIDR']
  PublicSubnetOne:
    Type: AWS::EC2::Subnet
    Properties:
      AvailabilityZone:
        Fn::Select:
          - 0
          - Fn::GetAZs: {Ref: 'AWS::Region'}
      VpcId: !Ref 'VPC'
      CidrBlock: !FindInMap ['SubnetConfig', 'PublicOne', 'CIDR']
      MapPublicIpOnLaunch: true
  PublicSubnetTwo:
    Type: AWS::EC2::Subnet
    Properties:
      AvailabilityZone:
        Fn::Select:
          - 1
          - Fn::GetAZs: {Ref: 'AWS::Region'}
      VpcId: !Ref 'VPC'
      CidrBlock: !FindInMap ['SubnetConfig', 'PublicTwo', 'CIDR']
      MapPublicIpOnLaunch: true
  InternetGateway:
    Type: AWS::EC2::InternetGateway
  GatewayAttachment:
    Type: AWS::EC2::VPCGatewayAttachment
    Properties:
      VpcId: !Ref 'VPC'
      InternetGatewayId: !Ref 'InternetGateway'
  PublicRouteTable:
    Type: AWS::EC2::RouteTable
    Properties:
      VpcId: !Ref 'VPC'
  PublicRoute:
    Type: AWS::EC2::Route
    DependsOn: GatewayAttachment
    Properties:
      RouteTableId: !Ref 'PublicRouteTable'
      DestinationCidrBlock: '0.0.0.0/0'
      GatewayId: !Ref 'InternetGateway'
  PublicSubnetOneRouteTableAssociation:
    Type: AWS::EC2::SubnetRouteTableAssociation
    Properties:
      SubnetId: !Ref PublicSubnetOne
      RouteTableId: !Ref PublicRouteTable
  PublicSubnetTwoRouteTableAssociation:
    Type: AWS::EC2::SubnetRouteTableAssociation
    Properties:
      SubnetId: !Ref PublicSubnetTwo
      RouteTableId: !Ref PublicRouteTable
  ECRRepository:
    Type: AWS::ECR::Repository
    Properties:
      RepositoryName: !Ref 'ECRRepositoryName'
  ECSCluster:
    Type: AWS::ECS::Cluster
  ContainerSecurityGroup:
    Type: AWS::EC2::SecurityGroup
    Properties:
      GroupDescription: Access to the Fargate containers
      VpcId: !Ref 'VPC'
  AutoscalingRole:
    Type: AWS::IAM::Role
    Properties:
      AssumeRolePolicyDocument:
        Statement:
          - Effect: Allow
            Principal:
              Service: [application-autoscaling.amazonaws.com]
            Action: ['sts:AssumeRole']
      Path: /
      Policies:
        - PolicyName: service-autoscaling
          PolicyDocument:
            Statement:
              - Effect: Allow
                Action:
                  - 'application-autoscaling:*'
                  - 'cloudwatch:DescribeAlarms'
                  - 'cloudwatch:PutMetricAlarm'
                  - 'ecs:DescribeServices'
                  - 'ecs:UpdateService'
                Resource: '*'
  ECSRole:
    Type: AWS::IAM::Role
    Properties:
      AssumeRolePolicyDocument:
        Statement:
          - Effect: Allow
            Principal:
              Service: [ecs-tasks.amazonaws.com]
            Action: ['sts:AssumeRole']
      Path: /
      Policies:
        - PolicyName: ecs-service
          PolicyDocument:
            Statement:
              - Effect: Allow
                Action:
                  - 'ec2:AttachNetworkInterface'
                  - 'ec2:CreateNetworkInterface'
                  - 'ec2:CreateNetworkInterfacePermission'
                  - 'ec2:DeleteNetworkInterface'
                  - 'ec2:DeleteNetworkInterfacePermission'
                  - 'ec2:Describe*'
                  - 'ec2:DetachNetworkInterface'
                  - 'elasticloadbalancing:DeregisterInstancesFromLoadBalancer'
                  - 'elasticloadbalancing:DeregisterTargets'
                  - 'elasticloadbalancing:Describe*'
                  - 'elasticloadbalancing:RegisterInstancesWithLoadBalancer'
                  - 'elasticloadbalancing:RegisterTargets'
                  - 'appconfig:GetEnvironment'
                  - 'appconfig:GetHostedConfigurationVersion'
                  - 'appconfig:GetConfiguration'
                  - 'appconfig:GetApplication'
                  - 'appconfig:GetConfigurationProfile'
                Resource: '*'
  ECSTaskExecutionRole:
    Type: AWS::IAM::Role
    Properties:
      AssumeRolePolicyDocument:
        Statement:
          - Effect: Allow
            Principal:
              Service: [ecs-tasks.amazonaws.com]
            Action: ['sts:AssumeRole']
      Path: /
      ManagedPolicyArns:
        - 'arn:aws:iam::aws:policy/service-role/AmazonECSTaskExecutionRolePolicy'
Outputs:
  ClusterName:
    Description: The name of the ECS cluster
    Value: !Ref 'ECSCluster'
    Export:
      Name: !Sub AppConfigBlog:${EnvironmentName}:ClusterName
  AutoscalingRole:
    Description: The ARN of the role used for autoscaling
    Value: !GetAtt 'AutoscalingRole.Arn'
    Export:
      Name: !Sub AppConfigBlog:${EnvironmentName}:AutoscalingRole
  ECSRole:
    Description: The ARN of the ECS role
    Value: !GetAtt 'ECSRole.Arn'
    Export:
      Name: !Sub AppConfigBlog:${EnvironmentName}:ECSRole
  ECSTaskExecutionRole:
    Description: The ARN of the ECS role
    Value: !GetAtt 'ECSTaskExecutionRole.Arn'
    Export:
      Name: !Sub AppConfigBlog:${EnvironmentName}:ECSTaskExecutionRole
  ECRRepository:
    Description: The ARN of the ECR Repository
    Value: !GetAtt 'ECRRepository.Arn'
    Export:
      Name: !Sub AppConfigBlog:${EnvironmentName}:ECRRepository
  VpcId:
    Description: The ID of the VPC that this stack is deployed in
    Value: !Ref 'VPC'
    Export:
      Name: !Sub AppConfigBlog:${EnvironmentName}:VpcId
  PublicSubnetOne:
    Description: Public subnet one
    Value: !Ref 'PublicSubnetOne'
    Export:
      Name: !Sub AppConfigBlog:${EnvironmentName}:PublicSubnetOne
  PublicSubnetTwo:
    Description: Public subnet two
    Value: !Ref 'PublicSubnetTwo'
    Export:
      Name: !Sub AppConfigBlog:${EnvironmentName}:PublicSubnetTwo
  ContainerSecurityGroup:
    Description: A security group used to allow Fargate containers to receive traffic
    Value: !Ref 'ContainerSecurityGroup'
    Export:
      Name: !Sub AppConfigBlog:${EnvironmentName}:ContainerSecurityGroup
- Open the AWS CloudFormation console, and choose Create stack.
- On the Specify template page, choose Upload a template file, and choose the file you just saved. Choose Next.
- On the Specify stack details page, enter a name for the stack (for example,
ECSCluster-dev). - In the Parameters section, use
devas the value for the Environment and choose Next. - (Optional) Define your tags, and then choose Next.
- On the Review page, select the check box in the Capabilities section, and then choose Create stack.
Wait until the status displayed for the stacks is Create Complete.
Clone the code repository, create a Docker container, and publish to Amazon ECR
- Clone the code from the GitHub repository.
- Navigate to Amazon Elastic Container Registry console , click on the repository that you created and click View push commands.
- Navigate to the code repository in the command prompt and execute the push commands to upload the project.
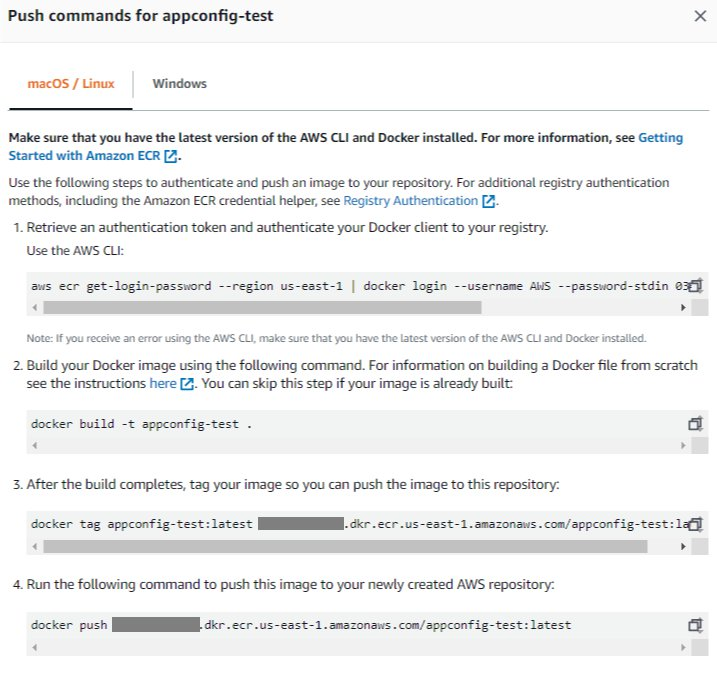
Figure 6: Push commands for the Docker image in Amazon ECR
Note: This operation might take few minutes to complete. When it is complete, a success message appears.
- When the upload is complete, copy the URL of the image in the repository. Use this URL as a parameter (
ImageUrl) to the AWS CloudFormation template mentioned in the next section.
Create a Fargate task and deploy the container application into Amazon ECS on AWS Fargate using AWS CloudFormation
We are using AWS CloudFormation to set up the application container. It includes Amazon ECS, an AWS Fargate task definition, and a load balancer in front of Amazon ECS.
- Use the following code block to save a template as a local file (
.ymlfile extension) on your computer.
AWSTemplateFormatVersion: '2010-09-09'
Description: Deploy a service on AWS Fargate, hosted in a public subnet,  accessible via a public load balancer.
Metadata:
  AWS::CloudFormation::Interface:
    ParameterGroups:
      -
        Label:
          default: "Container Configuration"
        Parameters:
          - ImageUrl
          - ContainerPort
          - ContainerCpu
          - ContainerMemory
      -
        Label:
          default: "Networking"
        Parameters:
          - Path
          - HealthCheckPath
      -
        Label:
          default: "Service parameters"
        Parameters:
          - EnvironmentName
          - ServiceName
          - Priority
          - DesiredCount
          - MaximumPercent
          - MinimumHealthyPercent
Parameters:
  EnvironmentName:
    Type: String
    Default: dev
    Description: The name of the environment to add this service to
  ServiceName:
    Type: String
    Default: appconfig-test
    Description: A name for the service
  ImageUrl:
    Type: String
    Default: ""
    Description: Provide the url of a docker image that was pushed to the ECR that contains the application process that
      will handle the traffic for this service
  ContainerPort:
    Type: Number
    Default: 80
    Description: What port number the application inside the docker container is binding to
  ContainerCpu:
    Type: Number
    Default: 256
    Description: How much CPU to give the container. 1024 is 1 CPU
    AllowedValues:
        - 1024
        - 512
        - 256
  ContainerMemory:
    Type: Number
    Default: 512
    Description: How much memory in megabytes to give the container
    AllowedValues:
        - 2048
        - 1024
        - 512
  Path:
    Type: String
    Default: "*"
    Description: A path on the load balancer that this service
      should be connected to. Use * to send all load balancer
      traffic to this service.
  HealthCheckPath:
    Type: String
    Default: "/movies/getMovies"
    Description: A Valid path on the service which the Healthcheck will ping to get a valid 200 Response
  Priority:
    Type: Number
    Default: 1
    Description: The priority for the routing rule added to the load balancer.
      This only applies if your have multiple services which have been
      assigned to different paths on the load balancer.
  DesiredCount:
    Type: Number
    Default: 2
    Description: How many copies of the service task to run
  MaximumPercent:
    Type: Number
    Default: 200
    Description: Upper limit on the number of tasks in a service that are allowed in the RUNNING or PENDING state during a deployment, as a percentage of the desired number of tasks
  MinimumHealthyPercent:
    Type: Number
    Default: 75
    Description: Lower limit on the number of tasks in a service that must remain in the RUNNING state during a deployment, as a percentage of the desired number of tasks

Resources:
  EcsSecurityGroupIngressFromPublicALB:
    Type: AWS::EC2::SecurityGroupIngress
    Properties:
      Description: Ingress from the public ALB
      GroupId:
        Fn::ImportValue: !Sub AppConfigBlog:${EnvironmentName}:ContainerSecurityGroup
      IpProtocol: tcp
      SourceSecurityGroupId: !Ref 'PublicLoadBalancerSG'
      FromPort: 80
      ToPort: 80
  PublicLoadBalancerSG:
    Type: AWS::EC2::SecurityGroup
    Properties:
      GroupDescription: Access to the public facing load balancer
      VpcId:
        Fn::ImportValue: !Sub AppConfigBlog:${EnvironmentName}:VpcId
      SecurityGroupIngress:
        # Allow access to ALB from anywhere on the internet
        - CidrIp: 0.0.0.0/0
          IpProtocol: tcp
          FromPort: 80
          ToPort: 80
  PublicLoadBalancer:
    Type: AWS::ElasticLoadBalancingV2::LoadBalancer
    Properties:
      Scheme: internet-facing
      LoadBalancerAttributes:
        - Key: idle_timeout.timeout_seconds
          Value: '30'
      Subnets:
        # The load balancer is placed into the public subnets, so that traffic
        # from the internet can reach the load balancer directly via the internet gateway
        - Fn::ImportValue: !Sub AppConfigBlog:${EnvironmentName}:PublicSubnetOne
        - Fn::ImportValue: !Sub AppConfigBlog:${EnvironmentName}:PublicSubnetTwo
      SecurityGroups: [!Ref 'PublicLoadBalancerSG']
      Tags:
        - Key: "Name"
          Value: !Sub ${ServiceName}:LB
  # A dummy target group is used to setup the ALB to just drop traffic
  # initially, before any real service target groups have been added.
  DummyTargetGroupPublic:
    Type: AWS::ElasticLoadBalancingV2::TargetGroup
    Properties:
      HealthCheckIntervalSeconds: 6
      HealthCheckPath: /
      HealthCheckProtocol: HTTP
      HealthCheckTimeoutSeconds: 5
      HealthyThresholdCount: 2
      Port: 80
      Protocol: HTTP
      UnhealthyThresholdCount: 2
      VpcId:
        Fn::ImportValue: !Sub AppConfigBlog:${EnvironmentName}:VpcId
  PublicLoadBalancerListener:
    Type: AWS::ElasticLoadBalancingV2::Listener
    Properties:
      DefaultActions:
        - TargetGroupArn: !Ref 'DummyTargetGroupPublic'
          Type: 'forward'
      LoadBalancerArn: !Ref 'PublicLoadBalancer'
      Port: 80
      Protocol: HTTP
  # A log group for storing the stdout logs from this service's containers
  LogGroup:
    Type: AWS::Logs::LogGroup
    Properties:
      LogGroupName: !Sub AppConfigBlog-${EnvironmentName}-service-${ServiceName}

  # The task definition. This is a simple metadata description of what
  # container to run, and what resource requirements it has.
  TaskDefinition:
    Type: AWS::ECS::TaskDefinition
    Properties:
      Family: !Ref 'ServiceName'
      Cpu: !Ref 'ContainerCpu'
      Memory: !Ref 'ContainerMemory'
      NetworkMode: awsvpc
      RequiresCompatibilities:
        - FARGATE
      ExecutionRoleArn:
        Fn::ImportValue: !Sub AppConfigBlog:${EnvironmentName}:ECSTaskExecutionRole
      TaskRoleArn:
        Fn::ImportValue: !Sub AppConfigBlog:${EnvironmentName}:ECSRole
      ContainerDefinitions:
        - Name: !Ref 'ServiceName'
          Cpu: !Ref 'ContainerCpu'
          Memory: !Ref 'ContainerMemory'
          Image: !Ref 'ImageUrl'
          PortMappings:
            - ContainerPort: !Ref 'ContainerPort'
          LogConfiguration:
            LogDriver: 'awslogs'
            Options:
              awslogs-group: !Sub AppConfigBlog-${EnvironmentName}-service-${ServiceName}
              awslogs-region: !Ref 'AWS::Region'
              awslogs-stream-prefix: !Ref 'ServiceName'

  # The service. The service is a resource which allows you to run multiple
  # copies of a type of task, and gather up their logs and metrics, as well
  # as monitor the number of running tasks and replace any that have crashed
  Service:
    Type: AWS::ECS::Service
    DependsOn: LoadBalancerRule
    Properties:
      ServiceName: !Ref 'ServiceName'
      Cluster:
        Fn::ImportValue: !Sub AppConfigBlog:${EnvironmentName}:ClusterName
      LaunchType: FARGATE
      DeploymentConfiguration:
        MaximumPercent: !Ref 'MaximumPercent'
        MinimumHealthyPercent: !Ref 'MinimumHealthyPercent'
      DesiredCount: !Ref 'DesiredCount'
      NetworkConfiguration:
        AwsvpcConfiguration:
          AssignPublicIp: ENABLED
          SecurityGroups:
            - Fn::ImportValue: !Sub AppConfigBlog:${EnvironmentName}:ContainerSecurityGroup
          Subnets:
            - Fn::ImportValue: !Sub AppConfigBlog:${EnvironmentName}:PublicSubnetOne
            - Fn::ImportValue: !Sub AppConfigBlog:${EnvironmentName}:PublicSubnetTwo
      TaskDefinition: !Ref 'TaskDefinition'
      LoadBalancers:
        - ContainerName: !Ref 'ServiceName'
          ContainerPort: !Ref 'ContainerPort'
          TargetGroupArn: !Ref 'TargetGroup'

  # A target group. This is used for keeping track of all the tasks, and
  # what IP addresses / port numbers they have. You can query it yourself,
  # to use the addresses yourself, but most often this target group is just
  # connected to an application load balancer, or network load balancer, so
  # it can automatically distribute traffic across all the targets.
  TargetGroup:
    Type: AWS::ElasticLoadBalancingV2::TargetGroup
    Properties:
      HealthCheckIntervalSeconds: 40
      HealthCheckPath: !Ref 'HealthCheckPath'
      HealthCheckProtocol: HTTP
      HealthCheckTimeoutSeconds: 30
      HealthyThresholdCount: 2
      TargetType: ip
      Name: !Ref 'ServiceName'
      Port: !Ref 'ContainerPort'
      Protocol: HTTP
      UnhealthyThresholdCount: 2
      VpcId:
        Fn::ImportValue: !Sub AppConfigBlog:${EnvironmentName}:VpcId

  # Create a rule on the load balancer for routing traffic to the target group
  LoadBalancerRule:
    Type: AWS::ElasticLoadBalancingV2::ListenerRule
    Properties:
      Actions:
        - TargetGroupArn: !Ref 'TargetGroup'
          Type: 'forward'
      Conditions:
        - Field: path-pattern
          Values: [!Ref 'Path']
      ListenerArn:
        !Ref PublicLoadBalancerListener
      Priority: !Ref 'Priority'
Outputs:
  ExternalUrl:
    Description: The url of the external load balancer
    Value: !Sub http://${PublicLoadBalancer.DNSName}
    Export:
Name: !Sub AppConfigBlog:${EnvironmentName}:ExternalUrl- Open the AWS CloudFormation console, and choose Create stack.
- On the Specify template page, choose Upload template file, and choose the file you just saved. Choose Next.
- On the Specify stack details page, enter a name for the stack (for example,
fargate-task-dev). - In the Parameters section, Use the image URL from the previous step for the ImageUrl parameter and use
devas the value for the Environment. Leave the rest of the parameters at their defaults. Choose Next. - (Optional) Define your tags, and then choose Next.
- On the Review page, select the check box in the Capabilities section, and choose Create stack.
Wait until the status displayed for the stacks is Create Complete.
Verify the deployed application, update the AppConfig configuration data, and deploy the updated configuration
- In the AWS CloudFormation console,open the fargate-task-dev stack you created
- Choose Outputs, and then copy the external URL for the load balancer.
- Use the
ExternalUrlfor the load balancer to verify the application.
http://ExternalUrl/movies/getMovies

Figure 7: Success response from the application
Next, change the configuration value in the AWS AppConfig configuration to see how it is reflected in the container application.
- Open the AWS AppConfig console, and choose your application.
- On the Configuration Profiles tab, choose the configuration profile you created.
- Under Hosted configuration versions, choose Create.
- Edit the configuration value and choose Create hosted configuration version.

Figure 8: Create hosted configuration version
- Choose Start Deployment, and then choose the environment, latest hosted configuration version, deployment strategy, and an optional description to start the deployment process.
- After the deployment is complete, visit the application URL again to check that the changes reflected immediately.

Figure 9: Successful response from the application
Best practices
AWS AppConfig uses the value of the ClientConfigurationVersion parameter to identify the configuration version on your clients. If you don’t send ClientConfigurationVersion with each call to GetConfiguration, your clients receive the current configuration. You are charged each time your clients receive a configuration. To avoid excessive charges, we recommend that you include the ClientConfigurationVersion value with every call to GetConfiguration. This value must be saved on your client. Subsequent calls to GetConfiguration must pass this value by using the ClientConfigurationVersion parameter.
For more information, see AWS AppConfig best practices.
Cleanup
To avoid ongoing charges, delete the resources you created.
AWS AppConfig
In the AWS Systems Manager console, delete the following resources:
- Hosted configuration
- Configuration profile
- Environment
- Application
Base container application and Fargate task
- In the AWS CloudFormation console,choose the
fargate-task-devstack, and then choose Delete. - Choose the
ECSCluster-devstack, and then choose Delete.
Conclusion
In this post, we showed you how to integrate container applications with AWS AppConfig to retrieve and use an application configuration. AWS AppConfig not only makes application configuration management for your container workloads seamless. It also decouples configuration from your application code. These application configuration changes can be easily tracked outside of your software release cycle and are readily available for your containers to consume.
For more information, see the AWS AppConfig documentation.
About the authors
 Luis Gómez is a Solutions Architect with AWS who works for the public sector in Spain. He has several years of experience building and operating cloud environments and applying DevOps practices. He works with customers to understand their goals and challenges and offers prescriptive guidance for achieving their objectives with AWS offerings.

Venugopalan Vasudevan is a Senior Technical Account Manager with AWS based in Denver, Colorado. Venu works with AWS customers to solve architectural, operational, and cost optimization challenges and help them build on AWS. In his spare time, he enjoys playing with his two kids.

Vinni Satija is a Product Manager for AWS AppConfig and is based in Washington D.C. She is passionate about taking a working backward approach with customers. She enjoys using technology to create solutions that address customer needs.