AWS Cloud Operations Blog
Build Golden Images with CIS Linux Build Kit within Amazon EC2 Image Builder
The build and rollout of hardened and certified operating systems (OS) is an imperative of any Cloud Operations (CloudOps) or Cloud Center of Excellence (CCoE) team within an organization. The guideline and security controls to certify the images come from the respective teams within your organization who, in turn, refer to the popular industry wide accepted standards for the same.
However, you would also like control over the hardening process with the flexibility to pick and choose remediation steps and specific application deployment scenarios. This is the “Golden Amazon Machine Images (AMI)” that is used directly by the respective Business Units. This process would also require automation, so the building and testing is done at scale and distributed through Amazon Machine Images (AMI) as approved images. One such popular standard that is adopted as a baseline for image hardening is the Center for Internet Security (CIS).
CIS creates and maintains a set of configuration guidelines, known as the CIS Benchmarks, which provide configuration best practices for specific technologies, including operating systems, cloud platforms, applications, databases, and more. CIS Benchmarks are recognized as an industry standard by organizations, and standards such as PCI DSS, HIPAA, DoD Cloud Computing SRG, FISMA, DFARS, and FEDRAMP.
For the purpose of this blog, we will choose the CIS benchmark for Amazon Linux and built a process to create certified AMI through automation that can be operationalized at scale. You can use one of the two approaches to create Golden Images by using the OS specific CIS benchmark to harden your AMIs.
Our two different approaches:
- Use managed component with CIS AMI from Amazon Web Services (AWS) Marketplace – You also get access to the associated hardening component that runs a script to enforce CIS Benchmarks Level 1 guidelines for your configuration. The CIS organization owns and maintains CIS hardening components to ensure that they reflect the latest guidelines. Details about this approach are mentioned in: Building CIS hardened Golden Images and Pipelines with EC2 Image Builder.
- Use a self-managed hardening process using Amazon EC2 Image builder – This process gives the Cloud Operations team the flexibility to customize the hardening process. They can exclude certain benchmark recommendations which might break the application that is planned to be deployed on the instances using the AMI.
You can decide to adopt either one of the aforementioned options analyzing various factors that are well elucidated in How to Decide Between Building or Buying a CIS Hardened Image.
We will demonstrate how to use the scripts published by the CIS Linux Build Kit (LBK) to create a self-managed hardening and validation process using EC2 Image Builder and Amazon Inspector. The scripts required to harden a specific OS, as stated by CIS Benchmark, is published on the CIS website at CIS workbench. These are accessible to you provided your organization is a CIS SecureSuite® member. This script can be downloaded and used with very little changes to create an EC2 Image Builder component and used in Image Builder pipelines. We’ll explore this approach by creating a hardened Amazon Linux 2 AMI and test the same using Amazon Inspector.
Solution Overview
The solution comprises of the following steps:
- Prerequisites for the solution
-
- An AWS account with appropriate permissions
- Download, explore and update the CIS LBK Utility
- Create the staging Amazon Simple Storage Service (Amazon S3) bucket to upload the CIS LBK Utility
- Configure S3 bucket for emitting notifications through Amazon EventBridge
- Steps for the solution
-
- Build the image building pipeline using EC2 Image Builder
- Validate the image and generate a report using Amazon Inspector
Prerequisites for the solution
Download, explore and update the CIS LBK Utility
The LBK for Amazon Linux 2 can be downloaded from the CIS. This is created and maintained by the CIS community and currently the utility for Amazon Linux 2 is downloaded as amazon_linux_2.tar.gz. After unzipping the tar file, the following folder structure is seen:
tar -xvzf amazon_linux_2.tar.gz
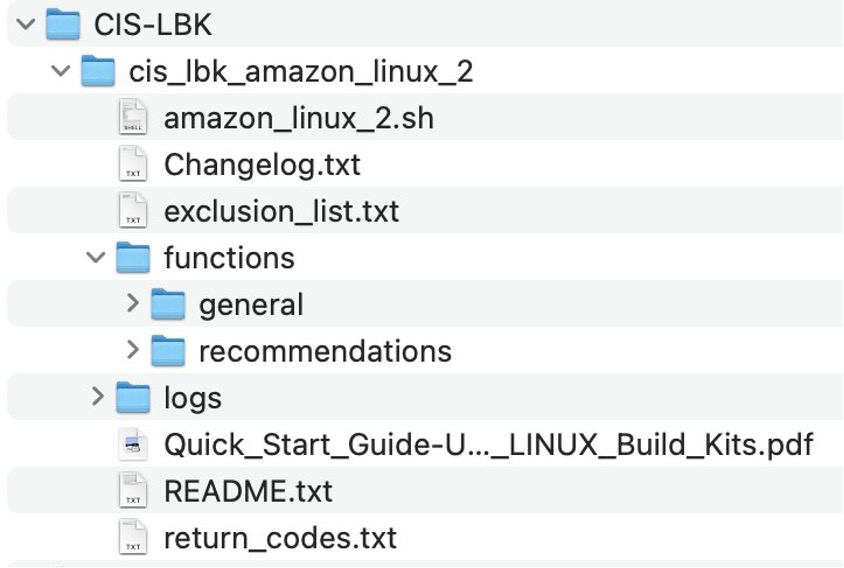
Figure 1: Folder structure of CIS Linux Build Kit
The amazon_linux_2.sh is the main shell script that makes subsequent calls to the scripts in the “functions” directory. If you wish to exclude some recommendations, please include the same in the “exclusion_list.txt”.
The usage and content of the build kit is explained in detail in the Quick Start Guide available in the build kit. The LBK script available for Amazon Linux 2 contains two interactive steps during runtime. The amazon_linux_2.sh should be edited to hardcode the expected inputs.
You will need to:
- Accept the terms and conditions to proceed – This input should be commented out and the terms and conditions can be provided by the CloudOps team as a part of the documentation for the users.
- Input the hardening profile – There are four hardening profiles (L1S, L2S, L1W, L2W) that can be chosen. L1 and L2 stand for CIS Benchmark Level1 or Level2. S and W denotes the profiles for Server or Workstation. Depending on the requirement the profile can be updated in the script.
For the purpose of this blog, we are using L1S level to harden the Amazon Linux 2 based servers as stated by CIS Benchmark Level1.
The following lines should be editing in the script to achieve the preceding:
#terms_of_use
#Display CIS Linux Build Kit warning banner
#WARBNR --->Comment this line
run_profile=L1S # Uncomment this line to provide profile to be run manually
Recreate the LBK amazon_linux_2.tar.gz file after completing the preceding steps.
tar cvf amazon_linux_2.tar.gz CIS-LBK
Create the staging S3 bucket to upload the CIS LBK Utility
Create an S3 bucket using either the AWS Management Console or AWS Command Line Interface (AWS CLI). For the purpose of this blog, we created an S3 bucket named cis-lbk-al2. The LBK is uploaded in this S3 bucket and used to download the script through EC2 Image Builder. The same bucket will also upload the LBK logs after execution is over.
aws s3api put-object --bucket cis-lbk-al2 --key amazon_linux_2.tar.gz --body amazon_linux_2.tar.gzConfigure S3 bucket for emitting notification through Amazon EventBridge
Amazon S3 Event Notifications for this bucket, using Amazon EventBridge, should be enabled. It can be enabled through the console from the Properties tab of the bucket.

Figure 2: Enabling sending notifications to EventBridge from S3 bucket
Steps for the Solution
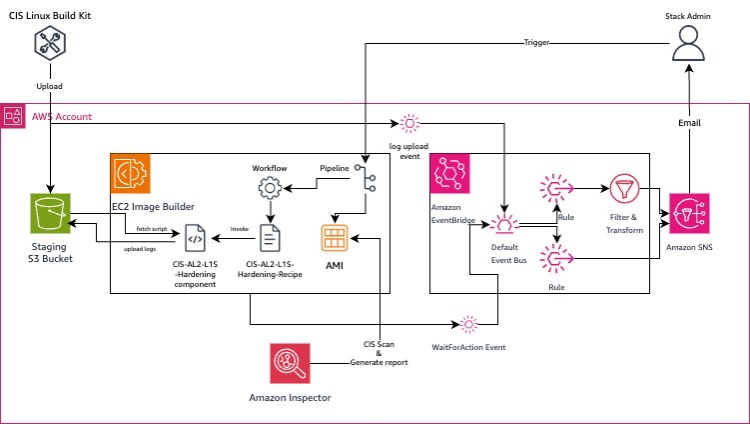
Figure 3: Architecture of the Solution
Build the Image building pipeline using EC2 Image Builder
The following AWS services are used to build this pipeline:
- EC2 Image Builder – EC2 Image Builder is used to run the LBK from Amazon S3 to harden and package the AMI. EC2 Image Builder uses the AWS Task Orchestrator and Executor (AWSTOE) component management application to orchestrate complex workflows. A custom component is created for invoking the LBK from Amazon S3. An EC2 Image Builder recipe defines the base image to use as your starting point to create a new image. The recipe also uses the set of components that you add to customize your image, using the custom component in this case, and verifies that everything works as expected—utilizing an Amazon Inspector CIS scan. An image workflow defines the sequence of steps that EC2 Image Builder performs during the build stage of the image creation process. We have now created a custom workflow for the “build” stage.
- Amazon Inspector – This is used to generate a report using the CIS scan feature of Amazon Inspector to validate the AMI post hardening.
- Amazon EventBridge – The in-built integration for both EC2 Image Builder and Amazon S3 is used to emit events to EventBridge. These can be chained to a supported target like Amazon Simple Notification Service (Amazon SNS) or AWS Lambda. We configure two rules in EventBridge for the following events:
-
- Receive and process the event from the “WaitForAction” image workflow step from EC2 Image Builder, to transform and send the message to Amazon SNS as a notification.
- Receive the “CreateObject” event from Amazon S3 after the CIS-LBK.log file is created in the bucket and send the message to Amazon SNS as a notification with the log file locations for review and approval.
- Amazon SNS – Creates an Amazon SNS Topic with an Email Subscription that is used as a target for the Amazon EventBridge Rules mentioned previously.
Define an EC2 Image Builder custom component
You can use the AWS CloudFormation template in this location to launch the stack that creates all the resources mentioned in the subsequent sections.
aws cloudformation create-stack --stack-name cis-al2-harden-stack --template-body file://cis-lbk-automation-template.yml --parameters ParameterKey=ImageVersion,ParameterValue=1.0.0 ParameterKey=StagingS3BucketName,ParameterValue=<<input_s3_bucket_name>> ParameterKey=AdminEmail,ParameterValue=<<your_admin_email>> --capabilities CAPABILITY_IAMThe CloudFormation template generates the following components mentioned in the architecture of the solution (Figure 3).
For the purpose of this blog, we defined an EC2 Image Builder custom component named CIS-AL2-L1S-Hardening:
- Type: build
- Platform: Linux and Compatible OS versions
- OS version: Amazon Linux 2
A Component is defined by a YAML document. The S3 bucket created in the Prerequisite’s step is used to download the utility and upload the logs. The following table lists series of steps in the build phase.
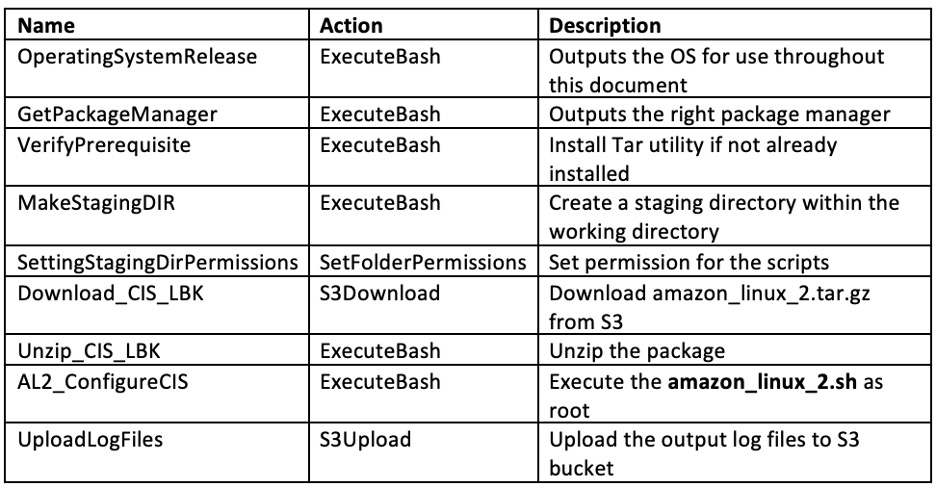
Figure 4: Steps of Build phase
name: 'CIS-Build-AL2-Level1'
                description: 'Applies the L1S CIS settings for Amazon Linux 2 (AL2)’
                schemaVersion: 1.0
                parameters:
                    - StagingS3BucketName:
                        type: string
                    - FileName:
                        type: string
                        default: 'amazon_linux_2.tar.gz'
                    - Version:
                        type: string
                        default: '2024.2.0'
                    - Level:
                        type: string
                        default: 'L1S'
                phases:
                    - name: build
                      steps:
                        - name: OperatingSystemRelease
                          action: ExecuteBash
                          inputs:
                            commands:
                              # Outputs the Operating System for use throughout this document
                              - |
                                  FILE=/etc/os-release
                                  if [ -e $FILE ]; then
                                  . $FILE
                                  echo "$ID${VERSION_ID:+.${VERSION_ID}}"
                                  else
                                  echo "The file $FILE does not exist. Exiting."
                                  exit 1
                                  fi

                        - name: GetPackageManager
                          action: ExecuteBash
                          inputs:
                            commands:
                              - |
                                  RELEASE='{{build.OperatingSystemRelease.outputs.stdout}}'
                                  case "${RELEASE}" in
                                  amzn*|centos*|rhel*)
                                      echo 'yum'
                                      ;;
                                  ubuntu*)
                                      echo 'apt'
                                      ;;
                                  *)
                                      echo "Operating System '${RELEASE}' is not supported. Exiting."
                                      exit 1
                                      ;;
                                  esac

                        - name: VerifyPrerequisite
                          action: ExecuteBash
                          onFailure: Abort
                          inputs:
                            commands:
                              - |
                                  INSTALL_TYPE='{{build.GetPackageManager.outputs.stdout}}'
                                  case "${INSTALL_TYPE}" in
                                  'yum')
                                      if ! yum -q list installed tar &>/dev/null; then
                                      yum install -q -y tar
                                      echo "Installed tar."
                                      else
                                      echo "Tar is already installed."
                                      fi
                                      ;;
                                  'apt')
                                      apt install -q -y tar
                                      echo "Installed tar."
                                      ;;
                                  *)
                                      echo "Install type '${INSTALL_TYPE}' is not supported at this time. Exiting."
                                      exit 1
                                      ;;
                                  esac

                        - name: MakeStagingDIR
                          action: ExecuteBash
                          inputs:
                            commands:
                              - |
                                  mkdir cis-stage
                                  cd cis-stage
                                  pwd

                        - name: SettingStagingDirPermissions
                          action: SetFolderPermissions
                          inputs:
                            - path: '{{build.MakeStagingDIR.outputs.stdout}}'
                              permissions: 0700

                        - name: Download_CIS_LBK
                          action: S3Download
                          inputs:
                            - source: s3://{{ StagingS3BucketName }}/{{ FileName }}
                              destination: '{{build.MakeStagingDIR.outputs.stdout}}/{{ FileName }}'

                        - name: Unzip_CIS_LBK
                          action: ExecuteBash
                          onFailure: Continue
                          inputs:
                            commands:
                              - sudo tar -xvf '{{build.MakeStagingDIR.outputs.stdout}}/{{ FileName }}' -C '{{build.MakeStagingDIR.outputs.stdout}}/' || ( echo "File extraction failed. Exiting" ; exit 1; )

                        - name: AL2_ConfigureCIS
                          action: ExecuteBash
                          onFailure: Continue
                          inputs:
                            commands:
                              - |
                                  RELEASE='{{ build.OperatingSystemRelease.outputs.stdout }}'
                                  if [ ! `echo "$RELEASE" | grep -E "^(amzn\.2$|(centos|rhel)\.7)"` ]; then
                                  echo 'Skipping this step for the current operating system.'
                                  exit 0
                                  fi
                                  cd {{build.MakeStagingDIR.outputs.stdout}}/CIS-LBK/cis_lbk_amazon_linux_2
                                  sudo ./amazon_linux_2.sh || ( echo "CIS configuration script failed to run. Exiting." ; exit 1; )

                        - name: UploadLogFiles
                          action: S3Upload
                          onFailure: Abort
                          maxAttempts: 3
                          inputs:
                            - source: '{{build.MakeStagingDIR.outputs.stdout}}/CIS-LBK/cis_lbk_amazon_linux_2/logs/*'
                              destination: 's3://{{ StagingS3BucketName }}/logs/'
                              recurse: true
                              expectedBucketOwner: <<your account number>>
Create image recipe based on the component
An image recipe is a document that defines components, to be applied to the base image, to produce the desired configuration for the output image. The recipe CIS-AL2-L1S-Hardening-Recipe should be created using the CIS-AL2-L1S-Hardening custom component as the buildstage.
The AWS CloudFormation template should look like the following:
ImageRecipeCISAL2L1S:
        Type: "AWS::ImageBuilder::ImageRecipe"
        Properties:
          Components:
          - ComponentArn: !GetAtt CISAL2HardeningComponent.Arn
            Parameters:
            - Value:
              - !Sub "${StagingS3BucketName}"
              Name: "StagingS3BucketName"
          WorkingDirectory: "/var/tmp"
          ParentImage: !Sub "arn:aws:imagebuilder:${AWS::Region}:aws:image/amazon-linux-2-x86/x.x.x"
          Version: "1.0.0"
          AdditionalInstanceConfiguration:
            SystemsManagerAgent:
              UninstallAfterBuild: true
          Name: "CIS-AL2-L1S-Hardening"
        DependsOn:
          - CISAL2HardeningComponent
As you can see the custom component is referenced in the image recipe. It also references the latest version of Amazon Linux 2 as the base image for the build in the ParentImage property.
The CIS-AL2-L1S-Hardening custom component takes the WorkingDirectory as input.
NOTE: This should be set as: /var/tmp since the default /tmp folder permissions are changed by the CIS LBK script, which would lead to access problems while running the script.
Create custom image workflow for EC2 Image Build
An image workflow defines the sequence of steps that EC2 Image Builder performs during the build and test stages of the image creation process. This workflow introduces a WaitForAction action to enable an approval step, after the hardening process, to review the logs and proceed with the image creation. This is also the time when the Amazon Inspector scan can be triggered and reviewed. This step action pauses the running workflow and waits to receive an external action from the EC2 Image Builder SendWorkflowStepAction API action. This step publishes an EventBridge event to your default EventBridge event bus with detail type “EC2 Image Builder Workflow Step Waiting”.
For the purpose of this blog, we created a custom image workflow, build-cis-hardened-manual-action, with Type BUILD and the following YAML code:
name: build-cis-hardened-manual-action
description: Workflow to build an AMI
schemaVersion: 1.0

steps:
  - name: LaunchBuildInstance
    action: LaunchInstance
    onFailure: Abort
    inputs:
      waitFor: "ssmAgent"

  - name: ApplyBuildComponents
    action: ExecuteComponents
    onFailure: Abort
    inputs:
      instanceId.$: "$.stepOutputs.LaunchBuildInstance.instanceId"

  - name: InventoryCollection
    action: CollectImageMetadata
    onFailure: Abort
    if:
      and:
        - stringEquals: "AMI"
          value: "$.imagebuilder.imageType"
        - booleanEquals: true
          value: "$.imagebuilder.collectImageMetadata"
    inputs:
      instanceId.$: "$.stepOutputs.LaunchBuildInstance.instanceId"

  - name: RunSanitizeScript
    action: SanitizeInstance
    onFailure: Abort
    if:
      and:
        - stringEquals: "AMI"
          value: "$.imagebuilder.imageType"
        - stringEquals: "Linux"
          value: "$.imagebuilder.platform"
    inputs:
      instanceId.$: "$.stepOutputs.LaunchBuildInstance.instanceId"

  - name: CheckBuildLogsAndApprove
    action: WaitForAction

  - name: CreateOutputAMI
    action: CreateImage
    onFailure: Abort
    if:
      stringEquals: "AMI"
      value: "$.imagebuilder.imageType"
    inputs:
      instanceId.$: "$.stepOutputs.LaunchBuildInstance.instanceId"

  - name: TerminateBuildInstance
    action: TerminateInstance
    onFailure: Continue
    inputs:
      instanceId.$: "$.stepOutputs.LaunchBuildInstance.instanceId"

outputs:
  - name: "ImageId"
    value: "$.stepOutputs.CreateOutputAMI.imageId"
Create image pipeline
For the purpose of the blog, we created an image pipeline: CIS-AL2-L1S-Hardening-pipeline. EC2 Image Builder uses Amazon Inspector to scan your test instances for vulnerabilities. Amazon Inspector identifies operating system and programming language package vulnerabilities. We disabled this scanning feature since we would be using Amazon Inspector to perform CIS scans only on the output image and not the vulnerability scan.
We set the Build Schedule as Manual. You can set a schedule by setting Schedule Builder to CRON expression. Next, we selected the image recipe (CIS-AL2-L1S-Hardening-Recipe) created in the previous steps. Then, we defined the image creation process by selecting Custom Workflow, where build-cis-hardened-manual-action workflow should be selected for the Build workflow.
Select AWSServiceRoleForImageBuilder as an AWS Identity and Access Management (IAM) role for access. We left all the default values of the Infrastructure Configuration unchanged, except for adding a Resource Tag for the Amazon EC2 Instance as “Key=IBCISHardened, Value=Yes”. This is used in the Amazon Inspector configuration as a filter criterion to perform CIS scans on the hardened instance.
We also left the service defaults for Distribution Settings. This launches the build and the test Amazon EC2 instances in the default VPC and distributes the output AMI to the current Region by default.
The proceeding Infrastructure Configuration creates an IAM role and associated instance profile that is used by build instances to configure the Amazon EC2 AMIs. This instance role is configured using the EC2InstanceProfileForImageBuilder, and AmazonSSMManagedInstanceCore managed policy. In order to run the Amazon Inspector CIS scan successfully, this instance profile requires that the AmazonInspector2ManagedCisPolicy IAM policy is attached to the instance profile.
The IAM Instance Profile Role should look like this:
IAMManagedPolicyIBCisComponentS3Access:
      Type: "AWS::IAM::ManagedPolicy"
      Properties:
        ManagedPolicyName: "IBCisComponentS3Access"
        Path: "/"
        Description: "Access to S3 Bucket from EC2 ImageBuilder CIS Custom component"
        Groups: []
        PolicyDocument:
          Version: "2012-10-17"
          Statement:
          - Resource: "arn:aws:s3:::cis-lbk-al2/*"
            Action:
            - "s3:PutObject"
            - "s3:GetObject"
            Effect: "Allow"
            Sid: "VisualEditor0"

    IAMRoleForImageBuilderCISAL2:
      Type: "AWS::IAM::Role"
      Properties:
        Path: "/"
        ManagedPolicyArns:
        - "arn:aws:iam::aws:policy/EC2InstanceProfileForImageBuilder"
        - Ref: "IAMManagedPolicyIBCisComponentS3Access"
        - "arn:aws:iam::aws:policy/AmazonInspector2ManagedCisPolicy"
        - "arn:aws:iam::aws:policy/AmazonSSMManagedInstanceCore"
        MaxSessionDuration: 3600
        AssumeRolePolicyDocument:
          Version: "2012-10-17"
          Statement:
          - Action: "sts:AssumeRole"
            Effect: "Allow"
            Principal:
              Service: "ec2.amazonaws.com"

    EC2InstanceProfileForImageBuilderCISAL2:
      Type: "AWS::IAM::InstanceProfile"
      Properties:
        Path: "/"
        Roles:
        - !Ref "IAMRoleForImageBuilderCISAL2"
        InstanceProfileName: "EC2InstanceProfileForImageBuilderCISAL2"
Attach a bucket policy to the cis-lbk-al2 S3 bucket so that only the IAM role with the instance profile can access the bucket.
{
Version: "2012-10-17",
Statement: [
    {
    Sid: "Statement1",
    Effect: "Allow",
    Principal: {
        "AWS": "arn:aws:iam::7284282*****:role/IAMRoleForImageBuilderCISAL2"
    },
    Action:
        - "s3:GetObject"
        - "s3:PutObject",
    Resource: "arn:aws:s3:::cis-lbk-al2"
    }
    ]
}
Create an Amazon SNS Topic for Email Notifications
For the purpose of this blog, we created an Amazon SNS Topic ImageBuilderQueue with an Email Subscription.
Create Amazon EventBridge rules for notifications
For the purpose of this blog, we configured two Amazon EventBridge rules for notifying the owner of the process:
- Notification to Amazon SNS Topic for WaitForAction approval step – EC2 Image Builder sends event messages to EventBridge when there are significant changes in status for EC2 Image Builder resources. For example, when there’s a state change for an image. EC2 Image Builder sends a message when a WaitForAction workflow step pauses to wait for an asynchronous action to complete. We have created CheckBuildLogsAndApprove as the WaitForAction workflow step. The rule matches the event pattern and sends the message to an Amazon SNS Topic ImageBuilderQueue as a Target.
AWSTemplateFormatVersion: '2010-09-09'
Description: CloudFormation template for EventBridge Ruleec2-imagebuilder
Resources:
  Rule41742a2e:
    Type: AWS::Events::Rule
    Properties:
      Name: ec2-imagebuilder
      EventPattern: >-
        {"source":["aws.imagebuilder"],"detail-type":["EC2 Image Builder
        Workflow Step
        Waiting"],"detail":{"workflow-step-name":["CheckBuildLogsAndApprove"]}}
      State: ENABLED
      EventBusName: default
      Targets:
        - Id: Idffd52f9b-e9b2-403a-8779-4a2d979c07f9
          Arn:
            Fn::Sub: >-
            arn:${AWS::Partition}:sns:${AWS::Region}:${AWS::AccountId}:ImageBuilderQueue
Parameters: {}- Notification to an Amazon SNS Topic for log objects created in an S3 bucket – We enabled EventBridge notification for cis-lbk-al2 S3 bucket. The notification is sent when an CIS-LBK.log file is created with an /logs/{Date+SerialNo}/CIS-LBK.log object key. The rule matches this event and then transforms the message to plain English to review the output log in the given S3 location before resuming the CheckBuildLogsAndApprove step. The transformed message is sent to an Amazon SNS Topic ImageBuilderQueue as a Target.
AWSTemplateFormatVersion: '2010-09-09'
Description: CloudFormation template for EventBridge RuleCISHardeningExitLogEvent
Resources:
  Rule104d463b:
    Type: AWS::Events::Rule
    Properties:
      Name: CISHardeningExitLogEvent
      EventPattern: >-
        {"source":["aws.s3"],"detail-type":["Object
        Created"],"detail":{"bucket":{"name":["cis-lbk-al2"]},"object":{"key":[{"wildcard":"logs/*CIS-LBK.log"}]}}}
      State: ENABLED
      EventBusName: default
      Targets:
        - Id: Id67c8da0c-9d82-4b14-b75f-c9f8c14daa84
          Arn:
            Fn::Sub: >-
              arn:${AWS::Partition}:sns:${AWS::Region}:${AWS::AccountId}:ImageBuilderQueue
          InputTransformer:
            InputPathsMap:
              bucketname: $.detail.bucket.name
              objectkey: $.detail.object.key
              region: $.region
            InputTemplate: >-
              "Review the output log for the CIS Hardeing process in
              \"<bucketname>\" S3 bucket and \"<objectkey>\" location. The URL
              of the log would be as follows
              https://<bucketname>.s3.<region>.amazonaws.com/<objectkey> subject
              to your access right."
Parameters: {}
Running the image pipeline
You can run the image pipeline from the console or from the AWS CLI. Your appropriate AWS Region and Account ID will need to be replaced in the following command:
aws imagebuilder start-image-pipeline-execution \
    --image-pipeline-arn arn:aws:imagebuilder:{REGION}:{ACCOUNT_ID}:image-pipeline/CIS-A
    L2-L1S-Hardening-pipeline
The output should be as follows:
{
    "requestId": "a1b2c3d4-5678-90ab-cdef-EXAMPLE11111",
    "clientToken": "a1b2c3d4-5678-90ab-cdef-EXAMPLE22222",
    "imageBuildVersionArn": "arn:aws:imagebuilder:{REGION}:{ACCOUNT_ID}:image/cis-al2-l1s-hardening/1.0.1/1"
}
Make a note of the imageBuildVersionArn and stepExecutionId. This starts the pipeline and pauses at the CheckBuildLogsAndApprove workflow step.
This can be checked through the AWS CLI using the following command:
aws imagebuilder list-waiting-workflow-stepThe output should look something like this:
"steps": [
    {
    "stepExecutionId": "step-5efed7ba-26d6-4aa0-828e-26435f6d73eb",
    "imageBuildVersionArn": "arn:aws:imagebuilder:ap-south-1:7284282*****:image/cis-al2-l1s-hardening/1.0.1/1",
    "workflowExecutionId": "wf-320826a7-c376-4e35-8629-046da3babc71",
    "workflowBuildVersionArn": "arn:aws:imagebuilder:ap-south-1:331185729973:workflow/build/build-cis-hardened-manual-action/1.0.0/1",
    "name": "CheckBuildLogsAndApprove",
    "action": "WaitForAction",
    "startTime": "2024-07-23T12:36:22.837Z"
    }
]
}
Once this output is visible, there should be two email notifications received, as defined in the Amazon EventBridge rules. The Amazon S3 notification should look like the following:
"Review the output log for the CIS Hardening process in "cis-lbk-al2" S3 bucket and "logs/08_27_2024_1210/CIS-LBK.log" location. The URL of the log would be as follows https://*********.s3.ap-south-1.amazonaws.com/logs/08_27_2024_1210/CIS-LBK.log subject to your access right."
The log file provides a list of actions taken on all the recommendations and also provides a summary report at the end which looks like this:
—————————TOTALS—————————-
- Total – Total number of recommendations: – 289
- Skipped – Recommendations not in selected profile: – 60
- NA – Recommendations that are not applicable: – 4
- Excluded – Recommendations on the excluded list: – 0
- Passed – Recommendations already remediated: – 89
- Remediated – Recommendations successfully remediated: – 68
- Manual – Recommendations need manual remediation: – 68
- Failed – Recommendations failed remediation: – 0
————————————————————-
—————-SUMMARY—————
- TOTAL RECOMMENDATIONS – 289
- APPLICABLE RECOMMENDATIONS – 225
- PASSING RECOMMENDATIONS – 157
- MANUAL REMEDIATION NEEDED – 68
————————————–
The log file clearly states the recommendations that need to be remediated manually. The recommendations also appear as findings in the Amazon Inspector report—generated as an output of the testing process mentioned in the subsequent section.
Validate the image and generate a report using Amazon Inspector
For the purpose of this blog, we used Amazon Inspector through the AWS CLI to create a CIS scan so that it will run for “one-time”. We perform this step while the EC2 Image Builder workflow is waiting for approval.
In the following command sequence enter in your specific Account ID and targetResourceTags as an input:
aws inspector2 create-cis-scan-configuration --scan-name cis-hardened-scan --schedule oneTime={} --security-level "LEVEL_1" --targets "accountIds=<<insert account id>>,targetResourceTags={IBCISHardened=Yes}"The following command outputs the scan configuration ID and starts running the CIS scan in the background:
{
    "scanConfigurationArn": "arn:aws:inspector2:ap-south-1:7284282*****:owner/7284282*****/cis-configuration/16101e7a-1b61-4acd-8fad-c042fed68b30"
}
The status of the scan can be monitored through the following command and needs the scanConfigurationArn as an input:
aws inspector2 list-cis-scans --filter-criteria "scanConfigurationArnFilters=[{comparison=EQUALS,value=<< scanConfigurationArn >>}]"Once complete, an output similar to the following can be seen:
{
    "scans": [
        {
            "failedChecks": 53,
            "scanArn": "arn:aws:inspector2:ap-south-1:7284282*****:owner/7284282*****/cis-scan/3b2c034d-0eb1-4bd6-a907-7a88dac5f970",
            "scanConfigurationArn": "arn:aws:inspector2:ap-south-1:7284282*****:owner/7284282*****/cis-configuration/16101e7a-1b61-4acd-8fad-c042fed68b30",
            "scanDate": "2024-12-09T18:32:03.784000+00:00",
            "scanName": "cis-hardened-scan",
            "scheduledBy": "7284282*****",
            "securityLevel": "LEVEL_1",
            "status": "COMPLETED",
            "targets": {
                "accountIds": [],
                "targetResourceTags": {
                    "IBCISHardened": [
                        "Yes"
                    ]
                }
            },
            "totalChecks": 205
        }
    ]
}
Please note the status shows as COMPLETE instead of IN_PROGRESS. Please note the scan-arn attribute from the output Json file.
The report can be fetched from the following command in PDF format (The scan-arn should be passed as input):
aws inspector2 get-cis-scan-report --scan-arn <<scan-arn>> --report-format PDFThe output of this command is the report URL that can be opened in a browser that has an authenticated AWS session:
{
    "status": "SUCCEEDED",
    "url": "https://cis-reports-ap-south-1-664584041376.s3.ap-south-1.amazonaws.com/7284282*****/3b2c034d-0eb1-4bd6-a907-7a88dac5f970/cis_report.pdf?X-Amz-Security-Token=IQoJb3JpZ2luX2VjEMH%2F%2F%2F%2F%2F%2F%2F%2F%2F%2FwEaCmFwLXNvdXRoLTEiRjBEAiBbYJ3R7hIYk3GSLp5N%2BntEUTEVcg8E0bPZqLkmDLOQSgIgECi%2B3M0WktyWUHR%2FxXD7zIvB6qiTBjKA7cJCzX6VgKYq9wIIehAAGgw2NjQ1ODQwNDEzNzYiDHmUTYtbcdwCN0B8LyrUAvU0%2BVdCQHLstxAvgS6r01ma9Q%2B0VRL9usGH7YluoidXte%2FGgOMLG%2BTX%2BsFToNFyO3Kz%2BPMSTzzlDage6ZKV6lse1BuG5%2B1rzgA7titaVyclsj4Zp46KPiRdsJ6kM6vfITGQW3zRK94B6lLDH10AnbR2npqJXknNPAU5iRcQMF8Q54mE9SqnRZsmZgQzkWx0ORX1y1XdmTAtKFJXbTI8LGCXhnkARQyaBPN%2B1BpRUisc8w6o4cvzMZUP6tVSpVnBQ3Y8Gu%2BjVCxbBGwrNTnhxj4mYLSvcQbPK39F9tauhkbLsqnFxXiZjKypfXay9eEItY78yVvNsIUccfoN%2Ftahhm0eXOtVUhnjgDrv59AZ39HYCSoB%2BsyD7WTBxaXYXhr0%2BerTjEFD31IOM6t6O0tYTP4Mm3P%2BPGL948MfXt2%2BkoIOvGR%2BjNKVixA9Nv3aYQLtgQz4YbwwwcjcugY6nwFPN0FqCWeBUtfEE1%2F3mq7GnpucoNK5JmoH4GAGQTglv8bXxCsMKBhVrZs8AOmd7jMmSb6RFArhFa1agt0qpn7S4sFVwUk4eTf9grPPVwS2R1qKOYJsjaujMQHsHW%2Bh2qyGMUYNyxO2d1LlDDMDLMjuMA7Vqk88R4Lhdkr4Kzx9PZnQNCPggx8gRLXcQPaa%2Fj0SwU5i5MYUWW5%2B5iGLokc%3D&X-Amz-Algorithm=AWS4-HMAC-SHA256&X-Amz-Date=20241209T183815Z&X-Amz-SignedHeaders=host&X-Amz-Credential=ASIAZVPCLWOQKV2F6QQX%2F20241209%2Fap-south-1%2Fs3%2Faws4_request&X-Amz-Expires=600&X-Amz-Signature=0975c85895fb1c6474140b8e428b5511946b483a601515be6fdd8d2c1e47f00c"
}
Once you have reviewed the CIS-LBK.log file and the test report from Amazon Inspector you can resume the workflow step with the following command. (Use stepExecutionId and imageBuildVersionArn, as previously noted, as the input to the command):
aws imagebuilder send-workflow-step-action —step-execution-id << stepExecutionId >> —image-build-version-arn << imageBuildVersionArn >> —action RESUMETo stop the workflow due to issues in the build, use the following command where the workflow can be stopped with a reason:
aws imagebuilder send-workflow-step-action —step-execution-id << stepExecutionId >> —image-build-version-arn << imageBuildVersionArn >> —action STOP -reason "Please fix the issue and recreate the Image"Once the image pipeline has finished successfully the image created by the pipeline can be listed using this command (Use the latest image ARN in the next command, imageBuildVersionArn, as noted previously):
aws imagebuilder get-image —image-build-version-arn << imageBuildVersionArn >> --query 'image.outputResources.amis[0].image'This should display the ami-id, which is the output AMI that can be used in your organization for distribution.
The Amazon S3 event notification with EventBridge can be further improvised to parse the log data to maintain the run log in a database. The framework implemented in this can be extended or tweaked to harden AMIs for other Linux distributions like Ubuntu and CentOS using the corresponding LBKs from the CIS community.
Conclusion
In this blog we have setup an EC2 Image Builder based process to harden an Amazon Linux 2 AMI as stated by the CIS Amazon Linux 2 Benchmark using the Linux Build Kit provided by CIS Community. We also used the event-based notifications from Amazon S3 and Amazon EventBridge to trigger email notifications to review the output logs and introduced a manual approval action.
Contact an AWS Representative to know how we can help accelerate your business.
Further reading