Networking & Content Delivery
AWS Network Firewall proxy and native NAT Gateway integration
With this launch you can use your AWS Network Firewall to filter HTTP and HTTPS traffic as an explicit proxy, inspect all other traffic as a routed firewall, and centralize egress from overlapping and non-overlapping source VPC through a NAT Gateway that Network Firewall manages for you. In August 2026, we re-introduced Network Firewall proxy as a capability of AWS Network Firewall rather than as a standalone product. Because the explicit proxy is a function of Network Firewall, it comes with the Network Firewall features you already use. These include, but are not limited to, intrusion detection and prevention (IDS/IPS), AWS managed rule groups including Active Threat Defense, geographic IP filtering, URL and domain category filtering, TLS inspection, container attribute-based rules for Amazon EKS and Amazon ECS, and automated domain lists.
At the time of preview, we also promised to keep collecting your feedback and iterating on the feature set until we made the capability globally available. Today, AWS Network Firewall proxy is globally available. This post explains the improvements we have made since August based on your feedback and shows what the new setup experience looks like.
What’s new
We made two big changes and introduced new proxy enhancements:
- One firewall for both explicit proxy and routed firewall functions: You no longer have to choose between using routed firewall or proxy (formerly known as source-preservation and no-source-preservation mode).
- Native NAT for routed firewall. Your Network Firewall can now perform network address translation (NAT) itself when used as a routed firewall, without requiring a service-chained NAT Gateway. You can use this to centralize egress from networks that have overlapping IP CIDR spaces.
- New proxy enhancements include custom hostnames for the proxy to simplify migration from DIY proxy, Squid-to-Suricata converter to migrate your existing squid filtering rules to Network Firewall, domain-based selective TLS inspection on proxy, and TLS inspection support on multiple endpoints (the endpoints must be in the same account as the Network Firewall).
The rest of this post covers why each change matters, and then walks through how to set up a firewall with these changes.
One firewall for both routed firewall and explicit proxy functionalities
You can now use a single Network Firewall with its endpoints to perform both explicit proxy and routed firewall functionalities.
- Explicit proxy for HTTP and HTTPS traffic. With an explicit proxy, the client knows that the way out of VPC is via the proxy. The clients do not reach the server directly. The client sends the proxy a CONNECT request that states the domain it wants to access. The firewall filters the domain in the CONNECT request against the stateful firewall rules to filter DNS requests. If the domain is allowed, the firewall queries it using the configured DNS to get the destination IP address, and establishes a new TCP connection with the destination. The client can now send traffic to the destination via this TCP connection. You do not need route table changes for proxied traffic. Instead, you configure the application to send the CONNECT requests to the Network Firewall proxy’s hostname. Your VPC’s .2 resolver resolves the proxy’s hostname to the IP address of the firewall endpoint.
- Routed firewall for everything else. For applications that don’t need to use the proxy, you route traffic to the same firewall endpoint using route tables.
Both paths are governed by one firewall policy, produce the same logs, and leave through the same egress IP addresses, so there is one set of IP addresses to allowlist with your partners. With this, you can also adopt the explicit proxy gradually, one application at a time, while everything else keeps flowing through routed firewall function of Network Firewall.
NAT Gateway association for routed firewall
Before this launch, Network Firewall did not attach NAT Gateways. Traffic entered the firewall endpoint, was inspected, and then exited through the same endpoint. If you wanted to inspect internet-bound traffic, you service chained the firewall endpoint with a NAT Gateway. If you wanted centralized egress, you placed that endpoint and NAT Gateway pair in front of a transit gateway (or AWS Cloud WAN) connecting multiple VPCs, as shown in the following figure.
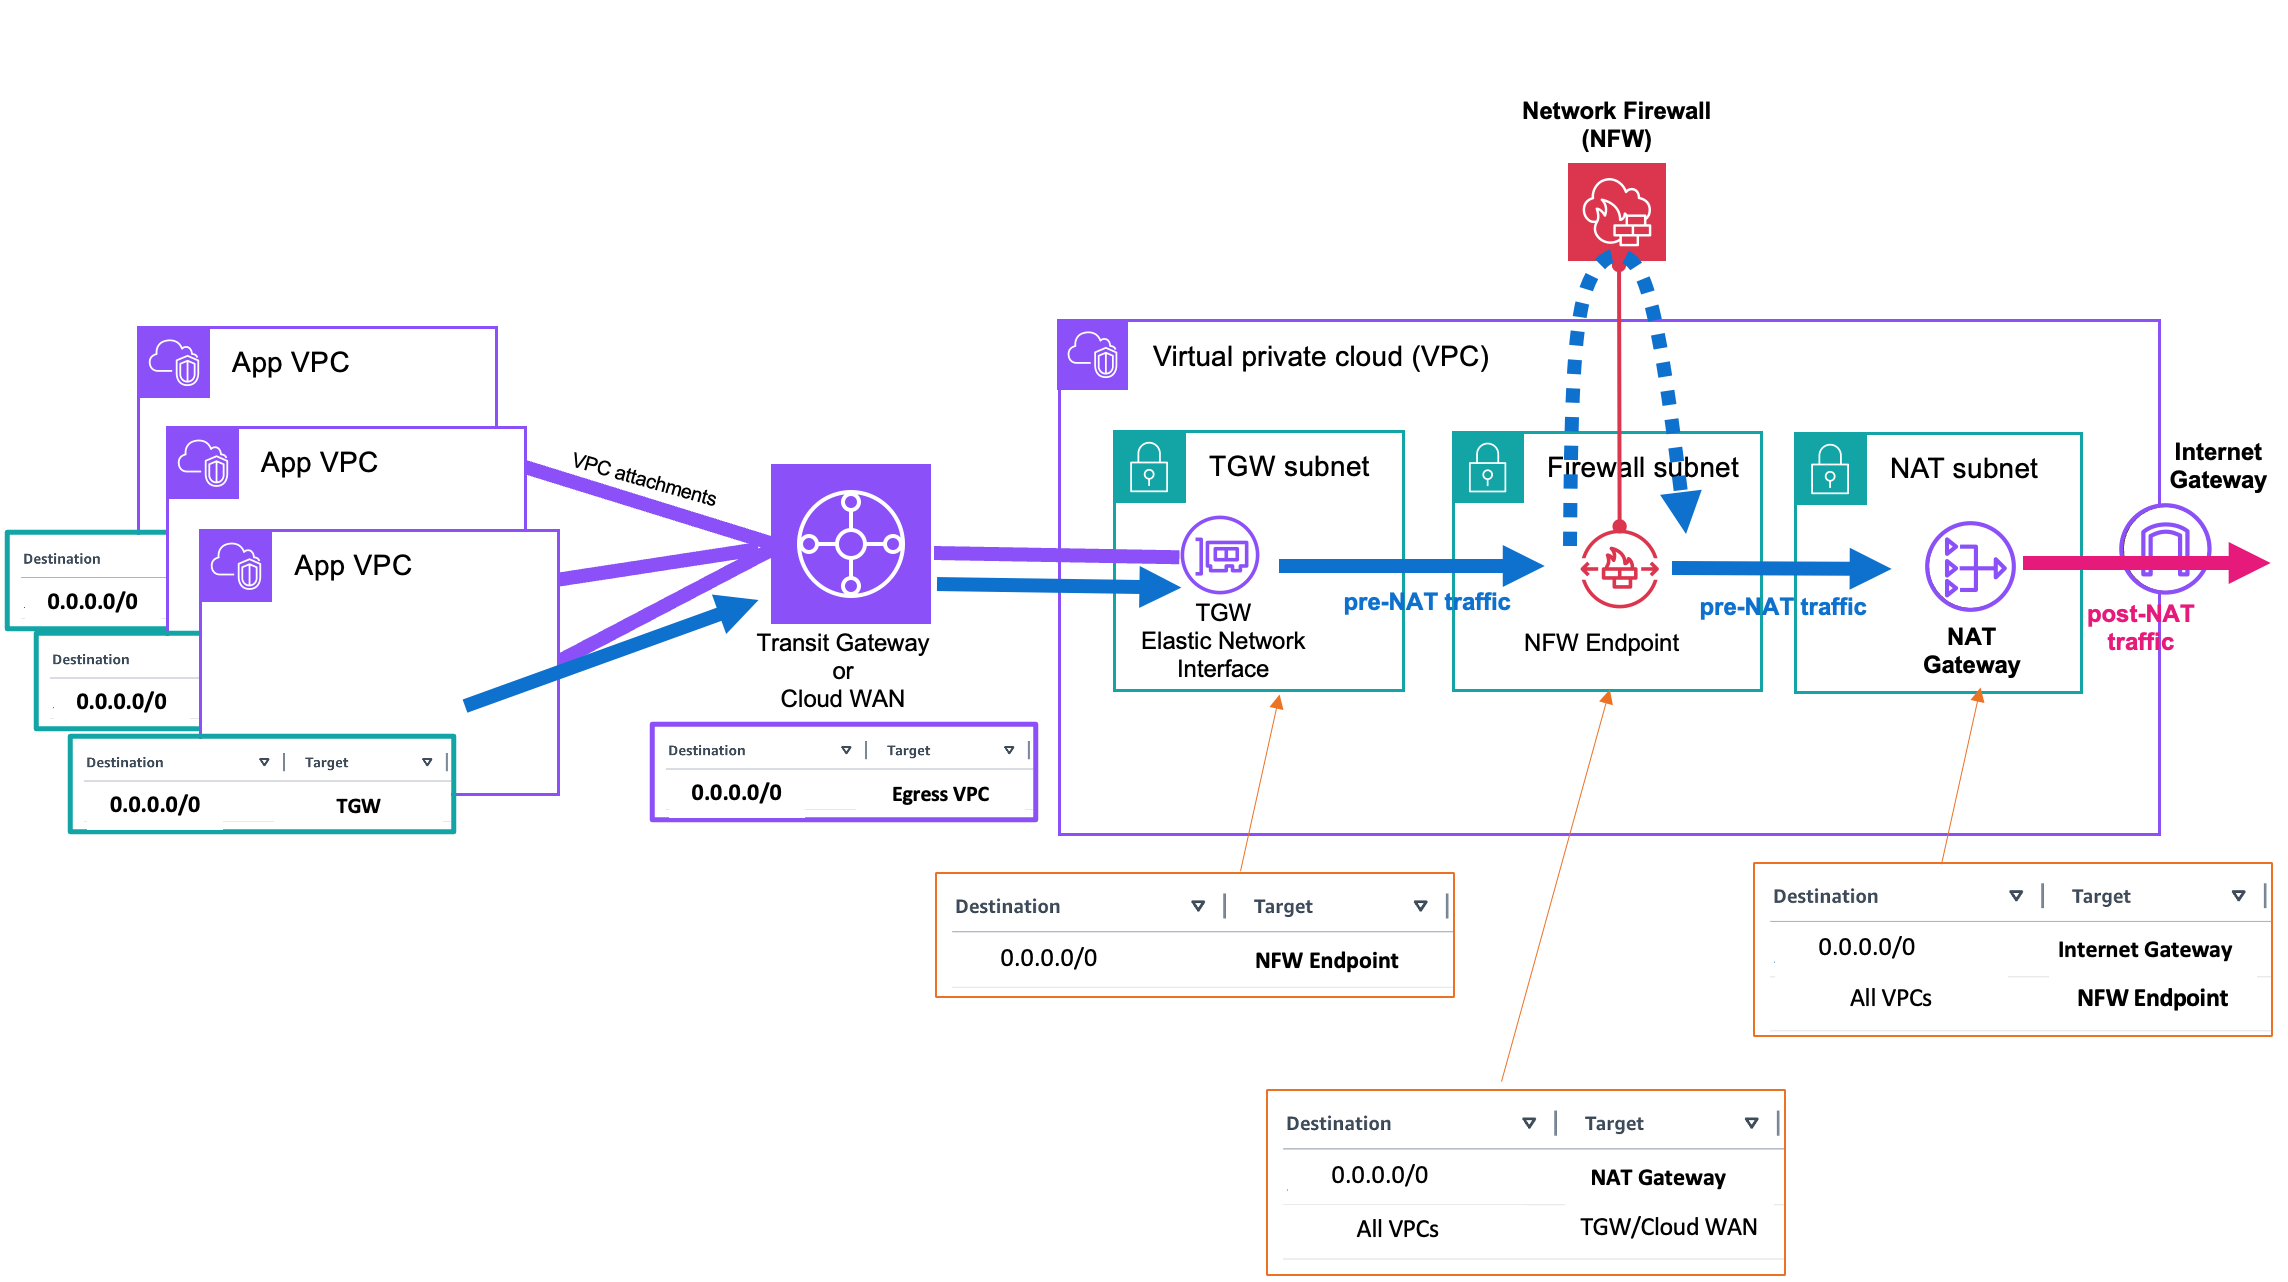
Figure 1: Centralized egress with Network Firewall and a service-chained NAT Gateway
This architecture lets you centralize egress from VPCs with non-overlapping CIDRs but does not work if the VPCs using the Firewall have overlapping CIDR. You can use the multiple endpoint feature to centralize inspection, but egress stays distributed. That is, you have to configure each endpoint with its own NAT Gateway, each with its own IP addresses, as shown in the following figure.
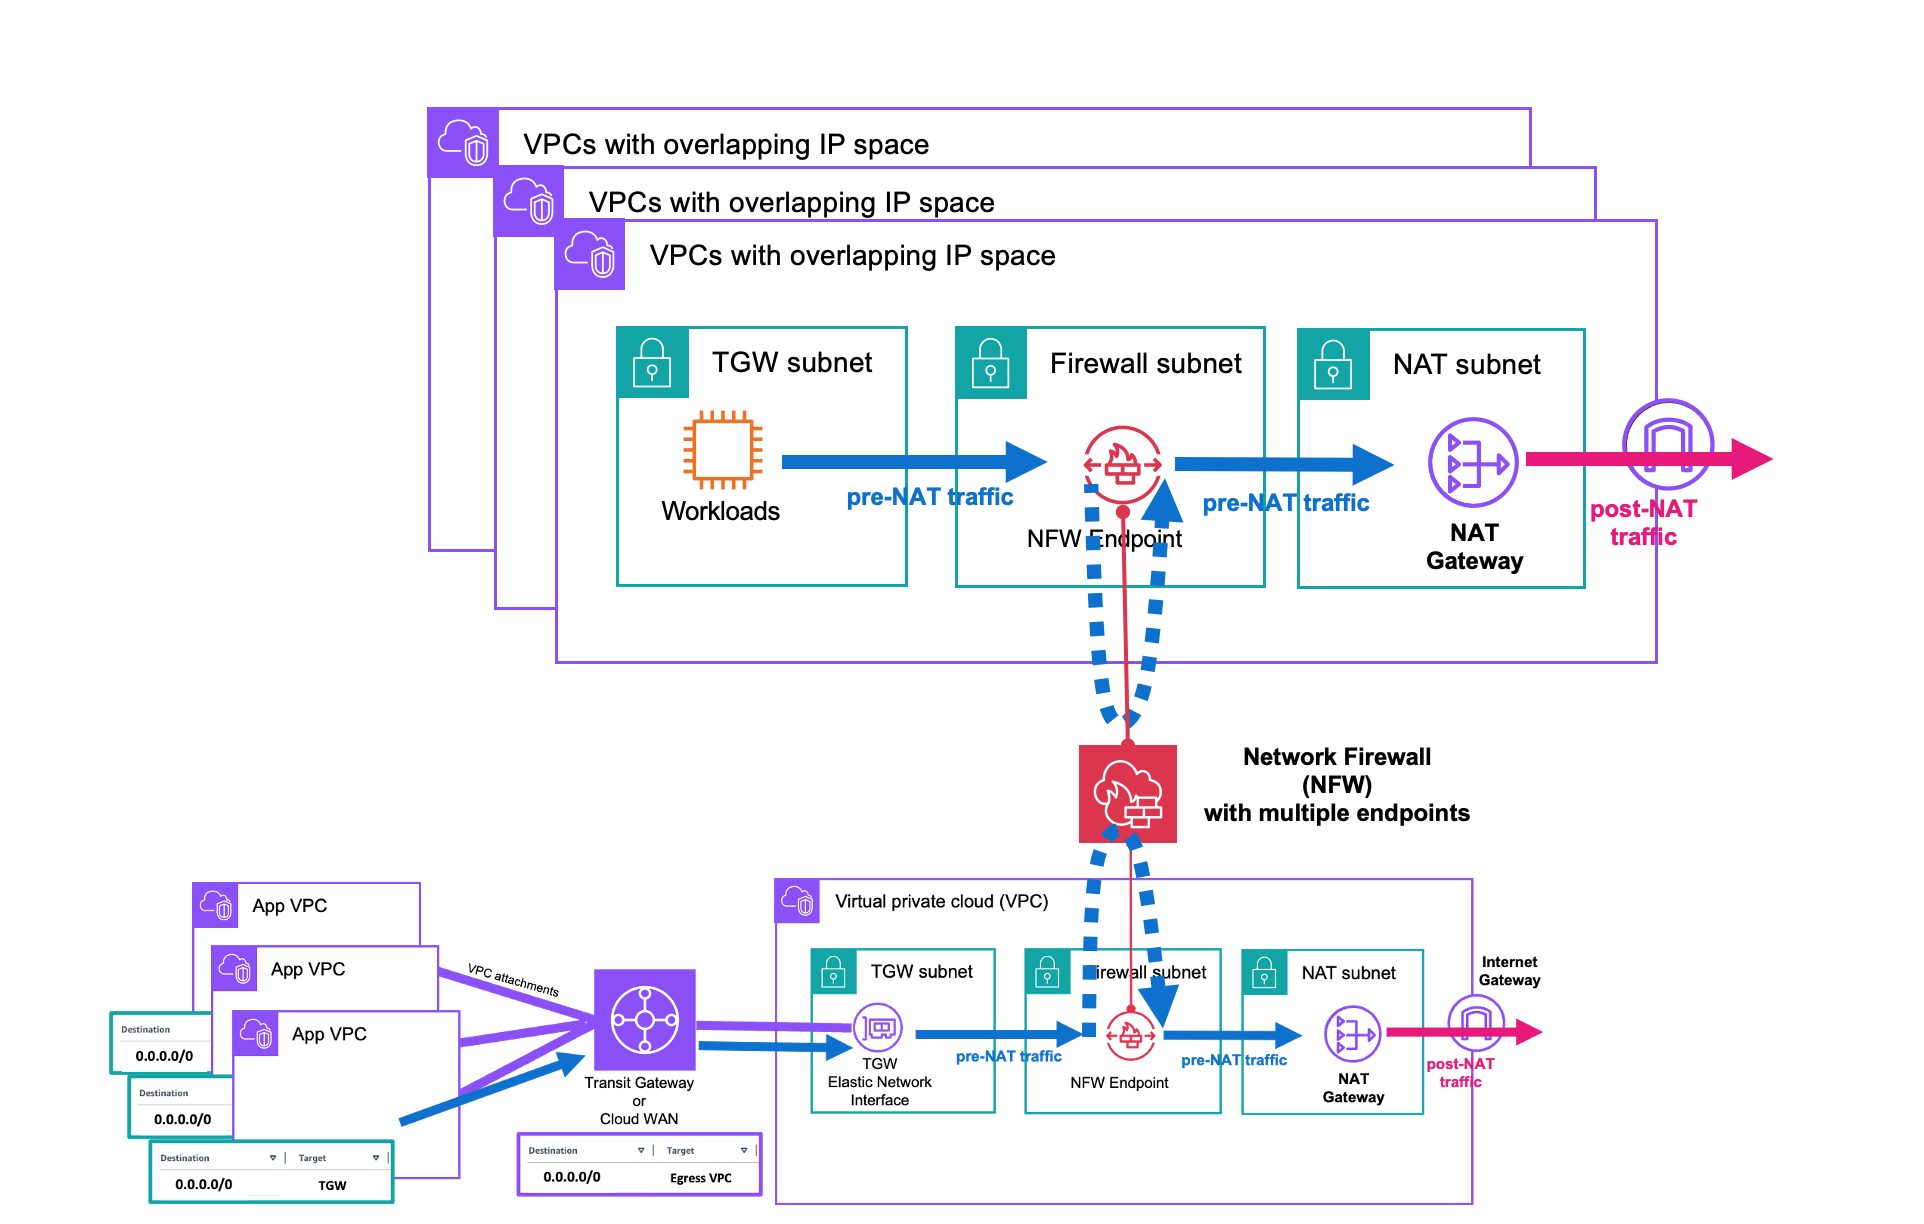
Figure 2: Multiple Network Firewall endpoints, each service-chained with its own NAT Gateway
This does not work when your overlapping CIDRs need to reach out to a partner, SaaS vendor, or on-premises firewall that allow traffic from a specific allowlisted IP address.
NAT Gateway association on Network Firewall fills this gap and addresses the use cases where you need centralized egress (plus inspection) from overlapping VPCs. Traffic enters through the firewall endpoint and is filtered by the firewall. It then exits directly through the NAT Gateway that Network Firewall creates and manages for you. The traffic does not return to the endpoint, and you do not need to service chain anything. You can access the firewall using Transit Gateway, VPC endpoints, or both. This lets you centralize egress (and inspection), even from VPCs with overlapping CIDRs. The following figure shows an example of a centralized egress setup with overlapping and non-overlapping VPCs sharing one Network Firewall with NAT association.
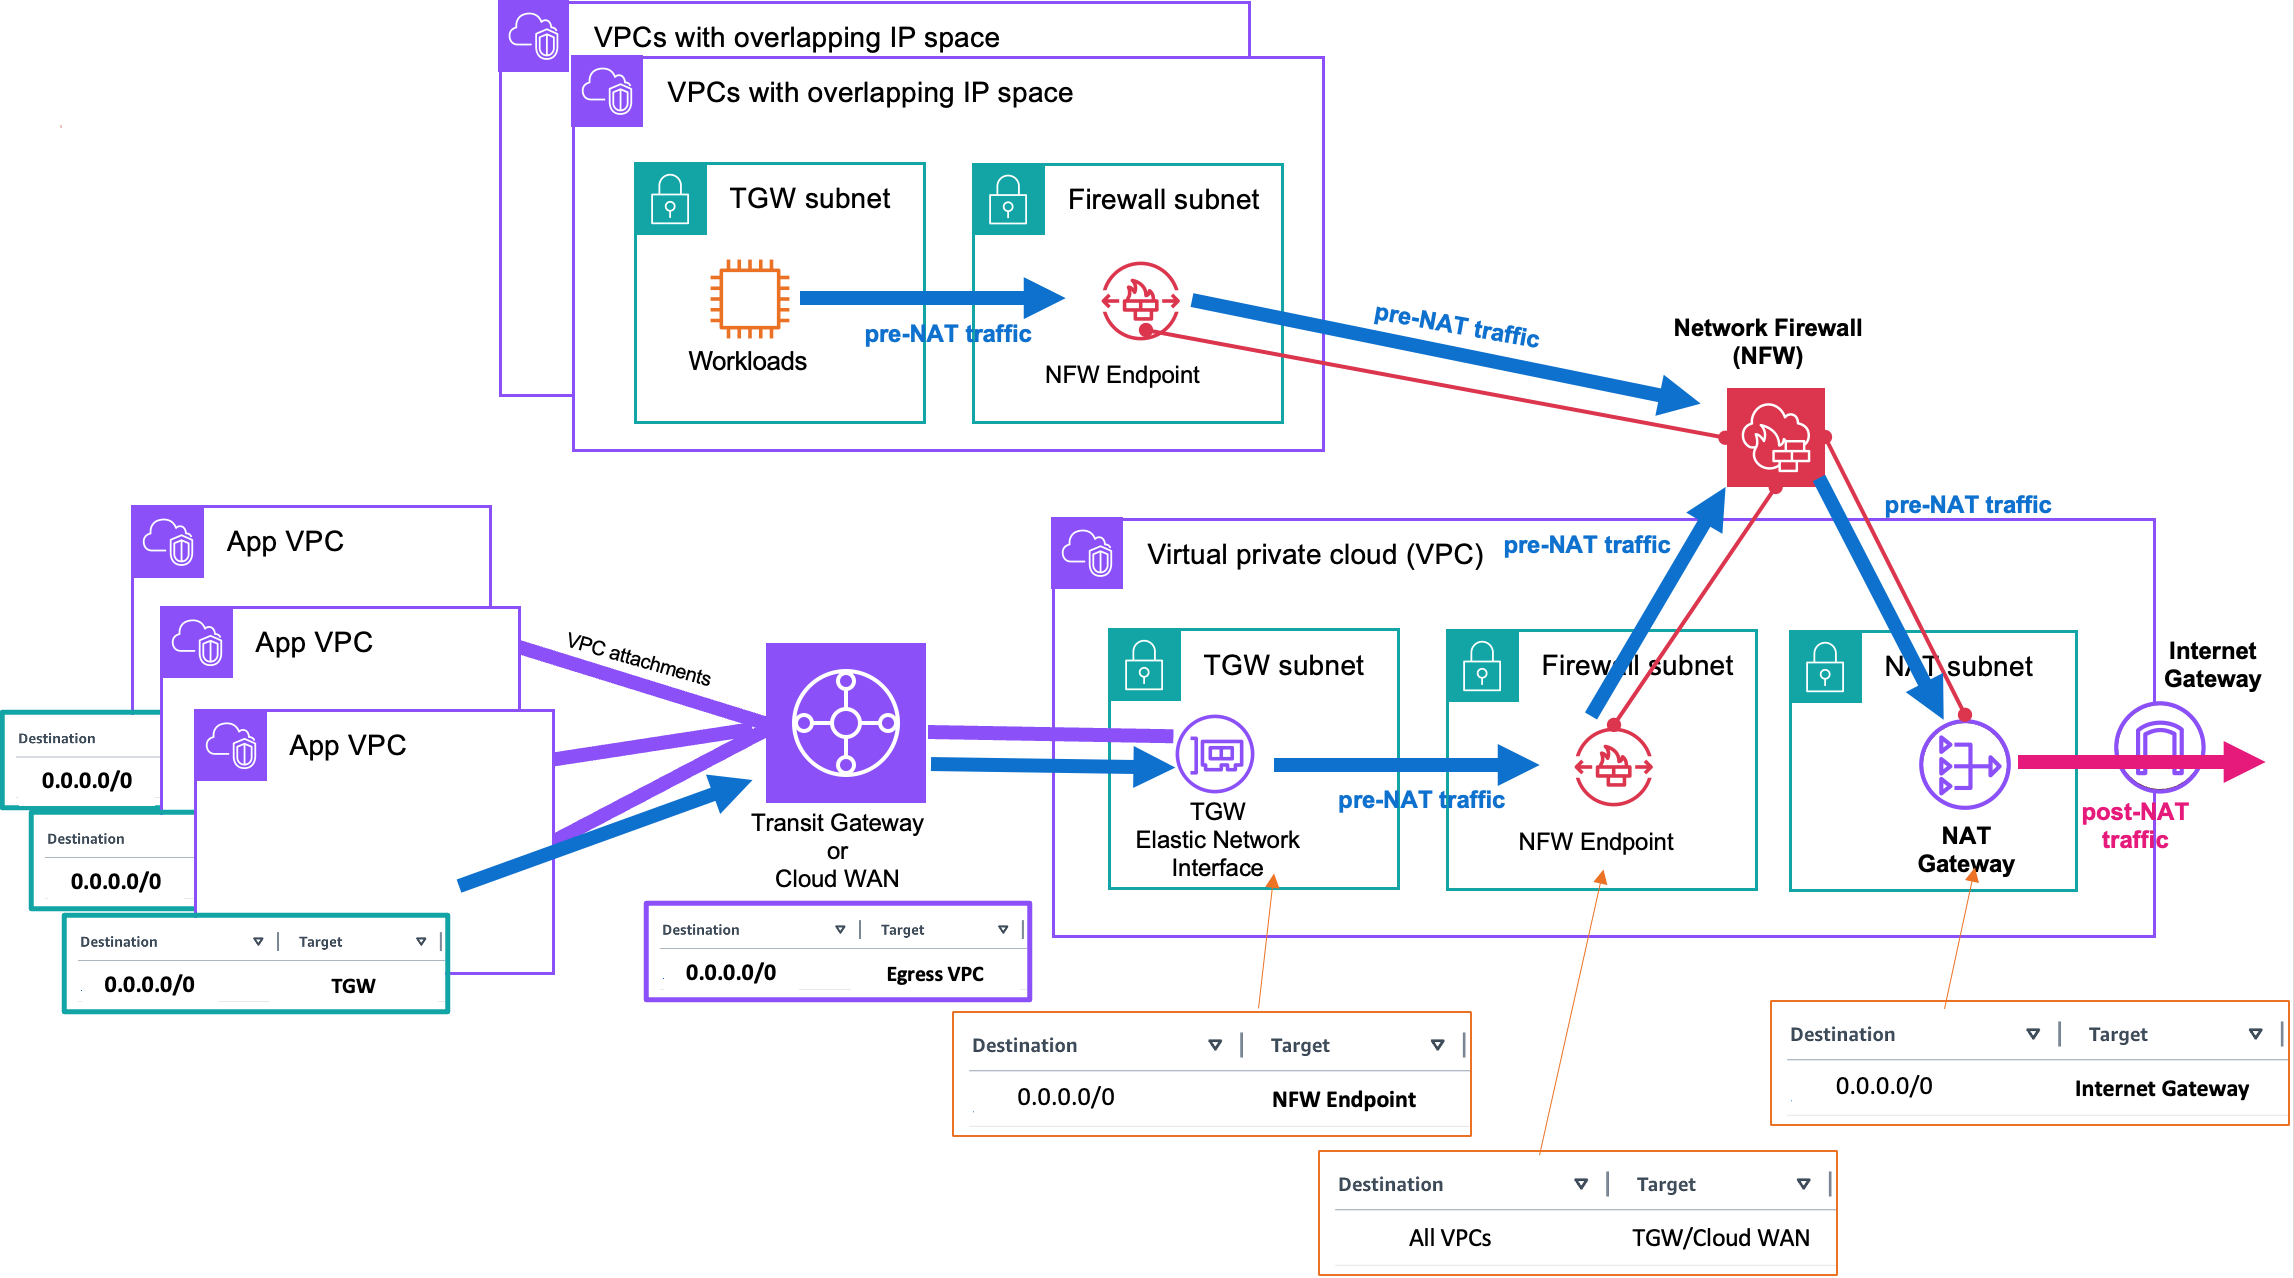
Figure 3: Centralized egress from overlapping and non-overlapping VPCs with Network Firewall native NAT
Please note that Native NAT is optional. If you do not need address translation, you can choose not to perform NAT. In that case the firewall filters the traffic and sends it back to the endpoint, as it did before.
New Proxy Enhancements
Custom Hostname: If you run your own proxy fleet today, your applications are already configured with your proxy’s hostname. Changing that setting across every application, script, and build agent often slows down your migration. With custom hostnames, you can keep using the same proxy hostname. You configure the hostname on the Network Firewall proxy and onboard the appropriate certificate on AWS Certificate Manager (ACM). The NFW proxy uses this certificate to sign certs sent to your clients. The Network Firewall sets up private hosted zones in your VPCs so that your custom hostname automatically resolves to the endpoints that are used to access the proxy.
Squid-to-Suricata Converter: To further streamline the migration, we have also built a Squid-to-Suricata converter. It converts your existing Squid rules into Network Firewall rules, so you can bring over your current allow and deny lists. To learn more about the converter and to get started, go here.
TLS inspection from secondary endpoints: You can now perform TLS inspection for traffic that arrives through secondary endpoints, as long as those endpoints are in the same account as the firewall.
Domain-based selective TLS inspection: Today, customers can define the scope of the traffic to decrypt based on source and destination addresses and port ranges in a scope configuration. Now, customers can even add destination domain in scope for TLS inspection for the proxy functionality.
Please note that domain based selective TLS inspection does not work for routed firewall functionality.
Now that we have introduced the enhancements since the preview the next session takes you through the steps to set up Network Firewall.
Getting started
You can set up a Network Firewall with proxy and native NAT functionality in four steps.
Step 1: Create (or reuse) a firewall policy. A firewall policy is the top-level container where you stack your custom rule groups, AWS managed rule groups, and partner managed rule groups. If you already use Network Firewall, you can reuse your existing policy directly. The same policy drives both routed firewall and explicit proxy behavior. To create a new policy, follow the steps in this document.
Step 2: Create the firewall with an associated NAT Gateway. Go to the Network Firewall section in the VPC console and choose Create firewall. You will notice 6 steps in creating the Firewall. You name the firewall in the first step and in the second step, you can pick option to just perform routed firewalling or routed firewalling, NAT and explicit proxy.
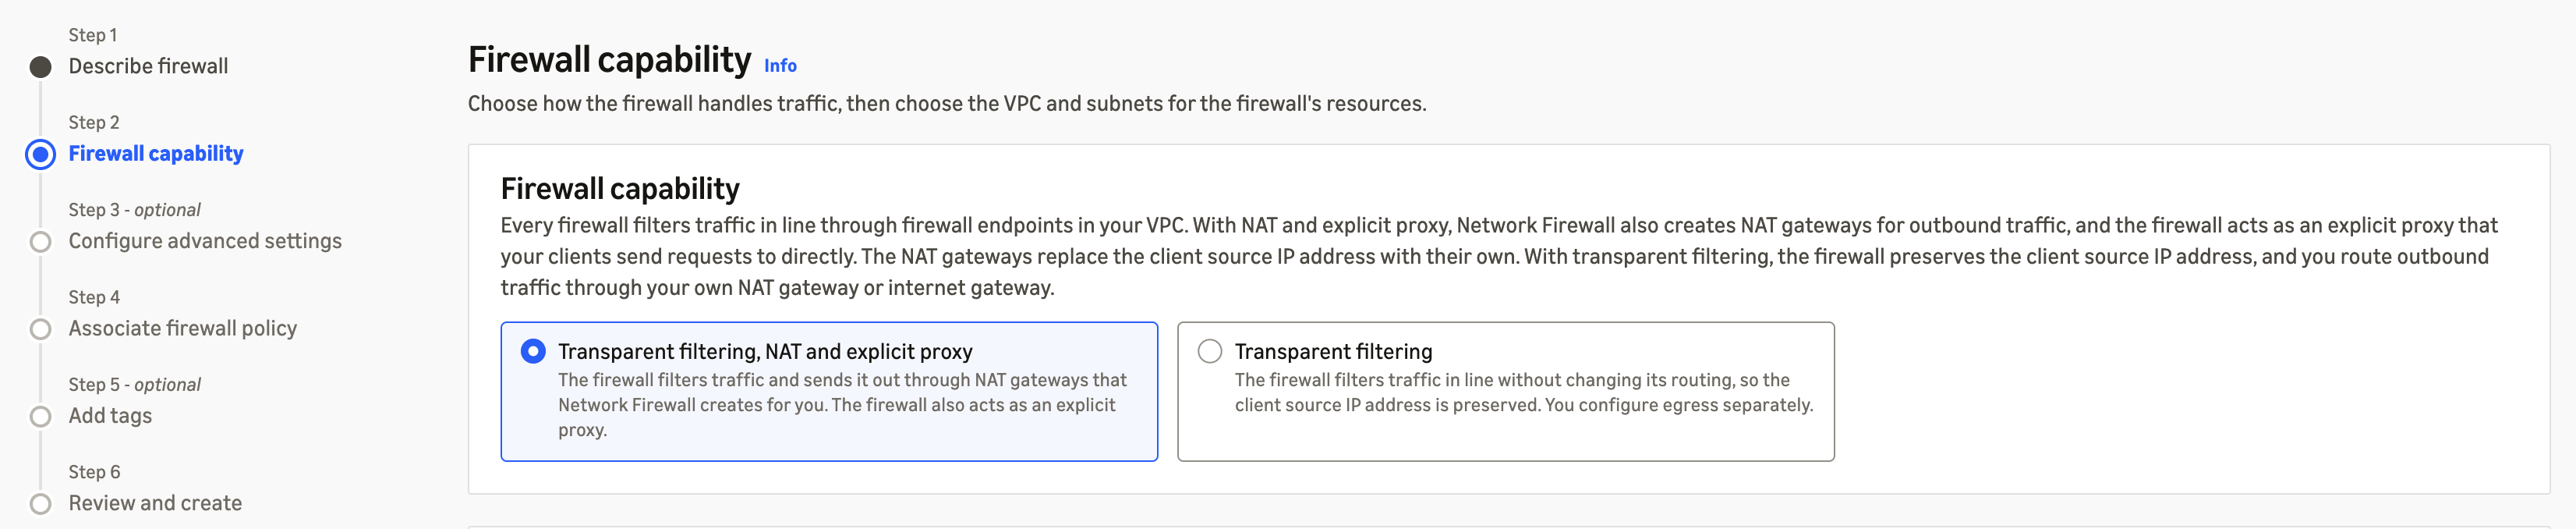
Figure 4: Select firewall capability
You can pick ‘Routed firewalling, NAT and explicit proxy’. You next enter the details of the NAT Gateway and the primary endpoint, including:
- The VPC where the NAT Gateway and the endpoint reside. The primary endpoint must reside in the same VPC as the NAT Gateway; you can later create additional endpoints in other VPCs to access the Firewall from them.
- The connectivity type for the NAT Gateway. You can create a public or a private NAT Gateway to be associated with the Network Firewall.
- The public and the private IP addresses for the NAT Gateway, and
- The subnet where you want the primary endpoint to reside
Please note that you cannot associate an existing NAT Gateway with your Network Firewall; you need to create a new Firewall.
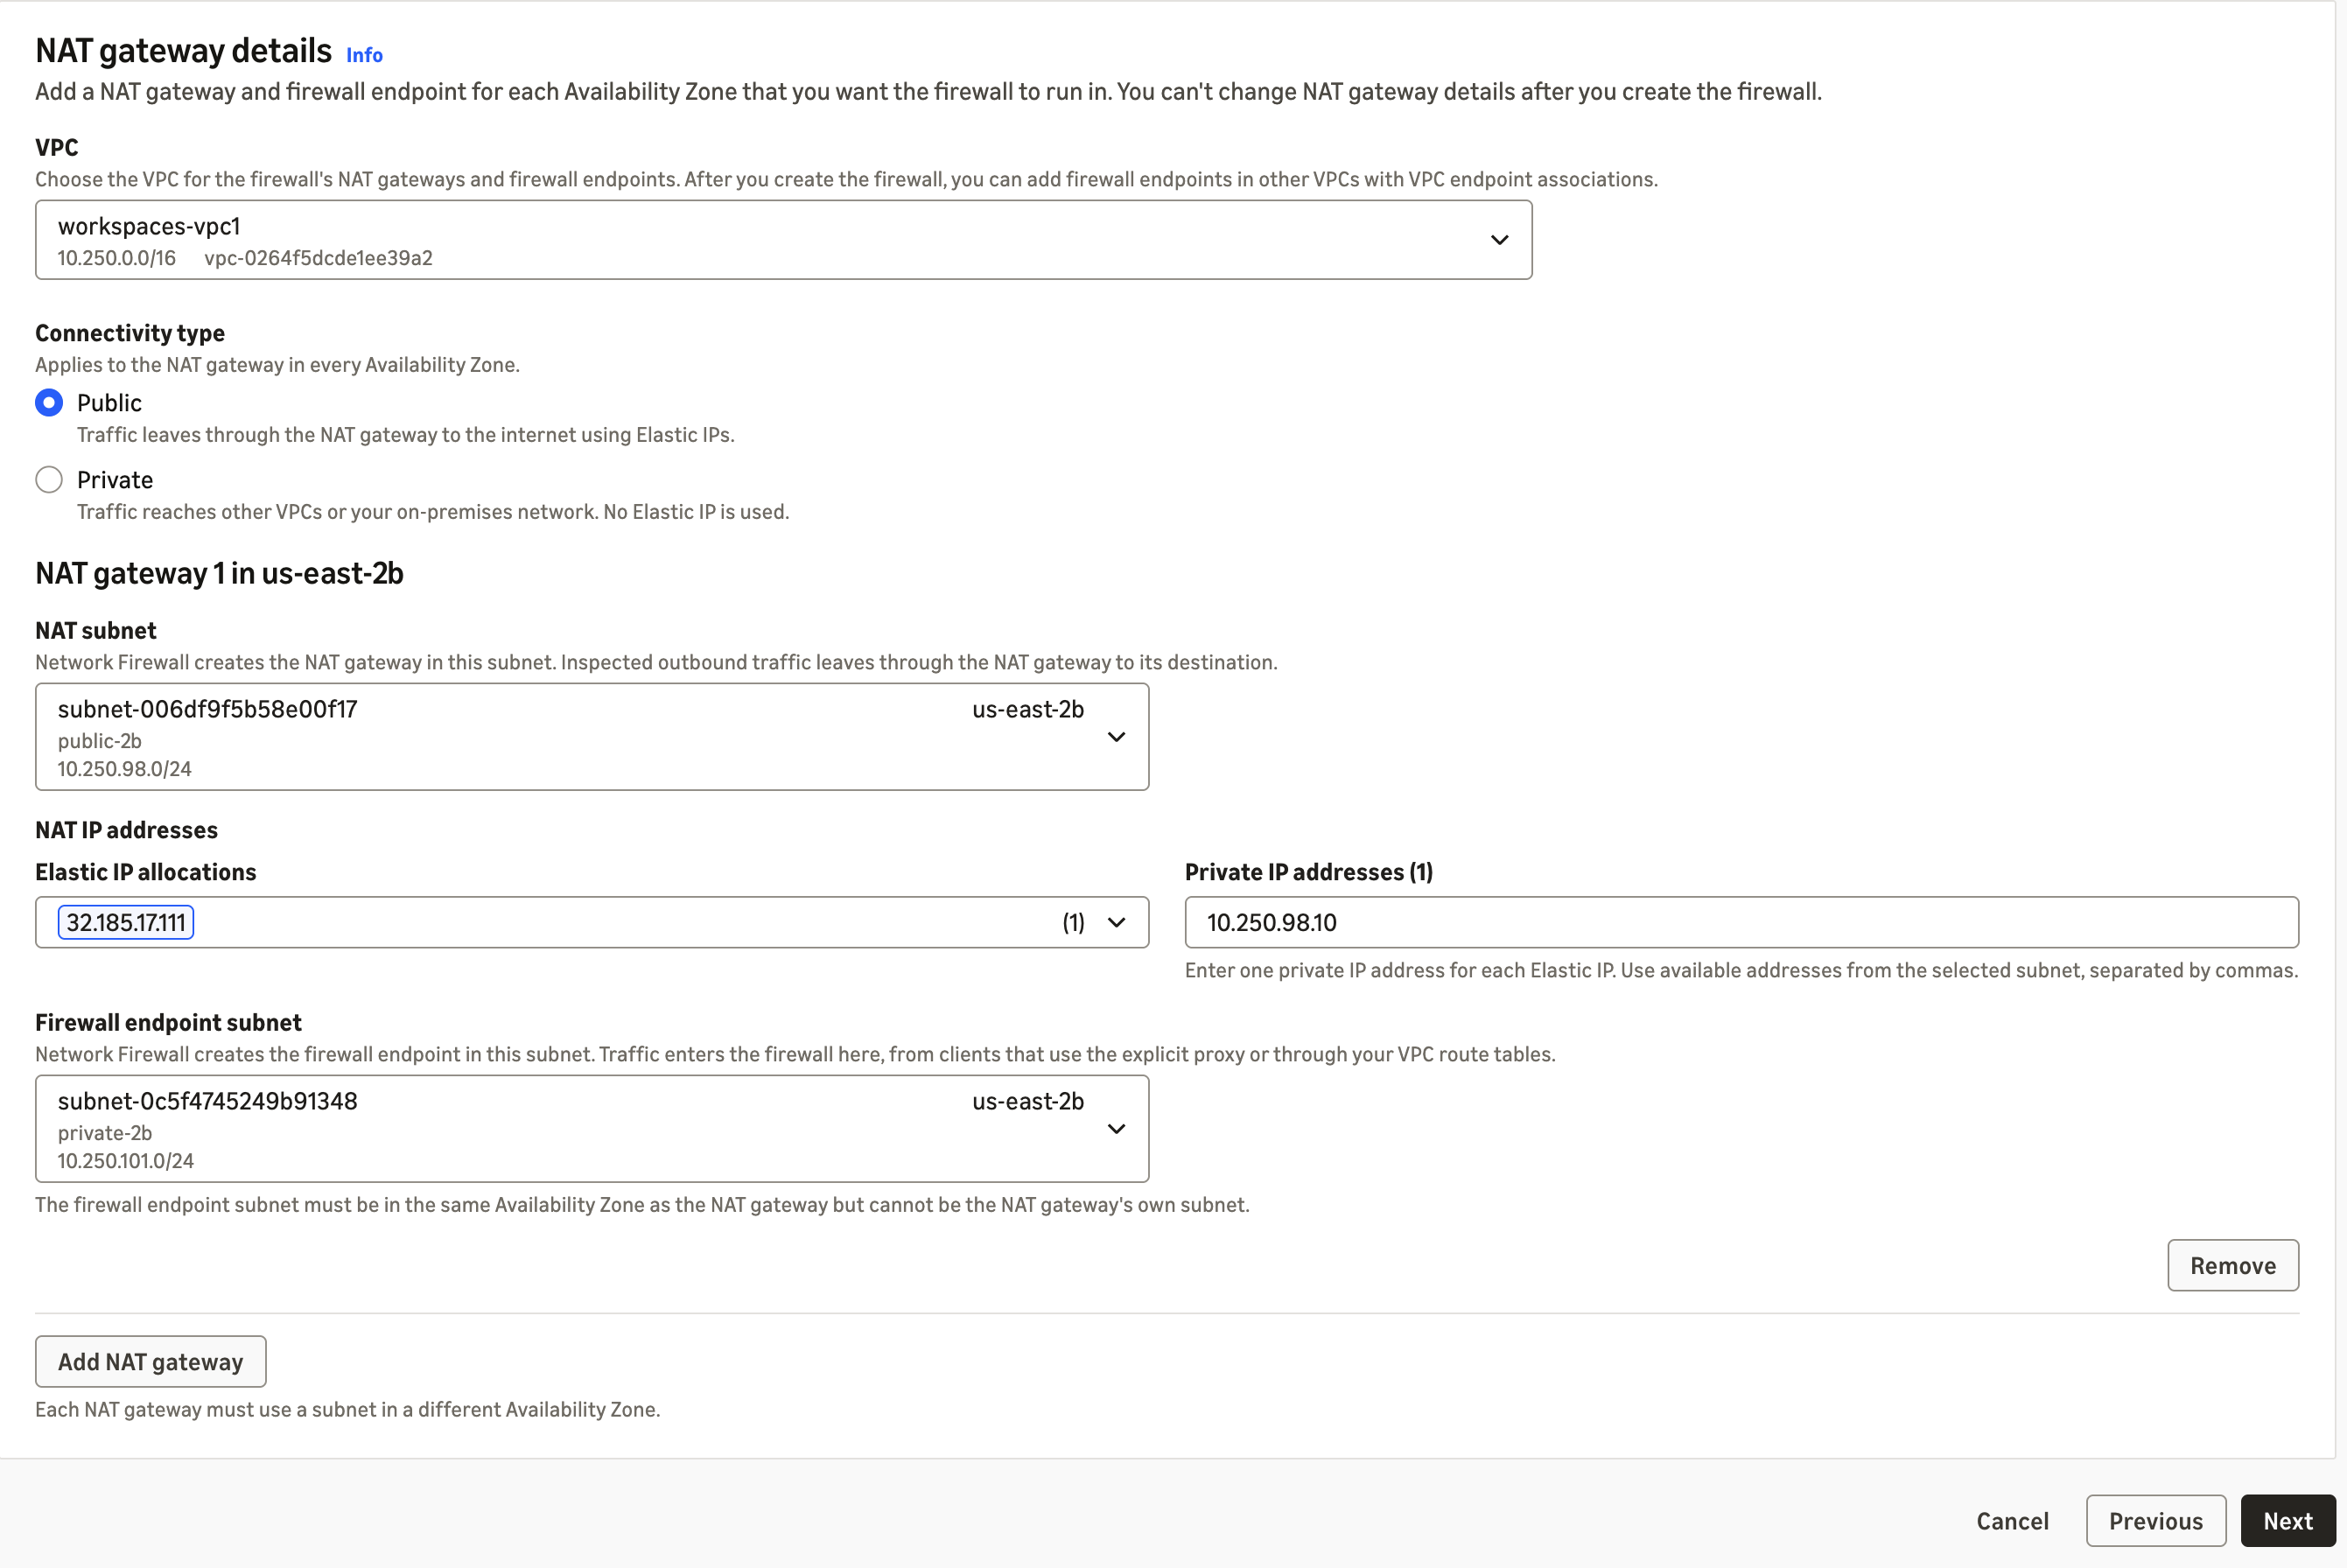
Figure 5: Specify NAT Gateway details.
You can expand your Firewall across more availability zones by choosing the ‘Add NAT gateway’ button and adding details for NATGW and primary endpoint in the new availability zone.
In the next step, you can set up proxy listeners and choose to have custom hostname by choosing a certificate from ACM
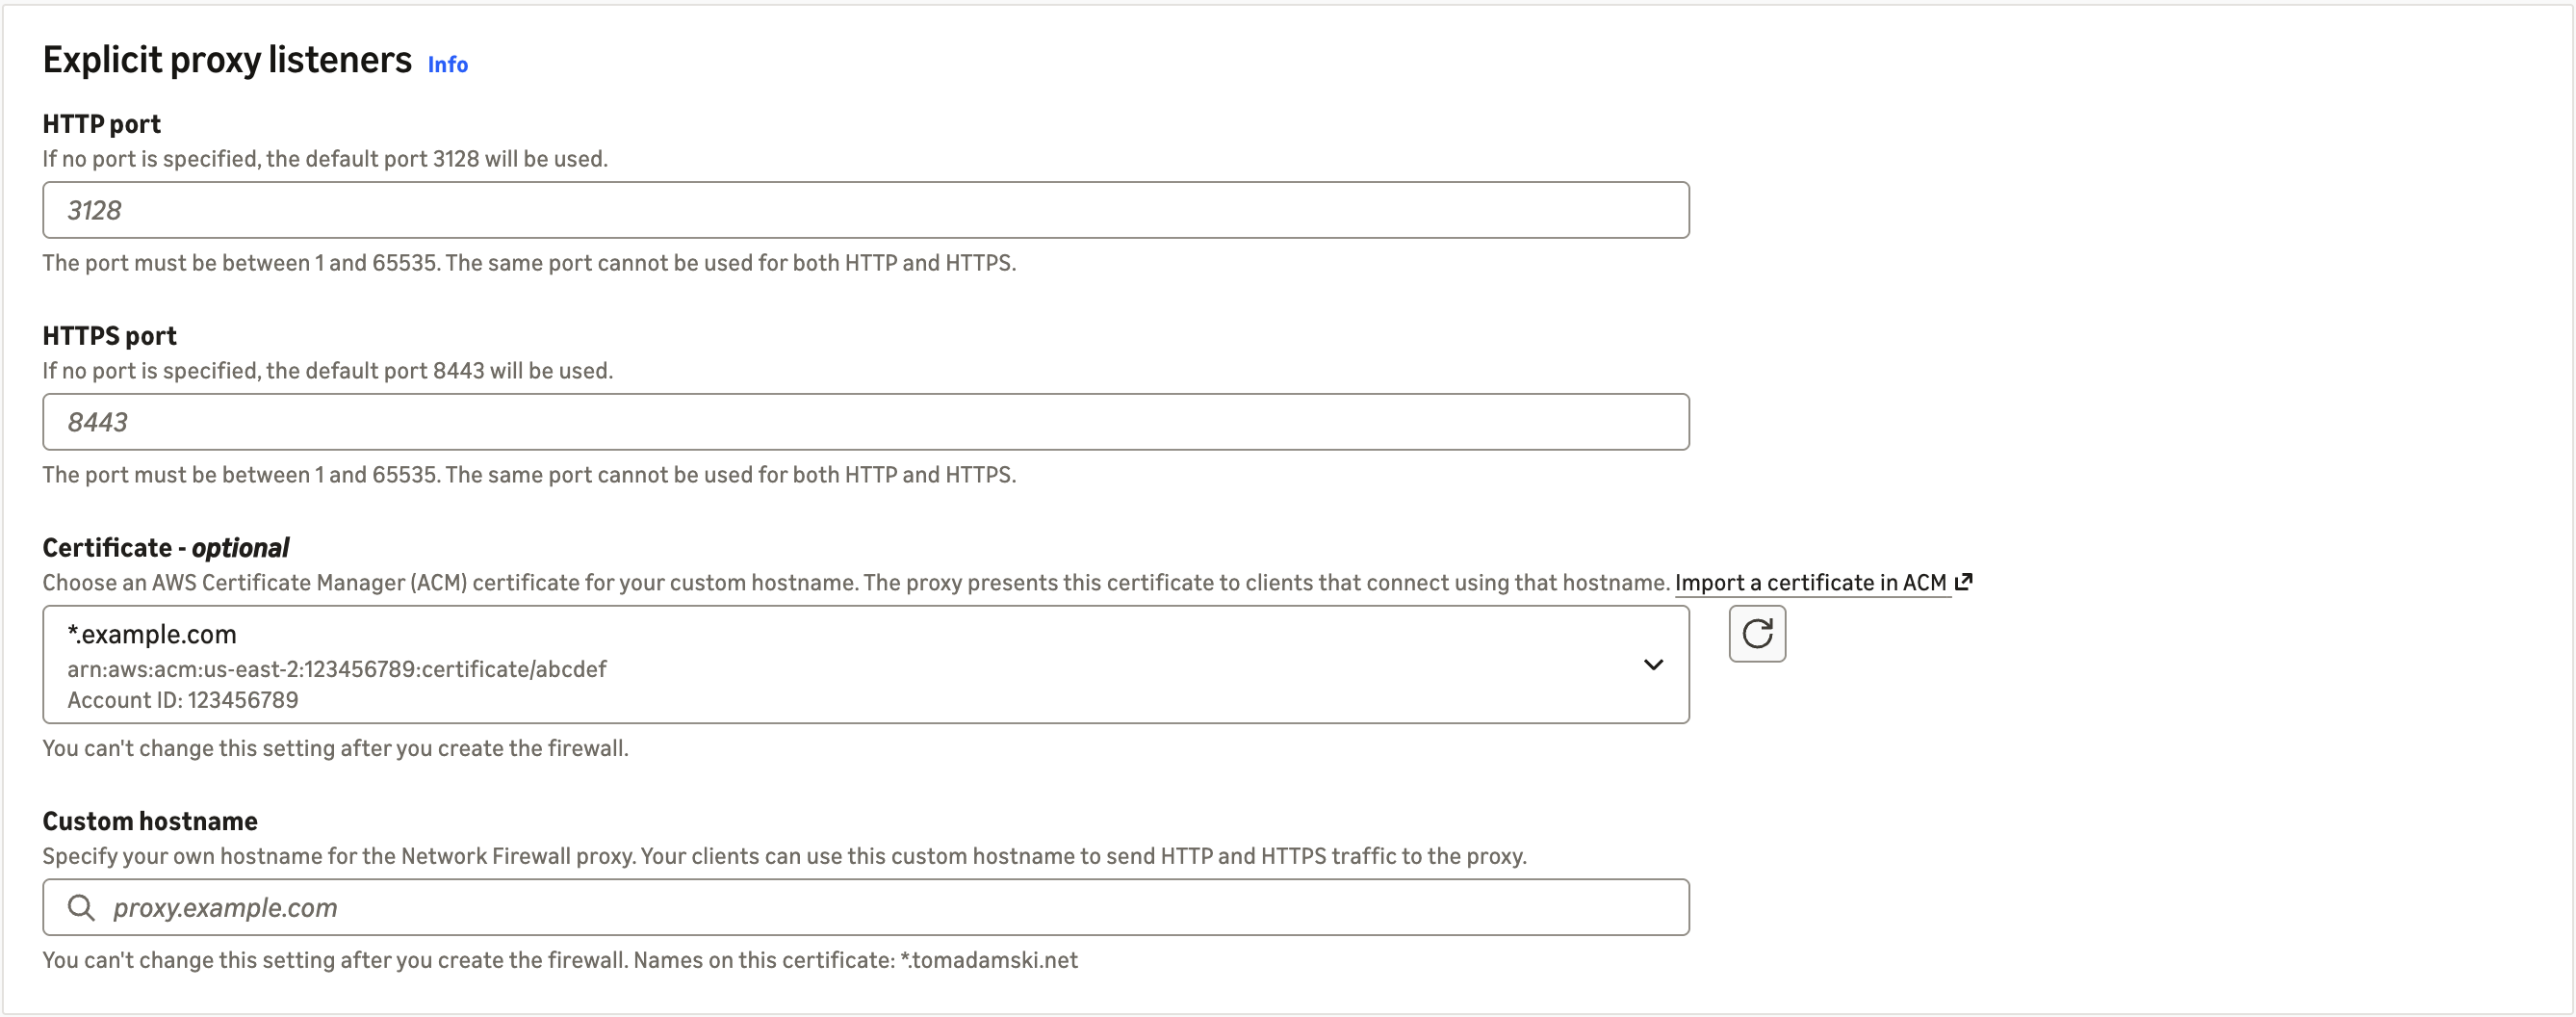 Figure 6: Explicit proxy listeners setup
If you do not select listeners, the firewall picks default ports for HTTP and HTTPS traffic.
In the same step, you can also choose if you want your non-proxy (routed traffic) to be translated using NAT Gateway or not.

Figure 7: Enable NAT on non-proxy traffic
Next, you select the policy that you created, set the tags and create the Firewall.
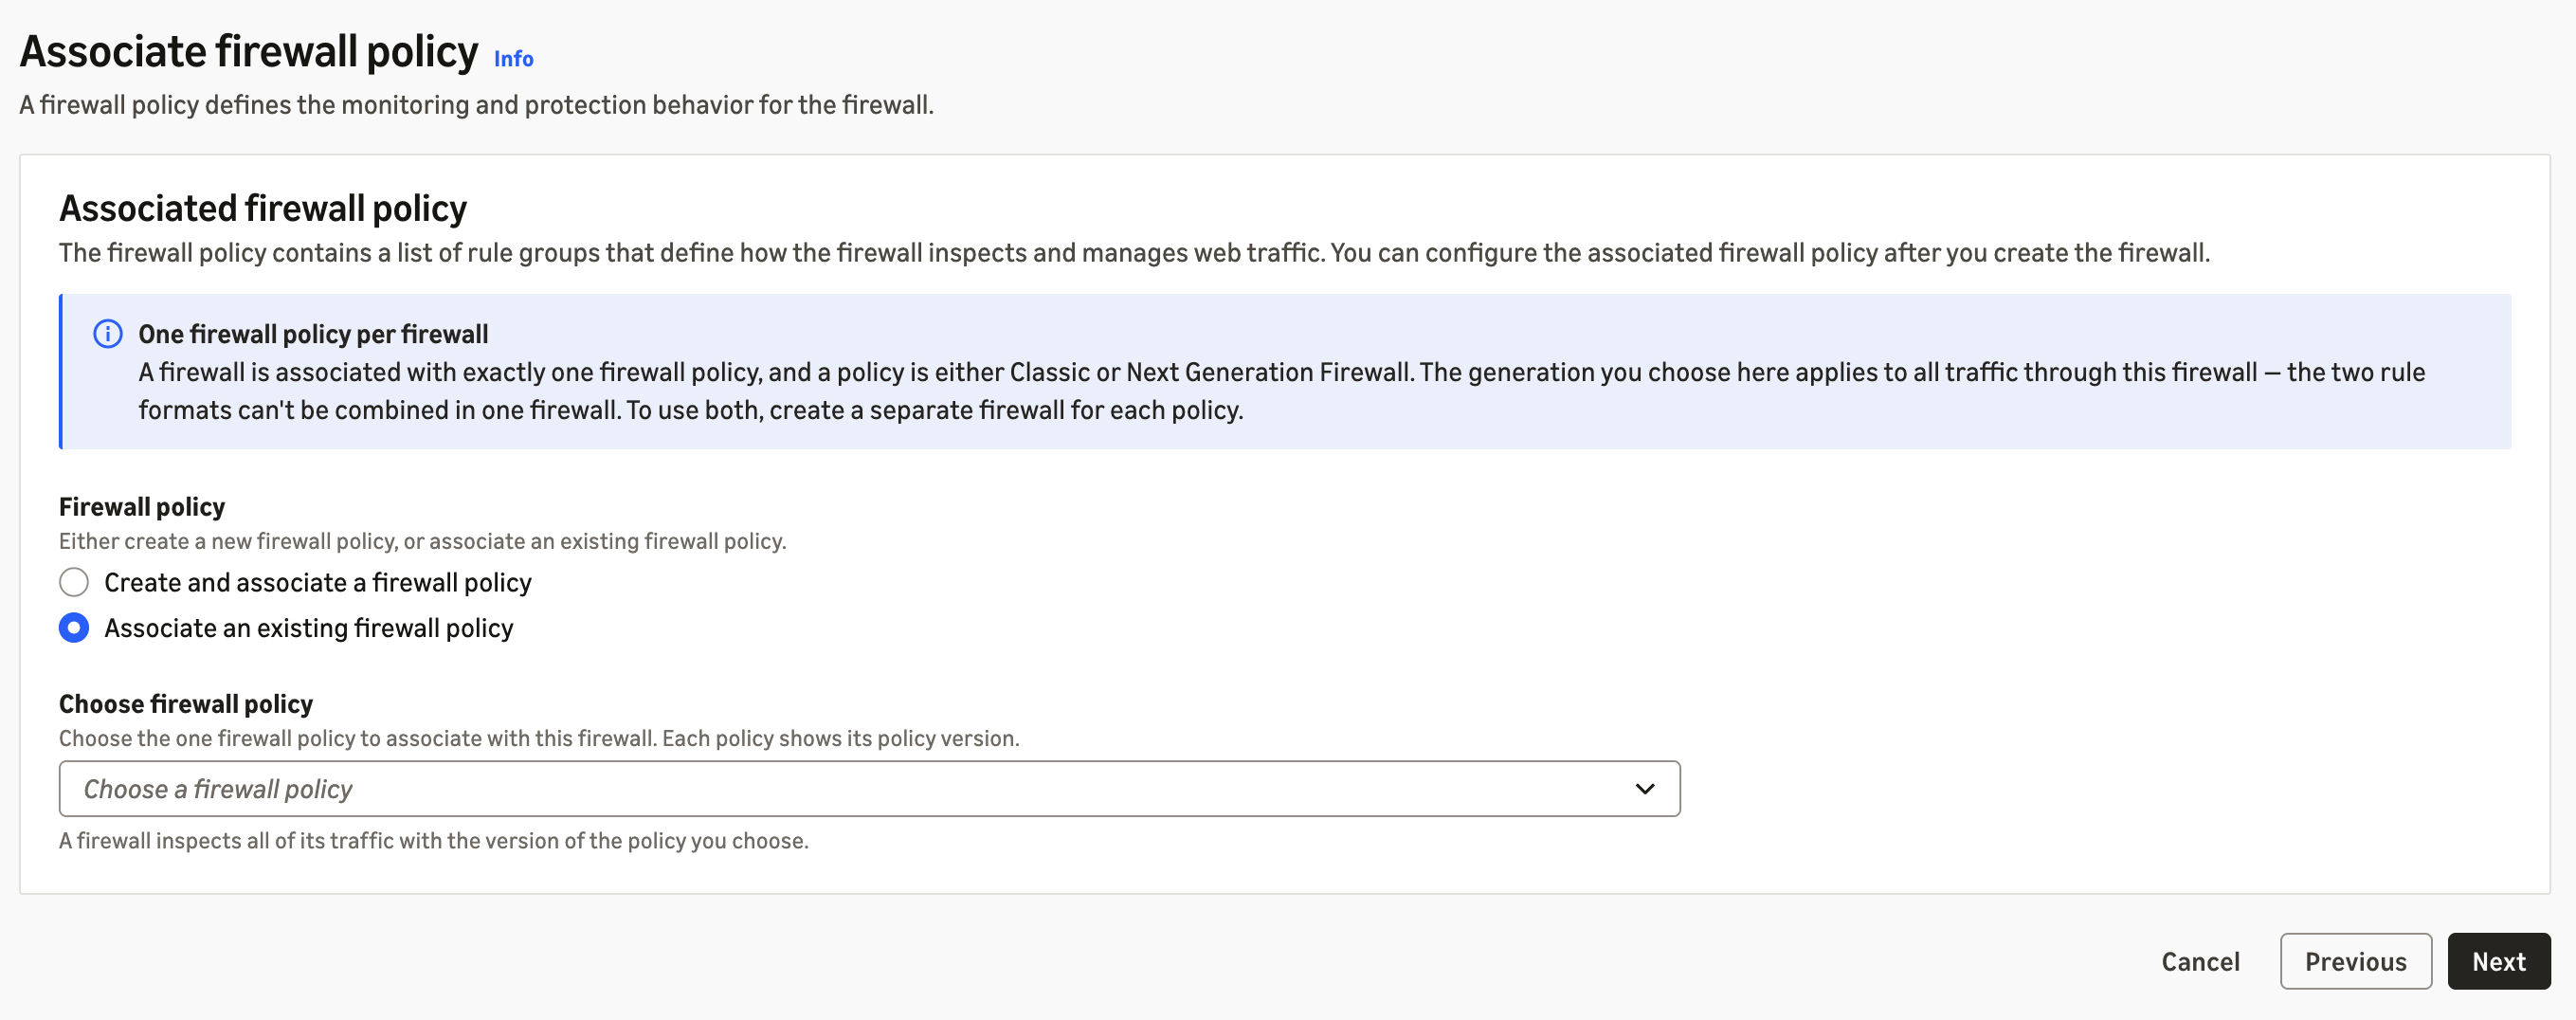
Figure 8: Associate firewall policy
The Firewall is now created to work both as a routed firewall and an explicit proxy. You can now go to the firewall details page to see the listeners, the hostname and the associated NAT Gateways.
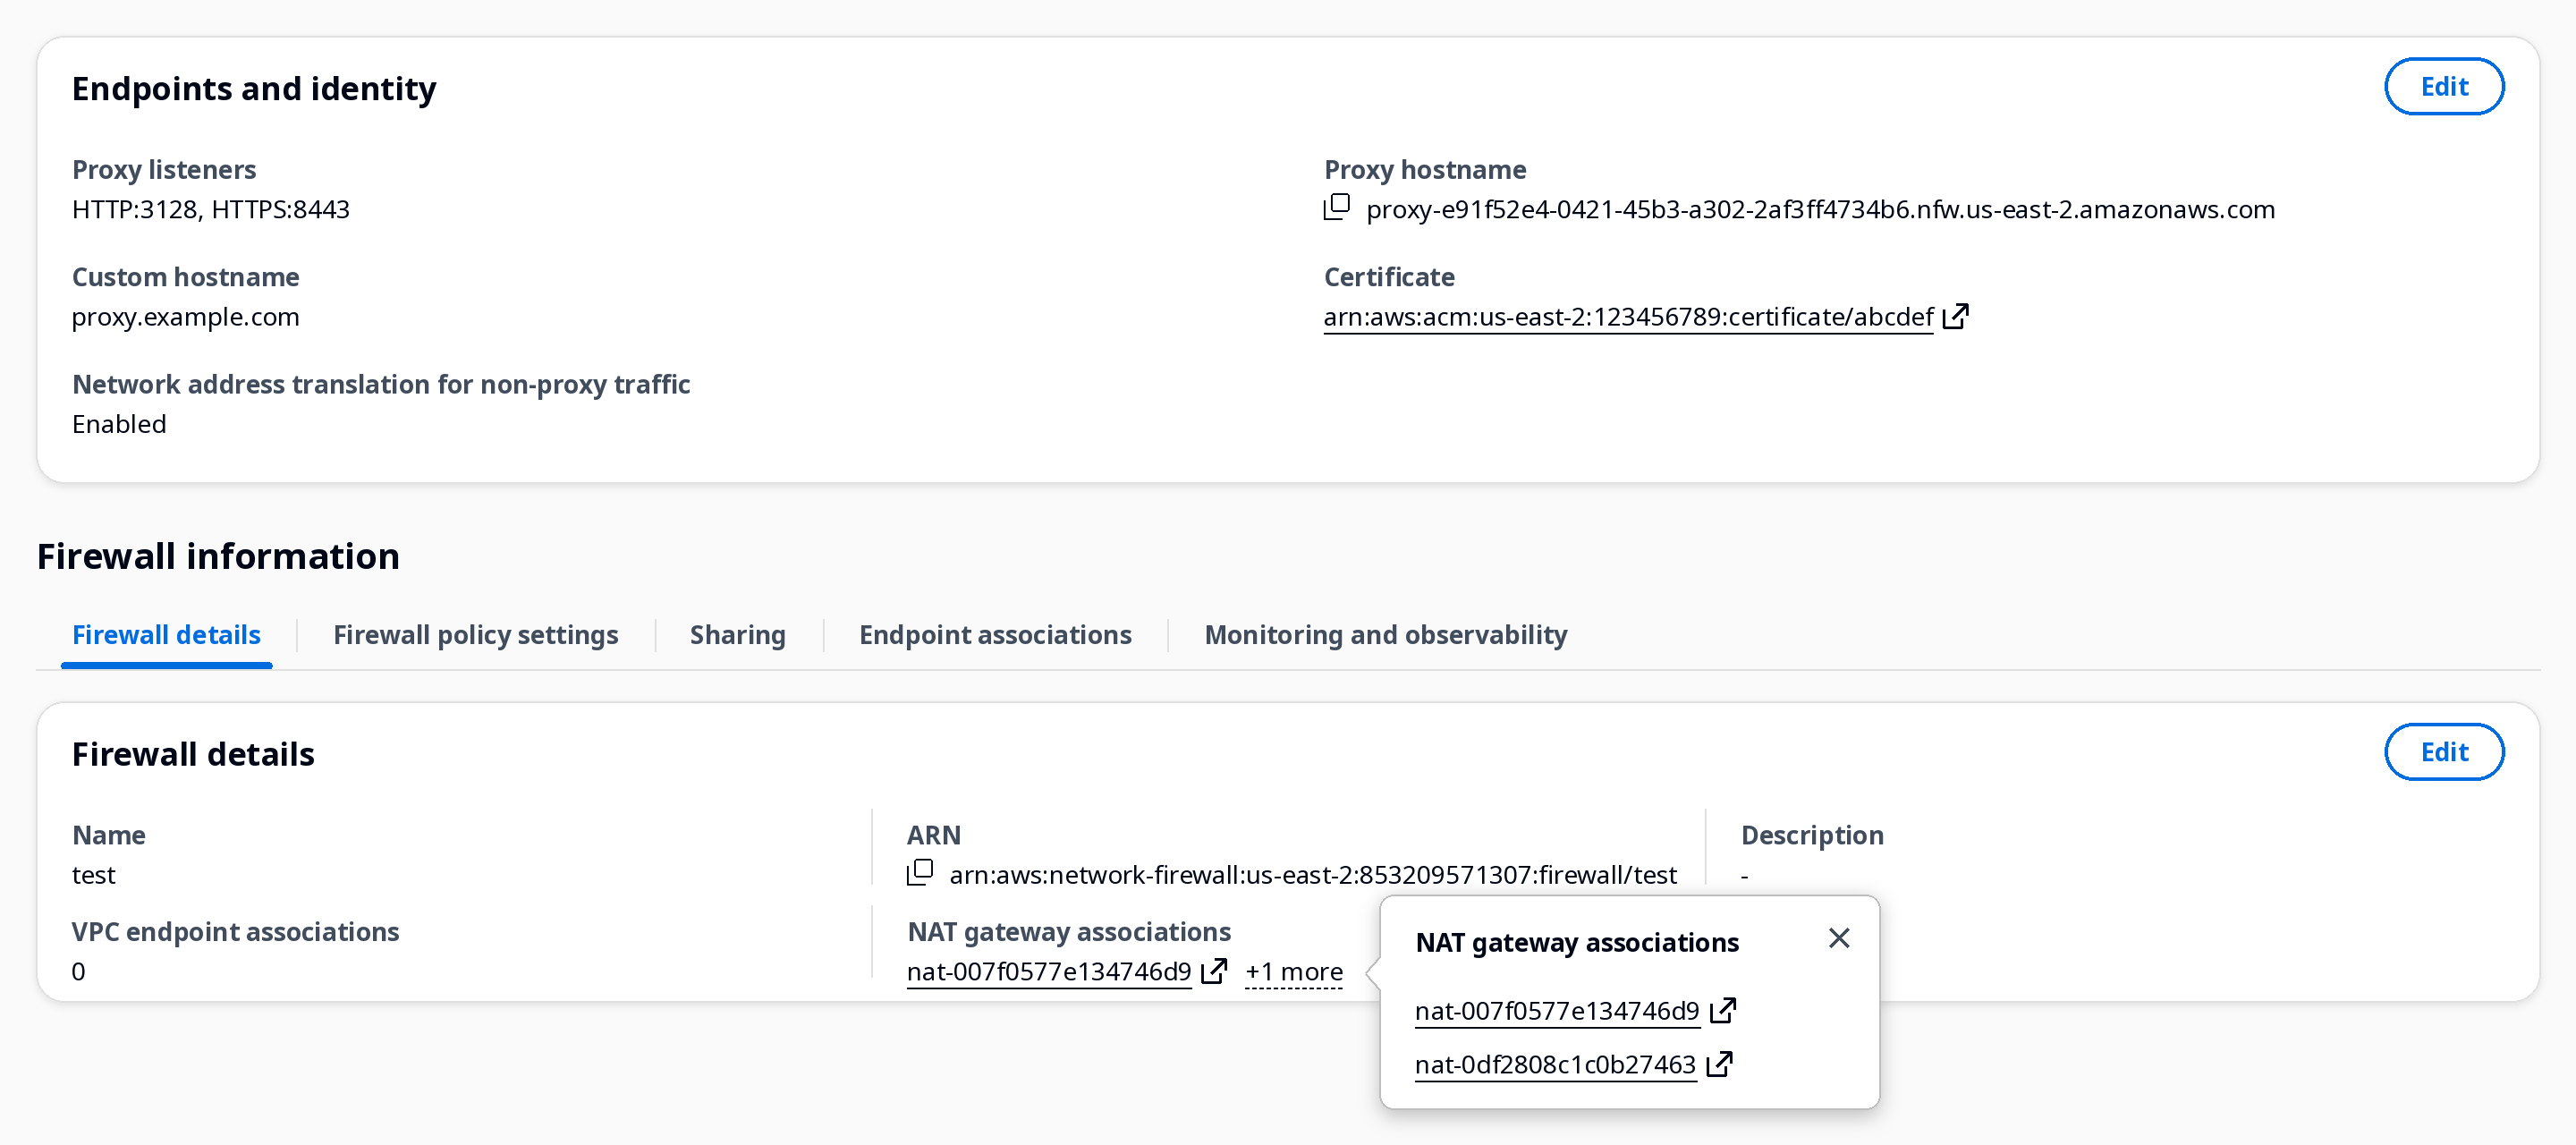
Figure 9: Overview of created firewall
Since there’re two NAT Gateways associated, it means the proxy is active across the two availability zones the NAT Gateways are provisioned in. You can add more availability zones by adding more NAT Gateways in this details page

Figure 10: NAT gateways details view
You can access this Firewall from other VPCs by deploying endpoints in those VPCs through endpoint associations panel in the Firewall details tab.
 Figure 11: Endpoint association tab
When you choose ‘Create VPC endpoint association’, you get the screen below that tells you what all availability zones your firewall is running in. You can only create endpoints in these availability zones.
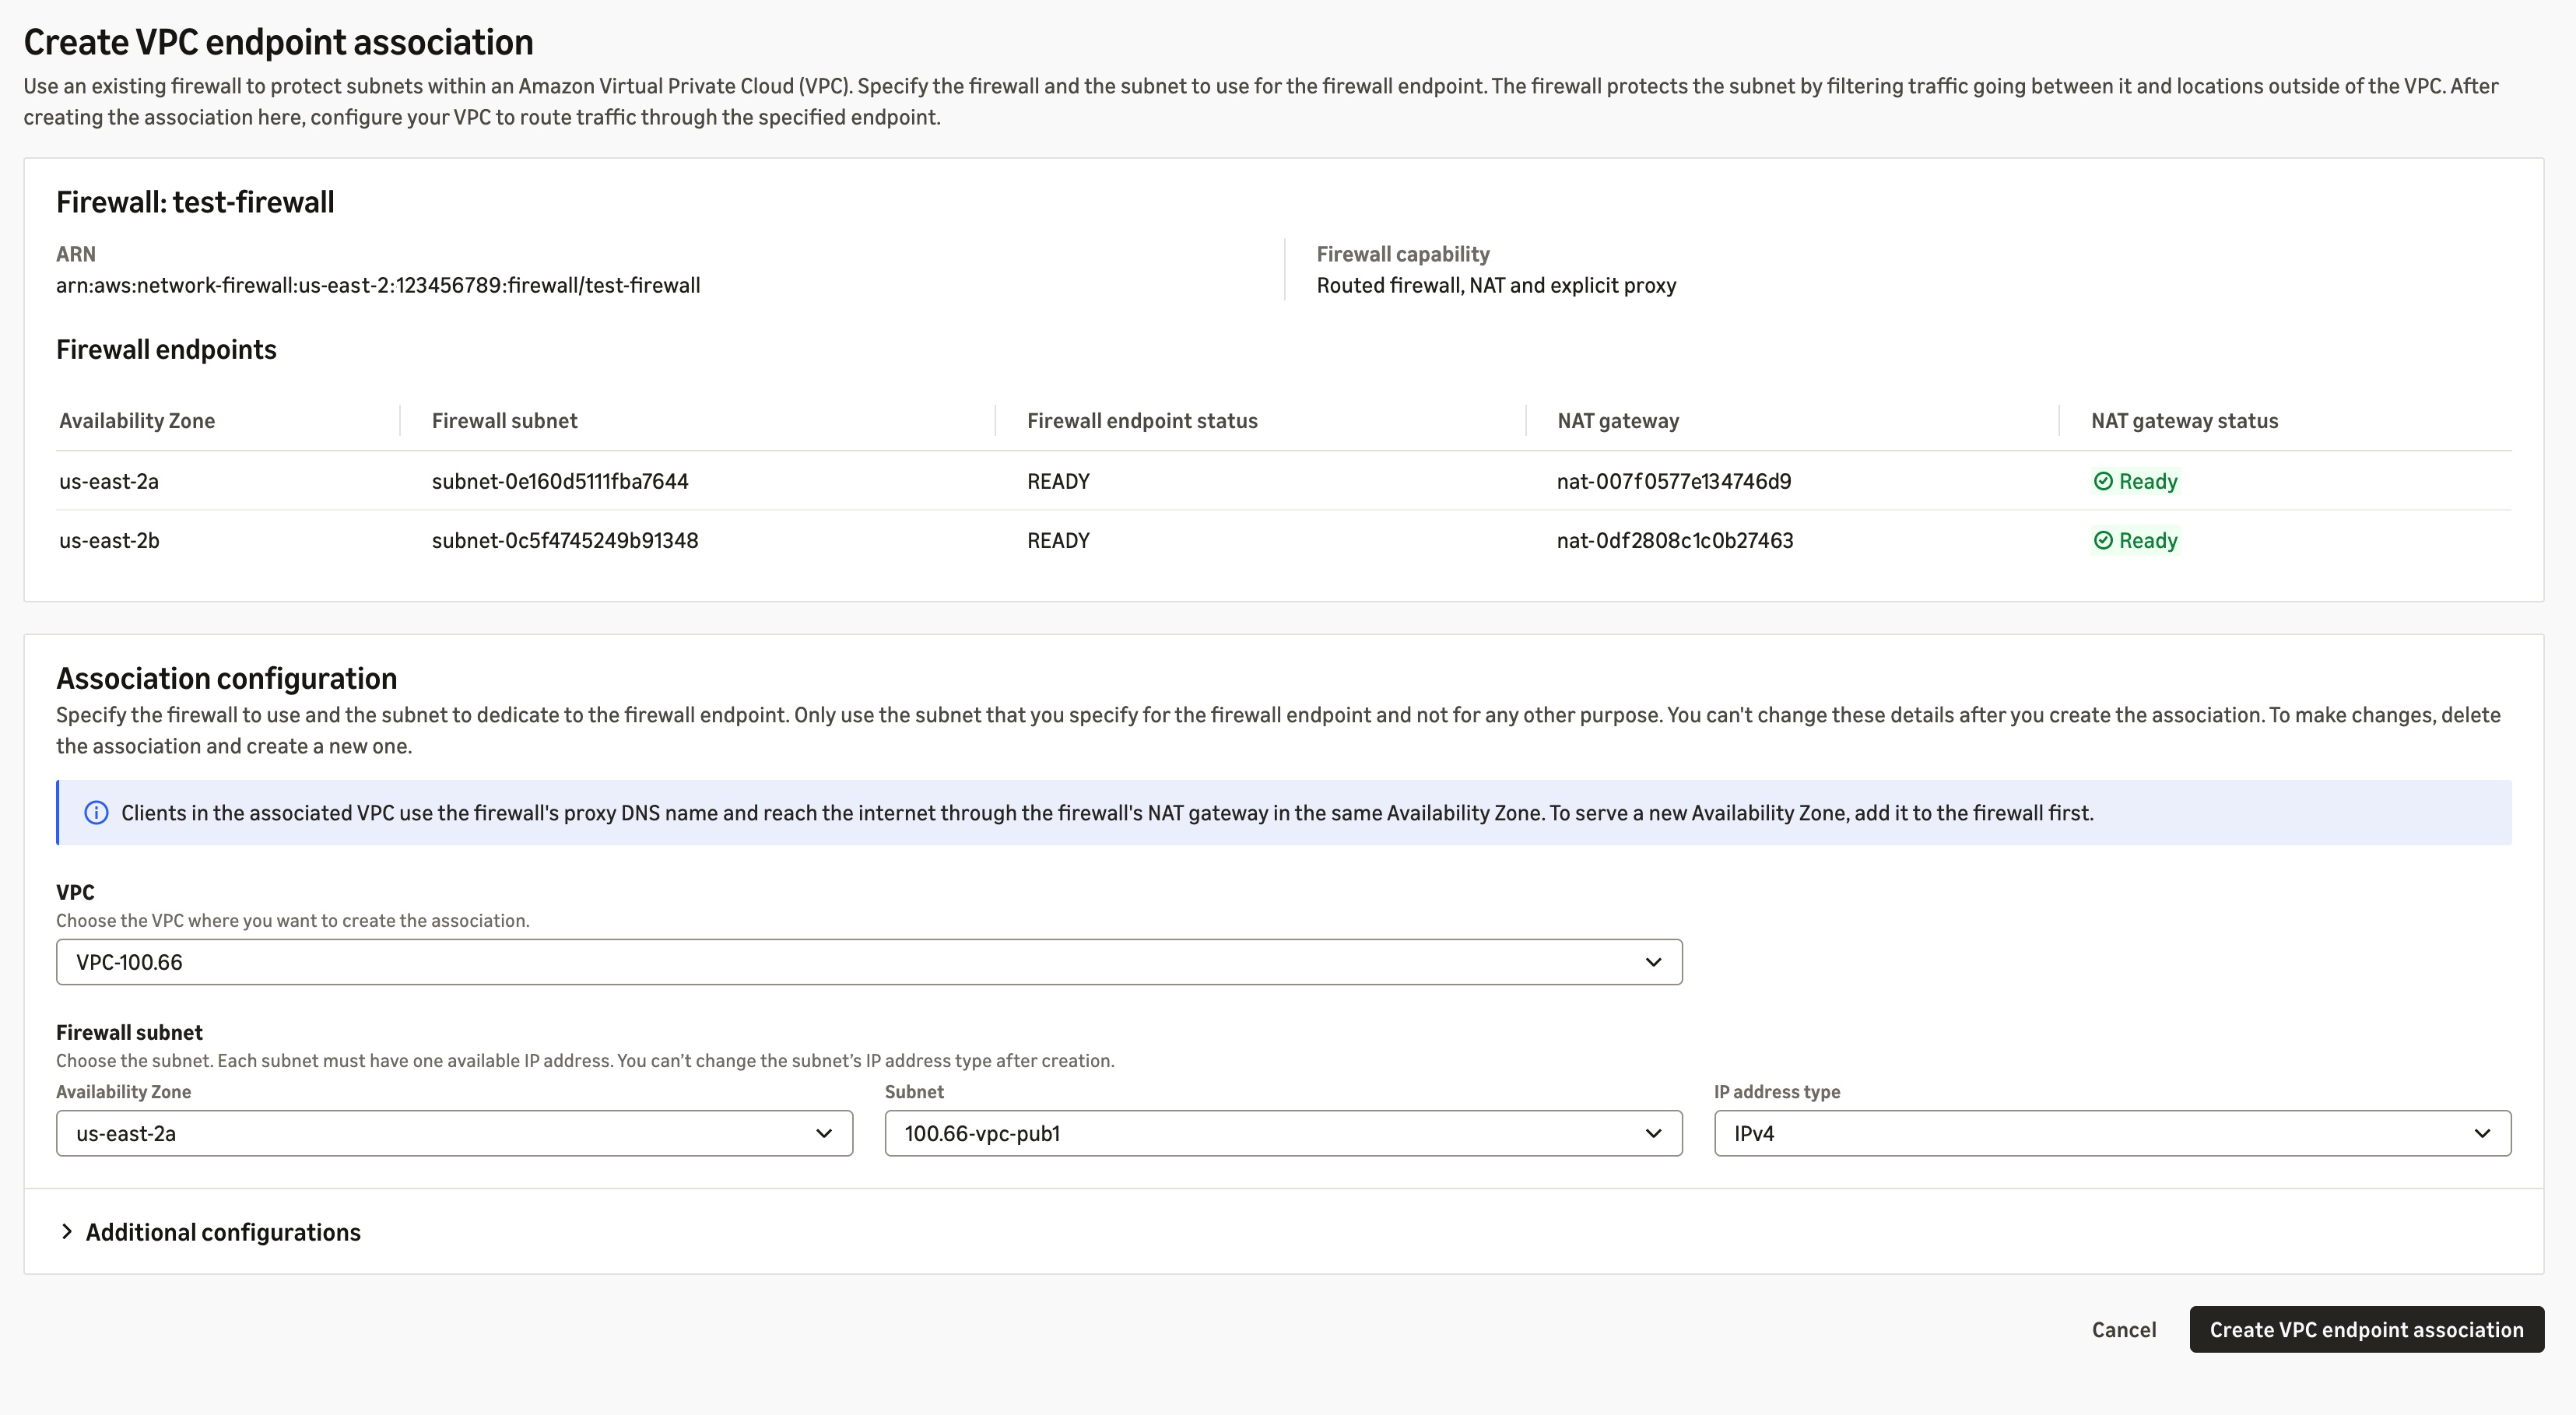
Figure 12: Endpoint association and Availability Zones
Once the endpoint is created, you can route traffic from your applications in the VPC to the endpoint either using route tables (when using it as a routed firewall) or by configuring your workloads to send traffic to the Firewall’s hostname. On Linux, for example, this is typically done with environment variables:
export https_proxy="https://<nfw_hostname>:<port>"
export http_proxy="https://<nfw_hostname>:<port>"
Note that both variables use the https:// scheme intentionally. This directs the client to establish a TLS-secured connection to the proxy for all traffic, including HTTP requests. This ensures that communication between the client and the proxy is always encrypted.
The hostname resolves to the local VPC endpoint, so no route table changes are required for proxied traffic.
How proxy connections work and how to filter them
When a client uses the explicit proxy, the connection is set up in stages, as shown in the following figure:
- CONNECT request. The client sends a CONNECT request to the proxy hostname. The request includes the destination hostname and port, for example example.com:443.
- DNS resolution. The proxy resolves the destination hostname with its own DNS query. This query passes through the firewall, so your DNS rules apply to it.
- Connection to the destination. If the hostname resolves, the proxy opens a TCP connection to the destination and confirms the CONNECT to the client. This creates a logical tunnel between the client and the destination.
- Traffic over the tunnel. The client sends the rest of its traffic over the tunnel, starting with the TLS ClientHello. Your TLS rules, such as SNI matching, apply to this traffic.
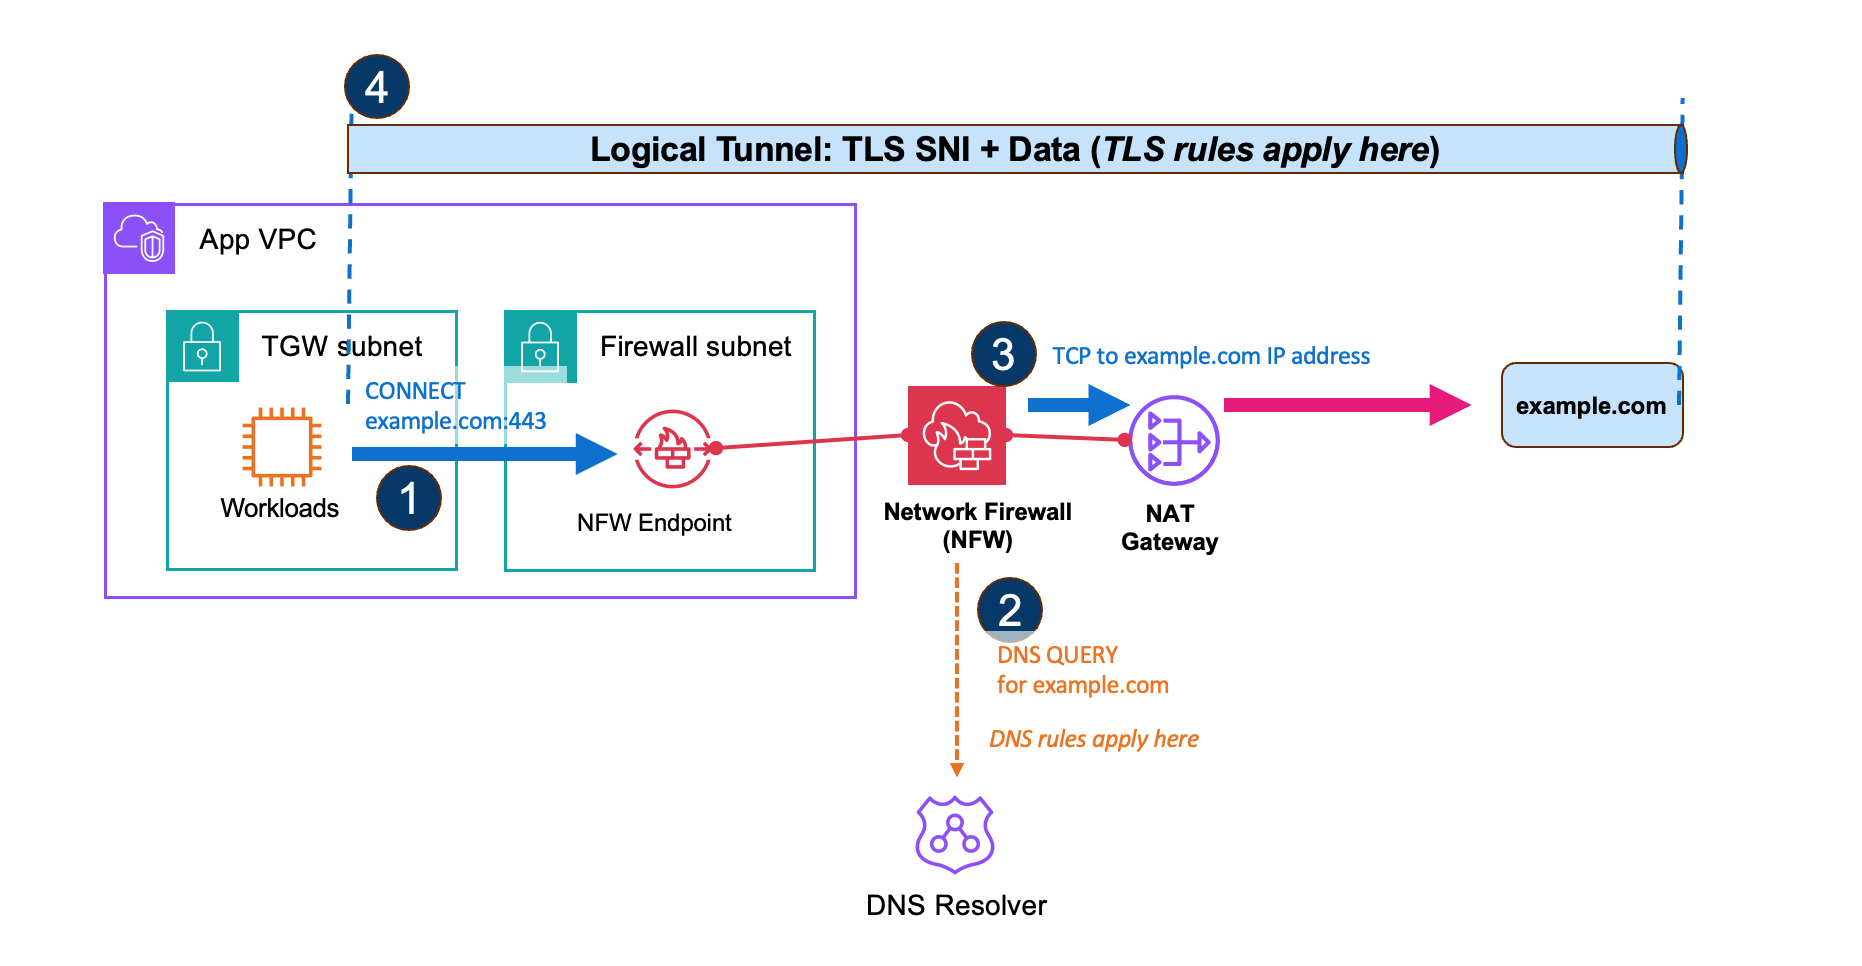
Figure 13: How the explicit proxy sets up a CONNECT tunnel
Because of this, you need the same domain rules at two points:
- DNS rules stop the proxy from resolving a blocked domain, so the CONNECT request fails and no tunnel is set up.
- TLS rules check the SNI of traffic inside a tunnel that is already set up. Without them, a client can open a tunnel to an allowed domain and then send a new TLS ClientHello with a different SNI.
With both in place, a client can’t reach a blocked domain by opening a new tunnel or by switching the SNI inside an existing one.
We recommend a default drop policy with accept rules for only the domains you want to allow. The following rules allow example.com and drop everything else:
accept:hook udp:all any any <> any 53 (sid:1000001;)

          accept:hook tcp:all any any <> any 443 (sid:1000002;)

          accept:flow dns:request_complete any any -> any any (dns.query.name; content:"example.com"; startswith; nocase; endswith; sid:1000010;)

          accept:tx tls:<client_hello any any -> any any (tls.sni; content:"example.com"; startswith; nocase; endswith; sid:1000020;)
The first two rules let DNS and HTTPS packets through, in both directions, so the DNS and TLS rules can inspect them. The third rule allows DNS queries for example.com only. The fourth rule allows TLS connections only when the SNI is example.com. The < in tls:<client_hello also accepts the TLS state before the ClientHello, so you don’t need a separate rule for it. Add each domain you want to allow to both the DNS and the TLS rule. To match several domains in one rule, you can use PCRE with dns.query.name and tls.sni.
The proxy caches DNS responses and honors the DNS TTL, between 5 and 3,600 seconds. If you add a drop rule for a domain the proxy has already resolved, the rule takes effect for new connections when the cached entry expires.
Conclusion
In this post, we covered the improvements that have taken Network Firewall proxy from the August re-introduction to general availability. You can now use one firewall as both an explicit proxy and a routed firewall. Network Firewall can now perform NAT directly, without requiring a service-chained NAT Gateway, so you can centralize egress from overlapping CIDRs. Custom hostnames and selective TLS decryption make it easier to move off your DIY proxy and to focus inspection where you need it.
To get started, follow the directions in the public documentation.
About the authors

Tom Adamski
Tom is a Principal Solutions Architect specializing in Networking and Security. He has over 15 years of experience building networks and security solutions across various industries – from telcos and ISPs to small startups. He has spent the last 8 years helping AWS customers build their network environments in the AWS Cloud. In his spare time Tom can be found hunting for waves to surf around the California coast.

Akshay Choudhry
Akshay is a Principal Product Manager in the Networking and Security Services Team at Amazon Web Services. He is focused on making Virtual Private Clouds more intuitive and secure for the millions of customers running their workloads on AWS. In his free time, he enjoys exploring the outdoors, trying out new restaurants, and spending time with friends and family.