Networking & Content Delivery
Manage caches with precision using Amazon CloudFront Invalidation by Cache Tag
Today, Amazon CloudFront is launching Invalidation by Cache Tag, a new capability that transforms how developers manage cached content. With this feature, you can invalidate groups of related cached objects using a single invalidation request, regardless of URL structure—making cache management more precise, efficient, and developer-friendly.
In this post, we discuss the benefits of this new feature and how to get started.
The challenge of cache management
AWS customers appreciate the scale, security, and performance of CloudFront, including its caching capabilities. Although we recommend CloudFront customers tune their cache control headers and use URL versioning to maintain content freshness, there are scenarios where explicit invalidations are required.
URL-based invalidations work well for purging individual cached objects, but many applications need to invalidate groups of related content that don’t share a common path. Until now, developers did this by managing lists of URLs, using wildcard invalidations, or adjusting their caching strategies—each requiring trade-offs between cache freshness, performance, and operational overhead.
Solution overview
Invalidation by Cache Tag addresses these challenges by making it possible for developers to create straightforward invalidation logic that targets the precise objects impacted by an update, regardless of URL path, resulting in lower origin load and faster websites.
To invalidate cached objects using cache tags, the cache tags must by associated with the objects when they are cached. When CloudFront fetches an object from the origin, the origin must include a cache tag header with a comma-separated list of tags (basic text strings) that will be stored along with the cached content. After tags are associated with a cache object, an invalidation request can be made to invalidate objects with a specified tag. This allows for precise invalidation of objects without waiting for cache expiry or impacting unrelated content—simplifying code, increasing cache hit rates, and improving application performance.
Over the years, CloudFront has made improvements to propagation times. At the time of writing, invalidations take effect in under 5 seconds at P95. The end-to-end completion time, which includes reporting the invalidation status back, is under 25 seconds at P95.
Invalidation by Cache Tag addresses common challenges in modern applications:
-
- Content Management Systems (CMS) – When updating an article, invalidate related cached content—hero images, thumbnails, text, and metadata—with a single tag. For example, updating a news article tagged
article:123refreshes associated content across different URLs in one operation. - Ecommerce platforms – Propagate product changes across category pages, search results, detail pages, and recommendations instantly. A price update for
product:456refreshes cached content featuring that product, regardless of location. - Compliance requirements – Handle regulatory and legal take-down requests efficiently. Invalidate content from a specific user—images, posts, and comments across your application—using a single tag like
user:ABC. - Video streaming services – Manage complex content hierarchies with tags for series, seasons, episodes, and languages. Update subtitles for an entire series, refresh season thumbnails, or invalidate region-specific content with precision.
- Content Management Systems (CMS) – When updating an article, invalidate related cached content—hero images, thumbnails, text, and metadata—with a single tag. For example, updating a news article tagged
In the following sections, we show how to configure tag-based invalidation, invalidate cached objects using a tag, and verify the invalidation.
Prerequisites
Enable tag-based invalidation
To use tag-based invalidation, you must first enable the feature on your CloudFront distribution and specify the HTTP response header that contains your cache tags. Complete the following steps:
- On the CloudFront console, choose Distributions in the navigation pane.
- Choose your distribution.
- On the General tab, choose Edit settings.
- Turn on Use cache tags for cache invalidation.
- For Header to use for cache tags, enter the HTTP header your origin uses to set cache tags. The default value is
x-amz-meta-cache-tag. - Save your changes.
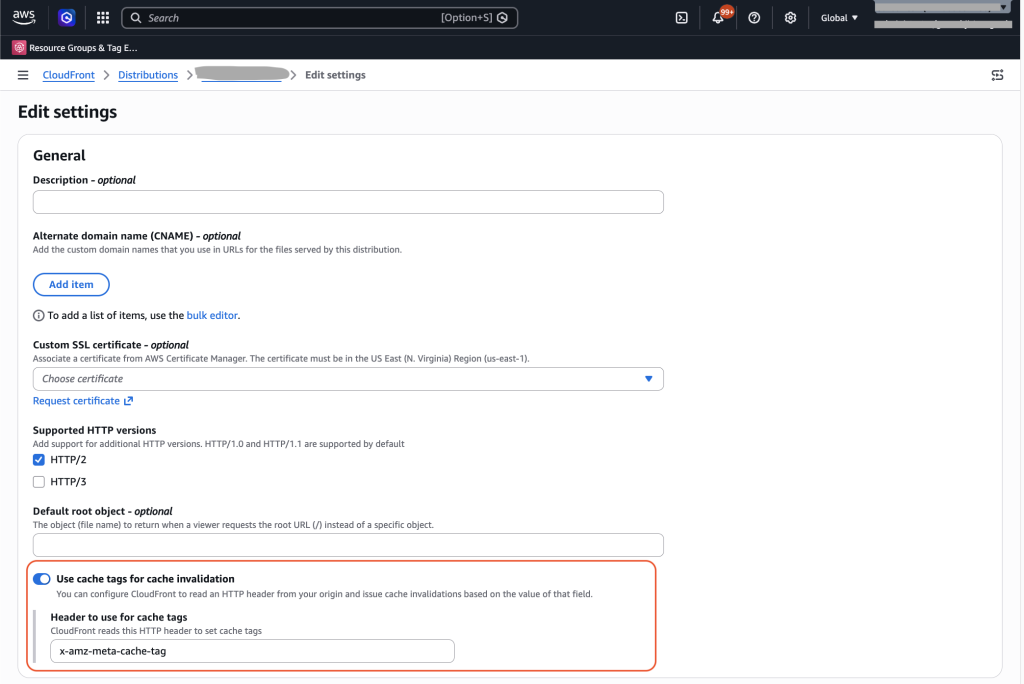
Figure 1: Enable tag-based invalidations
For objects that you want to cache with cache tags, return the configured header as part of the origin response. The header value should be a comma-separated list of cache tags (simple text strings). CloudFront will cache the object along with the cache tags, then you can make tag-based invalidation requests to invalidate objects with a specified tag.
With Amazon Simple Storage Service (Amazon S3), you have two options for adding them to origin responses:
- Amazon S3 user-defined metadata (recommended) – Add a metadata key to your S3 objects. Amazon S3 returns user-defined metadata as an HTTP response header in the format
x-amz-meta-<key>. For example, if you add a metadata key calledcache-tagwith your tag values, Amazon S3 returns the headerx-amz-meta-cache-tagin the response. - Lambda@Edge origin response function – Write a Lambda@Edge function triggered on origin response to set a custom cache tag header.
Your CloudFront distribution’s header to use for cache tags must match the header your origin returns. For example, if you use S3 metadata with a key called cache-tag, set the header value to x-amz-meta-cache-tag.
The following diagram illustrates the tag-based caching workflow.
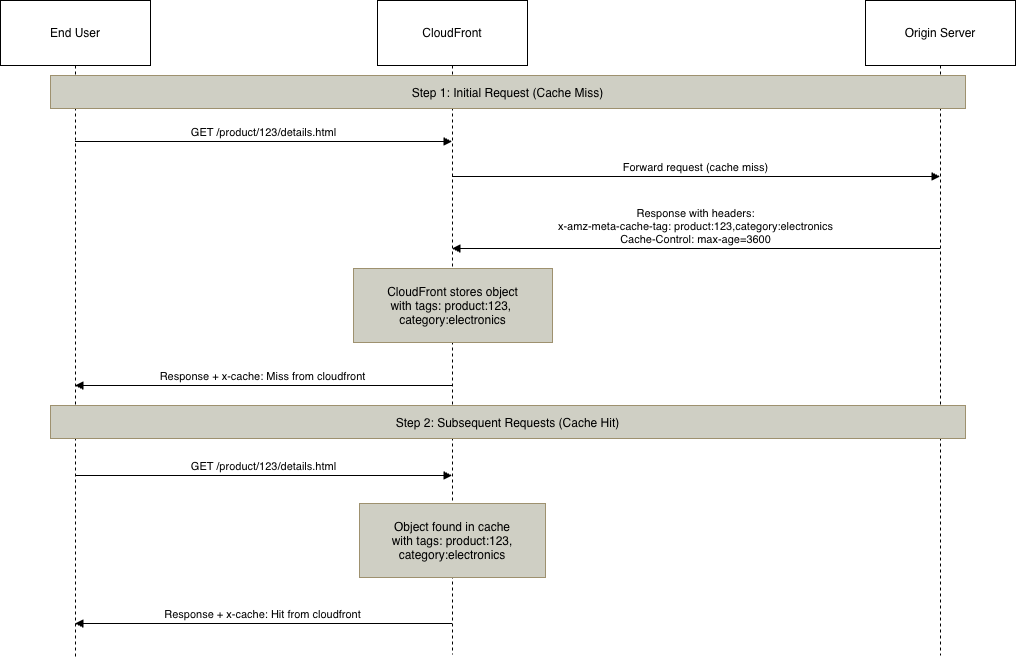
Figure 2: Tag-based caching workflow
Perform invalidations
To invalidate cached objects associated with a tag, you invoke the invalidation API passing a tag or list of tags as input. The following diagram illustrates the invalidation workflow.
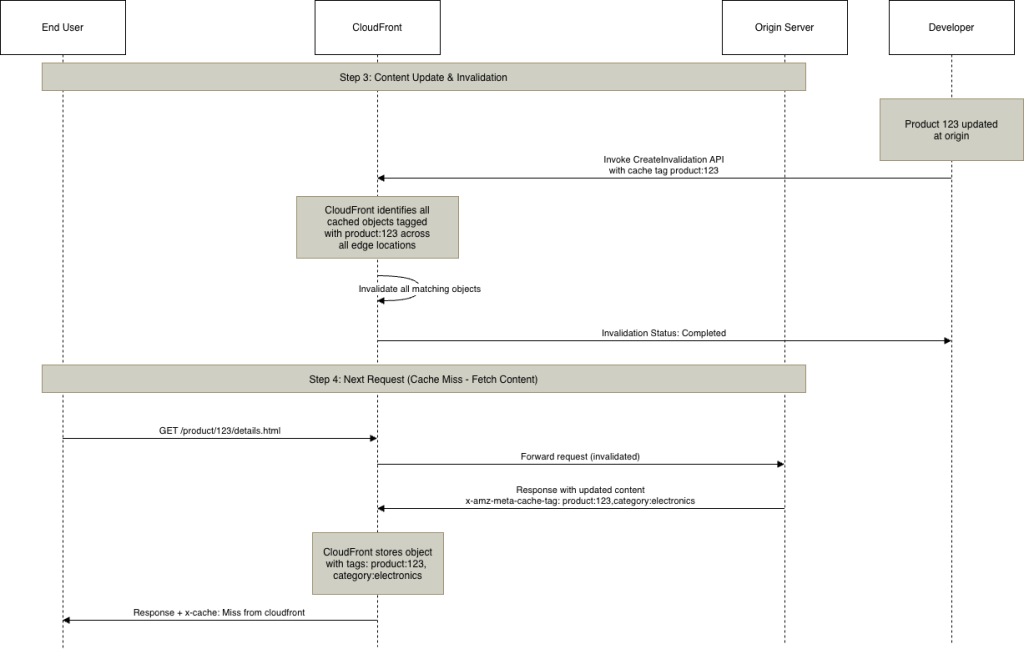
Figure 3: Tag-based invalidation workflow
When content is updated at the origin (for example, for product:123), developers trigger an invalidation using a cache tag. CloudFront automatically identifies and invalidates cached objects with that tag across edge locations.
You can create tag-based invalidations using the AWS Management Console, AWS Command Line Interface (AWS CLI), or APIs. We explore each method in the following sections.
AWS console
To use the console, complete the following steps:
-
- On the CloudFront console, go to a distribution or tenant page (for an individual tenant using multi-tenant distributions).
- On the Invalidations tab, choose Create invalidation.
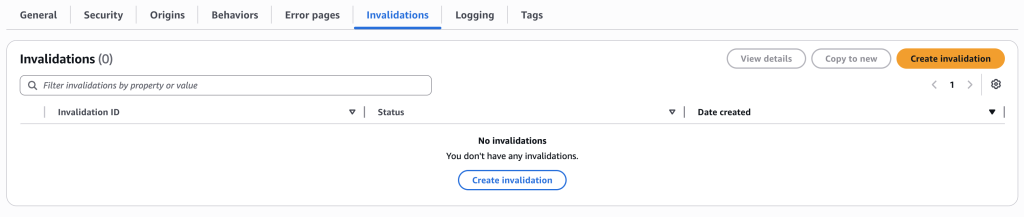
Figure 4: Create invalidation
- Select By cache tags.
- Enter cache tags to invalidate, with a single tag per line.
- Choose Create invalidation.
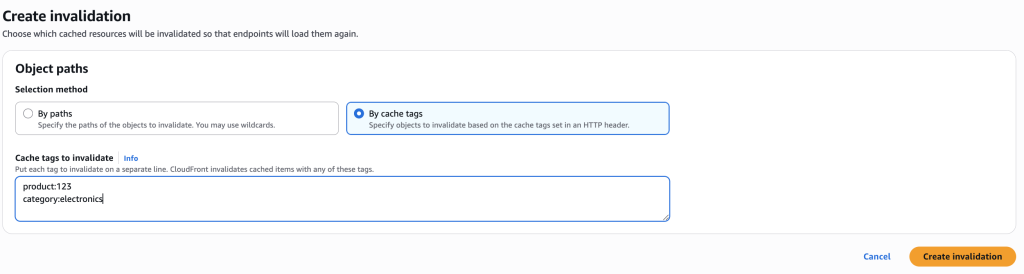
Figure 5: Create invalidation by cache tags
You can view the status of your invalidation requests in the Invalidations details pane on the CloudFront console after a tag-based invalidation has been submitted. On the left, you see the Date created timestamp and the Status field, which displays a green checkmark with Completed—indicating that CloudFront has successfully invalidated the matching cached object. On the right, the Cache tags field shows the specific tags that were invalidated (in this example, category:electronics and product:123). This means any cached object tagged with either of those values has been invalidated and will be fetched fresh from the origin on the next request.

Figure 6: View invalidation status
When you first submit the invalidation, the status will show InProgress while CloudFront propagates the invalidation globally, and it transitions to Completed once its processed. You can choose Copy to new to quickly create a new invalidation using the same tags.
AWS CLI
To invalidate cached objects by tag using the AWS CLI, prefix your tag with # to distinguish it from path-based invalidations.
Invalidate objects with a specific tag:
aws cloudfront create-invalidation \
  --distribution-id E1A2SI6ABUP8J5 \
  --paths "#product:123"
Invalidate multiple tags:
aws cloudfront create-invalidation \
  --distribution-id E1A2SI6ABUP8J5 \
  --paths "#product:123" "#category:electronics"
Combine URI paths and tags in a single request:
aws cloudfront create-invalidation \
  --distribution-id E1A2SI6ABUP8J5 \
  --paths "/index.html" "#product:123" "/top-products/*"
To check the status of an invalidation request, use the get-invalidation command with the invalidation ID returned from the create-invalidation response along with the CloudFront distribution ID:
aws cloudfront get-invalidation \
  --distribution-id <distribution_id> \
  --id <invalidation-id>
The response includes the invalidation status, which can be InProgress or Completed:
{
    "Invalidation": {
        "Id": "<invalidation-id> ",
        "Status": "Completed",
        "CreateTime": "2025-01-15T10:30:00.000Z",
        "InvalidationBatch": {
            "Paths": {
                "Quantity": 1,
                "Items": ["#product:123"]
            },
            "CallerReference": "my-tag-invalidation-2025-01-01"
        }
    }
}
To view invalidation requests for a distribution, use the following code:
aws cloudfront list-invalidations \
  --distribution-id <distribution_id>
API
Cache tag invalidation is supported through the CreateInvalidation API for standard distributions and the CreateInvalidationforDistributionTenant API for multi-tenant distributions. Both maintain backward compatibility while adding cache tag support using the hashtag (#) prefix.
The following code is an example of a cache tag invalidation request:
{
  "InvalidationBatch": {
    "CallerReference": "my-tag-invalidation-2025-01-01",
    "Paths": {
      "Quantity": 2,
      "Items": [
        "#product:123",
        "#category:electronics"
      ]
    }
  }
}
The following code is an example of combined path and tag invalidation:
{
  "InvalidationBatch": {
    "CallerReference": "my-tag-invalidation-2025-01-01",
    "Paths": {
      "Quantity": 4,
      "Items": [
        "#product:123",
        "#category:electronics",
        "/index.html",
        "/top-products/*"
      ]
    }
  }
}
In all these cases, CloudFront will treat each invalidation item as a separate invalidation operation.
Verify invalidation
Complete the following steps to verify an invalidation:
- Make an initial request to cache an object with cache tags. Verify the configured cache tag response header is present with values and check for
x-cache: Miss from cloudfront. You can inspect response headers using several common tools. In the terminal,curl -Iorcurl -vwill display the response headers for a given URL. Browser developer tools let you click on any request and view its response headers visually. For a more streamlined experience, API clients like Postman also display response headers alongside the body. Any of these approaches let you confirm the presence of your cache tag header and thex-cacheheader from CloudFront. - To confirm caching, request the same object multiple times and verify that its being served from the cache (
x-cache: Hit from cloudfront). - Submit an invalidation request using one of the methods described earlier, specifying the cache tag associated with your object.
- Make a final request and confirm
x-cache: Miss from cloudfront.
Design your cache tagging strategy
A well-designed tagging strategy is key to maximizing the benefits of cache tag invalidation. Start by analyzing how content changes in your application. What objects need to be updated together? How frequently do different types of content change? Understanding these patterns will guide you toward a tagging approach that aligns with your application’s natural content relationships.
Entity-based tags work well when you need to invalidate content related to a specific item. For example, using product:456 lets you refresh objects associated with that product—detail pages, images, and reviews—with a single invalidation. Similarly, user:ABC can invalidate content for a specific user, and using article:789 as a cache tag value can invalidate its content and associated images.
Category tags help when you need to update groups of related content. You can use tags like category:electronics or category:sports to refresh sections of your site, or use brand:xyz to target brand-specific assets. This approach is particularly useful for merchandising updates or category-wide promotions.
For applications with complex content hierarchies, hierarchical tags provide granular control. In video streaming services, for instance, you can use series:xyz, season:xyz-1, and episode:xyz-s1-1 to invalidate at different levels of specificity. Geographic applications benefit from tags like region:us, state:california, and city:san-francisco, and multi-tenant platforms can organize with tenant:tenant1, workspace:tenant1-engineering, and project:tenant1-alpha.
To get the most from cache tags, assign multiple tags to each object. A cache tag value like x-amz-meta-cache-tag: product:456,category:electronics,brand:xyz,featured gives you the flexibility to invalidate by product, category, brand, or featured status. This multi-dimensional tagging enables precise control without creating separate cache entries.
Establish clear naming conventions early. We recommend using colons for namespacing (like entity:id), keeping tags lowercase for consistency, and using hyphens for multi-word values such as category:home-appliances. Document these conventions so your team maintains consistency as your application grows. Balance granularity with simplicity—tags like product:456 and product:456:images provide useful flexibility, whereas overly complex tags like product:456:image:thumbnail:small add unnecessary complexity.
Before rolling out to production, test your strategy with a subset of content. Monitor invalidation patterns and cache hit rates to confirm your approach delivers the expected benefits. Start simple, validate your assumptions with real traffic, and iterate based on what you learn. The flexibility of cache tags means you can refine your strategy over time as your application evolves.
Limitations and considerations
In this section, we discuss some limitations of this feature and additional considerations. For the full list of considerations, see What you need to know when invalidating tags.
Header name
The cache tag header name value must conform to the RFC 7230 HTTP header specification. This means it can only contain ASCII visible characters (codes 33–126), excluding separators such as parentheses, angle brackets, commas, semicolons, colons, backslashes, quotes, slashes, square brackets, question marks, equals signs, curly braces, spaces, and tabs. Control characters (codes 0–31 and 127) are also disallowed. Header names are case-insensitive during processing, though common conventions use either hyphenated lowercase (for example, edge-cache-tag) or capitalized words with hyphens (for example, Edge-Cache-Tag). Cache tag header names should be limited to under 256 characters is recommended for broad compatibility.
Tag name and multiple tags
When configuring your origin to return cache tags, the specified header value should contain a comma-separated list of tags. For example, both Edge-Cache-Tag: tag1,tag2,tag3 and Edge-Cache-Tag: tag1, tag2, tag3 with spaces are valid formats. CloudFront automatically trims leading and trailing whitespace from each tag value.
Tag values themselves must also meet certain constraints. Each tag can only contain ASCII visible characters (codes 33–126), with control characters, spaces, and commas explicitly disallowed. Tags are treated as case-insensitive; each individual tag value is limited to a maximum of 256 characters and only the first 50 tags are considered for caching.
Changing header names
Tag invalidations are looked up against the current CacheTagConfig configuration. If you change the header name in the configuration, invalidations issued to objects cached with tags under the old header name will no longer be evaluated. If you need to change the header name, start returning both the new and the old cache tags headers with your objects, then invalidate existing paths that use the old tags to avoid serving stale content.
Defaults and response policies
By default, CloudFront will forward the x-amz-meta-cache-tag header along with other response headers. You can change this behavior and remove this header from HTTP responses using a response headers policy. You attach a response headers policy to one or more cache behaviors, and CloudFront modifies the headers in the responses that it sends to matched requests.
With Lambda@Edge, you can add response headers dynamically based on your application logic without modifying your origin server. You can use this approach to add the cache tags on the response path. It’s also useful when your origin doesn’t support custom headers, when you need conditional tagging based on request attributes like user segments or geographic location, or when you want centralized tag management across multiple origins. By running Lambda@Edge functions on your origin-response event trigger, you can inspect requests and responses to apply these tagging strategies.
For example, you can tag content based on user device type detected from user-agent strings, enabling mobile-specific invalidations without origin changes. Ecommerce platforms can dynamically tag responses based on broad customer segments extracted from cookies, allowing personalized cache invalidation strategies. Media streaming services can add geographic tags using viewer-country headers in CloudFront to invalidate region-specific content efficiently.
Summary
Invalidation by Cache Tag in CloudFront represents a significant leap forward in cache management, giving you the precise control needed for modern applications. By decoupling invalidation logic from URL structure, you can build simpler, more maintainable systems while improving cache efficiency and reducing origin load.
We’re excited to see how you use Invalidation by Cache Tag to solve your caching challenges. Share your feedback, use cases, and questions in the comments or reach out to AWS Support.
Learn more
- Invalidating content by cache tags
- Amazon CloudFront FAQs: caching
- Amazon CloudFront pay-as-you-go pricing
About the authors

Jaiganesh Girinathan
Jaiganesh Girinathan is a Principal Edge Specialist Solutions Architect focused on content delivery networks and edge computing capabilities with AWS. He has worked with several media customers globally over the last two decades, helping organizations modernize & scale their platforms. He is passionate about building solutions to address key customer needs. Outside of work, you can usually find Jaiganesh star gazing!

Rishu Gupta
Rishu is a Senior Cloud Engineer at AWS, helping users enhance their applications’ performance and security. With his cloud expertise, he guides customers through technical challenges and designs secure, scalable solutions tailored to their needs. Beyond work, Rishu is a foodie who loves trying diverse cuisines and exploring new flavors. He also values spending quality time with family and friends, cherishing those precious moments together.