AWS Security Blog
How to clone an AWS CloudHSM cluster across Regions
You can use AWS CloudHSM to generate, store, import, export, and manage your cryptographic keys. It also permits hash functions to compute message digests and hash-based message authentication codes (HMACs) and supports cryptographically signing data and verifying signatures. To help ensure redundancy of data and simplification of the disaster recovery process, AWS recommends you to clone your CloudHSM cluster into a different AWS Region. By doing this, you can synchronize keys, including non-exportable keys, across Regions. Non-exportable keys can only be synchronized to cloned clusters. Non-exportable keys are keys that can never leave the CloudHSM device in plaintext. They reside on the CloudHSM device and are encrypted for security purposes.
In this post, I show you how to set up one cluster in Region 1 and how to use the CopyBackupToRegion feature to clone the cluster and hardware security modules (HSMs) to a virtual private cloud (VPC) in Region 2.
Solution overview
You clone a cluster to another Region in a two-step process:
- Copy a backup to the destination Region
- Create a new cluster from this backup
To complete this solution, you can use either the AWS Command Line Interface (AWS CLI) or the CloudHSM API. For this post, I show you how to use the AWS CLI to copy the cluster backup from Region 1 to Region 2 and then launch a new cluster from that copied backup.
Figure 1 illustrates the process described in this post.
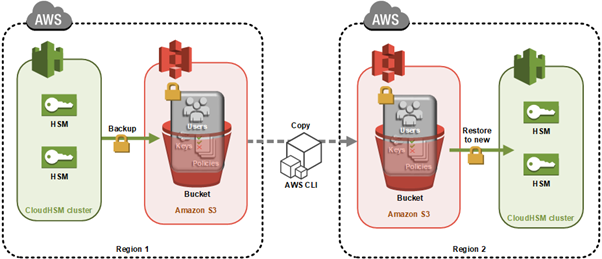
Figure 1: Architecture diagram
Here’s how the process works:
- CloudHSM creates a backup of the cluster and stores it in an Amazon Simple Storage Service (Amazon S3) bucket owned by the CloudHSM service.
- You use the AWS CLI API command to copy the backup to another Region.
- When the backup is completed, you use that backup to then create a new cluster and HSMs.
As with all cluster backups, when you copy the backup to a new Region, it’s stored in an S3 bucket owned by a CloudHSM account. CloudHSM manages the security and storage of cluster backups for you. This means the backup in both Regions will also have the durability of Amazon S3, which has 99.999999999% durability. The backup in Region 2 will be encrypted and secured in the same way as your backup in Region 1. You can read more about the encryption process of your CloudHSM backups in AWS CloudHSM cluster backups.
Any HSMs created in this cloned cluster will have the same users and keys as the original cluster at the time the backup was taken. From this point on, you must manually keep the cloned clusters in sync. Specifically:
- If you create users after creating your new cluster from the backup, you must create them on both clusters manually.
- If you change the password for a user in one cluster, you must change the password on the cloned clusters to match.
- If you create more keys in one cluster, you must sync them to at least one HSM in the cloned cluster. After you sync the key from cluster 1 to cluster 2, the CloudHSM automated cluster synchronization will take care of syncing the keys in the second cluster.
Prerequisites
Before starting, ensure you have the following in place:
- VPC in Region 1 with at least 1 public subnet and 1 private subnet
- VPC in Region 2 with at least 1 public subnet and 1 private subnet
- Cross-Region VPC enabled between Region 1 and Region 2
- AWS CLI installed
- AWS Identity and Access Management (IAM) permissions for AWS CloudHSM APIs in both Regions
- Client SDK 5 installed on your management instance (version 5.17 or later recommended)
Note: Syncing keys across clusters in more than one Region will only work if all clusters are created from the same backup. This is because synchronization requires the same secret key—called a masking key—to be present on the source and destination HSM. The masking key is specific to each cluster. It can’t be exported, and can’t be used for any purpose other than synchronizing keys across HSMs in a cluster.
Step 1: Create your first cluster in Region 1
The first step in cloning your CloudHSM cluster is to create the initial cluster—which will serve as the foundation for your cross-Region deployment—in your source Region.
Create the cluster
Replace <SUBNET_ID_1> with one of your private subnets. Make a note of the cluster ID to use later:
aws cloudhsmv2 create-cluster --hsm-type hsm2m.medium --subnet-ids <SUBNET_ID_1>
Launch the EC2 client
Launch an Amazon Elastic Compute Cloud (Amazon EC2) instance in your public subnet. See Step 1 of Get started with Amazon EC2 for detailed steps.
Create the first HSM
Replace <CLUSTER_ID> with the ID you recorded earlier and <AVAILABILITY_ZONE> with the Availability Zone matching your private subnet (for example, us-east-1a):
aws cloudhsmv2 create-hsm --cluster-id <CLUSTER_ID> --availability-zone <AVAILABILITY_ZONE>
Initialize the cluster
Before you initialize the cluster, create a self-signed certificate and use it to sign the cluster’s certificate signing request (CSR). Once you have the signed certificate, initialize the cluster:
Important: Copy the certificate used to sign your cluster’s CSR to to maintain a secure connection.
After the command completes, the cluster transitions to the Initialized state. Copy the certificate used to sign your cluster’s CSR to /opt/cloudhsm/etc so that the CloudHSM client can verify the cluster’s identity when you configure it in the next step:
sudo cp _CustomerHsmCertificate.crt /opt/cloudhsm/etc/
sudo cp customerCA.crt /opt/cloudhsm/etc/
Install the CloudHSM Client SDK 5
Download and install the latest CloudHSM Client SDK 5 (version 5.17 or later):
For example, for Amazon Linux 2023:
wget https://s3.amazonaws.com/cloudhsmv2-software/CloudHsmClient/Amzn2023/cloudhsm-cli-latest.amzn2023.x86_64.rpm
sudo yum install -y ./cloudhsm-cli-latest.amzn2023.x86_64.rpm
Configure the client
Configure the CloudHSM client with your HSM’s elastic network interface (ENI IP) address:
configure-cli -a <HSM_IP>
Activate the cluster
To activate the cluster, run the CloudHSM CLI in interactive mode.
cloudhsm-cli interactive
You can run user list to see the admin user, which is not yet activated.
Use the cluster activate command to set the initial admin password.
When completed, sign out using the command quit, then sign back in with the new password, using the command login --username admin --role admin.
After doing this, you can create the first crypto user (CU). You create the user by running the command: user create --username <USERNAME> --role crypto-user. For more information, see HSM user types for CloudHSM CLI. Crypto users are permitted to create and share keys on the CloudHSM.
When completed, sign out using the command quit.
Step 2: Create keys in Region 1
Create a non-exportable AES-256 key:
Make note of the key reference returned in the output, because you’ll need it for synchronization later.
Step 3: Trigger a backup of your cluster
To trigger a backup for Region 2:
- Add another HSM to your cluster in Region 1 (can be done using the AWS Management Console or AWS CLI)
- The backup will contain:
- All users (crypto officers (COs), crypto users (CUs), and appliance users)
- All key material on the HSMs
- All configurations and policies
Record the backup ID to use later. You can find this in the CloudHSM console under Backups, or using the following command:
aws cloudhsmv2 describe-backups --cluster-id
To avoid unnecessary charges, you can delete the additional HSM after the backup is created.
Step 4: Copy your backup Between Regions
Before you can transfer the backup to your destination Region, you need to configure the appropriate IAM permissions to allow the copy operation.
IAM permissions
Ensure proper permissions are configured for your IAM role or user. You need CloudHSM administrator privileges. Here’s an example permissions policy:
Copy the backup
To copy your backup from Region 1 to Region 2, you need:
- The destination Region
- The source cluster ID and backup ID (you can use either or both) found in the CloudHSM console
If you specify only the cluster ID, the most recent backup will be chosen. For a specific backup, use the backup ID.
Example response:
After copying, you will see a new backup ID in your console. Use this to create your new cluster in Region 2:
Certificate transfer
Copy the cluster certificate from the original cluster to the new Region:
- Open two terminal sessions (one for each HSM)
- Copy the certificate content from cluster 1
- Create and paste into a new file in cluster 2
The certificate is required for encrypted connections between your client and HSM instances.
Security group configuration
Add the cloned cluster’s Security Group to your EC2 client instance:
- Select the Security Group for your EC2 client in the EC2 console
- Choose “Add rules”
- Add a rule allowing traffic from the cluster’s Security Group ID on port 2225
Then retrieve the ENI IP address of the HSM in Region 2 using the following command, and make a note of the output—you will use it in the next step to configure cross-Region connectivity:
Step 5: Configure cross-Region connectivity
To enable the CloudHSM CLI to communicate with both clusters simultaneously, add the Region 2 cluster to your existing client configuration using the ENI IP address you retrieved in the previous step:
Step 6: Synchronize keys between clusters
To synchronize keys between your source and destination clusters, you first need to verify which users and keys exist before replicating them.
The CloudHSM CLI will now communicate with both clusters simultaneously using the certificates already configured during the initial setup, enabling key synchronization using the masking key shared between cloned clusters.
List users and keys
First, verify users and list available keys:
# List all users
cloudhsm-cli user list
# List keys for specific user
cloudhsm-cli key list --username
Replicate keys
To replicate a key from Region 1 to Region 2:
Verify the key replication by listing keys again:
cloudhsm-cli key list --username <username>
The output should show identical key references on both clusters. Repeat this process for any additional keys that you want to synchronize.
Points to remember
After cloning a cluster to a backup cluster, remember these important points:
- Always manually update users across clusters after the initial backup
- Use key replication for any keys created after the initial backup
- Keep your Client SDK 5 tools updated for the latest features and security improvements
- The January 1, 2025, end-of-support date for Client SDK 3 tools (CMU and KMU) means you should migrate to Client SDK 5 as soon as possible
Client SDK 5 supports ARM64 architecture on the following Linux distributions:
- Amazon Linux 2023
- Amazon Linux 2
- Red Hat Enterprise Linux (RHEL) 8 (8.3+)
- Red Hat Enterprise Linux (RHEL) 9 (9.2+)
- Red Hat Enterprise Linux (RHEL) 10 (10.0+)
- Ubuntu 22.04 LTS
- Ubuntu 24.04 LTS
- Debian 12
- USE Linux Enterprise Server 15
Conclusion
You now have a fault-tolerant AWS CloudHSM environment with synchronized keys across Regions using the latest tools and best practices. By implementing this cross-Region cluster configuration, you gain improved disaster recovery capabilities, reduced risk of data loss, and enhanced business continuity for your cryptographic operations. This approach helps ensure that your critical cryptographic keys remain available even in the event of a Regional outage, providing the resilience that enterprise workloads demand.
If you have feedback about this post, submit comments in the Comments section below. For questions about this post, start a new thread on the AWS re:Post.