AWS Security Blog
Secure Amazon container workloads using container attribute-based rules in AWS Network Firewall
Today, you can use AWS Network Firewall to protect traffic flowing to and from containerized applications on Amazon Elastic Kubernetes Service (Amazon EKS) and Amazon Elastic Container Service (Amazon ECS) clusters. If you run AI and machine learning (ML) workloads on Amazon EKS—such as model inference, RAG pipelines, or JupyterHub—your containerized workloads require the same firewall protections you enforce for traditional applications. However, traditional firewall rules rely on IP addresses, and pod IPs in Kubernetes change frequently as containers scale or restart. Writing and maintaining static firewall rules based on these ephemeral IPs, CIDRs, and subnets is difficult and error-prone, which can leave gaps in your security posture.
Kubernetes Network Policies offer basic traffic control at the namespace level, operating at layers 3 and 4. Depending on your security requirements, you might need additional capabilities beyond what network policies provide: Layer 7 inspection, FQDN-based filtering, and protection from threats detected by managed IDS/IPS rules. Visibility into which pod or service generates blocked traffic is equally important, so you can troubleshoot faster and meet audit requirements.
You can use container attribute-based rules for Network Firewall to define firewall rules for your containerized workloads on both Amazon EKS and Amazon ECS using native container attributes, rather than relying on ephemeral IP addresses. For Amazon EKS, these attributes include namespaces, pod names, cluster names, and labels. This reduces the need to maintain IP-based rules in dynamic container environments. While this capability supports both Amazon EKS and Amazon ECS, this post focuses on Amazon EKS. Your containerized workloads get the same Network Firewall capabilities you use today.
There is no additional charge for the feature itself, because it’s included in the base tier of Network Firewall.
How it works
When you create a container association and link it to your EKS cluster, Network Firewall automatically discovers and tracks the pods that match your defined attributes (namespace, labels, cluster name) and resolves them to their current IP addresses. As pods scale up or restart, the firewall dynamically updates the IP-to-attribute mapping in near real-time and no manual rule updates are required. This approach keeps your firewall rules accurate in dynamic environments while minimizing performance impact on the EKS cluster. In multi-cluster environments, this feature enables centralized cross-cluster traffic inspection for any traffic that passes through the firewall.
Container attribute-based rules also enrich firewall alert logs with container context. Alert logs now include a new metadata field with the container association name associated with the matched rule. This gives security teams the ability to trace blocked, allowed, or alerted traffic directly back to the originating workload. Network Firewall exports these enriched logs to Amazon CloudWatch Logs and Amazon Simple Storage Service (Amazon S3), from where you can forward them to the SIEM of your choice. To bind these attribute groups to running workloads, Network Firewall continuously watches your EKS cluster for pod lifecycle events (create and delete) across the namespaces covered by your container association definition. This definition is stored in a container association, keyed by attribute name and value.
When published, you reference these @ aliases in stateful Suricata rules. The following are some common patterns:
- Pod group rules: Allow only payment-service pods to reach the external payment gateway over TLS:
- Layer 7 application rules : Enforce block from all pods from reaching malicious destinations:
At packet evaluation time, Network Firewall expands each @ reference against the current catalog. When pods scale, restart, or move between nodes, the controller refreshes group membership, and the firewall picks up the new IPs, hence no rule edits or operator intervention is required. Each match—whether alert, pass, or drop—streams to the logging destination of your choice with container context. This gives your team a real-time, auditable view of policy effectiveness and a feedback loop for tuning rules and pod-group definitions over time.
Getting started
The Network Firewall container attribute-based rules for Amazon container workloads can be configured using the AWS Management Console for Amazon Virtual Private Cloud (Amazon VPC), AWS Command Line Interface (AWS CLI), or AWS SDK by creating a container association. This container association then can be used to create attribute-based Network Firewall rules.
Prerequisites
This walkthrough requires an existing Network Firewall configured to filter traffic through your Amazon VPC. If you haven’t set one up yet, see Getting started with AWS Network Firewall.
Step 1 – Create a container association:
- In the AWS VPC console, navigate to Network Firewall, select Container associations. Choose Create container association.
- Enter a Name and optional Description for this container association.
- Under Cluster configuration, select the Cluster type and select your EKS cluster from the Cluster drop down.
- For Attribute filters, configure the EKS attribute to identify which pods to associate:
- Attribute key: Enter the attribute key defined in your EKS cluster (for example, namespace, pod, cluster, or custom label key).
- Attribute value: Enter an attribute key value defined in your EKS cluster.
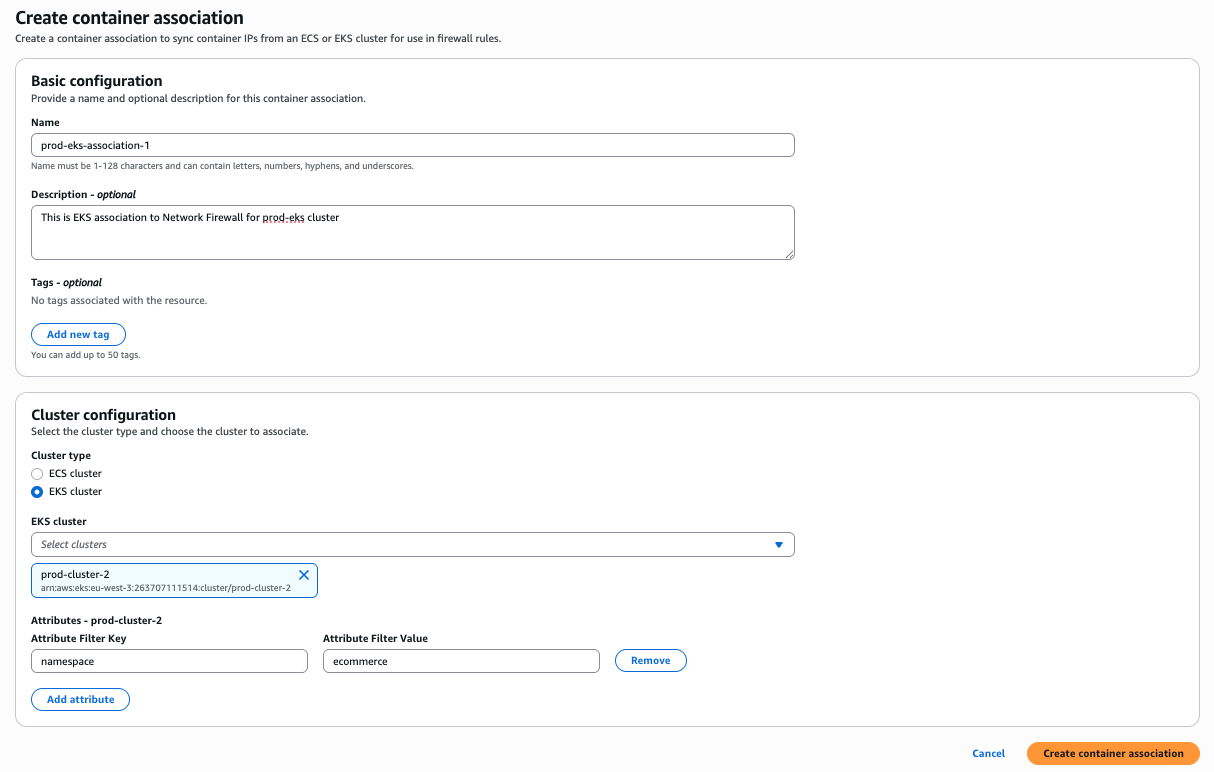
Figure 1: Create container association
Step 2 – Create an attribute-based firewall rule:
- In the AWS VPC console, navigate to Network Firewall, then select Network Firewall rule groups.
- Select Create rule group.
- For Rule group type, select Stateful rule group.
- For Rule group format, select Suricata compatible rule string.
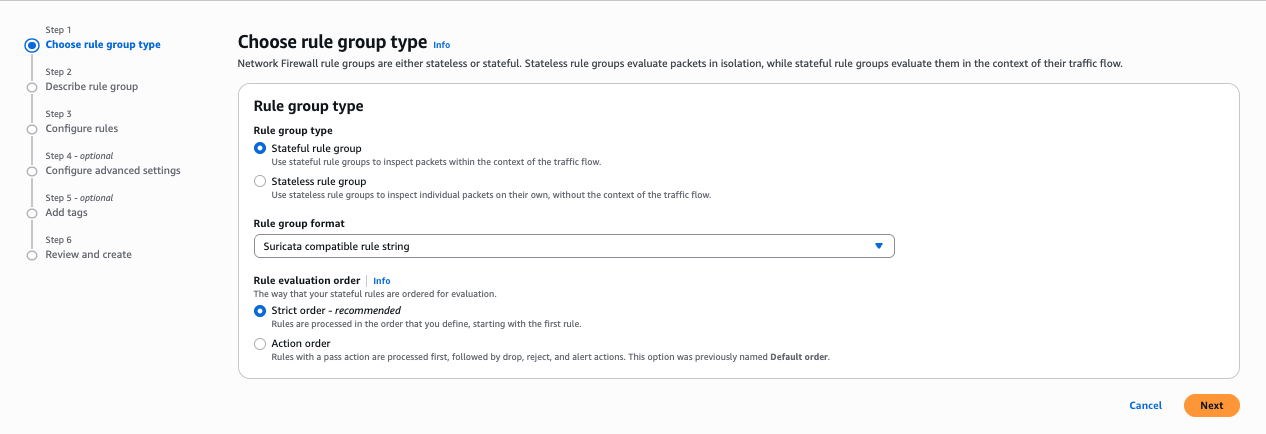
Figure 2: Rule group selection
- For Rule evaluation order, select Strict order. Choose Next.
- Under Describe rule group, enter a Name, Description, and Capacity for the rule group. Choose Next.

Figure 3: Describe rule group
- Under IP set references, enter a variable name and from the resource ID drop-down, select the container association created in step 1.
- Under Suricata compatible rule string, enter your Suricata rule string. The following is a sample string used for this post:
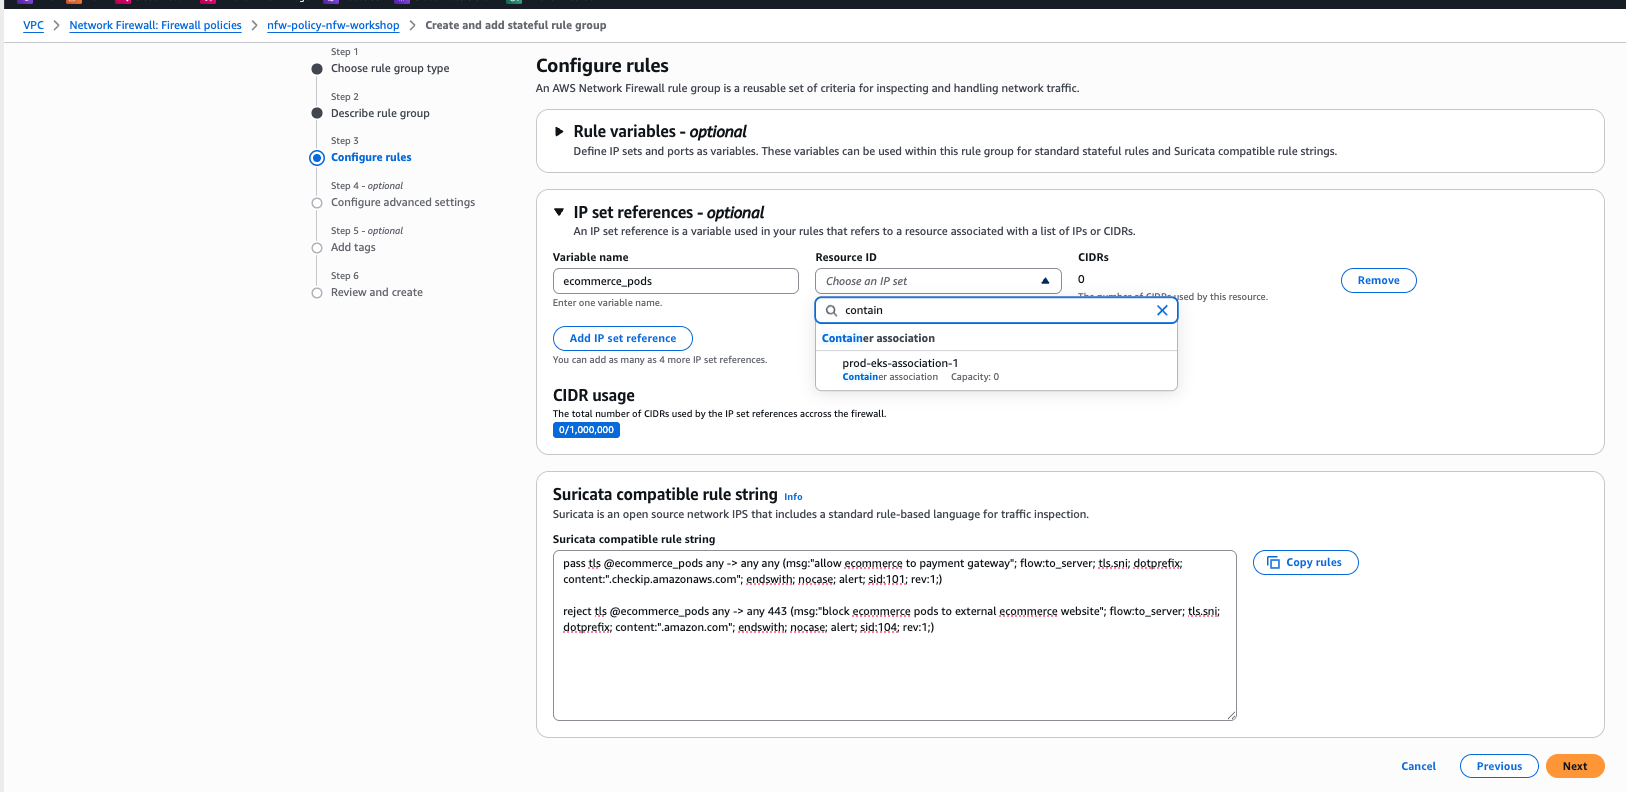
Figure 4: Configure rules
- Choose Next.
- Enter the details if required on the next options. For this post, we’re using the default values.
- On the review and create page, choose Create rule group.
Tests and results
To verify these rules are working as expected, test using the curl command on a pod in the ecommerce namespace. A curl request to www.amazon.comshould fail, because action=rejectis defined in the Suricata rule string. Similarly, a request to the payment gateway URL should succeed, because action=passis defined in the Suricata rule string.
Test 1 – Allowed traffic:
Test 2 – Blocked traffic:
Container association can also be used in a Standard stateful rules format.
Considerations
There are several important considerations when adopting this feature.
- Source NAT (SNAT) must be disabled so that the Network Firewall can see pod IP addresses. If SNAT remains enabled, only the node IP will be visible, preventing granular pod-level egress controls.
- This feature can’t enforce security on pod-to-pod traffic within the same node, because that traffic doesn’t traverse the Network Firewall endpoint. A separate solution is needed for this use case.
- Performance impact can vary based on rule complexity and traffic volume.
Conclusion
In this post, you learned how container attribute-based rules for AWS Network Firewall solve the challenge of securing dynamic containerized workloads. You explored how the feature maps Kubernetes attributes such as namespaces, pod names, cluster names, and labels to firewall rules, eliminating the need to track ephemeral IP addresses. You walked through how to create a container association to link your EKS cluster attributes to Network Firewall, and then how to reference that association using IP set references in Suricata compatible rule strings. This gives you granular traffic control of your Amazon EKS workloads with the same Network Firewall capabilities as traditional applications including layer 7 inspection, FQDN filtering, TLS decryption, and managed IDS/IPS rules along with enriched logging that traces traffic back to the originating workload.
If you have feedback about this post, submit comments in the Comments section below.