AWS Security Blog
Signing executables with HSM-backed certificates using multiple Windows instances
December 22, 2025: CloudHSM SDK3 is no longer supported. AWS recommends that you use the latest version, AWS CloudHSM KSP SDK5. We updated this post with SDK5 functionality and features.
Customers use code signing certificates to digitally sign software, documents, and other certificates. Signing is a cryptographic tool that lets users verify that the code hasn’t been altered and that the software, documents or other certificates can be trusted.
This blog post shows you how to configure your applications so you can use a key pair already on your hardware security module (HSM) to generate signatures using any Windows instance. Many customers use multiple Amazon Elastic Compute Cloud (Amazon EC2) instances to sign workloads using the same key pair. You must configure these instances to use a pre-existing key pair from the HSM.
In this post, I show you how to create a key container on a new Windows instance from an existing key pair in AWS CloudHSM, and then update the certificate store to associate the newly imported certificate with the new key container. I also show you how to sign executables with this key pair.
Every certificate is associated with a key pair, which includes a private key and a public key. You can only trust a signature if you can be sure that the private key has remained confidential and can be used only by the owner of the certificate. You achieve this goal by generating the key pair on an HSM and securely storing the private key on the HSM. Enterprise certificate authority (CA) or public key infrastructure (PKI) applications are configured to use this private key in the HSM whenever they need to use the corresponding certificate to sign. This configuration is generally handled transparently between the application and the HSM on the Windows instance your application is running on. The process gets tricky when you want to use multiple Windows instances to sign using the same key pair. This is especially true if your current EC2 instance that acts as a Windows Server CA, which you used to issue the HSM-backed certificate, is deleted and you have a backup of the HSM-backed certificate.
Before we get into the details, you need to know about a library called the key storage provider (KSP). Windows systems use KSP libraries to connect applications to an HSM. For each HSM brand, such as CloudHSM, you need a corresponding KSP to run operations that involve cryptographic keys stored on that HSM. From your application, select the KSP that corresponds with the HSM you want to use to store (or use) your keys. All KSPs associate keys on their HSM with metadata in the Microsoft ecosystem using key containers. Key containers map the metadata in certificates with metadata on the HSM, which allows the application to properly address keys. The list of certificates available for Microsoft utilities to sign with is contained in a trust store. To use the same key pair across multiple Windows instances, you must copy the key containers to each instance—or create a new key container from an existing key pair in each instance—and import the corresponding certificate into the trust store for each instance.
Prerequisites
The solution in this post assumes that you’ve completed the steps in Signing executables with Microsoft SignTool.exe using AWS CloudHSM-backed certificates. You should already have your HSM-backed certificate on one Windows instance.
Before you implement the solution, you must:
- Install the AWS CloudHSM KSP client SDK 5 and AWS CloudHSM CLI SDK5.16.0 or later on the new instance and make sure that you can interact with HSM in your CloudHSM cluster.
- Verify the CloudHSM KSP provider installation on your new instance.
- Set the login credentials for the HSM on your system. Set credentials through Windows Credentials Manager. I recommend that you reboot your instance after setting up the credentials.
Note: The login credentials identify a crypto user (CU) in the HSM that has access to the key pair in CloudHSM.
Architectural overview
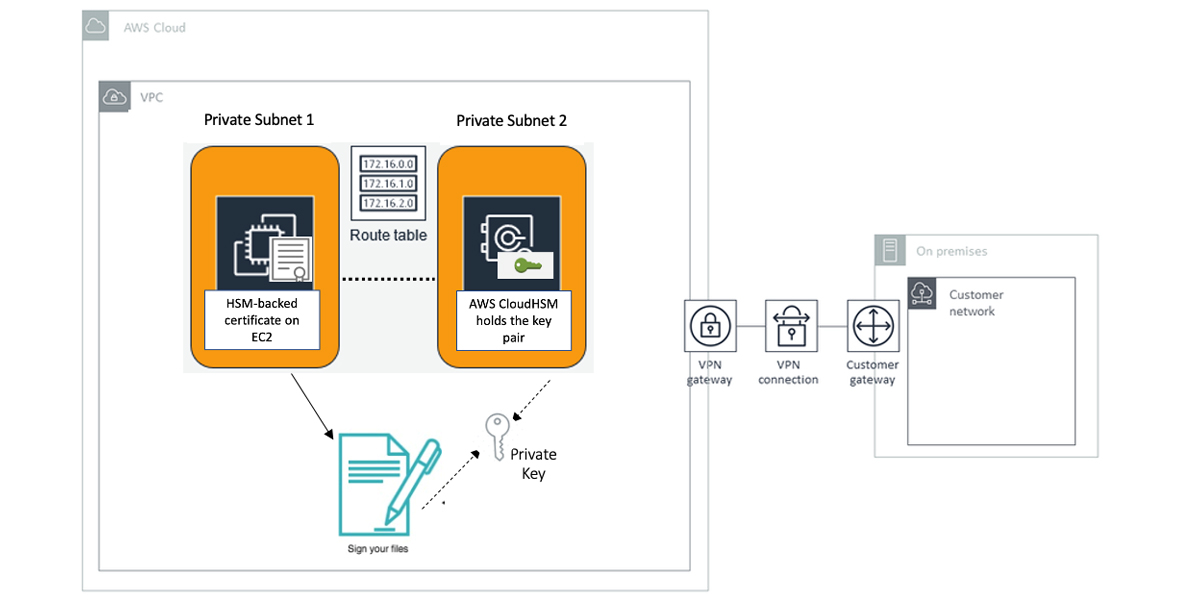
Figure 1: Architectural overview
This diagram shows a virtual private cloud (VPC) that contains an EC2 instance running Windows Server 2022 that resides in private subnet 1. This instance will run the CloudHSM client software and will use your HSM-backed certificate with a key pair already on your HSM to sign executable files. The instance can be accessed through a VPN connection. It will also have security groups that enable RDP access for your on-premises network. Private subnet 2 hosts the elastic network interface for the CloudHSM cluster.
Out of scope
The focus of this blog post is how to use an HSM-backed certificate with a key pair already on your HSM to sign executable files from any Windows instance using Microsoft SignTool.exe. This post isn’t intended to represent any best practices for implementing code signing or Amazon EC2. For more information, see the NIST cybersecurity whitepaper Security Considerations for Code Signing and Best practices for Amazon EC2, respectively.
Deploy the solution
To deploy the solution, you use certutil, CloudHSM CLI, and signtool.exe. Certutil is a Microsoft tool that helps you examine your system for available certificates and key containers. CloudHSM CLI—a tool provided by CloudHSM—generates a local key container for a key pair that’s on your HSM. To complete the process, use SignTool—a Microsoft tool that enables Windows users to digitally sign files, and verifies signatures in files and timestamps files.
You will need the following:
| Certificates or key material | Purpose |
<my root certificate>.cer |
Root certificate |
<my signed certificate>.cer |
HSM-backed signing certificate |
<private key reference> |
Private key reference of the signing certificate |
Import the HSM-backed certificate and its RootCA chain certificate into the new instance
Before you can use third-party tools such as SignTool to generate signatures using the HSM-backed certificate, you must move the signing certificate file to the Personal certificate store in the new Windows instance.
To do that, you copy the HSM-backed certificate that your application uses for signing operations and its root certificate chain from the original instance to the new Windows instance.
If you issued your signing certificate through a private CA (like in my example), you must deploy a copy of the root CA certificate and any intermediate certificates from the private CA to any systems you want to use to verify the integrity of your signed file.
To import the HSM-backed certificate and root certificate
Sign in to the Windows Server that has the private CA that you used to issue your signing certificate. Then, run the following certutil command to export the root CA to a new file. Replace <my root certificate> with a name that you can remember easily.
Copy the <my root certificate>.cer file to your new Windows instance and run the following certutil command. This moves the root certificate from the file into the Trusted Root Certification Authorities store in Windows. You can verify that it exists by running certlm.msc and viewing the Trusted Root Certification Authorities certificates.
Copy the HSM-backed signing certificate from the original instance to the new one, and run the following certutil command. This moves the certificate from the file into the Personal certificate store in Windows.
Verify that the certificate exists in your Personal certificate store by running the following certutil command. The following sample output from certutil shows the serial number. Take note of the certificate serial number to use later.
Retrieve the key reference of the RSA key pair on the HSM
In this step, you retrieve the key reference of the existing private key on your CloudHSM and use that key to create a key container on the new Windows instance.
Run the following PowerShell command. Replace <full path to my signed certificate.cer> with the full path to the location you store the code signing certificate file.
The modulus value is saved into the modulus.txt file in the same folder. You can view the content of the modulus file by opening it using Notepad. This information will be used in next steps. For example:
Run the CloudHSM CLI tool, and log in as the CU that owns the private key, as described in Getting Started with CLI. Replace <CU username> and <CU password> with the username and password of the CU.
Now you can append the 0x to the modulus value discovered previously and use it in place of <modulus value in hexadecimal value here> in the following command to find the private key reference.
For example:
The output key-reference is 0x0000000000400018 in the example is the private key reference that we will use in next steps.
Create a new key container for the existing private key pair in the CloudHSM
To use the same key pair across new Windows instances, you must have a copy of the key containers for each instance.
Alternatively, you can re-create the key container object on new instances by using the following steps.
- On the new instance with CloudHSM KSP SDK5, you might need to enable the backward SDK3 compatibility mode by using the following command.
- Create a new key container to hold the corresponding private key of the certificate. To create a new key container from an existing private key pair in the HSM, you can use the same CloudHSM CLI session and run following command.
For example”
- Exit the CloudHSM CLI by running
quit. For example: - You can run following command to see the newly created key container
For example:
Note down the value CNGRSAPriv-4194328-4194327-EXAMPLE, which will be used in the next steps.
Update the certificate store
Now you have everything in place: the imported certificate in the Personal certificate store of the new Windows instance and the key container that represents the key pair in CloudHSM. In this step, you associate the certificate to the key container that you made a note of earlier.
To update the certificate store
- Create a file named
repair.txtas shown following.Fill the
<key container name>with the key container ID that you noted down in the previous step. Ensure that you include the&. - Then, use the
certutilverb-repairstoreto update the certificate serial number that you took note of earlier, as shown in the following command. The following sample shows the command and output. See the Microsoft documentation for information about the-repairstoreverb.Run the following
certutilcommand to verify that your certificate has been associated with the new key container successfully.Note down the
Cert Hash(sha1)value, which you will use for the signing activity later.
Use the certificate with Microsoft SignTool
Now that you have everything in place, you can use the certificate to sign a file using the Microsoft SignTool.
To use the certificate
- Download and install one of the following versions of the Microsoft Windows SDK on your Windows EC2 instance:
Install the latest applicable Windows SDK package for your operating system. For example, for Microsoft Windows 2012 R2 or later versions, you should install the Microsoft Windows 10 SDK.
- To open the SignTool application, navigate to the application directory within PowerShell. This is usually:
- When you’ve located the directory, sign your file by running the following command. Remember to replace <thumbprint> and <test.exe> with your own values. <test.exe> can be any executable file in your directory.
You should see a message like the following:
- (Optional) To verify the signature on the file, you can use
SignTool.exewith the verify option by using the following command.If successful, you should see output similar to the following.
Conclusion
In this post, I walked you through the process of using an HSM-backed certificate on a new Windows instance for signing operations. You used the CloudHSM CLI utility to create a new key container from an existing private key in CloudHSM. Then, you updated the certificate store to associate your certificate with the key container. Finally, you saw how to use the HSM-backed certificate with the new key container to sign executable files. As you continue to use this solution, it’s important to keep Microsoft Windows SDK, CloudHSM client software, and any other installed software up-to-date.
If you have feedback about this post, submit comments in the Comments section below. If you have questions about this post, start a new thread on the AWS CloudHSM forum or contact AWS Support.
Want more AWS Security how-to content, news, and feature announcements? Follow us on Twitter.