AWS Security Blog
Use ACM Private CA for Amazon API Gateway Mutual TLS
October 5, 2021: In the section “Retrieving your ACM Private CA root CA certificate public key,” in step 4, we’ve updated the formatting of the commands to indicate placeholder text.
May 14, 2021: In the section “Retrieving your ACM Private CA root CA certificate public key,” in step 1, we updated the command to include an input at the end.
Last year Amazon API Gateway announced certificate-based mutual Transport Layer Security (TLS) authentication. Mutual TLS (mTLS) authenticates the server to the client, and requests the client to send an X.509 certificate to prove its identity as well. This way, both parties are authenticated to each other. In a previous post, you can learn how to set up TLS using an OpenSSL-generated root CA and its public key. This is great for learning how to set up the authentication mechanisms and works well. However, some customers have requested a tutorial on how to set this up with AWS Certificate Manager Private Certificate Authority (ACM Private CA).
In this post, I’m going to show you how to set up API Gateway with mutual TLS using ACM Private CA. I will walk you through retrieving the certificate’s public key with ACM Private CA, and then using the public key with API Gateway to secure the connection between server and client. By associating the public key of the root CA with the API Gateway endpoint, you allow the endpoint to trust any certificate issued by that CA or any subordinate CA that rolls up to that root CA. This simplifies the management process because you don’t need to provide a list of individual client certificates that are trusted by API Gateway.
Note: You will need the public keys of the root CA and any intermediate CAs you have created, because the keys will need to be uploaded to API Gateway for proper authentication.
Prerequisites
For this walkthrough, you should have the following in place:
- An AWS account.
- A domain name you own.
- An AWS Certificate Manager public certificate for your custom domain.
- An AWS Certificate Manager Private CA in the same AWS region as your Amazon API Gateway. This walkthrough uses us-east-1.
Retrieving your ACM Private CA root CA certificate public key
For this walkthrough, you are only going to be using a single root CA to generate your certificate for mutual TLS authentication. Because you are only using a single root CA, you will only need to upload the RootCA.pem file to your Amazon S3 bucket. If you have an intermediary CA as well, then you also need that certificate file for upload.
You’ll start by retrieving the public key from your root CA certificate, and creating the PEM-encoded trust store file. To do this, follow the steps listed below. Remember to replace each user input placeholder with your own resource information.
To retrieve the public key from your root CA certificate and create the PEM-encoded trust store file
- To retrieve the certificate authority certificate, in a terminal window, run the following command, ensuring you are replacing account_id and certificate_authority_id with your own values:
- To extract the public key from the certificate, run the following OpenSSL command:
- To prepare the PEM-encoded trust store file that contains the certificate authority public key, run the following command, replacing truststore.pem with your own value:
- To upload the trust store file to an Amazon S3 bucket in the same AWS account and Region as your API Gateway API, run the following commands. Replace my-example-truststore and truststore.pem with your own values:
Note: Best practice is to enable object versioning for the bucket as well. In this walkthrough, you will generate a new S3 bucket, enable versioning, and upload your truststore.pem file.
Generating a Client Certificate
For testing purposes, you need to generate a certificate from your ACM Private CA. To do this, complete the following steps.
- To generate the CSR for your certificate request, run the command below. This will provide you with both the RSA private key and the CSR.
- Now that you have the private key and CSR, you can request a certificate from ACM Private CA using the following command, replacing account_id and certificate_authority_id with your own values:
This command outputs the certificate ARN.
- To retrieve the certificate, use the certificate ARN in the following command. Replace account_id, the certificate_authority_id, and the certificate_id with your own values:
- Save the retrieved certificate as my_client.pem.
Now that you have your root CAs public key uploaded to your truststore S3 bucket and your certificate, you can move on to enabling mutual TLS on your API Gateway.
Enable mutual TLS on your custom domain name
Now that you have your root CA’s key in your S3 bucket as a truststore, and a certificate for your custom domain, you can move on to configuring your mutual TLS for your API Gateway. First, you will need to log into your API Gateway console in the AWS Management Console in the us-east-1 region. Once there, follow the steps below.
Configure mutual TLS for your API Gateway
- Log into your API Gateway console in the us-east-1 Region.
- On the left menu, choose Custom domain names, as shown in Figure 1.

Figure 1: Custom domain names pane
- On the Custom domain names pane, choose Create. You will be taken to a screen similar to the one in Figure 2.

Figure 2: Create domain name pane
- On the Domain details pane, as shown in Figure 3, enter your custom domain name. Under Minimum TLS version, select TLS 1.2 (recommended) and Mutual TLS authentication. For Truststore URI, enter the URI of the truststore you created, in the format of s3://my-example-truststore/truststore.pem. Remember to replace my-example-truststore and truststore.pem with your own values. (Optional) You can specify the version of the truststore.pem. Specifying the version helps with version control and allows you to revert back to a previous version if needed. If you upload a new version to S3, you will need to update the truststore URI.

Figure 3: Domain details page
- On the Endpoint configuration pane, for Endpoint type, select Regional. For ACM certificate, select your public certificate from ACM. Then choose Create domain name.
Note: When you enable mutual TLS, you must use a public ACM certificate with API Gateway for all public APIs. ACM Private CA is used only for S3 truststore operations.
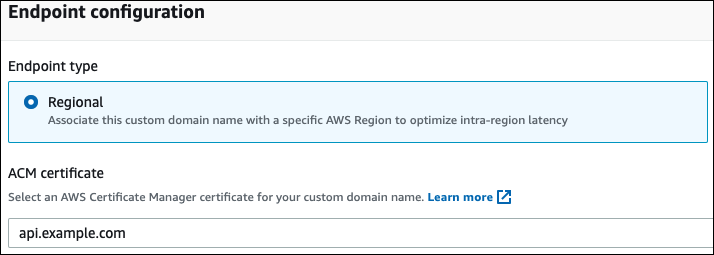
Figure 4: Endpoint configuration
You now have an API Gateway custom domain generated, that uses a public ACM certificate for the APIs, and uses ACM Private CA for the mutual TLS connections. You can test the mutual TLS session using the curl command with the –key and –cert parameters, as shown in the following example. Remember to replace my_client.key and my_client.pem with the private key and certificate you created previously in the section “Generating a Client Certificate.”
Your request should return properly authenticated and successful.
Conclusion
In this post, you learned how to use ACM Private CA for your mutual TLS authentication on your API Gateway. You walked through retrieving your root CA public key to upload to your truststore, generating a certificate from the root CA for testing the authentication, and enabling mutual TLS on your API Gateway. If you do not need any of these resources going forward, do not forget to delete them as to not incur costs. I hope this tutorial assisted in setting up mutual TLS with the added confidence of it being authenticated with ACM Private CA.
If you have feedback about this post, submit comments in the Comments section below. If you have questions about this post, start a new thread on the Amazon API Gateway forum or contact AWS Support.
Want more AWS Security how-to content, news, and feature announcements? Follow us on Twitter.