AWS Storage Blog
Enhancing co-located Kubernetes Pod data access with Amazon EBS Node-Local volumes
Modern containerized applications running on Kubernetes enable organizations to deploy read-heavy workloads—such as machine learning inference, data analytics, and High Performance Computing (HPC)—at unprecedented scale. However, when multiple pods on the same node need to access identical datasets, a performance challenge emerges. Each pod typically fetches files from external storage independently over the network. This results in redundant data transfers that consume bandwidth and increase latency, especially when dozens of pods on the same node all require access to identical files. The maximum number of pods on a Kubernetes node is determined by a configurable limit, which currently defaults to 110 pods per node in a standard Kubernetes installation. At this scale, the redundancy can significantly impact performance. While node-level caching approach offers clear performance benefits, Kubernetes’ current mechanisms for implementing it present operational challenges.
A potential solution is the hostPath volume type, a Kubernetes-native feature that allows containers to access directories on the host filesystem. However, while functional, hostPath volume type introduces serious security risks by granting containers direct access to the host filesystem. Kubernetes documentation suggests avoiding hostPath volumes when possible and using alternatives such as local PersistentVolume (PV) instead. The local PV approach, also natively supported by Kubernetes, requires users to create individual PersistentVolumes (PVs) per node (each with nodeAffinity configurations) and their corresponding PersistentVolumeClaims (PVCs), implement custom scheduling logic to ensure pods land on the correct nodes, and manually manage the lifecycle of these volumes. At scale, these approaches become operationally untenable, forcing organizations to choose between performance, security, and operational simplicity.
Amazon Elastic Block Store (Amazon EBS) provides durable, high-performance block storage for Amazon Elastic Compute Cloud (Amazon EC2) instances. The Amazon EBS Container Storage Interface (CSI) driver manages the lifecycle of EBS volumes as storage for Kubernetes volumes. As organizations scale their Kubernetes workloads on Amazon Elastic Kubernetes Service (Amazon EKS), they increasingly rely on EBS volumes for stateful applications such as databases, message queues, and data processing pipelines.
In this post, we demonstrate how to use Amazon EBS Node-Local Volumes to enable secure, shared node-local storage for co-located Kubernetes pods—multiple pods running on the same node—eliminating operational complexity while maintaining performance and security.
Solution overview
Amazon EBS Node-Local volumes provide safe node-level shared storage by enabling a single cluster-wide PersistentVolume (PV) and PersistentVolumeClaim (PVC) to mount pre-attached, node-specific EBS volumes. When pods reference this PV, each node independently mounts its own local EBS device, and all pods on that node share the mount. This eliminates the need for per-node PV provisioning and complex pod scheduling logic while maintaining the security and operational benefits of cloud-native storage. This feature is particularly useful for scenarios where:
- Multiple co-located pods need access to a shared dataset (e.g., cached files from Amazon S3)
- You want to avoid using hostPath volumes for security reasons
- You need to scale workloads across nodes while maintaining node-local caching with simplified operations
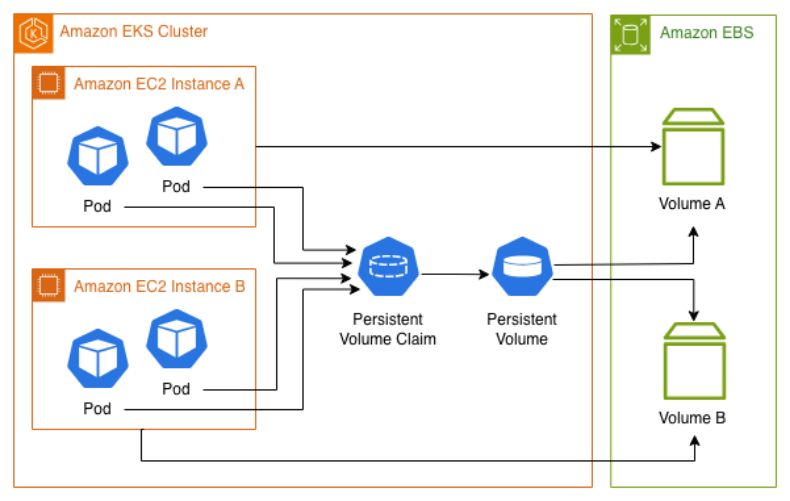
Figure 1: Amazon EKS cluster architecture with 2 nodes, each having an additional Amazon EBS volume for node-local storage shared by co-located pods
Prerequisites
To get started with this post, you should have the following:
- An AWS account with appropriate AWS Identity and Access Management (IAM) permissions to create the required resources.
- Command line tools: the latest version of AWS CLI, kubectl, and eksctl installed on your workstation.
Walkthrough
To use Amazon EBS Node-Local volumes, you need an Amazon EKS cluster where each worker node has an additional EBS volume pre-attached at a consistent device name (e.g., /dev/xvdbz). The root device cannot be used as a node-local volume.
Step 1: Create an Amazon EKS Cluster
If you don’t already have a suitable cluster, follow these steps to create one using the AWS CLI.
- Store your cluster configuration details in environment variables to simplify subsequent commands. Replace <cluster-name> with your desired cluster name and <region> with your target AWS region (e.g., us-east-1) and run following commands:
export CLUSTER_NAME="<cluster-name>"
export AWS_REGION="<region>"
export AWS_ACCOUNT_ID=$(aws sts get-caller-identity --query Account --output text)- Create an Amazon EKS cluster with worker nodes that have additional EBS volumes pre-attached:
eksctl create cluster -f - <<EOF
apiVersion: eksctl.io/v1alpha5
kind: ClusterConfig
metadata:
  name: ${CLUSTER_NAME}
  region: ${AWS_REGION}
nodeGroups:
  - name: ng-1
    instanceType: t3.small
    desiredCapacity: 2
    volumeSize: 30
    additionalVolumes:
      - volumeName: /dev/xvdbz
        volumeSize: 20
        volumeType: gp3
        volumeEncrypted: true
EOF
This configuration creates a cluster with 2 worker nodes, each having a primary 30 GB root volume and an additional 20 GB encrypted General Purpose SSD (gp3) EBS volume attached at /dev/xvdbz. Cluster creation takes approximately 15-20 minutes.
- When you create a cluster with eksctl, it automatically updates your kubeconfig file. However, if you need to manually configure kubectl or are working from a different machine, run:
aws eks update-kubeconfig --name ${CLUSTER_NAME} --region ${AWS_REGION}- Enable the IAM OIDC provider for your cluster to allow mapping IAM roles to Kubernetes service accounts:
eksctl utils associate-iam-oidc-provider --cluster=${CLUSTER_NAME} --approve- Create an IAM role with the necessary permissions for the Amazon EBS CSI driver:
eksctl create iamserviceaccount \
    --name ebs-csi-controller-sa \
    --namespace kube-system \
    --cluster ${CLUSTER_NAME} \
    --role-name AmazonEKS_EBS_CSI_DriverRole \
    --role-only \
    --attach-policy-arn arn:aws:iam::aws:policy/service-role/AmazonEBSCSIDriverPolicy \
--approve- Install the Amazon EBS CSI driver addon with the node-local volumes feature enabled, the driver must be deployed with controller.enableNodeLocalVolumes=true:
aws eks create-addon \
  --cluster-name ${CLUSTER_NAME} \
  --addon-name aws-ebs-csi-driver \
  --service-account-role-arn arn:aws:iam::${AWS_ACCOUNT_ID}:role/AmazonEKS_EBS_CSI_DriverRole \
  --configuration-values '{ "controller": { "enableNodeLocalVolumes": true }}' \
--region ${AWS_REGION}- To verify that the Amazon EBS CSI driver add-on is working as expected, run the following command:
kubectl get pods -n kube-system | grep ebs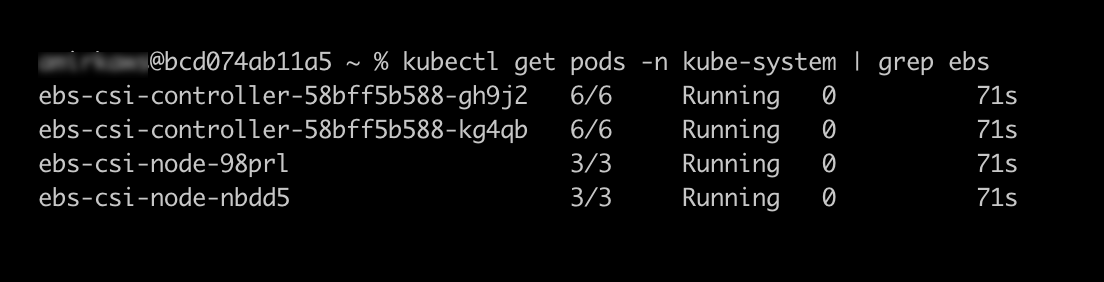
Step 2: Create a single cluster-wide PV and PVC
Create a single cluster-wide PV and PVC to mount additional pre-attached, node-specific EBS volumes. When pods reference this PVC, each node independently mounts its own local EBS device, and all pods on that node share the mount.
- Create a cluster-wide PV that references the node-local EBS volumes:
kubectl apply -f - <<EOF
apiVersion: v1
kind: PersistentVolume
metadata:
  name: node-local-cache-pv
spec:
  capacity:
    storage: 20Gi
  volumeMode: Filesystem
  accessModes:
    - ReadWriteMany
  storageClassName: ""
  persistentVolumeReclaimPolicy: Retain
  csi:
    driver: ebs.csi.aws.com
    volumeHandle: local-ebs://dev/xvdbz
    volumeAttributes:
      ebs.csi.aws.com/fsType: "xfs"
EOF- Create a cluster-wide PVC that binds to the PV:
kubectl apply -f - <<EOF
apiVersion: v1
kind: PersistentVolumeClaim
metadata:
  name: node-local-cache-pvc
spec:
  accessModes:
    - ReadWriteMany
  storageClassName: ""
  resources:
    requests:
      storage: 20Gi
  volumeName: node-local-cache-pv
EOF- To verify that the PVC is bound, run the following command:
kubectl get pvc node-local-cache-pvcYou should see the PVC status as Bound to PV.

Step 3: Deploy a Sample Application
Deploy a sample application with 4 pods that will demonstrate how co-located pods can share data through node-local EBS volumes. The Kubernetes scheduler will automatically distribute these pods evenly across your 2 worker nodes.
- Apply the following manifest to deploy the application:
kubectl apply -f - <<EOF
apiVersion: apps/v1
kind: Deployment
metadata:
  name: ebs-csi-node-local-cache-app
spec:
  replicas: 4
  selector:
    matchLabels:
      app: ebs-csi-node-local-cache-app
  template:
    metadata:
      labels:
        app: ebs-csi-node-local-cache-app
    spec:
      containers:
      - name: app
        image: public.ecr.aws/amazonlinux/amazonlinux:latest
        command: ["/bin/bash"]
        args: ["-c", "while true; do sleep 30; done"]
        resources:
          limits:
            memory: 512Mi
            cpu: 500m
          requests:
            memory: 256Mi
            cpu: 250m
        volumeMounts:
        - name: cache
          mountPath: /cache
      volumes:
      - name: cache
        persistentVolumeClaim:
          claimName: node-local-cache-pvc
EOF
2. Check that all 4 pods are running and evenly distributed across your nodes:
kubectl get pods -l app=ebs-csi-node-local-cache-app -o wideStep 4: Test Data Sharing Between Co-Located Pods
In this step, we demonstrate how pods on the same node can share data through the node-local EBS volume.
1. View your pods grouped by node to identify which pods are co-located:
kubectl get pods \
-l app=ebs-csi-node-local-cache-app \
-o custom-columns=NAME:.metadata.name,NODE:.spec.nodeName \
--no-headers | sort -k2
2. Select two pods on the same node from the output above and set them as variables, Replace with your actual pod names from the same node:
export POD1="ebs-csi-node-local-cache-app-xxxxx"
export POD2="ebs-csi-node-local-cache-app-yyyyy"
3. Write data to the shared cache from the first pod:
kubectl exec $POD1 -- bash -c "echo 'Hello from Pod 1' > /cache/message.txt"4. Now read the message from the second pod on the same node:
kubectl exec $POD2 -- cat /cache/message.txtYou should see the Hello from Pod 1 output, which confirms that you could read the file from pod2 written by pod one in the node local volume

5. Confirm that both pods have access to the same shared volume:
kubectl exec $POD1 -- ls -lh /cache/ | grep '\.txt$'
kubectl exec $POD2 -- ls -lh /cache/ | grep '\.txt$'
6. To demonstrate that data is isolated between nodes, select a pod on the different node and set it as a variable:
export POD3="ebs-csi-node-local-cache-app-zzzzz"
kubectl exec $POD3 -- ls -lh /cache/ | grep '\.txt$'
The command returns no output (or an error), confirming that the message.txt file does not exist on the second node. This demonstrates that each node has its own independent EBS volume, and data written by pods on one node is not visible to pods on other nodes.
Cleaning up
To avoid incurring future charges, delete the resources you created in this walkthrough.
- Run the following command to delete the cluster and all associated resources:
eksctl delete cluster --name ${CLUSTER_NAME} --region ${AWS_REGION} --disable-nodegroup-evictionThe disable-nodegroup-eviction flag bypasses pod eviction policies and ensures a clean, fast deletion even if system pods are running. The cleanup process takes approximately 10-15 minutes.
- Confirm that the cluster has been removed:
aws eks list-clusters --region ${AWS_REGION}Conclusion
Amazon EBS Node-Local volumes provide a powerful solution for organizations running data-intensive Kubernetes workloads that require efficient data sharing between co-located pods. By enabling a single cluster-wide PV and PVC to mount pre-attached, node-specific EBS volumes, this feature eliminates the operational complexity of managing per-node PVs while maintaining the security and performance benefits of cloud-native storage.
In this blog, we demonstrated how to create an Amazon EKS cluster with pre-attached EBS volumes, configure the Amazon EBS CSI driver with node-local volumes enabled, deploy a single PV/PVC pair that intelligently maps to node-specific storage, and verify data sharing between co-located pods while maintaining isolation across nodes. This architecture is particularly valuable for use-cases such as machine learning inference with shared model caches, data analytics pipelines, HPC workloads, and content delivery systems with node-level caching. The feature is available now in EBS CSI driver version v1.53.0 and later, enabling you to optimize your containerized workloads for performance and cost-effectiveness.
For more information about the Amazon EBS CSI driver and node-local volumes, visit the official documentation.