AWS Compute Blog
Building server-side rendering for React in AWS Lambda
This post is courtesy of Roman Boiko, Solutions Architect.
React is a popular front-end framework used to create single-page applications (SPAs). It is rendered and run on the client-side in the browser. However, for SEO or performance reasons, you may need to render parts of a React application on the server. This is where the server-side rendering (SSR) is useful.
This post introduces the concepts and demonstrates rendering a React application with AWS Lambda. To deploy this solution and to provision the AWS resources, I use the AWS Cloud Development Kit (CDK). This is an open-source framework, which helps you reduce the amount of code required to automate deployment.
Overview
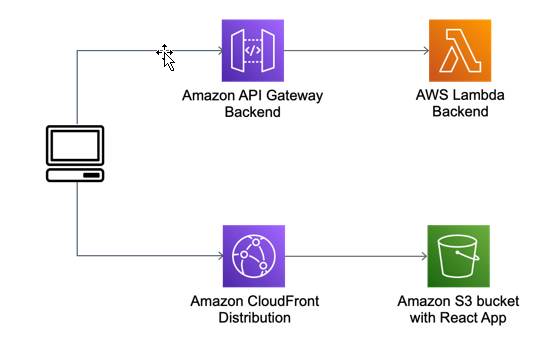
This solution uses Amazon S3, Amazon CloudFront, Amazon API Gateway, AWS Lambda, and Lambda@Edge. It creates a fully serverless SSR implementation, which automatically scales according to the workload. This solution addresses three scenarios.
1. A static React app hosted in an S3 bucket with a CloudFront distribution in front of the website. The backend is running behind API Gateway, implemented as a Lambda function. Here, the application is fully downloaded to the client and rendered in a web browser. It sends requests to the backend.
2. The React app is rendered with a Lambda function. The CloudFront distribution is configured to forward requests from the /ssr path to the API Gateway endpoint. This calls the Lambda function where the rendering is happening. While rendering the requested page, the Lambda function calls the backend API to fetch the data. It returns a static HTML page with all the data. This page may be cached in CloudFront to optimize subsequent requests.

3. The React app is rendered with a Lambda@Edge function. This scenario is similar but rendering happens at edge locations. The requests to /edgessr are handled by the Lambda@Edge function. This sends requests to the backend and returns a static HTML page.

Walkthrough
The example application shows how the preceding scenarios are implemented with the AWS CDK. This solution requires:
This solution deploys a Lambda@Edge function so it must be provisioned in the US East (N. Virginia) Region.
To get started, download and configure the sample:
- From a terminal, clone the GitHub repository:
git clone https://github.com/aws-samples/react-ssr-lambda - Provide a unique name for the S3 bucket, which is created by the stack and used for React application hosting. Change the placeholder <your bucket name> to your bucket name. To install the solution, run:
cd react-ssr-lambda cd ./cdk npm install npm run build cdk bootstrap cdk deploy SSRApiStack --outputs-file ../simple-ssr/src/config.json cd ../simple-ssr npm install npm run build-all cd ../cdk cdk deploy SSRAppStack --parameters mySiteBucketName=<your bucket name> - Note the following values from the output:
- SSRAppStack.CFURL – the URL of the CloudFront distribution. Its root path returns the React application stored in S3.
- SSRAppStack.LambdaSSRURL – the URL of the CloudFront /ssr distribution, which returns a page rendered by the Lambda function.
- SSRAppStack.LambdaEdgeSSRURL – the URL of the CloudFront /edgessr distribution, which returns a page rendered by Lambda@Edge function.

- In a browser, open each of the URLs from step 3. You see the same page with a different footer, indicating how it is rendered.


Understanding the React app
The application is created by the create-react-app utility. You can run and test this application locally by navigating to the simple-ssr directory and running the npm start command.
This small application consists of two components that render the list of products received from the backend. The App.js file sends the request, parses the result, and passes it to the component.
import React, { useEffect, useState } from "react";
import ProductList from "./components/ProductList";
import config from "./config.json";
import axios from "axios";

const App = ({ isSSR, ssrData }) => {
  const [err, setErr] = useState(false);
  const [result, setResult] = useState({ loading: true, products: null });
  useEffect(() => {
    const getData = async () => {
      const url = config.SSRApiStack.apiurl;
      try {
        let result = await axios.get(url);
        setResult({ loading: false, products: result.data });
      } catch (error) {
        setErr(error);
      }
    };
    getData();
  }, []);
  if (err) {
    return <div>Error {err}</div>;
  } else {
    return (
      <div>
        <ProductList result={result} />
      </div>
    );
  }
};

export default App;
Adding server-side rendering
To support SSR, I change the preceding application using several Lambda functions with the implementation. As I change the way data is retrieved from the backend, I remove this code from App.js. Instead, the data is retrieved in the Lambda function and injected into the application during the rendering process.
The new file SSRApp.js reflects these changes:
import React, { useState } from "react";
import ProductList from "./components/ProductList";

const SSRApp = ({ data }) => {
  const [result, setResult] = useState({ loading: false, products: data });
  return (
    <div>
      <ProductList result={result} />
    </div>
  );
};

export default SSRApp;
Next, I implement SSR logic in the Lambda function. For simplicity, I use React’s built-in renderToString method, which returns an HTML string. You can find the corresponding file in the simple-ssr/src/server/index.js. The handler function fetches data from the backend, renders the React components, and injects them into the HTML template. It returns the response to API Gateway, which responds to the client.
const handler = async function (event) {
  try {
    const url = config.SSRApiStack.apiurl;
    const result = await axios.get(url);
    const app = ReactDOMServer.renderToString(<SSRApp data={result.data} />);
    const html = indexFile.replace(
      '<div id="root"></div>',
      `<div id="root">${app}</div>`
    );
    return {
      statusCode: 200,
      headers: { "Content-Type": "text/html" },
      body: html,
    };
  } catch (error) {
    console.log(`Error ${error.message}`);
    return `Error ${error}`;
  }
};
For rendering the same code on Lambda@Edge, I change the code to work with CloudFront events and also modify the response format. This function searches for a specific path (/edgessr). All other logic stays the same. You can view the full code at simple-ssr/src/edge/index.js:
const handler = async function (event) {
  try {
    const request = event.Records[0].cf.request;
    if (request.uri === "/edgessr") {
      const url = config.SSRApiStack.apiurl;
      const result = await axios.get(url);
      const app = ReactDOMServer.renderToString(<SSRApp data={result.data} />);
      const html = indexFile.replace(
        '<div id="root"></div>',
        `<div id="root">${app}</div>`
      );
      return {
        status: "200",
        statusDescription: "OK",
        headers: {
          "cache-control": [
            {
              key: "Cache-Control",
              value: "max-age=100",
            },
          ],
          "content-type": [
            {
              key: "Content-Type",
              value: "text/html",
            },
          ],
        },
        body: html,
      };
    } else {
      return request;
    }
  } catch (error) {
    console.log(`Error ${error.message}`);
    return `Error ${error}`;
  }
};
The create-react-app utility configures tools such as Babel and webpack for the client-side React application. However, it is not designed to work with SSR. To make the functions work as expected, I transpile these into CommonJS format in addition to transpiling React JSX files. The standard tool for this task is Babel. To add it to this project, I create the configuration file .babelrc.json with instructions to transpile the functions into Node.js v12 format:
I also include all the dependencies. I use the popular frontend tool webpack, which also works with Lambda functions. It adds only the necessary dependencies and minimizes the package size. For this purpose, I create configurations for both functions. You can find these in the webpack.edge.js and webpack.server.js files:
const path = require("path");

module.exports = {
  entry: "./src/edge/index.js",

  target: "node",

  externals: [],

  output: {
    path: path.resolve("edge-build"),
    filename: "index.js",
    library: "index",
    libraryTarget: "umd",
  },

  module: {
    rules: [
      {
        test: /\.js$/,
        use: "babel-loader",
      },
      {
        test: /\.css$/,
        use: "css-loader",
      },
    ],
  },
};
The result of running webpack is one file for each build. I use these files to deploy the Lambda and Lambda@Edge functions. To automate the build process, I add several scripts to package.json.
"build-server": "webpack --config webpack.server.js --mode=development",
"build-edge": "webpack --config webpack.edge.js --mode=development",
"build-all": "npm-run-all --parallel build build-server build-edge"
Launch the build by running npm run build-all.
Deploying the application
After the application successfully builds, I deploy to the AWS Cloud. I use AWS CDK for an infrastructure as code approach. The code is located in cdk/lib/ssr-stack.ts.
First, I create an S3 bucket for storing the static content and I pass the name of the bucket as a parameter. To ensure only CloudFront can access my S3 bucket, I use an access identity configuration:
const mySiteBucketName = new CfnParameter(this, "mySiteBucketName", {
      type: "String",
      description: "The name of S3 bucket to upload react application"
    });

const mySiteBucket = new s3.Bucket(this, "ssr-site", {
      bucketName: mySiteBucketName.valueAsString,
      websiteIndexDocument: "index.html",
      websiteErrorDocument: "error.html",
      publicReadAccess: false,
      //only for demo not to use in production
      removalPolicy: cdk.RemovalPolicy.DESTROY
    });

new s3deploy.BucketDeployment(this, "Client-side React app", {
      sources: [s3deploy.Source.asset("../simple-ssr/build/")],
      destinationBucket: mySiteBucket
    });

const originAccessIdentity = new cloudfront.OriginAccessIdentity(
      this,
      "ssr-oia"
    );
    mySiteBucket.grantRead(originAccessIdentity);
I deploy the Lambda function from the build directory and configure an integration with API Gateway. I also note the API Gateway domain name for later use in the CloudFront distribution.
const ssrFunction = new lambda.Function(this, "ssrHandler", {
      runtime: lambda.Runtime.NODEJS_12_X,
      code: lambda.Code.fromAsset("../simple-ssr/server-build"),
      memorySize: 128,
      timeout: Duration.seconds(5),
      handler: "index.handler"
    });

const ssrApi = new apigw.LambdaRestApi(this, "ssrEndpoint", {
      handler: ssrFunction
    });

const apiDomainName = `${ssrApi.restApiId}.execute-api.${this.region}.amazonaws.com`;
I configure the Lambda@Edge function. It’s important to create a function version explicitly to use with CloudFront:
const ssrEdgeFunction = new lambda.Function(this, "ssrEdgeHandler", {
      runtime: lambda.Runtime.NODEJS_12_X,
      code: lambda.Code.fromAsset("../simple-ssr/edge-build"),
      memorySize: 128,
      timeout: Duration.seconds(5),
      handler: "index.handler"
    });

const ssrEdgeFunctionVersion = new lambda.Version(
      this,
      "ssrEdgeHandlerVersion",
      { lambda: ssrEdgeFunction }
    );
Finally, I configure the CloudFront distribution to communicate with all the origins:
const distribution = new cloudfront.CloudFrontWebDistribution(
      this,
      "ssr-cdn",
      {
        originConfigs: [
          {
            s3OriginSource: {
              s3BucketSource: mySiteBucket,
              originAccessIdentity: originAccessIdentity
            },
            behaviors: [
              {
                isDefaultBehavior: true,
                lambdaFunctionAssociations: [
                  {
                    eventType: cloudfront.LambdaEdgeEventType.ORIGIN_REQUEST,
                    lambdaFunction: ssrEdgeFunctionVersion
                  }
                ]
              }
            ]
          },
          {
            customOriginSource: {
              domainName: apiDomainName,
              originPath: "/prod",
              originProtocolPolicy: cloudfront.OriginProtocolPolicy.HTTPS_ONLY
            },
            behaviors: [
              {
                pathPattern: "/ssr"
              }
            ]
          }
        ]
      }
    );
The template is now ready for deployment. This approach allows you to use this code in your Continuous Integration and Continuous Delivery/Deployment (CI/CD) pipelines to automate deployments of your SSR applications. Also, you can create a CDK construct to reuse this code in different applications.
Cleaning up
To delete all the resources used in this solution, run:
cd react-ssr-lambda/cdk
cdk destroy SSRApiStack
cdk destroy SSRAppStack
Conclusion
This post demonstrates two ways you can implement and deploy a solution for server-side rendering in React applications, by using Lambda or Lambda@Edge.
It also shows how to use open-source tools and AWS CDK to automate the building and deployment of such applications.
For more serverless learning resources, visit Serverless Land.