AWS HPC Blog
Integrating OKTA identity service provider with NICE EnginFrame
OKTA is an identity service provider that supports SAML 2.0 single sign on authentication and several other features like multi-factor verification, API access management and multi-device support.
NICE EnginFrame is an application portal for user-friendly submission, control, and monitoring of HPC jobs and interactive remote sessions using NICE DCV. It includes sophisticated data management for all stages of HPC job lifetime and is integrated with most popular job schedulers and middle-ware tools to submit, monitor, and manage jobs.
Many of our HPC customers want to leverage OKTA’s user authentication and authorization services alongside the EnginFrame’s management of HPC and data resources. Today, we’ll describe how to integrate EnginFrame with OKTA, specifically leveraging single sign-on (SSO) and Multiple Factor Authentication (MFA).
Overview of the solution
EnginFrame doesn’t provide a specific authentication plugin for OKTA, but it can leverage Apache web server authentication. Apache has several SAML authentication modules that can be configured to work with OKTA. In this post, we’ll use mod_auth_mellon. For more information about SAML and OKTA, please refer to their planning for SAML documentation.
Our procedure will be:
- Setup an Apache web server. For this walk-through we will use the same server that EnginFrame is running on, but it could be a separate one.
- Configure Apache SAML module mod_auth_mellon to work with OKTA.
- Protect the EnginFrame website URL root path (
/enginframeby default) with mod_auth_mellon - Setup EnginFrame to leverage Apache/HTTP authentication, using mod_proxy_ajp and the Apache AJP connector.
mod_auth_mellon is an Apache module that authenticates the user against a SAML 2.0 Identity Provider (IdP), and grants access to directories depending on attributes received from the IdP.
mod_proxy_ajp is an Apache module that’s used to reverse proxy to a backend application server (the EnginFrame Tomcat server in our case) using the AJP13 (Apache JServ Protocol version 1.3) protocol.
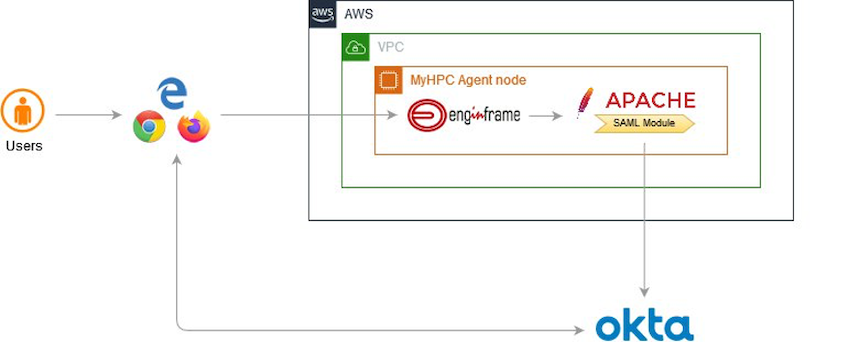
Figure 1 – Overall logic we’ll implement in our walkthrough. Users are specifying EnginFrame portal HTTPS URL in their browsers, EnginFrame leverages Apache webserver authentication that is implemented by mod_auth_mellon module, that in turn triggers OKTA for verification.
Walkthrough
Prerequisites
To enable EnginFrame HPC portal to authenticate using OKTA, you’ll need:
- OKTA console administrator
- EnginFrame portal up and running.
- Privileged access to the host/instance running EnginFrame portal.
The instructions provided here are valid for EnginFrame installations on AWS and on-premises.
Important: When EnginFrame runs a service, it does so as the user logged into the portal. To be seamless, your operating system must recognize the same user IDs as OKTA. For this tutorial we are assuming that the Linux server where EnginFrame runs is able to recognize the same users that are coming from OKTA.
Linux user space configuration is a big topic and can be implemented in a variety of ways that are out of scope for this post. A common setup, however, is to use Linux Pluggable Authentication Modules (PAM) and System Security Services Daemon (SSSD) to point to the same directory service (Active Directory or LDAP, for example) set in OKTA. You can find more information and examples in the following AWS documentation links:
- Seamlessly join a Linux EC2 instance to your AWS Managed Microsoft AD directory
- Manually join a Linux instance
- Manually join a Linux instance using Winbind
To create a new SAML application in OKTA:
- Login into OKTA console, and create a new SAML Application. The full procedure is described in OKTA’s “Add an Okta SAML application” documentation.
- Setup the application with the desired parameters, for what concerns our integration, we’ll just need to have the following SAML settings:
- Single sign on URL (and in case also Recipient and Destination URL) set to the fully qualified DNS entry of your EnginFrame portal, followed by /mellon/postResponse E.g.
Single sign on URL: https://company.enginframe.portal.com/mellon/postResponse - Audience URI (or Audience Restriction) set to EnginFrame website URL root path (/enginframe by default) without the initial slash, the one we’ll protect with mod_auth_mellon authentication, e.g:
Audience URI: enginframe
Figure 2 – OKTA application SAML settings. Check to set Single Sign On URL, Recipient URL, Destination URL and Audience Restriction as mentioned above. The blurred text will be your EnginFrame website server name.
- Single sign on URL (and in case also Recipient and Destination URL) set to the fully qualified DNS entry of your EnginFrame portal, followed by /mellon/postResponse E.g.
- Download an Identity Provider (IdP) metadata XML file. That XML file includes OKTA information, related certificate, and URL endpoints. You can get it in this way:
- Click the name of the newly added application.
- Select the Sign On
- In the SAML 2.0 section of the Settings page, click Identity Provider metadata.
- Select and copy the displayed metadata, save it, let’s assume the file name is idp-metadata-<FQDN>.xml.
To install Apache with the mod_auth_mellon plugin on the EnginFrame server:
- Login into your EnginFrame node with privileged access. Install Apache, its mod_auth_mellon module, that integrates it with OKTA and openssl. For Amazon Linux 2, Red Hat Enterprise Linux 7 or CentOS 7 the commands would be:
yum install httpd mod_auth_mellon openssl mod_ssl(mod_ssl is needed, and recommended, if you want to enable HTTPS).
For Ubuntu distributions, you can refer to Ubuntu – Install and configure Apache. - Create a sub-directory named mellon, inside the Apache configuration folder: /etc/httpd/mellon. This folder will contain all the files necessary to our integration.
cdinto that folder. - Copy and paste the contents of the OKTA metadata XML file we saved in step 3.d (idp-metadata-<FQDN>.xml) to the /etc/httpd/mellon
- Run the utility script sh, included by mod_auth_mellon package, to create Service Provider (SP) metadata file, e.g:
/usr/libexec/mod_auth_mellon/mellon_create_metadata.sh \
    'enginframe' "https://company.enginframe.portal.com/mellon"
The script requires 2 values:
- Entity ID: a unique reference for your application. In our case we use enginframe
- Base URL: the base URL of our EnginFrame portal (aka https:// followed by our site domain name), followed by /mellon This identifies the full URL where mod_auth_mellon will listen and interact with OKTA.
In our example it’s https://company.enginframe.portal.com
As output, this will create 3 files:
- A .key file, which contains the SP private key in PEM format.
- A .cert file, which contains the SP certificate in PEM format.
- An .xml file, which contains the SP metadata.
Their name will be the first parameter specified in the mellon_create_metadata.sh command line, so enginframe in our above example. Copy the 3 generated files under the Apache folder we have previously created: /etc/httpd/mellon.
Check: you may need to change the ownership of the three generated files to the user running Apache (apache, by default):chown apache -R /etc/httpd/mellon - Edit mod_auth_mellon configuration file: /etc/httpd/conf.d/auth_mellon.conf according to suit your needs. You can check this sample configuration file. The integration-specific entries are marked in bold:
MellonCacheSize 100 MellonLockFile "/run/mod_auth_mellon/lock" # This is a server-wide configuration that will add information from the Mellon session to all requests. <Location /> # Add information from the mod_auth_mellon session to the request. MellonEnable "info" # Configure the SP metadata # This should be the files which were created when creating # SP metadata. MellonSPPrivateKeyFile /etc/httpd/mellon/enginframe.key MellonSPCertFile /etc/httpd/mellon/enginframe.cert MellonSPMetadataFile /etc/httpd/mellon/enginframe.xml # IdP metadata. This should be the metadata file you got from # the IdP. MellonIdPMetadataFile /etc/httpd/mellon/idp-metadata-<FQDN>.xml # The location all endpoints should be located under. # It is the URL to this location that is used as the second # parameter to the metadata generation script. # This path is relative to the root of the web server. MellonEndpointPath /mellon </Location> # This is a location that will trigger authentication when requested. <Location /enginframe> # This location will trigger an authentication request to the IdP. MellonEnable "auth" </Location> - Set Apache mod_proxy_ajp. You can simply add the following lines into a file under Apache configuration folder, so it will be automatically loaded by Apache, e.g.
/etc/httpd/conf.d/http-enginframe.conf:<Location /enginframe> ProxyPass ajp://127.0.0.1:8009/enginframe flushpackets=on ProxyPassReverse ajp://127.0.0.1:8009/enginframe </Location>By default, AJP uses port 8009. We’ll also set it up on the EnginFrame / Tomcat side later. Of course, if you want to run Apache and EnginFrame on different hosts, you’ll need to replace the loopback address mentioned above
127.0.0.1.
To setup EnginFrame to leverage Apache as authentication issuer:
- Edit files:
EF_CONF_ROOT/enginframe/server.conf
Set EnginFrame default authority to http (an EnginFrame system preset authority) and enable HTTP authentication. For more information, refer to EnginFrame Administration Guide.EF_DEFAULT_AUTHORITY=http EF_HTTP_AUTHENTICATION=trueEF_CONF_ROOT/tomcat/conf/server.xmlUn-comment Tomcat AJP connector, by default it uses port 8009. The connector code is already preset by the EnginFrame installer, so you just have to un-comment it (XML comments are enclosed by<!--and-->). Also addtomcatAuthentication="false"to avoid Tomcat interferences in the authentication process:<!-- Define an AJP 1.3 Connector on port 8009 --> <Connector port="8009" tomcatAuthentication="false" enableLookups="false" redirectPort="8443" protocol="AJP/1.3" URIEncoding="utf-8" secretRequired="false" />
- Finally, restart Apache and EnginFrame:
systemctl restart httpd
systemctl restart enginframe
Optional tasks
Depending on your starting EnginFrame configuration, you might need to perform these further actions:
- If your current EnginFrame port is not HTTPS 8443 as mentioned above, you might need to change it. This is to be set in the same file
EF_CONF_ROOT/tomcat/conf/server.xml. - You might need to add or modify the HTTPS URL certificate associated to your EnginFrame URL (https://company.enginframe.portal.com, in our example): it should be provided by Apache instead of EnginFrame/Tomcat now.
- If your Linux OS users are not strictly matching the ones provided by OKTA, you will need to setup EnginFrame users mapping feature. Refer to EnginFrame Administrator Guide for more details.
Test the integration
We can test the integration by directing our browser to EnginFrame website:
- Point the browser to https://company.enginframe.portal.com.
- Apache gets the request and engages mod_auth_mellon to manage it.
- mod_auth_mellon redirects our browser to OKTA access portal.
- If you’re not already logged into OKTA, or if your previous session expired, OKTA will ask your credentials and MFA code/verification.
- Once you are authorized by OKTA, you’ll be redirected to EnginFrame’s portal and logged in without further interactions.
Conclusion
In this post we’ve shown how to setup EnginFrame to leverage OKTA as an SSO and MFA provider. Users logging into the portal will now be automatically redirected to OKTA credentials verification instead of the standard EnginFrame login form. Once OKTA correctly verifies the user, they’ll be automatically logged into EnginFrame without any further input.
Further Reading
AWS Single Sign-On can be easily added in the picture, since it supports OKTA as Identity Provider (IdP). You can find more details about this option in AWS SSO – Use OKTA as IdP.
OKTA integration can be part of a fully-integrated enterprise-grade authentication and authorization system, such as the one presented in our tech talk on “Using AWS SSO with Okta, Active Directory, and AWS SSO Identities”.
OKTA’s website also provides technical documents such as How to Configure SAML 2.0 for AWS Single Sign-On and Okta + Amazon Web Services: Automate AWS SSO with Okta Workflows.
The same logic we applied here can be adapted to other SSO/MFA tools such as PingID/PingFederate using PingFederate Apache integration kit or OpenID/Oauth implementations in general. Keep an eye on our HPC blog for further EnginFrame authentication integrations.