AWS Contact Center
Programmatically manage contact flows with new Amazon Connect APIs
Amazon Connect, an easy to use contact center service, allows contact center managers to build contact flows in a single user interface. Typically, contact centers have more than one contact flow that serve a number of different purposes. However, there are often cases in which certain aspects of one contact flow must be replicated in another. For example, if you would like to store customer data during a call you must invoke the same AWS Lambda function across multiple different contact flows. Performing these tasks manually is prone to error, time consuming to replicate flows, and also leads to inconsistent configuration.
Today, AWS launched new contact flow APIs for Amazon Connect that will help perform these operations programmatically and enable customers to automate these tasks. Customers will be able to replicate flows across instances using a CI/CD pipeline, as opposed to manually performing these tasks. This also enables Amazon Connect administrators to have faster and robust mechanism to innovate, deliver value, and better experience for their customers.
In this blog, you learn how to leverage Amazon Connect contact flow APIs to automate create, read, update, and publish functions through a web-based user interface (UI). This is easily deployed from an AWS CloudFormation template.
Prerequisites
- An AWS account
- An existing Amazon Connect instance
- Access to AWS services
- AWS IAM with access to create policies and roles
- Amazon CloudFront with access to create a distribution
- Amazon S3 with access to create buckets
- AWS CloudFormation to run the stack
- AWS IAM access and secret key credentials
Overview of solution
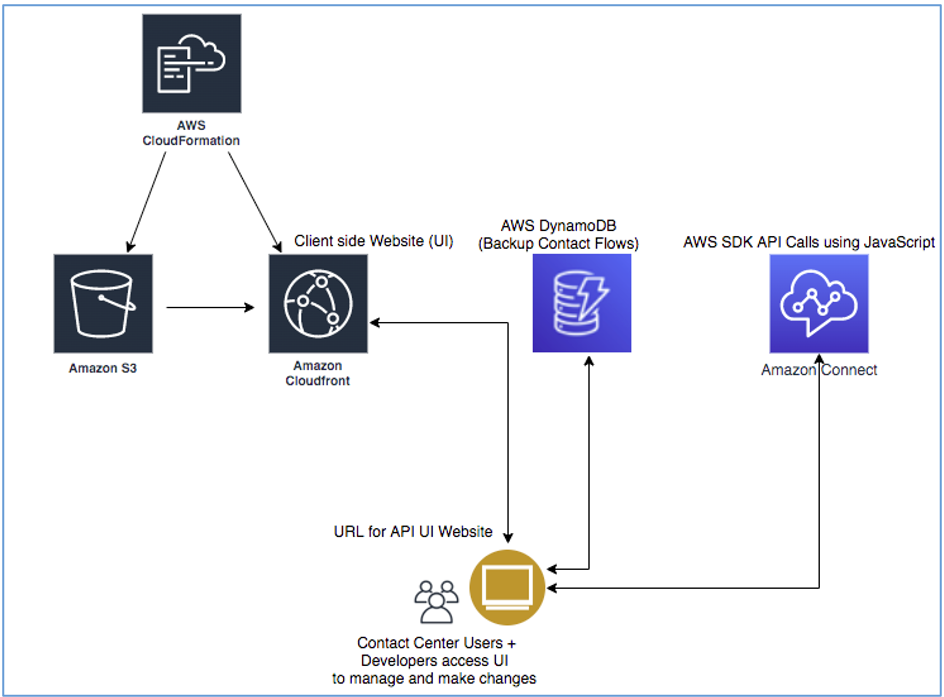
This solution leverages the new APIs with the help of a front-end Web UI developed and provided in the CloudFormation template. The UI uses the AWS SDK for JavaScript and APIs to access contact flows in the source and destination Amazon Connect instances. We can then use the UI to make API calls to back up the contact flows in JSON format in the DynamoDB table and also replicate contact flows from source to destination instance using the same JSON.
Walkthrough
Steps:
- Click to Launch the CloudFormation Template

- Select next at the bottom of the screen:
- Enter a Stack Name (e.g. contactflowapiblog) and click next to continue:
- On the next page, leave everything default and click next to continue
- On the following page, check the radio button for acknowledgement of statement, and then click on create stack button.
- Wait for confirmation that the stack creation is complete.
- Access the CloudFront Web UI to access the portal
- Configure the source and destination Amazon Connect instances
- Get all the contact flows in each instance
- Test and validate the solution by performing actions on both Amazon Connect instances
Note: All resources must be created in US West (Oregon) Region
Launch the Contact Flow APIs User Interface Website
-
- Go to the AWS CloudFormation service in the AWS Console and click on the stack you just created.
- Go to the outputs section of the newly created Stack and copy the CloudFrontEndpoint URL. Paste this in a browser window to access the Amazon Connect contact flows APIs Website, which shows the source Amazon Connect instance on the left and destination instance on the right.
- Next, configure the AWS IAM credentials. Click on AWS Configurations on the left and input all the required information (All Fields are mandatory) to access the two Amazon Connect instances and click on save configurations.
For this example, we are using two separate AWS accounts and IAM credentials.
- Use your AWS account access key, secret key, instance ID, region of Amazon Connect instance, table name for backup DynamoDB (for backing up contact flows), and a table name for ARN mapping DynamoDB (used to map ARNs of objects between the two Amazon Connect instances) and press the save configurations button.
- Press the get all contact flows button and notice the returned list of contact flows for both Amazon Connect instances.
-
- Click the details link for one of the contact flows listed to see the formatted JSON view of the contact flow.
- Select the change name icon for one of the listed contact flows and change the name to something new as depicted here. Once you click rename contact flow, it modifies the contact flow in that Amazon Connect instance and displays the updated contact flow name in the list without requiring a browser refresh.
- Promote the renamed contact flow to the destination Amazon Connect Instance:
-
- The promote function copies or creates an identical contact flow from the source instance on the left to the destination instance on the right. The UI enumerates all the required dependencies or other contact flows required for the flow being copied or created to function properly.

- Select the update contact flow button to run the promotion of the contact flow. If the target Amazon Connect instance does not have a contact flow with the same name it alerts with the prompt below. You can select Ok to create a new contact flow with the intended name, or select Cancel to abort the promotion of the flow.
-
- If you Select OK, you should see the same contact flow exists in both Amazon Connect Instances.

-
- You can back up selected contact flows in the DynamoDB table by clicking on the backup selected flows and then verify the DynamoDB to ensure the flows are backed up.

-
- We also create a new flow in the source or the destination instance through the UI. We demonstrate creating an agent whisper flow.
- Click on create contact flow button.
- In the pop-up screen, please make sure you have the correct instance and type of flow selected. Give a name and description to your flow and copy the flow in the JSON format in the body of the screen. Click create contact flow to create the flow.
- We also create a new flow in the source or the destination instance through the UI. We demonstrate creating an agent whisper flow.

- You can see now that we have the Flow created in the list “XXXXX”.
Cleaning up
To avoid incurring future charges, delete the resources that you created by visiting AWS CloudFormation.
Conclusion
This post demonstrated how to leverage the new contact flow APIs to read all the contact flows across the two Amazon Connect instances and perform following functions programmatically, instead of logging in to the web interface and walking through a multi-step process.
This enables customers to orchestrate these activities in their CI/CD pipeline and also comply with some of the compliance requirements from BCP perspective.
- Use a web interface (GUI) to list all contact flows in 2 different Amazon Connect instances leveraging APIs
- How to get a JSON output of each contact flow and rename individual contact flows in either Instance.
- How to back up contact flows in the source or production Amazon Connect instances.
- Create new contact flows in either of the instances
To learn more about how this solution was built and see how the APIs were executed, refer to the GitHub repo.