AWS Compute Blog
Using Amazon RDS Proxy with AWS Lambda
Update – June 30, 2020: Amazon RDS Proxy support for MySQL and PostgreSQL is now generally available.
Update – April 8, 2020: We have announced Postgres compatibility with the Amazon RDS Proxy. Version 10.11 and 11.5 are supported in the preview.
The AWS Serverless platform allows you to build applications that automatically scale in response to demand. During periods of high volume, Amazon API Gateway and AWS Lambda scale automatically in response to incoming load.
Often developers must access data stored in relational databases from Lambda functions. But it can be challenging to ensure that your Lambda invocations do not overload your database with too many connections. The number of maximum concurrent connections for a relational database depends on how it is sized.
This is because each connection consumes memory and CPU resources on the database server. Lambda functions can scale to tens of thousands of concurrent connections, meaning your database needs more resources to maintain connections instead of executing queries.
See the architecture blog post “How to Design your serverless apps for massive scale” for more detail on scaling.
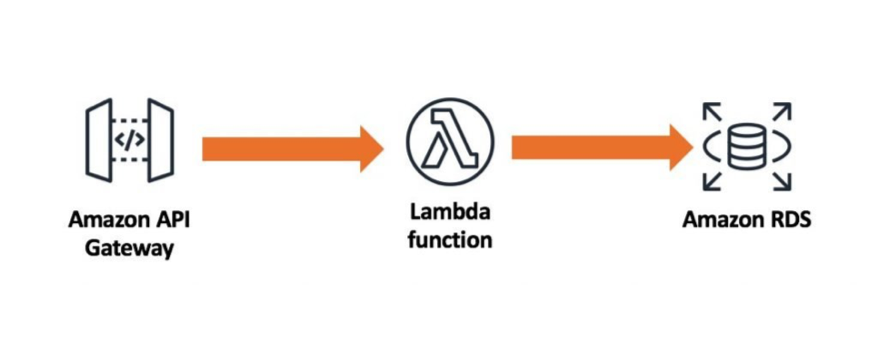
Serverless Architecture with RDS
This design places high load on your backend relational database because Lambda can easily scale to tens of thousands of concurrent requests. In most cases, relational databases are not designed to accept the same number of concurrent connections.
Database proxy for Amazon RDS
Today, we’re excited to announce the preview for Amazon RDS Proxy. RDS Proxy acts as an intermediary between your application and an RDS database. RDS Proxy establishes and manages the necessary connection pools to your database so that your application creates fewer database connections.
You can use RDS Proxy for any application that makes SQL calls to your database. But in the context of serverless, we focus on how this improves the Lambda experience. The proxy handles all database traffic that normally flows from your Lambda functions directly to the database.
Your Lambda functions interact with RDS Proxy instead of your database instance. It handles the connection pooling necessary for scaling many simultaneous connections created by concurrent Lambda functions. This allows your Lambda applications to reuse existing connections, rather than creating new connections for every function invocation.
The RDS Proxy scales automatically so that your database instance needs less memory and CPU resources for connection management. It also uses warm connection pools to increase performance. With RDS Proxy, you no longer need code that handles cleaning up idle connections and managing connection pools. Your function code is cleaner, simpler, and easier to maintain.
Getting started
The RDS Database proxy is in preview, so there are a few things to keep in mind:
- We currently support Amazon RDS MySQL or Aurora MySQL, running on MySQL versions 5.6 or 5.7
- The preview is available in Asia Pacific (Tokyo), EU (Ireland), US East (Ohio), US East (N.Virginia), and US West (Oregon)
- During the public preview, you should use the AWS Management Console to interact with RDS Proxy
- Do not use this service for production workloads as you might encounter preview-related changes
Review the preview guide for a detailed description of the service
Prerequisites
Start with an existing database that is either Amazon RDS MySQL or Aurora MySQL. Then, store your database credentials as a secret in AWS Secrets Manager, and create an IAM Policy that allows RDS Proxy to read this secret.
To create the secret:
- Sign into AWS Secrets Manager and choose Store a new Secret.
- Choose Credentials for RDS Database.
- Enter the user name and password.
- Select the RDS Database this secret is valid for. Choose Next.

Store a new secret
- Enter a Secret Name and choose Next.

Save the secret
- Accept all defaults and choose Store. Note the ARN assigned to this secret, as you need it later.

Secret details
- Now create an IAM role that allows RDS Proxy to read this secret. RDS Proxy uses this secret to maintain a connection pool to your database. Go to your IAM console and create a new role. Add a policy that provides secretsmanager permissions to the secret you created in the previous step. For example:
{ "Version": "2012-10-17", "Statement": [ { "Sid": "VisualEditor0", "Effect": "Allow", "Action": [ "secretsmanager:GetResourcePolicy", "secretsmanager:GetSecretValue", "secretsmanager:DescribeSecret", "secretsmanager:ListSecretVersionIds" ], "Resource": [ "arn:aws:secretsmanager:us-east-2:[your-account-number]:secret:gmao-rds-secret-YZ2MMN" ] }, { "Sid": "VisualEditor1", "Effect": "Allow", "Action": [ "secretsmanager:GetRandomPassword", "secretsmanager:ListSecrets" ], "Resource": "*" } ] } - Add the following Trust Policy to allow RDS to assume the role. Save the role and take note of the IAM Role ARN, as you need it later.
{
 "Version": "2012-10-17",
 "Statement": [
  {
   "Sid": "",
   "Effect": "Allow",
   "Principal": {
    "Service": "rds.amazonaws.com"
   },
   "Action": "sts:AssumeRole"
  }
 ]
}
Create and attach a proxy to a Lambda function
Next, use the Lambda console to Add a Database proxy to a Lambda function.
- Sign into the AWS Lambda console and open the Lambda function you would like to enable RDS Proxy. This Lambda function needs to be configured for access to the same VPC and Subnets as your RDS database.
- Scroll to the bottom of your Lambda configuration page and choose Add Database Proxy.

Add database proxy
- Follow the Add database proxy wizard, and fill in the Proxy Identifier and select your RDS Database. Then choose the Secrets Manager secret and the IAM role you created earlier. RDS Proxy uses this secret to connect to your database. Choose Add.

Configure database proxy
- Wait a few minutes for the RDS Proxy to provision and the status updates to Available.

Database proxy available
- Choose your proxy to view the details. Note the Proxy endpoint. You need this later in the Lambda function code.

Available Proxy configuration
Now the Lambda function has permission to use the configured RDS Proxy, and you are ready to connect to the proxy.
Using the proxy
Instead of connecting directly to the RDS instance, connect to the RDS proxy endpoint. To do this, you have two options for security. You can use IAM authentication or you can use your native database credentials stored in Secrets Manager. IAM authentication is recommended because it removes the need to embed or read credentials in your function code. This guide uses IAM authentication to your RDS Proxy.
You can use any Lambda-supported programming language. The example below uses Node.js:
let AWS = require('aws-sdk');
var mysql2 = require('mysql2'); //https://www.npmjs.com/package/mysql2
let fs  = require('fs');

let connection;

exports.handler = async(event) => {
	const promise = new Promise(function(resolve, reject) {

		console.log("Starting query ...\n");
	  	console.log("Running iam auth ...\n");

      	//
    	var signer = new AWS.RDS.Signer({
	        region: '[insert your region here]', // example: us-east-2
	        hostname: '[insert your RDS Proxy endpoint here]',
	        port: 3306,
	        username: '[Your RDS User name]'
  		});

	    let token = signer.getAuthToken({
	      username: '[Your RDS User name]'
	    });

    	console.log ("IAM Token obtained\n");

        let connectionConfig = {
          host: process.env['endpoint'], // Store your endpoint as an env var
          user: '[Your RDS User name]',
          database: process.env['my_db'], // Store your DB schema name as an env var
          ssl: { rejectUnauthorized: false},
          password: token,
          authSwitchHandler: function ({pluginName, pluginData}, cb) {
              console.log("Setting new auth handler.");
          }
        };

		// Adding the mysql_clear_password handler
        connectionConfig.authSwitchHandler = (data, cb) => {
            if (data.pluginName === 'mysql_clear_password') {
              // See https://dev.mysql.com/doc/internals/en/clear-text-authentication.html
              console.log("pluginName: "+data.pluginName);
              let password = token + '\0';
              let buffer = Buffer.from(password);
              cb(null, password);
            }
        };
        connection = mysql2.createConnection(connectionConfig);

		connection.connect(function(err) {
			if (err) {
				console.log('error connecting: ' + err.stack);
				return;
			}

			console.log('connected as id ' + connection.threadId + "\n");
		 });

		connection.query("SELECT * FROM contacts", function (error, results, fields) {
			if (error){
		  		//throw error;
		  		reject ("ERROR " + error);
			}

			if(results.length > 0){
				let result = results[0].email + ' ' + results[0].firstname + ' ' + results[0].lastname;
				console.log(result);

				let response = {
			        "statusCode": 200,
			        "statusDescription": "200 OK",
			        "isBase64Encoded": false,
			        "headers":{
			        	"Content-Type": "text/html"
			        },
			        body: result,
			    };

				connection.end(function(error, results) {
					  if(error){
					    //return "error";
					    reject ("ERROR");
					  }
					  // The connection is terminated now
					  console.log("Connection ended\n");

					  resolve(response);
				});
			}
		});
	});
	return promise;
};
You need to package the NodeJS MySQL client module with your function. I’m using MySQL2 module, which can be found here. Just perform the standard `npm install –save mysql2` command and include the dependencies in your Lambda package. I use Lambda environment variables to store the connection information. This is the best practice for database configuration settings so you can change these details without updating your code. The endpoint environment variable is the RDS Proxy Endpoint noted earlier. The user and password are the database credentials, and the db variable is the database schema name.
Make sure that your Lambda execution role includes rds-db:connect permissions as outlined here. The Lambda console automatically does this on your behalf. This option allows you to retrieve a temporary token from IAM to authenticate to the database, instead of using native database credentials.
Confirm your RDS Proxy is using IAM Authentication
- Navigate to the RDS Proxies console
- Select your Proxy and select the ‘Actions’ button, and choose Modify.
- Under the Connectivity module, ensure the ‘IAM Authentication’ option is set to Required.
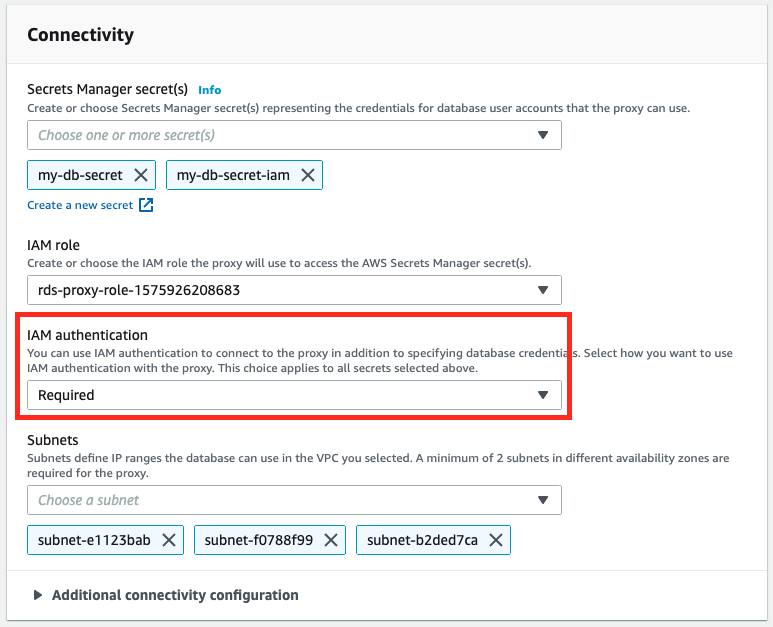
Confirming IAM authentication
If you choose to use native database credentials to connect to your RDS Proxy, you can skip the above steps.
Conclusion
RDS Proxy helps you manage a large number of connections from Lambda to an RDS database by establishing a warm connection pool to the database. Your Lambda functions can scale to meet your needs and use the RDS Proxy to serve multiple concurrent application requests. This reduces the CPU and Memory requirements for your database, and eliminates the need for connection management logic in your code. Finally, please review the pricing details for RDS Proxy.
We look forward to your feedback during this preview!