With Amazon Interactive Video Service (Amazon IVS), you can now can start your contribution broadcast live stream directly from web browsers using the IVS web broadcast SDK.
Amazon IVS is a managed live streaming solution that is quick and easy to set up, and ideal for creating interactive video experiences. Send your live streams to Amazon IVS using standard streaming software like Open Broadcaster Software (OBS), or now with the IVS web broadcast SDK, just by opening your browser. The service is designed to do everything you need to make low-latency video available to any viewer around the world, letting you focus on building interactive experiences alongside the live stream.
Amazon IVS is well known by the developer community for simplifying live streaming integration. In addition to providing low-latency, the live video service is designed to work “out of the box.” It provides the Amazon IVS player SDK, timed metadata API, mobile broadcasting SDK, and stream chat API . Now, Amazon IVS is also simplifying the streamer side so developers can capture video from web browsers and send it as input to an Amazon IVS channel.
The Amazon IVS web broadcast SDK can integrate into new and existing applications. It supports camera source, screen share, swap between cameras, automatic bitrate adjustments, and secure streaming. Visit stream.ivs.rocks to try it out now.
In this blog post, we provide an overview of how to get started using the Amazon IVS web broadcast SDK and migrate your existing application to benefit from the SDK.
Migrating to the Amazon IVS web broadcast SDK
RTMPS is required to stream video to Amazon IVS from any source. Therefore, before the Amazon IVS web broadcast SDK, streaming from a web application needed a server to transcode or proxy the content, changing the transport from a WebSocket to RTMP. We described one potential solution in a recent blog post here.
With the introduction of the Amazon IVS web broadcast SDK, we can now implement a client-side only integration, eliminating the need for a live streaming proxy and extra architectural components to optimize scale, costs, and resilience.
Supported features and use cases
- Landscape and portrait mode presets 480p for basic channel ingest and 1080 for standard channel ingest
- Swap video positions of video devices, from rear to frontal camera, allowing for multi-position use cases
- Video controls: hide video or mute controls for simple operation
- Automatic bitrate adjustments: the Amazon IVS web broadcast SDK automatically adjusts the video bitrate to accommodate changing network conditions
Advantages of using the SDK
- Optimized latency for live streaming: With the SDK, latency is reduced; no extra round trip to servers, no double encoding. This means less buffering and the ability to watch your live streams in near-real time
- Resiliency: With the WebRTC ingest endpoint, your application can stream directly to Amazon IVS without a remote proxy
- Optimized infrastructure:When you stream directly to Amazon IVS, it is designed to automatically ingest video at a location near you
- Easier integration and development: Allows broadcasters to stream from their browsers with minimal setup
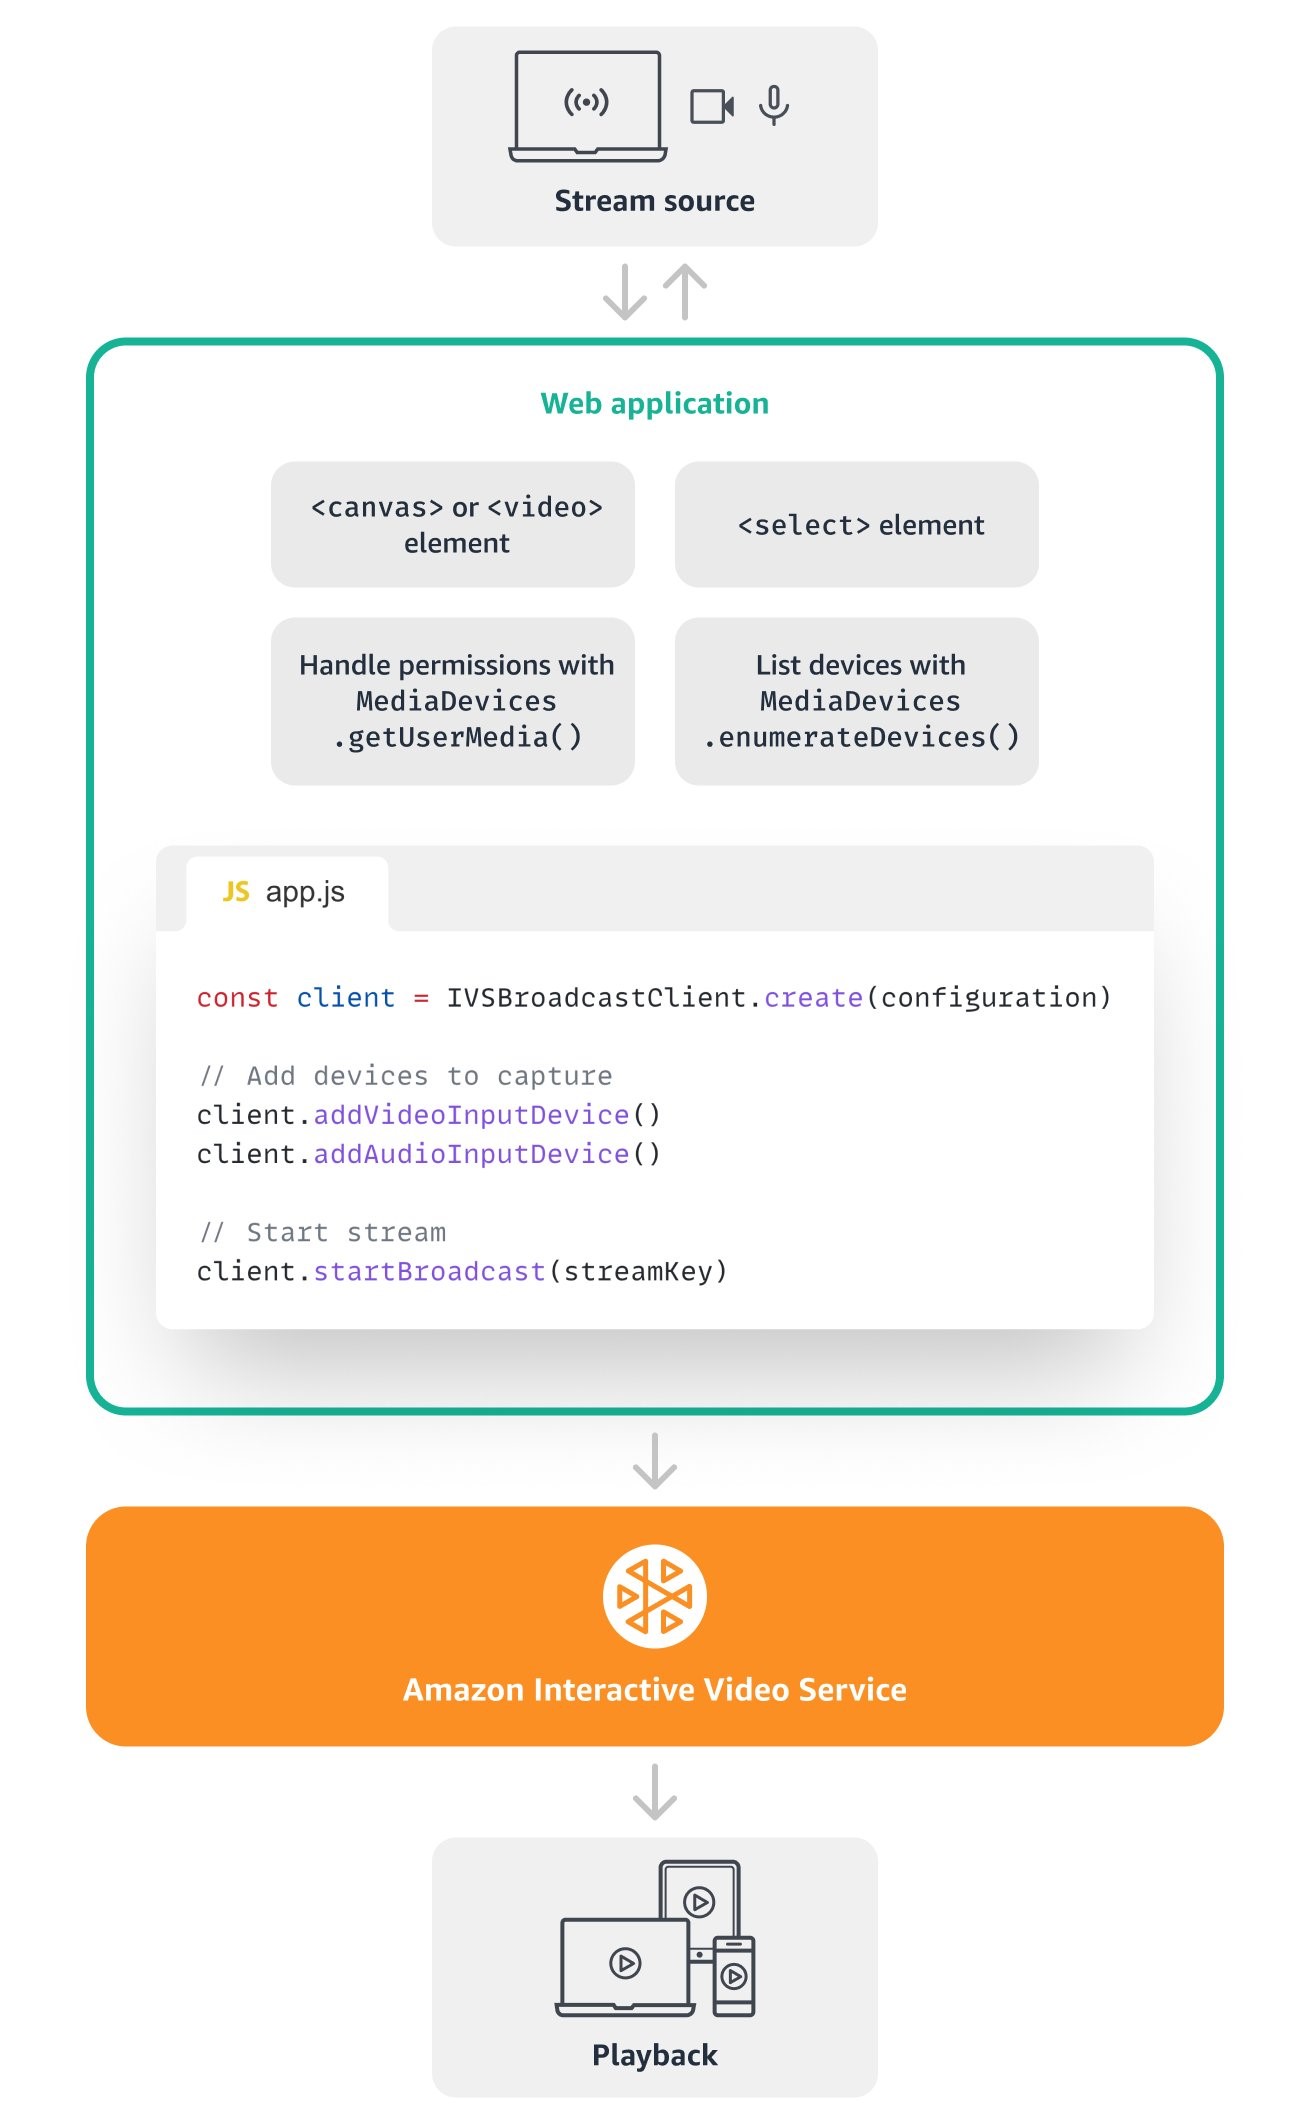
Integration Diagram
Integration steps
The following guide summarizes the integration steps required to migrate an existing web application to the Amazon IVS web broadcast SDK. Please visit the Getting Started guide for detailed documentation.
If you need a full sample code implementation, you can find it on the ivs.rocks website, along with our most recent collection of examples.
You can also refer to the Simplifying live streaming contribution GitHub repository if your application uses the React.js framework.
-
Load the IVS web broadcast SDK
The library can be either installed via npm or loaded via <script> html tags. This post will use the hosted files.
In the index.html file, load the script at the head of our page.
<script src="https://web-broadcast.live-video.net/1.0.0/amazon-ivs-web-broadcast.js"></script>
-
Instance the AmazonIVSBroadcast Client
The SDK exposes a global variable in the window scope named IVSBroadcastClient, and we can create an instance of the client by calling the create method with the streamConfig parameter. This parameter comprises the IVS channel class configuration, (standard channel full HD 1080p or basic channel, SD 480p) and the camera orientation mode, landscape or portrait.
Let’s assume a streaming landscape with full HD resolution for this sample integration.
IVSBroadcastClient.STANDARD_LANDSCAPE;
We also need to provide the ingest endpoint, which can be obtained in the AWS Management Console or returned by the Amazon IVS API using actions like CreateChannel or GetChannel.
In the Amazon IVS Console, find your channel and then the Stream configuration section. Under “Other ingest options,” copy the ingest endpoint, and also copy the Stream Key, which will be used in a later step as a parameter to start the live broadcast.

Now we can instance our client configuration.
const client = IVSBroadcastClient.create({
    // Enter the desired stream configuration
    streamConfig: IVSBroadcastClient.STANDARD_LANDSCAPE,
    // Enter the ingest endpoint created above
    ingestEndpoint: 'uniqueID.global-contribute.live-video.net',
});
-
Handle browser authorization and get the stream
Your application may handle browser permissions with the MediaDevices API using the getUserMedia method. That provides access to connected media input devices such as cameras, microphones, and screen sharing. The MediaStream audio and video tracks can then be added as an input device to the SDK.

-
Get MediaStream tracks
The getUserMedia method requests the user for permission to use a media input and produces a MediaStream with tracks containing audio and video tracks.
const videoParams = {video:true}
const audioParams = {audio: true}

window.cameraStream = await navigator.mediaDevices.getUserMedia(videoParams);
window.microphoneStream = await navigator.mediaDevices.getUserMedia(audioParams);
Note: The API MediaDevices also provides the enumerateDevices method that allows listing available devices, and we can filter the audio and video input array. Please refer to the sample application.
If you are using a composed canvas element to add filter or overlay in to your video element, the cameraStream needs to be captured using the method HTMLCanvasElement.captureStream().
window.cameraStream = canvas.captureStream(30);
-
Add stream to the IVS web broadcast SDK
If permission is granted, we can proceed to add the device stream to the Amazon IVS web broadcast SDK.
client.addVideoInputDevice(window.cameraStream, 'camera1', { index: 0 });
client.addAudioInputDevice(window.microphoneStream, 'mic1');
-
Start live streaming
Now that we have audio and video tracks, let’s start the broadcast by using the startBroadcast method. Provide the stream key from step 2 as a parameter.
client
    .startBroadcast(streamKey)
    .then((result) => {
        console.log('I am successfully broadcasting!');
    })
    .catch((error) => {
        console.error('Something drastically failed while broadcasting!', error);
    });
-
Stop live streaming
General tips
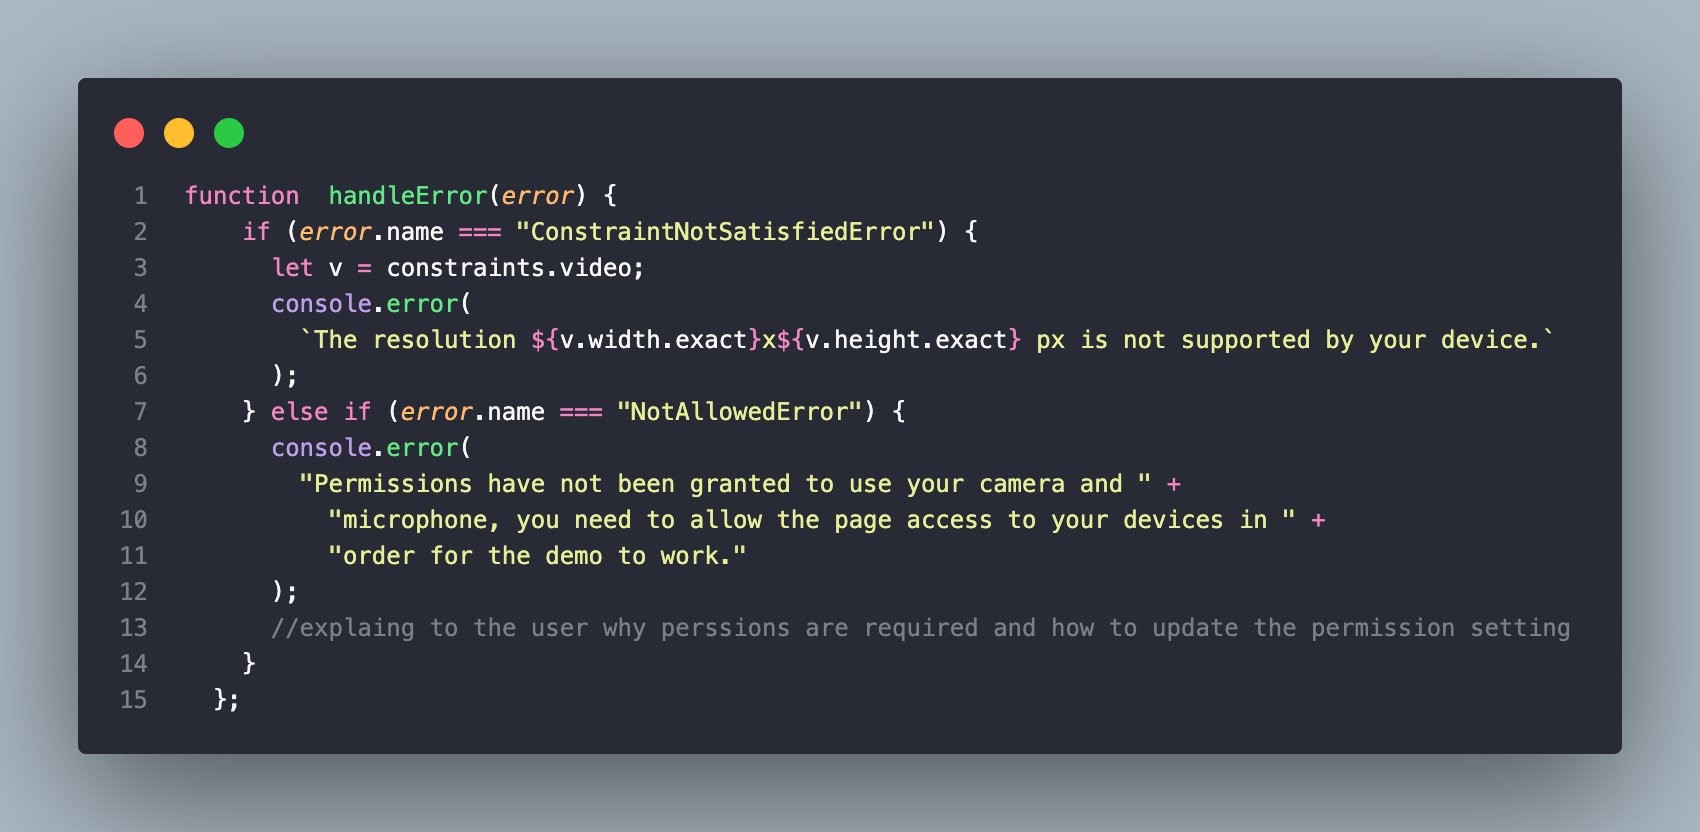
- Browser permissions: user consent is required when capturing the video from a browser using the MediaDevices.getUserMedia. On the first page load, the browser prompts a dialog box asking users to allow or block access to the devices. If the user does not ALLOW device access in the browser, after the initial denial, the browser will not prompt anymore and the application cannot capture video. Therefore, we recommend providing a clear explanation to the end user about why and how to allow access to devices to stream audio and video from the browser. You may also want to re-prompt the permission in case it is initially denied.
- The method enumerateDevices() returns a MediaDeviceInfo array describing the devices. In your application, you may want to provide the list of cameras and microphones as an input selection in a form. When the user selects a different device, the application will need to update the deviceId passing the current value to the method getUserMedia({video:{deviceId: activeSource}}). The newly selected device will also need permission to access the MediaStream. The Amazon IVS web broadcast SDK allows you to change the camera and microphone during the transmission based on user-allowed devices (including using the method exchangeVideoDevicePositions to capture the video from a different view, like switching from rear to front camera).
client.exchangeVideoDevicePositions('camera1', 'camera2');
- WebRTC dynamically chooses the best bitrate and resolution for the resources available, and the streamer needs to consider at least 200 Kbps of upload to ensure good quality streaming.
Get started now using the Amazon IVS web broadcast SDK
The Amazon IVS web broadcast SDK allows customers to stream from their browsers with minimal setup. Follow the Getting Started guide to implement the SDK and leverage key features like high-quality streaming, automatic bitrate adjustments, secure streaming, multiple input sources, stream controls, and camera swap. Use the sample app to get started or demo the features using stream.ivs.rocks.