- AWS Builder Center
- builders.flash
ゲーム分析を Amazon Aurora と Amazon Redshift の Zero-ETL 統合ではじめよう
2023-09-01 | Author : Sheng Hsia Leng, 渡邉 真太郎
はじめに
ゲームなみなさんこんにちは、Game Solutions Architect の Leng (@msian.in.japan) と Game Solutions Architect の渡邉 (@nabesh1n) です。
この記事ではモバイルゲームやオンラインゲームといった運営型のゲームにおいて簡単にゲーム分析を始める手段として、Amazon Aurora MySQL と Amazon Redshift の Zero-ETL (※) 統合をご紹介します。
※ ETL とはデータの抽出 (Extract)、変換 (Transform)、ロード (Load) というデータ統合に関わる各プロセスの頭文字を取った用語です。様々なデータソースのデータを分析の中心となるリポジトリにまとめるための一連のプロセスを指しています。ここではゲームのバックエンドシステムのデータベースに存在するデータを抽出し、分析用途に応じて事前に変換を行い、データ分析環境のデータウェアハウスに格納するという一連の処理を ETL 処理としています。
builders.flash メールメンバー登録
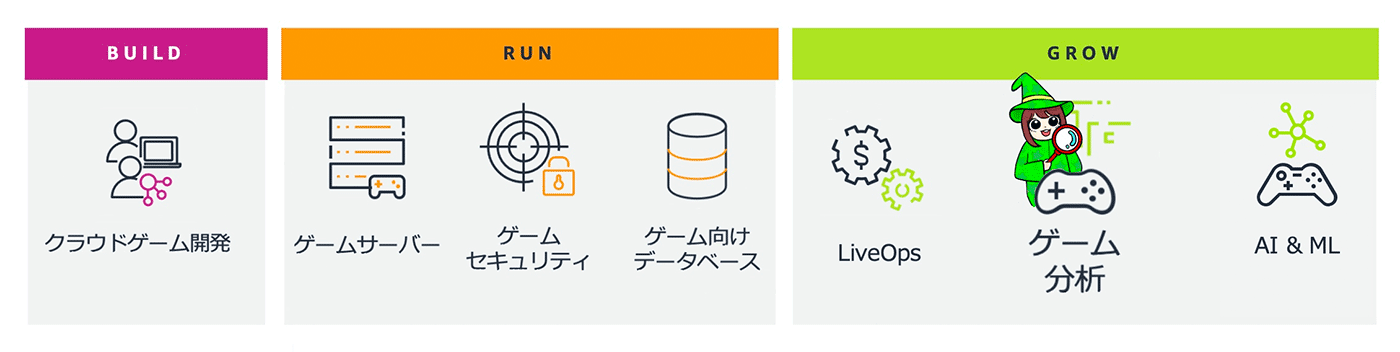
AWS for Games
なぜゲーム分析が必要なのか
Zero-ETL 統合を使ったゲーム分析をご紹介する前に、なぜゲーム分析が必要なのかご説明します。ゲームビジネスにおいてゲーム分析が必要となる理由は、ゲームビジネスを成長させ継続的に収益を拡大させるためです。
昨今のゲームビジネスは、「Free-to-play」と呼ばれる基本プレイ無料で、ユーザーが必要に応じて有料のゲーム内アイテムを購入するものや、売り切り型ゲームでも発売後に有料の追加コンテンツを販売するものが多くなっています。
このようなゲームビジネスにおいては、ゲームのリリース後もユーザーを飽きさせないようにサービスとしてゲームを運営し、様々な施策を打ってユーザー規模と収益を維持・拡大していくことが求められます。
すなわち、ゲームをサービスとして運営する中で的確な施策を打つことがゲームビジネスにおいて重要であり、その施策はユーザーのニーズに応えるものでなければなりません。そして、施策を立案するにあたってはゲームプランナーのひらめきや経験則に基づいたアイディアも重要ですが、同時に現在のユーザーの動向を正確に把握しユーザーのニーズに対する正しい仮説を立てることも重要です。そこで、ゲーム分析を導入することでデータを元にゲームビジネスの現状を正しく把握し、求められる施策についてより確度の高い仮説を立てることができます。
また、ゲーム分析は一度きりの取り組みではなく、ゲームの運営が続く限り継続して取り組んで、ゲームビジネスの発展とともに成長させていくことが望ましいです。
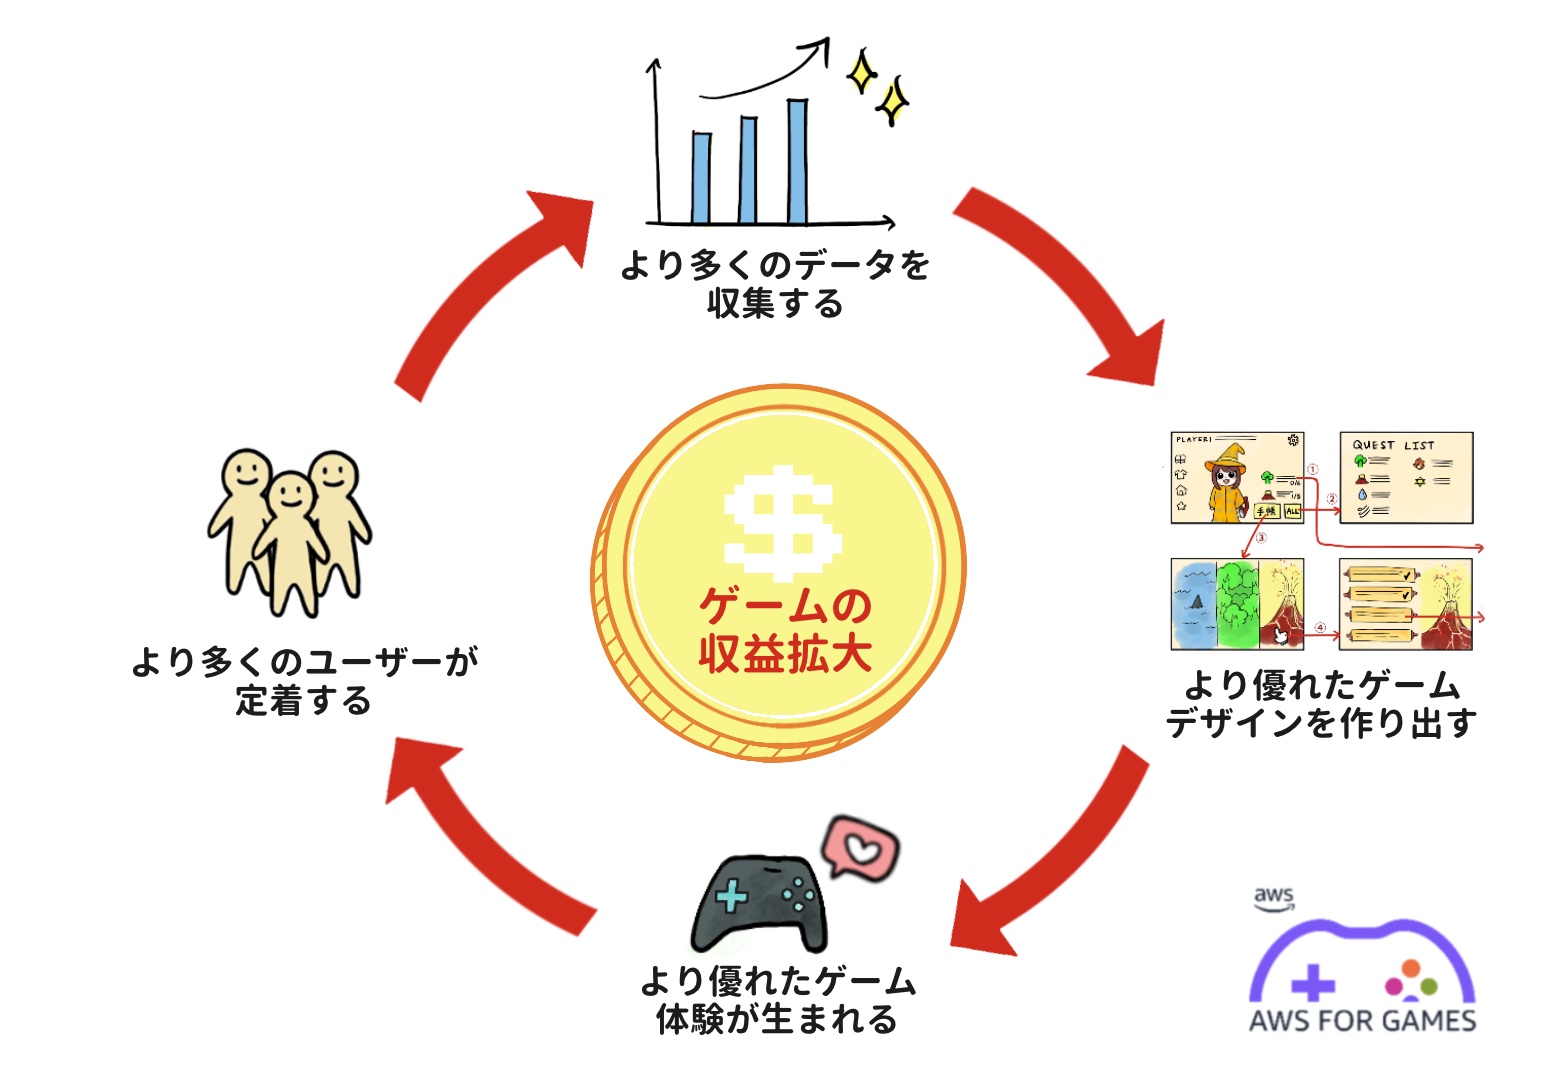
ゲームの収益を拡大させるサイクル
図はゲーム分析を導入しデータ活用の拡大とともにゲームの収益を拡大させるサイクルを示したものです。
ゲームからデータを収集し、データに基づいてゲームデザインやビジネス面の改善につながる仮説を立て、より優れたゲーム体験を作り出すことでより多くのユーザーを獲得し、より多くのユーザーからデータを得て次の改善に繋げる、というサイクルを回してゲームビジネスの規模と収益を拡大していくことが理想的なゲームビジネスとデータ活用の関係となります。
しかし、実際にはこのようなサイクルを回し始めるためにデータ分析の仕組みを取り入れることのハードルが高く、なかなかゲーム分析を始めることができないことも多いかと思います。
そこで、今回はデータベース上にあるデータの分析を簡単に始めるための方法として、 Amazon Aurora MySQL と Amazon Redshift の Zero-ETL 統合をご紹介します。
Amazon Aurora MySQL と Amazon Redshift の Zero-ETL 統合
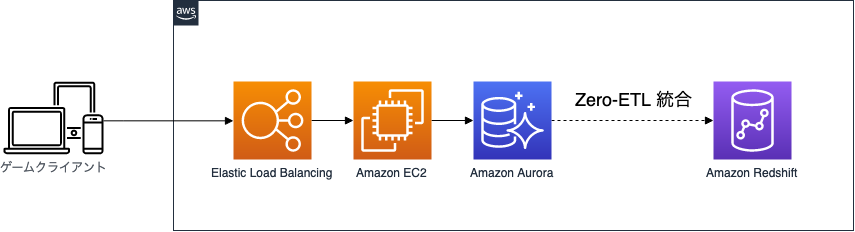
モバイルゲームやオンラインゲームといった運営型のゲームではゲームクライアントから API 越しに接続されるバックエンドシステムが存在し、そのバックエンドシステムのデータベースにユーザーの様々なデータが保存されているかと思います。
そして、データベースに保存されているデータを分析するとなると、本番データベースの分析系統を用意しデータ分析の要求がある度に SQL に熟達したエンジニアがその分析系統のデータベースに対してクエリを発行する運用が発生するかと思います。あるいはバックエンドシステムと分離されたデータ分析環境を用意し、その間を繋ぐデータパイプラインを構築して ETL 処理を行うことで、データベースに保存されているデータをデータ分析環境に転送しデータ分析をすることが考えられます。
しかし、本番データベースの分析系統にクエリを発行する場合は本番データベースに影響を与えないように細心の注意を払う必要があり、独立した分析環境を用意するためには複雑なデータパイプラインの構築と運用に多くのコストがかかります。
そこで、今回ご紹介する Amazon Aurora MySQL と Amazon Redshift の Zero-ETL 統合を使うことで、バックエンドシステムのデータベースに保存されているデータがそのまま Amazon Redshift にコピーされることとなり、お客様はデータベースとデータ分析環境の間でデータを転送するデータバイプラインの構築や運用をすることなく、すぐにデータ分析をはじめることができます。
それでは、ゲーム内アイテムの売上データを模したサンプルデータを Amazon Aurora MySQL データベースに保存し、Amazon Redshift Serverless と Zero-ETL 統合をして Amazon Redshift Serverless 上でデータ分析を試してみましょう。
※2023 年 9 月 1 日現在、Zero-ETL 統合は Public Preview で提供されています。
us-east-1, us-east-2, us-west-2, ap-northeast-1, eu-west-1 のいずれかのリージョンでご利用ください。
※Public Preview における制約事項は下記ページに詳細が記載されております。
https://docs.aws.amazon.com/ja_jp/AmazonRDS/latest/AuroraUserGuide/zero-etl.html#zero-etl.reqs-lims
1. Amazon Aurora MySQL の準備
Zero-ETL 向けのパラメータグループを作成
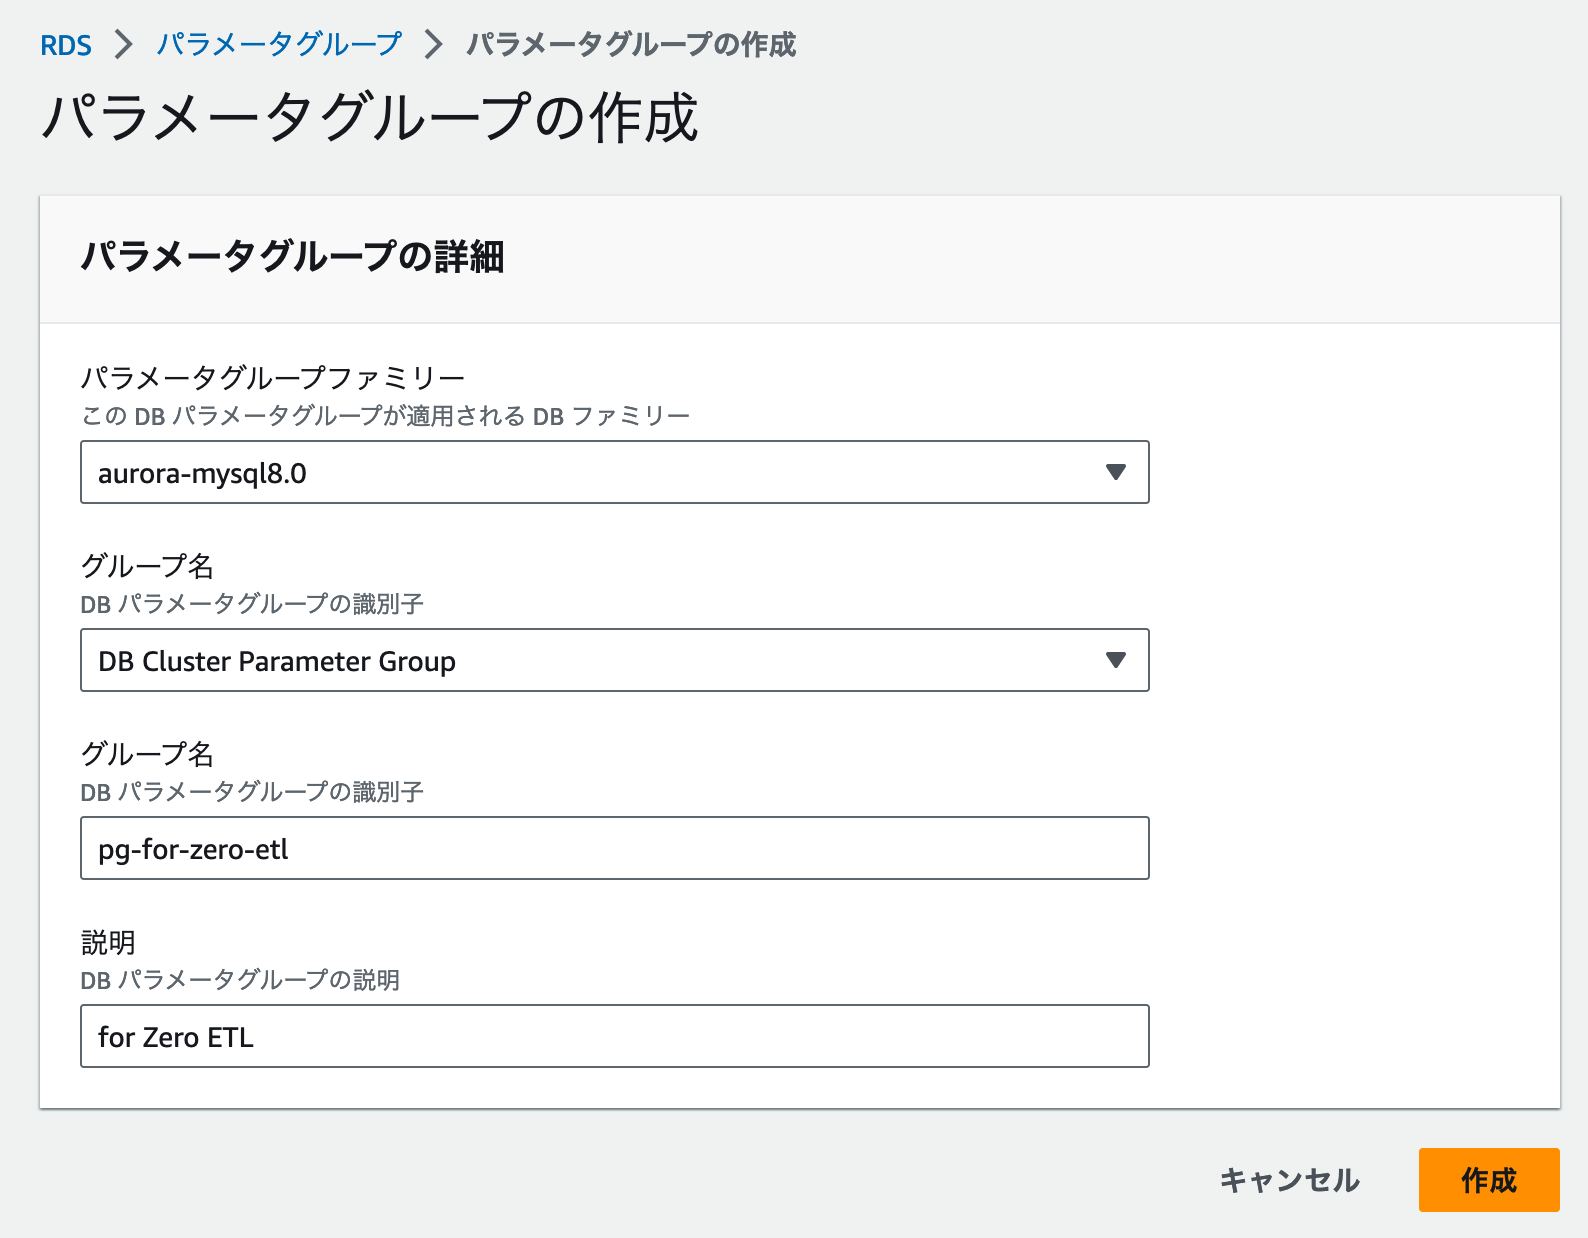
AWS コンソールの Amazon RDS を開き、以下の内容でパラメータグループを作成します。
- パラメータグループファミリー : aurora-mysql-8.0
- グループ名 : DB Cluster Parameter Group
- グループ名 : pg-for-zero-etl
- 説明 : for Zero ETL
パラメータグループの変更
入力が完了したら「作成」をクリックします。
パラメータグループが作成されたら、以下の変更を加えます。
- aurora_enhanced_binlog=1
- binlog_backup=0
- binlog_format=ROW
- binlog_replication_globaldb=0
- binlog_row_image=full
- binlog_row_metadata=full
これでパラメータグループの作成は完了です。
データベースを作成
引き続き AWS コンソールの Amazon RDS コンソールからデータベースの作成を行います。
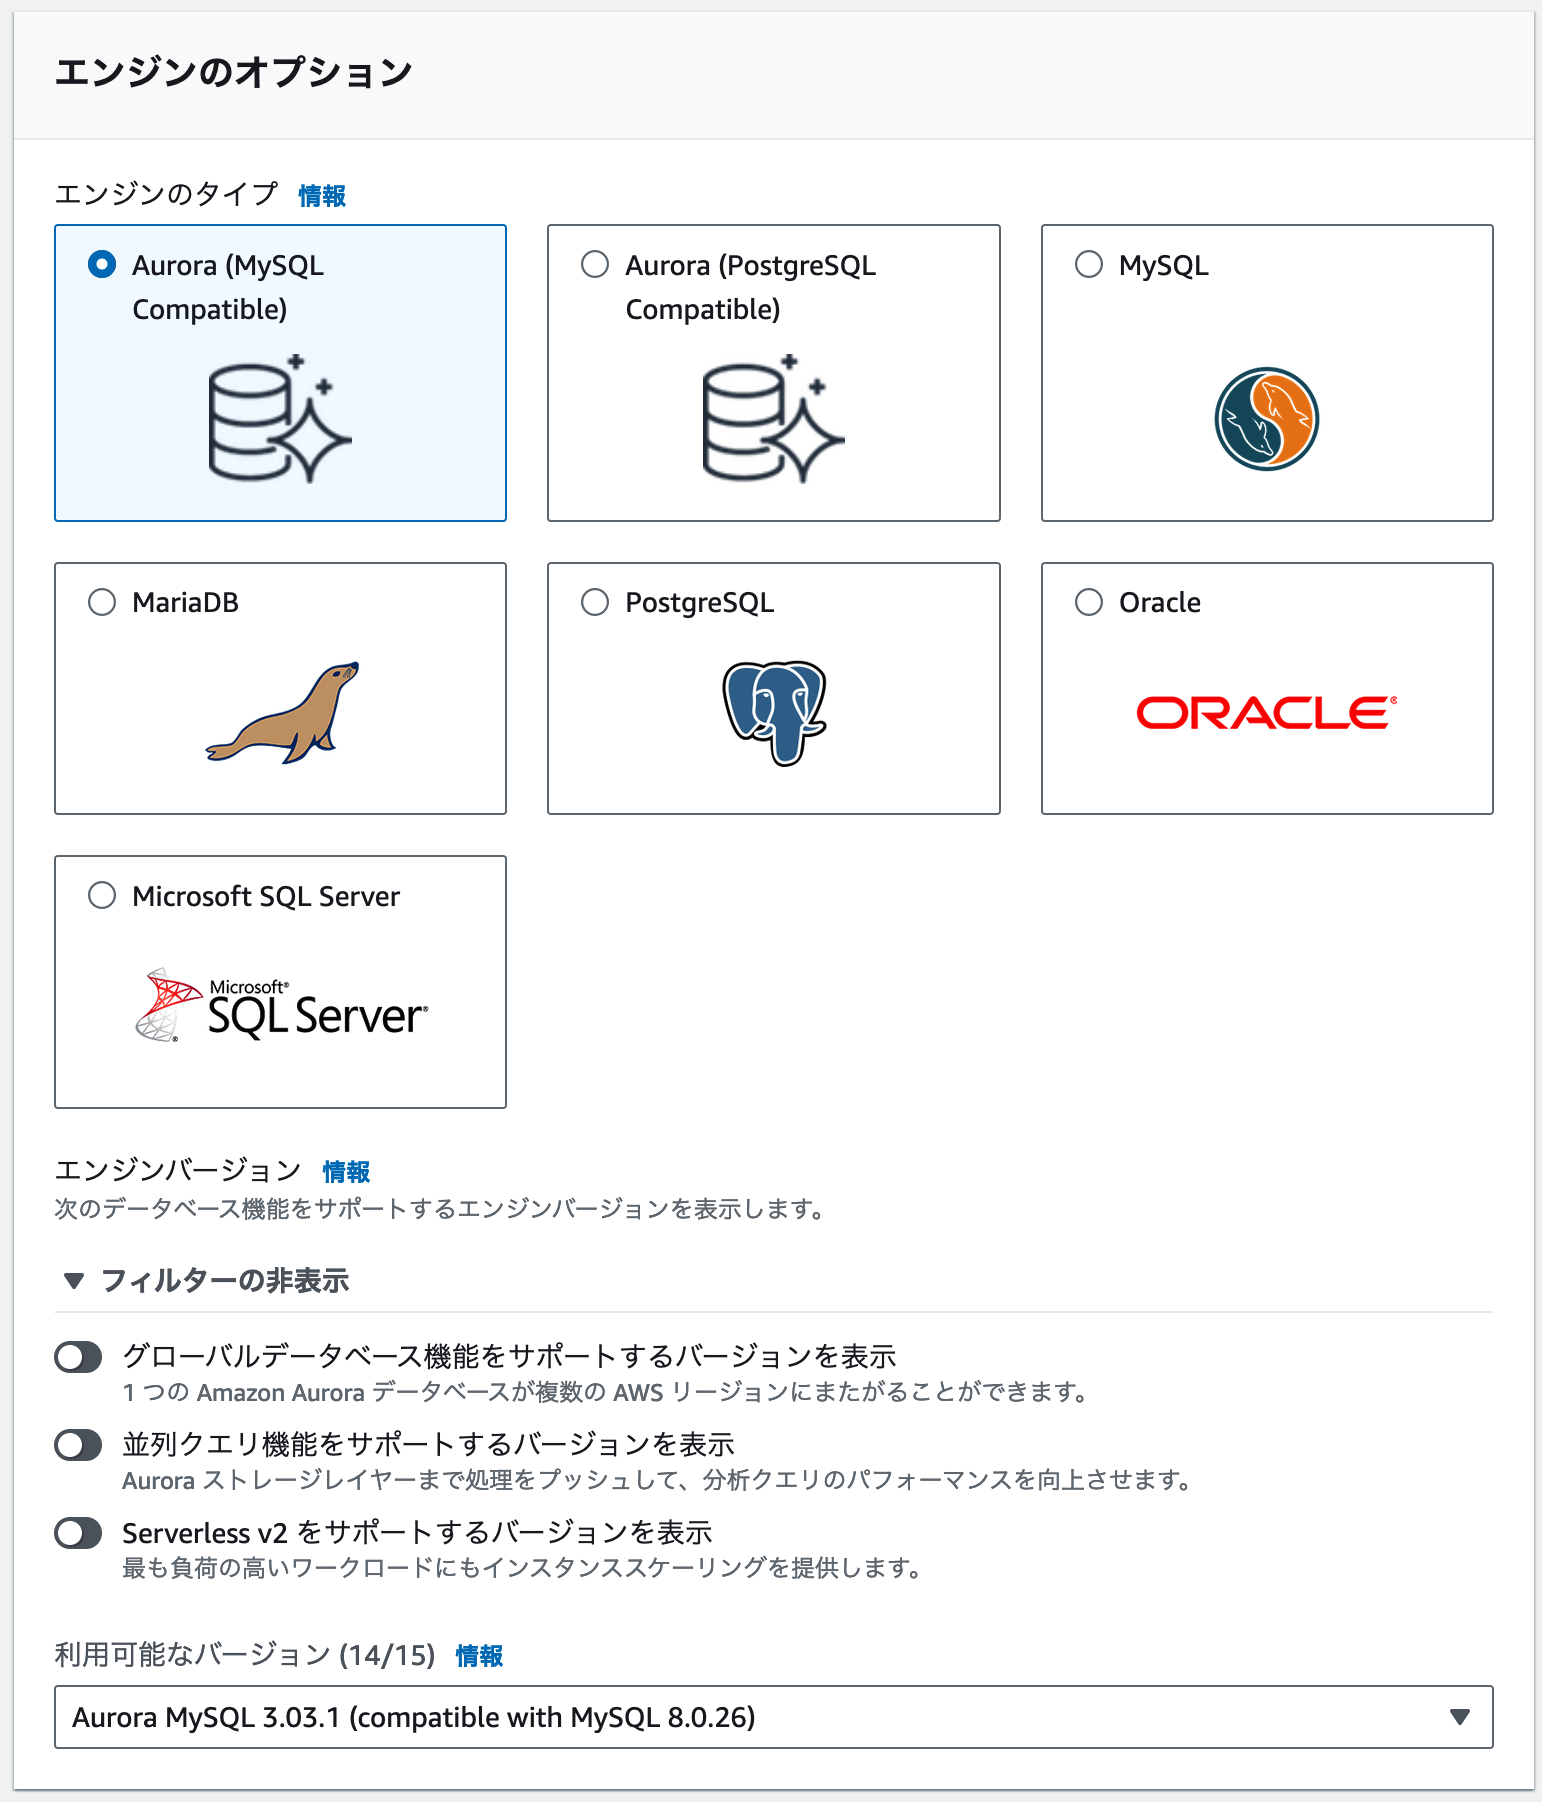
エンジンのタイプは Aurora (MySQL Compatible) を選択します。
エンジンバージョンは Aurora MySQL 3.03.1 (compatible with MySQL 8.0.26) を選択します。
データベース設定
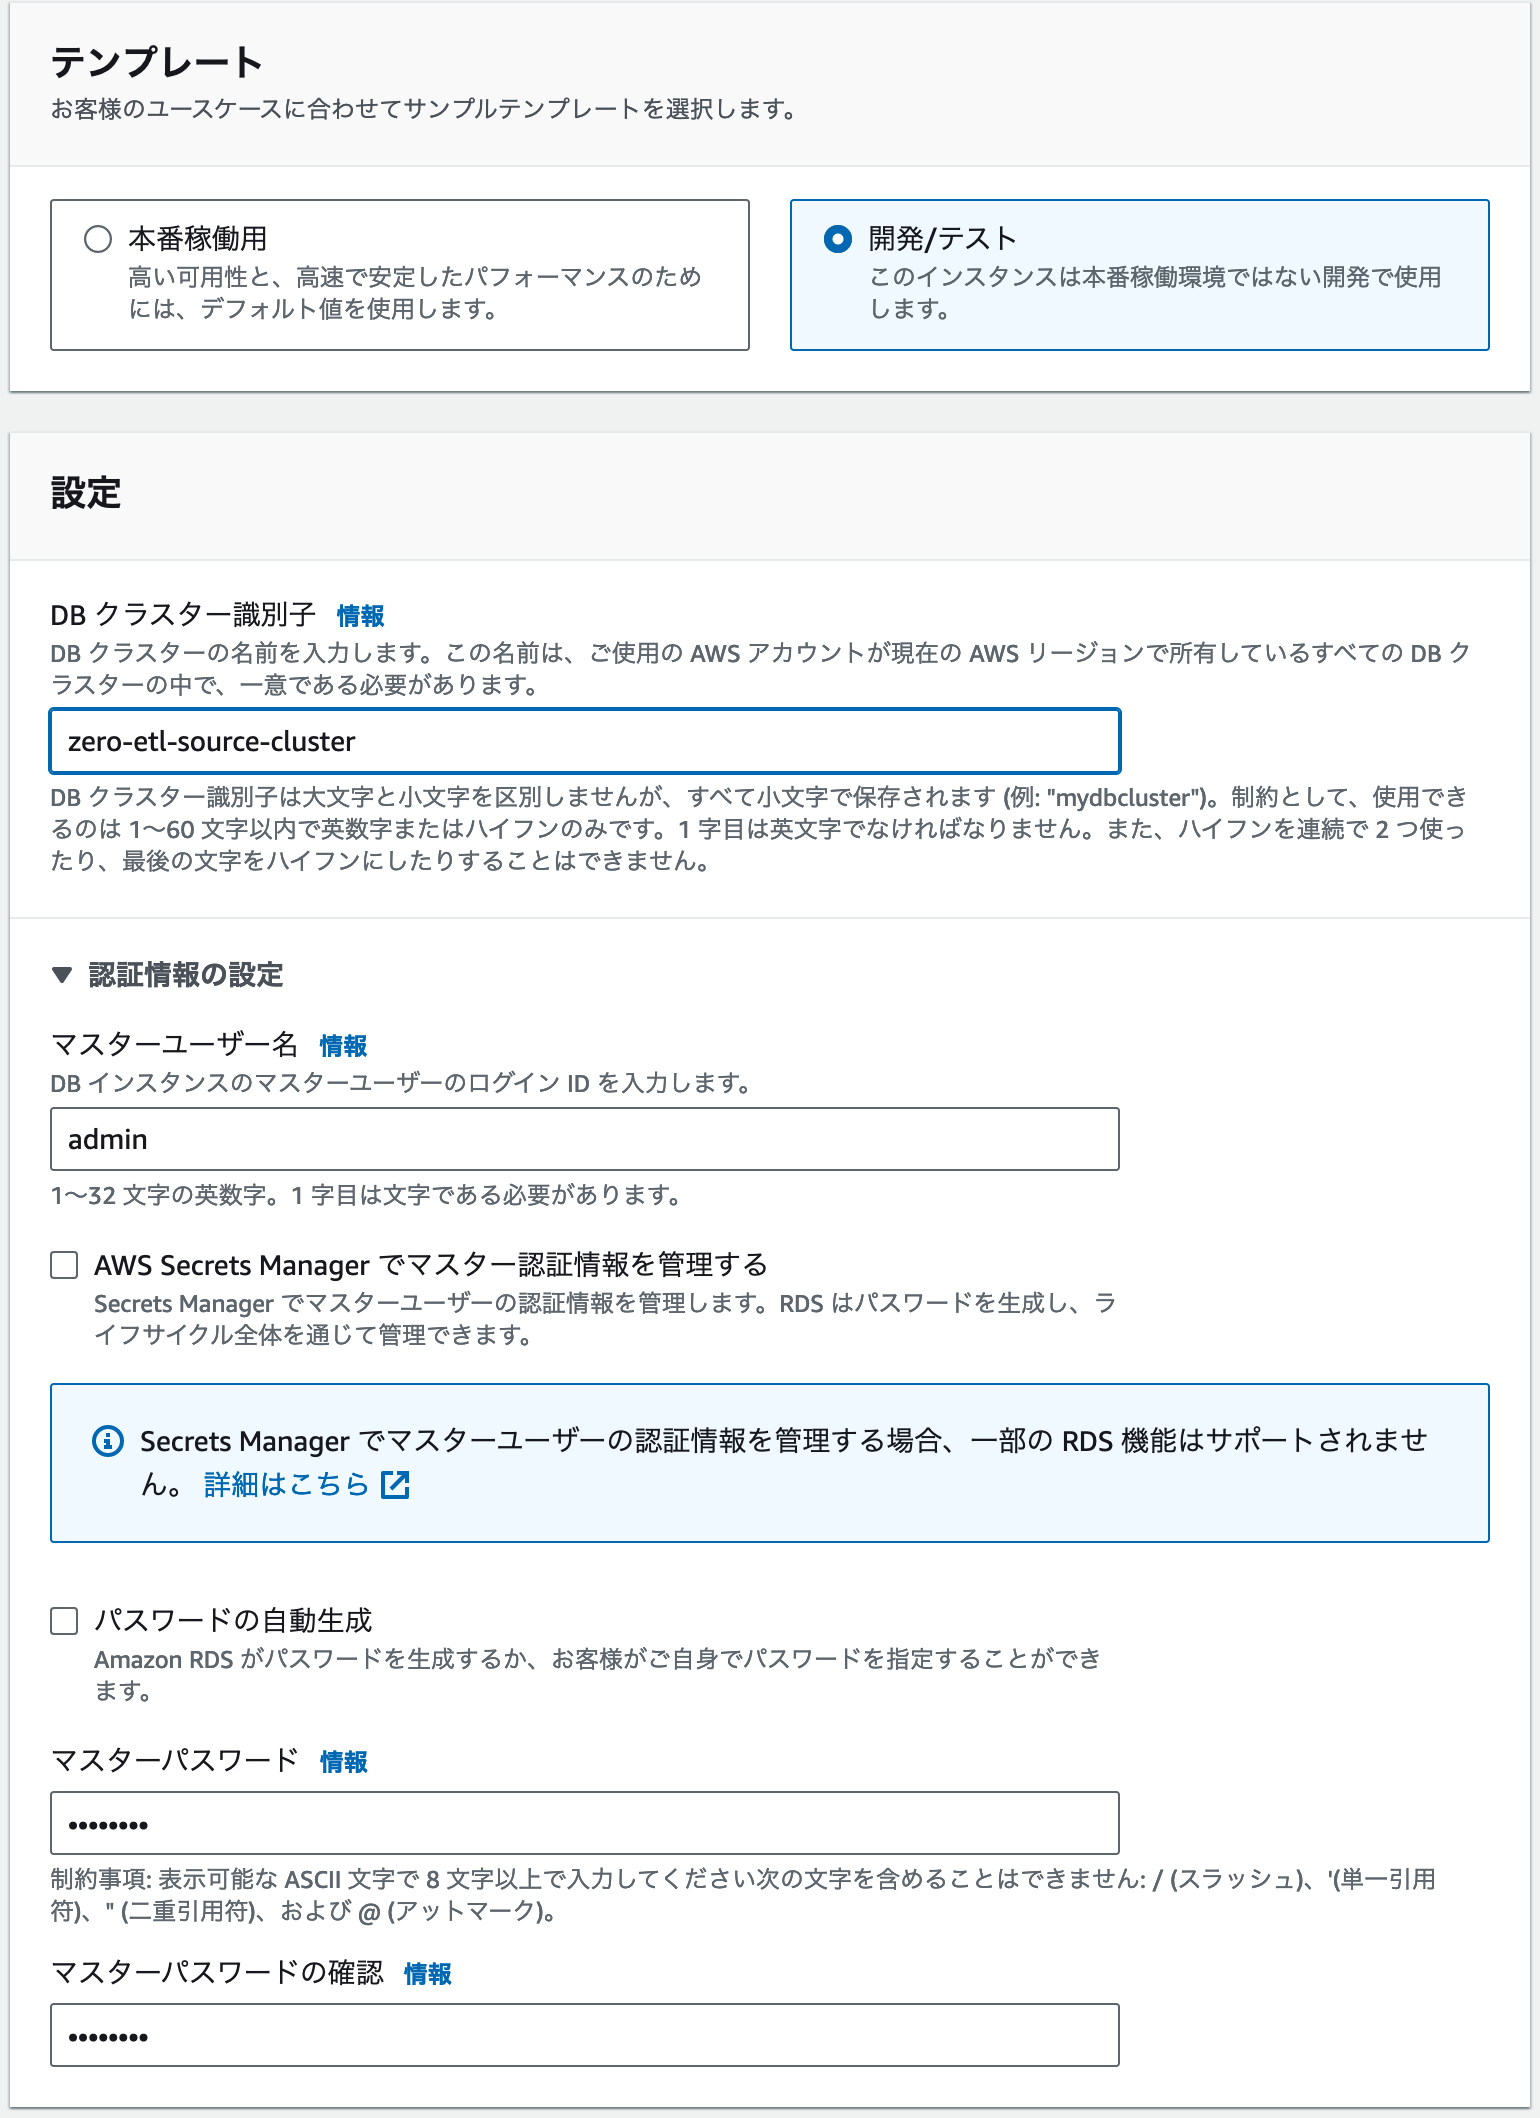
テンプレートは「開発/テスト」を選択します。
DBクラスター識別子には任意の名称を入力します。(例: zero-etl-source-cluster )
マスターユーザー名、パスワードも任意のものを入力してください。
※この後の手順はマスターユーザー名に admin を設定したものとして進めます。
追加設定
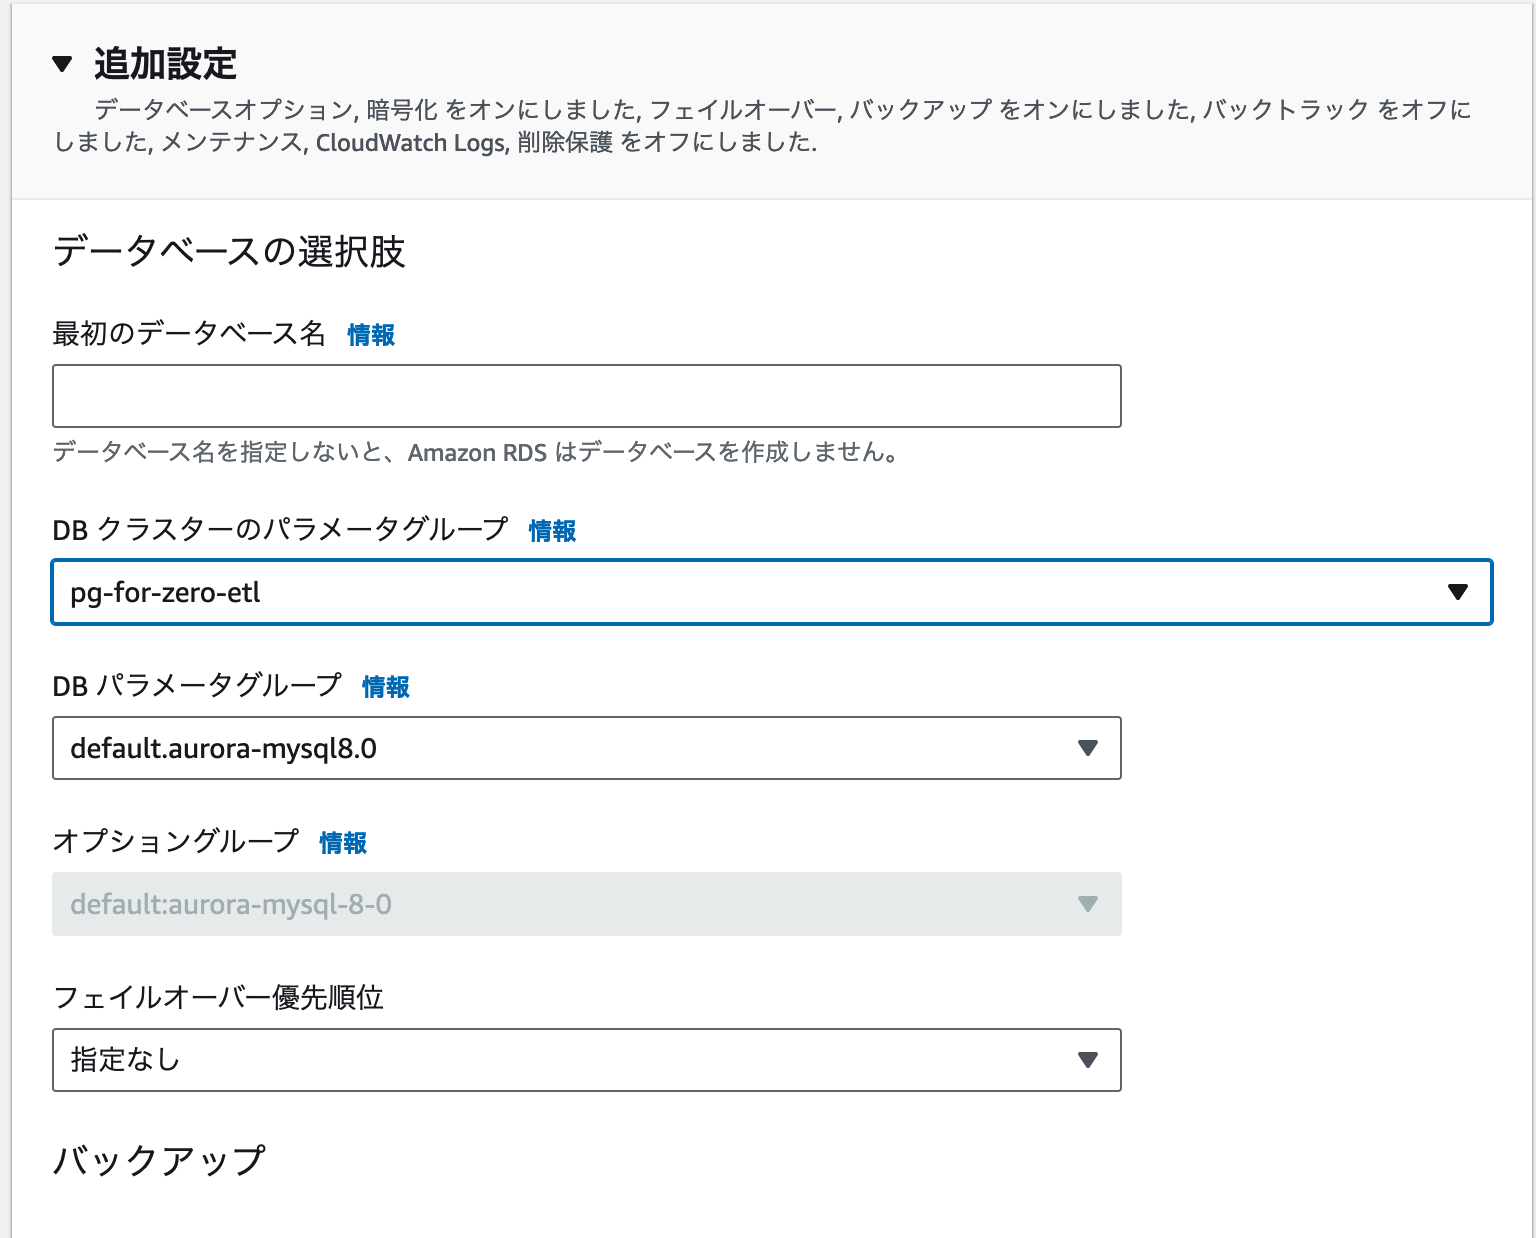
また、追加設定で DB クラスターのパラメータグループを先ほど作成した Zero-ETL 統合向けのものに設定します。
作成完了
その他の設定(VPC など)は任意のものにし、全ての設定が完了したら「データベースの作成」をクリックします。
これで Amazon Aurora MySQL の準備は完了です。
2. Amazon Redshift Serverless の準備
Amazon Redshift Serverless の名前空間とワークグループを作成する
今回は Amazon Redshift Serverless を使用します。
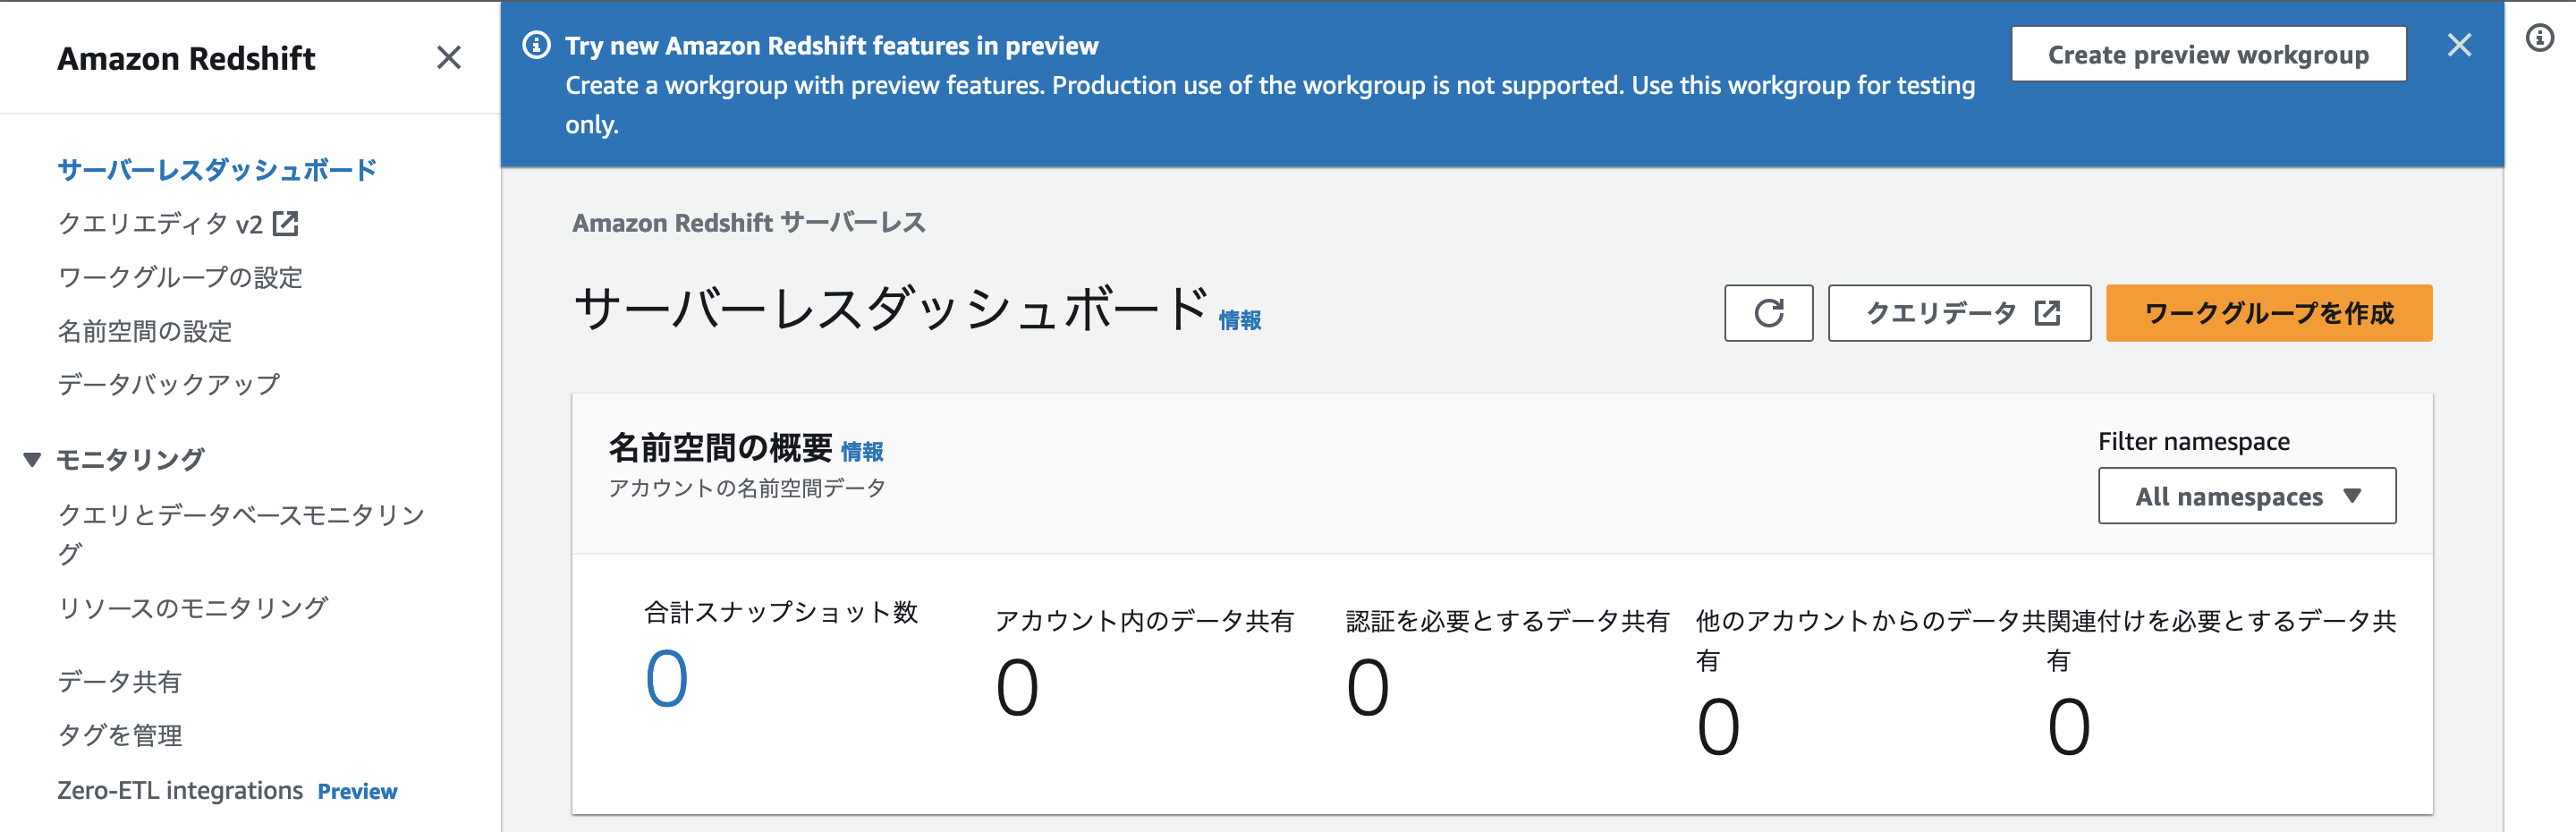
AWS コンソールから Amazon Redshift を開き、Redshift サーバーレスのコンソールを開きます。
ワークグループの作成
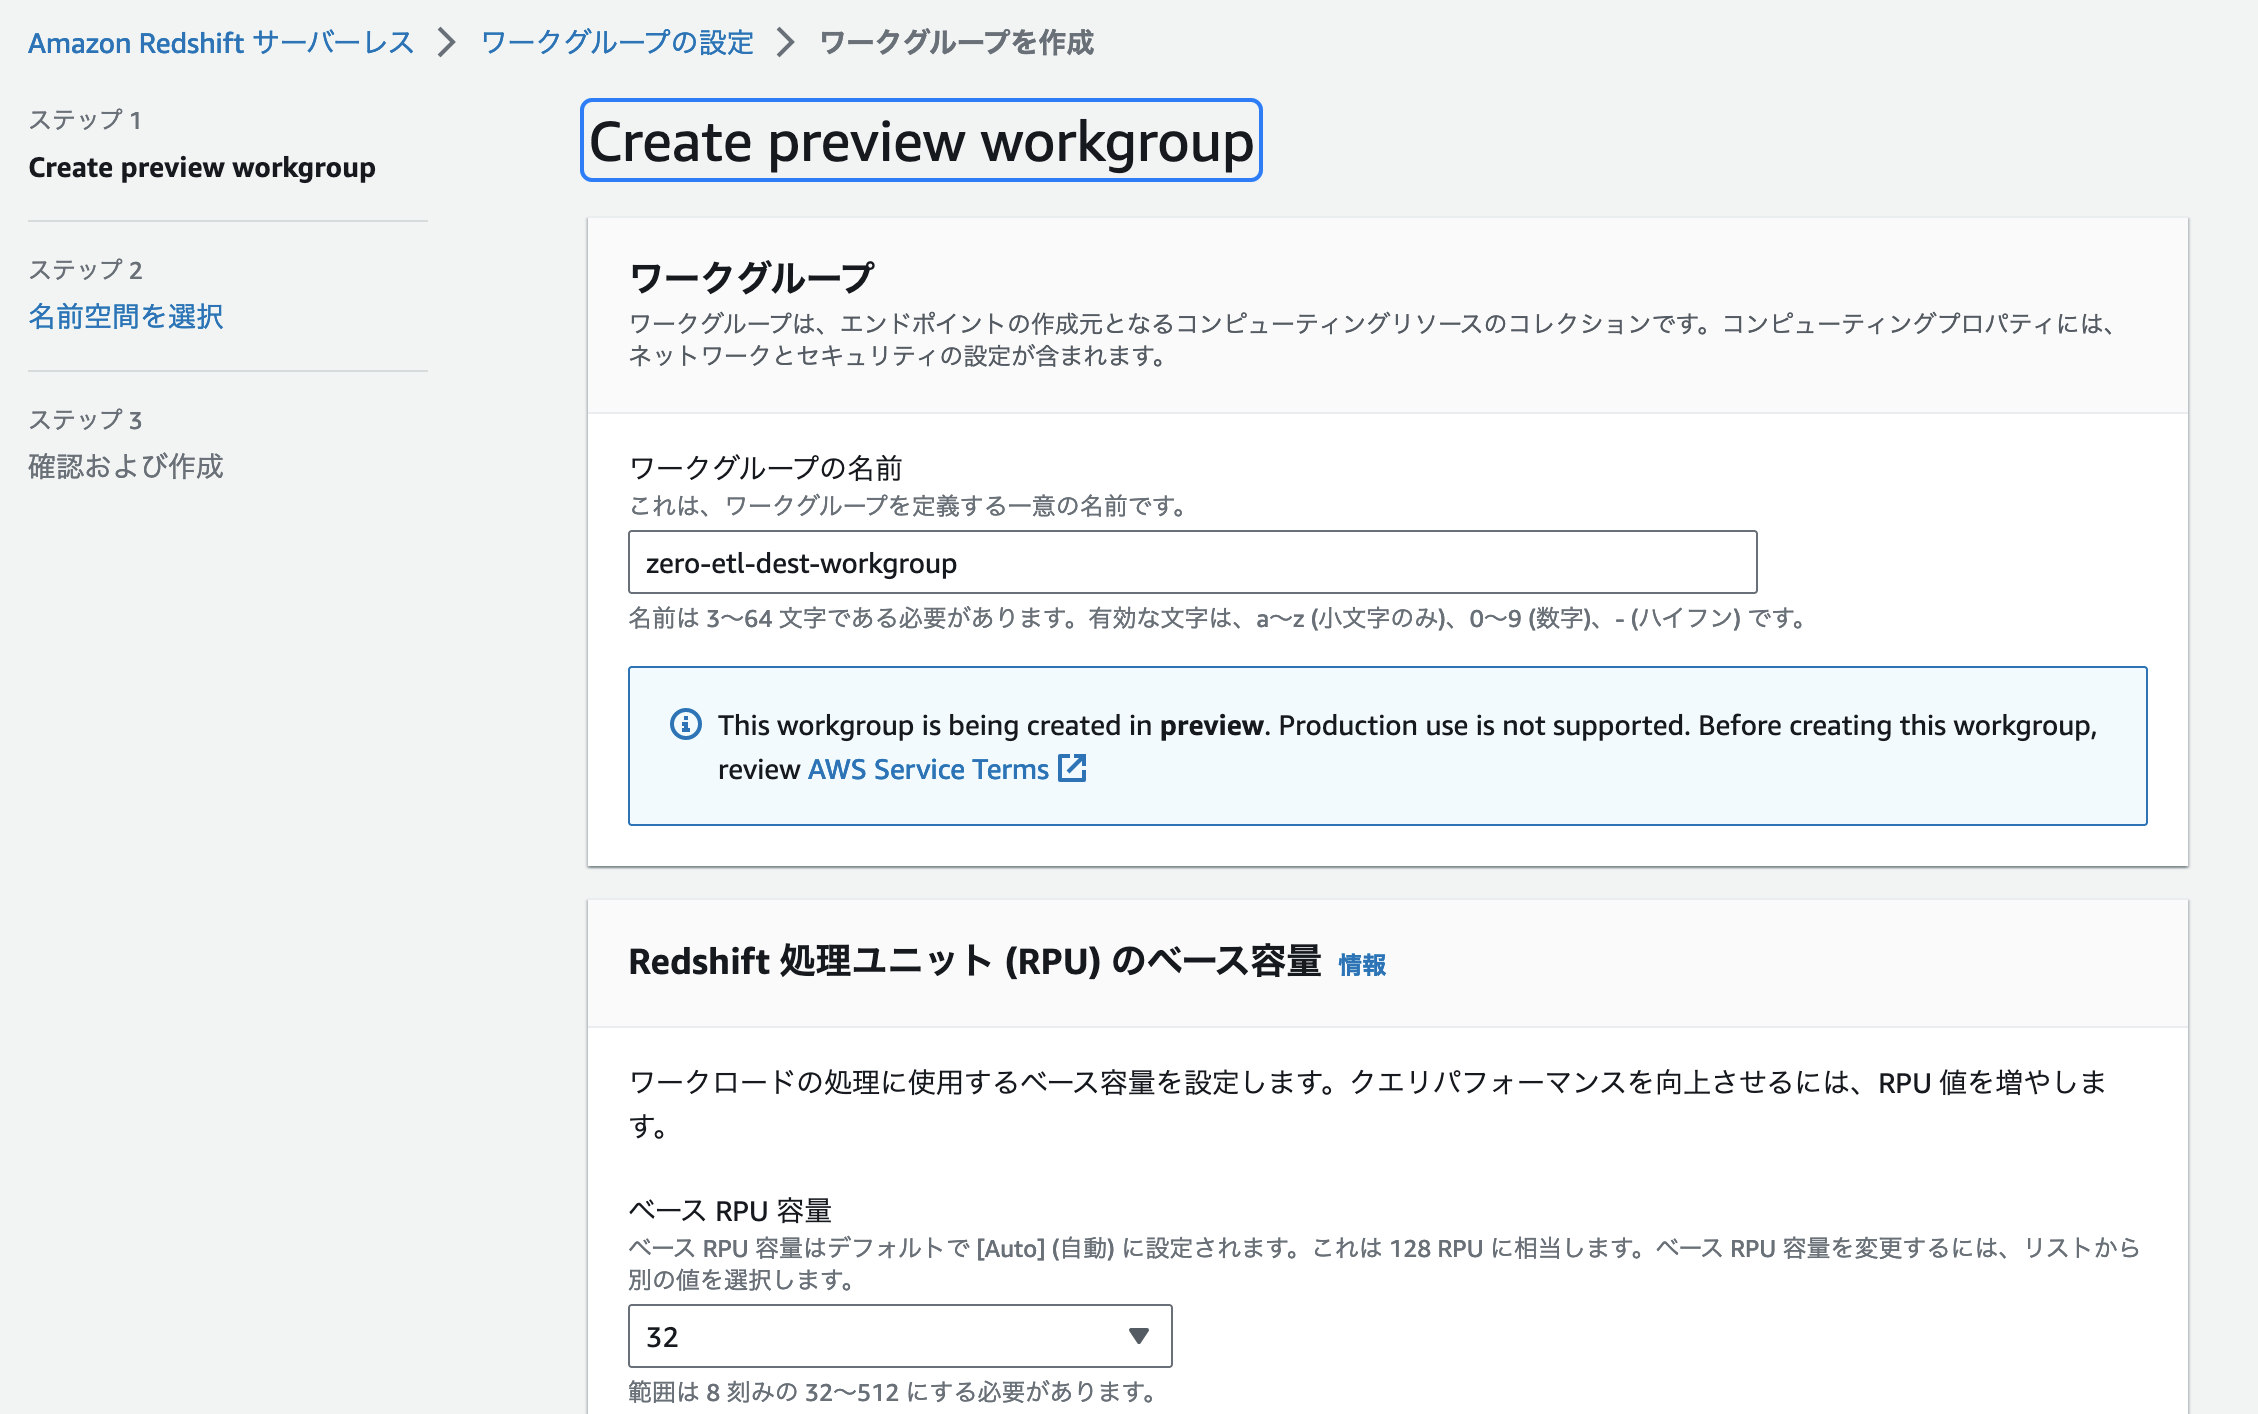
Zero-ETL の Public Preview 期間中は Redshift サーバーレスのページ (サーバーレスダッシュボード) の上部にある「Create Preview Workgroup」というボタンからワークグループの作成を行うことで、Amazon Redshift Serverless で Zero-ETL 統合を試すことが可能です。
「Create Preview Workgroup」をクリックすると通常のワークグループと同様にワークグループの名前やネットワークの設定を行うこととなります。
ワークグループの名前は任意の名前、ベース RPU 容量は最小の「32」、VPC やセキュリティグループは「Amazon Aurora MySQL データベースと同じ内容」を設定し、「次へ」をクリックします。
名前空間の設定
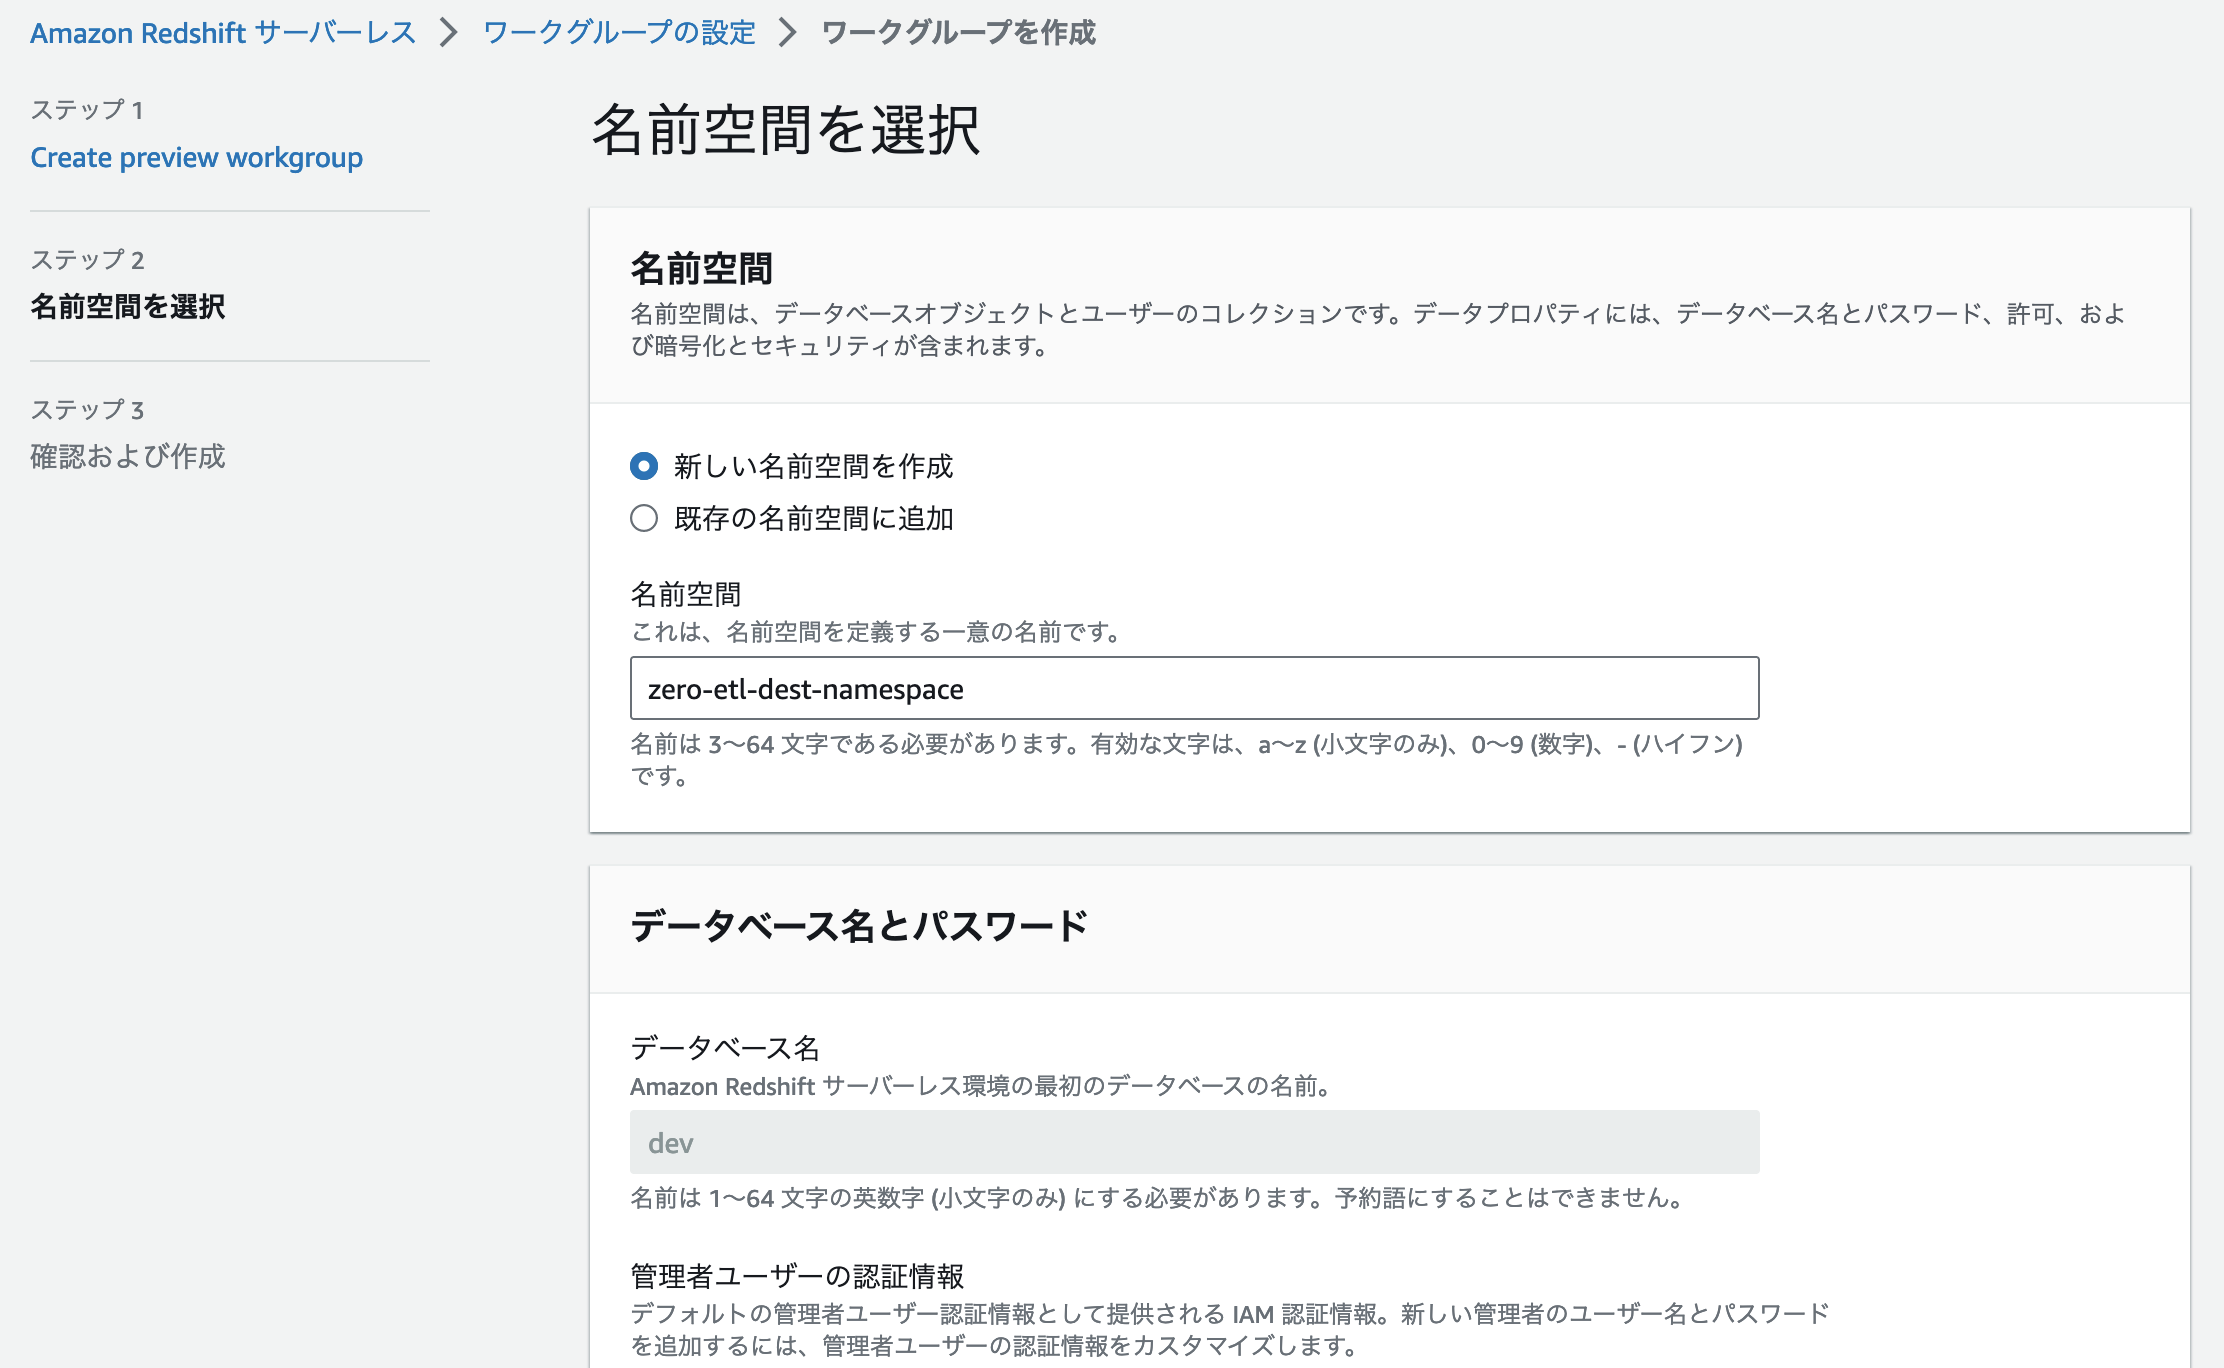
名前空間 (namespace) も「新しい名前空間を作成」で任意の名前空間を設定します。
IAM ロールの設定
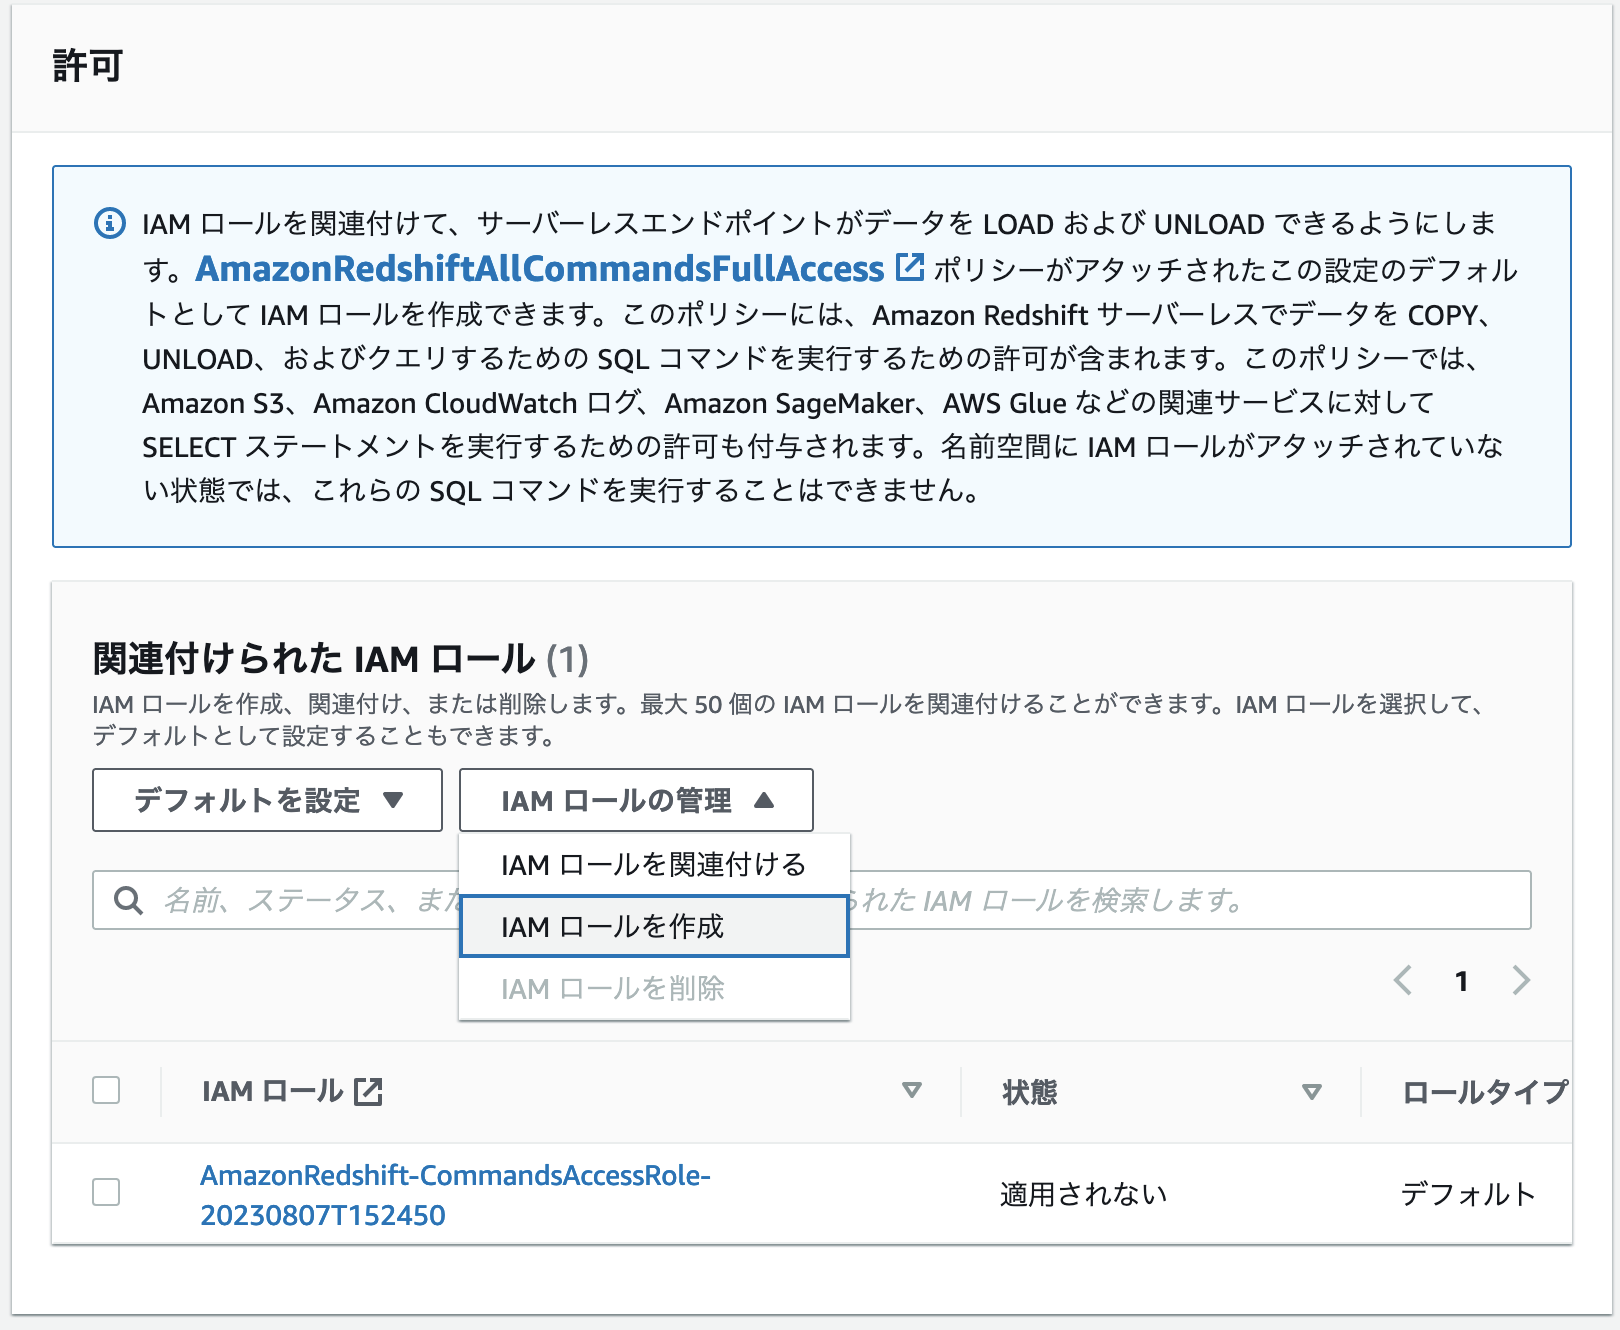
IAM ロールについては特に指定はないため、特に指定がない場合はデフォルトの IAM ロールを作成してください。
設定の確認と作成
暗号化やセキュリティについても特に指定はありません。
これらの設定が完了したら「次へ」をクリックし、確認画面で設定項目に問題ないことを確認します。
その後「作成」をクリックして、名前空間とワークグループを作成します。
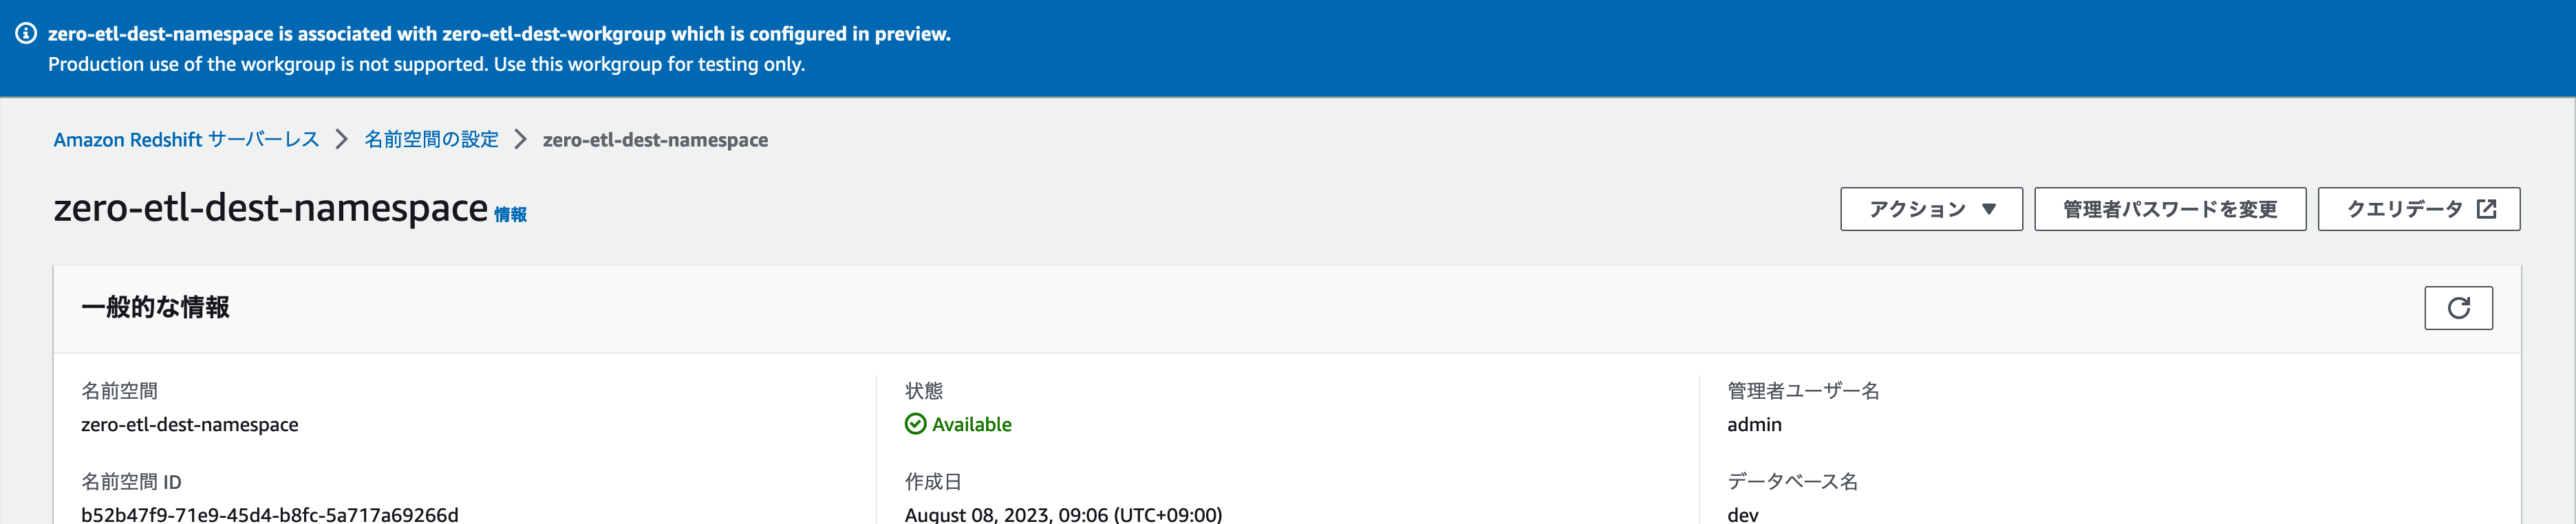
作成が完了したら作成した名前空間を開きます。
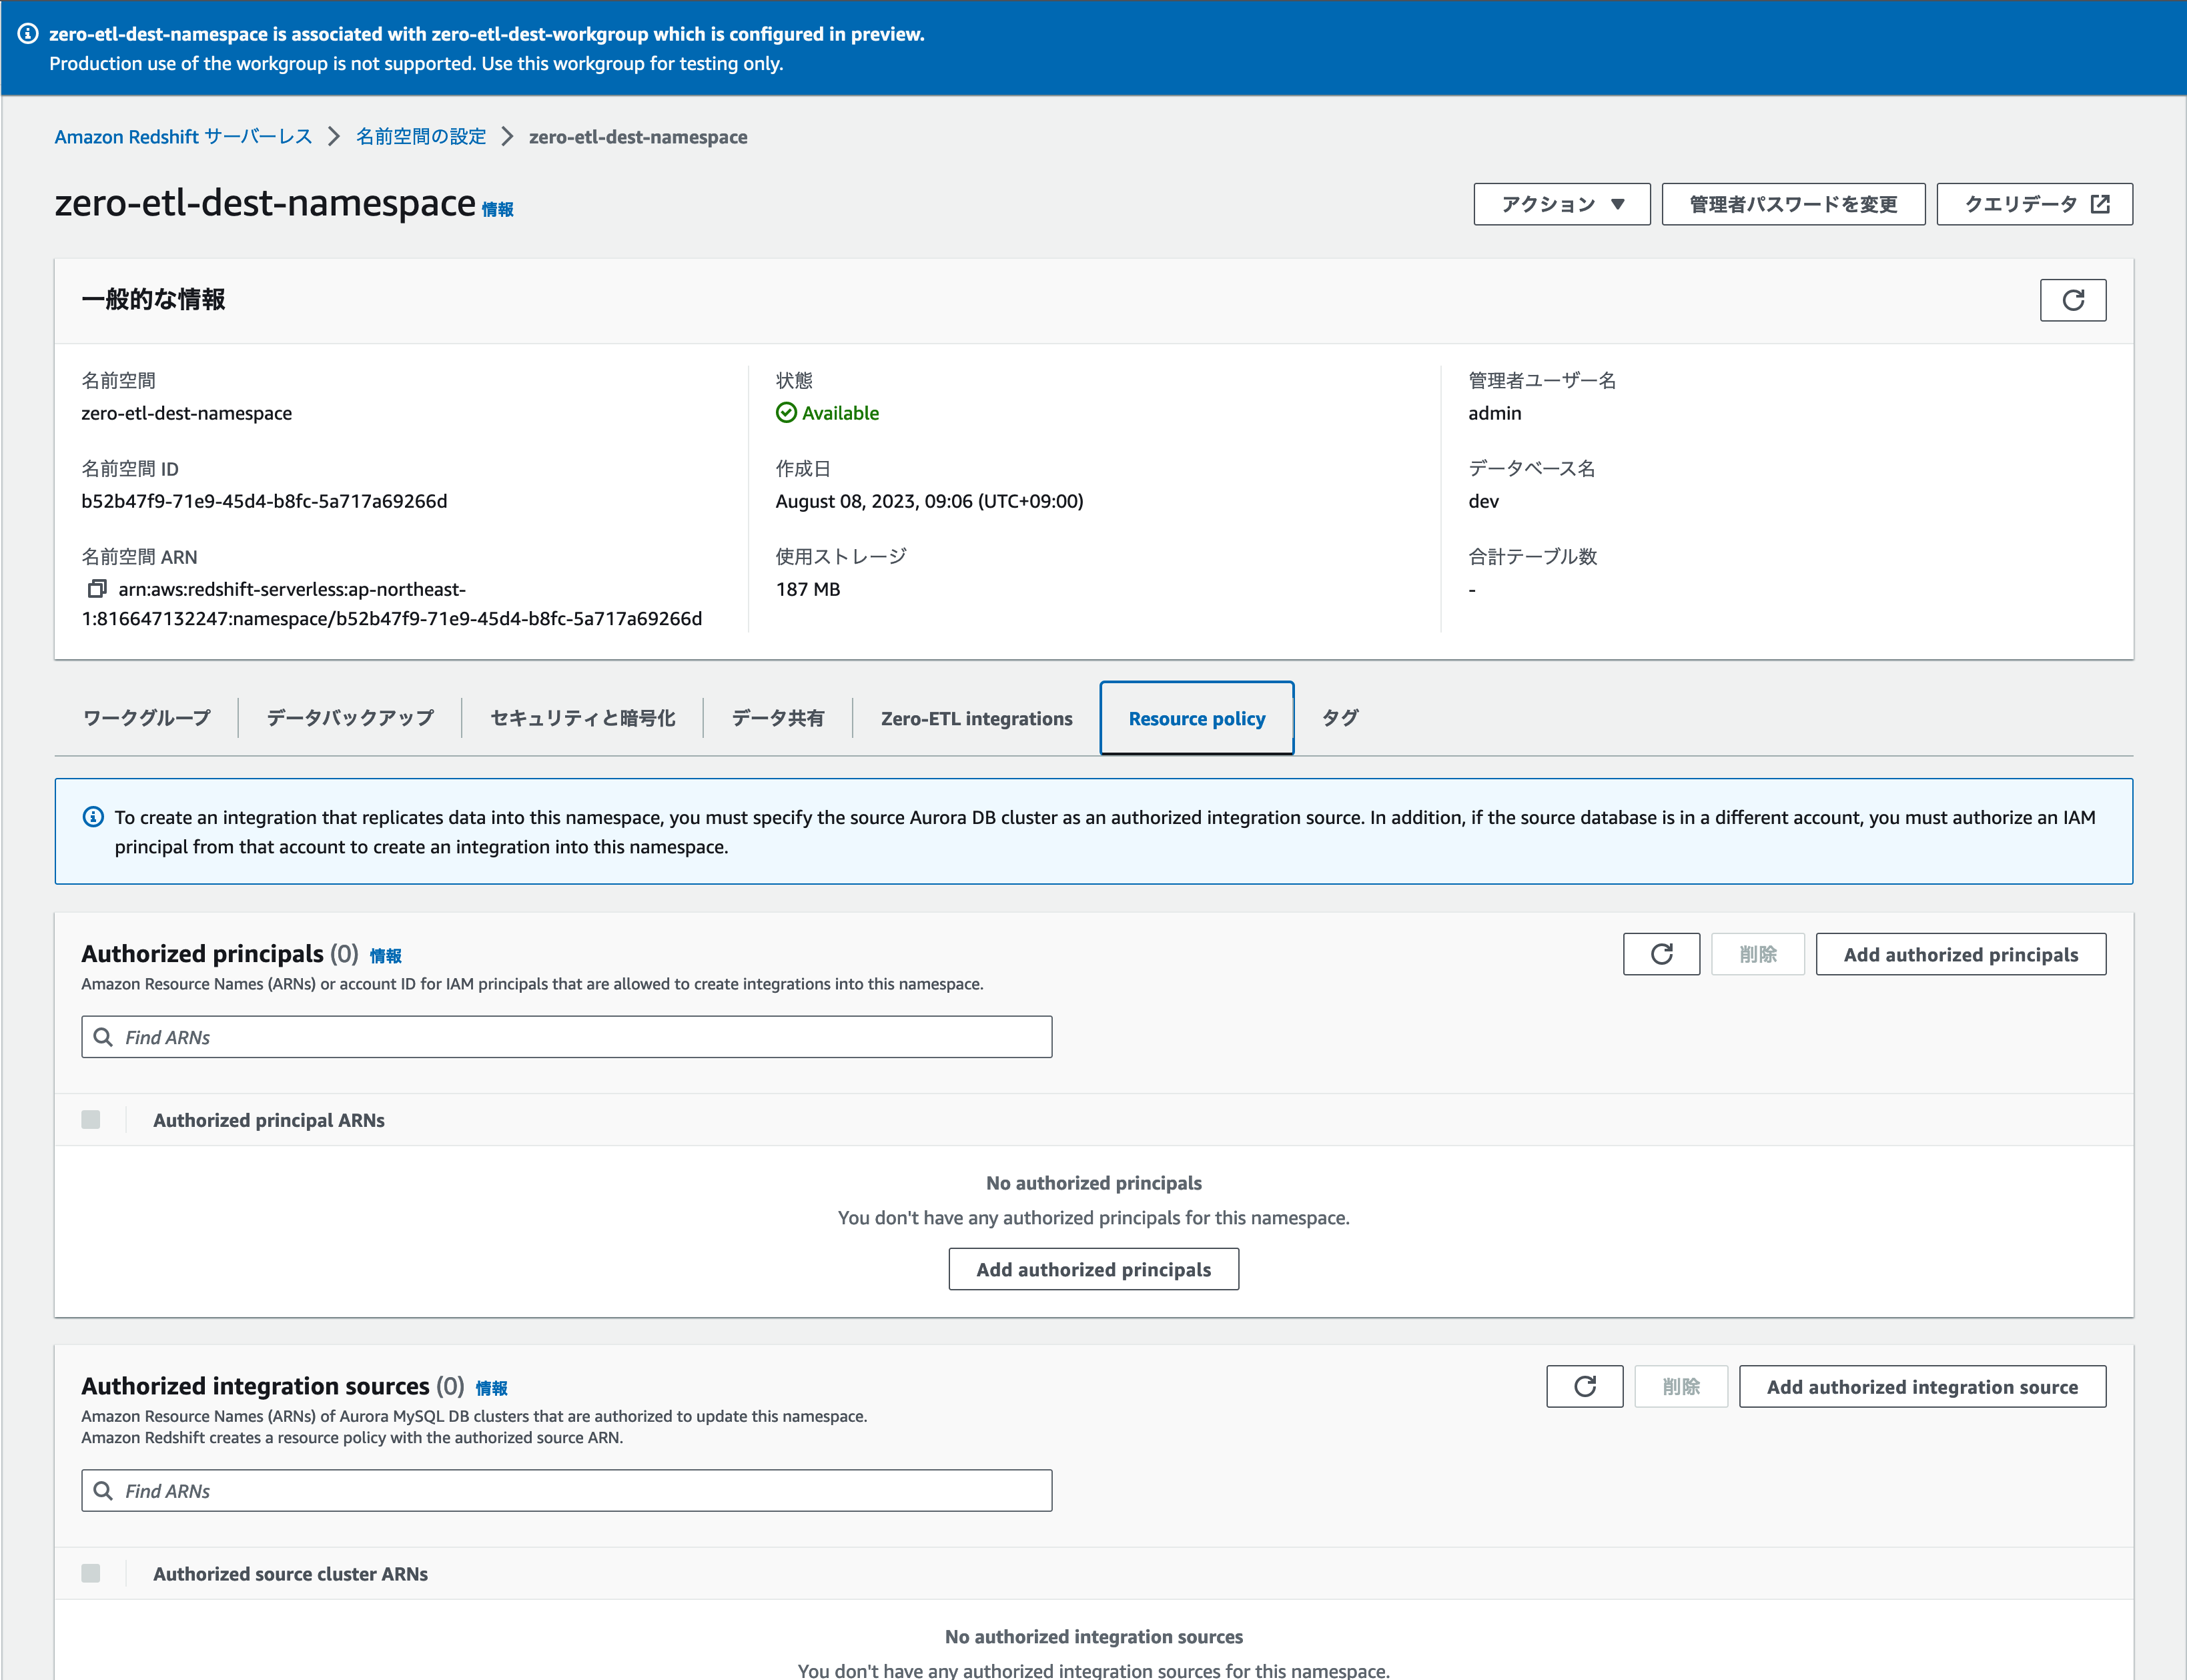
Resource Policy の設定
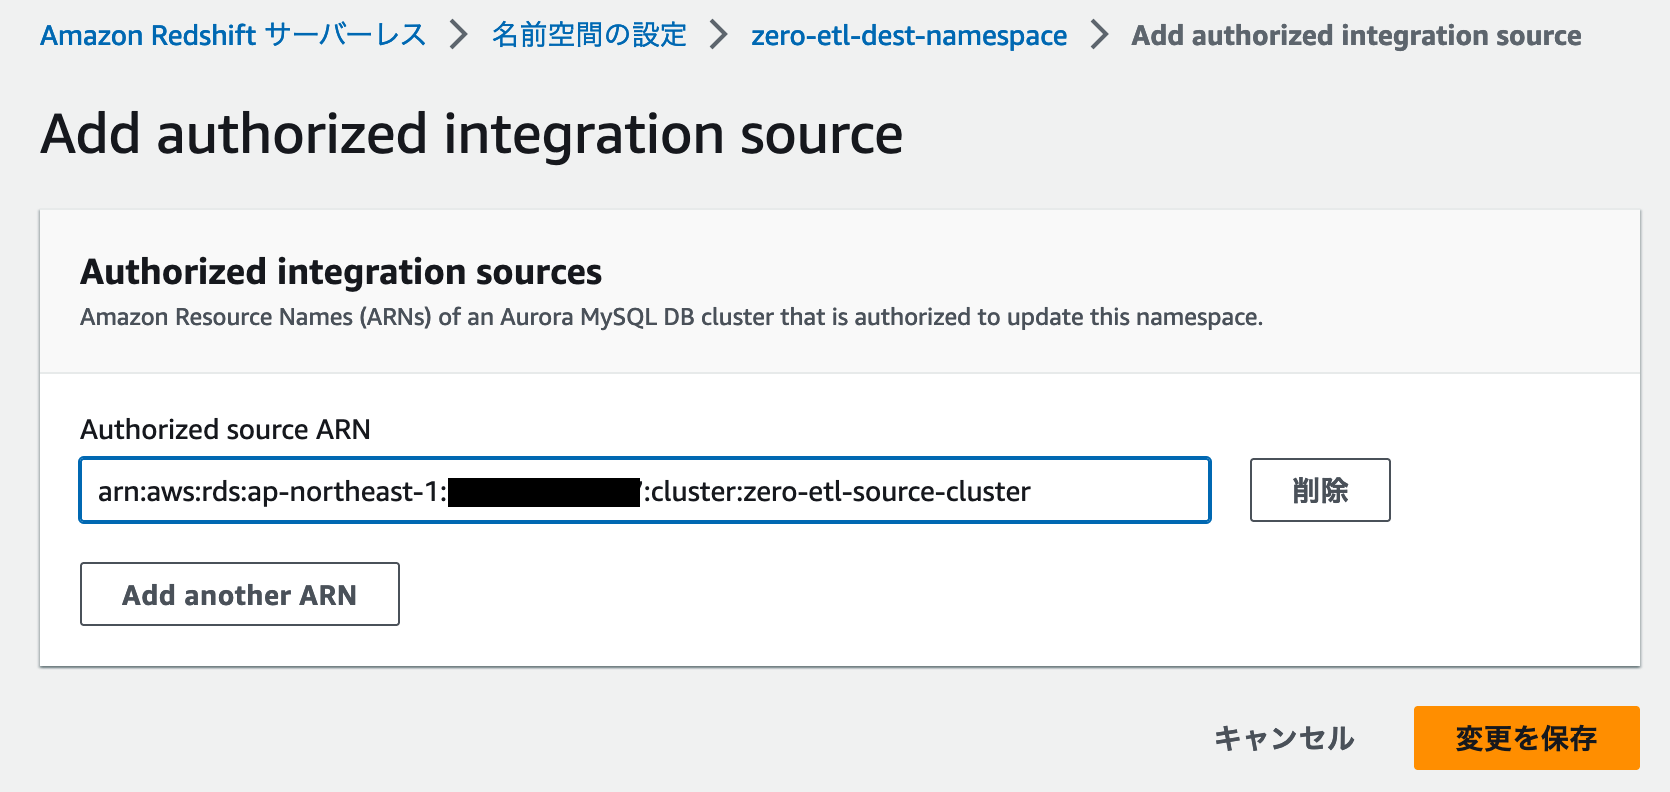
Resource Policy というタブをクリックすると、「Authorized Integration sources」というメニューがあります。
Authrized Integration sources にある「Add authorized integration source」というボタンをクリックし、先ほど作成した Amazon Aurora MySQL DB クラスターの ARN を指定します。
ARN を指定したら「変更を保存」をクリックします。
AWS CLI を実行
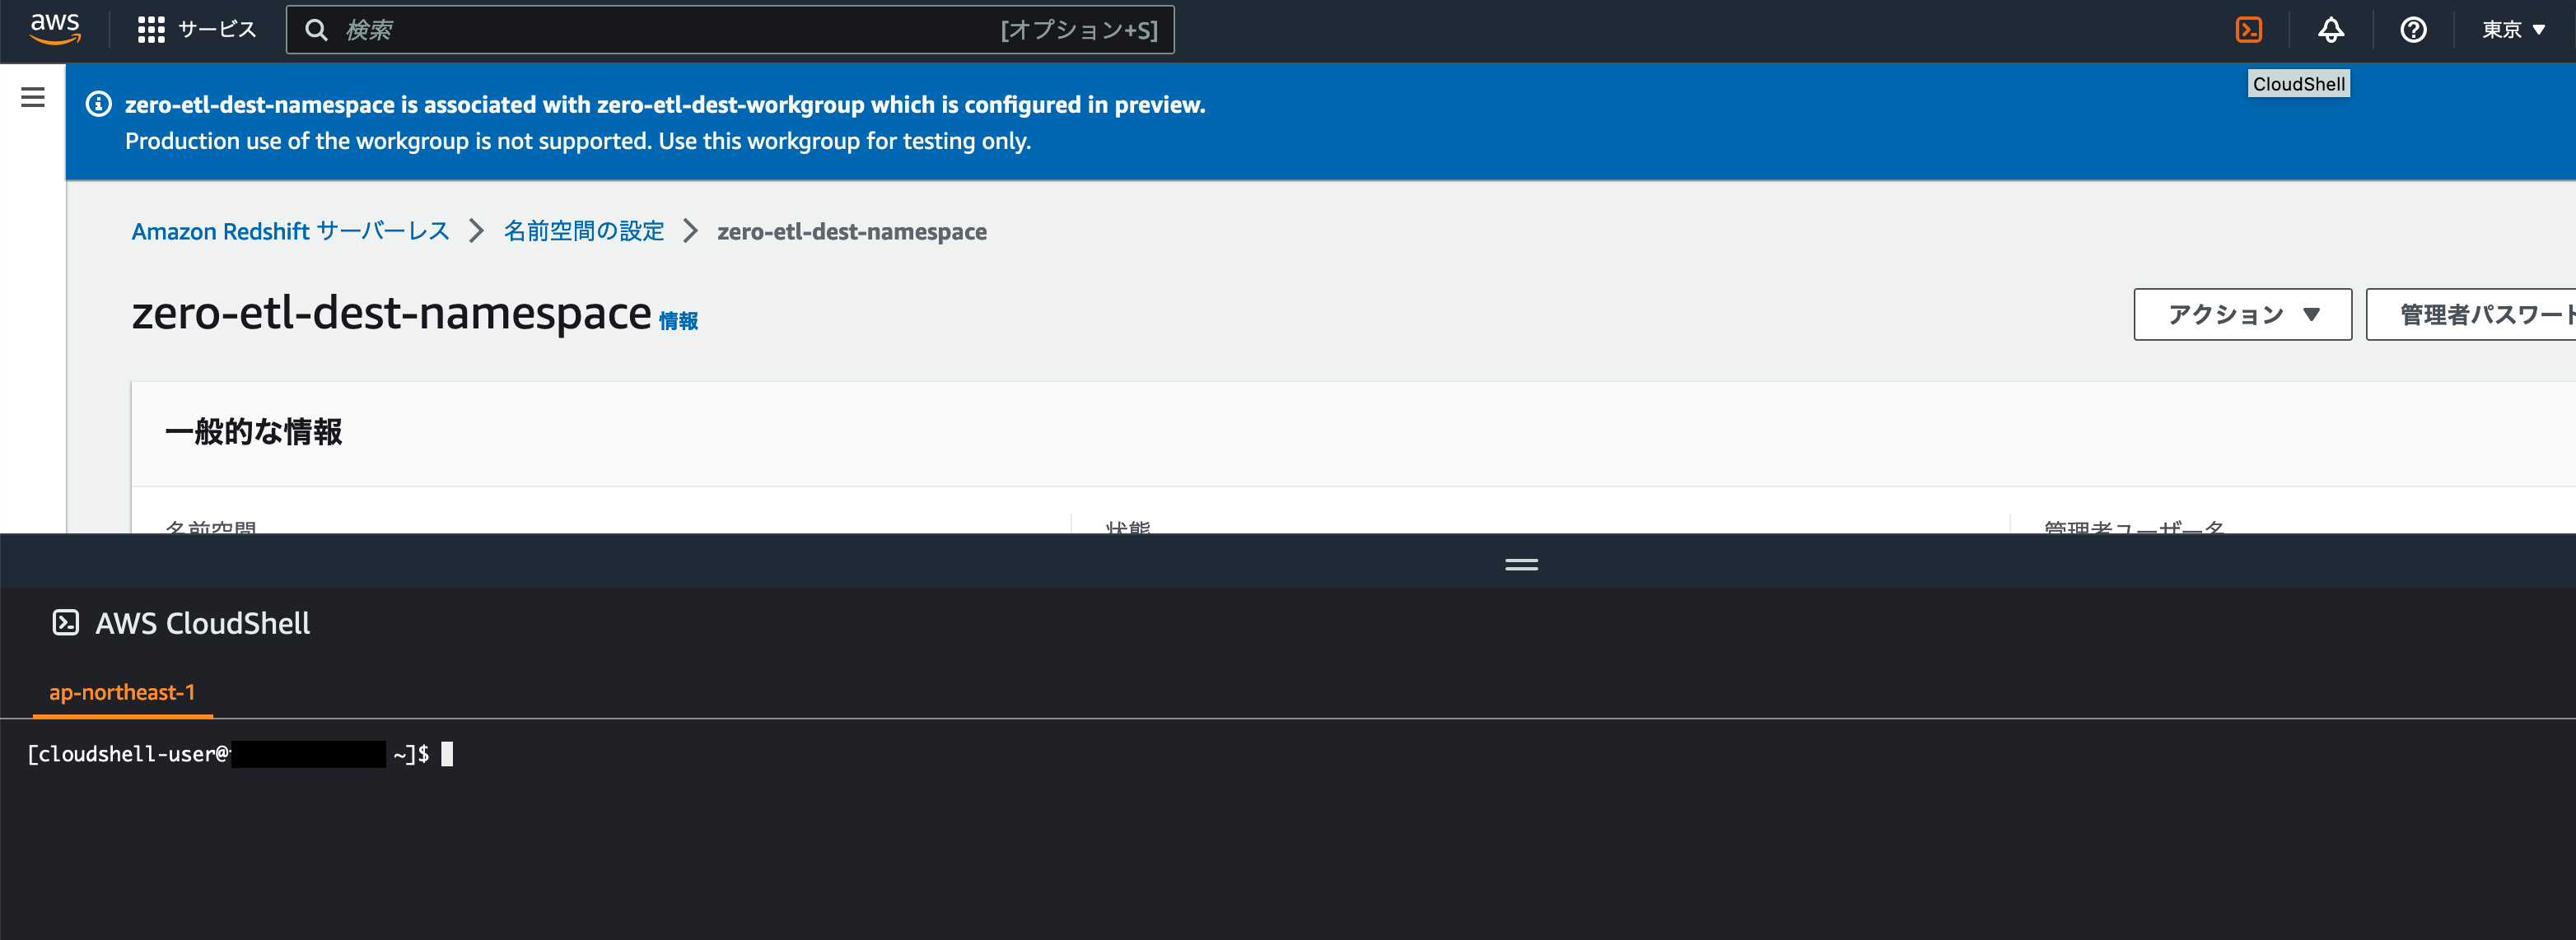
次に以下の AWS CLI を実行します。(ワークグループ名やリージョンは使用中のものを適用してください。)
AWS コンソールのヘッダーにある CloudShell のアイコンをクリックすることで CloudShell を開くことができ、AWS CLI コマンドをすぐに実行できます。
aws redshift-serverless update-workgroup --workgroup-name zero-etl-dest-workgroup --config-parameters parameterKey=enable_case_sensitive_identifier,parameterValue=true --region {region}上記 AWS CLI のコマンドが正常に実行できたら Amazon Redshift Serverless の設定は完了となります。
3. IAM ポリシーの作成
Zero-ETL 統合を使用するためには専用の IAM ポリシーを作成する必要があります。
AWS コンソールから IAM コンソール を開き、以下の内容で新規ポリシーを作成します。
- {region} : 使用リージョンのコード
- {account-id} : ご利用中の AWS アカウント ID
- {source-cluster} : 先ほど作成した Amazon Aurora MySQL クラスターのクラスター識別子
- {namespace-uuid} : 先ほど作成した Amazon Redshift Serverless の名前空間 ID
新規ポリシーを作成
以下の JSON をポリシーエディタに貼り付けます。
{
    "Version": "2012-10-17",
    "Statement": [{
        "Effect": "Allow",
        "Action": [
            "rds:CreateIntegration"
        ],
        "Resource": [
            "arn:aws:rds:{region}:{account-id}:cluster:{source-cluster}",
            "arn:aws:rds:{region}:{account-id}:integration:*"
        ]
    },
    {
        "Effect": "Allow",
        "Action": [
            "rds:DescribeIntegration"
        ],
        "Resource": ["*"]
    },
    {
        "Effect": "Allow",
        "Action": [
            "rds:DeleteIntegration"
        ],
        "Resource": [
            "arn:aws:rds:{region}:{account-id}:integration:*"
        ]
    },
    {
        "Effect": "Allow",
        "Action": [
            "redshift:CreateInboundIntegration"
        ],
        "Resource": [
            "arn:aws:redshift-serverless:{region}:{account-id}:namespace/{namespace-uuid}"
        ]
    }]
}
ポリシーのアタッチ
IAM ポリシーが作成されたら現在利用している IAM ロール / ユーザーにアタッチします。
4. Zero-ETL 統合の作成
ゼロ ETL の統合開始
ここまでの手順で Zero-ETL 統合の作成に必要な準備ができましたので、Zero-ETL 統合を作成します。
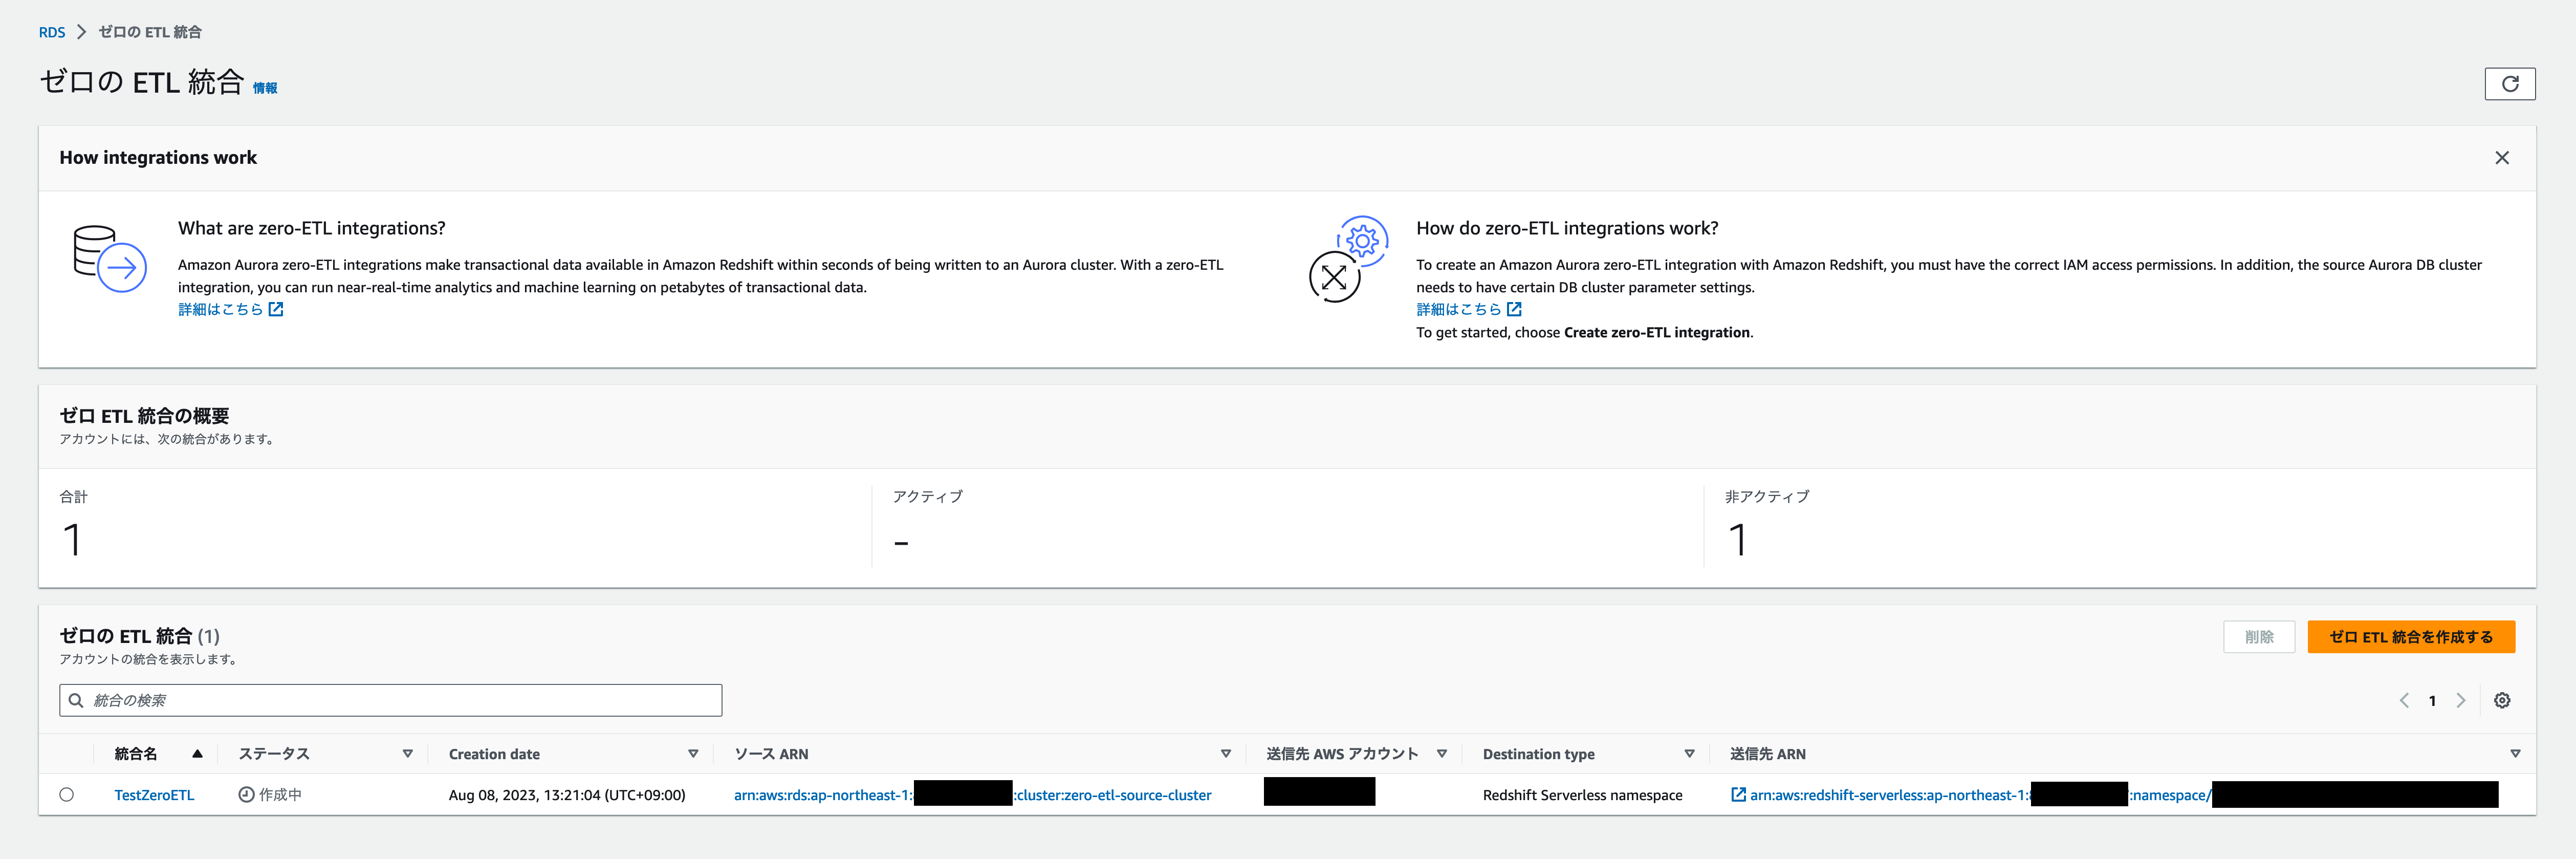
Amazon RDS コンソール のサイドメニューから「ゼロの ETL 統合」というページを開きます。
ゼロ ETL の統合の作成
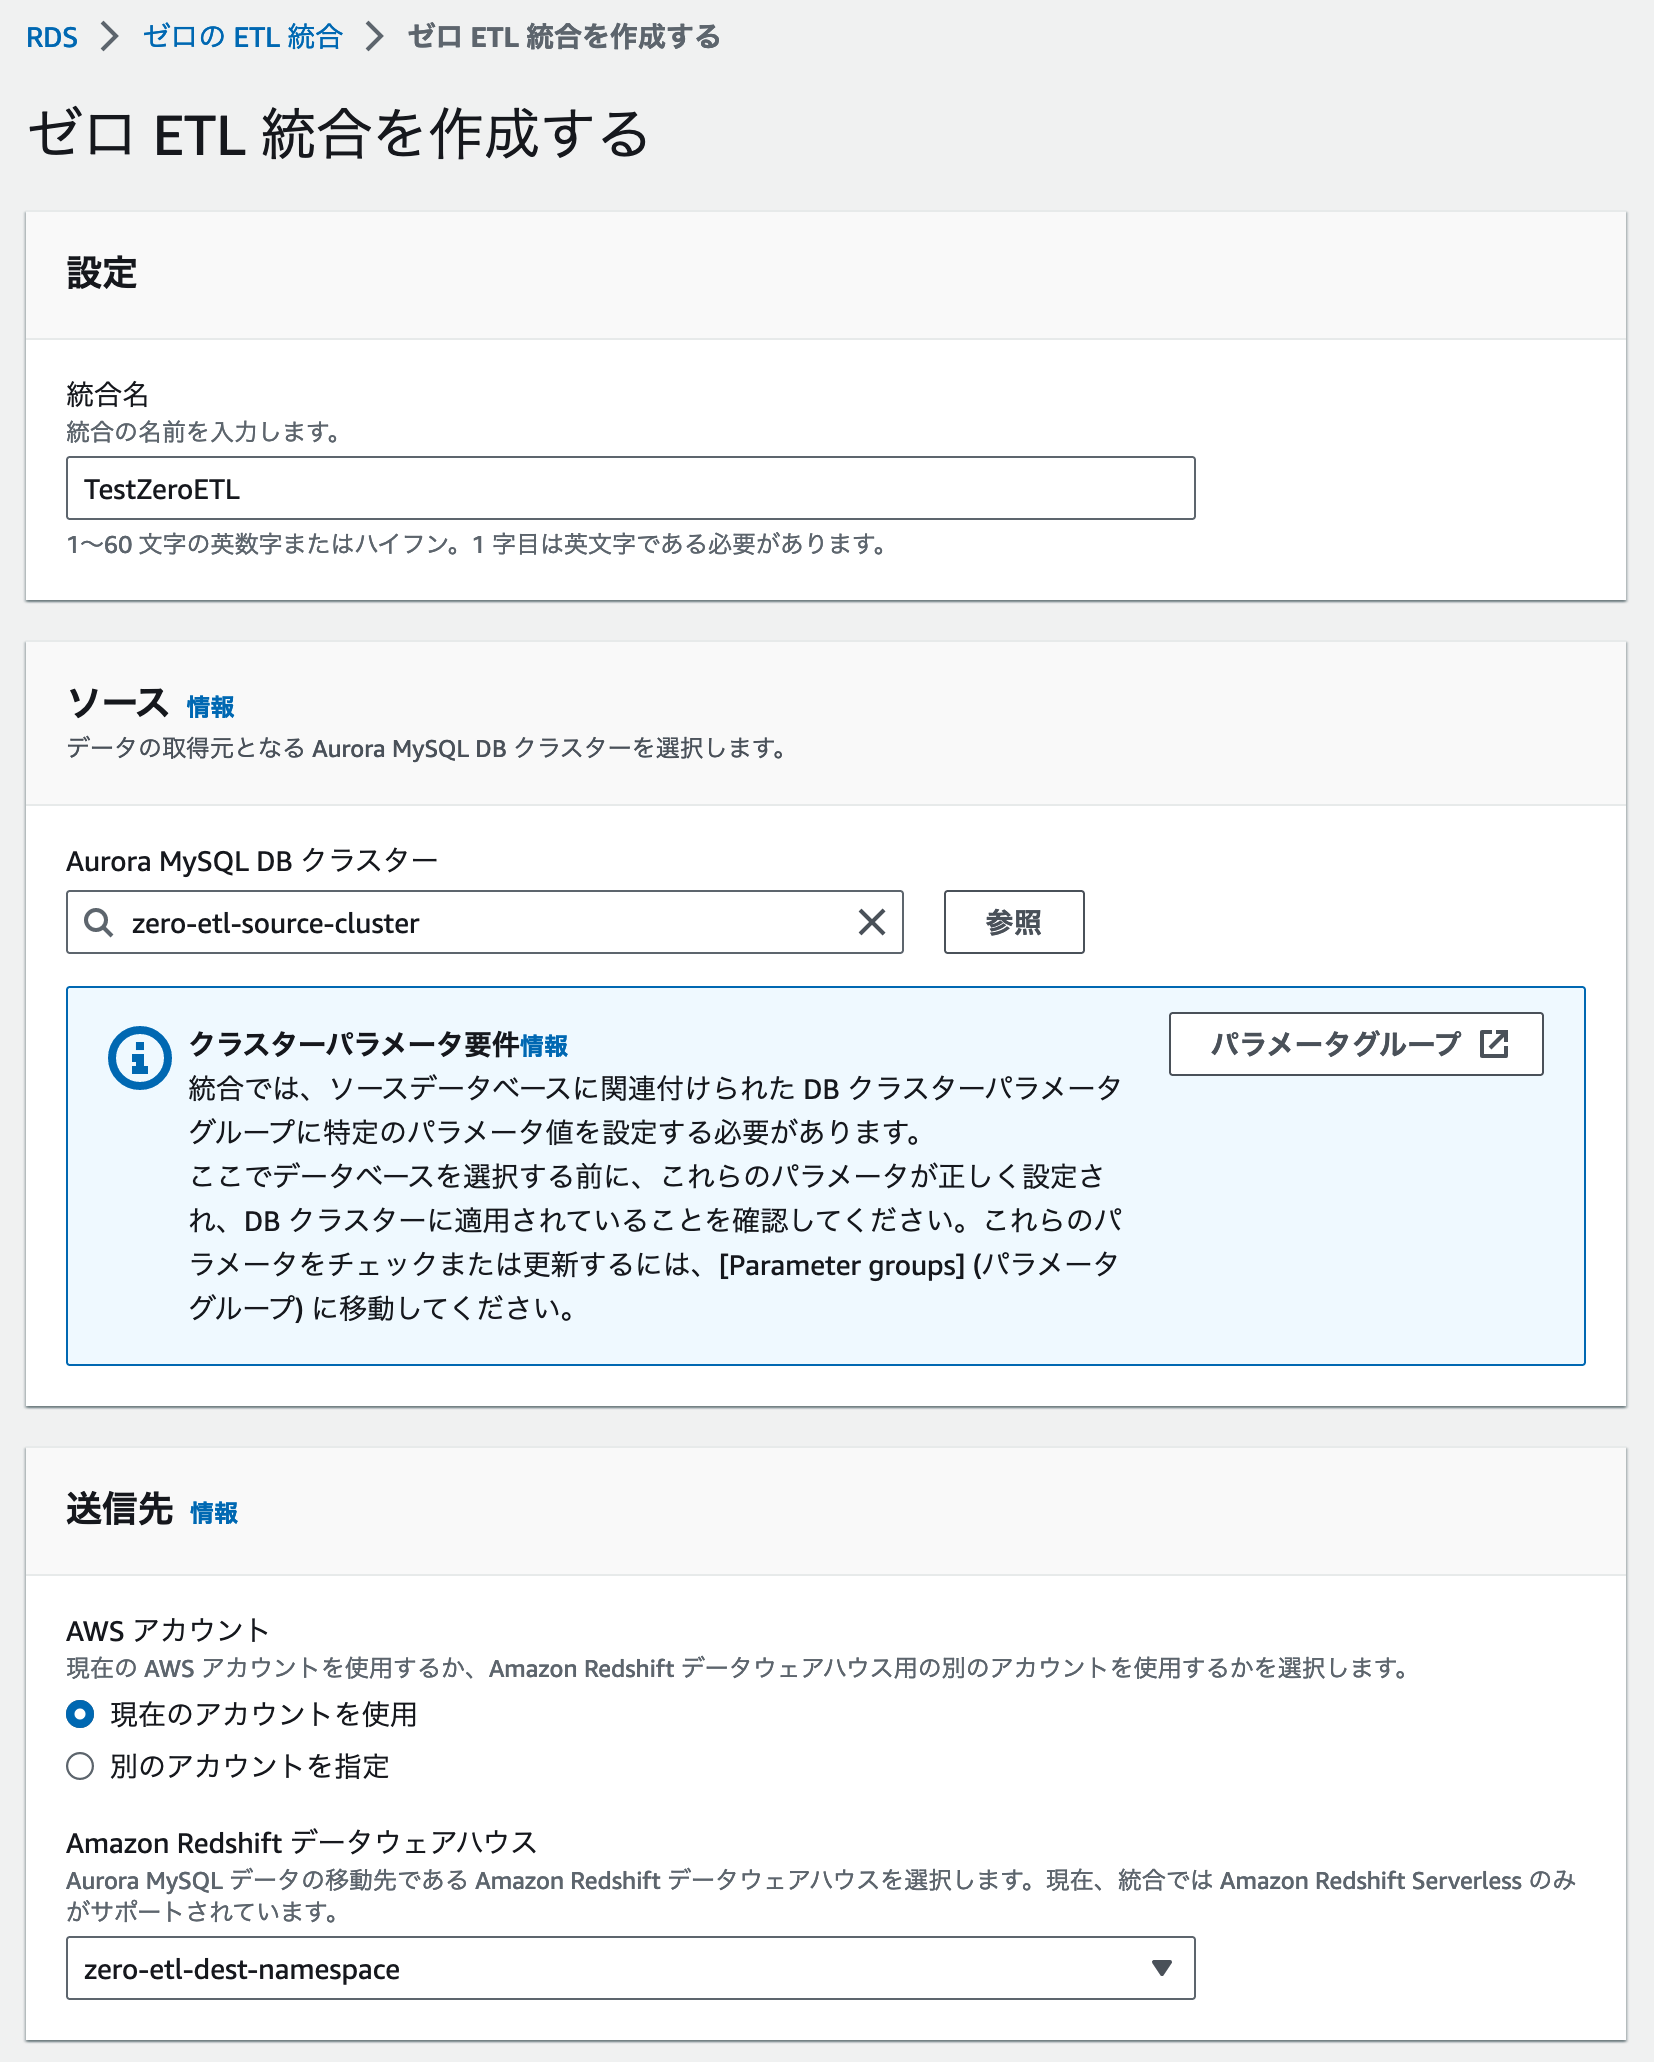
ページ中央にある「ゼロ ETL の統合の作成」というボタンをクリックし、任意の Zero-ETL 統合名、ソースとして先ほど作成した Aurora MySQL DB クラスター、送信先として先ほど作成した Amazon Redshift Serverless の名前空間を設定します。
ゼロ ETL 統合作成の確認
これらの入力が完了したら「ゼロ ETL 統合を作成する」ボタンをクリックします。
するとこのようにゼロ ETL 統合のステータスが作成中となります。
データベースを作成
ゼロ ETL 統合の作成が完了し、ステータスが Active に変わったら Amazon Redshift Serverless でデータの送信先となるデータベースを作成します。
クエリの実行
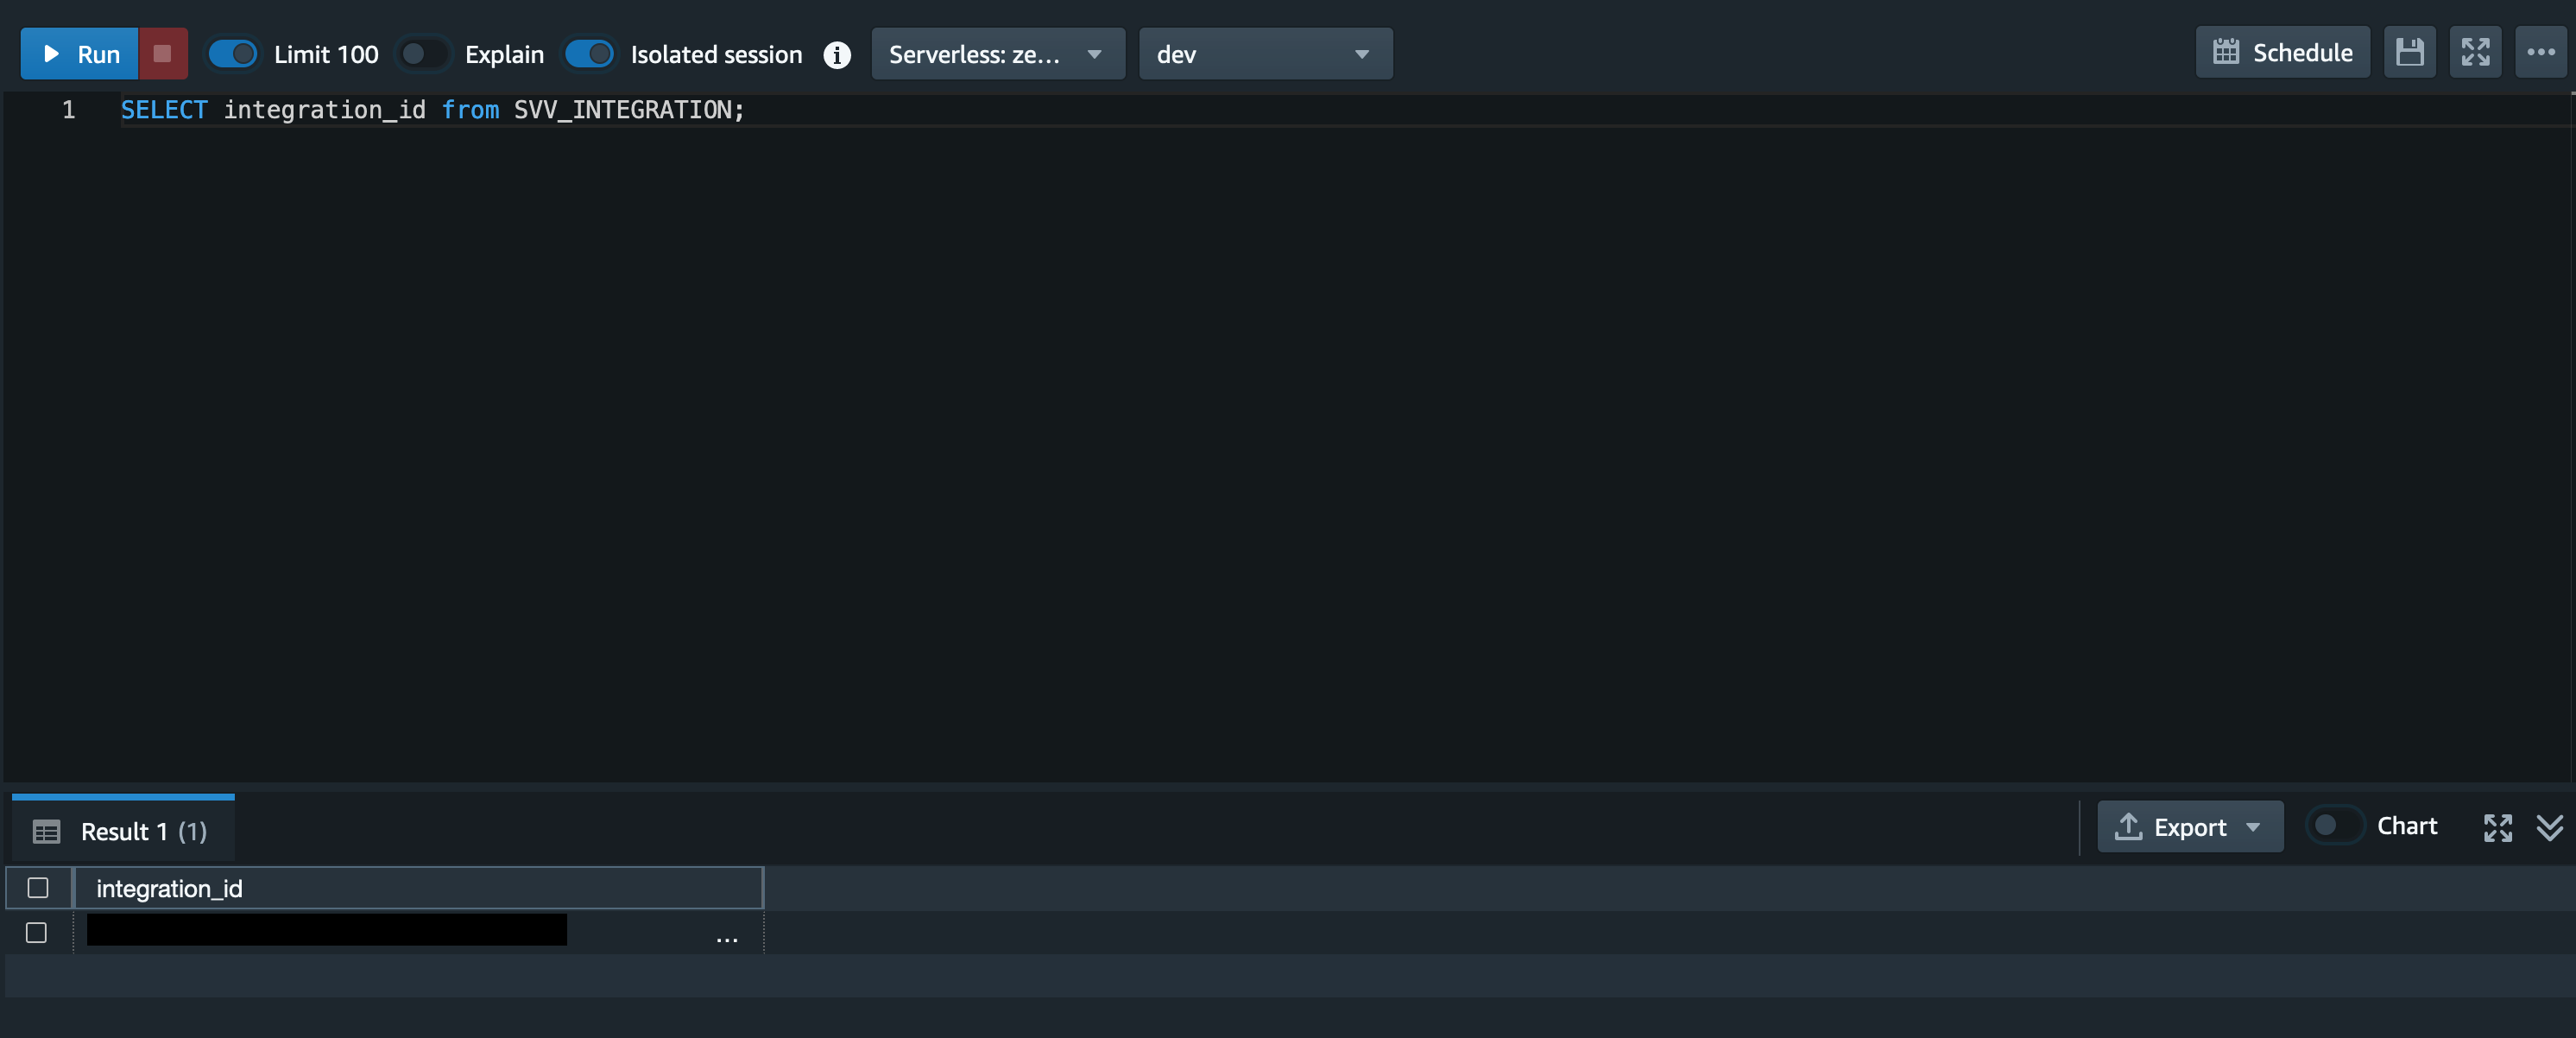
先ほど作成した Amazon Redshift Serverless の名前空間を開き、「クエリデータ」をクリックします。
Redshift Query Editor v2 が開けたら、以下のクエリを実行し、integration_id を取得します。
SELECT integration_id from SVV_INTEGRATION;クエリを実行
取得した integration_id を元に以下のクエリを実行します。
-
{database_name} : 任意のデータベース名
-
{integration_id} : 先ほど取得した integration_id
CREATE DATABASE {database_name} FROM INTEGRATION '{integration_id}';準備完了
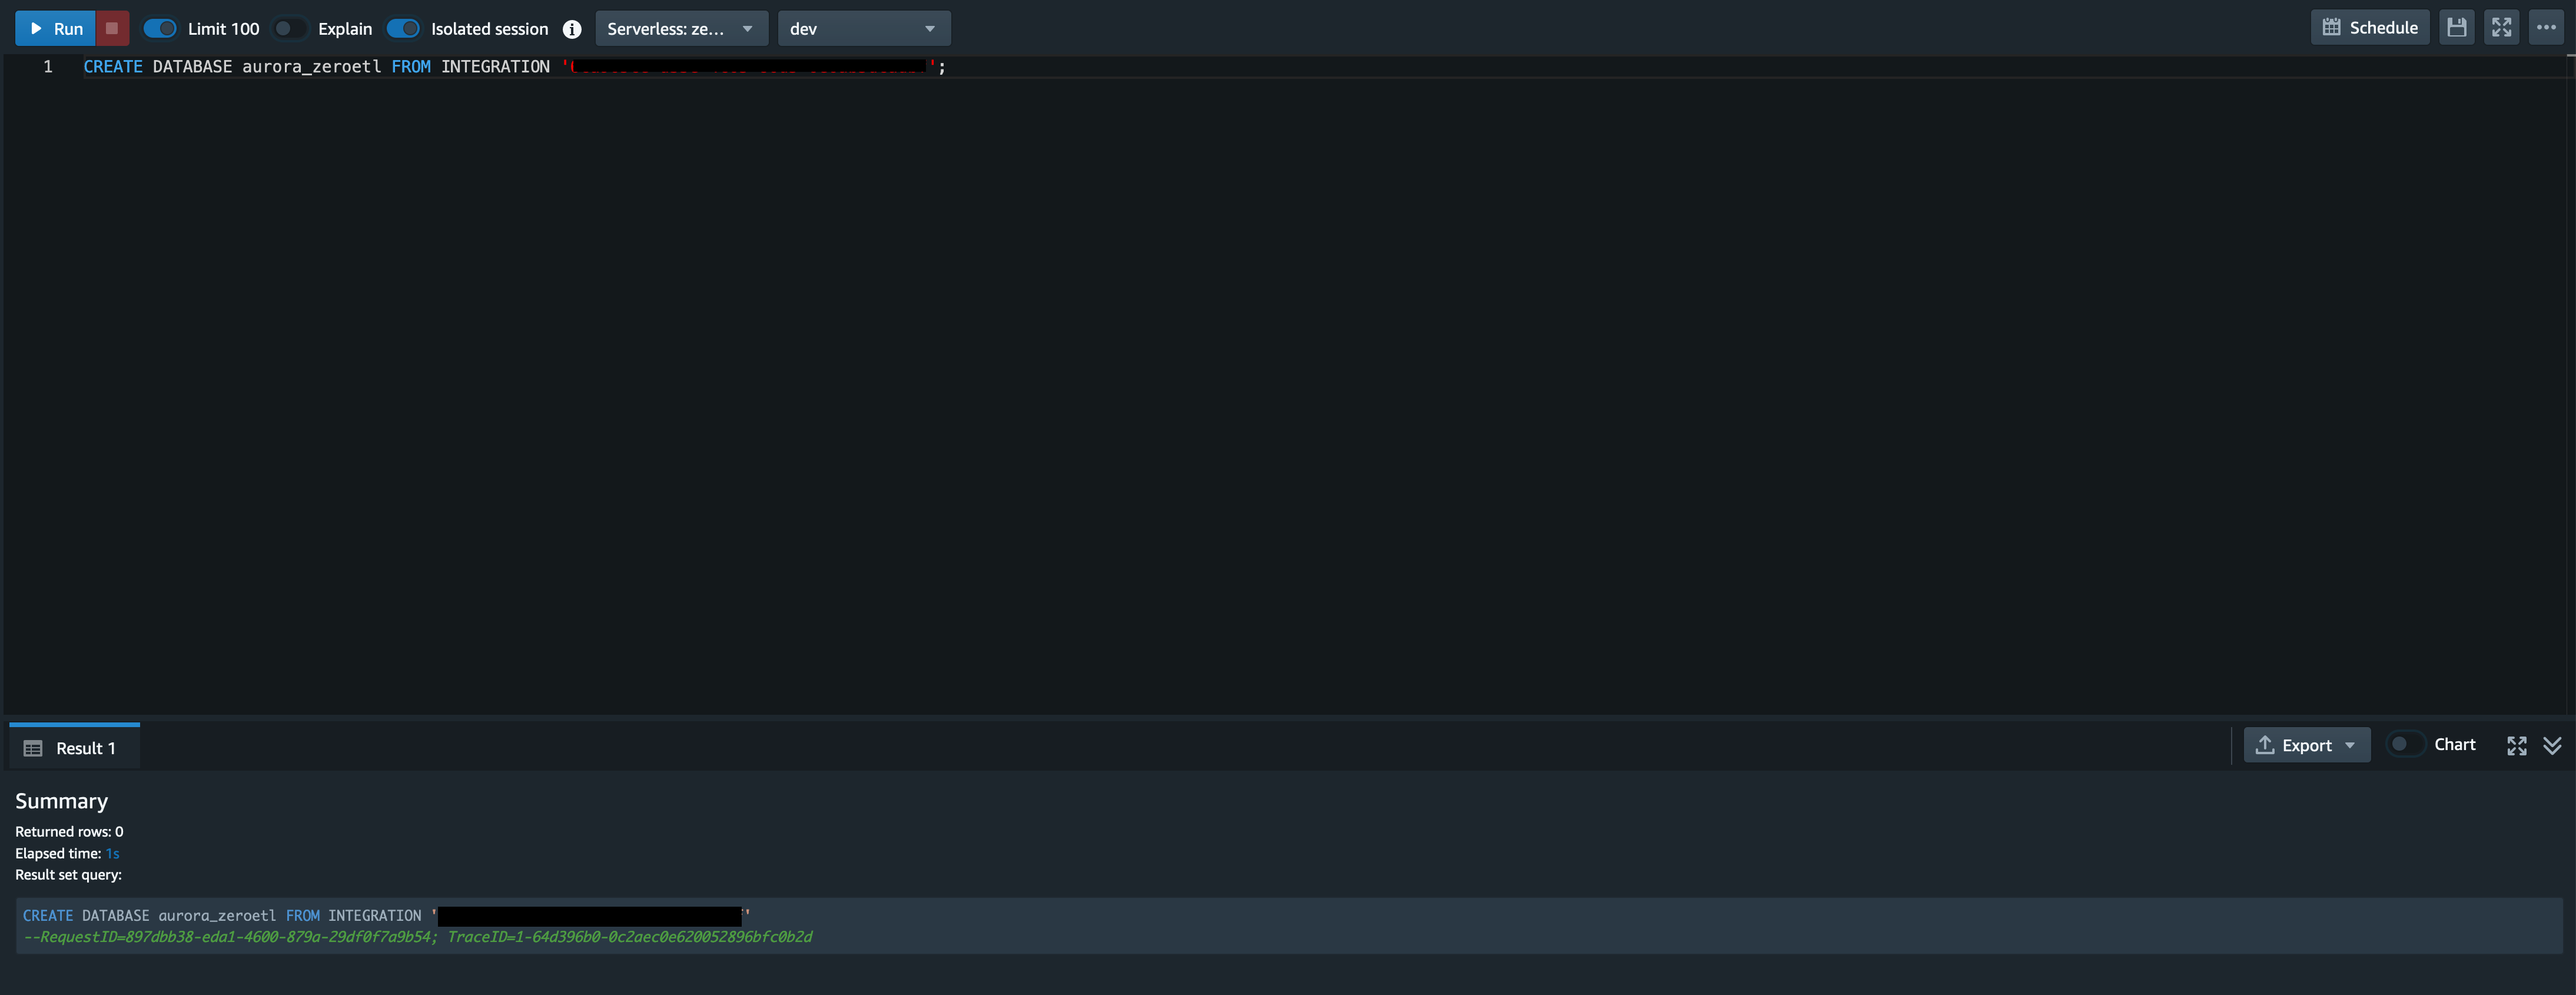
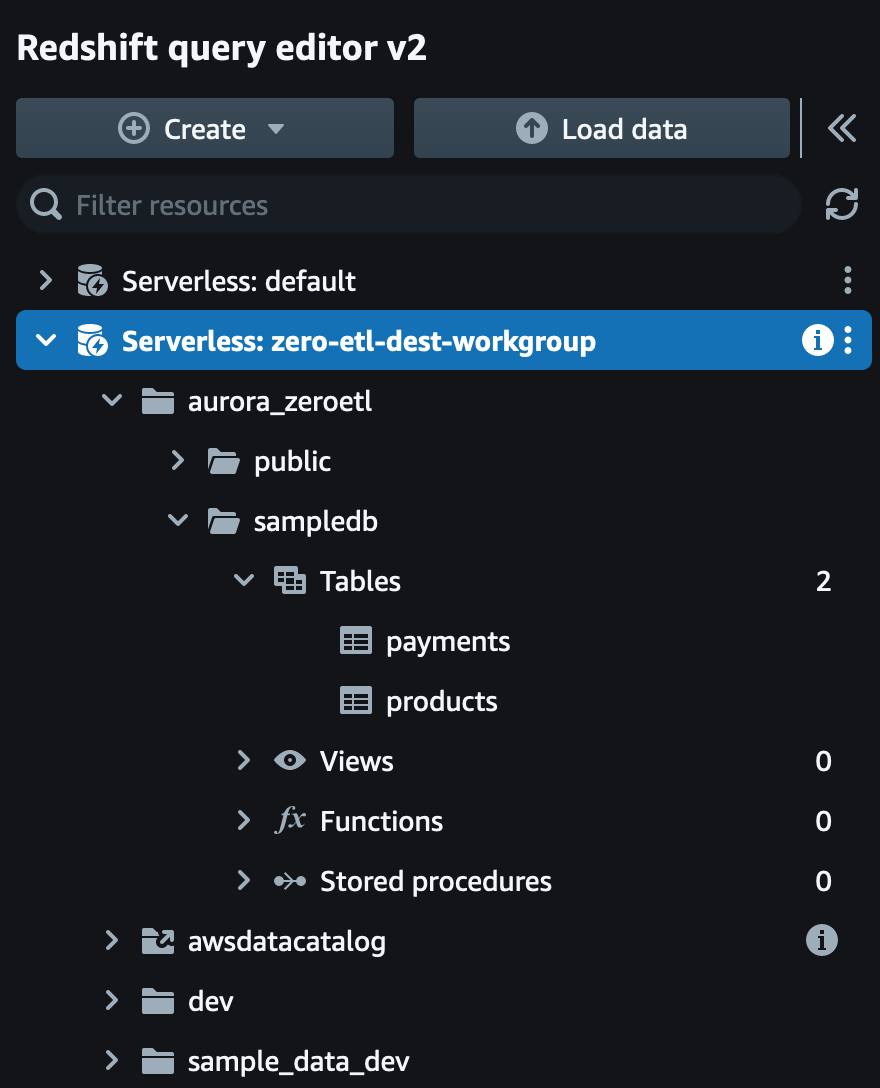
今回は{database_name}にaurora_zeroetlと入力しています。
データベースが正常に作成できたら、Zero-ETL 統合の準備は完了です。
5. サンプルデータの追加と Amazon Redshift での分析
以下の SQL とスクリプトを実行してゲーム内アイテムの売上データを模したサンプルデータをデータベースに追加します。
データベースへの接続
データベースにアクセスできたら以下の SQL を実行し、products テーブルと payments テーブルを作成します。
CREATE DATABASE sampledb;

CREATE TABLE sampledb.payments (
    id int AUTO_INCREMENT NOT NULL PRIMARY KEY,
    order_id varchar(255),
    platform_product_id varchar(255),
    purchase_time int,
    purchase_state int
);

CREATE TABLE sampledb.products (
    id int AUTO_INCREMENT NOT NULL PRIMARY KEY,
    platform_product_id varchar(255),
    price int
);
サンプルデータについて
今回のサンプルでは AppStore や GooglePlay、Steam などのゲーム配信プラットフォームにおける有料アイテムの購入データを模したデータを payments テーブルに保存し、それらの有料アイテムの価格情報を products テーブルに保存します。
PyMySQL のインストール
テーブルの作成が完了したら、以下のコマンドでスクリプトの実行に必要な PyMySQL をインストールします。
pip install PyMySQLサンプルデータの追加
PyMySQL がインストールできたら、スクリプトを実行しサンプルデータを追加します。
import pymysql.cursors
import random
import uuid
import time

PAYMENT_RECORDS_NUM = 1000
PURCHASE_STATE_LIST = [
    0, # 決済待ち
    1, # 決済済み
    2  # 上記以外の例外的な決済状態
]
PLATFORM_PRODUCTS = [
    ["item_1", 100],
    ["item_2", 200],
    ["item_3", 300],
    ["item_4", 400]
]

platform_product_ids = list(map(lambda x: x[0], PLATFORM_PRODUCTS))

connection = pymysql.connect(
    host = "{Aurora MySQL ライターエンドポイント}",
    user = "{DB ユーザー名}",
    password = "{DB パスワード}",
    database = "sampledb",
    cursorclass = pymysql.cursors.DictCursor
)

with connection:
    with connection.cursor() as cursor:
        sql = "INSERT INTO products (platform_product_id, price) VALUES (%s, %s)"
        cursor.executemany(sql, PLATFORM_PRODUCTS)

        current_timestamp = int(time.time())
        payments = []
        for i in range(PAYMENT_RECORDS_NUM):
            order_id = uuid.uuid4()
            platform_product_id = random.choice(platform_product_ids)
            purchase_time = random.randint(current_timestamp - 86400, current_timestamp)
            purchase_state = random.choices(PURCHASE_STATE_LIST, [1, 100, 1])
            payments.append([order_id, platform_product_id, purchase_time, purchase_state])
        sql = "INSERT INTO payments (order_id, platform_product_id, purchase_time, purchase_state) VALUES (%s, %s, %s, %s)"
        cursor.executemany(sql, payments)
    connection.commit()
スクリプトの実行
以下のコマンドでスクリプトを実行します。
python insert_sample_data.pyデータの確認
クエリを実行 - products テーブルの確認
以下のクエリを実行し、products テーブルの中身が登録されていることも確認します。
SELECT * FROM sampledb.products ORDER BY id;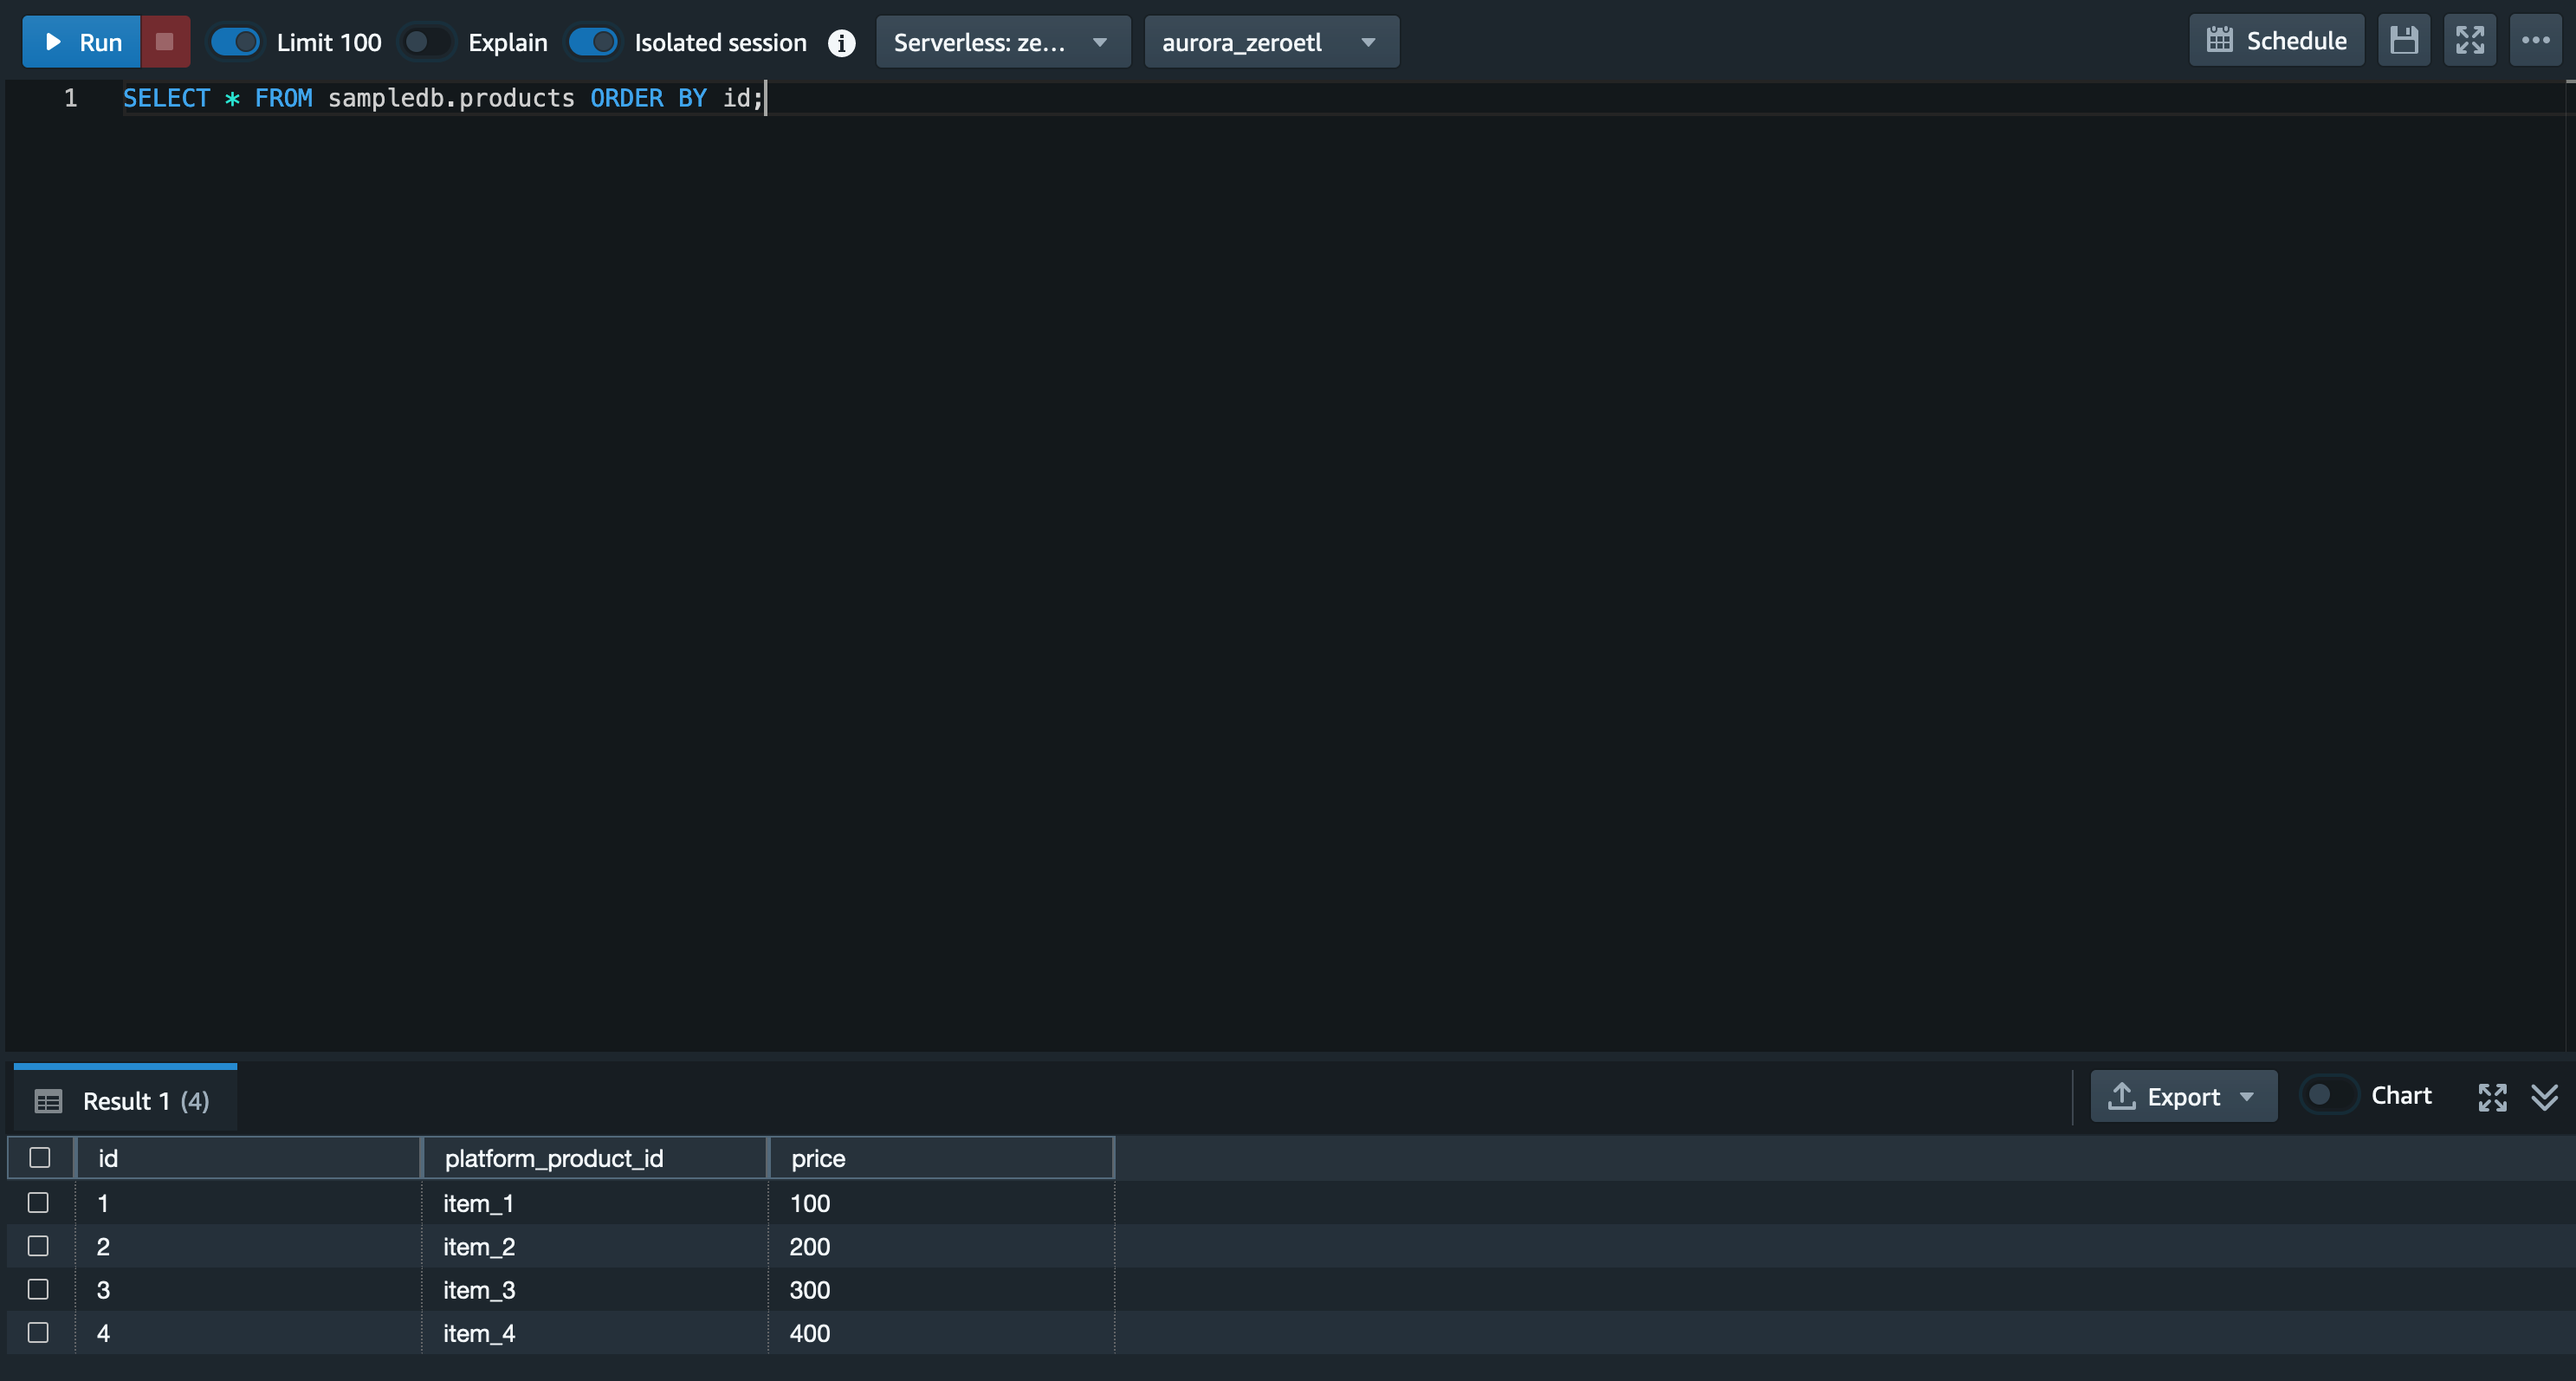
クエリを実行 - payments テーブルの確認
以下のクエリを実行し、payments テーブルの中身が登録されていることも確認します。
SELECT * FROM sampledb.payments ORDER BY id;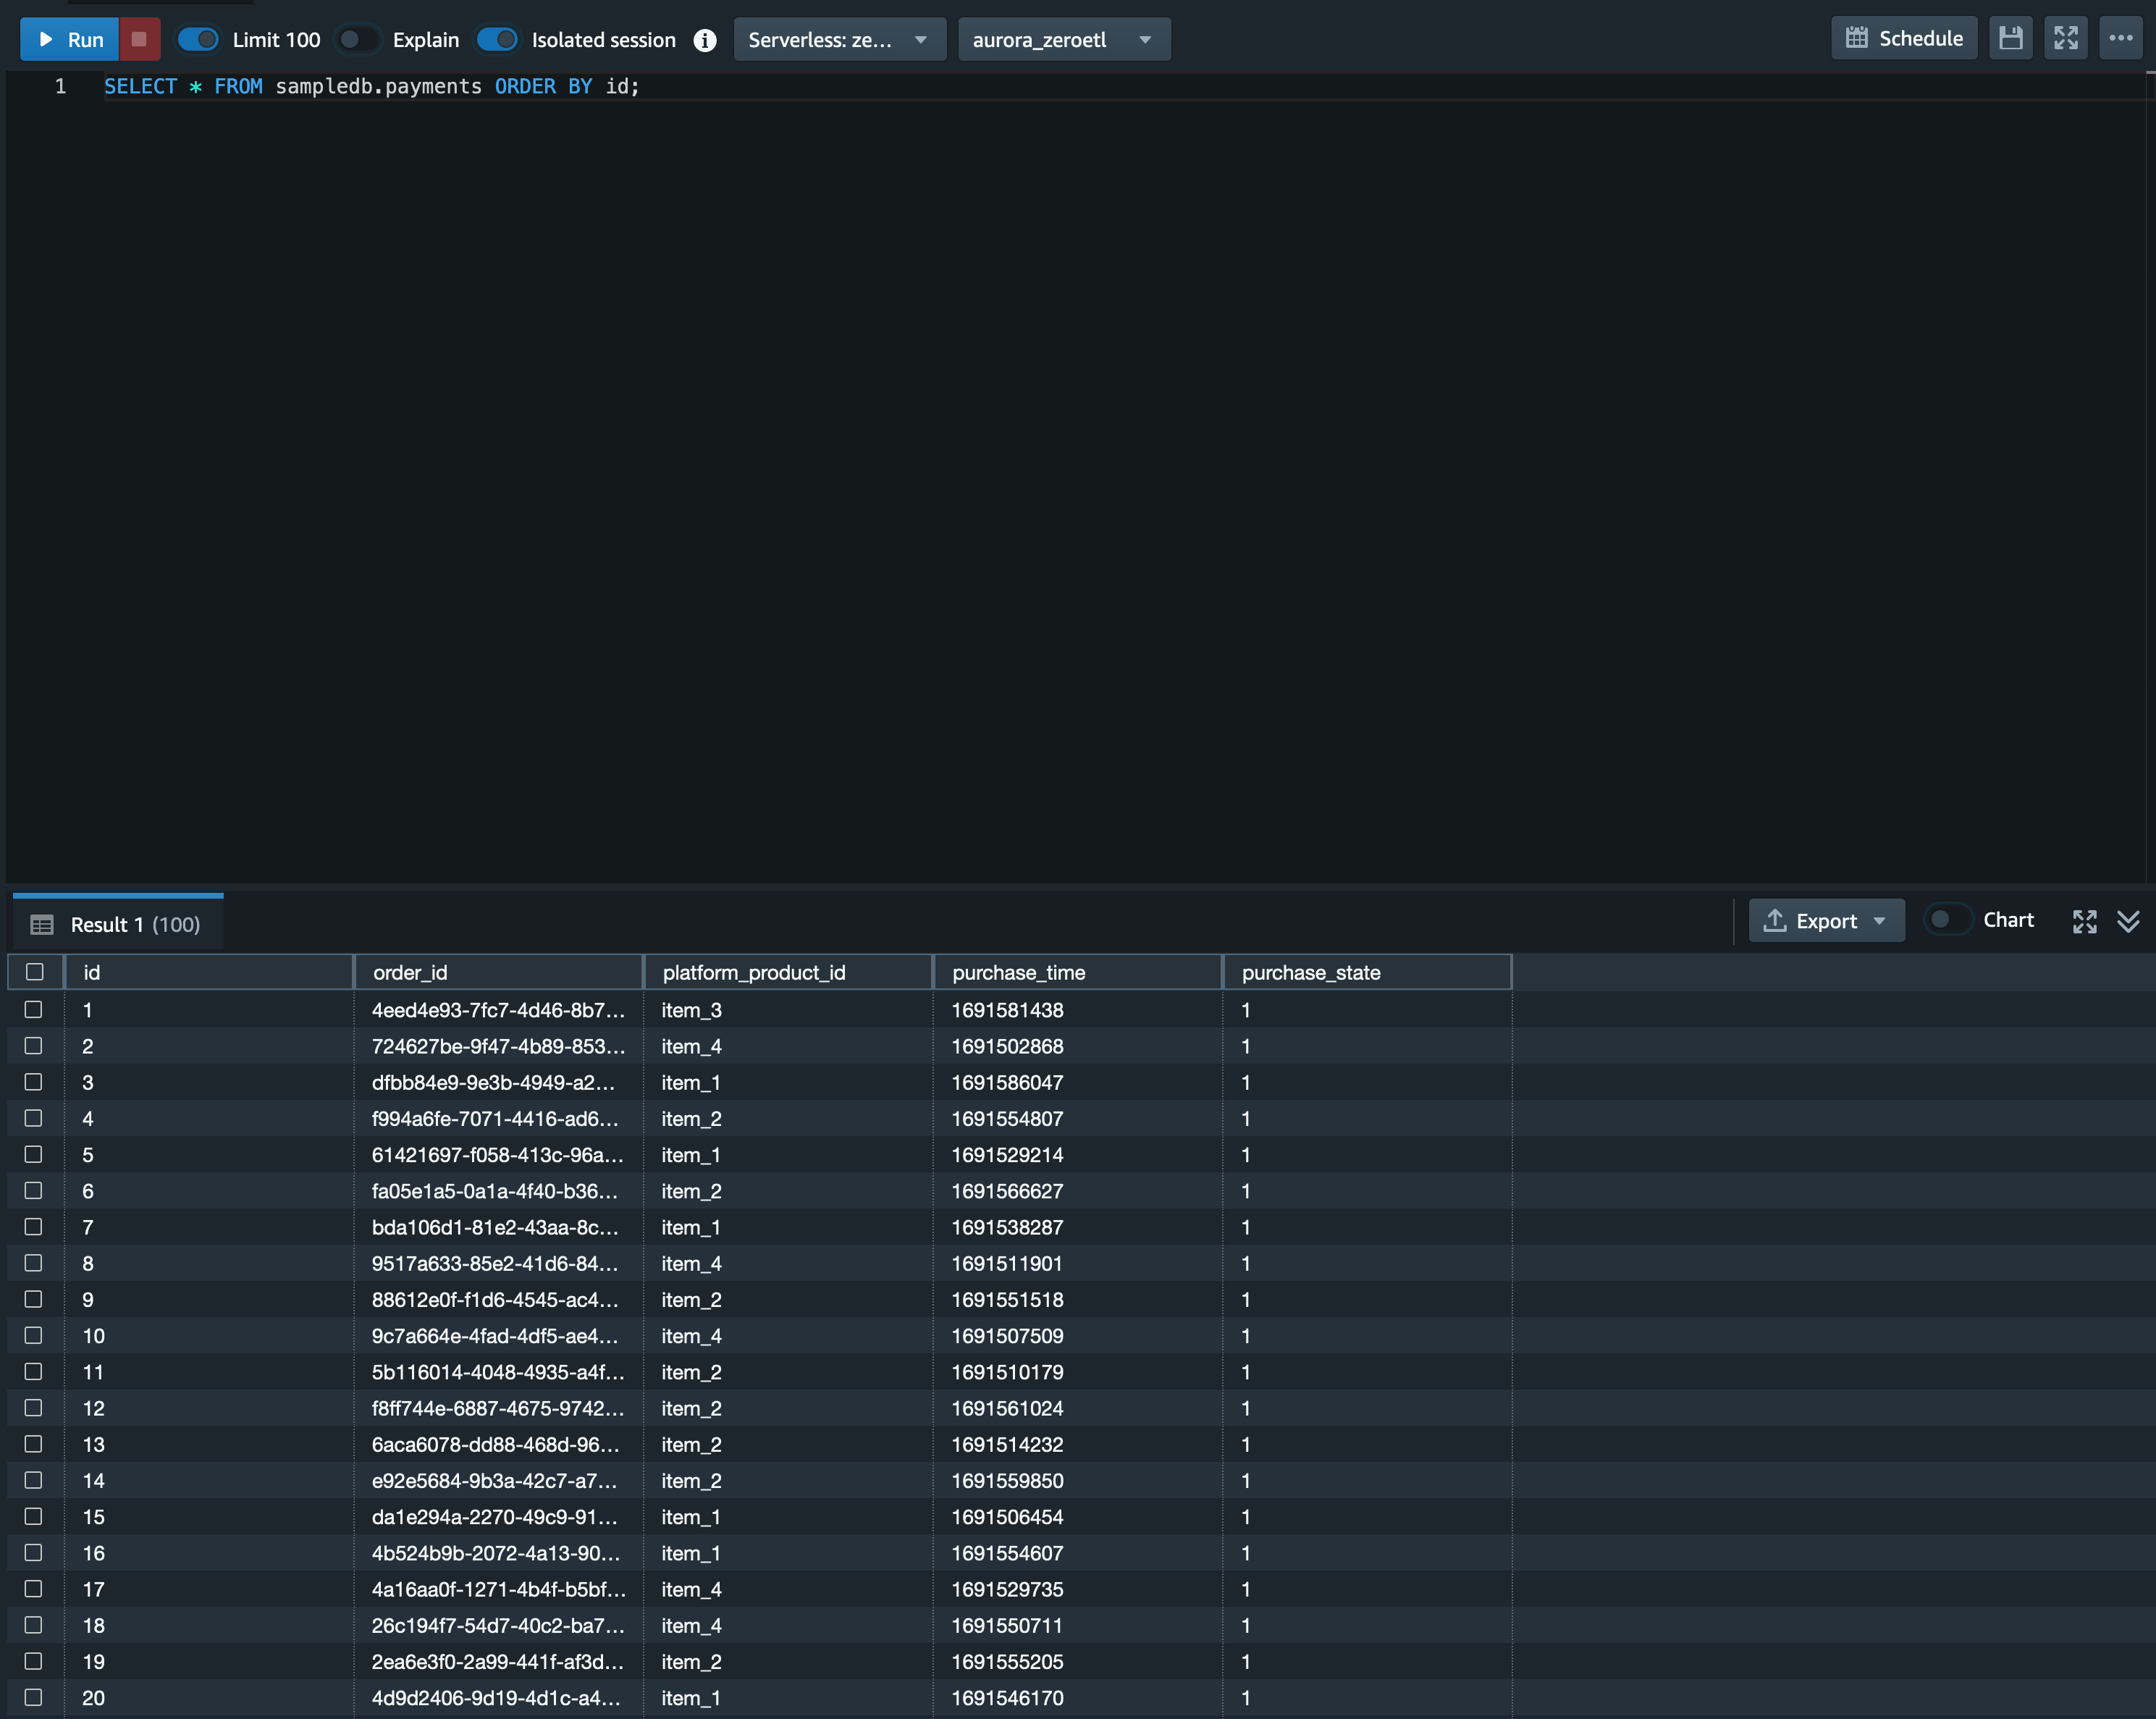
売上を集計
ここからは実際の分析を想定して簡単な集計を行ってみます。
まず以下のクエリで商品別の売上を集計します。
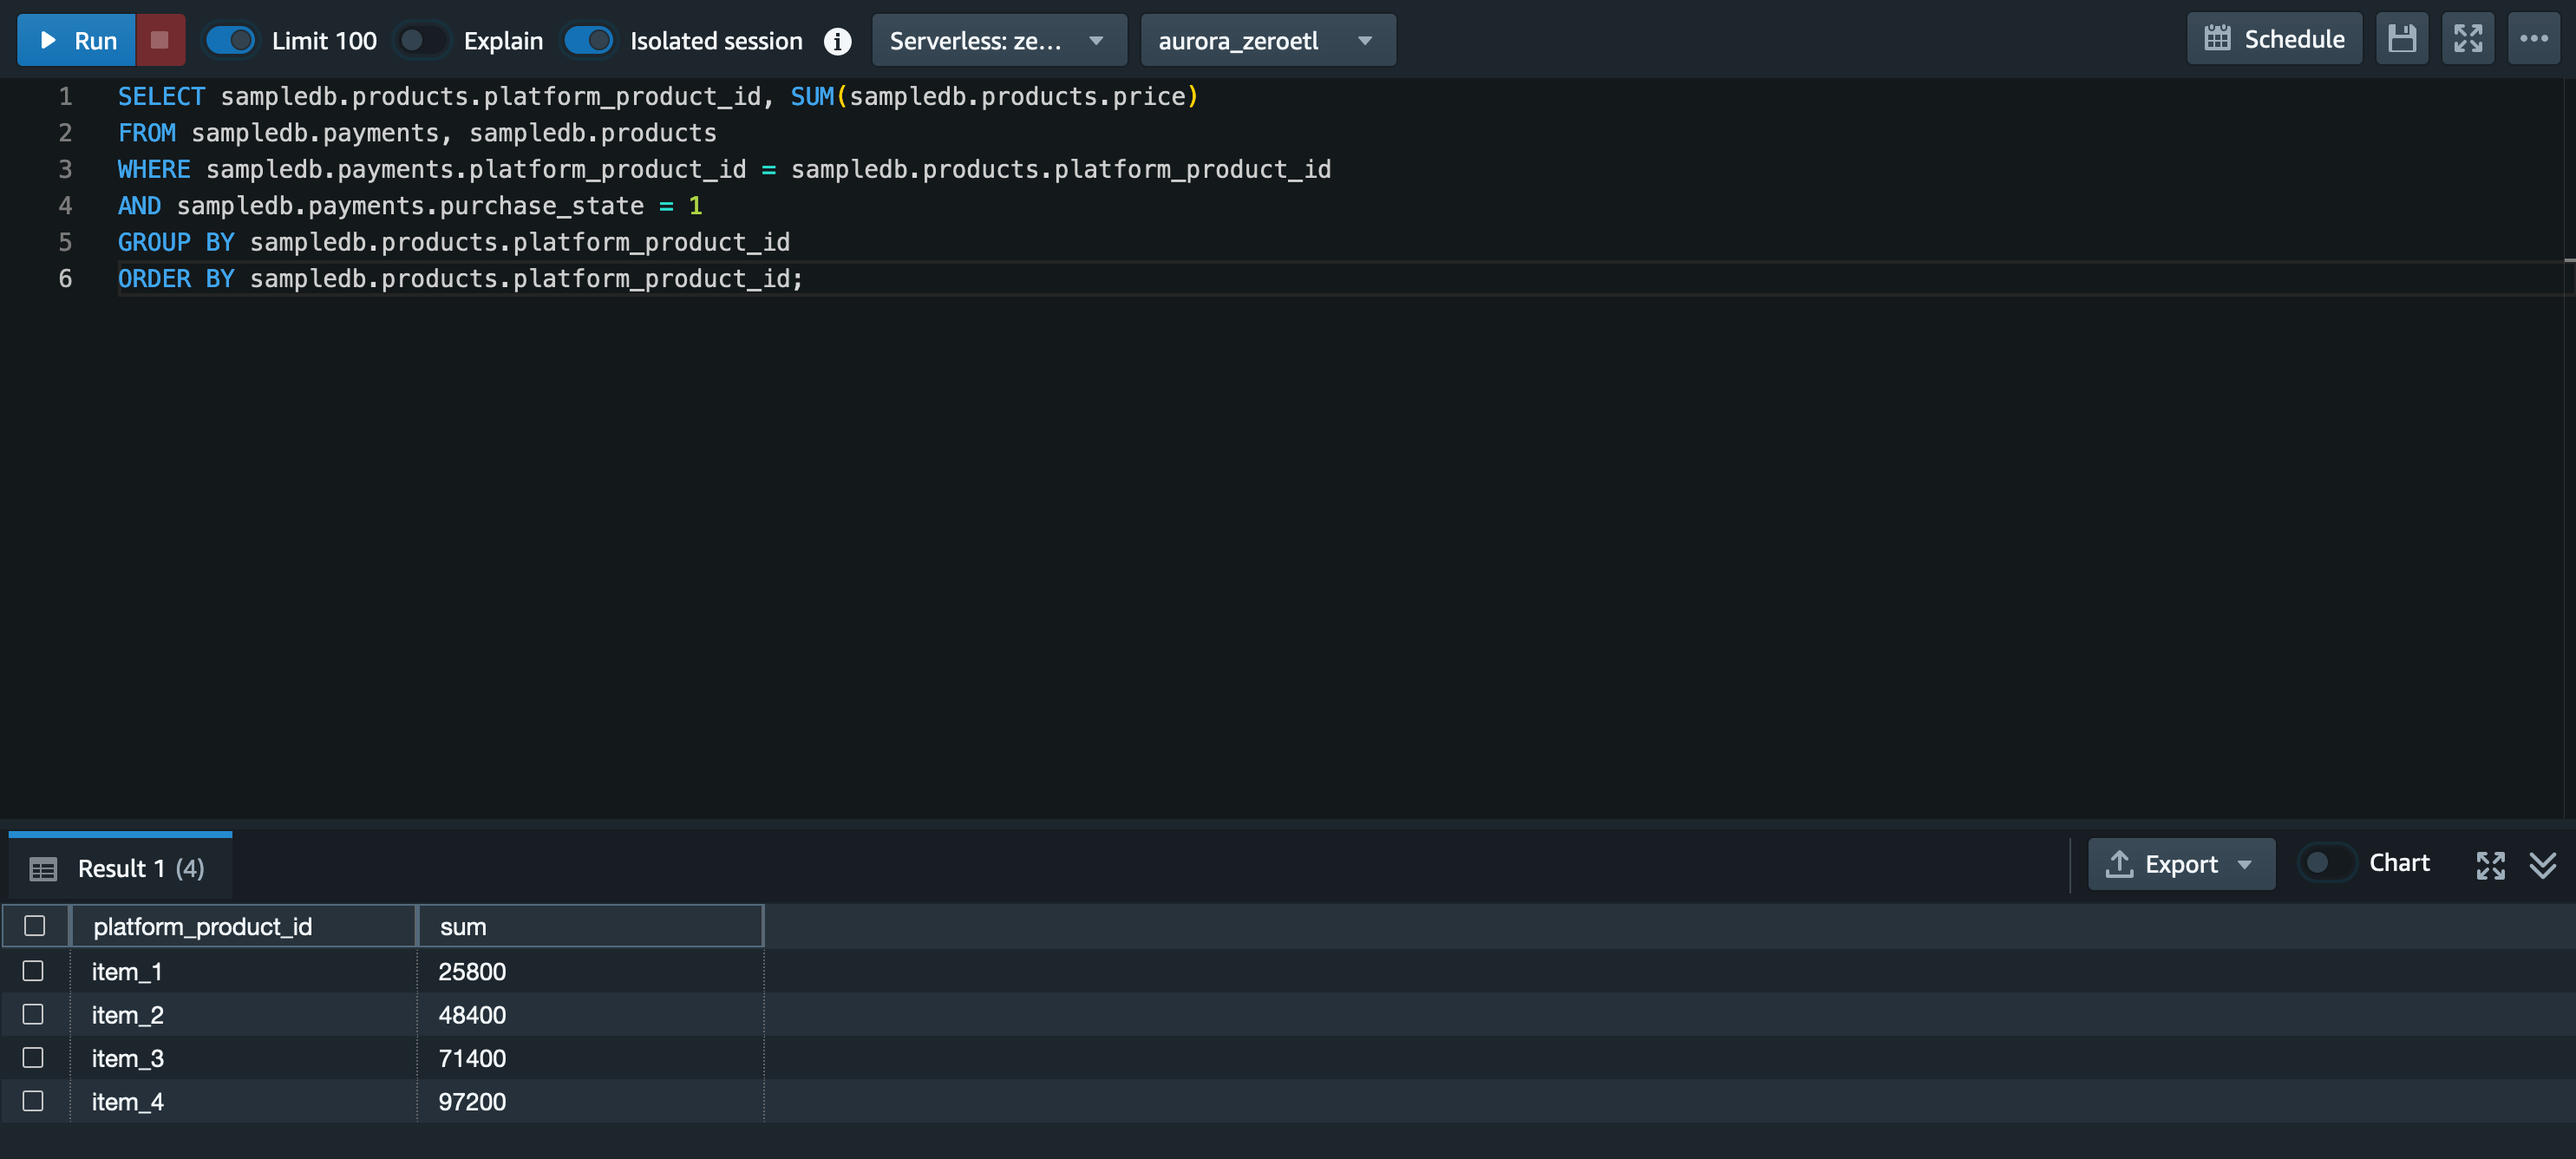
商品別の売上を集計
クエリ
SELECT sampledb.products.platform_product_id, SUM(sampledb.products.price)
FROM sampledb.payments, sampledb.products
WHERE sampledb.payments.platform_product_id = sampledb.products.platform_product_id
AND sampledb.payments.purchase_state = 1
GROUP BY sampledb.products.platform_product_id
ORDER BY sampledb.products.platform_product_id;
集計グラフ
サンプルデータの生成において、payments テーブルの内容は購入された商品、決済ステータス (purchase_state) はランダムなものとなっているため集計結果の数値は画像とは異なるかと思いますが、商品別の売上の合計値が集計できているかと思います。
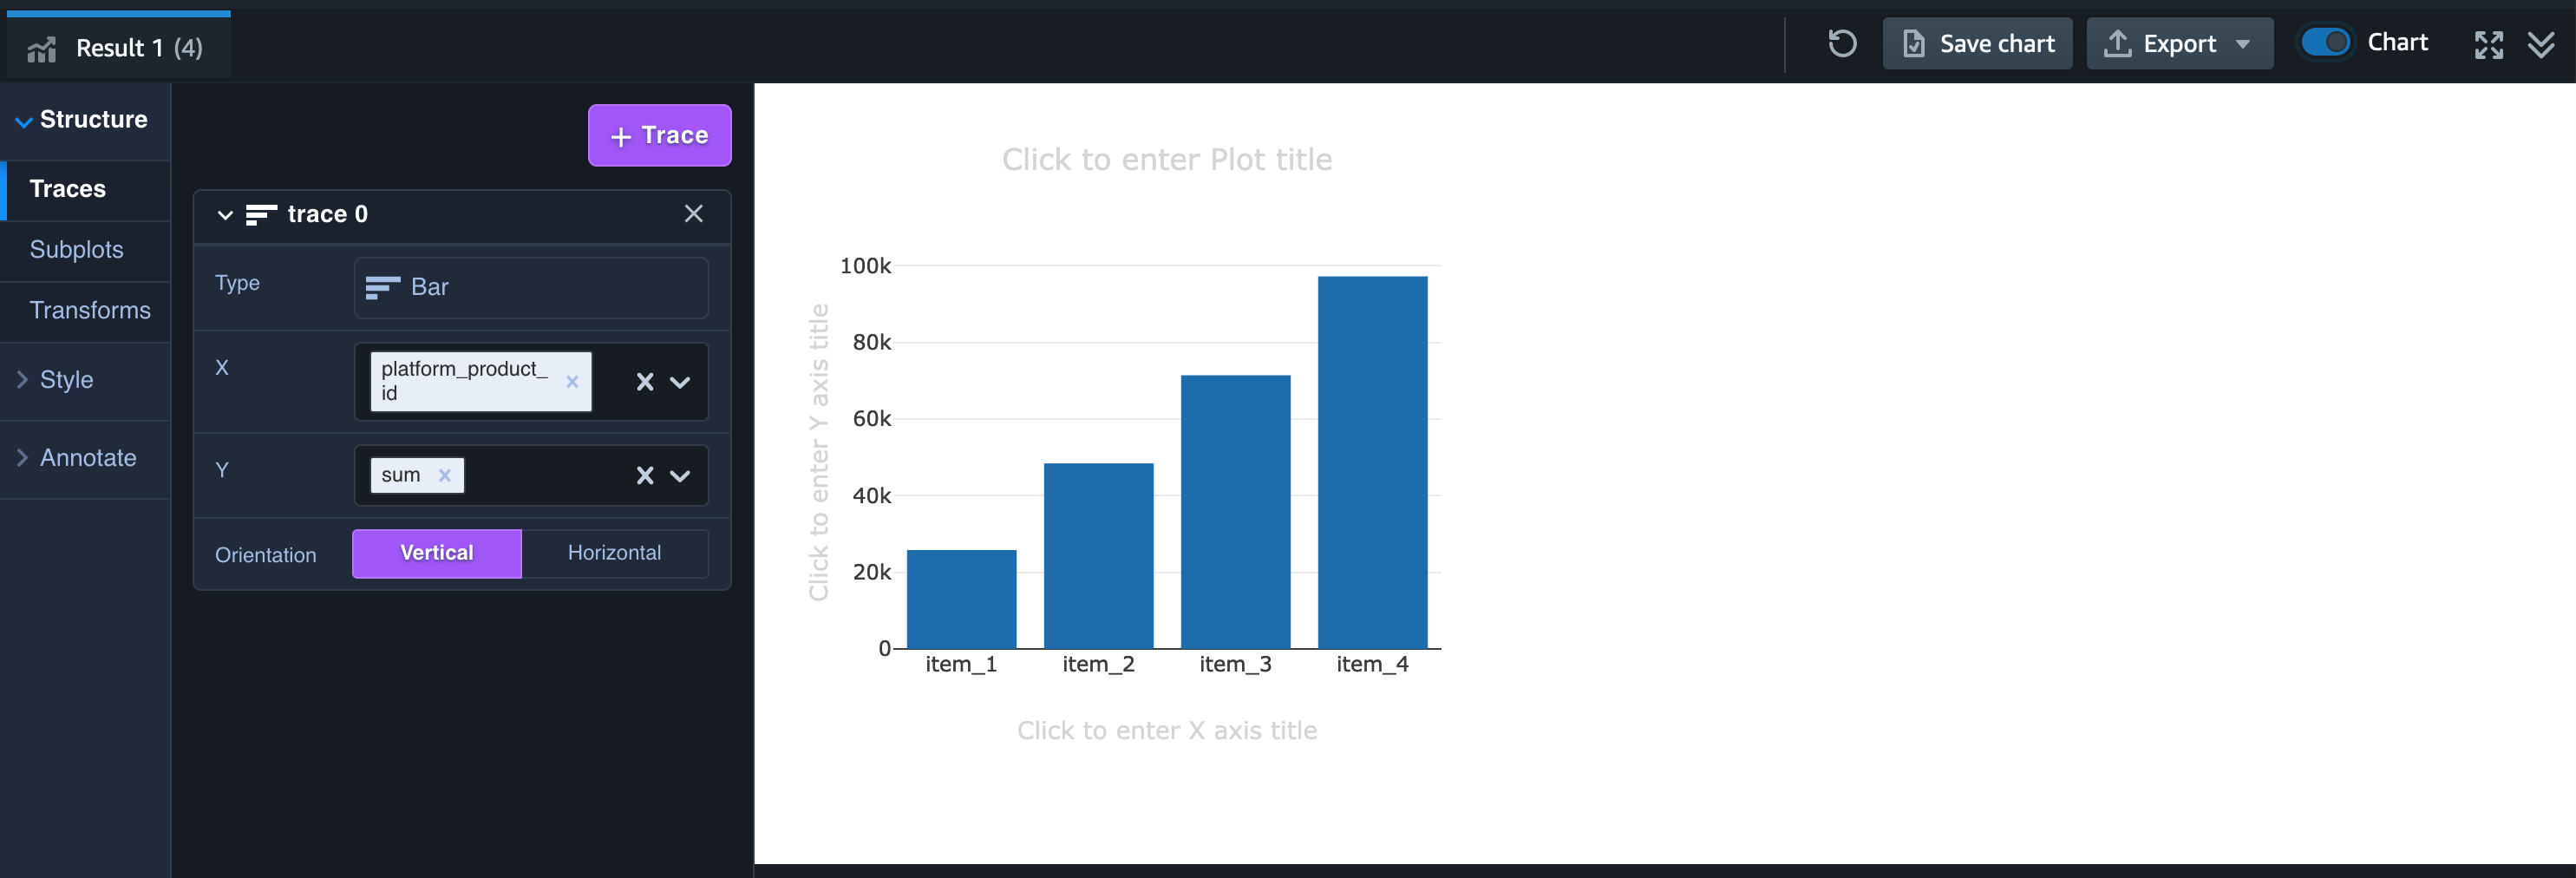
Redshift query editor v2 では集計した結果をそのままグラフ化することができ、Result 1 (集計結果タブ) の右側にある Chart と書かれたトグルを on にします。
するとグラフが表示されますので、Type を Bar にし、X を platform_product_id、Y を sum にすると売上の合計値を棒グラフで可視化することができます。
1 時間毎の商品別の売上を集計
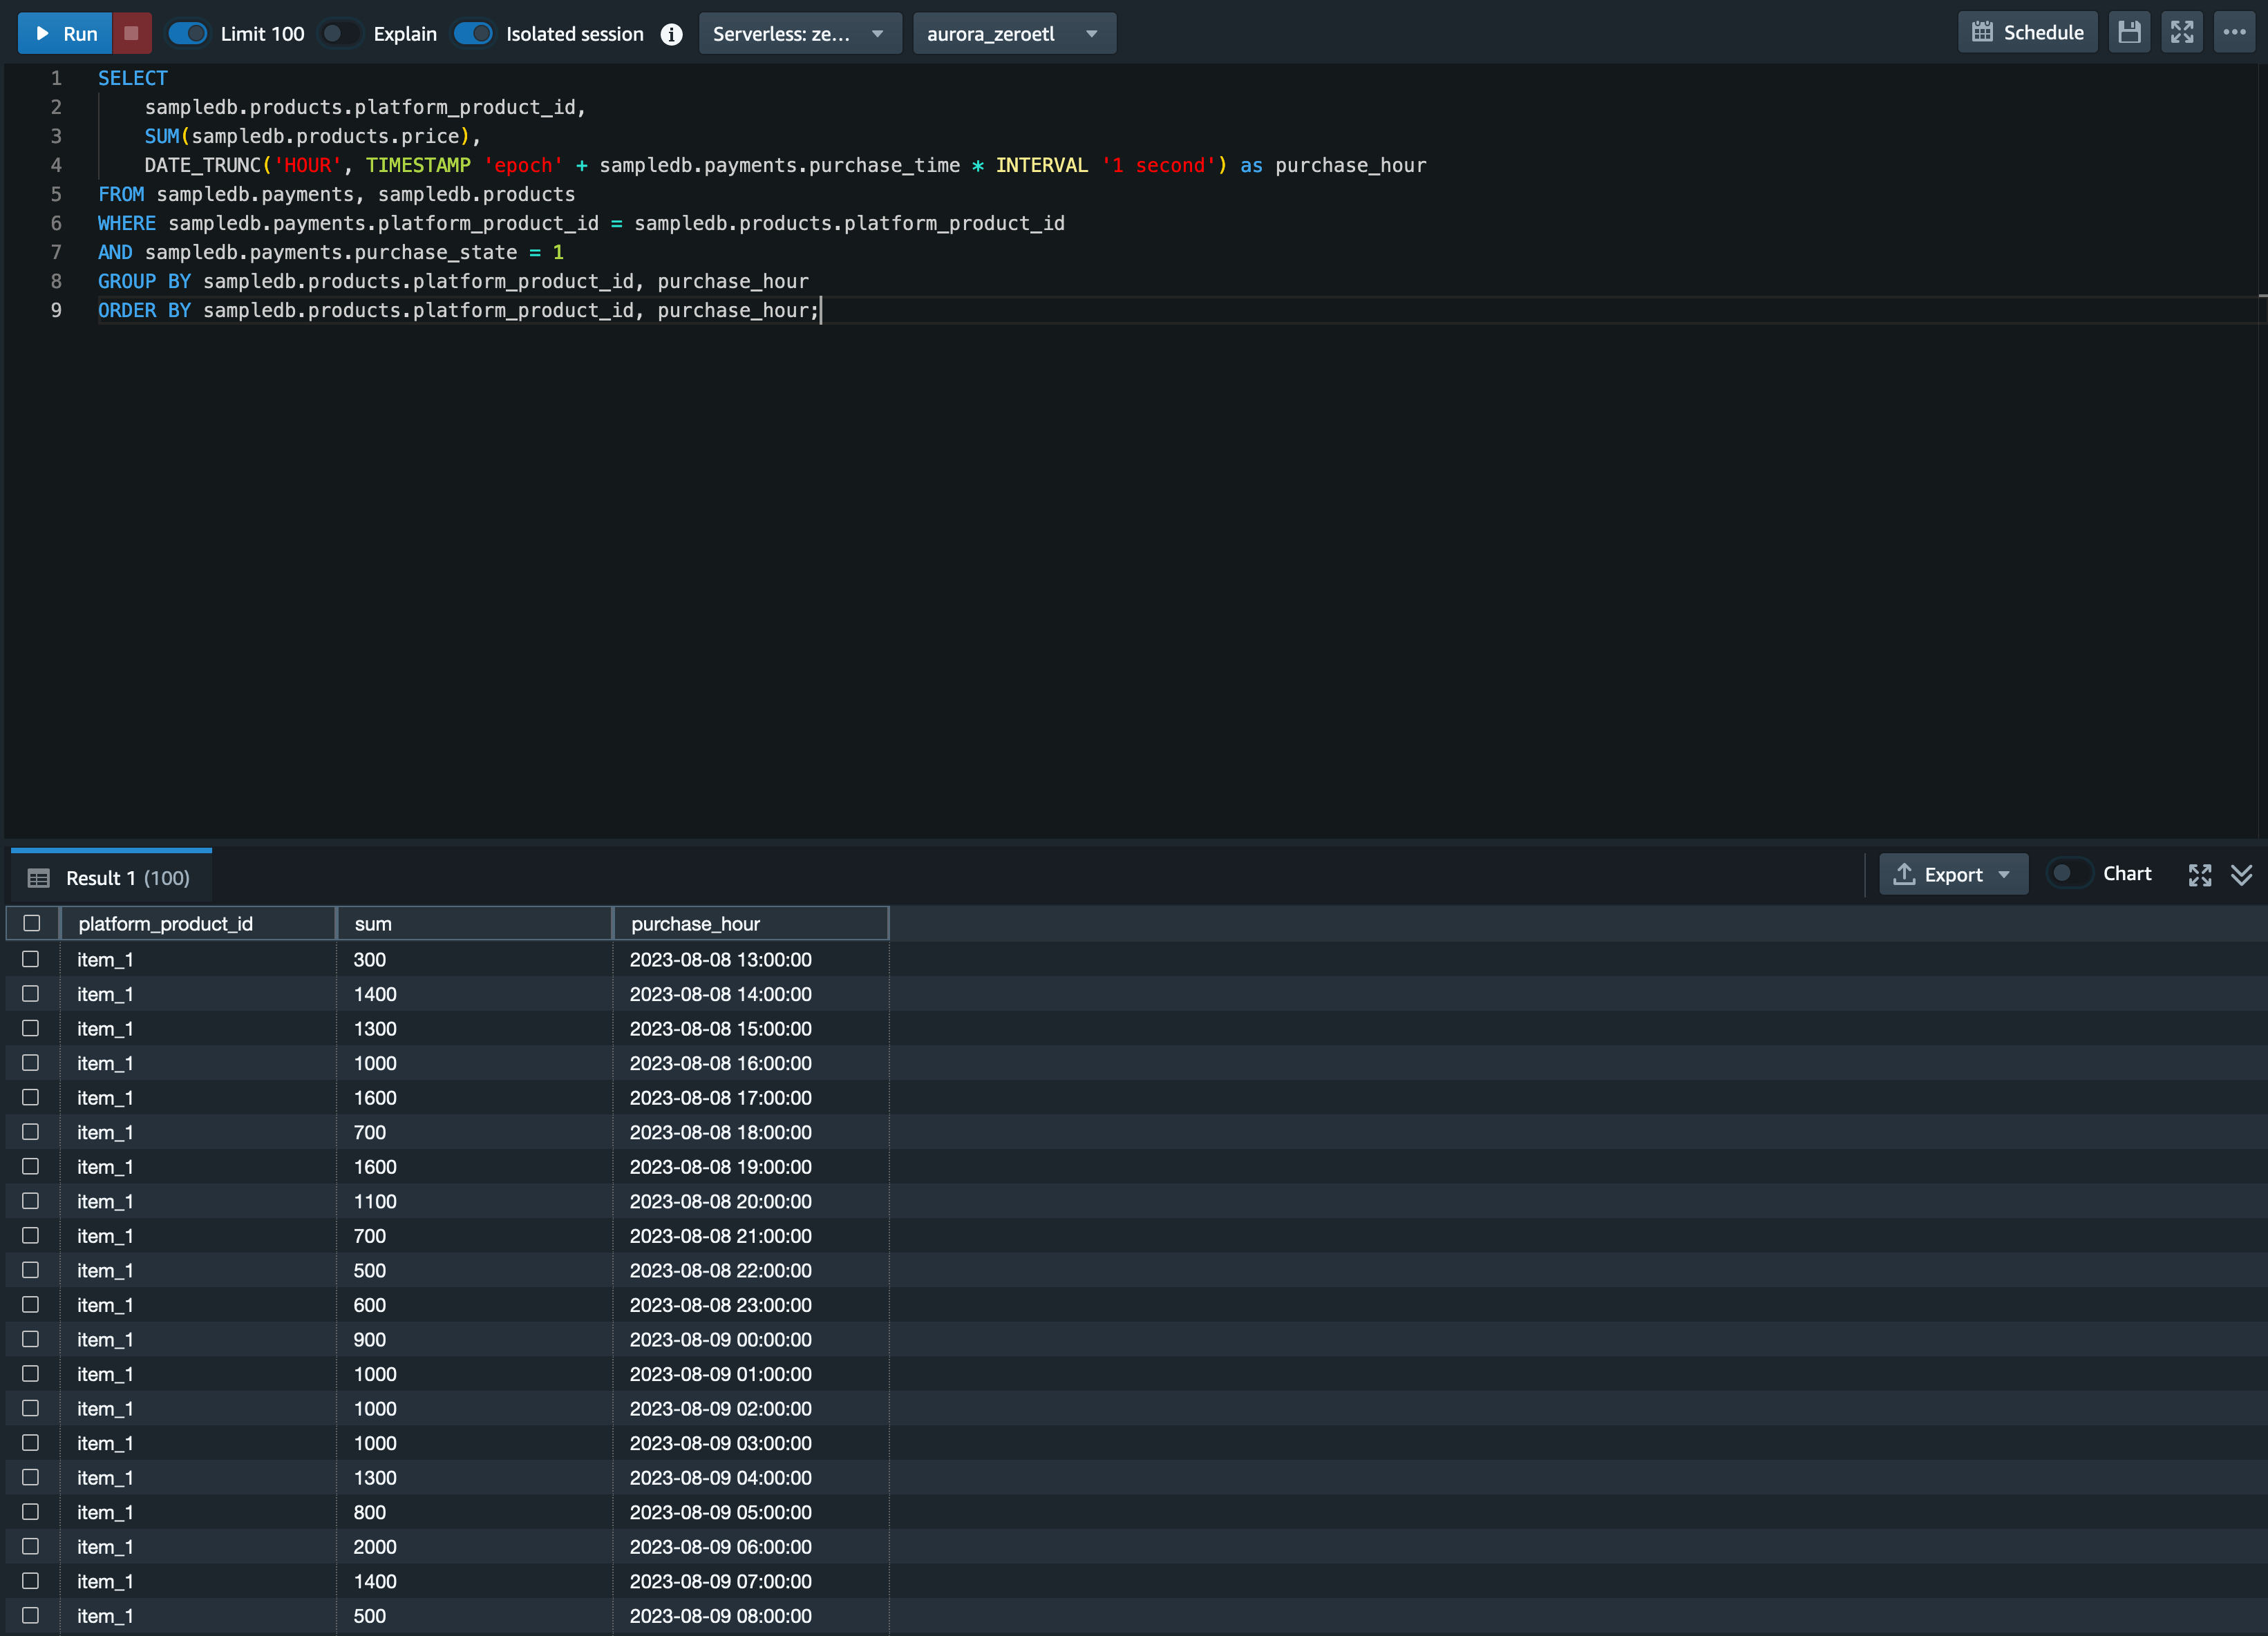
そこで、1 時間毎の商品別の売上を集計し、その推移を可視化したいと思います。 以下のクエリを実行します。
SELECT
    sampledb.products.platform_product_id,
    SUM(sampledb.products.price),
    DATE_TRUNC('HOUR', TIMESTAMP 'epoch' + sampledb.payments.purchase_time * INTERVAL '1 second') as purchase_hour
FROM sampledb.payments, sampledb.products
WHERE sampledb.payments.platform_product_id = sampledb.products.platform_product_id
AND sampledb.payments.purchase_state = 1
GROUP BY sampledb.products.platform_product_id, purchase_hour
ORDER BY sampledb.products.platform_product_id, purchase_hour;
出力結果
するとこのような結果が出力されます。
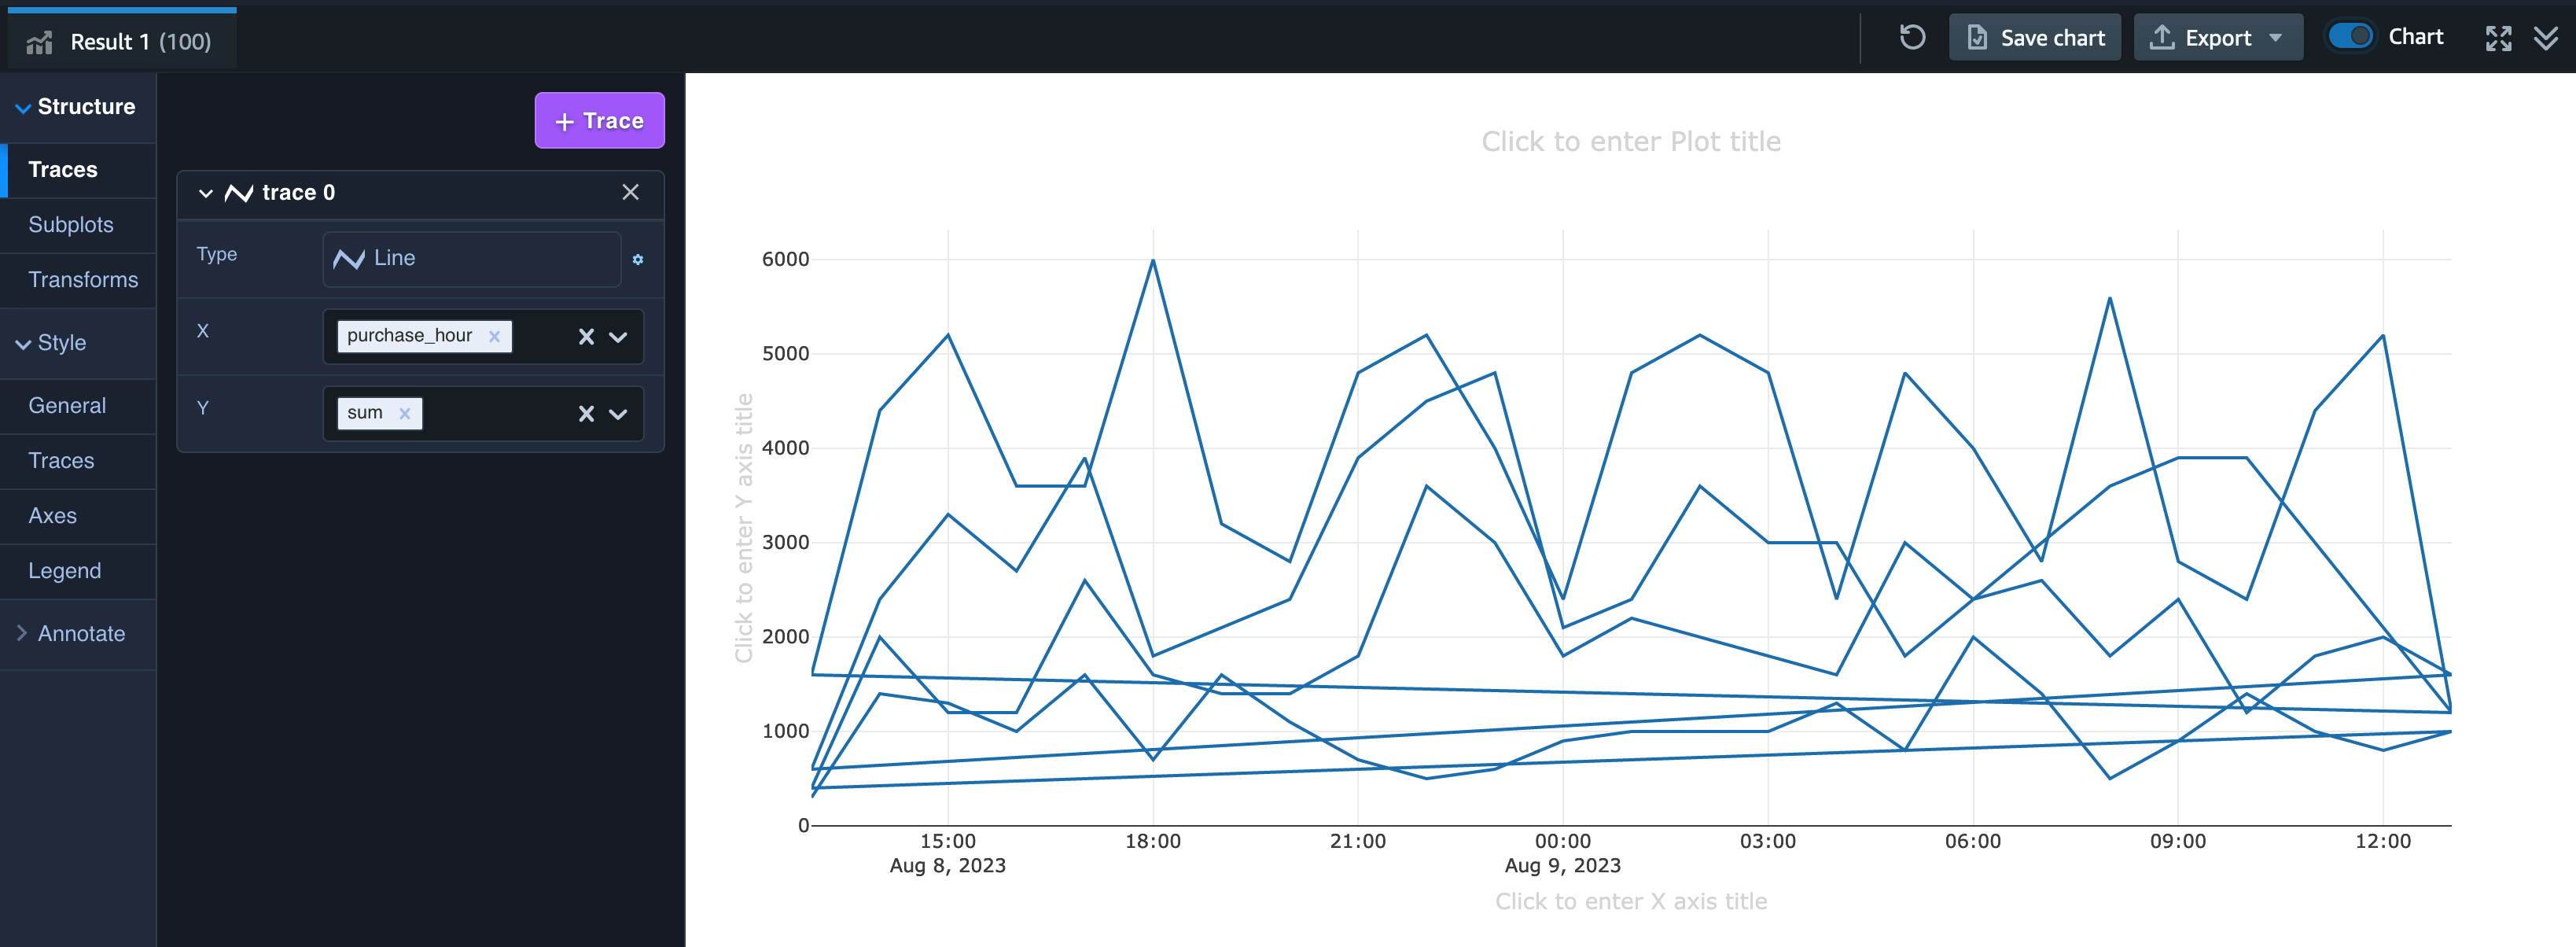
集計グラフ
売上の合計値を可視化した時と同様に Chart を有効にして可視化します。
trace 0 の Type で「Line」を選択し、X に purchase_hour、Y に sum を選択します。
すると商品別の折れ線グラフがまとめて一つの色で出力されるかと思います。
グラフのフィルタリング
これでは商品別の売上の変動を確認することが難しいので、左側の「Transforms」タブをクリックし、「+ Transform」というボタンから「Filter」を選択、Target を platform_product_id、Operator を Include Values、Values を item_1 とします。
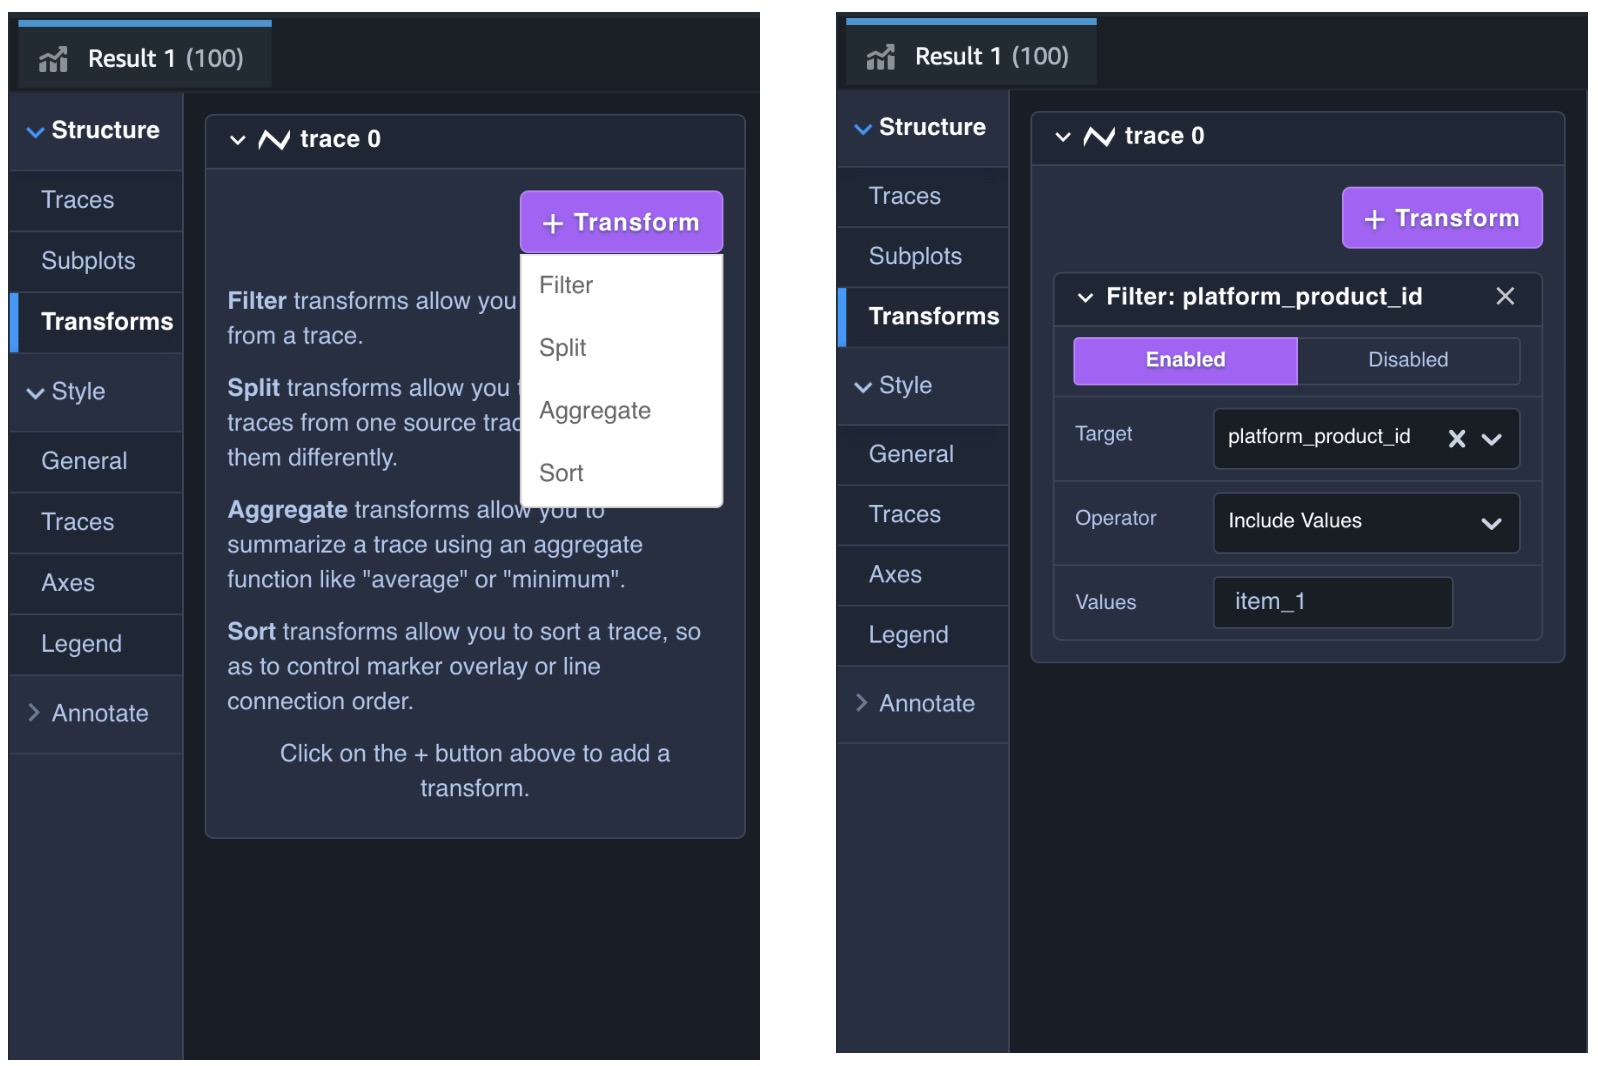
フィルタリング結果
すると図のように item_1 のみの時間別売上高の推移を確認することができます。
複数商品のグラフ表示
他の商品の折れ線グラフを追加するためには、Traces のタブから「+ Trace」ボタンをクリックし、新しく作成された trace 1 に trace 0 と同じ設定を行います。
そして Transforms で、trace 1 のタブに対して trace 0 (item_1) と同様の設定をし、Values のみ item_2 とします。
item_3、item_4 についても同様に Trace の作成と Transform の設定を行うと以下のようなグラフが作成されます。

分析の結論
簡単ではありますが、サンプルデータの追加と Amazon Redshift での分析について紹介しました。
このグラフではあくまでランダムに生成された売上データであるため売上の増減から読み取れる情報はほとんどありません。しかし、運営型のゲームにおける実際のデータであれば、例えばゲーム内イベントを開始されたタイミングでそのイベントで有利に働くアイテムの売上が増えたことを観測できたり、その売上の増加が想定通りのものであるか否かを確認することも可能です。
6. リソースの削除
最後に不要になったリソースの削除をしておきましょう。
まず、Amazon RDS コンソールからゼロ ETL 統合を削除します。
そして Amazon Aurora MySQL のデータベースと Amazon Redshift Serverless のワークグループ、名前空間を削除します。
まとめ
Amazon Aurora と Amazon Redshift の Zero-ETL 統合を使うことで Amazon Aurora MySQL データベースに保存されているデータをデータパイプラインを構築することなく Amazon Redshift Serverless にコピーし、すぐにデータ分析をはじめられることをご紹介しました。
これまでデータパイプラインの構築が難しくゲーム分析に取り組むことがなかなかできなかった方や、これからゲーム分析に取り組むことをお考えで、まずデータベース上のデータを分析したいと考えている方のお役に立てば幸いです。
筆者プロフィール
Sheng Hsia Leng
アマゾン ウェブ サービス ジャパン合同会社
ソリューションアーキテクト
ゲーム業界に特化したソリューションアーキテクトとしてお客様を支援しております。
RPG とドット絵ゲームが好きです。オフモードの時はインスタでバイリンガル漫画を投稿しています。

渡邉 真太郎
アマゾン ウェブ サービス ジャパン合同会社
ソリューションアーキテクト
モバイルゲームの開発会社2社でサーバーサイドエンジニアとして従事し現職。
普段はゲーム業界向けのソリューションアーキテクトとしてゲーム開発に携わるお客様をご支援しております。
Did you find what you were looking for today?
Let us know so we can improve the quality of the content on our pages