AWS Big Data Blog
Effective data lakes using AWS Lake Formation, Part 1: Implementing cell-level and row-level security
July 2023: This post was reviewed for accuracy.
We announced the general availability of AWS Lake Formation transactions, cell-level and row-level security, and acceleration at AWS re: Invent 2021. In this post, we focus on cell-level and row-level security and show you how to enforce business needs by restricting access to specific rows.
Effective data lakes using AWS Lake Formation
|
The goal of modern data lakes is to democratize access to broad datasets to empower data analysts and business users. In these scenarios, data lake security becomes more important than ever. Enterprises want to share their data across groups, departments, and organizations, while balancing their compliance and security needs. A common paradigm used by many enterprises is to restrict data access to limit scope based on the user profile or the organizations to which they belong. Previously, you had to enforce this by duplicating the original data or creating materialized and non-materialized views of the data based on filtered datasets. However, these solutions often break the concept of a single source of truth and result in write amplification, which doubles or triples storage. The large number of copies required also increases the management effort required due to their complexity.
Lake Formation supports simple row-level security and cell-level security:
- Basic row-level security allows you to specify filter expressions that limit access to specific rows of a table to a user.
- Cell-level security builds on row-level security by allowing you to hide or show specific columns along with providing access to specific rows.
In this post, we consider an example use case in which Company A does business across the United States and Canada. They have built an enterprise customer data hub on Amazon Simple Storage Service (Amazon S3), which sources customers from both countries into this central location for company-wide analytics and marketing.
The marketing department of Company A is responsible for organizing promotion campaigns and developing communications content to promote services and product to prospects. The team consumes the data from this enterprise customer data hub to create the targeted campaign.
The marketing team data analysts are divided by country, and the requirement is to restrict analyst access to customer data from their country—analysts from the United States can see only customers from the United States, and analysts from Canada can only access customers from Canada. Additionally, analysts from Canada aren’t allowed to see the date of birth (DoB column) due to local company policy (this restriction is an example of cell-level security).
The dataset used for this post is synthetically generated; the following screenshot shows an example of the data.

Solution overview
Let’s see how you can use the Lake Formation row-level security feature to enforce Company A’s requirements on the data in the S3 data lake. You can apply row-level security to a governed table or to a standard table in Lake Formation. In this post, you apply row-level security on a standard Lake Formation table; you can follow a similar process for a governed table.
We walk through the following high-level steps:
- Create a database (
lf_rls_blog) and table (customer). - Grant select (row and column) permissions to the users
lf-rls-blog-analyst-usandlf-rls-blog-analyst-ca. - Run queries in Amazon Athena as the US and Canada analysts to verify that you only see rows from the user’s respective country (and the appropriate columns).
Set up resources with AWS CloudFormation
This post includes an AWS CloudFormation template for a quick setup. You can review and customize it to suit your needs.
The CloudFormation template generates the following resources:
- AWS Identity and Access Management (IAM) users, roles, and policies:
- The three users include
lf-rls-blog-manager(data lake administrator),lf-rls-blog-analyst-us(US data analyst), andlf-rls-blog-analyst-ca(Canada data analyst)
- The three users include
- Lake Formation data lake settings and resources:
- This includes an S3 bucket with the prefix
lf-rowlevel-security-blog-*and the customer data files used in this post
- This includes an S3 bucket with the prefix
To create your resources, complete the following steps:
- Sign in to the AWS CloudFormation console in the
us-east-1Region. - Choose Launch Stack:

- Create passwords for the three users.
- Review the details on the page and select I acknowledge that AWS CloudFormation might create IAM resources.
- Choose Create stack.

Create a database and table
To create your database and table, complete the following steps:
- Sign in to the AWS Management Console as the data lake administrator (
lf-rls-blog-manager). - On the Lake Formation console, choose Databases in the navigation pane.
- Choose Create database.

- For Name, enter
lf_rls_blog. - If Use only IAM access control for new tables in this database is selected, uncheck it.
- Choose Create database.

Next, you create a new data lake table.
- In the navigation pane, choose Tables.
- Choose Create table.

- For Name, enter
customer. - For Database, choose the database you just created (
lf_rls_blog).

- Browse to the
customersfolder underdatafilesin the S3 bucket (starting withlf-rowlevel-security-blog-*) created by the CloudFormation template.

- For Classification, select CSV.
- For Delimiter, choose Comma:
- Choose Upload Schema.

- Enter the following JSON code:
- Choose Upload.

- Choose Submit.

Create data filters and grant permissions
To implement column-level, row-level, and cell-level security, first you create data filters. Then you choose that data filter while granting the select Lake Formation permission on tables. For this use case, you create two data filters: one for the US data analyst and one for the Canada data analyst.
Permitted filter expressions are predicates that obey a subset of the WHERE clause grammar in PartiQL. You can use comparison operators to compare columns with constants. The following are the supported operators:
- Comparison operators – =, >, <, >=, <=, <>, BETWEEN, IN, LIKE
- Logical operators – AND, OR
Let’s first create the data filter for the US analyst.
- On the Lake Formation console, choose Data filters in the navigation pane.
- Choose Create new filter.

- For Data filter name, enter
US Filter. - For Target database, choose the
lf_rls_blogdatabase. - For Target table, choose the
customertable. - For Column-level access, select Access to all columns.
- For Row filter expression, enter
country='US'. - Choose Create filter.

The US analyst has access to all the columns of US customers only.
Now let’s create a data filter for the Canada analyst.
- On the Data filters page, choose Create new filter.
- For Data filter name, enter
Canada Filter. - For Target database, choose the
lf_rls_blogdatabase. - For Target table, choose the
customertable. - For Column-level access, select Exclude columns.
- For Select columns, choose the
dobcolumn. - For Row filter expression, enter
country='Canada'. - Choose Create filter.

The Canada analyst now has access to all the columns except dob (date of birth) of Canadian customers only.
Verify both data filters are created by checking the Data filters page.

Now we can grant table and column permissions.
- On the Tables page, select the
customertable. - On the Actions menu, choose Grant.

-
- For IAM users and roles, choose lf-rls-blog-analyst-us.
- Choose Named data catalog resources
- For Databases, choose lf_rls_blog.
- For Tables – optional, choose customer.
- For Data filters – optional¸ select US Filter.
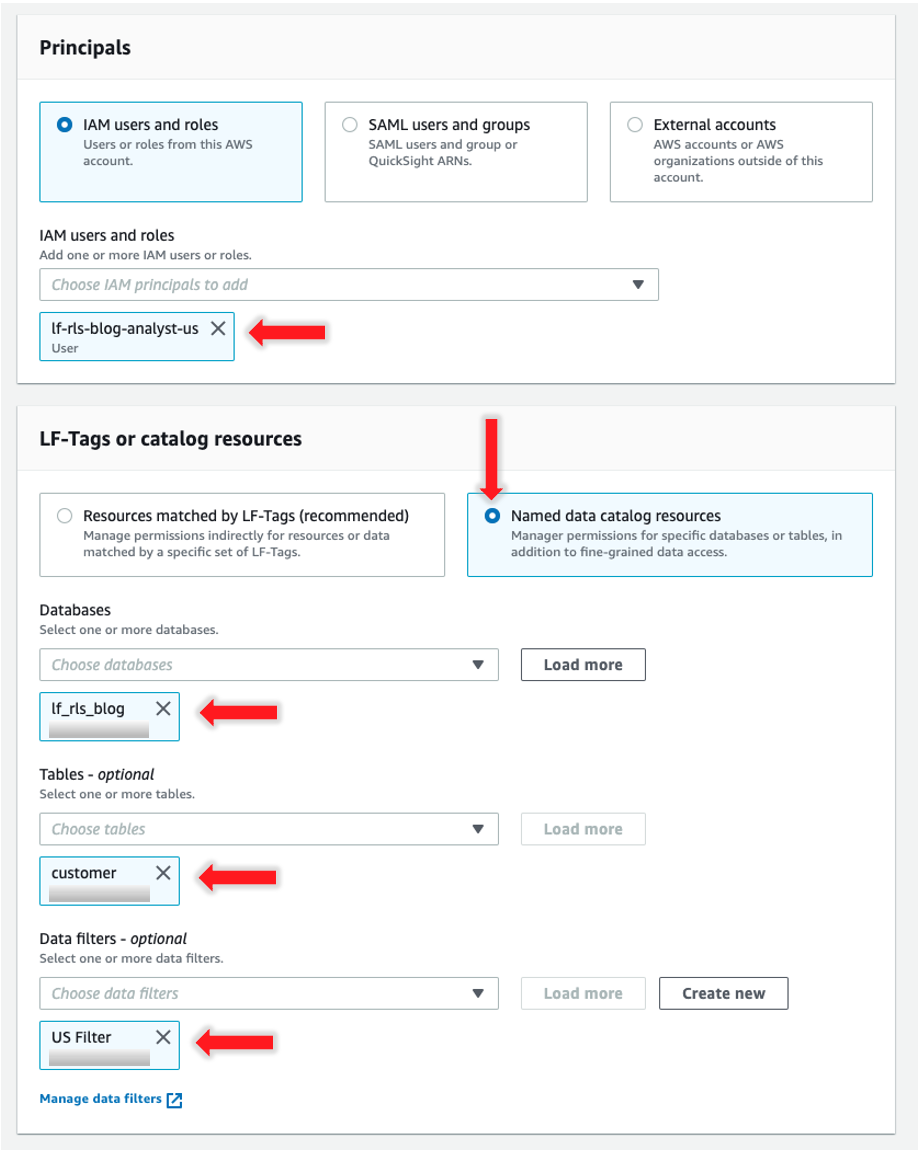
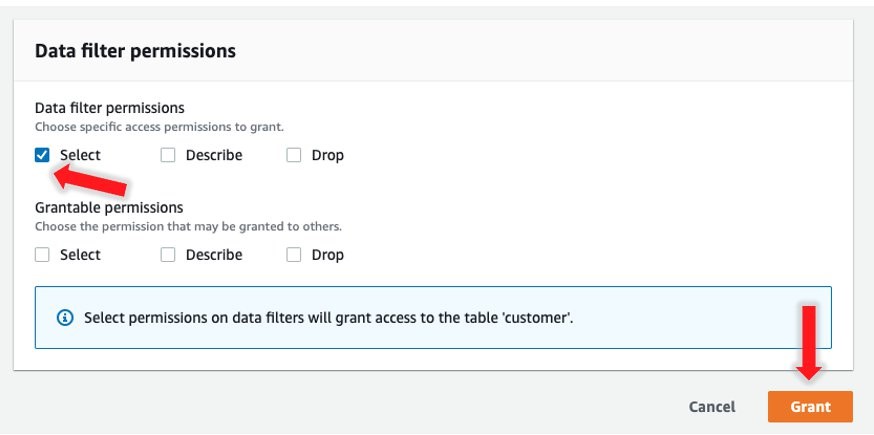
- For Data filter permissions, choose Select.
- Choose Grant.

- Repeat these steps for the
lf-rls-blog-analyst-causer, choosing thelf_rls_blogdatabase,customertable,Canada Filterand granting Select permissions.

- Choose Grant.
Run queries to test permission levels
Lake Formation implicitly grants all permissions to the table creator. In this use case, lf-rls-blog-manager has SELECT permissions on all rows and columns of the customer table. Let’s first verify permissions for lf-rls-blog-manager by querying the customer table using Athena.
- On the Athena console (in Region us-east-1), open the query editor.
- Choose set up a query result location in Amazon S3.

- Navigate to the S3 bucket starting with
lf-rowlevel-security-blog-*and select the folderanthenaqueryresults. - Choose Save.
- In the query editor, for Data source, choose AWSDataCatalog.
- For Database, choose lf_rls_blog.
You can see the customer table under Tables.
- Enter the following query:
- Choose Run query.
Rows from both countries are displayed to the lf-rls-blog-manager users.

Next, lets verify permission of the lf-rls-blog-analyst-us and lf-rls-blog-analyst-ca users on this table.
- Sign in to the console as
lf-rls-blog-analyst-us. - Repeat the previous steps on the Athena console (in
us-east-1) to set up the query result location. - Run the following query:
Only US customers are shown in the result for the US data analyst.

Now you verify the same for the Canada data analyst.
- Sign in to the console as
lf-rls-blog-analyst-ca. - Repeat the previous steps on the Athena console (in
us-east-1) to set up the query result location. - Run the following query:
Only customers from Canada are visible to the Canada data analyst. Furthermore, the lf-rls-blog-analyst-ca user doesn’t have access to the dob column.

Clean up
For the final step, clean up the resources you created:
- Sign in to the console as
lf-rls-blog-manager. - On the Lake Formation console, choose Databases in the navigation pane.
- Select the database
lf_rls_blog. - On the Action menu, choose Delete.
- Delete
anthenaqueryresultsfolder from the Amazon S3 bucket with prefixlf-rowlevel-security-blog-*. - Login as the user that launched the CloudFormation stack in this post.
- On the AWS CloudFormation console, delete the stack
lf-rowlevel-security-blog.
When you delete the stack, the resources it created are automatically deleted.
Conclusion
In this post, you learned how to implement fine-grained access control on a data lake table using the new row-level security feature of Lake Formation. This feature allows you to easily enforce privacy regulations or corporate governance data access rules on your data lake.
Learn more about Lake Formation and start using these features to build and secure your data lake on Amazon S3 using Lake Formation today, and leave your thoughts and questions in the comments.
About the Authors
 Deenbandhu Prasad is a Senior Analytics Specialist at AWS, specializing in big data services. He is passionate about helping customers build modern data platforms on the AWS Cloud. Deenbandhu has helped customers of all sizes implement master data management, data warehouse, and data lake solutions.
 Noritaka Sekiyama is a Senior Big Data Architect at AWS Glue and AWS Lake Formation. His passion is for implementing software artifacts for building data lakes more effectively and easily. During his spare time, he loves to spend time with his family, especially hunting bugs—not software bugs, but bugs like butterflies, pill bugs, snails, and grasshoppers.