AWS Compute Blog
Getting Started with Anka on EC2 Mac Instances
This post is written by Scott Malkie, Specialist Solutions Architect, EC2
At re:Invent 2020, we announced Amazon EC2 Mac instances, which enable you to run on-demand macOS workloads in the AWS Cloud for the first time. Apple developers can now benefit from the scalability, elasticity, reliability, and security of the AWS Cloud and the AWS Nitro System to support their entire macOS development pipeline to build, test, sign, and publish Apple apps.
In this blog, I review the basics of Amazon EC2 Mac instances, how to start using macOS on EC2, and finish by showing integration with Anka, by Veertu, Inc., a software suite to create and manage macOS virtual machines running on top of macOS. The combination of EC2 Mac instances and Anka allows for very flexible and responsive CI/CD pipelines for Apple application development.
Amazon EC2 Mac specifics
There are a few differences between Amazon EC2 Mac instances and the other EC2 Linux and Windows instances you may be more familiar with. Amazon EC2 Mac instances are offered as bare-metal instances running on top of single-tenant, Dedicated Hosts to comply with macOS licensing. Let’s break that nomenclature down.
Amazon EC2 bare-metal instances were released in 2017, and allow for direct hardware access by the EC2 instance, bypassing the type-1 Nitro hypervisor. Note that the rest of the AWS Nitro System is still present, including the Nitro Security Chip, which blocks write access to non-volatile memory and provides a hardware root-of-trust, and the Nitro I/O card, which offloads storage and networking I/O to separate custom silicon, conserving CPU and memory for the instance.
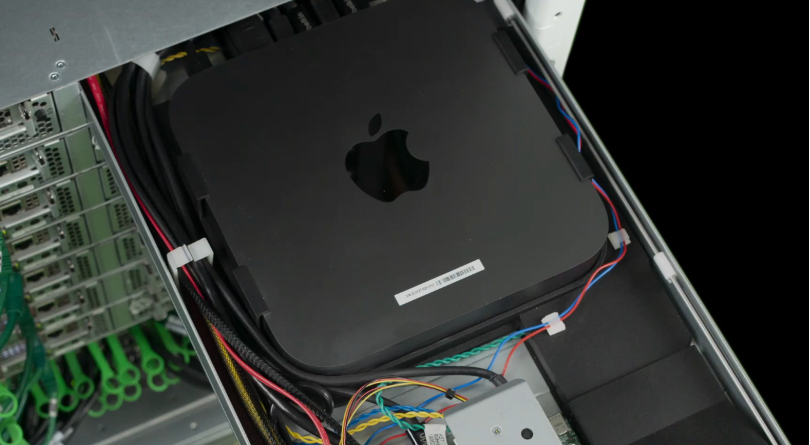
With EC2 Mac instances, you have the full performance of the underlying Mac mini. EC2 Mac instances run on physical host machines that are dedicated to one account, which AWS calls Dedicated Hosts. These are allocated and released as a specific operation (via the AWS Management Console or AWS Command Line Interface) before use. With dedicated hosts, your cost is tallied by the amount of time the host itself is allocated to your AWS account, and any instances running on top are no additional charge. Dedicated Host pricing is available here.
The first step with Amazon EC2 Mac instances is to allocate a dedicated Mac1 host. Let’s do that now via the AWS Command Line Interface (CLI):
As part of Apple’s macOS Software Licensing Agreement (SLA), there is a 24-hour minimum allocation period for macOS in the cloud. This means that once you’ve successfully allocated a dedicated Mac1 host and received a host-id back, a 24-hour clock ‘starts running.’ So the earliest time you can release that Dedicated Host is after the 24-hour period has passed. Trying to release that Dedicated Host before 24 consecutive hours have elapsed will return an error, as seen in the following screenshot:

Note that you are billed per-second whenever you have an allocated host either in the “Available” state or with an instance running on top. You are simply unable to release the host back to AWS until after 24 consecutive hours have elapsed, to comply with the macOS SLA. After those initial 24 hours, you may release the host and stop the per-second billing whenever you’d like.
Because Amazon EC2 Mac instances are bare-metal instances, macOS has direct access to the Mac mini hardware. When you launch an EC2 Mac instance, imagine plugging a USB SSD into the back of a Mac mini and turning it on. That’s roughly analogous to what is happening, only instead of a USB SSD, it’s an up-to-16K-IOPs, up-to-16-TiB, highly durable Amazon Elastic Block Storage (EBS) boot volume connected via the Nitro I/O card to the Mac mini’s Thunderbolt3 port:
Launching an Amazon EC2 Mac instance
Now that you understand Amazon EC2 Mac instance specifics, let’s launch a bare-metal instance on the Dedicated Host you allocated before. All you need is an existing EC2 key pair for SSH access, and you can launch an EC2 Mac instance.
Note that you can change the VolumeSize and VolumeType parameters under the Block Device Mappings to whichever Amazon EBS size and type you’d like. For more information, please see this doc about EBS Block Device Mappings.
The direct access to the underlying hardware from mac1.metal bare-metal instances enables other exciting options for test and build pipelines. Amazon EC2 Mac instances are built on Intel Core i7-based Mac minis, and AWS fully exposes the Intel VT-x and VT-d functionality of that processor. While these instances do not have a type-1 hypervisor (such as the Nitro hypervisor), type-2 virtualization is fully supported. However, any management and orchestration of these type-2 virtual machines is not managed by the EC2 control plane, as they are running on top of a mac1.metal instance. Specifically, for EC2 Mac instances, many of the workloads using type-2 virtual machines require integration with existing build and test pipelines, such as Jenkins, Gitlab, and TeamCity.
Leveraging Anka for Type-2 virtualization
Now that the bare-metal EC2 Mac instance is up and running, we can install virtualization software on it. Anka is a suite of software for creating and managing macOS virtual machines to run on top of macOS. It’s built on top of the native Apple Hypervisor technology for maximum performance, and enables integration with existing container-based DevOps workflows. Unlike other macOS virtualization solutions, Anka lets the macOS operating system manage virtual machines in the same manner as other native macOS applications.
The macOS CI/CD workflow emphasizes automation. Because of this, Anka has multiple options to either integrate with existing workflows/tools or create them from scratch. You can build and tag virtual machine templates (a.k.a “images”) for different versions of macOS using the Anka CLI or via leveraging Hashicorp’s Packer – which also enables automation of the installation of your project/app dependencies – and then manage these images via a CLI, GUI, or REST API. You could also use Packer to build macOS AMIs for the mac1.metal instance itself!
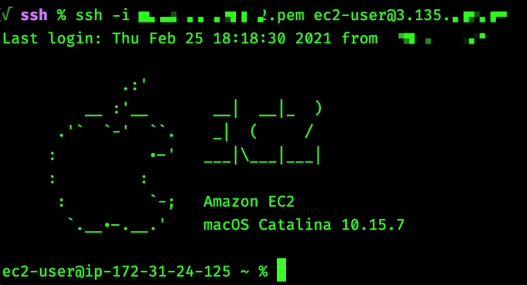
Let’s install Anka on a mac1.metal instance and spin up a Big Sur virtual machine. Start by finding your public IP address and SSHing in using your key-pair, just like any other EC2 instance:
Once connected, you should see the Amazon EC2 SSH prompt:
Next, expand the default Apple File System (APFS) filesystem to fill your entire Amazon EBS boot volume, allowing enough storage space to download Xcode or any other development software:
The following screenshot shows a truncated result of the above commands:

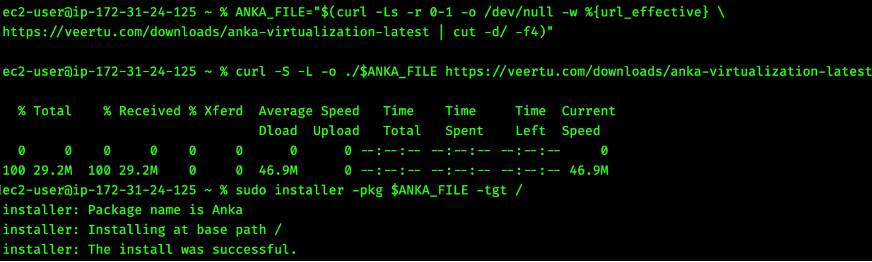
Let’s set an environment variable to make things easier, then download and install the latest version of Anka:
You will receive a “The install was successful.” response once installation is complete:
Let’s verify the version to ensure everything succeeded:
Anka has many licensing options: Anka Develop, Anka Build (Basic, Enterprise, and Enterprise Plus), Anka Flow, and Anka Secure. For this blog, I use Anka Build, as it is available for EC2 Mac instances. Visit the official Veertu documentation to request and install a trial license.
Starting our first Virtual Machine
Once you’re licensed, download a macOS Catalina 10.15.7 installer, then create and start your first virtual machine from the CLI (a GUI is also available) with the following commands:
Much like docker run, you can use Anka to run commands programmatically inside your virtual machine:
Anka also provides a viewer, avoiding the need for VNC to see the desktop:

After you’re done with this virtual machine, you can stop it, suspend it (to enable quick boot when we need it again), clone it to avoid re-creating the virtual machine if you mess it up and need to start over (reusing existing layers and avoiding extra disk space), and push it to your Anka Build Cloud Registry. Let’s delete our virtual machine for now:
Conclusion
Let’s summarize what you’ve done so far: you allocated an EC2 Mac Dedicated Host, launched a mac1.metal instance on it, installed and configured Anka for type-2 virtualization and orchestration, and successfully launched and ran commands inside a macOS virtual machine.
In the real world, you wouldn’t want to be manually interacting with these virtual machines. One of the biggest strengths of Anka is its integration with existing macOS CI/CD software – including plugins to connect Jenkins, TeamCity, GitLab, BuildKite, GitHub Actions, and even exporting metrics to Prometheus. Please visit Anka documentation for more details on how to enable these integrations as part of Anka Build.
With EC2 Mac instances, you can provision macOS environments within minutes, dynamically scale provisioned capacity as needed, remove build bottlenecks, only pay for actual usage, and leverage additional AWS services, such as Amazon Virtual Private Cloud (VPC), Amazon Machine Images (AMIs), Elastic Load Balancing (ELB), Amazon FSx, and Amazon CloudWatch. With Anka, you can maximize the resource utilization provided by the instance and ensure clean build/test environments for your CI/CD pipelines. You can automate macOS virtual machine creation and setup using industry standard infrastructure-as-code tools, store and distribute virtual machine templates and tags with your specific dependencies using the Anka Registry, and automatically request virtual machines for your CI/CD jobs using plugins — even develop custom integrations with Anka’s REST APIs.
All of this means faster, consistent builds and convenient, distributed testing, without having to procure, maintain, and manage physical computers specifically for Apple application development. To learn more about EC2 Mac instances, please visit the product page. Go out there and build!