AWS Partner Network (APN) Blog
Isolating SaaS Tenants with Dynamically Generated IAM Policies
By Bill Tarr, Sr. Partner Solutions Architect, AWS SaaS Factory
 Many software-as-a-service (SaaS) organizations leverage AWS Identity and Access Management (IAM) as the backbone of their tenant isolation strategy.
IAM enables organizations to define a series of policies and roles that can be used to ensure tenants are not allowed to cross tenant boundaries when accessing resources.
The challenge here is that, to make this work, many organizations have to create separate policies for each tenant. This often creates an explosion of tenant policies which, in turn, can push the account limits of IAM.
More importantly, this proliferation of policies can get unwieldy to manage and update. Imagine changing some aspect of your policy and rolling out that change to every tenant in your system. It quickly begins to undermine the manageability and agility of your environment.
This post by AWS SaaS Factory looks at how dynamic policy generation creates a more scalable and manageable isolation experience. This post focuses on the foundations of this experience, illustrating techniques for introducing the mechanisms needed to support dynamic policy generation.
Isolation Fundamentals with IAM
Before we dig in, let’s look at a simple, static version of how you might implement tenant isolation with IAM using the Security Token Service (STS).

Figure 1 − Multi-tenant security model with tenant specific roles and policies.
Incoming requests include an authentication header with a JSON Web Token (JWT) (1) that includes data identifying the current tenant. These tokens are signed by an identity provider, guaranteeing the JWT cannot be modified and the tenant identity can be trusted.
We retrieve (2) a tenant specific policy from IAM, and ask STS to return a credential (3) scoped by our policy. When we attempt to access (4) Amazon DynamoDB, our permission (5) to make the SDK call to getItem is checked by IAM, allowing or rejecting access based on the tenant-specific policy we retrieved.
This model is simple, and it does restrict access to specific Amazon DynamoDB data for our tenant. The policy simply gives our tenant permission to use DynamoDB data. However, this model requires you to create a custom policy, like the one below, for every tenant in your system:
1   {
2      "Effect": "Allow",
3      "Action": [
4            "dynamodb:*"
5       ],
6       "Resource": [
7            "arn:aws:dynamodb:us-west-2:123456789012:table/Employee"
8       ],
9       "Condition": {
10          "ForAllValues:StringEquals": {
11              "dynamodb: LeadingKeys": [ "Tenant1" ]
12          }
13      }
14   }
Figure 2 – Custom IAM policy required for each tenant.
We’ll examine this policy in more detail later, but for now just note that (line 11) the tenant identifier is hard coded into our policy.
To better conceptualize this problem, consider that your SaaS environment may have hundreds or even thousands of tenants using your system. In this scenario, each tenant requires its own set of nearly identical isolation policies. You can see how the number of policies quickly multiplies as each new tenant is added to the system.
Even if you don’t run into account limits on IAM resources, your team will likely find it difficult to manage all of these tenant isolation artifacts.
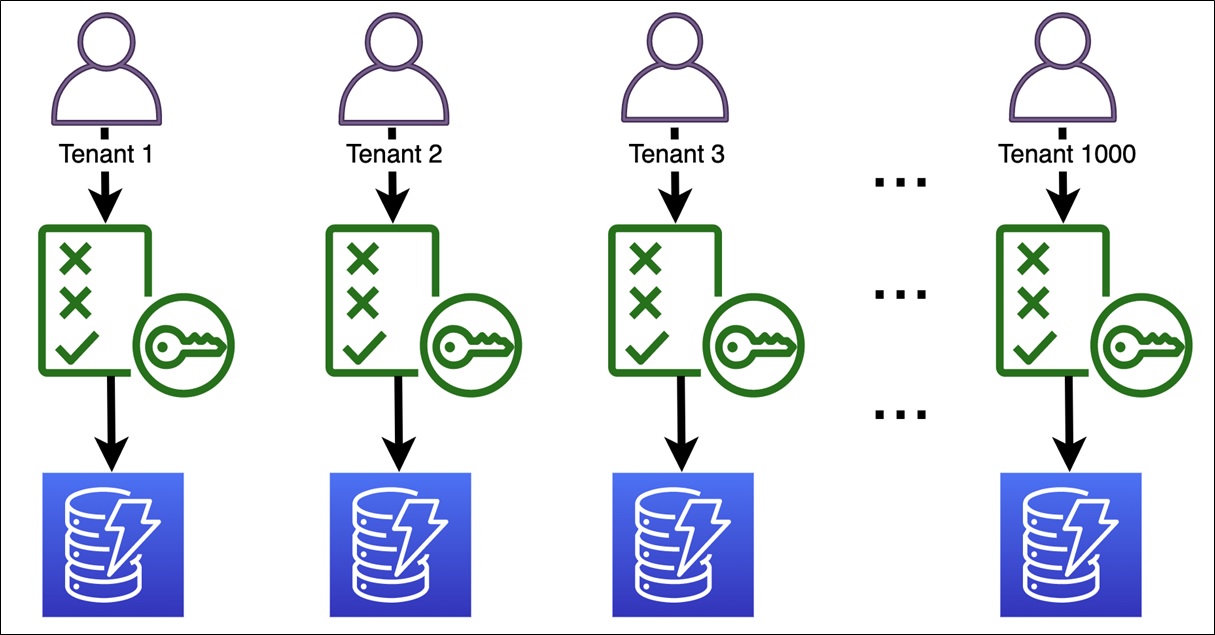
Figure 3 – Number of IAM roles multiples rapidly as you add tenants.
Other issues with this solution can affect scalability and security. As you release new functionality for your service, you need to change your existing IAM resources and update processes for onboarding. This creates a tight coupling between your services and your security infrastructure, which may increase the complexity of your deployment process.
This also limits your team’s ability to focus on delivering new functionality. As your tenant isolation and security story becomes more difficult to maintain and test, you’ll also be increasing the possibility of introducing a mistake that could expose tenant data.
Dynamic Policy Generation
We’ve established some of the challenges SaaS developers face managing tenant isolation using IAM. Let’s discuss how we address these problems through dynamic policy generation.
Consider again our example of trying to restrict a user’s access to an Amazon DynamoDB resource. This time, though, we don’t store our policy in IAM. Instead, we turn our policy into a template where static tenant references are replaced by templated placeholders.
The table and tenant placeholders in the following template can now be hydrated with the appropriate values at runtime. We’ll look at some ways to facilitate the processes of template hydration later. For now, just consider it a string that we’ll find and replace.
1  {
2    "Effect": "Allow",
3    "Action": [
4         "dynamodb:*"
5    ],
6    "Resource": [
7         "arn:aws:dynamodb:*:*:table/{{table}}"
8    ],
9    "Condition": {
10        "ForAllValues:StringEquals": {
11            "dynamodb: LeadingKeys": [ "{{tenant}}" ]
12        }
13    }
14 }
Figure 4 – Dynamic policy template used for multiple tenants.
Now that our policy is in its final form, let’s examine it in more detail. First, you’ll notice that the action (line 4) in this template is broadly scoped. This gives us the most flexibility to apply this permission to a variety of tenant security use cases.
In this strategy, the resources (line 7) are not tenant-specific, but note that some strategies will enforce tenant isolation at the resource level. The condition operator (line 9) limits our tenant to only seeing rows with a key that begins with a specific tenant identifier value (line 11).
To learn more about this strategy, read Multi-Tenant Storage with Amazon DynamoDB.
Assuming a Role
While policies are at the core of enforcing isolation, we still need to think about how these policies get applied and enforced. This is where the notion of assuming roles comes in. The easiest way to visualize a role is as a collection of policies, but the real power of roles lies in how we can use them.
Roles are independent of users, so a user can temporarily take on a role and assume that role’s permissions. So how does our dynamically generated policy work with a role? STS lets us pull together the role with the policy we generated. STS combines the permissions in our role and our dynamically generated policy, so our user gets just the permissions that are present in both our policy and our role.
For our example, the role must contain an inline policy allowing access to an Amazon DynamoDB resource. Notice the following role’s policy. It allows anyone access to DynamoDB resources without any tenant-specific limitations.
1 {
2  "Version": "2012-10-17",
3  "Statement": [
4    {
5      "Action": [
6        "dynamodb:GetItem",
7        "dynamodb:BatchGetItem",
8        "dynamodb:Query",
9        "dynamodb:DescribeTable"
10      ],
11      "Resource": "arn:aws:dynamodb:us-west-2:123456789012:table/Employee",
12      "Effect": "Allow"
13    }
14  ]
15 }
Figure 5 – Inline policy without tenant-specific limitations.
Now, examine the following dynamically generated policy, and compare it to the preceding inline policy. This is the resulting policy after we assume our role using STS, while passing in our dynamically generated policy.
1 {
2  "Version": "2012-10-17",
3  "Statement": [
4    {
5      "Action": [
6        "dynamodb:GetItem",
7        "dynamodb:BatchGetItem",
8        "dynamodb:Query",
9        "dynamodb:DescribeTable"
10      ],
11      "Resource": "arn:aws:dynamodb:us-west-2:123456789012:table/Employee",
12      "Effect": "Allow",
13      "Condition": {
14        "ForAllValues:StringEquals": {
15          "dynamodb: LeadingKeys": [ "tenant1" ]
16        }
17      }
18    }
19  ]
20 }
Figure 6 – Dynamically generated policy with a condition operator.
Notice the role’s inline policy has scoped down our Actions list, while our dynamically scoped policy has added a condition operator that limits access to data that is keyed with our tenant identifier.
From a code perspective, assuming a role with STS is straightforward. Figure 7 shows an abbreviated version of code that assumes a new role.
1  AssumeRoleResponse response = sts.assumeRole (ar -> ar
2       .webIdentityToken(openIdToken)
3       .policy(scopedPolicy)
4       .roleArn(role));
5  Credentials tenantCredentials = response.credentials();
6  DynamoDbClient dynamoDbClient = DynamoDbClient.builder()
7       .credentialsProvider(tenantCredentials)
8       .build();
Figure 7 – Abbreviated version of code that assumes a new role.
When we call STS assumeRole (line 1), we essentially pass in our dynamically generated policy (line 3) and our role (line 4). The result of this call to STS is a credential, which has been scoped down to just the permissions in the policy shown in Figure 7.
The service SDK clients such as DynamoDbClient (line 5) accept the resulting credentials (line 6). Any calls made with that client now have our scoped permissions applied.
The benefits of dynamically generated policies should be apparent. We started with a model that required us to create and maintain both a role and policy for each tenant just for our single microservice security scenario. Now, we just have to introduce a mechanism that manages the generation of our policies and assumption of roles.
Introducing a Token Vending Machine
Let’s look at how to simplify the management of dynamic policy generation by introducing a token vending machine. The primary role of the token vending machine is to create a single path to acquiring tokens while hiding the details of how those tokens are managed and generated. This simplifies the code in our microservices, and moves tenant isolation outside the view of day-to-day development.
However, it’s just as important that a token vending machine utilize a collection of permission templates that we can use to dynamically generate policies at runtime. This means we are no longer creating, maintaining, and worrying about physical policies in IAM for each tenant we onboard.
Here’s a conceptual model of a token vending machine.

Figure 8 – Conceptual model of a token vending machine.
The primary takeaway from Figure 8 should be that the application developer no longer interacts directly with policies and roles. The application code calls the token vending machine and receives a token, which has the required tenant security conditions already baked in.
Let’s walk through the steps in our diagram to see how a token vending machine works.
Our incoming HTTP headers include an authentication header with a bearer token, which in this example is a JSON Web Token (JWT) that holds our tenant identity (1). The JWT Manager (2) verifies the token, and extracts the tenant from the claims. Then, we inject the tenant (3) and any other variables needed into the permission templates (4). After loading the templates from file, the policies are hydrated with the variables we passed in.
The result is a fully formed dynamically generated policy. That dynamic policy takes the place of the many static tenant specific policies in our initial example. Then, our policy is used in assuming a role (6), which takes the place of the tenant-specific roles we previously required. Finally, the token vending machine returns (7, 8) the newly minted token, or credentials, to our developer.
Our implementation uses an AWS Lambda layer, which has the advantage of being distinct from our AWS Lambda code, and separately deployable. In other environments, this could be deployed as a Java Archive (JAR) file or a separately deployable artifact.
We’ve gone over the theoretical model in some depth. Let’s dive into the code that drives our example. These are the few lines of code that are needed to get the scoped credentials from the token vending machine:
1  TokenVendingMachine tokenVendorMachine = new TokenVendingMachine();
2  AwsCredentialsProvider tenantCredentials = tokenVendingMachine
    .vendToken(jwtToken);
This call simply passes through the JWT token that came in as part of the HTTP request. The credentials that are returned by this call can be used to access other resources and be assured the tenant policies will be applied. Your code, for example, might use these credentials to access Amazon Simple Storage Service (Amazon S3):
1 S3Client s3Client = S3Client.builder()
2             .credentialsProvider(tenantCredentials)
3             .build();
Notice how these credentials are applied when instantiating an Amazon S3 client. Most, if not all, service clients require an AwsCredentialProvider, so these tokens can be used to limit cross-tenant access across numerous services.
Permission Templates
The core of the token vending machine is a collection of permission template files. We already looked at one template in our example of dynamically generated policies. Let’s examine how we manage these template files, allowing them to evolve independently of our code.
Each template and service may have a different approach to describing the isolation policies. Let’s look at how you might create an Amazon S3 policy, for example, to restrict access at a folder level.
The template in Figure 9 allows access to the ListBuckets action (4) for those tenants that have a prefix matching the tenant identifier. This limits a tenant’s ability to interact with objects in folders that belong to other tenants.
1  {
2   "Effect": "Allow",
3   "Action": [
4     "s3:ListBucket"
5   ],
6   "Resource": [
7     "arn:aws:s3:::{{bucket}}"
8   ],
9   "Condition": {
10    "StringLike": {
11      "s3:prefix": [
12        "{{tenant}}",
13        "{{tenant}}/",
14        "{{tenant}}/*"
15      ]
16    }
17  }
18 },
19 {
20  "Effect": "Allow",
21  "Action": [
22    "s3:GetObject",
23    "s3:PutObject",
24    "s3:DeleteObject"
25   ],
26   "Resource": [
27        "arn:aws:s3:::{{bucket}}/{{tenant}}/*"
28   ]
29 }
Figure 9 – Template that restricts access at the folder level.
These two strategies are just a starting point of course, as any number of tenant security strategies could be added over time.
The lifecycle of your permission templates is also important. The templates are maintained separate from your code, and are deployed and versioned independently. For example, you could have a template repository containing all your templates with its own versioning. Alternatively, a configuration server, or a template service, could be an option for separation of concerns.
We’ve coded our example as a module in our repository. Since our example is written in Java, we’ve added a Maven pom.xml file. You can deploy the template as a JAR artifact.
Since the templates are just JSON files, it may be preferable to think of them as part of your infrastructure, as a code deployment process. Deploying them to a file system such as Amazon Elastic File System (Amazon EFS) or Amazon S3, both of which are accessible across your architecture, would fit well in a microservice architecture.
Generating a Policy from Templates
Now that we have our policies defined outside of IAM, we can introduce code that loads our permission templates into statements and adds them to dynamically scoped policies at runtime. Let’s consider how we hydrate the permission templates to create policies.
Here’s a simple Java class called PolicyGenerator, which is responsible for creating a policy:
1 String scopedPolicy = PolicyGenerator.generator()
2                .s3FolderPerTenant(bucket)
3                .dynamoLeadingKey(tableName)
4                .tenant(tenantIdentifier)
5                .generatePolicy();
The objective is to make it as easy as possible for the developer to add properly formed and valid security permissions. This process requires access to the tenant identifier that was extracted from the JWT.
Each permission method we add also takes as parameters the required values needed to hydrate that specific template. The token vending machine in our example is set up to add the permissions the microservice needs, and locate the values it needs, from environmental variables.
As shown in Figure 10, PolicyGenerator can also be split up so the permissions can be instantiated at one layer (like application code) and the tenant can be added by the token vending machine. We don’t want our developers to have to handle the tenant identity.
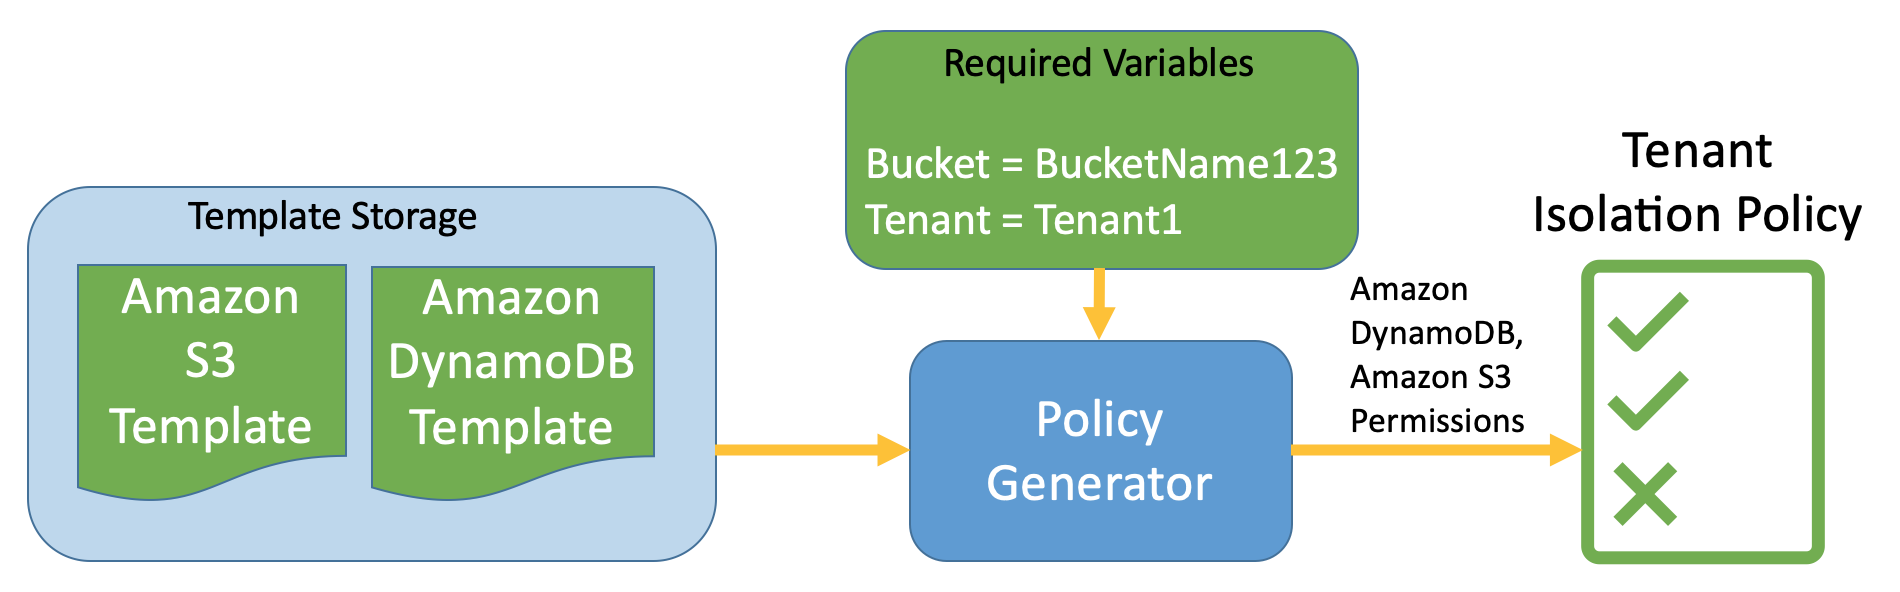
Figure 10 – Policy generator hydrating templates into a policy.
This illustration of our PolicyGenerator object shows how we are really just tying our template files to the variables needed to hydrate them. In this case, our Amazon S3 template requires a bucket variable, and our Amazon DynamoDB template requires a table name. Of course, both require a tenant identifier. The end result of our PolicyGenerator is a dynamically generated policy.
You could implement your policy-generating solution with any template engine that can replace the variables in a template. One option is Mustache, a simple, language-independent template engine.
In our example, the list of templates produced by PolicyGenerator are combined with the data (bucket, table and tenant) into a policy using Mustache as follows:
1 String resolvedStatements = Mustache.compiler()
2             .compile(statements)
3             .execute(data);
4 String scopedPolicy = "{ \"Version\": \"2012-10-17\",\n
                    \"Statement\": [\n" + resolvedStatements + " ]\n}";
The template engine (line 2) takes a string loaded from the files of our permission templates and hydrates it (line 3) with the data we provided as inputs, including our tenant. The outer wiring of the policy (line 4) can be a template itself, or just added manually as in this example.
Policy Size Limitation
It’s important to keep in mind policies have a size limit. Because you are assuming an IAM role, your policy is considered an inline policy, which has a limit of 2,048 characters. We just need to be sure the combined size of our dynamically generated policies does not exceed this character limit.
If you find yourself running into this limit, there’s a good chance you are using your role in too many contexts. Consider roles that are specific to a microservice or application, or roles shared by a group of similar functions. More specific roles require fewer permissions in your policy. Limiting the permissions assigned to roles improves your tenant isolation model.
AWS Lambda Layer
Now that we’ve examined all the moving parts of our solution in detail, let’s discuss our implementation choices. If you remember, our AWS Lambda example makes a single method call to a Lambda layer to request a token. We’ve chosen to implement a Lambda layer to encapsulate tenant security, allowing the token vending machine logic to evolve separately from our Lambda code.
The Lambda layer allows us to implement a variety of security token calls separate from our Lambda code, like our example of Amazon S3 and Amazon DynamoDB. This could also be done with Amazon Simple Query Service (SQS), AWS Secrets Manager, and other AWS services.
The end result is application code that can conform to the principle of least privilege. The application is only able to access the essential services and tenant data it needs. Minimum duplication of security and tenant isolation code makes life easier for developers, helping them focus on delivering functionality and improving scalability.
The following sample code shows one method of implementing our Lambda layer:
1 JwtClaimsManager jwtClaimsManager = JwtClaimsManager.builder()
2      .headers(headers)
3      .build();
4
5 String tenant = jwtClaimsManager.getTenantId(“custom:tenant_id”);
6 PolicyGenerator PolicyGenerator = PolicyGenerator.builder()
7     .s3FolderPerTenant(bucket)
8          .tenant(tenant);
9 String scopedPolicy = policyGenerator.generatePolicy();
10
11 AssumeRoleResponse assumeRoleResponse = sts
12     .assumeRole(assumeRoleReq -> assumeRoleReq
13                  .durationSeconds(durationSeconds)
14                  .policy(scopedPolicy)
15                  .roleArn(role)
16                  .roleSessionName(tenant)
17                );
18
19 Credentials tenantCredentials = assumeRoleResponse.credentials();
Figure 11 – One method of implementing AWS Lambda layer.
Our layer creates a policy generator, creates a scoped policy, and passes it along with our role. Under the hood, we invoke STS to assume our role with our dynamically generated policy as we previously reviewed.
Let’s go through the internals of our layer to see what’s being done. While the implementation is hidden within our code, the JwtClaimsManager (line 1) is responsible for processing our token and extracting (line 5) the tenant identifier, which we add (line 8) to our PolicyGenerator. The resulting policy (line 10) is passed to STS assumeRole (line 12). Finally, we retrieve our credentials (line 19) from the response from STS.
The tenantCredentials returned are the tenant-scoped permissions that we’ll use to access only the services we explicitly enabled. In our example, we have permission templates for an Amazon DynamoDB table and an S3 folder, so the resulting credential can only be used to retrieve DynamoDB and S3 data that belongs to this tenant.
Other Architectures
While our example uses AWS Lambda and Lambda layers, with a few changes, token vending machines can be implemented in a variety of architectures. Let’s see how this looks in an architecture that does not use JWT or AWS Lambda.
Some SaaS providers deploy agents in remote environments that report back to their servers. Those agents could communicate their tenant identity through the subdomains of SSL x509 certificates. A microservice deployed on Amazon Elastic Compute Cloud (Amazon EC2) instances receiving data from those agents could still use a token vending machine.
As you can see, our token vending machine concept would remain similar.

Figure 12 – An alternative architecture for a token vending machine.
A Reverse Proxy, perhaps NGINX or KONG, terminates the connection, and adds the tenant identity to a custom header. Our token vending machine needs to be adjusted to consume that new header.
Of course, an Amazon EC2 application could just as easily use an identity provider and JWT, but it’s useful to consider this architecture. Despite using certificates to determine tenant identity, the token vending machine concept remains largely the same.
Conclusion
Dynamic policy generation can help SaaS providers implement tenant isolation. Our example implementation of a token vending machine provides a dynamic and manageable mechanism to implement dynamic policy generation.
As you implement your own token vending machine, keep in mind a few points:
- Permission templates should provide separation of concerns for your isolation strategies, allowing them to evolve independently from our applications
- Policies should enable the principle of least privilege, limiting our tenants’ access to services and data as tightly as possible
- Tenant identity should be resolved consistently and verifiably within your solution
- Your solution should be encapsulated and reusable across all of your SaaS services, returning a tenant-scoped credential any of your services can use to call AWS SDKs.
Keep in mind that we’ve reviewed just a couple of the possible architectures for a token vending machine. Our AWS Lambda and Amazon EC2 examples demonstrate how, with just a couple of changes, you can adapt our architecture to very different models of token vending machine.
For more information about the examples in this post, see the AWS SaaS Factory GitHub repo. The repo contains a sample application and AWS CloudFormation resources to automatically provision the necessary infrastructure in your AWS account.

About AWS SaaS Factory
AWS SaaS Factory helps organizations at any stage of the SaaS journey. Whether looking to build new products, migrate existing applications, or optimize SaaS solutions on AWS, we can help. Visit the AWS SaaS Factory Insights Hub to discover more technical and business content and best practices.
SaaS builders are encouraged to reach out to their account representative to inquire about engagement models and to work with the AWS SaaS Factory team.
Sign up to stay informed about the latest SaaS on AWS news, resources, and events.