AWS for SAP
AWS DevOps tools for SAP, Part 1: Cloud Foundry Apps
This post was written by Marcel Toerpe and Kenny Rajan
The business benefits of running mission critical SAP workloads on Amazon Web Services (AWS) are already well proven. At AWS, we love partnering with our customers to migrate and modernize SAP environments using our AWS services. In fact, we discussed how customers continue to adopt AWS to run their SAP workloads and use additional AWS services to accelerate the innovation in their SAP environments in the AWS momentum with SAP blog.
As customers continue to adopt AWS to run their SAP solutions, they also realize that many SAP Cloud Platform (SCP) services run on AWS. This provides a depth and breadth of unparalleled opportunities to build SAP extensions on a solid infrastructure foundation. With this strong technical foundation, customers enjoy the prospects of developing SAP business applications on SCP with options to extend and integrate between AWS services and SCP. See our Accelerate your innovations by using SAP Cloud Platform on AWS blog to learn about different integration patterns.
Automate your operations within DevOps Tooling by AWS
DevOps is the combination of cultural philosophies, practices, and tools that increase an organization’s ability to deliver applications and services at high velocity. This includes evolving and improving products at a faster pace than organizations using traditional software development and infrastructure management processes. This speed enables organizations to better serve their customers and compete more effectively in the market. AWS DevOps tools help you practice DevOps at your company and automate manual tasks through continuous integration (CI) and continuous delivery and deployment (CD).
In this series of blog posts, we provide steps to set up a simplified continuous integration and continuous delivery (CI/CD) pipeline pattern for SCP Cloud Foundry (part 1) and Fiori apps (part 2). We will do this without setting up or managing Jenkins instances or other infrastructure and without any upfront investments. You can easily create these pipelines using AWS CodePipeline as the orchestrator, AWS CodeBuild for performing builds, AWS CodeDeploy to automate application deployments, Amazon Simple Notification Service for approval mechanism, and AWS CodeCommit for source control.
Architecture overview of SCP Cloud Foundry app integration with AWS DevOps
AWS CI/CD pipeline services are designed for businesses that want to improve applications frequently and require a reliable delivery process. The following diagram shows the high-level architecture of how to use AWS CodePipeline with AWS CodeBuild and AWS CodeDeploy as a serverless CI/CD toolset. AWS Cloud9 a cloud-based integrated development environment(IDE) is used to clone the repository, develop the SCP project, and store the project artifacts in AWS CodeCommit as a source control repository.

Figure 1: Architecture overview of SCP Cloud Foundry app integration with AWS DevOps
Prerequisites
Before you set up the pipeline, we assume that following prerequisites have been completed.
- Access and authorization to an SCP regular account or SCP trial account.
Creating the CodeCommit repository
- Create GIT credentials for your IAM user. See the CodeCommit setup documentation to generate GIT credentials.
- Create a new AWS CodeCommit repository. Choose an appropriate unique name with description.
- Copy the repository url upon successful creation. Your connection type will be HTTPS.

Figure 2: Code commit repository git clone url
Create a new AWS Cloud9 environment
- For this blog, we use AWS Cloud9 as development environment. See AWS Cloud9 setup instructions to create an EC2 environment, with t2.micro as the instance type and Ubuntu as the underlying OS. If you prefer Amazon Linux, you need to switch from Amazon Corretto to OpenJDK before continuing.
- Clone the empty repository created from the CodeCommit environment and enter the directory.

Figure 3: AWS Cloud9 clone directory
- Create a new sample application for your SCP Cloud Foundry by using the below mvn archetype command, a project template provided by SAP. See the SAP documentation to understand the SCP HelloWorld sample application project.
$ mvn archetype:generate -DarchetypeGroupId=com.sap.cloud.s4hana.archetypes -DarchetypeArtifactId=scp-cf-tomee -DarchetypeVersion=RELEASE
- Enter the usual module parameters when mvn requests the below information.
- groupId – an identifier representing your group, company, or organization (for example, com.mycompany.cloud)
- artifactId – an identifier for your application, which must be unique across an SAP Cloud Platform Region (for example, my-aws-sap-cf-app – this artifactId cannot be used by any other SCP user)
- version – the version of your application (for example, 1.0-SNAPSHOT = default).
- package – the name of the top-level package your source code resides in (default = groupId, e.g. com.mycompany.cloud)
- Alerts – input Y to gitignore and skipUsageAnalytics alerts
- After project generation is successful, move the mvn project folders one node up in the AWS Cloud9 folder hierarchy. You move the mvn project sub folders and files to the empty CodeCommit repository folder created in the earlier step. With AWS Cloud9 you can simply drag and drop the contents from one folder to another. See the following screenshot.
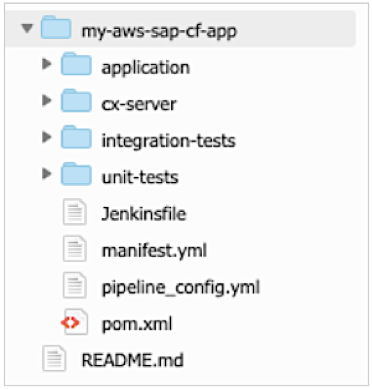
Figure 4: AWS Cloud9 directory path
- From your AWS Cloud9 environment, click new file from the menu and copy the below code snippet. Save the file as buildspec.yml file in the CodeCommit repository folder for your CI/CD pipeline execution. The integration test only works properly with openjdk8 => Choose Ubuntu as AWS CodeBuild Image.
version: 0.2

phases:
  install:
    runtime-versions:
      java: openjdk8

  build:
    commands:
       - mvn package

reports: #New
  SurefireReportsUnitTest: # CodeBuild will create a report group called "SurefireReports".
    files: #Store all of the files
      - '*.xml'
    base-directory: 'unit-tests/target/surefire-reports' # Location of the reports
  SurefireReportsIntegrationTest: # CodeBuild will create a report group called "SurefireReports".
    files: #Store all of the files
      - '*.xml'
    base-directory: 'integration-tests/target/surefire-reports' # Location of the reports

artifacts:
  files:
    - application/target/*
    - deployspec.yml
    - manifest.yml
- From your AWS Cloud9 environment, click “New File,” copy the below code snippet, and save the file as deployspec.yml file in the CodeCommit repository folder for your CI/CD pipeline execution.
version: 0.2

env:
  parameter-store:
    SCP_USER: SCP_USER
    SCP_PW: SCP_PW

phases:
  install:
    runtime-versions:
      java: openjdk8

  build:
    commands:
       - wget -q -O - https://packages.cloudfoundry.org/debian/cli.cloudfoundry.org.key | apt-key add
       - echo "deb https://packages.cloudfoundry.org/debian stable main" | tee   /etc/apt/sources.list.d/cloudfoundry-cli.list
       - apt-get update
       - apt-get install cf-cli
       - cf api https://api.cf.eu10.hana.ondemand.com #SCP@AWS FRA - Adjust if required
       - echo "Deploying as"
       - echo $SCP_USER
       - cf login -u $SCP_USER -p $SCP_PW -o <OrgId> -s <SpaceId> #Adjust
       - cf push
- Copy the API endpoint, Org name, and space from your SCP Cloud Foundry account. Replace the cf api, <OrgId> -s <SpaceId> parameter in code snippet and save the file as deployspec.yml for your CI/CD pipeline execution.

Figure 5: SCP Cloud Foundry account view
- Validate the application repository folder in AWS Cloud9 environment to verify the deployspec.yml and buildspec.yml paths.
Create Parameter Store inside AWS Systems Manager
Store your SCP tenant secrets (user and password) for your inside AWS Systems Manager Parameter Store. See AWS Systems Manager documentation for configuration steps.
- You store your SCP user login in the parameter SCP_USER.
- You store your SCP user password in the parameter SCP_PW.
Add the project code to the CodeCommit repository
- From your EC2 environment project folder path, execute the git commands to push the code.
$ git add *
$ git commit -m 'test'
$ git push- Validate the CodeCommit repository.
SNS Topic & Subscription
- Create a new SNS topic and choose a desired name (make sure to stick to the same AWS Region). See SNS documentation for configuration steps.
- Create a related email subscription. After your subscription is created, subscribers must confirm that the subscription sent to the subscribed email.
AWS CodePipeline for the build process
- Configure CodePipeline for the build process. See AWS CodePipleline documentation for configuration steps.
- CodePipeline [SM1] name can be like your application/artifactId used in AWS Cloud9 step. Keep the default settings for service role/role name and use the checkbox to allow CodePipeline to create a service role so it can be used with this new pipeline.
- Click next and select AWS CodeCommit as the source provider. Choose the Cloud Foundry repository you created in the previous steps with branch as the master. Click next to add the build stage.
- Choose AWS CodeBuild as the build provider with the appropriate Region. Click create project and provide project name similar to your application /artifactId used in AWS Cloud9 steps. Then, select the Ubuntu Image, the runtime as Standard, the image version as aws/codebuild/standard:2.0, and the environment variables as Linux. Click Continue to CodePipeline.
- Proceed with the CodePipeline wizard to add the build stage. Click Next, and then click Skip Deploy Stage to finish the wizard. You will add deploy stage later.
- In the next screen, click Create Pipeline. Once the pipeline has been successfully created, it will automatically be triggered based on your last commit. Validate the build output by clicking the Details link inside the build stage
- You should see the aggregated test reports using the recently announced CodeBuild reports.
AWS Pipeline for Deploy process
- Choose your Cloud Foundry pipeline and go to the edit mode. Click Add a New Stage after your build stage and name it Deploy.
- Add a new Action Group and Action “Approve”. Select the SNS topic created for this pipeline
- Create an Additional Action and name it Deploy. Select AWS CodeBuild as the Action provider, select your AWS Region, and Build Artifact as the Artifacts input.
- Click create project and provide a project name similar to your application <artifactId>-deploy used in AWS Cloud9 steps. Select the Ubuntu Image, runtime as Standard, aws/codebuild/standard:2.0 as the image version, and Linux as the environment variables.
- Choose the New Service Role option and copy the role name to attach SSM policy.
- In the Buildspec section of create project screen, enter deployspec.yml as name and finish the CodeBuild wizard.
Adding policy to AWS CodeDeploy to access the SSM parameter for the deploy process
- Use a new browser to open a new AWS Management Console screen. Choose IAM service to attach the SSM policy to the CodeBuild role. See the documentation to add IAM Identity Permissions for configuration steps.
- Locate the CodeDeploy role created during the deploy pipeline configuration. Search using the keyword role name and add a “AmazonSSMReadOnlyAccess” or similar policy. Attach the IAM policy to the role.
- Return to the CodePipeline screen and complete the wizard steps. Hit Save!
Test the pipeline and validate the build
- To trigger a new pipeline execution, you can modify any file inside the repository using AWS Cloud9and push changes. Enter a comment (#test) in deployspec.yml and execute the below comments from your AWS Cloud9.
$ git add *
$ git commit -m 'test'
$ git push- From your pipeline console, check if the code build is completed successfully. You should see the successful deployment message.
- Next navigate to build project section and validate build logs and copy the SCP route url.

Figure 6: Build project logs
- Launch the routes URL in your browser to open your application.

Figure 7: Application page
- You should see the application routes information in your SCP Cockpit application section
Conclusion
In part 1 of this blog series, we’ve showed you how to leverage the AWS DevOps Tooling such as AWS CodePipeline, AWS CodeCommit, Amazon SNS and AWS CodeBuild as serverless CI/CD toolset to orchestrate, build, validate, approve, and deploy. We have also used AWS Cloud9 as an integrated development environment for rich code-editing experience that works with continuous delivery solutions in AWS CodePipeline. In part 2, we’ll talk about using AWS DevOps toolsets for your SAP Fiori apps.