AWS Big Data Blog
Accelerate SQL development with SageMaker Data Agent in Query Editor
When you develop SQL against Amazon Redshift and Amazon Athena, you spend time finding the right tables across hundreds of databases, writing complex joins and aggregations, debugging failed queries without context from previous attempts, and re-specifying filters for every new question. Amazon SageMaker Data Agent in Query Editor takes a different approach. You describe what you need in natural language, and the Data Agent generates the SQL. It references your actual tables through AWS Glue Data Catalog, proposes step-by-step plans for complex questions, retains context across your session, and offers one-click error recovery with Fix with AI. In this post, you learn how to use Data Agent in Query Editor to explore data, build multi-step analyses, recover from errors, and summarize results using a public education dataset.
Solution overview
You can go from a natural language question to executable SQL in seconds. Data Agent in Query Editor provides a conversational interface with direct access to your AWS data environment, so you spend less time on query mechanics and more time on analysis. Data Agent in Query Editor focuses specifically on SQL development against Amazon Redshift and Amazon Athena. (For Python, SQL, and PySpark across broader analytical and machine learning (ML) workloads, use Data Agent in notebooks.)
Data Agent provides four key capabilities:
- Catalog-aware SQL generation. You don’t need to browse catalog structures or memorize schema details. Data Agent reads your table metadata directly.
- Querybook and session context. You build on previous work. Data Agent uses context from your earlier queries and results.
- Step-by-step planning. You review and approve a structured plan before Data Agent generates SQL.
- Fix with AI. You recover from failed queries with one click.
Data Agent integrates with AWS Glue Data Catalog and reads your actual table names, column types, descriptions, and relationships, so generated SQL references your real tables. Each follow-up question builds on your current Query Editor session—the SQL cells in your querybook, the active connection, your selected cell, and execution results from previously run cells. For complex requests, Data Agent produces a structured plan that specifies which data to retrieve, how to aggregate it, and what filters to apply. You review and approve each step before Data Agent proceeds. When a query fails, choose Fix with AI to get a corrected query based on the error and the failed cell’s context.
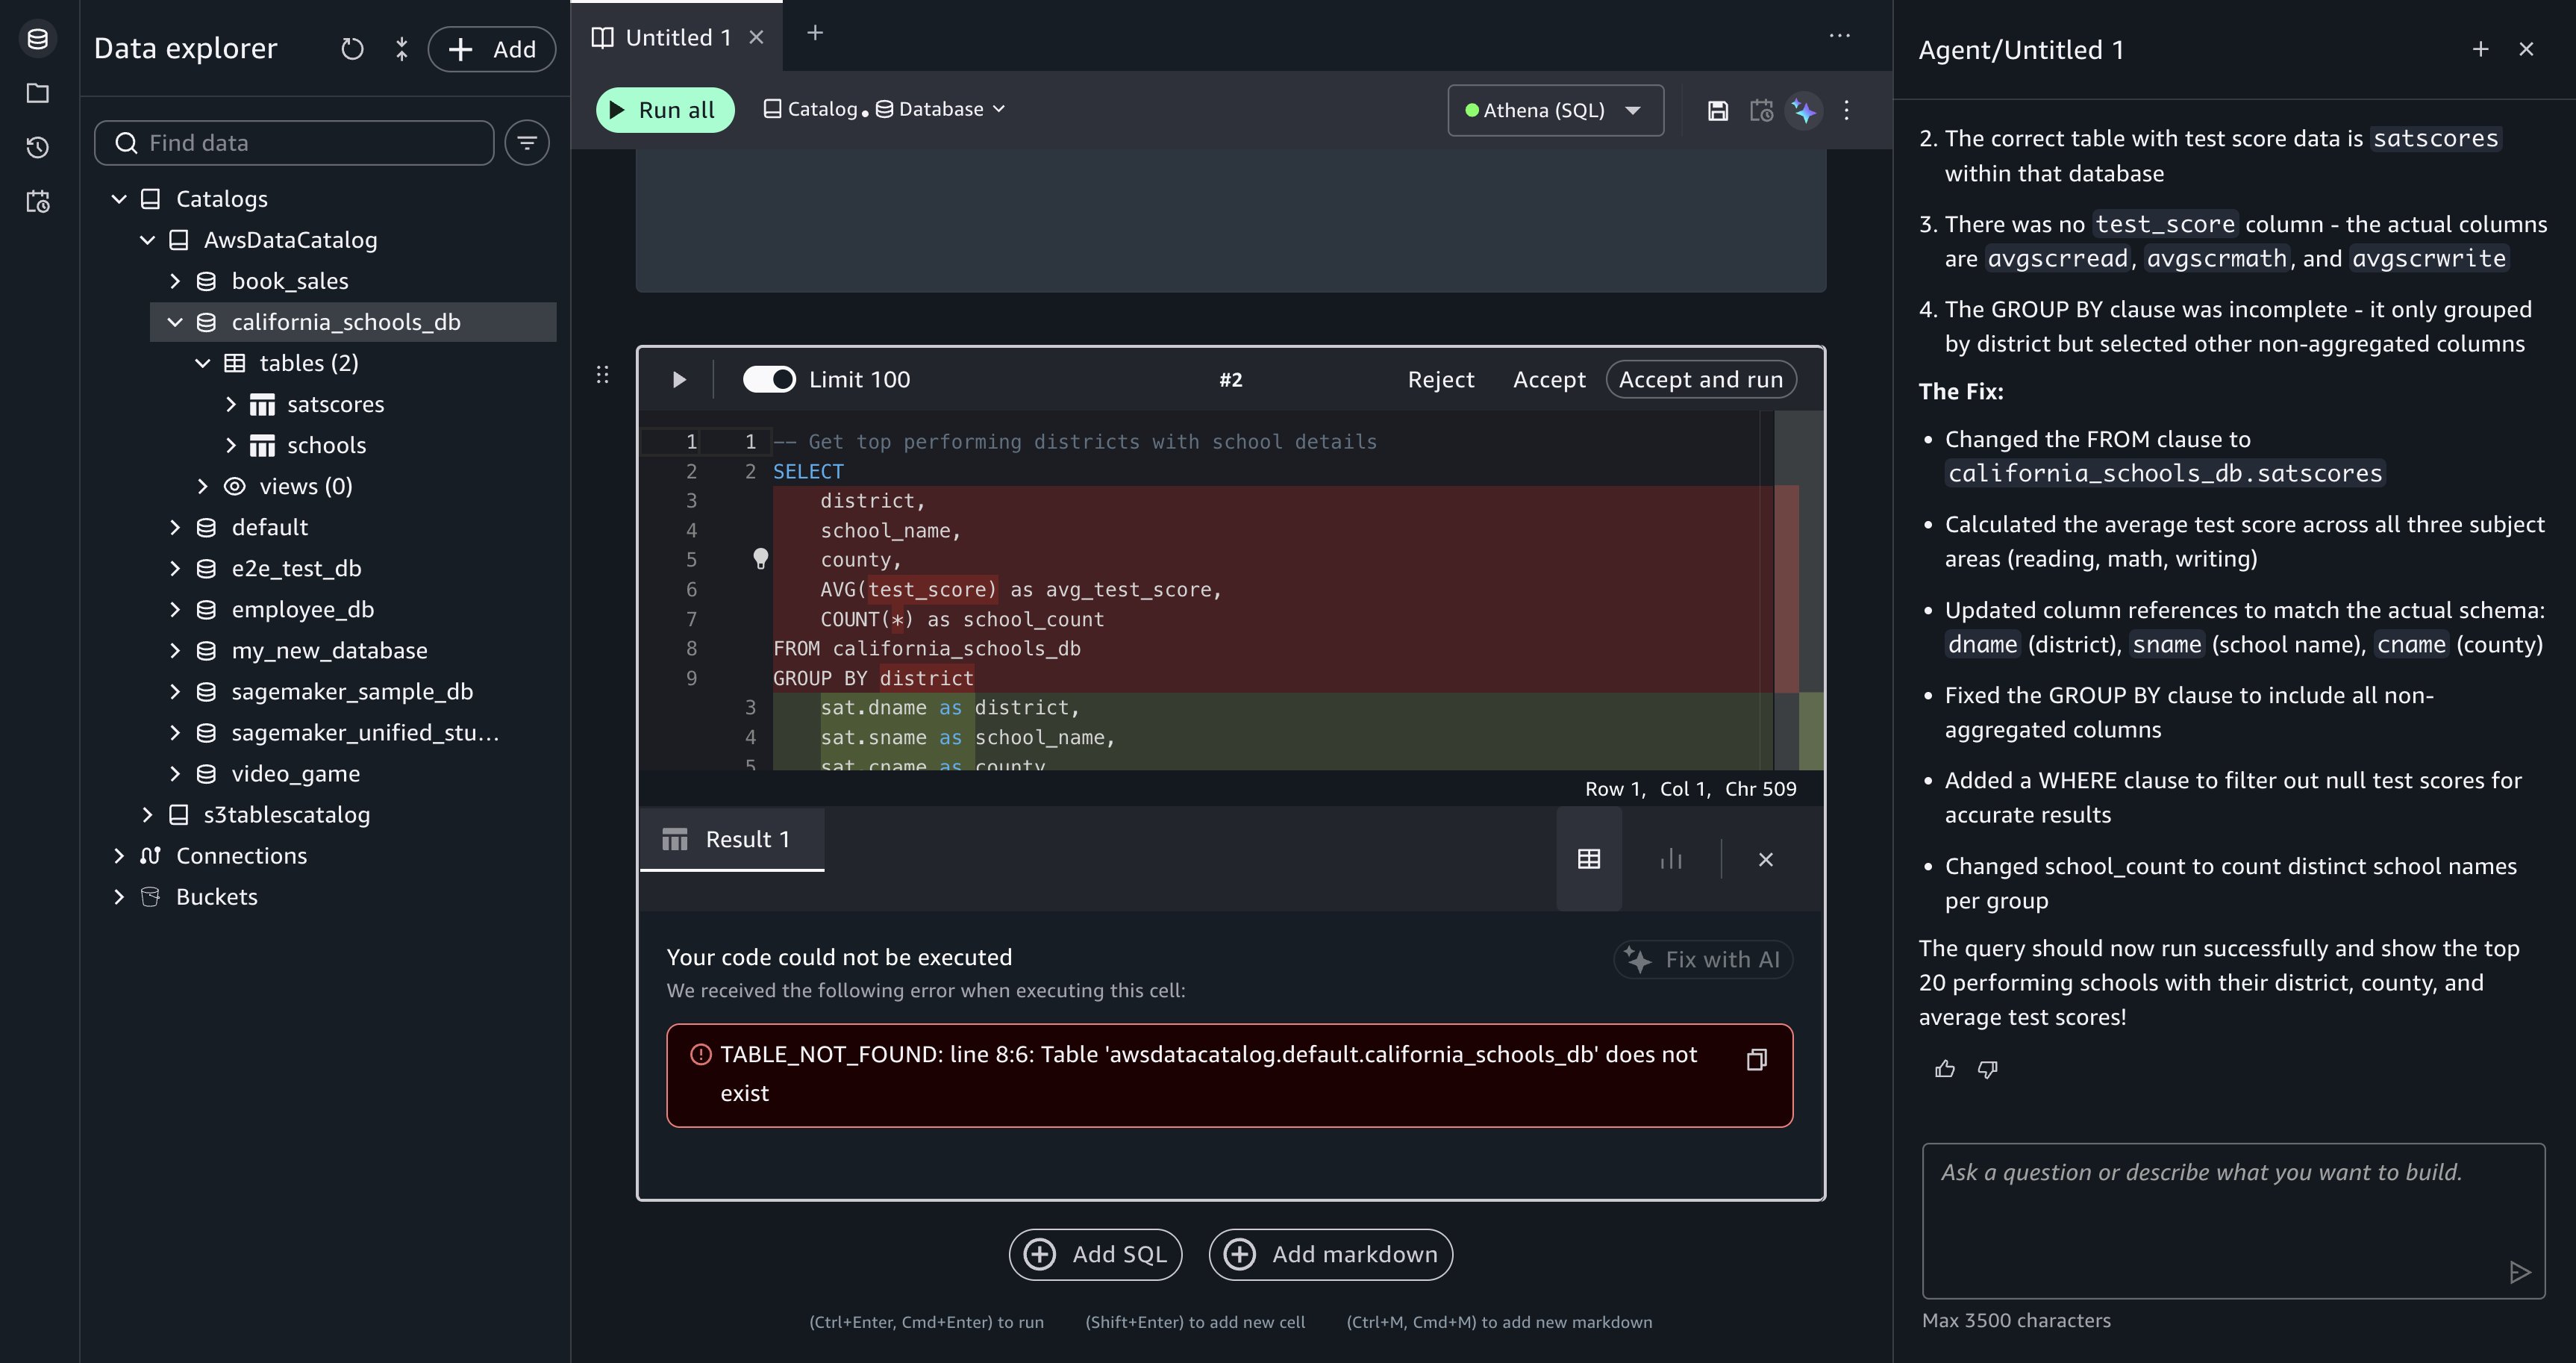
[Figure 1: The Query Editor Fix with AI panel, showing a corrected SQL query ready for your review.]
Walkthrough: Education data analysis
In this section, you use Data Agent in Query Editor to analyze California schools data and identify where SAT improvement investment has the most impact. The walkthrough covers four tasks:
- Explore available data.
- Build a multi-step analysis plan.
- Summarize insights from your queries.
- Recover from a failed query.
The same workflow applies to your own data, whether you are analyzing sales figures, operational metrics, or financial records.
The California schools dataset contains SAT score results, school demographic information, and county-level data for public schools across California. The dataset includes tables that organize SAT scores by subject (reading, writing, math), school details (name, address, county, district), and enrollment figures. After you upload the data into your project database, you directly access the tables from Query Editor through your Amazon Athena or Amazon Redshift Lakehouse connection.
Prerequisites
To complete this walkthrough, you need intermediate SQL knowledge and basic familiarity with the AWS Management Console. You don’t need prior AWS Glue experience, but familiarity with data catalogs (centralized metadata repositories) helps.
You can choose one of two setup paths:
- Quick start (5 minutes). SageMaker Unified Studio provides a sample database (
sagemaker_sample_db) with pre-loaded data. To explore it, choose Data in the navigation pane, expand AwsDataCatalog, and selectsagemaker_sample_db. - Full setup (30–45 minutes). Upload the California schools dataset into your project’s Lakehouse database. This dataset is publicly available from the California Department of Education. Download the SAT scores, school information, and county-level data files, then upload them through the SageMaker Unified Studio UI. In your project, go to Build, choose Query editor, right-click your project database in the Data explorer, and choose Create table. Drag and drop each CSV file to create the tables. SageMaker Unified Studio stores the data in the project-managed Amazon Simple Storage Service (Amazon S3) location, registers it in AWS Glue Data Catalog, and applies AWS Lake Formation governance automatically.
Running queries against Amazon Athena or Amazon Redshift might incur costs. For pricing details, refer to Amazon Athena pricing and Amazon Redshift pricing. For detailed setup instructions, refer to AWS Identity and Access Management (IAM)-based domains and projects. Before starting the walkthrough, you must have a SageMaker Unified Studio IAM-based domain with a project using the SQL analytics or All Capabilities project profile. The project automatically provisions an AWS Glue database, the required IAM role, and Athena or Redshift Lakehouse connections.
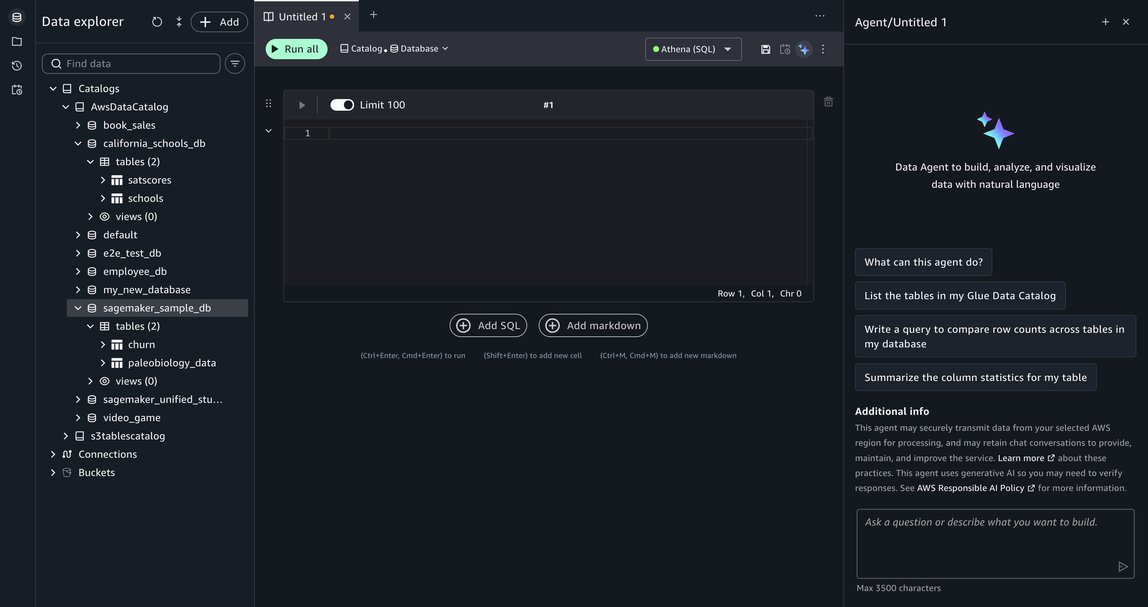
[Figure 2: The Data Explorer panel in Query Editor, showing the california_schools_db and sagemaker_sample_db tables.]
Explore available data. To start, enter the following prompt in the Data Agent panel:
Data Agent searches AWS Glue Data Catalog, locates the relevant tables, and generates an initial exploratory query that retrieves SAT score records. It adds a SQL cell directly to your querybook.
- Review the generated SQL in the comparison view, which highlights the proposed code.
- Choose Accept, Reject, or Accept and run.
- After you run the cell, the results appear inline, giving you a view of the data (column names, score ranges, and the number of records) before you write SQL.
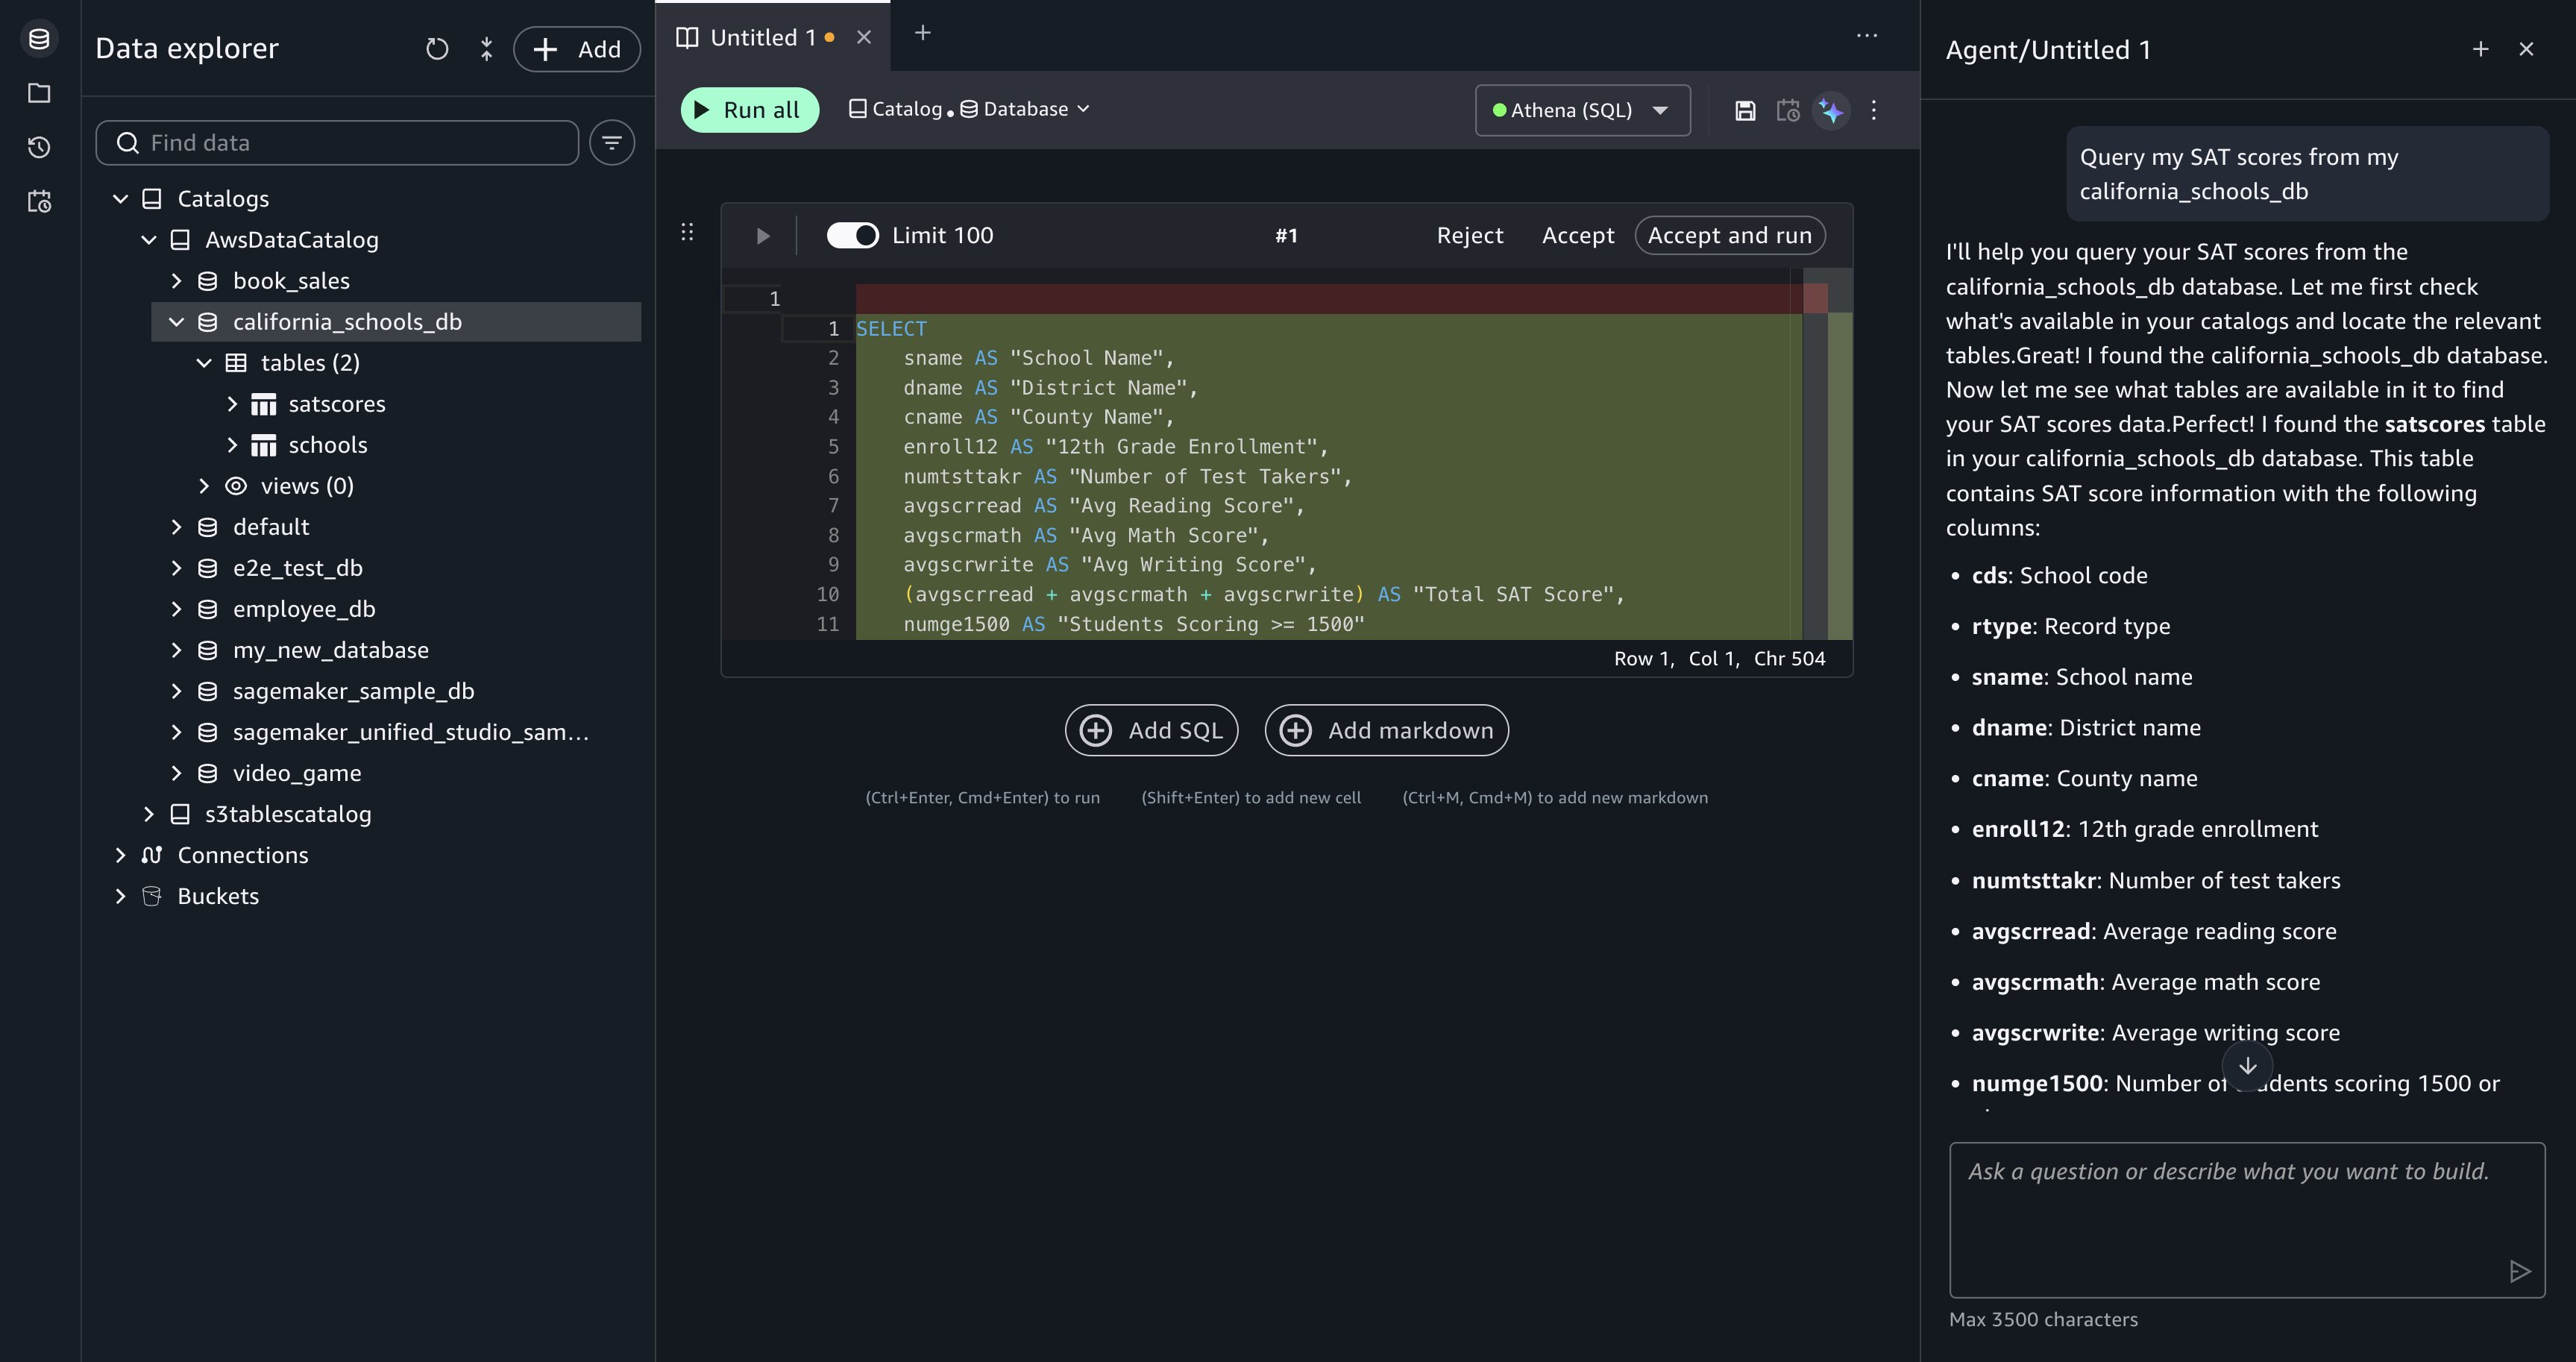
[Figure 3: Data Agent returns an exploratory query for the california_schools_db tables, ready for your review.]
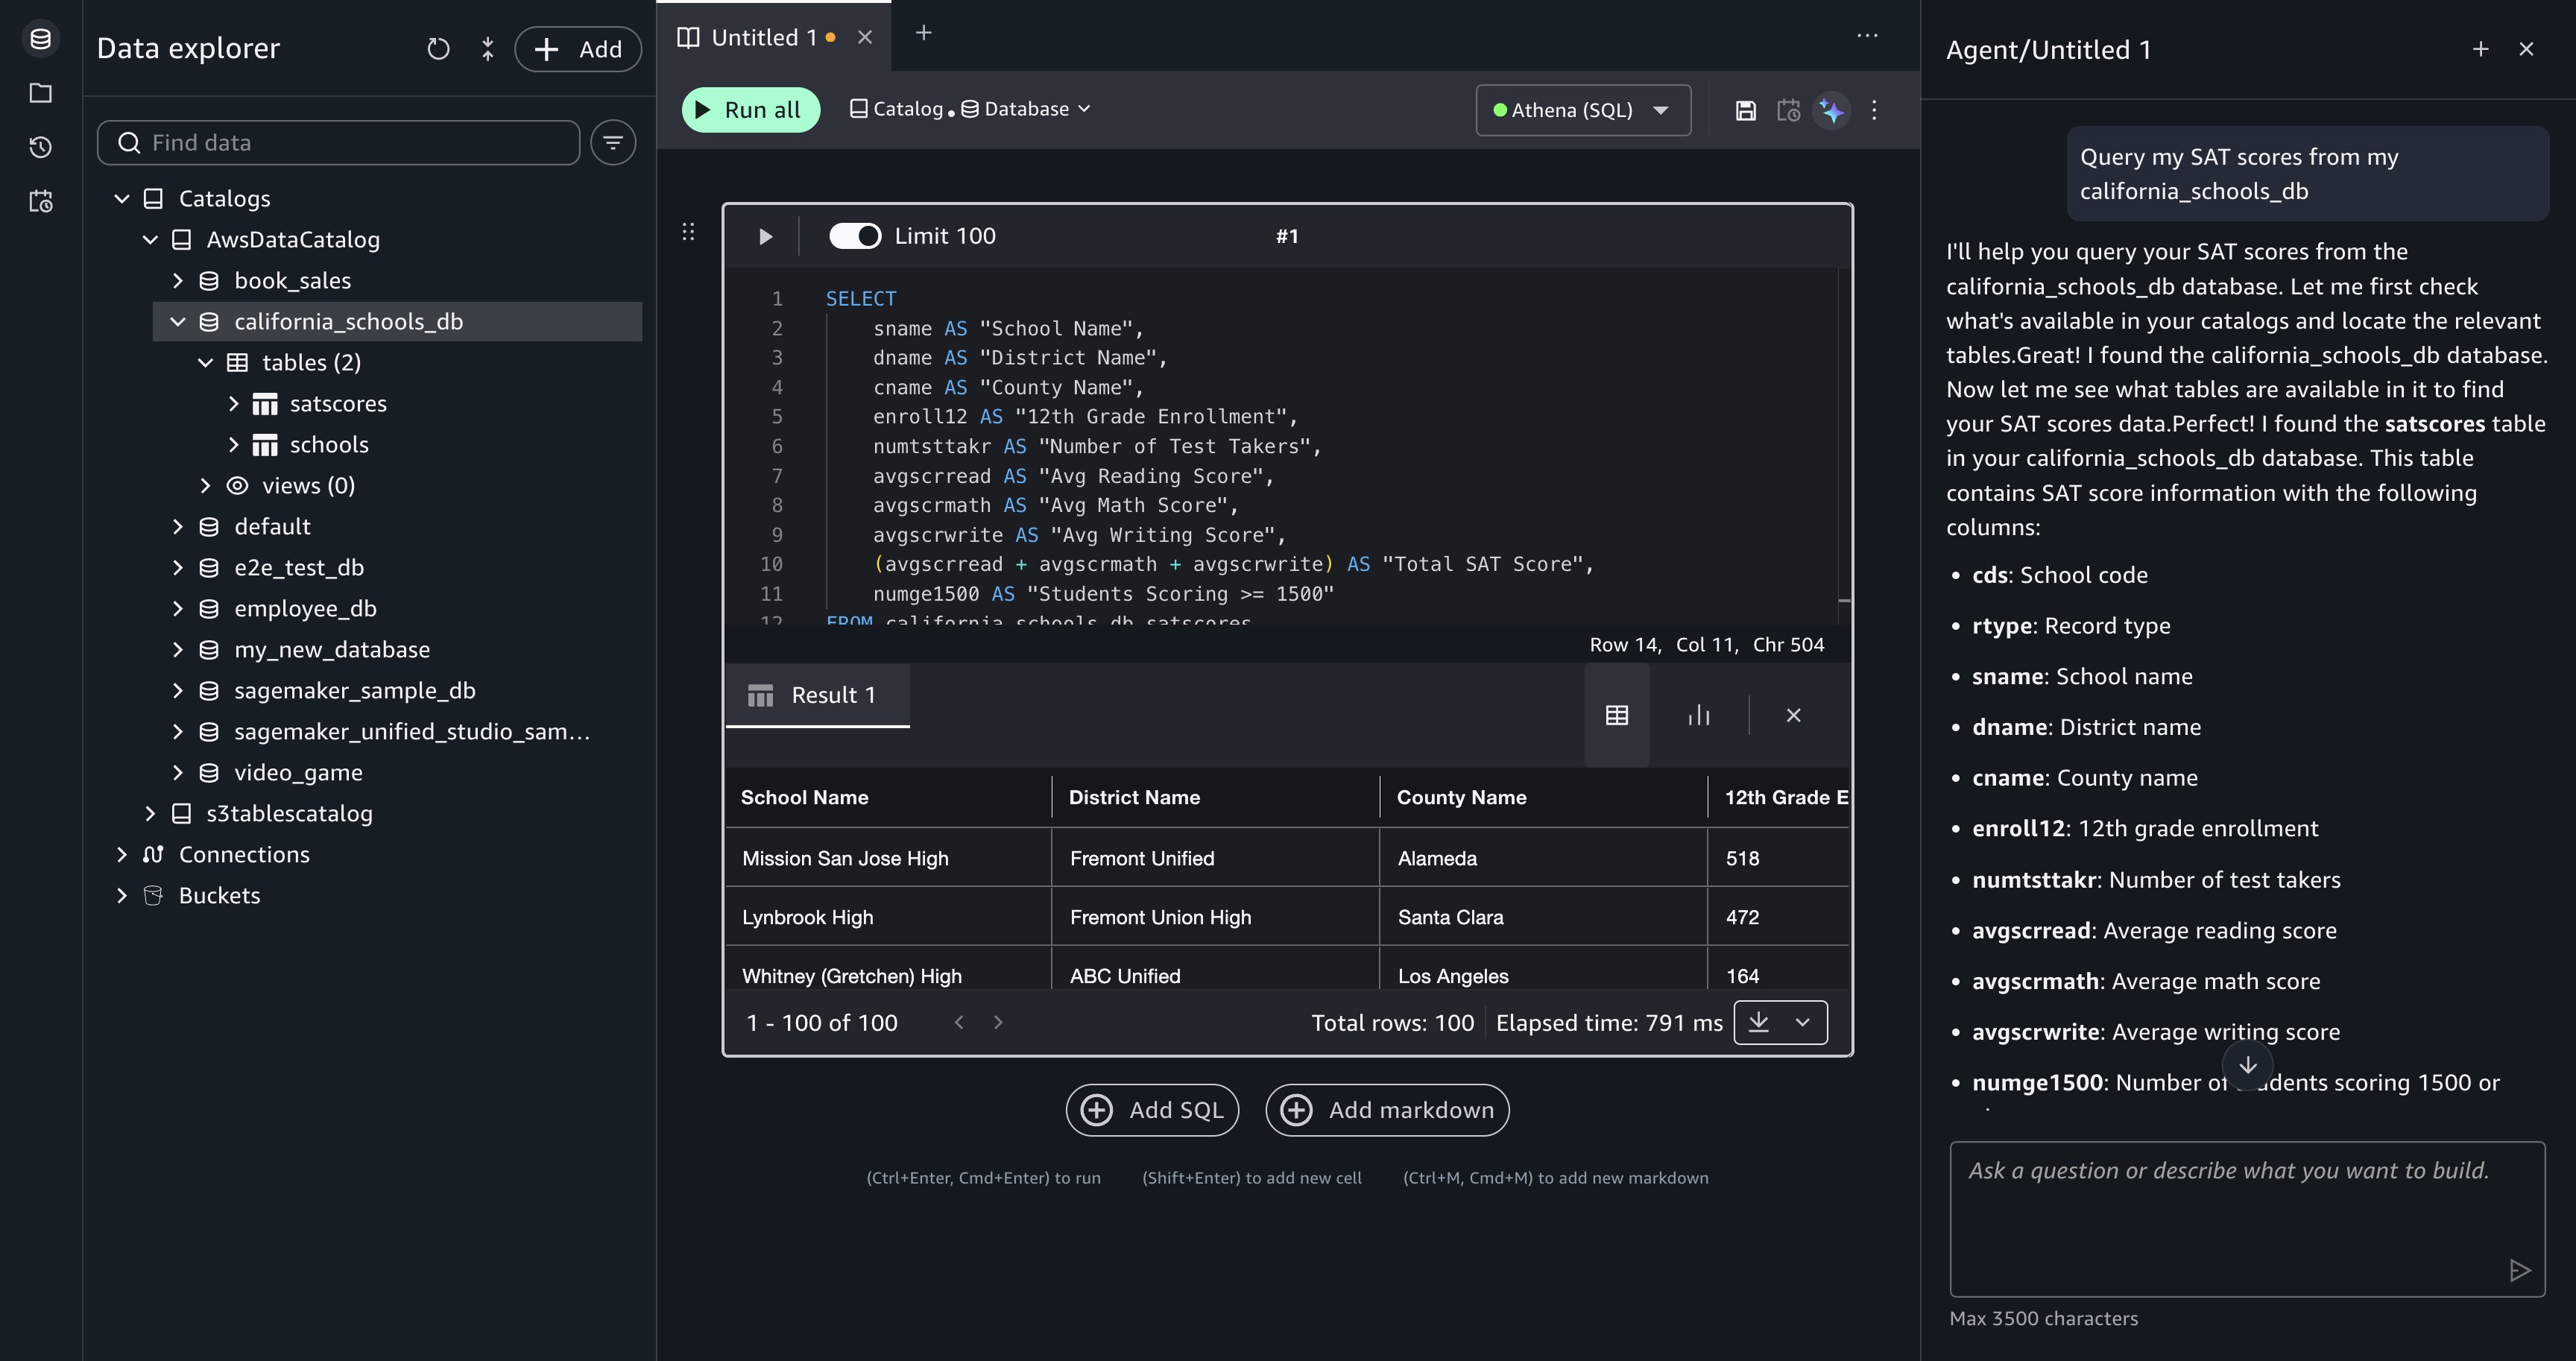
[Figure 4: The SQL query results appear beneath the cell after you choose Accept and run.]
Build a multi-step analysis plan. With the data explored, enter a more complex analytical question:
Data Agent proposes a step-by-step plan before generating SQL. For this request, Data Agent breaks the question into three steps:
- Aggregate SAT scores by county and subject to find performance patterns.
- Filter to counties with a sufficient number of schools and rank the lowest performers.
- Join school address data to produce a final detailed list.
Review the plan in the Data Agent panel and choose Run step-by-step to proceed.
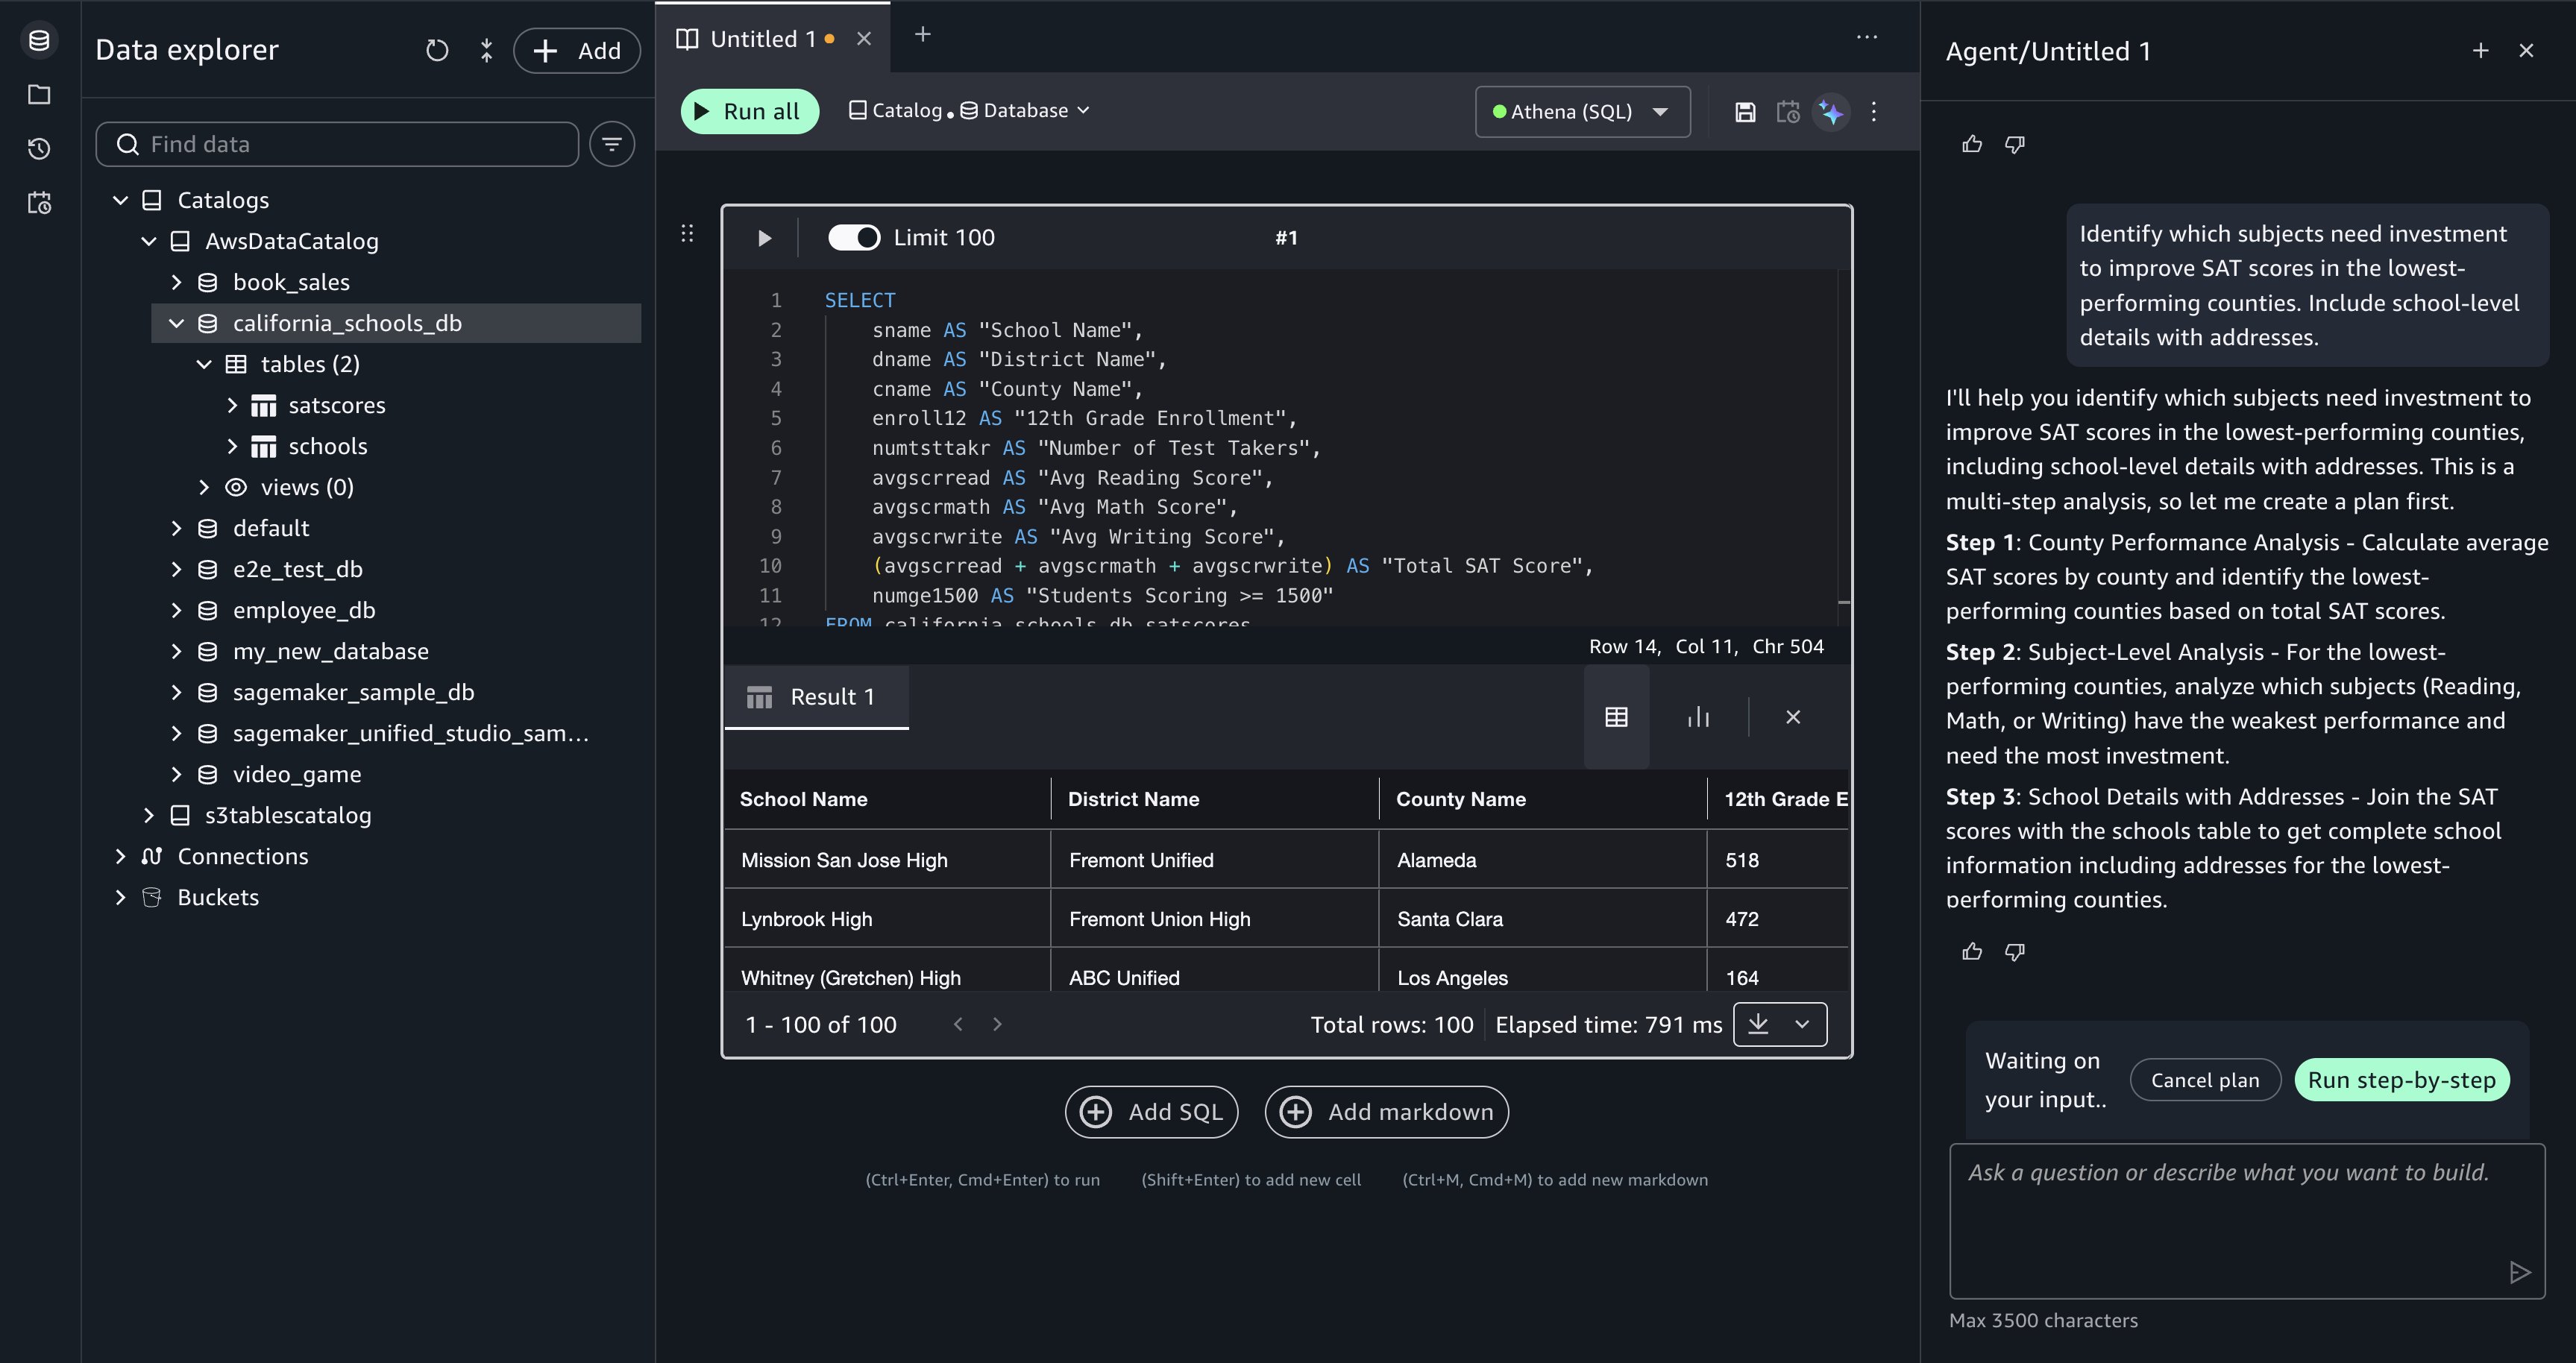
[Figure 5: Data Agent proposes a multi-step plan with options to Cancel plan or Run step-by-step.]
Data Agent generates SQL for each step and adds it as a separate querybook cell. Review each cell’s SQL in the comparison view, then choose Accept and run to execute it. The results from each step are visible inline, so you can verify the intermediate output (county-level aggregations, the filtered ranking, and the final school list) before moving to the next step. When the steps are complete, your querybook contains the full analytical progression from raw scores to a detailed investment list.
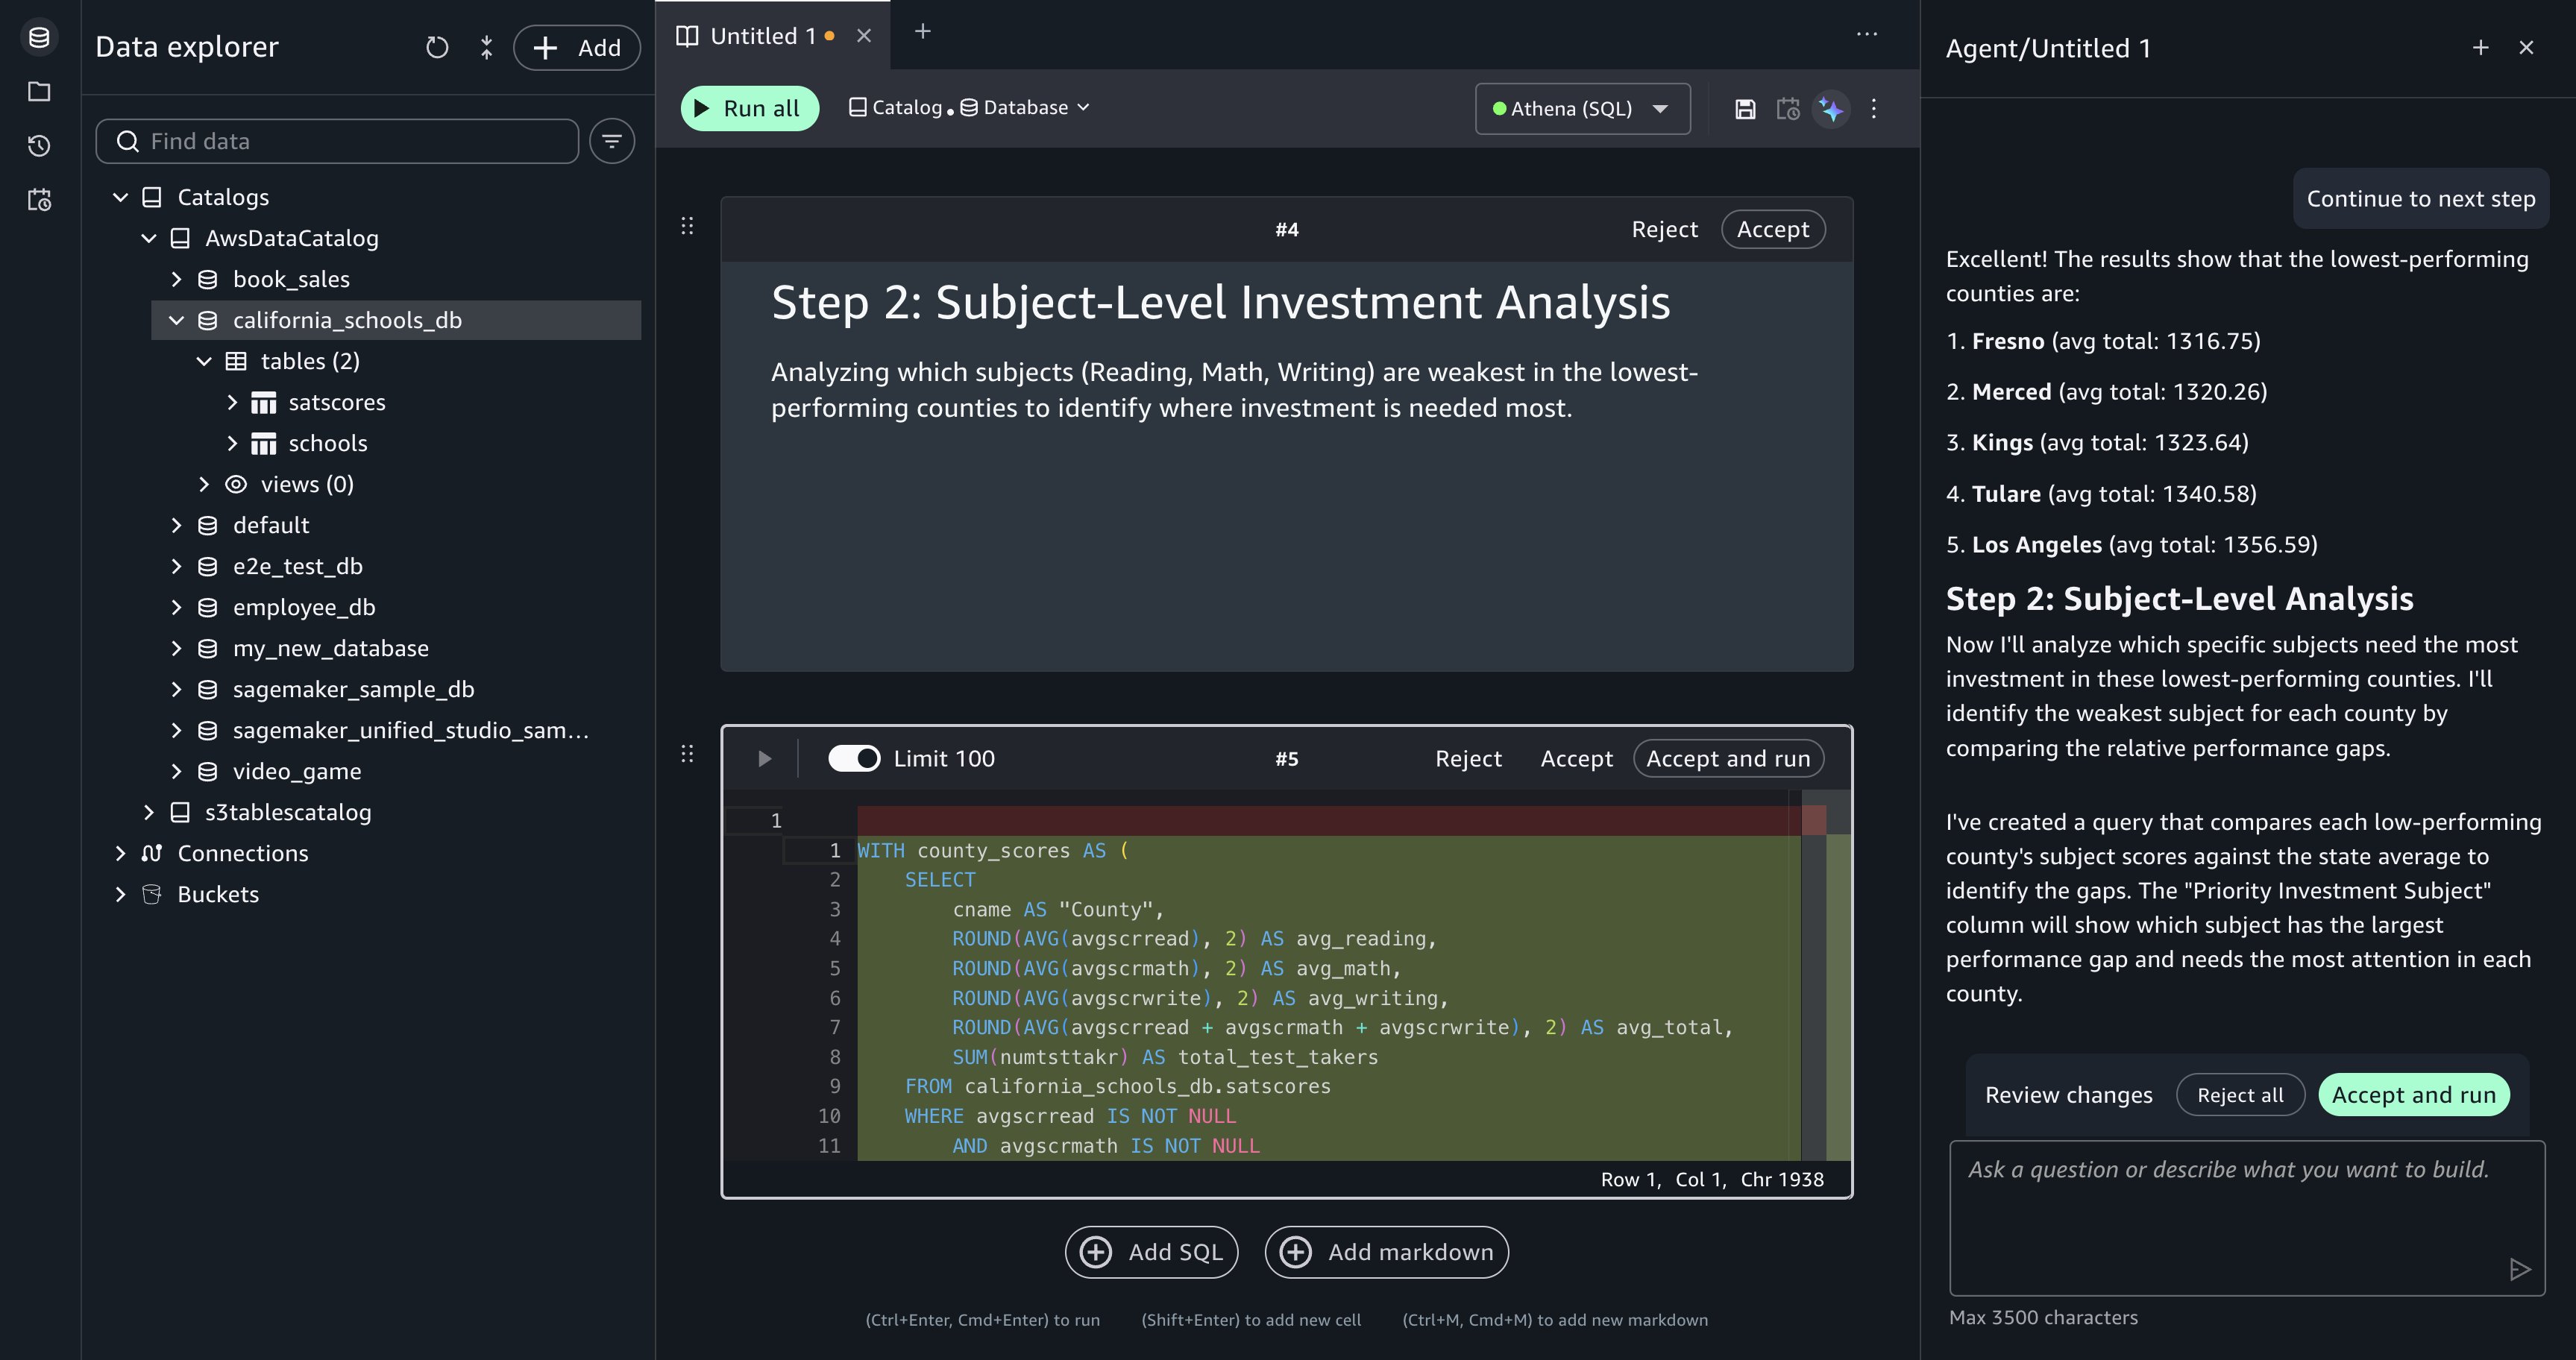
[Figure 6: Each plan step produces a querybook cell that you can review and run independently.]
Summarize insights from your queries. After running the analysis, enter the following prompt:
Data Agent has context on your querybook, including the SQL and the query results from each cell. It generates a natural language summary: which counties are underperforming, which subjects (reading, writing, or math) need the most attention in each county, and how many schools appear on the investment list. This summary provides a starting point for a report or presentation.
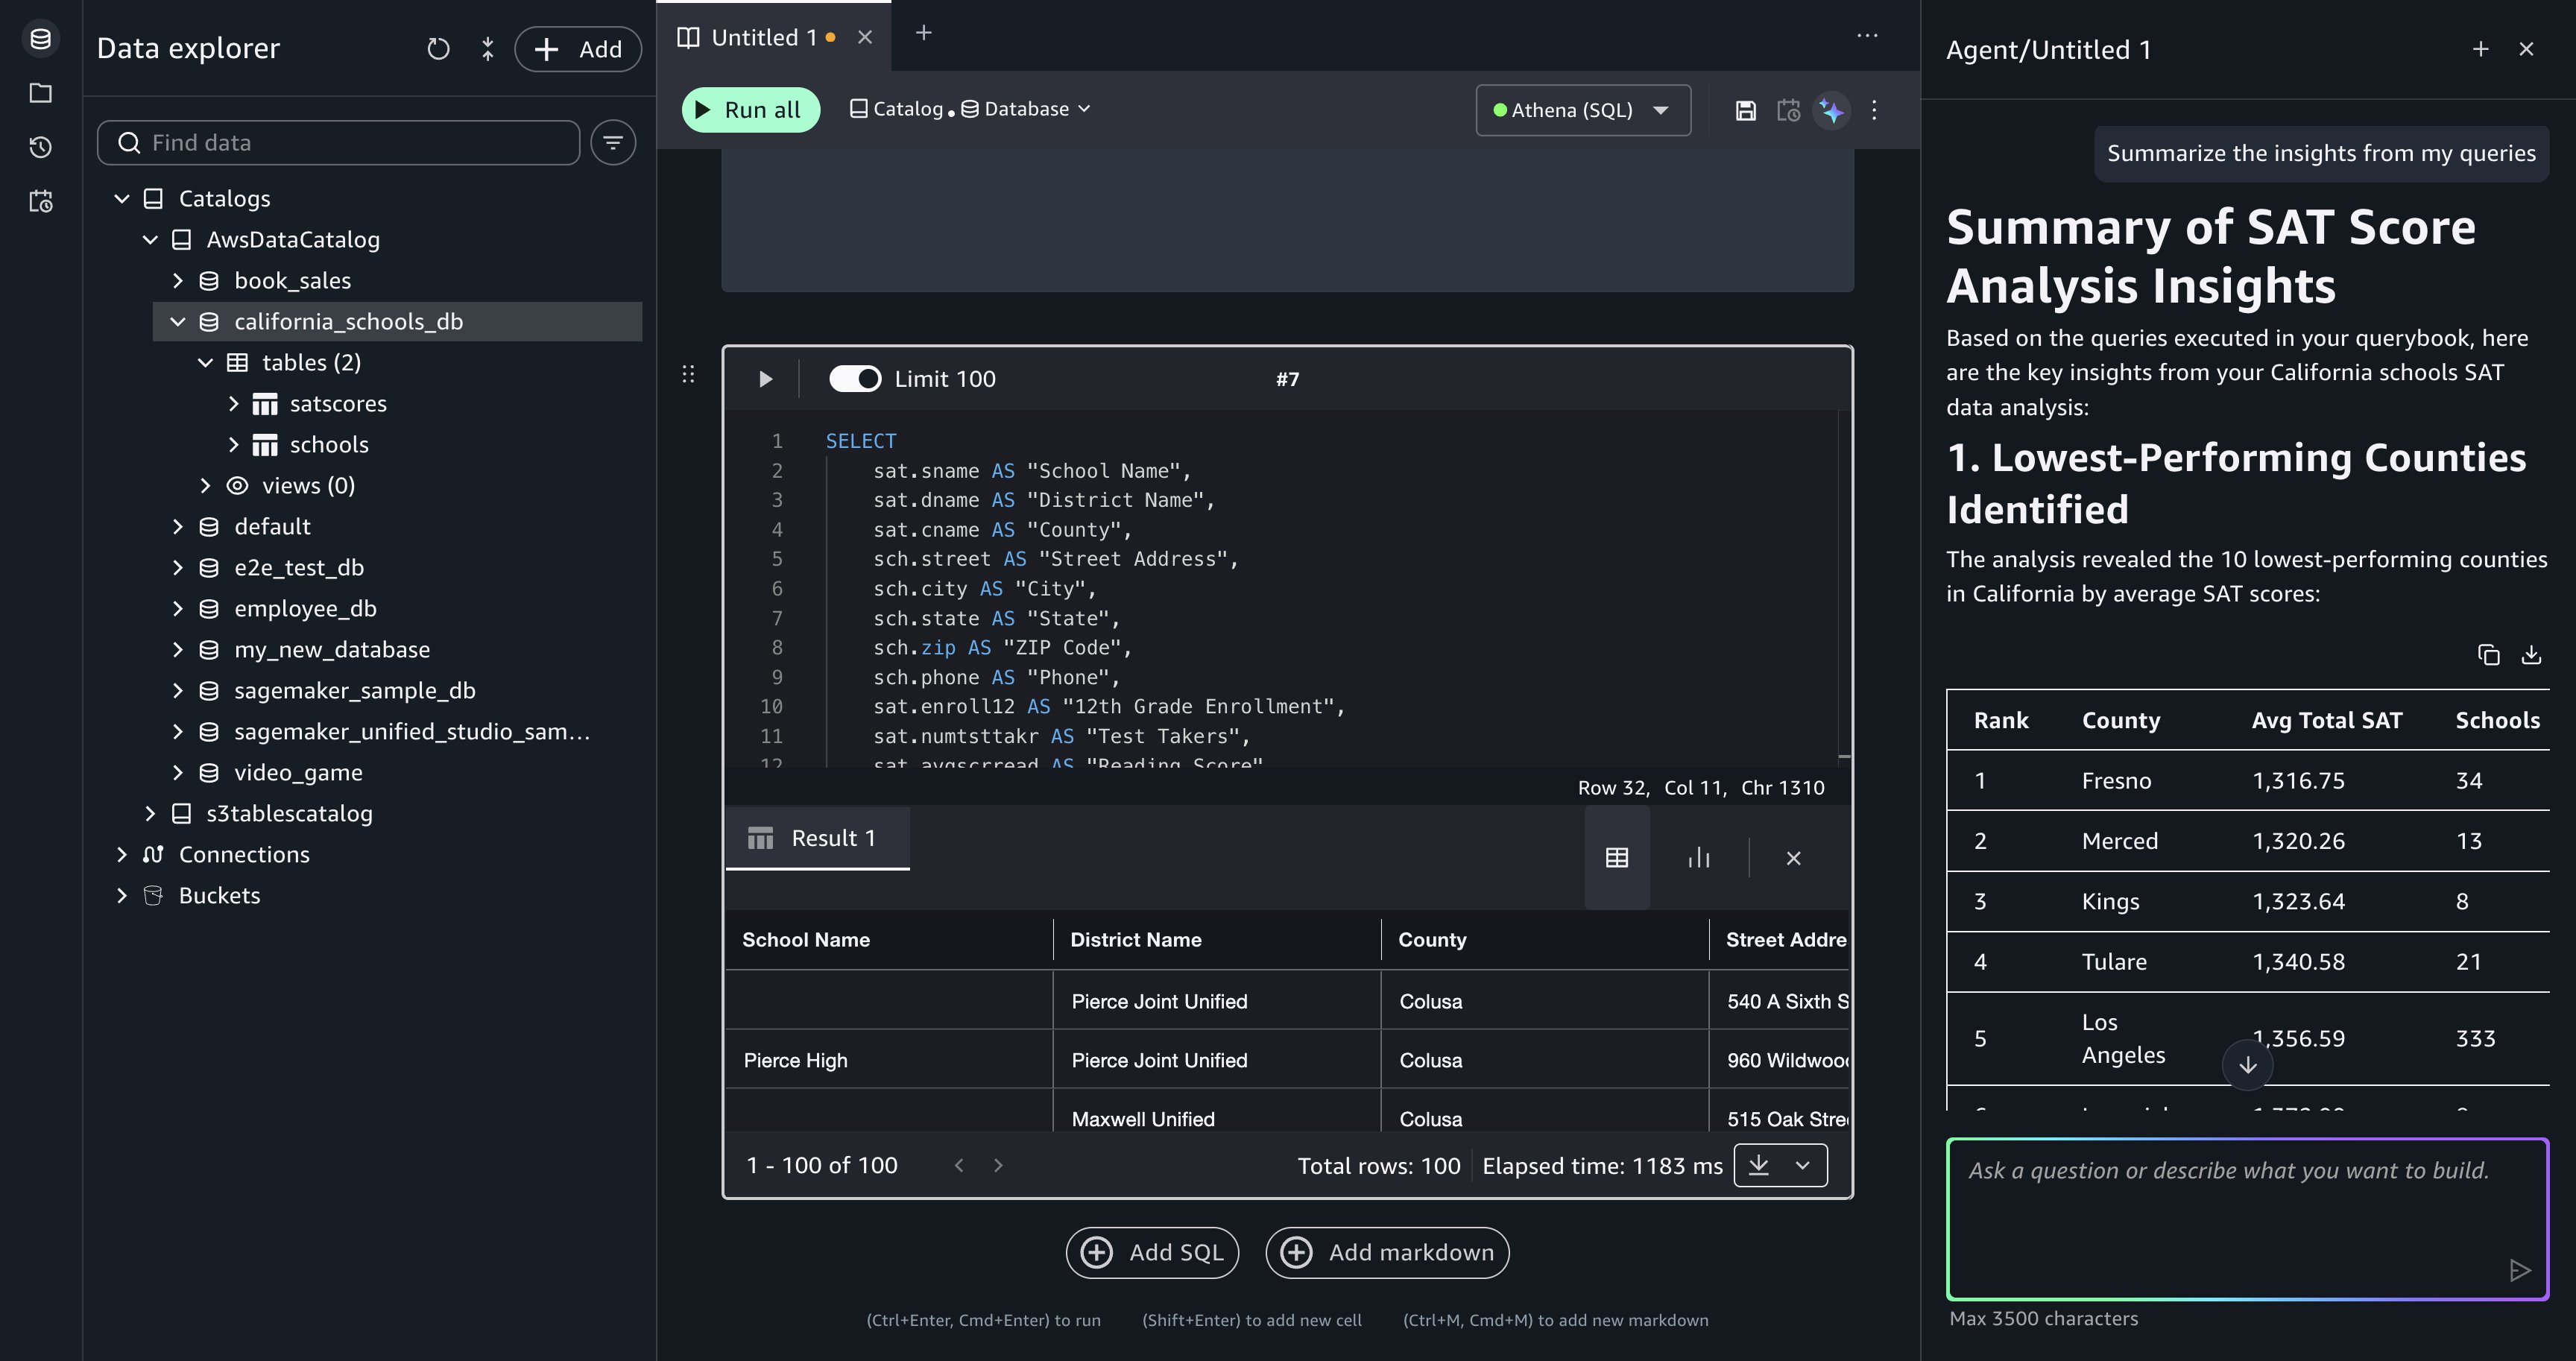
[Figure 7: Data Agent summarizes insights from the accumulated query results in the querybook.]
Recover from a failed query. During the analysis, a generated query might produce an error, for example, referencing a column name that doesn’t match the schema or a join condition that returns unexpected results. When a cell fails, Query Editor displays the error message and a Fix with AI option.
Choose Fix with AI, and Data Agent reads the error in the context of the failed cell, then generates corrected SQL and updates the querybook cell. Run the corrected cell to verify the fix.
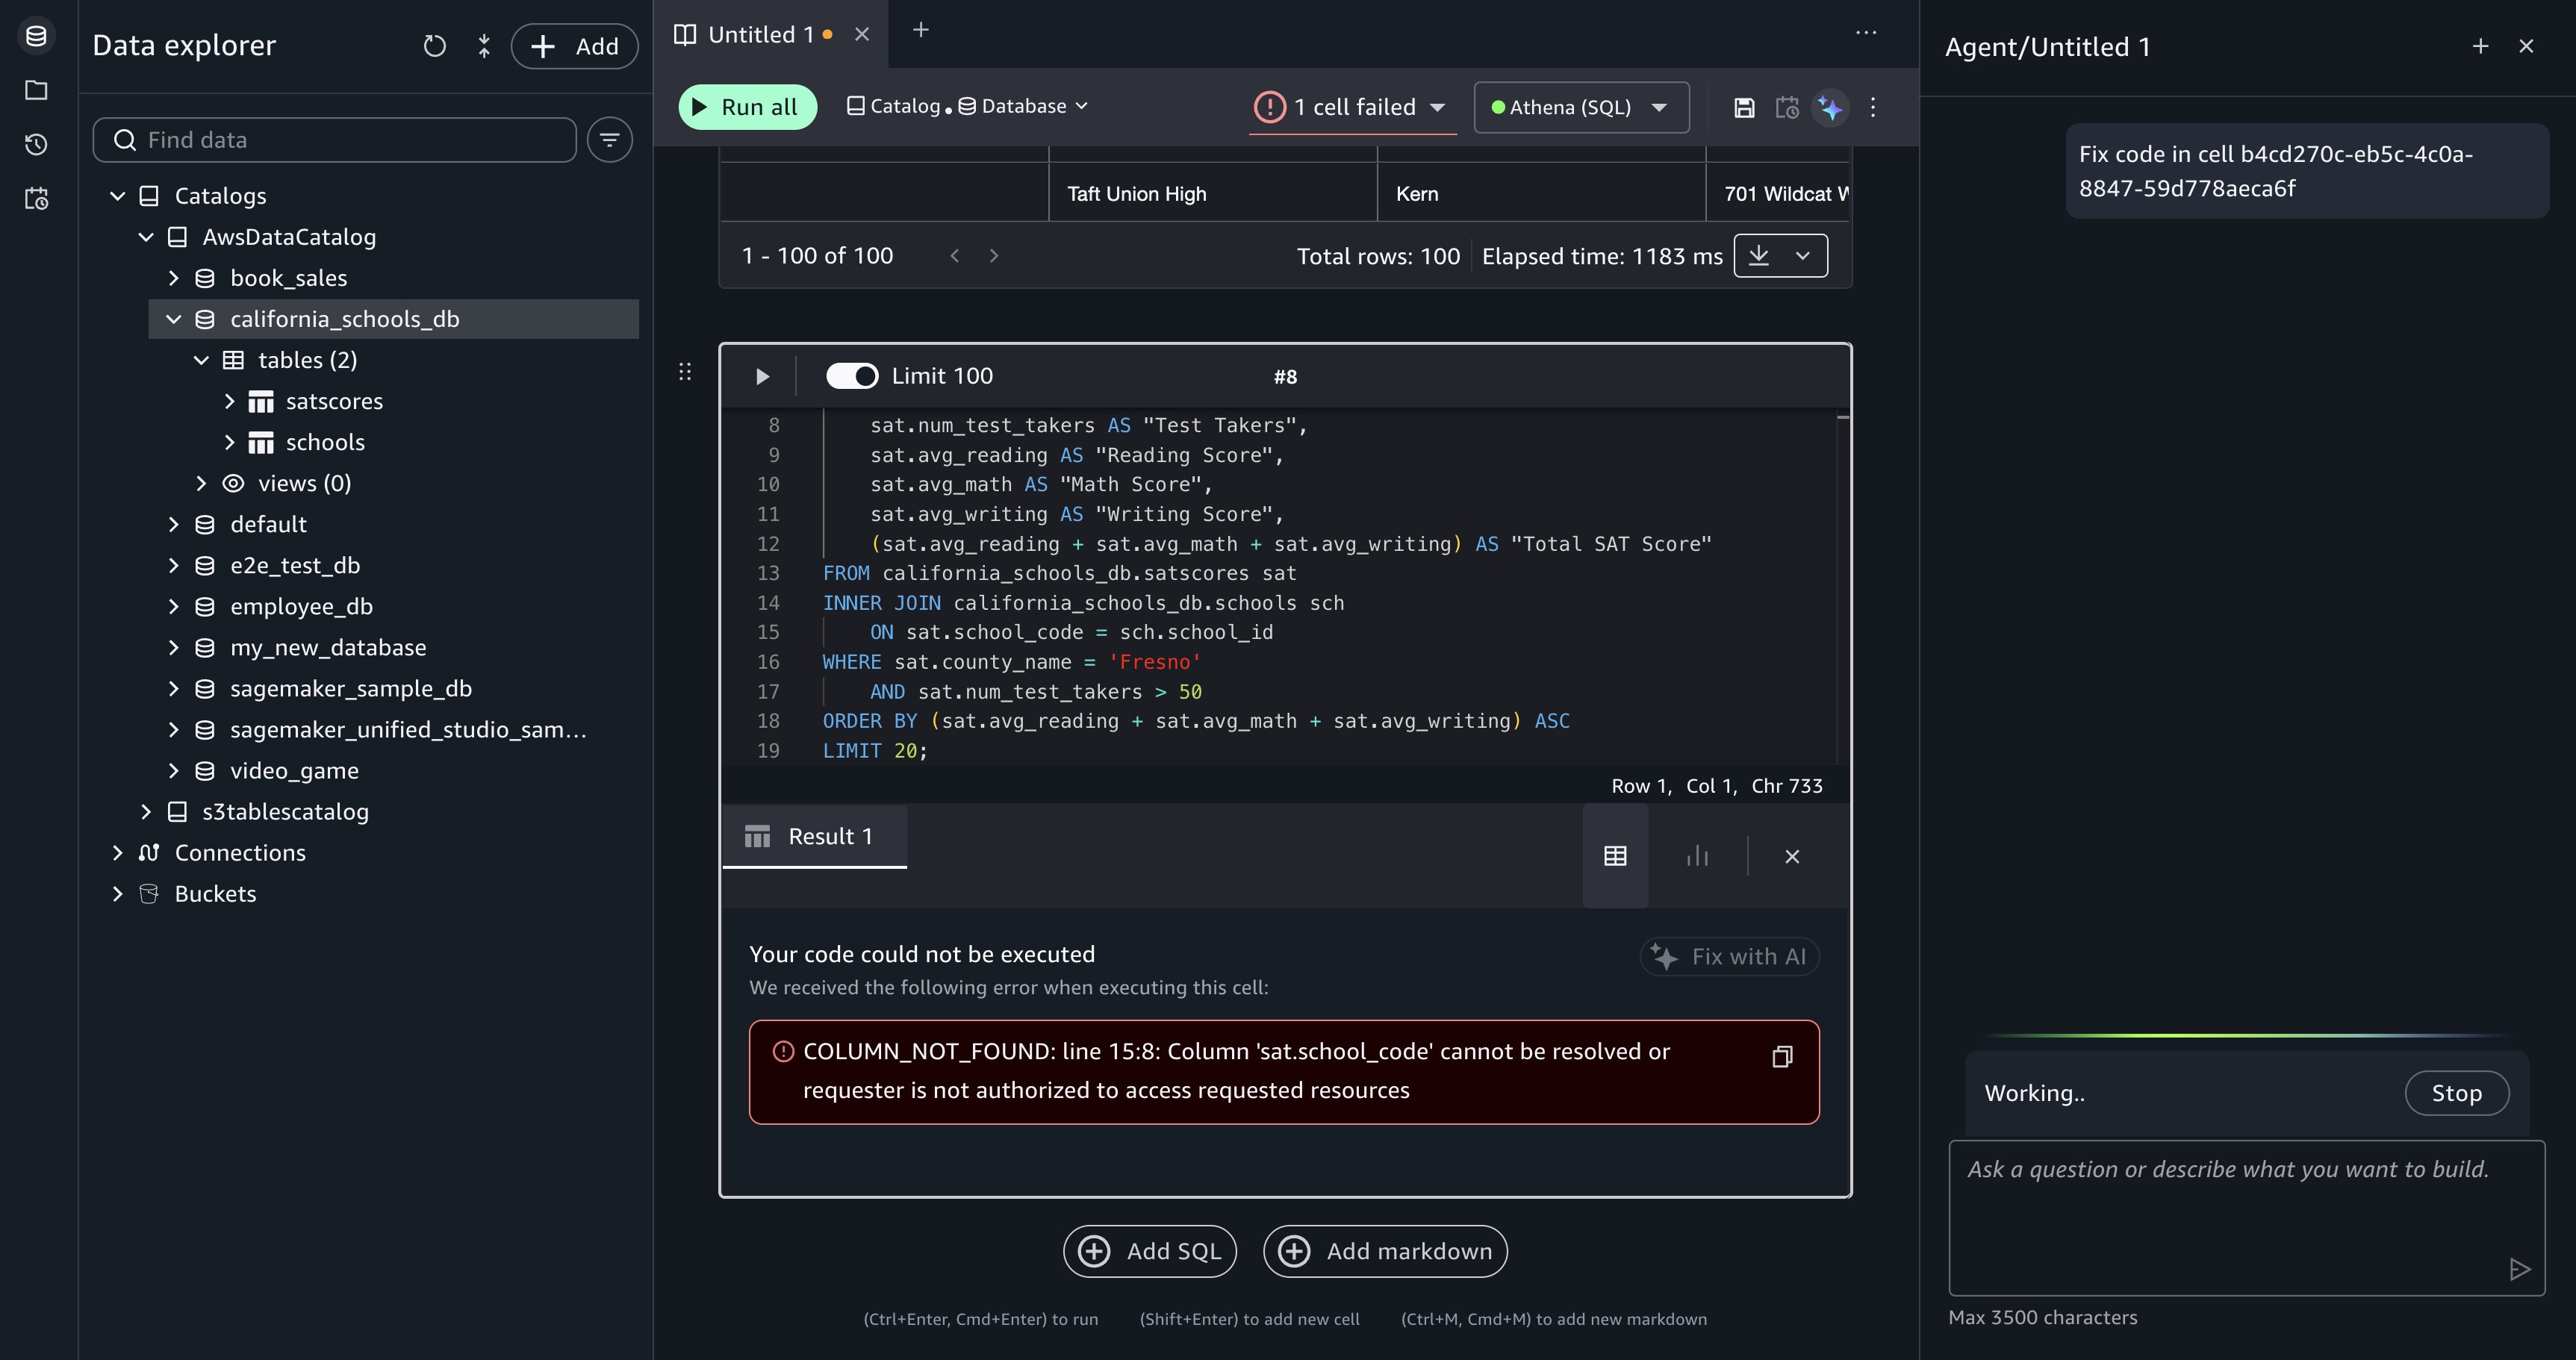
[Figure 8: After you choose Fix with AI, Data Agent is prompted to generate a corrected query for the failed cell.]
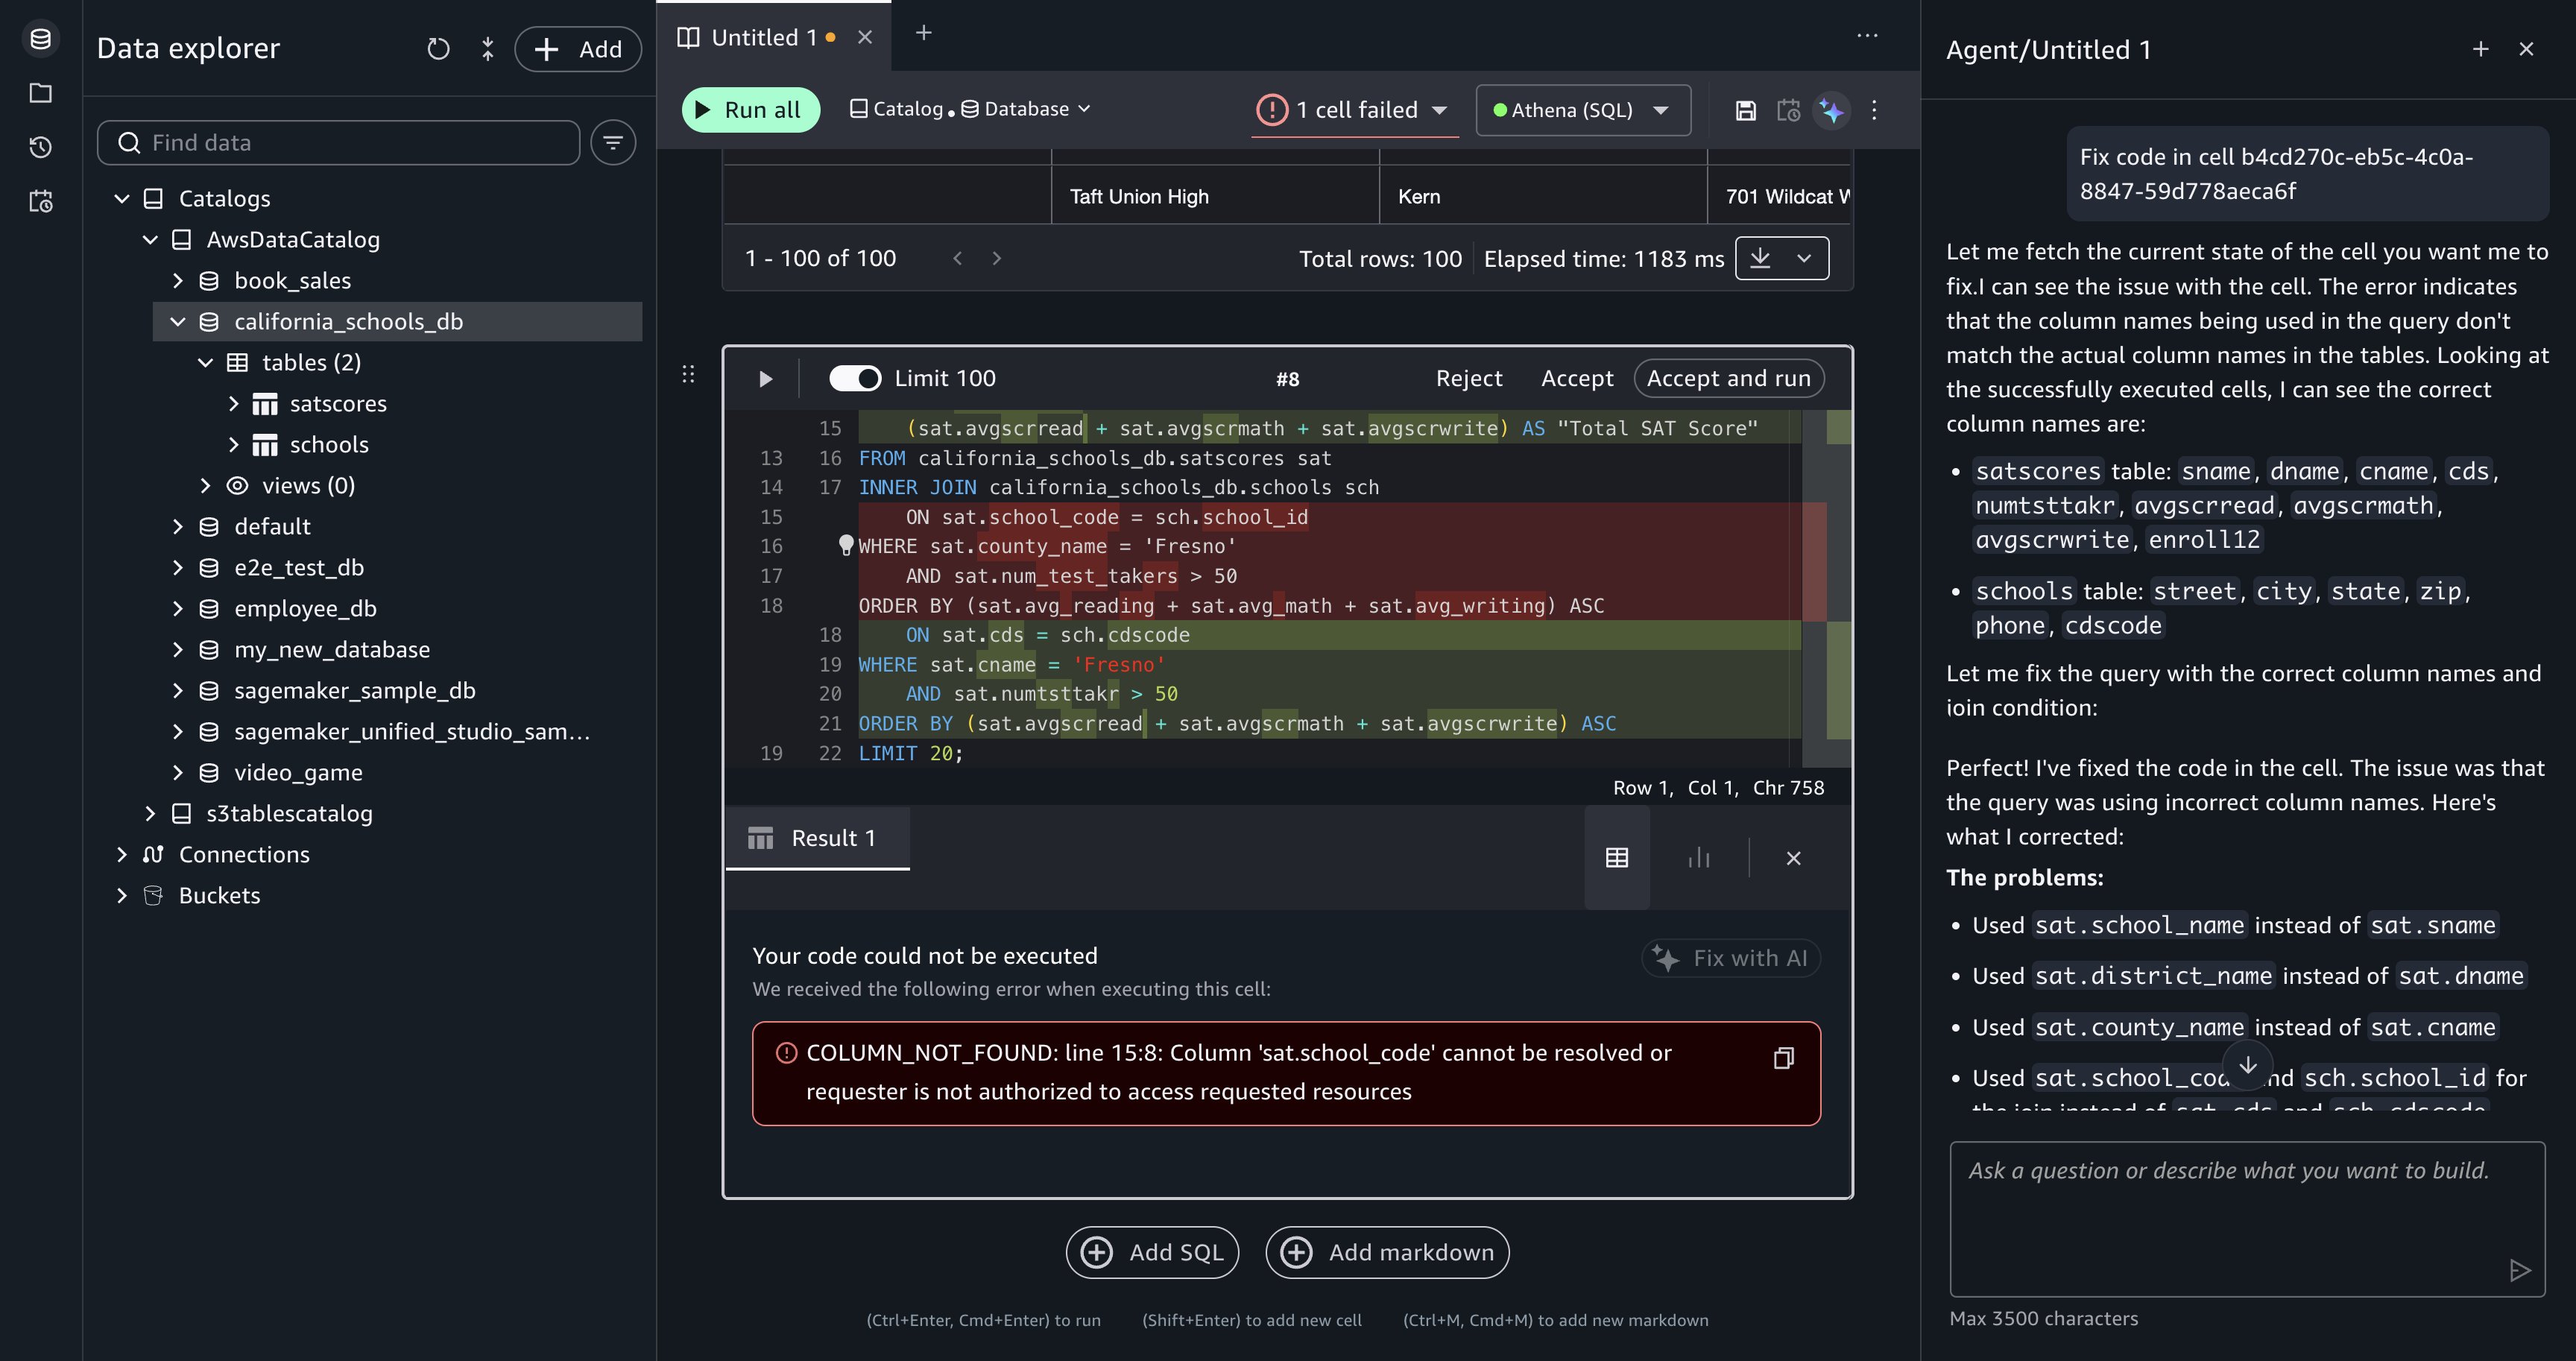
[Figure 9: Data Agent returns corrected SQL for you to review.]
Security and governance
Data Agent operates within your AWS environment and only accesses data that your IAM policies explicitly permit. Your existing IAM access controls and AWS Lake Formation permissions determine what data Data Agent can reach. To use Data Agent, your project role must have permissions to invoke specific Amazon DataZone APIs. For more information, refer to Actions, resources, and condition keys for Amazon DataZone.
Data Agent includes content filtering that prevents it from responding to off-topic requests, requests to reveal its system prompt, and requests for internal technical implementation details. Data Agent is restricted to AWS-related topics and English-language output.
Amazon SageMaker stores your natural language prompts and generated SQL in the AWS Region where you created your SageMaker Unified Studio domain. Data Agent doesn’t store your data, querybook context, or catalog metadata.
To opt out of data usage for service improvement, configure an AI services opt-out policy for Amazon DataZone in AWS Organizations. For more information, refer to Data storage in the SageMaker Data Agent, Service improvement, and AI services opt-out policies.
Clean up
The walkthrough creates querybook cells in your Query Editor session but doesn’t provision standalone infrastructure. To remove the generated SQL cells, delete them from your querybook or delete the querybook itself.
If you uploaded the California schools dataset specifically for this walkthrough, remove the following resources to avoid ongoing charges:
- SageMaker Unified Studio domain. If you created a domain solely for this walkthrough, delete it to stop incurring charges. Refer to the SageMaker Unified Studio administration guide for deletion steps.
- Uploaded tables. In the Data explorer, right-click each table you created and choose Delete table to remove the data from your project database and the underlying S3 storage.
- Amazon Athena query results. Amazon Athena stores query results in an S3 output location. Delete the query result files from that bucket, or delete the bucket if you created it solely for this walkthrough.
- Amazon CloudWatch logs. If Amazon Athena queries generated CloudWatch log groups, delete those log groups to avoid storage charges.
Conclusion
Data Agent in Query Editor brings conversational, catalog-aware SQL development to your Amazon Redshift and Amazon Athena workloads. In this post, you explored unfamiliar data, built a multi-step investment analysis, recovered from query errors, and summarized findings through natural language prompts.
Data Agent works within your existing IAM and AWS Lake Formation security controls, keeps your data within your AWS environment, and retains context across your analytical workflow so each question builds on the last.
Get started with these next steps:
- Run your first prompt. Open Query Editor in your SageMaker Unified Studio domain and enter
Show me the top 10 tables in my catalog with the most columns. For setup, refer to the SageMaker Unified Studio getting started guide. - Add descriptions to your AWS Glue Data Catalog. Table descriptions and column-level business metadata improve the quality of generated SQL. For best practices, refer to Populating the AWS Glue Data Catalog.
- Try a multi-step analysis. Enter
Which product categories had declining revenue quarter-over-quarter, and which regions drove the decline?and review Data Agent’s plan step by step.
For more information, refer to the Amazon SageMaker Data Agent documentation, the What’s New blog post, Amazon Redshift documentation, and Amazon Athena documentation. To learn how Data Agent works in notebooks, refer to Accelerate context-aware data analysis and ML workflows with Amazon SageMaker Data Agent.