AWS Big Data Blog
Configure seamless single sign-on with SQL analytics in Amazon SageMaker Unified Studio
Amazon SageMaker Unified Studio provides a unified experience for using data, analytics, and AI capabilities. SageMaker Unified Studio now supports trusted identity propagation (TIP) for SQL workloads, enabling fine-grained data access control based on individual user identities. Organizations can use this integration to manage data permissions through AWS Lake Formation while using their existing single sign-on (SSO) infrastructure.
Organizations already using Amazon Redshift with TIP can extend their existing Lake Formation permissions to SageMaker Unified Studio. Users simply log in through SSO and access their authorized data using the SQL editor, maintaining consistent security controls across their analytics environment.
This post demonstrates how to configure SageMaker Unified Studio with SSO, set up projects and user onboarding, and access data securely using integrated analytics tools.
Solution overview
For our use case, a retail corporation is planning to implement sales analytics to identify sales patterns and product categories that are doing well. This will help the sales team improve on sales planning with targeted promotions and help the finance team plan budgeting with better inventory management. The corporation stores a customer table in an Amazon Simple Storage Service (Amazon S3) data lake and a store_sales table in a Redshift cluster.
The corporation uses SageMaker Unified Studio as the UI, with users onboarded from their identity provider (IdP) to AWS IAM Identity Center with TIP. Amazon SageMaker Lakehouse centralizes data from Amazon S3 and Amazon Redshift, and Lake Formation provides fine-grained access control based on user identity. For our example use case, we explore two different users. The following table summarizes their roles, the tools they use, and their data access.
| User | Group | Tool | Data Access |
| Ethan (Data Analyst) | Sales | Amazon Athena for interactive SQL analysis | Non-sensitive customer data (id, c_country, birth_year) and store_sales full table access |
| Frank (BI Analyst) | Finance | Amazon Redshift for reports and visualization | US customer data (c_country='US') |
The following diagram illustrates the solution architecture.
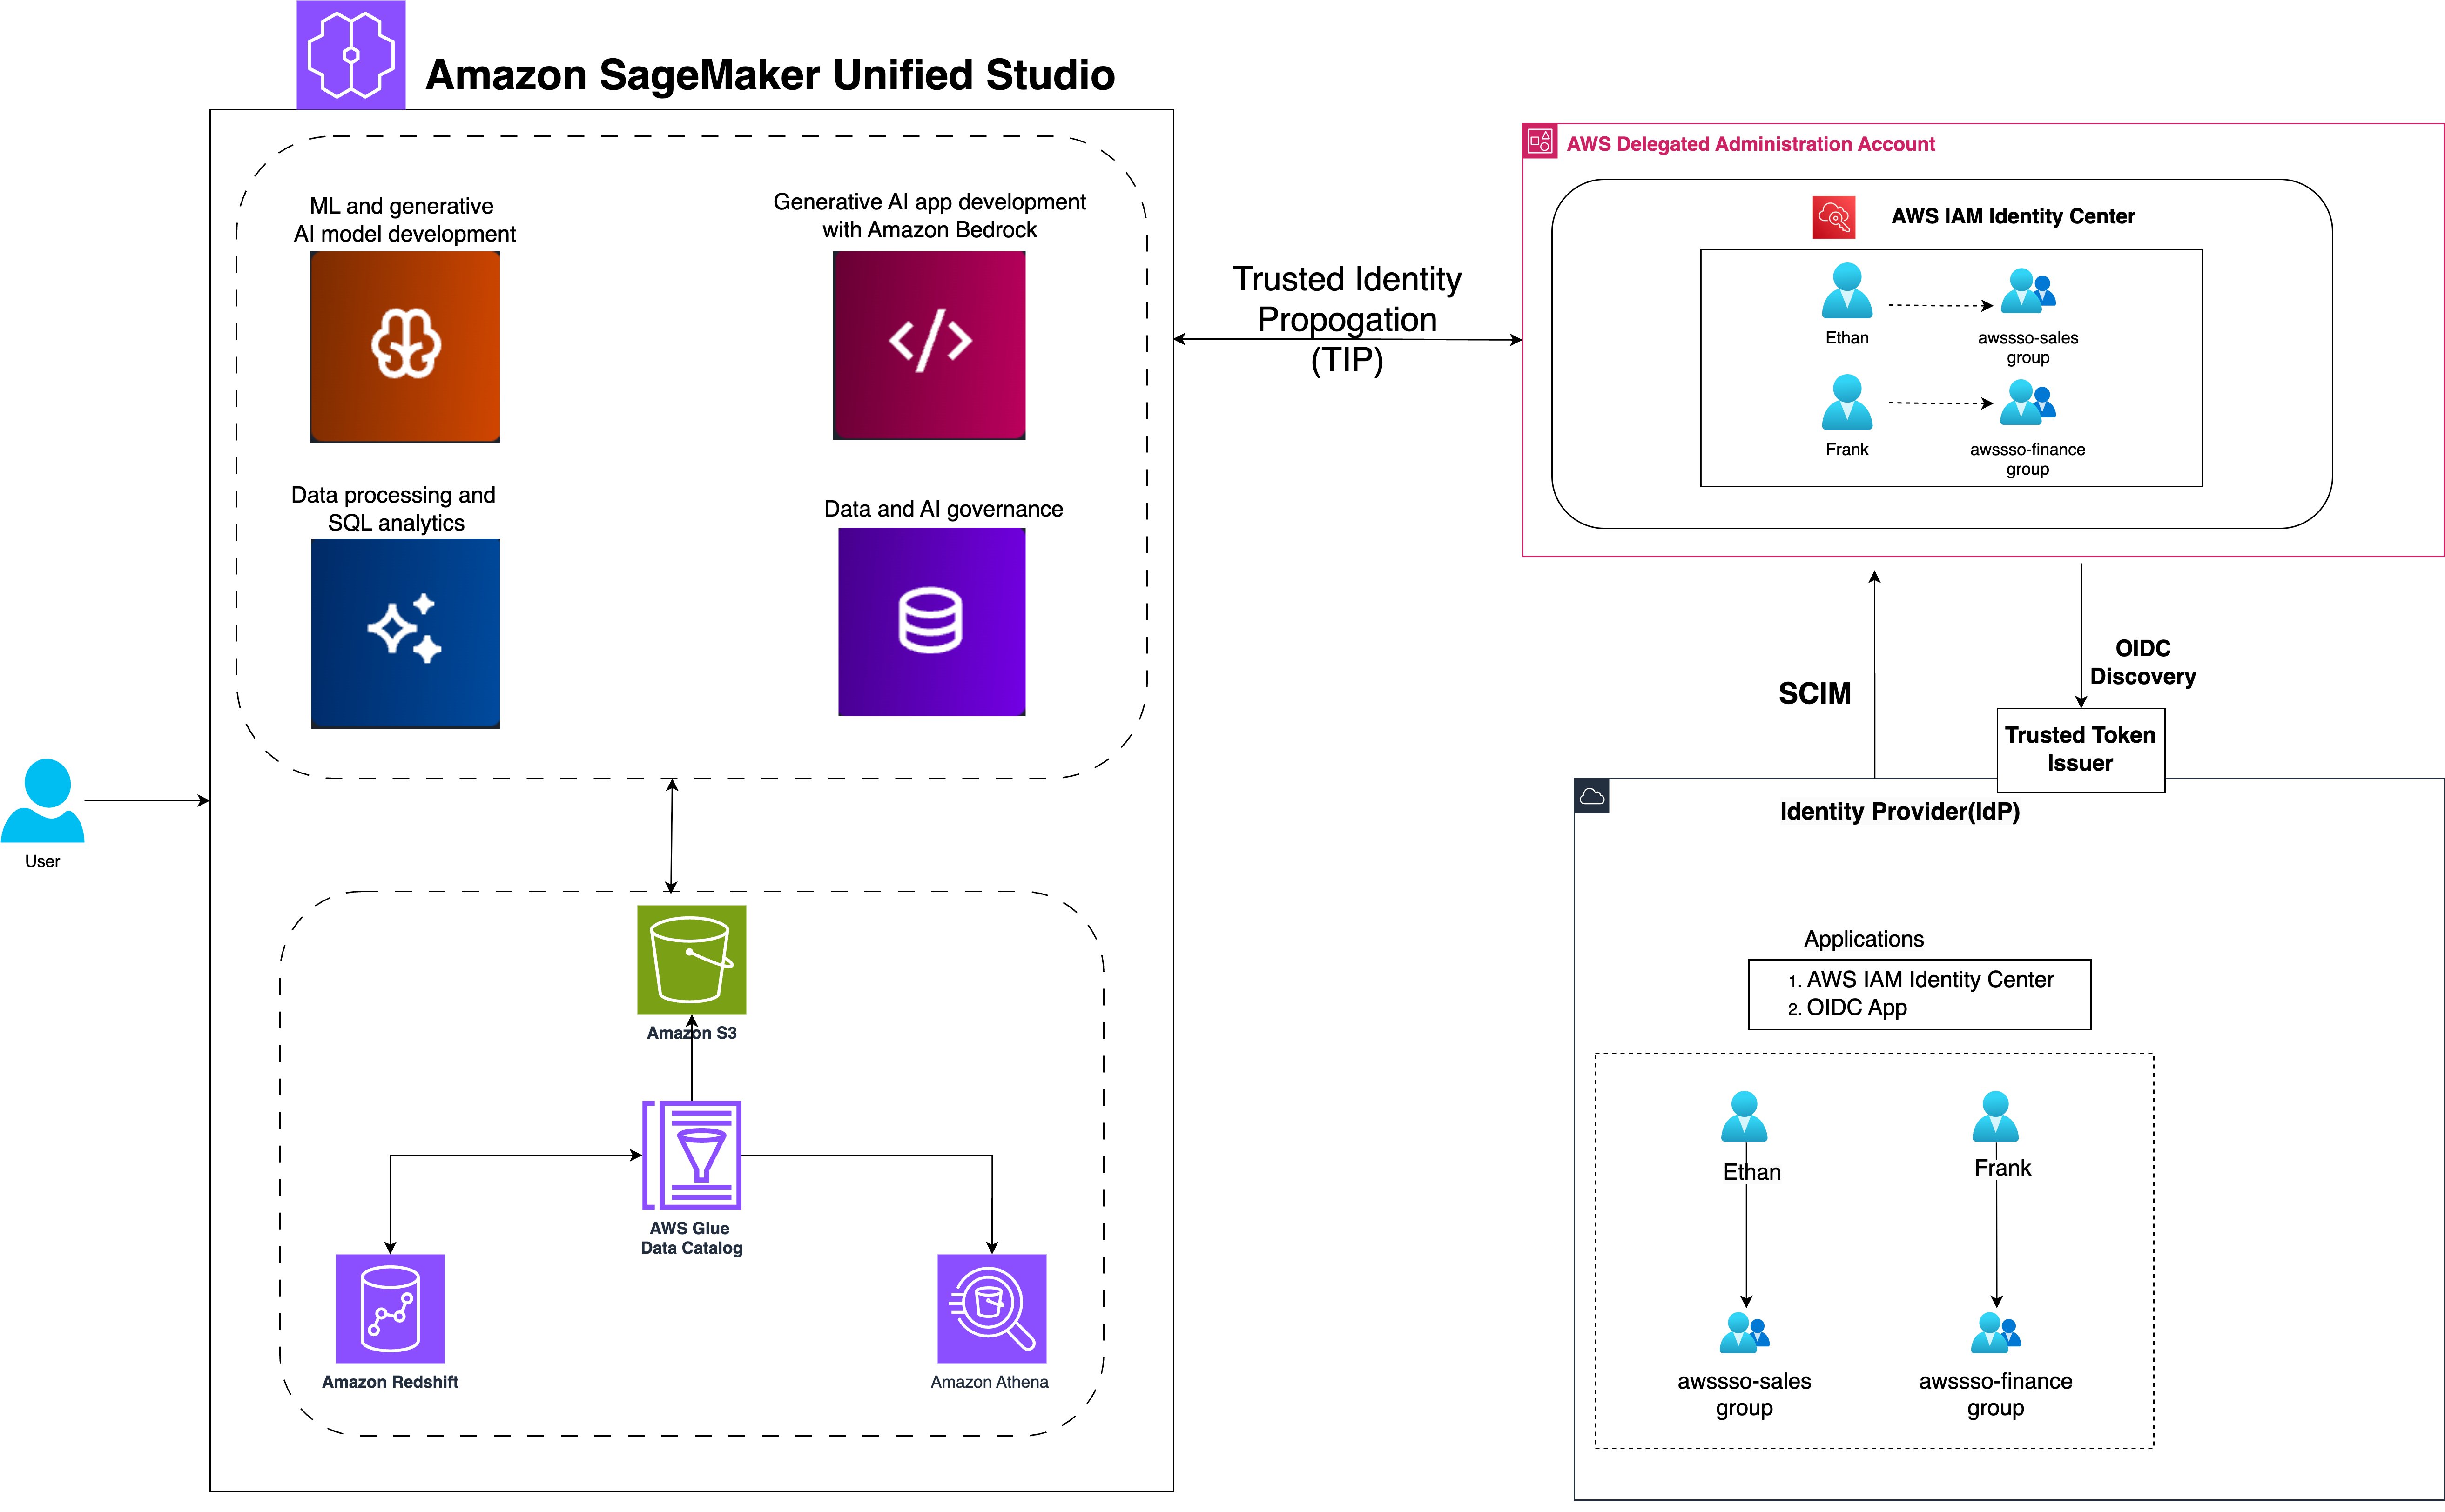
SageMaker Unified Studio with IAM Identity Center simplifies the user journey from authentication to data analysis. The workflow consists of the following steps:
- Users sign in with organizational SSO credentials through their IdP and are redirected to SageMaker Unified Studio.
- Users configure IAM Identity Center authentication for Amazon Redshift, linking identity management with data access.
- Users access the query editor for Amazon Redshift or SageMaker Lakehouse, triggering IAM Identity Center federation to generate session and access tokens.
- SageMaker Unified Studio retrieves user authorization details and group membership using the session token.
- Users are authenticated as IAM Identity Center users, ready to explore and analyze data using Amazon Redshift and Amazon Athena.
To implement our solution, we walk through the following high-level steps:
- Set up SageMaker Lakehouse resources.
- Create a SageMaker Unified Studio domain with SSO and TIP enabled.
- Configure Amazon Redshift for TIP and validate access.
- Validate data access using Amazon Athena.
Prerequisites
Before you begin implementing the solution, you must have the following in place:
- If you don’t have an AWS account, you can sign up for one.
- We provide utility scripts to help set up various sections of the post. To use them:
- Right-click this link and save the utility scripts zip file.
- Unzip the file to a terminal that has the AWS Command Line Interface (AWS CLI) configured. You can also use AWS CloudShell.
- Run the scripts only when prompted in the relevant sections.
- To deploy the infrastructure, right-click this link and select ‘Save Link As’ to save it as
sagemaker-unified-studio-infrastructure.yaml. Then upload the file when creating a new stack in the AWS CloudFormation console, which will create the following resources:- An S3 bucket to hold the customer data used in this post.
- An AWS Identity and Access Management (IAM) role called
DataTransferRolewith permissions as defined in Prerequisites for managing Amazon Redshift namespaces in the AWS Glue Data Catalog. - An IAM role called
IAMIDCRedshiftRole, which will be used later to set up the IAM Identity Center Redshift application. - An IAM role called
LakeFormationRegistrationRole, following the instructions in Requirements for roles used to register locations, and necessary IAM policies.
- If you don’t have a Lake Formation user, you can create one. For this post, we use an admin user. For instructions, see Create a data lake administrator.
- If IAM Identity Center is not enabled, refer to Enabling AWS IAM Identity Center for instructions to enable it.
- If you need to migrate existing Redshift users and groups, use the IAM Identity Center Redshift migration utility.
- For a quick way to test the feature and familiarize yourself with the process, we provide a script to generate mock users and groups. Run the
setup-idc.shscript, which is provided in Step 2, to create test users and groups in IAM Identity Center for demonstration purposes.
- Integrate IAM Identity Center with Lake Formation. For instructions, see Connecting Lake Formation with IAM Identity Center.
- Register the S3 bucket as a data lake location:
- On the Lake Formation console, choose Data lake locations in the navigation pane.
- Choose Register location.
- For the role, use
LakeFormationRegistrationRole.
- Create an IAM Identity Center Redshift application, as detailed in our previous post:
- On the Amazon Redshift console, choose IAM Identity Center connections in the navigation pane and choose Create application.
- For both the display name and application name, enter
redshift-idc-app. - Set the IdP namespace to
awsidc. - Choose
IAMIDCRedshiftRoleas the IAM role. - Choose Next to create the application.
- Take note of the application Amazon Resource Name (ARN) to use in subsequent steps. The ARN format is
arn:aws:sso::<ACCOUNT_NUMBER>:application/ssoins-<RANDOM_STRING>/apl-<RANDOM_STRING>.
- If you don’t have existing Redshift tables to work with, run the script
setup-producer-redshift.sh, which is provided in Step 2, to create a producer namespace and workgroup, set up a sample sales database, and generate necessary tables with test data. - The post also uses simulated customer data stored in the AWS Glue Data Catalog. To set up this data and configure the necessary Lake Formation permissions, run the
setup-glue-tables-and-access.shscript provided in Step 2.
us-east-1 region. If you prefer another region, edit the region in the scripts before running them.
Set up SageMaker Lakehouse resources
In this section, we configure the foundational lakehouse resources required for SageMaker to access and analyze data across multiple storage systems. We’ll register the Redshift instance to the AWS Glue Data Catalog to make warehouse data discoverable and establish Lake Formation permissions on lakehouse resources for user identities to ensure secure, governed access to both data lake and data warehouse resources from within SageMaker environments.
Register Redshift instance to the Data Catalog
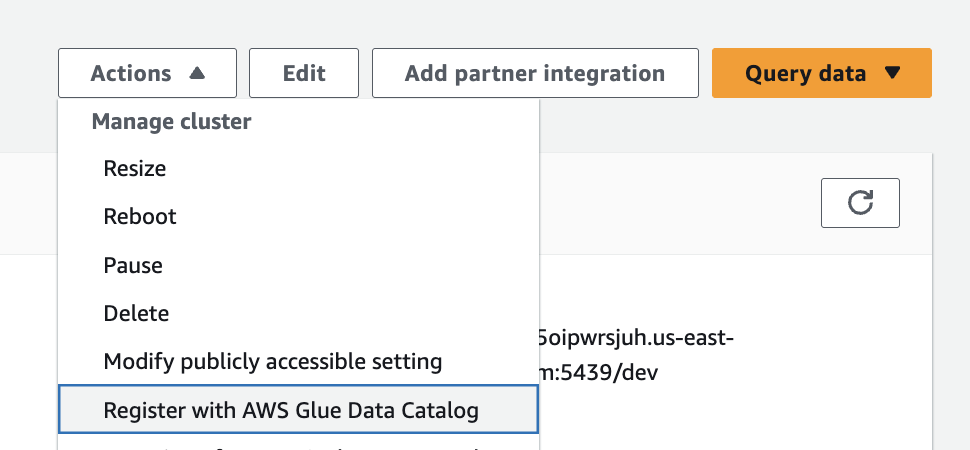
In this step, we use the store_sales data, which we created earlier using the setup-producer-redshift.sh script. You can register entire clusters to the Data Catalog and create catalogs managed by AWS Glue. To register a cluster to the Data Catalog, complete the following steps:
- On the Lake Formation console, choose Administrative roles and tasks in the navigation pane.
- Under Data lake administrators, choose Add.
- Choose Read-only administrator, then choose
AWSServiceRoleForRedshift. - On the Amazon Redshift console, open your namespace.
- On the Actions dropdown menu, chose Register with AWS Glue Data Catalog, then choose Register.
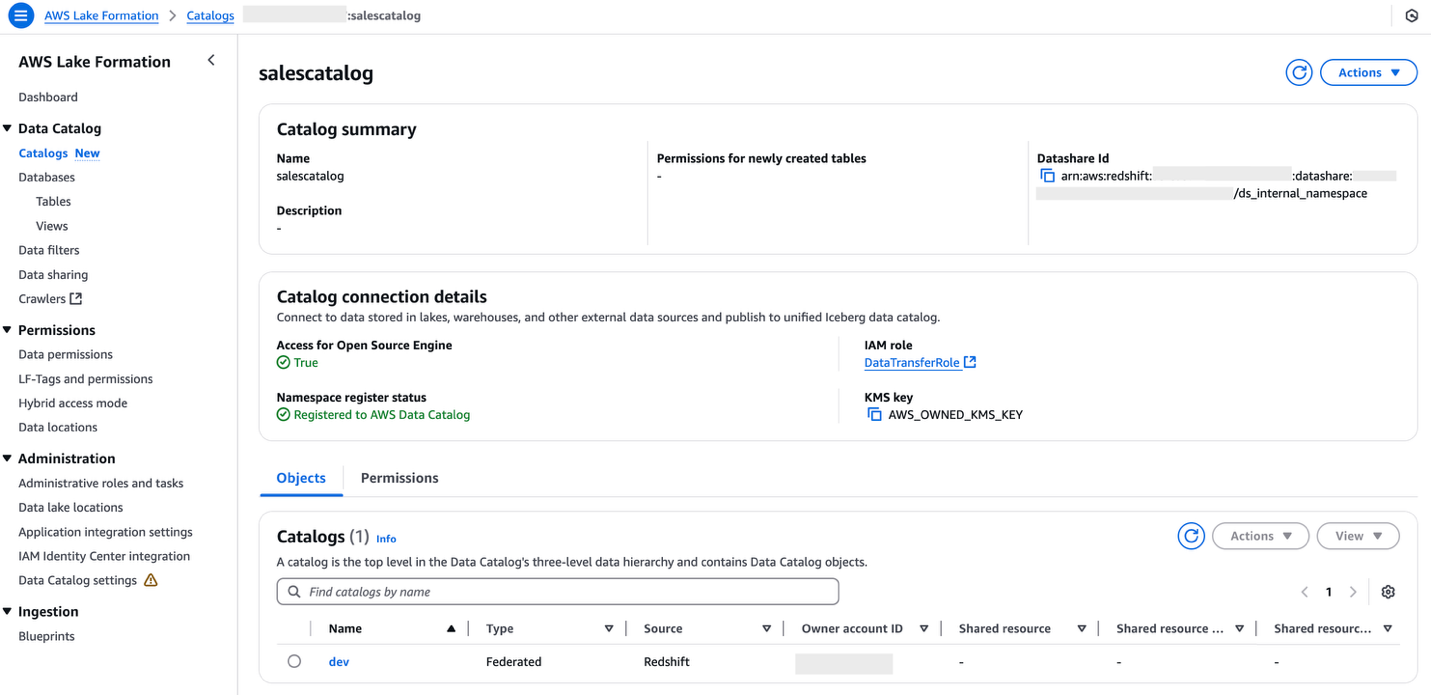
- Sign in to the Lake Formation console as the data lake administrator and choose Catalogs in the navigation pane.
- Under Pending catalog invitations, select the namespace and accept the invitation by choosing Approve and create catalog.

- Provide the name for the catalog as
salescatalog. - Select Access this catalog from Apache Iceberg compatible engines, choose
DataTransferRolefor the IAM role, then choose Next. - Choose Add permissions and choose the admin IAM role under IAM users and roles.
- Select Super user for catalog permissions and choose Add.
- Choose Next.
- Choose Create catalog.
Set up Lake Formation permission on lakehouse resources for user identities
In this section, we configure Lake Formation permissions to enable secure access to lakehouse resources for federated user identities. Lake Formation provides fine-grained access control that works seamlessly with IAM Identity Center, allowing you to manage permissions centrally while maintaining security boundaries.
We’ll focus on granting database access to IAM Identity Center groups in Lake Formation and setting table-level permissions for federated Redshift catalog tables. These permissions form the security foundation for our federated query architecture, enabling users to seamlessly access both S3 data lake and Redshift data warehouse resources through a unified interface.
Grant database access to IAM Identity Center groups in Lake Formation
After you share your Redshift catalog with the Data Catalog and integrate with Lake Formation, you must grant appropriate database access. Follow these steps to set up permissions on your data lake resources for corporate identities:
- On the Lake Formation console, under Permissions in the navigation pane, choose Data permissions.
- Choose Grant.
- Select Principals for Principal type.
- Under Principals, select IAM Identity Center and choose Add.
- In the pop-up window, if this is your first time assigning users and groups, choose Get started.
- Search for and select the IAM Identity Center groups
awssso-salesandawssso-finance. - Choose Assign.
- Under LF-Tags or catalog resources, choose Named Data Catalog resources.
- Choose
<accountid>:salescatalog/devfor Catalogs. - Choose
sales_schemafor Database.
- Choose
- Under Database permissions, select Describe.
- Choose Grant to apply the permissions.
Grant table-level permissions for federated Redshift catalog tables
Complete the following steps to grant table permissions to the IAM Identity Center groups:
- On the Lake Formation console, under Permissions in the navigation pane, choose Data permissions.
- Choose Grant.
- Select Principals for Principal type.
- Under Principals, select IAM Identity Center and choose Add.
- In the pop-up window, if this is your first time assigning users and groups, choose Get started.
- Search for and select the IAM Identity Center group
awssso-sales. - Choose Assign.
- Under LF-Tags or catalog resources, choose Named Data Catalog resources.
- Choose
<accountid>:salescatalog/devfor Catalogs. - Choose
sales_schemafor Database. - Choose
store_salesfor Table.
- Choose
- Select Select and Describe for Table permissions.
- Choose Grant to apply the permissions.
Create a SageMaker Unified Studio domain with SSO and TIP enabled
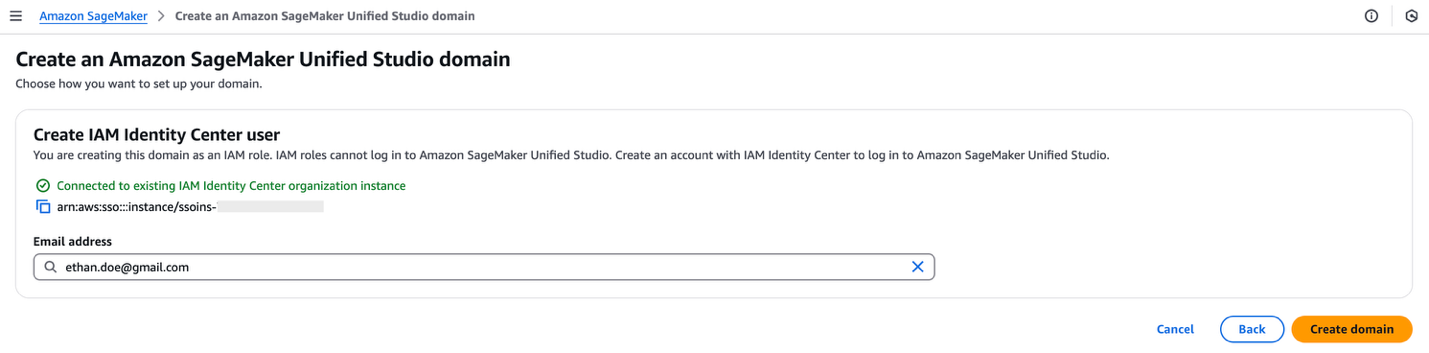
For instructions to create a SageMaker Unified Studio domain, refer to Create an Amazon SageMaker Unified Studio domain – quick setup. Because your IAM Identity Center integration is already complete, you can specify an IAM Identity Center user in the domain configuration settings.
Enable TIP in SageMaker Unified Studio
Complete the following steps to enable TIP in SageMaker Unified Studio:
- On the SageMaker console, use the AWS Region selector in the top navigation bar to choose the appropriate Region.
- Choose View domains and choose the domain’s name from the list.
- On the domain’s details page, on the Project profiles tab, choose a project profile, for example, SQL analytics.
- Select SQL analytics and choose Edit.
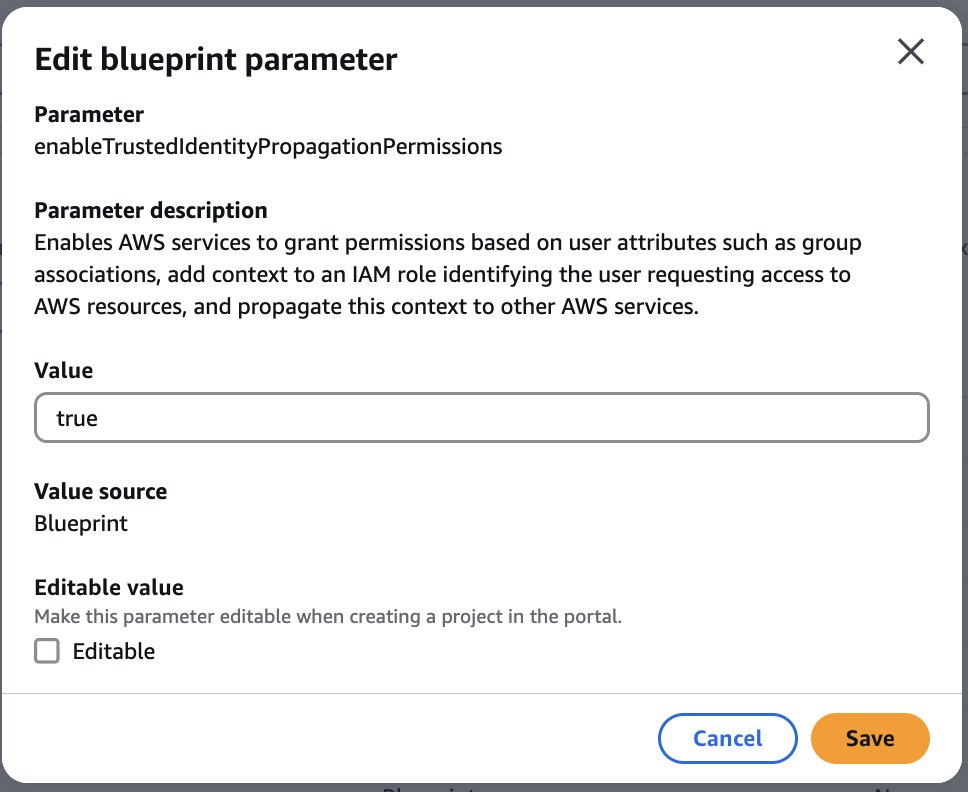
- In the Blueprint parameters section, select
enableTrustedIdentityPropagationPermissionsand choose Edit.
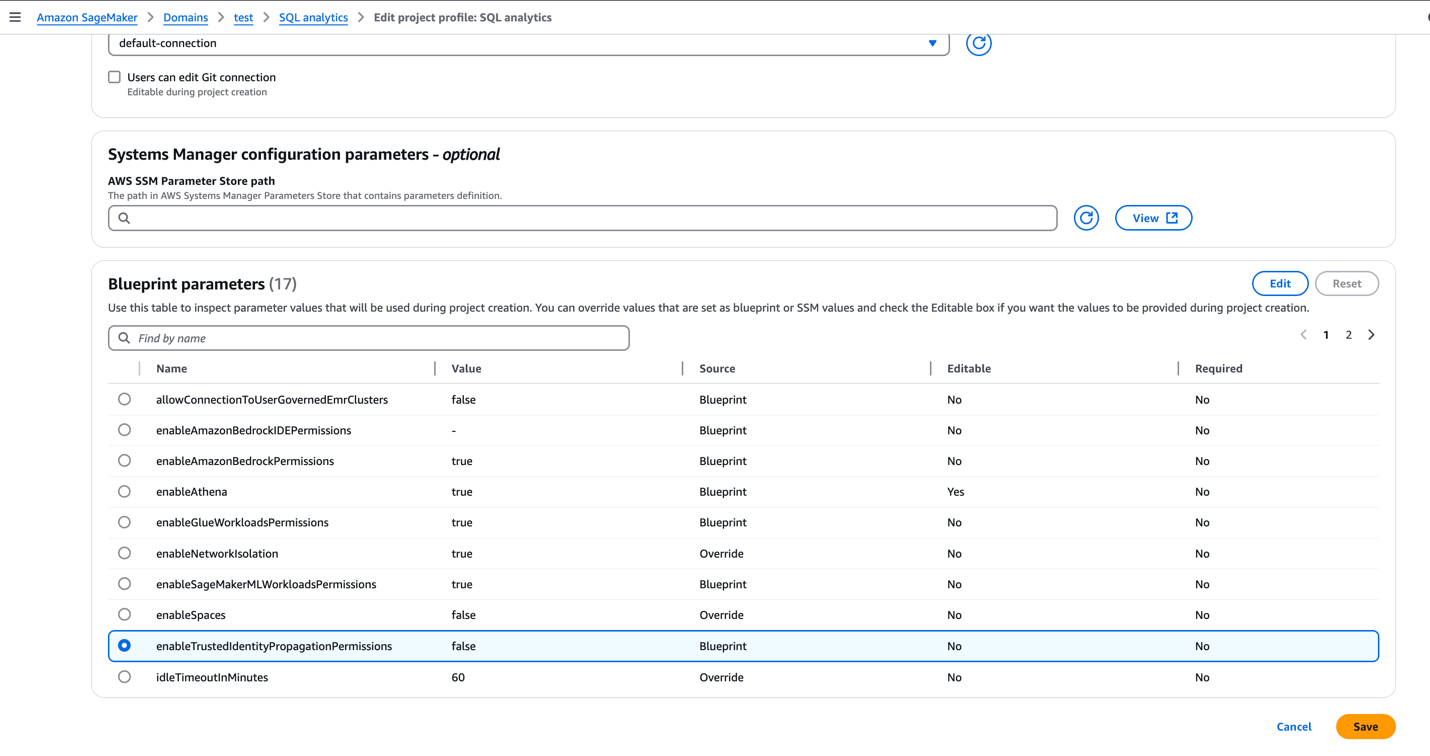
- Update the value as
true. - To enforce authorization-based on TIP, the SageMaker Unified Studio admin can make this parameter non-editable.
- Choose Save.
Enable user access for SageMaker Unified Studio domain
Complete the following steps to enable user access for the SageMaker Unified Studio domain:
- Open the SageMaker console in the appropriate Region and choose Domains in the navigation pane.
- Choose an existing SageMaker Unified Studio domain where you want to add SSO user access.
- On the domain’s details page, on the User management tab, in the Users section, choose Add and Add SSO users and groups.
- Choose the user (for this post, we add the user Frank) from the dropdown list and choose Add users and groups.
Add project members
SageMaker Unified Studio projects facilitate team collaboration for different business initiatives. As the project owner, Ethan now can add Frank as a team member to enable their collaboration. To add members to an existing project, complete the following steps:
- Sign in to the SageMaker Unified Studio console using the SSO credentials of who owns the project (for this post, Ethan).
- Choose Select a project.
- Choose the project you want to edit.
- On the Project overview page, expand Actions and choose Manage members.
- Choose Add members.
- Enter the name of the user or group you want to add (for this post, we add Frank).
- Select Contributor if you want to add the project member as a contributor.
- (Optional) Repeat these steps to add more project members. You can add up to eight project members at a time.
- Choose Add members.
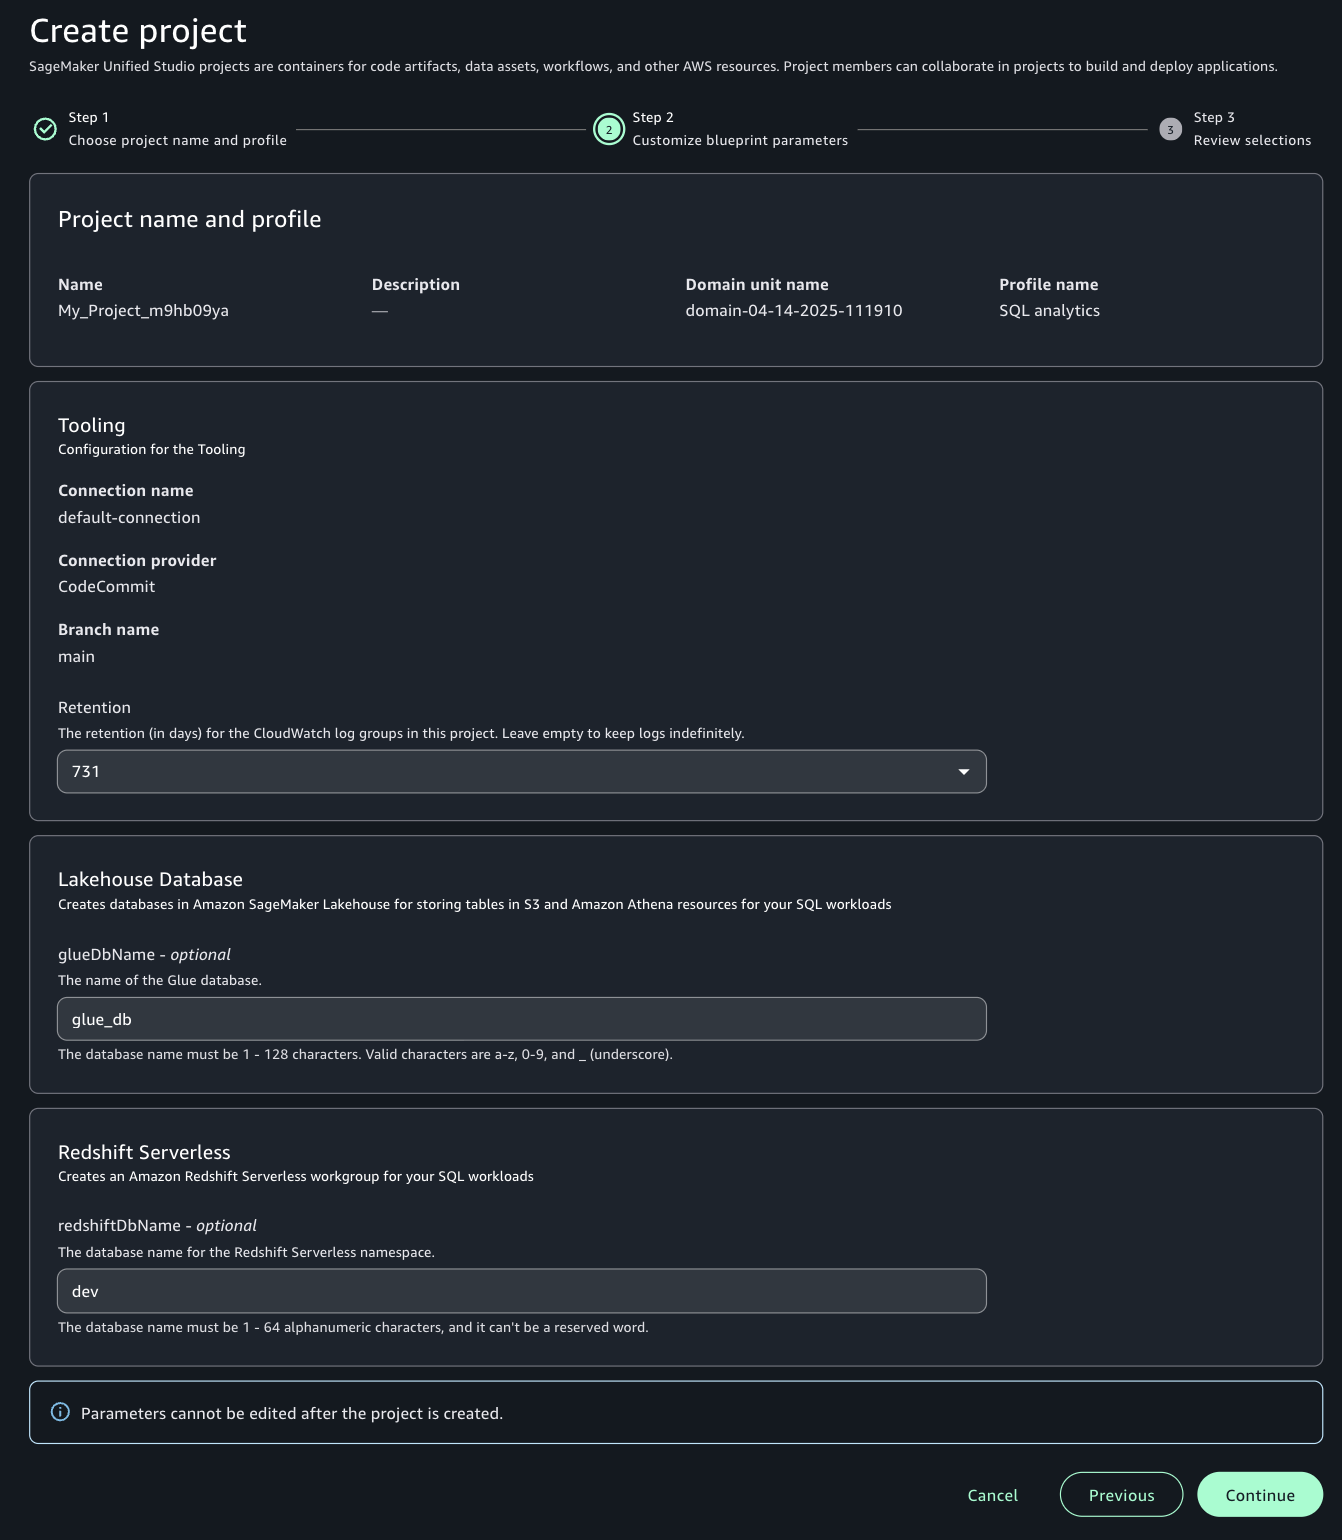
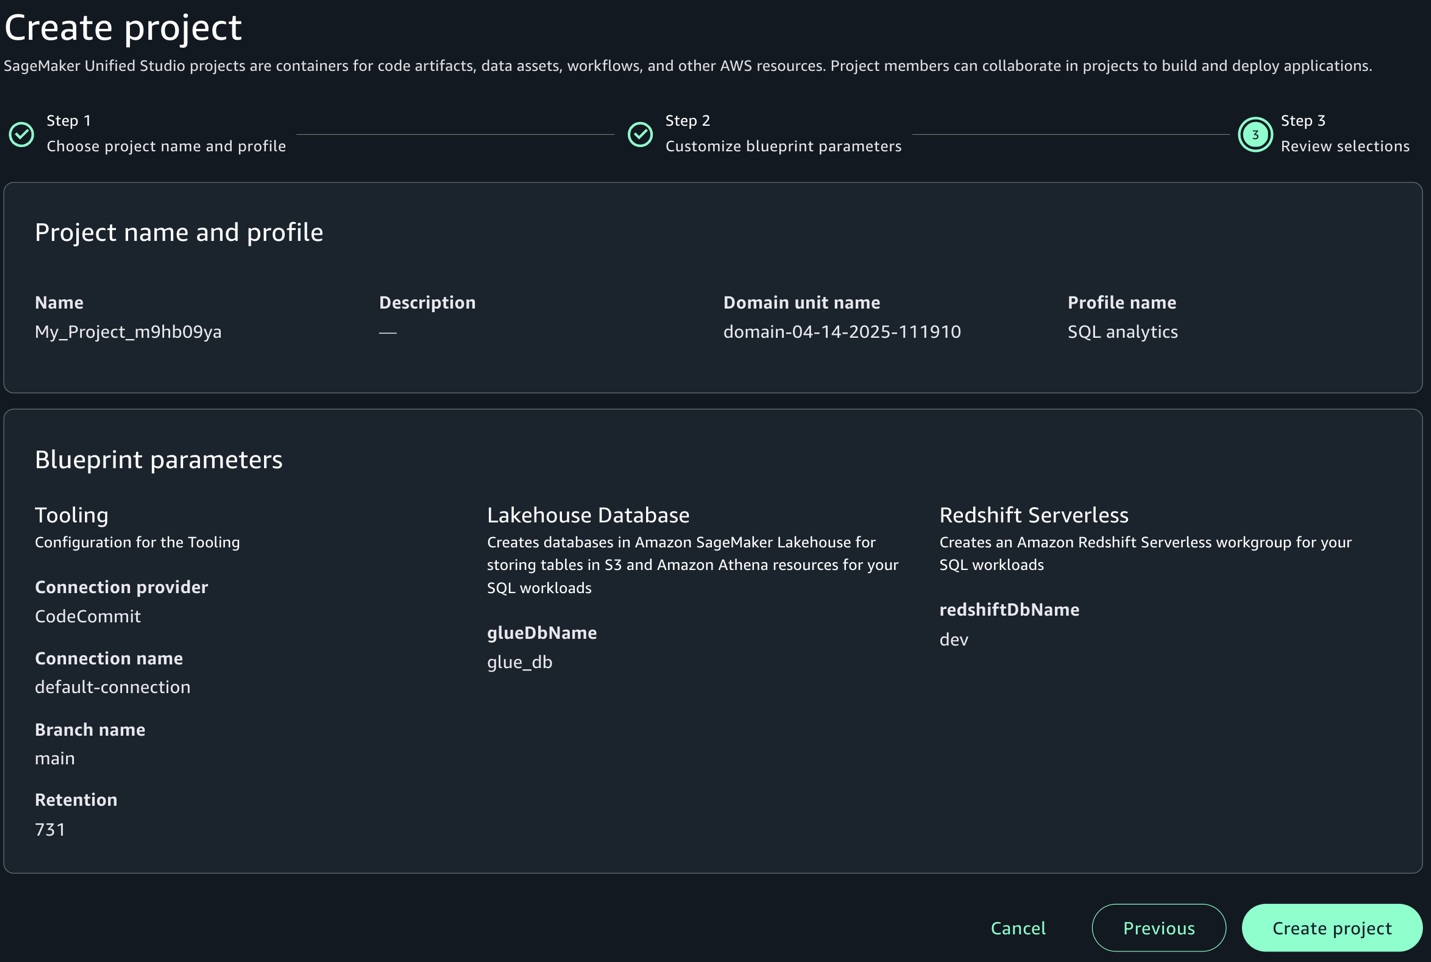
Create a SQL analytics project in Unified Studio
In this step, we federate into SageMaker Unified Studio and create a project using SQL analytics. Complete the following steps:
- Federate into SageMaker Unified Studio using your IAM Identity Center credentials:
- On the SageMaker console, choose Domains in the navigation pane.
- Copy the SageMaker Unified Studio URL for your domain and enter it into a new browser window.
- Choose Sign in with SSO.
- A browser pop-up will redirect you to your preferred IdP login page, where you enter your IdP credentials.
- If authentication if successful, you will be redirected to SageMaker Unified Studio.
- After logging in, choose Create project.
- Enter a name for your project. This project name is final and can’t be changed later.
- (Optional) Enter a description for your project. You can edit this later.
- Choose a project profile. For this demo, we choose the SQL analytics profile from the available templates.
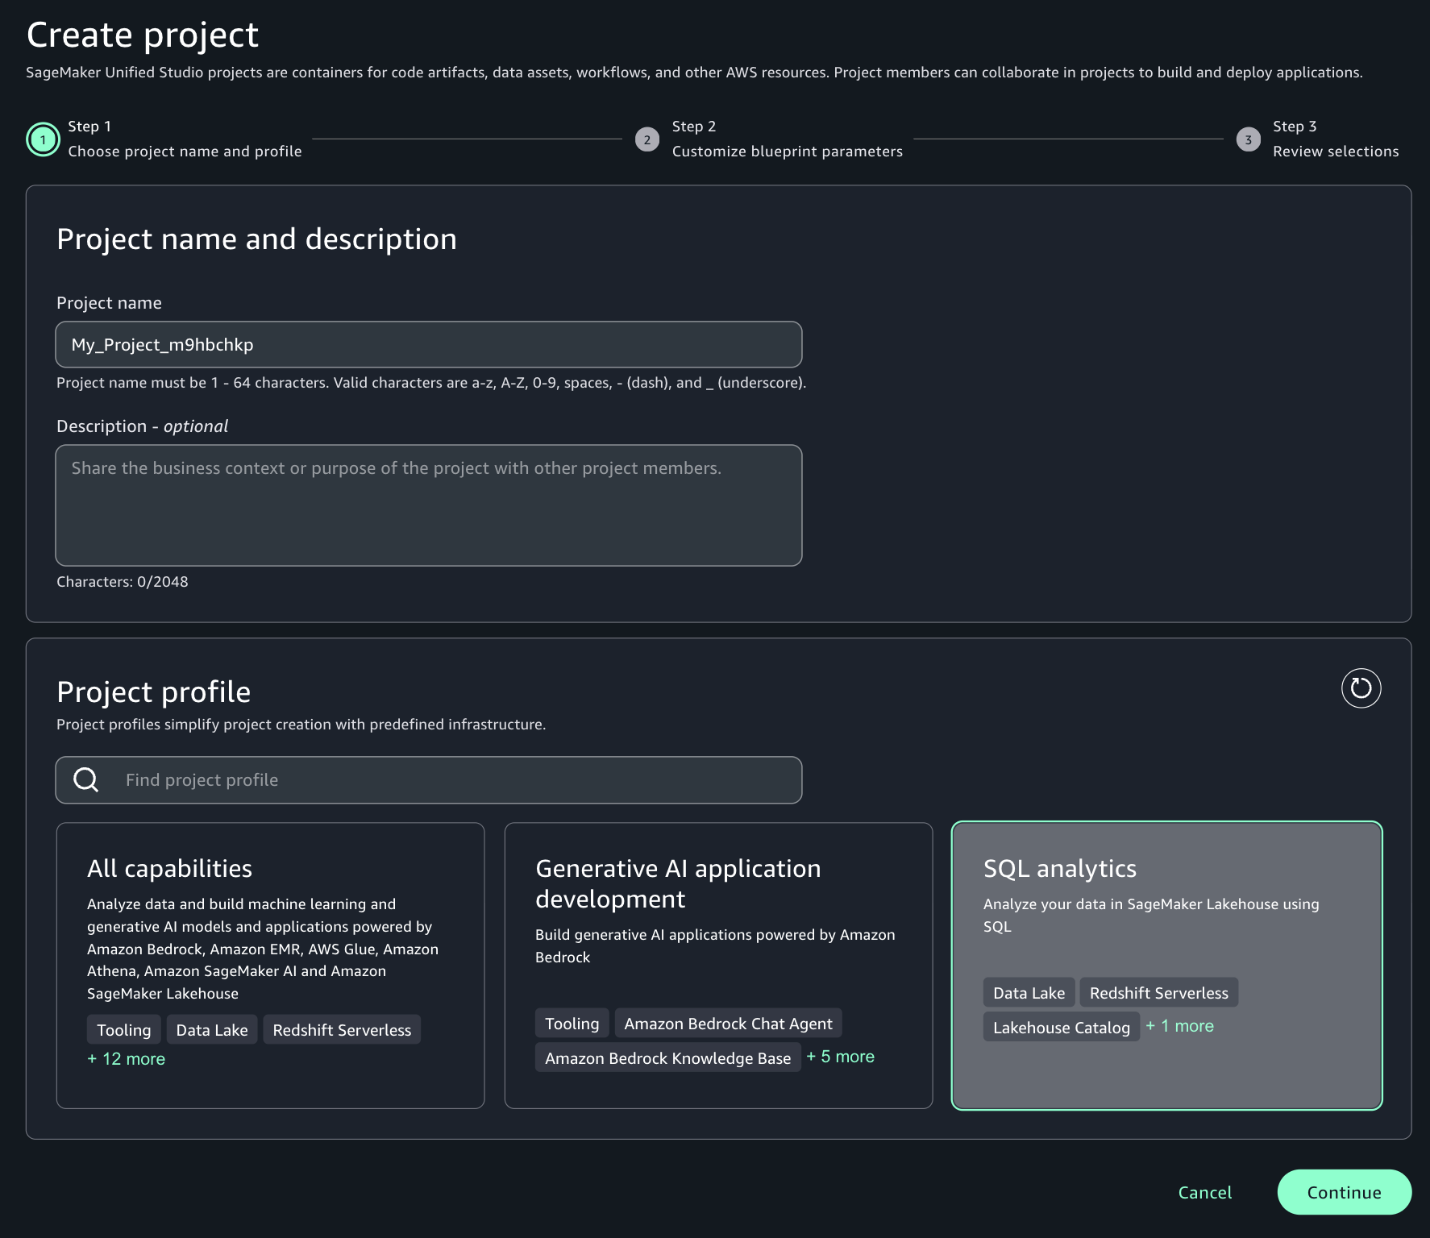
- Leave the default values as they are or modify them according to your use case, then choose Continue.
- Choose Create project to finalize the project and initialize your SQL analytics workspace.
For more detailed information and advanced configurations, refer to Create a project.
Configure Amazon Redshift for TIP and validate access
Run the setup-consumer-redshift.sh script (provided in the prerequisites). This script will create a new namespace and workgroup and add the required tags, which you will use later to integrate with SageMaker Unified Studio compute.
If you are creating the cluster manually, add one of the following tags to the Redshift cluster or workgroup that you want to add to SageMaker Unified Studio:
- Option 1 – Add a tag to allow only a specific SageMaker Unified Studio project to access it:
AmazonDataZoneProject=<projectID> - Option 2 – Add a tag to allow all SageMaker Unified Studio projects in this account to access it:
for-use-with-all-datazone-projects=true
Create compute using IAM Identity Center authentication
After you set up your project, the next step is to establish a compute resource connection on the SageMaker Unified Studio console. Follow these steps to add either Amazon Redshift Serverless or a provisioned cluster to your project environment:
- Go to the Compute section of your project in SageMaker Unified Studio.
- On the Data warehouse tab, choose Add compute.
- You can create a new compute resource or choose an existing one. For this post, we choose Connect to existing compute resources, then choose Next.
- Choose the type of compute resource you want to add, then choose Next. For this post, we choose Redshift Serverless.
- Under Connection properties, provide the JDBC URL or the compute you want to add, which is integrated with IAM Identity Center. If the compute resource is in the same account as your SageMaker Unified Studio project, you can select the compute resource from the dropdown menu. In our example, we use the consumer account that was just provisioned.
- Under Authentication, select IAM Identity Center.
- For Name, enter the name of the Redshift Serverless or provisioned cluster you want to add.
- For Description, enter a description of the compute resource.
- Choose Add compute.

The SageMaker Unified Studio Project Compute and Data pages will now display information for that resource.
If everything is configured correctly, your compute will be created using IAM Identity Center. Because your IdP credentials are already cached while you’re logged in to SageMaker Unified Studio, it uses the same credentials and creates the compute.
Test data access using Amazon Redshift
When Ethan logs in to SageMaker Unified Studio using IAM Identity Center authentication, he successfully federates and can access customer data from all countries but only for non-sensitive columns. Let’s connect to Amazon Redshift in SageMaker Unified Studio by following these steps:
- Choose Actions and choose Open Query editor.
- Choose Redshift in the Data explorer pane.
- Run the customer sales calculation query to observe that user Ethan (a data analyst) can access customer data from all countries but only non-sensitive columns (
id,birth_country,product_id):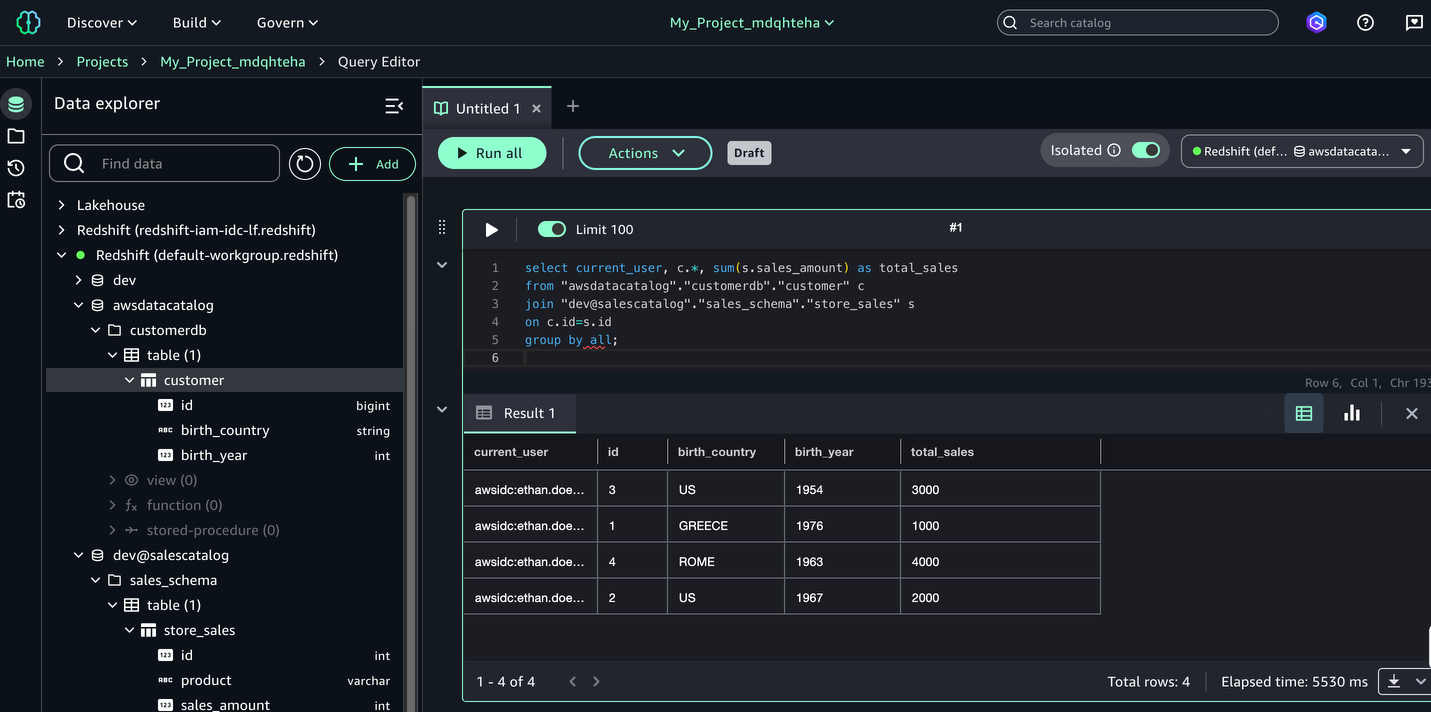
You have successfully configured Redshift to use IAM Identity Center authentication in SageMaker Unified Studio.
Validate data access using Amazon Athena
When Frank logs in to SageMaker Unified Studio using IAM Identity Center authentication, he successfully federates and can access customer data only for the United States. To query with Athena, complete the following steps:
- Choose Actions and choose Open Query editor.
- Choose Lakehouse in the Data explorer pane.
- Explore
AwsDataCatalog, expand the database, choose the respective table, and on the options menu (three dots), choose Preview data.
The following demonstration illustrates how user Frank, a BI analyst, can perform SQL analysis using Athena. Due to row-level filtering implemented through Lake Formation, Frank’s access is restricted to customer data from the United States only. Additionally, you can observe that in the Data explorer pane, Frank can only view the customerdb database. The dev@salescatalog database is not visible to Frank because no access has been granted to his respective group from Lake Formation.
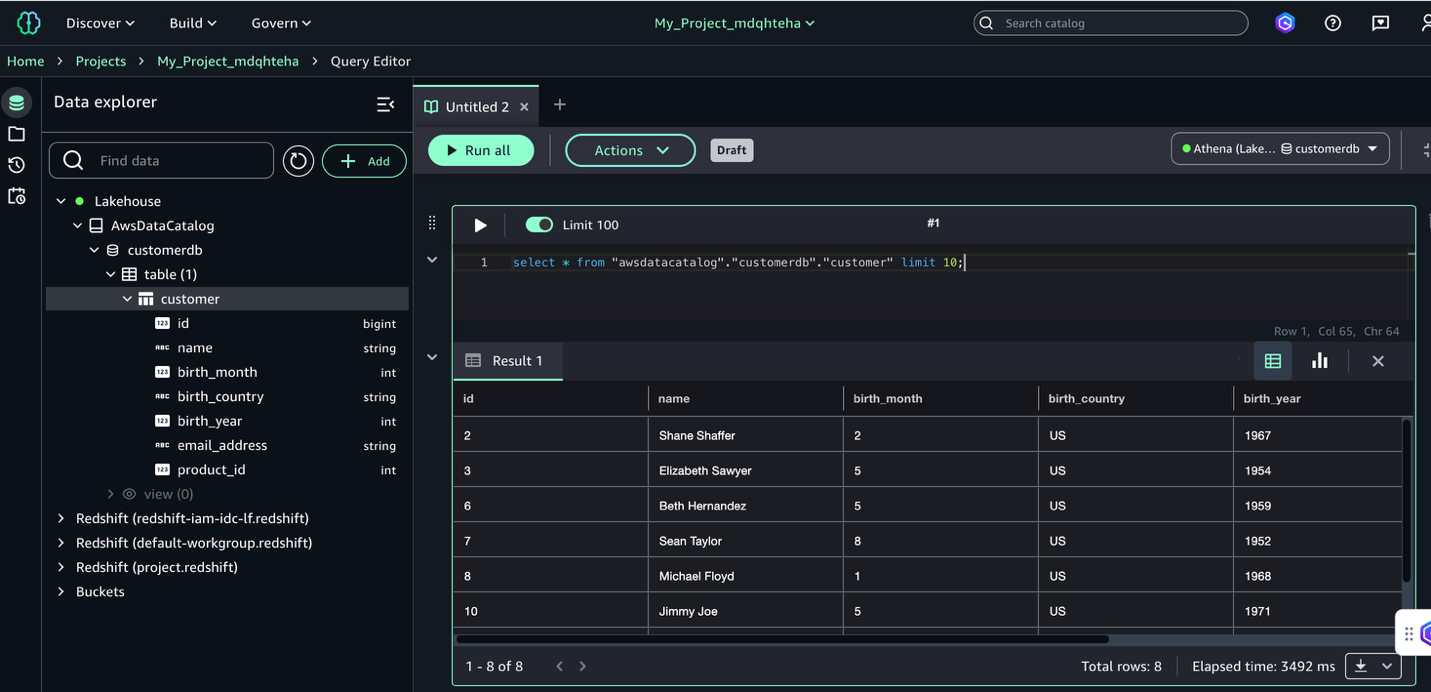
The IAM Identity Center authentication integration is complete; you can use both Amazon Redshift and Athena through SageMaker Unified Studio in a simplified, all-in-one interface.Note that, at the time of writing, Athena doesn’t work with Redshift Managed Storage (RMS).
Clean up
Complete the following steps to clean up the resources you created as part of this post:
- Delete the data from the S3 bucket.
- Delete the Data Catalog objects.
- Delete the Lake Formation resources and Athena account.
- Delete the SageMaker Unified Studio project and associated domain.
- If you created new Redshift cluster for testing this solution, delete the cluster.
Conclusion
In this post, we provided a comprehensive guide to enabling trusted identity propagation within SageMaker Unified Studio. We covered the setup of a SageMaker Unified Studio domain with SSO, the creation of tailored projects, efficient user onboarding with appropriate permissions, and the management of AWS Glue and Amazon Redshift managed catalog permissions using Lake Formation. Through practical examples, we demonstrated how to use both Amazon Redshift and Athena within SageMaker Unified Studio, showcasing secure data access and analysis capabilities. This approach helps organizations maintain strict identity controls while helping data scientists and analysts derive valuable insights from both data lake and data warehouse environments, supporting both security and productivity in machine learning workflows.
For more information on this integration, refer to Trusted identity propagation.