AWS Big Data Blog
Connect Amazon SageMaker Unified Studio to Microsoft Power BI – Part 2: IAM-based domains
In Part 1 of this series, we connected Microsoft Power BI to Amazon SageMaker Unified Studio using an IAM Identity Center (IDC)-based domain. The Amazon Athena ODBC driver (version 2.2.0 and later) supports Amazon SageMaker Unified Studio authentication natively, removing the third-party ODBC-JDBC bridge previously required. We walked through both the DSN-based connection and the DSN-less connection, from Power BI Desktop through the on-premises data gateway to Power BI Service, where report viewers access published dashboards.
In this post, you create the same direct connection using an AWS Identity and Access Management (IAM)-based domain. The walkthrough covers the same two connection methods. The differences are the Amazon SageMaker Unified Studio console navigation paths, the configuration values, and an additional administrator setup that provides AWS credentials through AWS IAM Identity Center. This is Part 2 of a two-part series. For a detailed comparison of the two connection methods, see Part 1.
Customer Spotlight
UC Irvine, a top-ten U.S. public research university, consolidates student data from systems across multiple departments into a single governed repository that supports reporting, research, and analytics for decision-making at the strategic, tactical, and operational levels. Many of their analysts rely on Power BI to explore and visualize this governed data.
“Our users rely on Power BI for data visualization and reporting, but connecting to governed data in AWS previously required workarounds. The ODBC connection feature gives a direct path from Power BI into our SageMaker Unified Studio projects—no bridge software, no extra licensing, just a connection string and we’re ready to go.”
— Bernadette Theologidy, Manager, Student Analytics, UC Irvine
Solution overview
The architecture is the same as the previous post (see the architecture diagram and walkthrough scenario in Part 1). Power BI Desktop connects to Amazon Athena through the ODBC driver and the Amazon SageMaker Unified Studio project governs all data access. At the same time, the on-premises data gateway on an Amazon Elastic Compute Cloud (Amazon EC2) instance bridges the connection to Power BI Service so report viewers can access published dashboards.
The difference is in authentication: An IAM-based domain uses SageMakerIam authentication for both connection methods. The driver retrieves credentials from the AWS default credential provider chain. For this walkthrough, AWS IAM Identity Center provides those credentials through a custom permission set. Power BI Desktop can run on-premises or on an EC2 instance in the AWS Cloud. The gateway EC2 instance authenticates using its attached IAM role.
Prerequisites
Complete the prerequisites from Part 1. Additionally, you need:
- AWS Command Line Interface (AWS CLI) – The latest version of the AWS CLI installed on your Windows machine. In this post series, the ODBC driver uses the AWS IAM Identity Center profile configured through the CLI for authentication.
- Amazon SageMaker Unified Studio – An Amazon SageMaker Unified Studio IAM-based domain with AWS IAM Identity Center single sign-on (SSO) enabled.
The following screenshot shows the Amazon SageMaker Unified Studio (IAM-based domain) project Query Editor interface. It runs a preview query on the EIA-860 generators dataset.
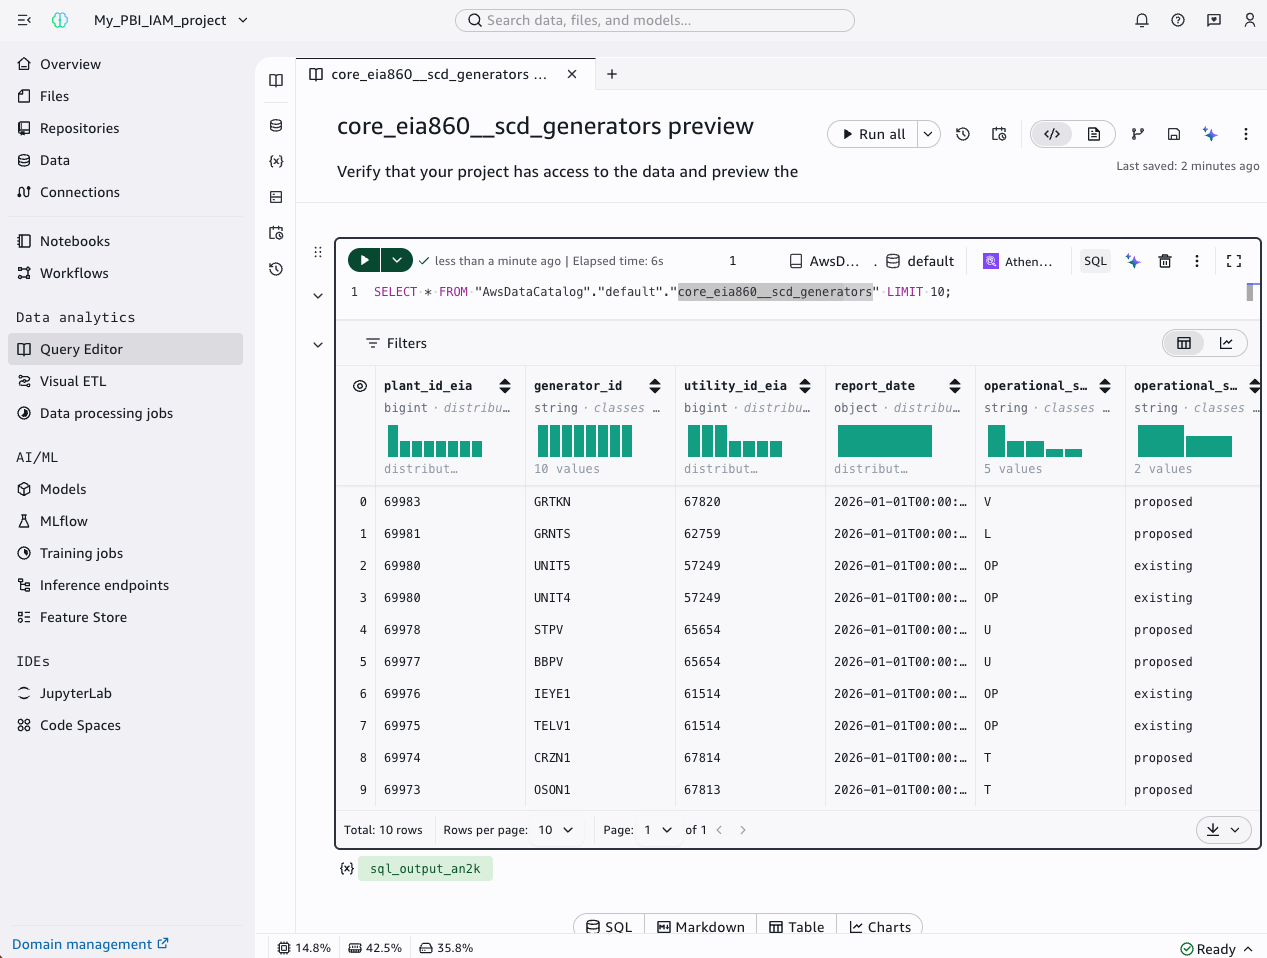
Figure 1: SageMaker Unified Studio (IAM-based domain) project with the EIA-860 generators dataset available in the data catalog
Administrator setup
This section configures AWS IAM Identity Center to provide credentials for the SageMakerIam authentication mode. It applies to Method 1 (IAM-based domain) and Method 2 (both domain types). If your machine already has AWS credentials available through another method in the default credential provider chain, you can skip this section and proceed directly to the method of your choice. For the full list of credential sources, refer to Credential providers in the AWS SDKs and Tools Reference Guide.
Create a permission set in IAM Identity Center
Create a custom permission set named SageMakerDataAnalyst in IAM Identity Center with the following inline policy. For detailed steps, see Create a permission set in the AWS IAM Identity Center User Guide.
The "Resource": "*" is required because these API actions do not support resource-level permissions. For more information, see Actions, resources, and condition keys for Amazon DataZone.
This doesn’t grant broad access to your data. These are read-only metadata actions that allow the ODBC driver to discover connection details and retrieve temporary Athena credentials. The actual data access is governed by Amazon SageMaker Unified Studio project membership: Users can only query data within projects where they have been explicitly added as members. The Amazon SageMaker Unified Studio project IAM role provides Athena and Amazon S3 permissions separately.
Assign users to the permission set
To assign users or groups to the target AWS account, complete the following steps:
- In the IAM Identity Center console, choose AWS accounts.
- Select the target account where your Amazon SageMaker Unified Studio IAM-based domain is deployed.
- Choose Assign users or groups.
- Select the SSO users or groups that need access.
- Select the SageMakerDataAnalyst permission set.
- Choose Submit.
Configure AWS IAM Identity Center profile
To configure the AWS IAM Identity Center profile, run the following command in your terminal on Windows:
When prompted, enter the following values:
| Prompt | Value |
| SSO session name | For example, smus |
| SSO start URL | The IDC issuer URL. For example, https://identitycenter.amazonaws.com/ssoins-0example |
| SSO region | The SSO Region. For example, us-east-1 |
| SSO registration scopes | sso:account:access |
A browser window opens for authentication. After authentication, select your account and the SageMakerDataAnalyst role.
The following screenshots show the consent window and the successful authentication message.
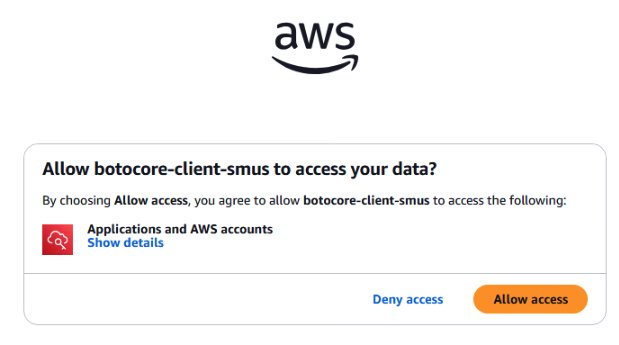
Figure 2: Browser consent prompt
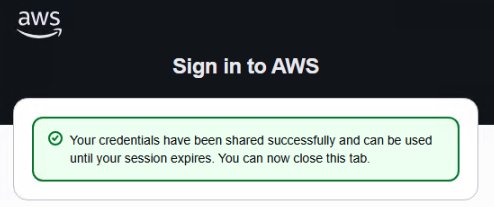
Figure 3: Browser authentication successful message
When prompted, enter the following values:
| Prompt | Value |
| Default client Region | None |
| CLI default output format | None |
| Profile Name | Change value by default |
The resulting ~/.aws/config file should look like the following:
Verify authentication and daily use
To verify that your SSO profile is working correctly, run the following command:
You should receive a response like the following:
For daily use, no passwords or EC2 instance roles are required. When your SSO session expires, run the following command to quickly refresh it:
Add your IAM identity as a member of your Amazon SageMaker Unified Studio project
The IAM identity providing credentials to the ODBC driver needs project-level access to query data through Athena. If you completed the administrator setup, this is the SSO role associated with your permission set (for example, AWSReservedSSO_SageMakerDataAnalyst_1234example). If you’re using another credential source, add the IAM role or user that provides those credentials. For detailed steps, see Managing users for IAM-based domains in the Amazon SageMaker Unified Studio Administrator Guide.
The following screenshot shows the Amazon SageMaker Unified Studio domain management page, which lists the members in a project.
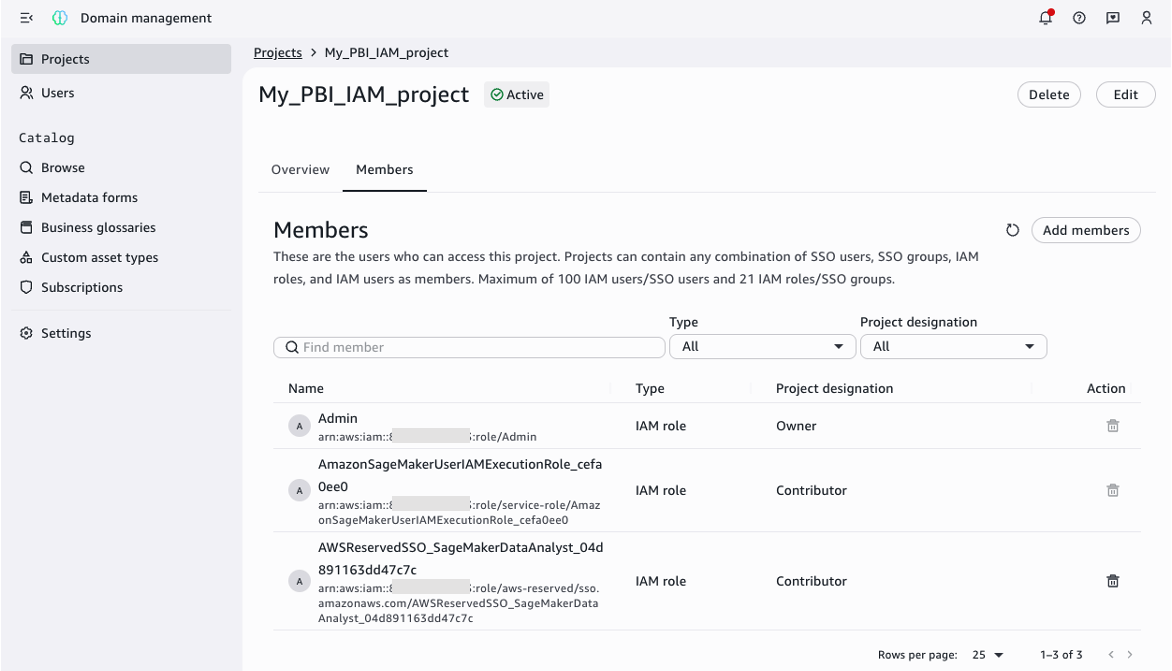
Figure 4: List of members of your SageMaker Unified Studio project
Gather the information to authenticate
To get the parameters that you need to authenticate, complete these steps:
- Open your Amazon SageMaker Unified Studio Project.
- Open Domain Management.
- Choose Users.
- Choose View SSO connection.
- Copy the end of the Instance ARN, so we can build the Instance URL like
https://identitycenter.amazonaws.com/ssoins-0example
The following screenshot shows the Amazon SageMaker Unified Studio domain management page with SSO connection details.
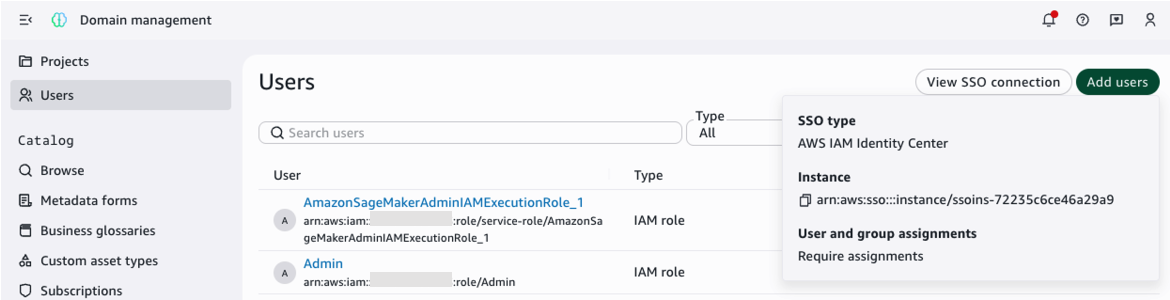
Figure 5: AWS IAM Identity Center information
- Choose the user icon and copy the Region as shown in the following screenshot.

Figure 6: User icon with the Region information
Method 1: DSN-based connection (Athena Power BI connector)
In this method, you configure an ODBC Data Source Name (DSN) and use the Amazon Athena connector in Power BI. This method uses SageMakerIam authentication mode and supports both DirectQuery and Import mode.
This section covers IAM-based domains. For IDC-based domains, see Part 1.
Gather configuration values to configure your Amazon Athena ODBC DSN
Before configuring the ODBC DSN, gather the following connection values from your Amazon SageMaker Unified Studio project:
- Open your Amazon SageMaker Unified Studio Project.
- Top right, select the three dots.
- Choose Project details.
- Select JDBC and ODBC details.
- Copy the following values: domain ID, Amazon SageMaker project ID, AWS Region, and Athena workgroup.
The following screenshot shows the Amazon SageMaker Unified Studio project overview page, which provides the project details to copy.
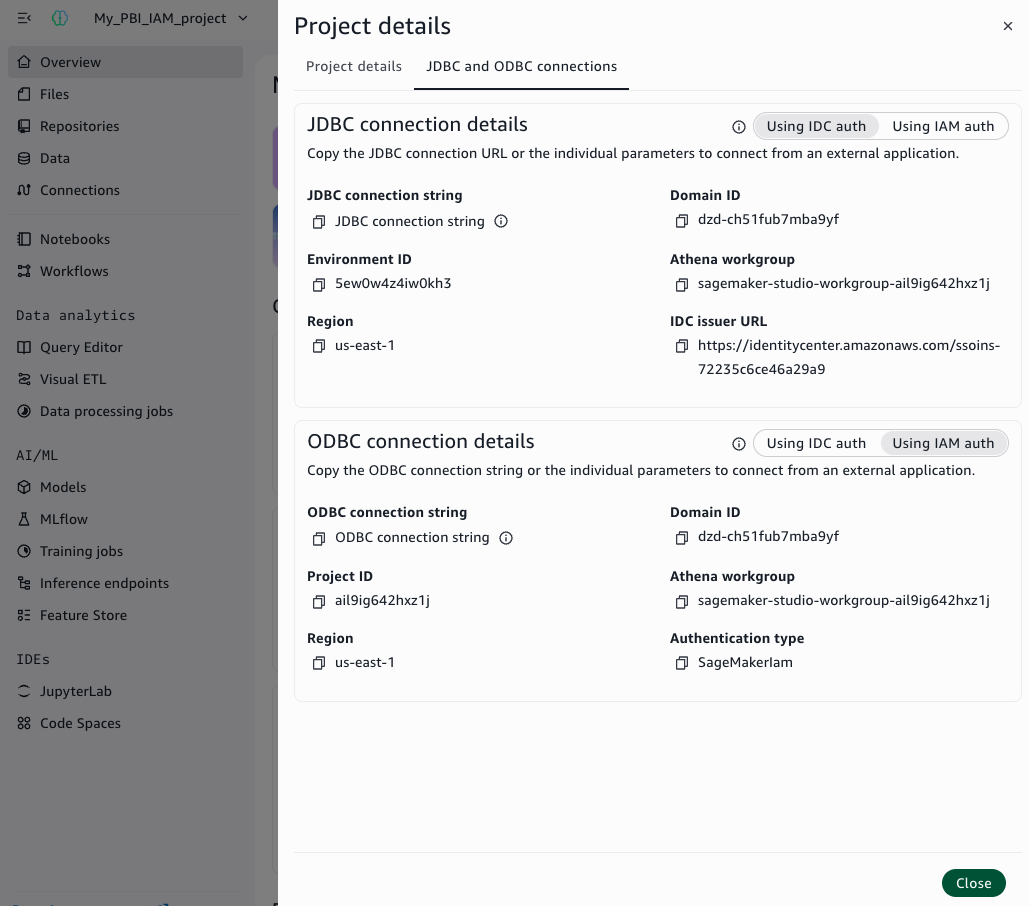
Figure 7: Project details with SageMaker domain ID, SageMaker project ID, Region, and Athena workgroup
Configure the ODBC DSN
Create a System DSN using the Amazon Athena ODBC driver. For the general DSN creation steps, see Configuring a data source name on Windows in the Amazon Athena User Guide. Enter the following values:
| Field | Value |
| Data Source Name | Name your datasource (for example, pbi-iamdomain) |
| Region | The AWS Region where your Amazon SageMaker domain is provisioned (for example, us-east-1) |
| Catalog | AwsDataCatalog |
| Database | default |
| Workgroup | Your Athena workgroup name (for example, workgroup-abcdefghij-klmexample) |
In the Authentication Options, configure the following values:
| Field | Value |
| Authentication Type | SageMakerIam |
| SageMaker Domain ID | dzd-123456example |
| SageMaker Project ID | abcd12example |
| SageMaker Region | Region of your SageMaker Unified Studio project (for example, us-east-1) |
Choose OK, then Test to verify the connection. Choose Allow Access when prompted by the browser.
The following screenshot shows the successful connection test.
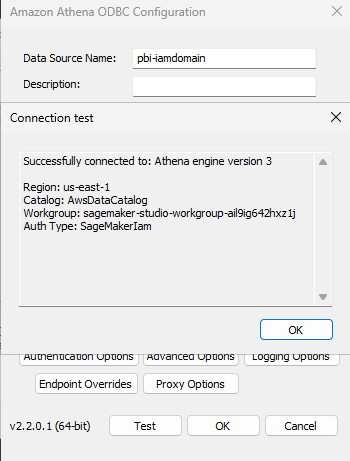
Figure 8: Successful connection test in the ODBC DSN configuration with SageMakerIam authentication
Connect Power BI Desktop to your data
With the DSN configured, you can connect Power BI Desktop to your data catalog and load the generators dataset.
- Open Microsoft Power BI Desktop.
- Open the Get Data menu and select More.
- Search for and select Amazon Athena and choose Connect.
- For Data Source Name (DSN), enter
pbi-iamdomain. - Select DirectQuery.
- Choose OK.
- Choose Use Data Source Configuration and then Connect.
- In the AwsDataCatalog folder, navigate to your database.
- Select the core_eia860__scd_generators table.
- Choose Load.
The following screenshot shows Power BI Desktop successfully connected to the data catalog.
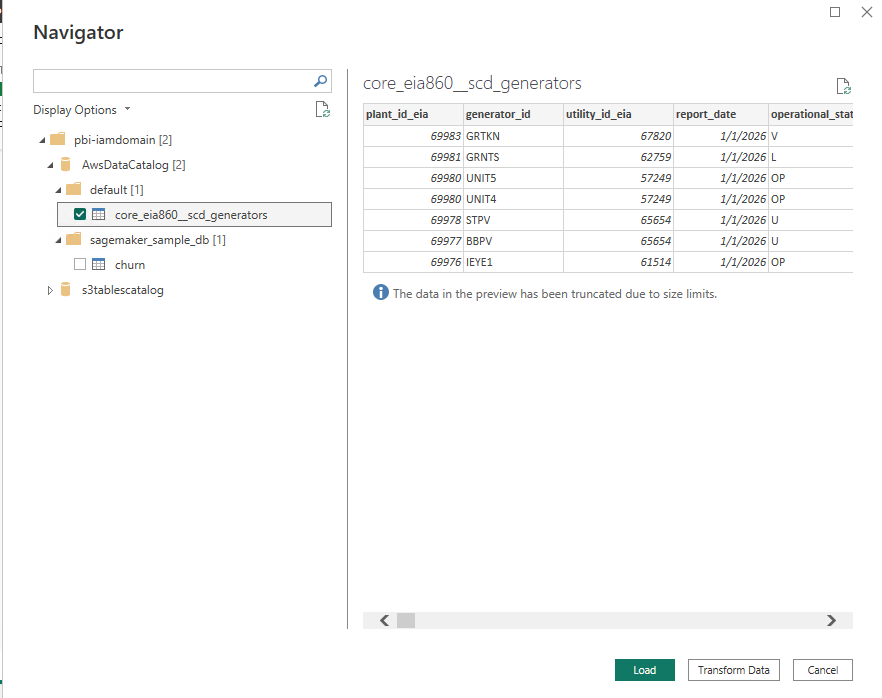
Figure 9: Power BI Desktop connected to the data catalog with the generators table loaded using SageMakerIam authentication
Create your dashboard and publish it
You can create a dashboard to visualize U.S. power generation data. To create a visualization, complete the following steps:
- In the Visualizations pane, choose the Stacked bar chart.
- Assign the Y-Axis: Drag
technology_descriptionto the Y-Axis. - Assign the X-Axis (Values): Drag
capacity_mwto the X-Axis (automatically summed). - Assign the Legend (Stack): Drag
operational_statusto the Legend field. - Choose Publish.
- Give your report a name (for example,
generation-iamdomain) and choose Save. - Sign in and choose a destination workspace.
The following screenshot shows the Power BI dashboard with U.S. power generation data.
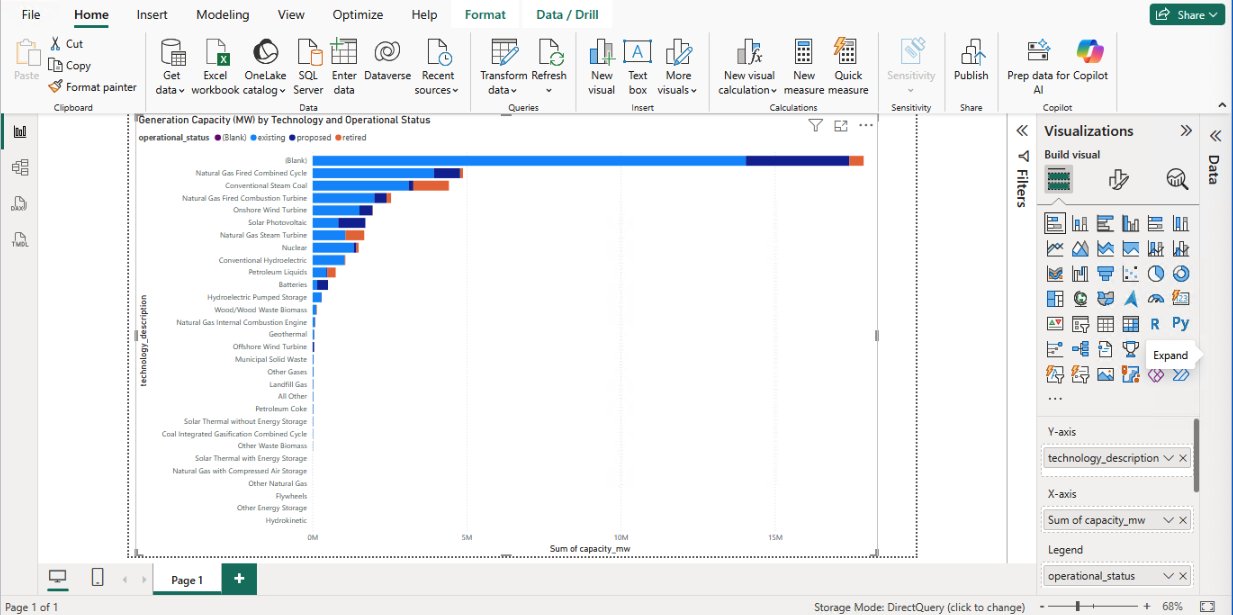
Figure 10: Power BI dashboard with U.S. power generation data
After you publish, the report structure becomes available on Microsoft Power BI Service.
Method 2: DSN-less connection (Power BI ODBC connector)
In this method, you use the Power BI ODBC connector with a connection string (no DSN required). This method supports Import mode only and SageMakerIam authentication. Because the gateway can’t perform browser authentication and connection strings need to match, both Desktop and gateway must use SageMakerIam.
This section covers IAM-based domains. For IDC-based domains, see Part 1.
Gather configuration values to configure your DSN-less connection
Gather the following connection values from your Amazon SageMaker Unified Studio project:
- Open your Amazon SageMaker Unified Studio Project.
- Top right, select the three dots.
- Choose Project details.
- Select JDBC and ODBC details.
- Copy the ODBC connection string.
The following screenshot shows the Amazon SageMaker Unified Studio project overview page with the ODBC connection string to copy.
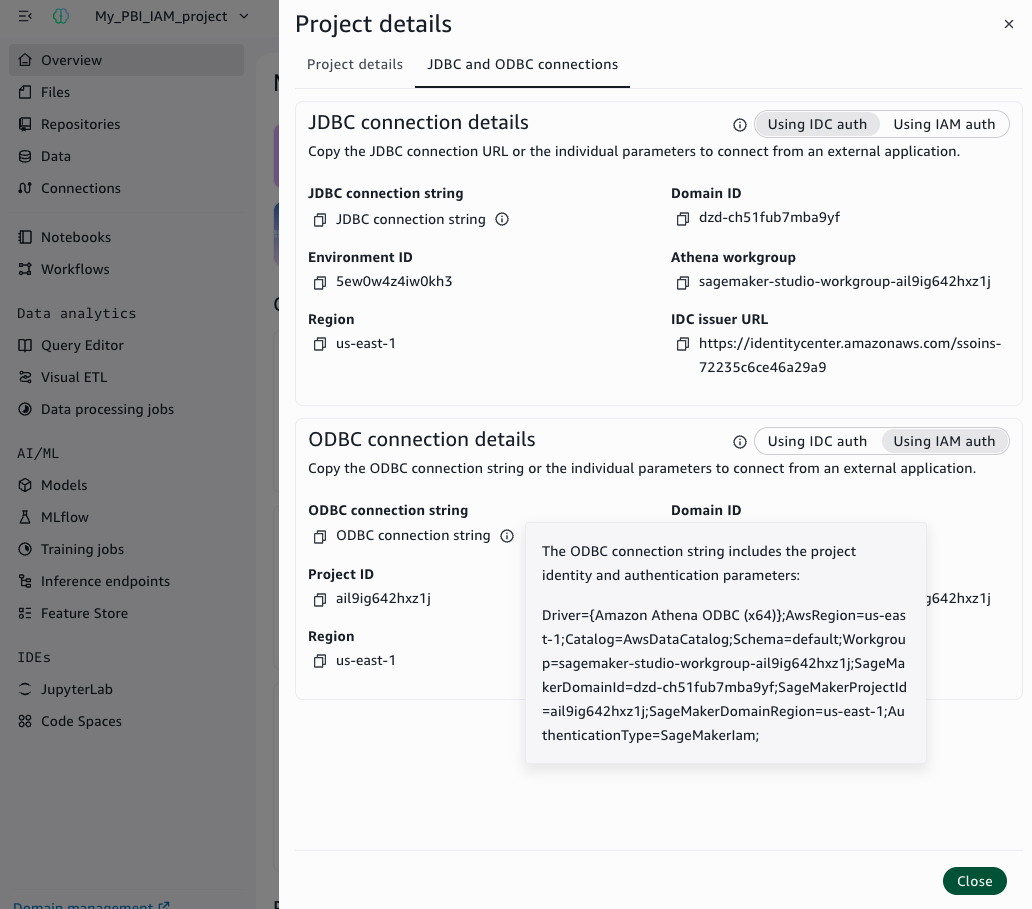
Figure 11: Project details with ODBC connection string
Connect Power BI Desktop to your data and publish
With the configuration parameters of your project, you can connect Power BI Desktop to your data catalog and load the generators dataset.
- Open Power BI Desktop.
- Open the Get Data menu and select More.
- Search for and select ODBC and choose Connect.
- For Data Source Name (DSN), select (None).
- Expand Advanced Options.
- In the Connection string field, enter your connection string. For example,
Driver={Amazon Athena ODBC (x64)};AwsRegion=us-east-1;Catalog=AwsDataCatalog;Schema=default;Workgroup=workgroup-abcdefghij-klmexample;SageMakerDomainId= dzd-123456example;SageMakerProjectId= abcd12example;SageMakerDomainRegion=us-east-1;AuthenticationType=SageMakerIam; - Choose OK.
- Choose Default or Custom and then Connect.
- In the AwsDataCatalog folder, navigate to your database.
- Select the core_eia860__scd_generators table.
- Choose Load.
When publishing, name your report generation-iamdomain-dsnless.
Configure the gateway and view your report on Power BI Service
After creating your reports in Power BI Desktop, configure the on-premises data gateway to view your report on Power BI Service.
You can configure the gateway using either a DSN or a DSN-less connection string, matching the method you used in Power BI Desktop.
Create and attach an IAM role to the Power BI Gateway EC2 instance
Create an IAM role for the EC2 instance that will host your Power BI gateway. Name the role pbi-gateway-role (or a name of your choice). The role must use EC2 as the trusted entity and include the following inline policy:
Attach this role to your Power BI Gateway EC2 instance. For detailed steps on creating and attaching an IAM role to an EC2 instance, refer to IAM roles for Amazon EC2 in the Amazon EC2 User Guide.
Add the Power BI Gateway IAM role as a member of SageMaker Unified Studio project
The gateway IAM role needs project-level access to query data through Athena. The steps to add the role differ depending on your domain type.
IAM-based domain
- Open your Amazon SageMaker Unified Studio Project.
- Open Domain Management.
- Choose your Project Name.
- Choose Members.
- Choose Add members.
- Select the IAM role of your Power BI gateway (for example,
pbi-gateway-role). - Choose Add.
The following screenshot shows the Amazon SageMaker Unified Studio project domain management page with options to add members to a project.
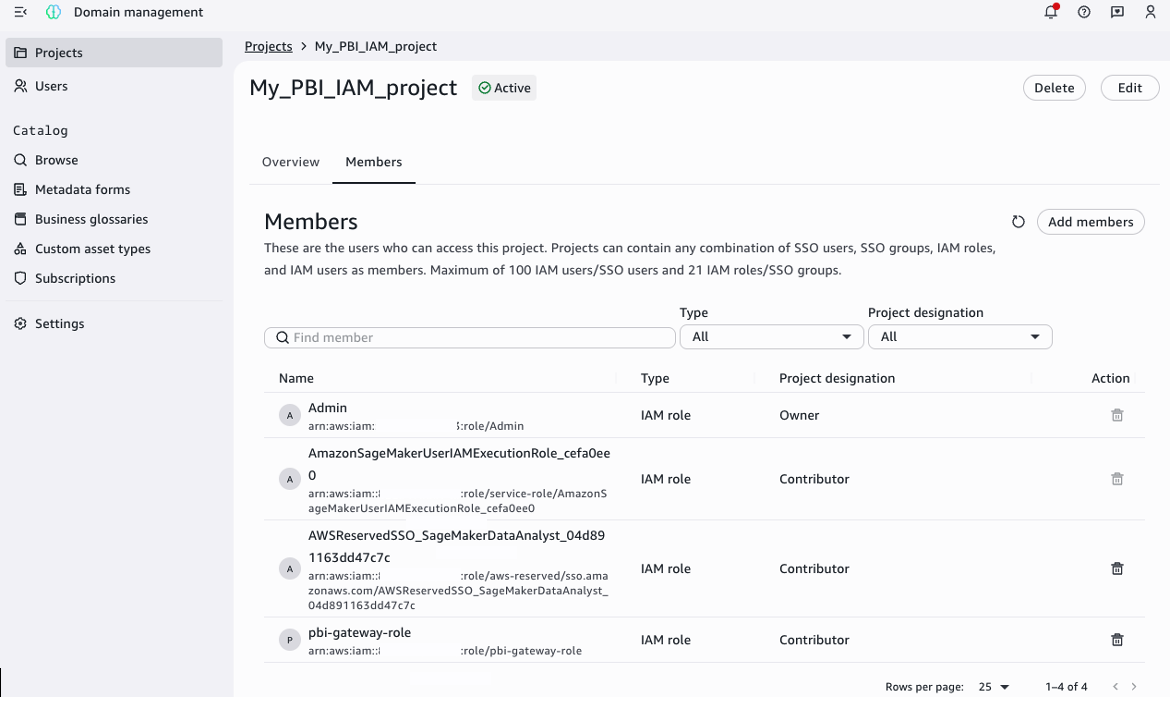
Figure 12: List of members of a SageMaker Unified Studio project with the IAM gateway role
Configure the data source on Power BI Gateway
How you configure the data source depends on the method you used in Power BI Desktop.
Method 1 (DSN-based)
Configure a System DSN on the gateway EC2 instance following the same ODBC DSN steps described in Method 1. When configuring, make sure that:
- You use the System DSN tab (not User DSN) because the gateway runs as a Windows service under a separate account.
- The authentication type is set to SageMakerIam.
- The DSN name matches exactly the one configured on Power BI Desktop (for example,
pbi-iamdomain).
Method 2 (DSN-less)
No configuration is needed on the gateway machine itself. You configure the data source directly in Power BI Service.
Configure the data source and view your report on Power BI Service
To view your report, complete the following steps:
- Open the workspace where you saved your report.
- Search the Semantic Model which has the same name as your report (for example,
generation-iamdomain) and choose the More options icon (three dots). - Choose Settings.
- Expand Gateway and Cloud Connection.
- Choose View Datasources (play icon) on your gateway.
- Choose Manually add to gateway.
- Add a connection name (for example,
pbi-iamdomain).
The next step depends on the method that you chose:
Method 1 (DSN-based)
- Add the DSN (for example,
pbi-iamdomain) that matches exactly the one configured on Power BI Desktop.
Method 2 (DSN-less)
- In the Connection string field, enter the connection string that matches exactly the one used in Power BI Desktop.
Next, continue with the configuration:
- Select Anonymous as Authentication Method.
- Choose Create.
- Expand again Gateway and Cloud Connection.
- For Maps to, choose the connection that you created (for example,
pbi-iamdomain). - Choose Apply.
- Return to the workspace where you saved your report.
- On the Content section, choose your report (for example,
generation-iamdomain).
The following screenshot shows a report on Power BI Service.
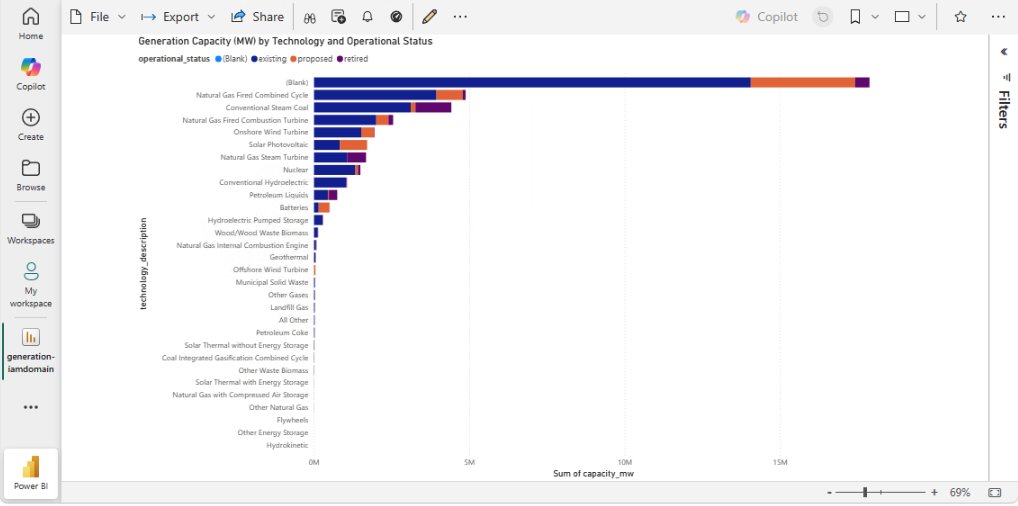
Figure 13: Power BI report on Power BI Service
You can now see your report online with the data from your Amazon SageMaker Unified Studio project.
Clean up
To avoid additional charges after testing, delete the Amazon SageMaker Unified Studio domain and EC2 instances. Refer to Delete domains and Terminate Instances for instructions.
Conclusion
In this two-part series, you connected Power BI to Amazon SageMaker Unified Studio through Amazon Athena. Part 1 covered IDC-based domains. This post covered IAM-based domains using SageMakerIam authentication. This provides a direct connection path, with no third-party licensing, while maintaining data governance and security.
You can automate many steps of this process. For information about automating DSN creation on the Power BI Gateway or Service, refer to How ENGIE automates the deployment of Amazon Athena data sources on Microsoft Power BI. If you don’t want users adding the gateway IAM role directly, you can create a custom blueprint as a self-service tool for gateway role addition. The blueprint uses a ProjectMembership resource with a configurable parameter that project owners can activate at project creation, automatically adding the gateway role as a project contributor.
For additional best practices, refer to the Using Microsoft Power BI with the AWS Cloud Whitepaper. To learn more, visit Amazon SageMaker Unified Studio and Amazon Athena.