AWS Big Data Blog
Enable federation to multiple Amazon QuickSight accounts with Microsoft Azure Active Directory
Amazon QuickSight is a scalable, serverless, embeddable, machine learning (ML)-powered business intelligence (BI) service built for the cloud that supports identity federation in both Standard and Enterprise editions. Organizations are working towards centralizing their identity and access strategy across all of their applications, including on-premises, third-party, and applications on AWS. Many organizations use Microsoft Azure Active Directory (Azure AD) to control and manage user authentication and authorization centrally. If your organization uses Azure AD for cloud applications and multiple QuickSight accounts, you can enable federation to all of your QuickSight accounts without needing to create and manage users multiple times. This authorizes users to access QuickSight assets—analyses, dashboards, folders, and datasets—through centrally managed Azure AD.
In this post, we go through the steps to configure federated single sign-on (SSO) between a single Azure AD instance and multiple QuickSight accounts. We demonstrate registering an SSO application in Azure AD, creating roles in Azure AD, and assigning these roles to map to QuickSight roles (admin, author, and reader) These QuickSight roles represent three different personas supported in QuickSight. Administrators can publish the QuickSight app in the Azure App portal to enable users to SSO to QuickSight using their Azure AD credentials.
Prerequisites
To complete this walkthrough, you must have the following prerequisites:
- An Azure AD subscription
- One or more QuickSight account subscriptions
Solution overview
The walkthrough includes the following steps:
- Register an AWS Single Sign-On (AWS SSO) application in Azure AD.
- Configure the application in Azure AD.
- Add Azure AD as your SAML identity provider (IdP) in AWS.
- Configure AWS Identity and Access Management (IAM) policies.
- Configure IAM roles.
- Create roles in Microsoft Graph Explorer.
- Assign the newly created roles through Graph Explorer to users in Azure AD.
- Test the application from Azure AD.
Register an AWS SSO application in Azure AD
To configure the integration of an AWS SSO application in Azure AD, you need to add AWS SSO to your list of managed software as a service (SaaS) apps.
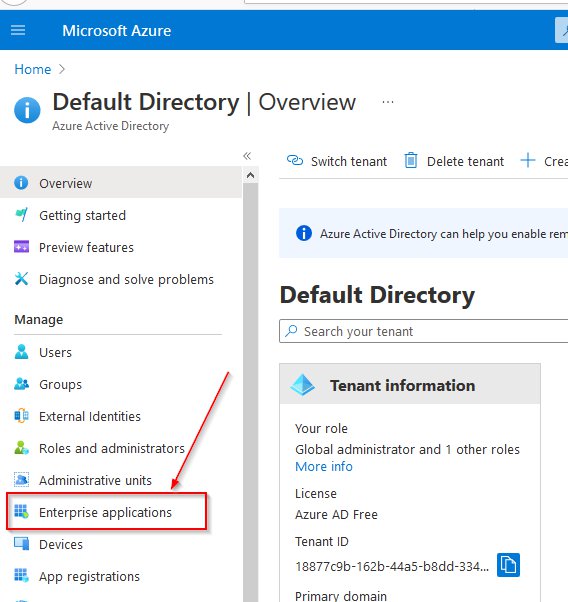
- Sign in to the Azure portal using a Microsoft account.
- Under Azure services, choose Azure Active Directory.

- In the navigation pane, under Manage, choose Enterprise Applications.
- Choose All applications.
- Choose New application.

- In the Browse Azure AD Gallery section, search for AWS Single Sign-On.
- Choose AWS Single Sign-On from the results panel and add the application.

- For Name, enter
Amazon QuickSight. - After the application is created, copy the Object ID value from the application overview.

You need this object ID in the later steps.
Configure an AWS SSO application in Azure AD
Follow these steps to enable Azure AD SSO in the Azure portal.
- In the Azure portal, on the AWS SSO application registered in first step, in the Manage section, choose single sign-on.
- On the Select a single sign-on method page, choose SAML.
- Choose the pencil icon.
- For Identifier (Entity ID), enter
URN:AMAZON:WEBSERVICES. - For Reply URL, enter
https://signin.aws.amazon.com/saml. - Leave Sign on URL blank
- For Relay State, enter
https://quicksight.aws.amazon.com. - Leave Logout URL blank.
- Choose Save.

- On the Set up Single Sign-On with SAML page, under User Attributes & Claims, choose Edit.
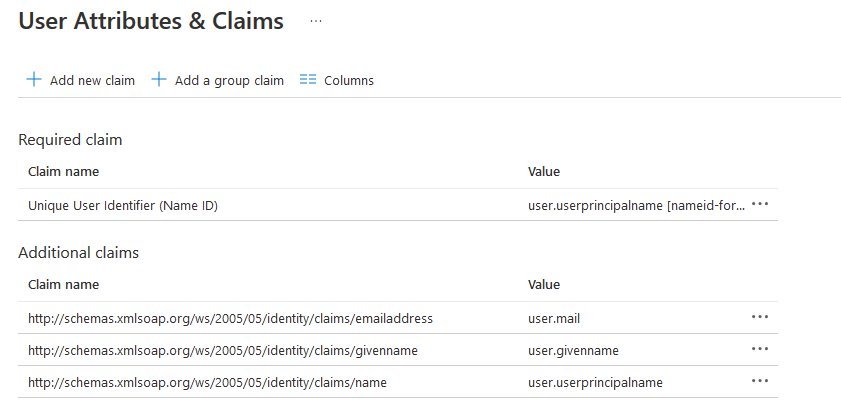
- In the Additional Claims section, configure SAML token attributes by using the values in the following table.
| Name | Source attribute | Namespace |
RoleSessionName |
user.userprincipalname |
https://aws.amazon.com/SAML/Attributes |
Role |
user.assignedroles |
https://aws.amazon.com/SAML/Attributes |
SessionDuration |
Provide a value from 900 seconds (15 minutes) to 43,200 seconds (12 hours) | https://aws.amazon.com/SAML/Attributes |
- In the SAML Signing Certificate section, choose Download to download the federation metadata XML file.

You this XML document later when setting up the SAML provider in IAM.
Add Azure AD as your SAML IdP in AWS
To configure Azure AD as your SAML IdP, complete the following steps:
- Open a new tab in your browser.
- Sign in to the IAM console in your AWS account with admin permissions.
- On the IAM console, under Access Management in the navigation pane, choose Identity providers.
- Choose Add provider.

- For Provider name, enter
AzureActiveDirectory. - Choose Choose file to upload the metadata document you downloaded in the earlier step.
- Choose Add provider.
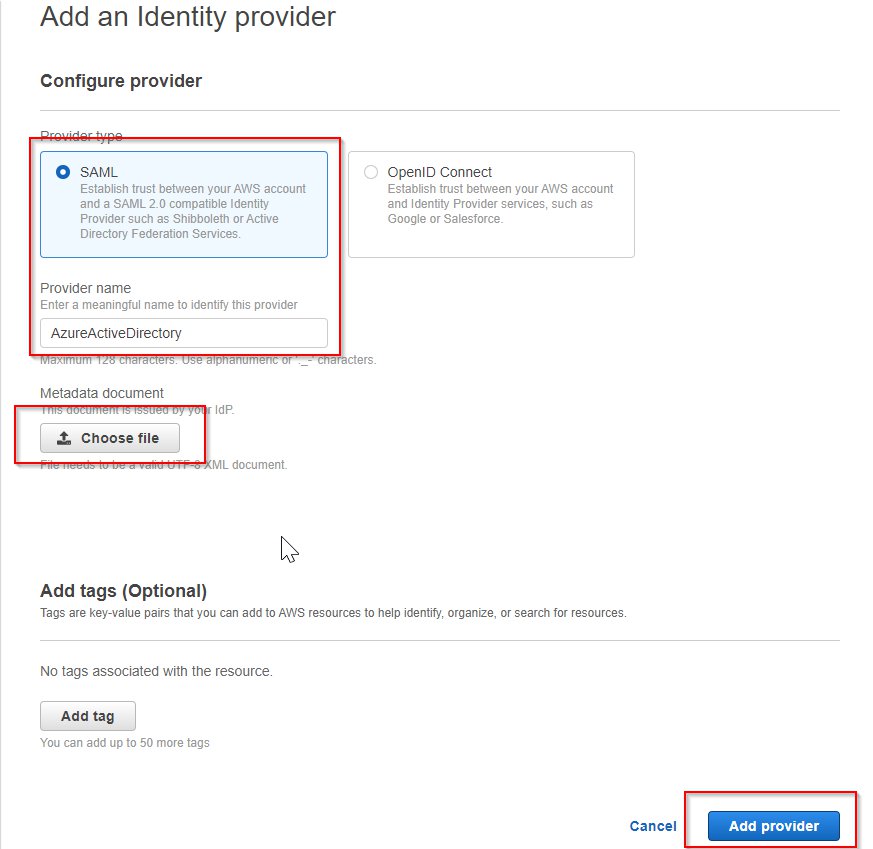
- In the banner message that appears, choose View provider.
![]()
- Copy the ARN to use in a later step.

- Repeat these steps in other accounts where you want to enable SSO.
Configure IAM policies
In this step, you create three IAM policies for mapping to three different roles with permissions in QuickSight (admin, author, and reader).
Use the following steps to set up the QuickSight-Admin-Account1 policy. This policy grants admin privileges in QuickSight to the federated user.
- On the IAM console, choose Policies.
- Choose Create policy.
- Choose JSON and replace the existing text with the code from the following table for
QuickSight-Admin-Account1.
| Policy Name | JSON Text |
QuickSight-Admin-Account1 |
|
QuickSight-Author-Account1 |
|
QuickSight-Reader-Account1 |
- Choose Review policy
- For Name, enter
QuickSight-Admin-Account1. - Choose Create policy.
- Repeat the steps for
QuickSight-Author-Account1andQuickSight-Reader-Account1. - Repeat these steps in other accounts where you want to enable SSO.
Configure IAM roles
Next, create the roles that your Azure AD users assume when federating into QuickSight. Use the following steps to set up the admin role:
- On the IAM console, choose Roles.
- Choose Create role.
- For Select type of trusted entity, choose SAML 2.0 federation.
- For SAML provider, choose the provider you created earlier (
AzureActiveDirectory). - Select Allow programmatic and AWS Management Console access.
- For Attribute, choose SAML:aud.
- For Value, enter
https://signin.aws.amazon.com/saml.

- Choose Next: Permissions.
- Choose the
QuickSight-Admin-Account1IAM policy you created in the previous step. - Choose Next: Tags.
- Choose Next: Review
- For Role name, enter
QuickSight-Admin-Role. - For Role description, enter a description.
- Choose Create role.

- On the IAM console, in the navigation pane, choose Roles.
- Choose the
QuickSight-Admin-Rolerole you created to open the role’s properties. - Copy the role ARN to the notepad.
- On the Trust Relationships tab, choose Edit Trust Relationship.
- Under Trusted Entities, verify that the IdP you created is listed.
- Under Conditions, verify that
SAML:audwith a value ofhttps://signin.aws.amazon.com/samlis present.

- Repeat these steps to create your author and reader roles and attach the appropriate policies:
- For
QuickSight-Author-Role, use the policyQuickSight-Author-Account1. - For
QuickSight-Reader-Role, use the policyQuickSight-Reader-Account1.
- For
- Repeat these steps in other accounts where you want to enable SSO.
Create roles in Microsoft Graph Explorer
Optionally, you can create roles within Azure AD with paid subscriptions. Open Microsoft Graph Explorer, and then do the following:
- Sign in to the Microsoft Graph Explorer site with the domain account for your tenant.

You need sufficient permissions to create the roles.
- To grant permissions, choose the ellipsis (three dots) next to your name and choose Select permissions.

- On the Permission list, expand Directory.
- Select the three directory-level permissions as shown in the following screenshot and choose Consent.

- Sign in to Graph Explorer again, and accept the site usage conditions.
- Choose GET for the method, and 0 for the version.
- In the query box, enter
https://graph.microsoft.com/v1.0/servicePrincipals/<objectId>(use the object ID you saved earlier). - In the Response preview pane, copy the response to an editor of your choice to modify.

- Extract the
appRolesproperty from the service principal object.

Now you generate new roles for your application. These roles must match the IAM roles in AWS that you created earlier.
- From the notepad, use the format
<Role ARN>,<IdP ARN>to create your roles:arn:aws:iam::5xxxxxxxxxx9:role/QuickSight-Admin-Role,arn:aws:iam::5xxxxxxxxxx9:saml-provider/AzureActiveDirectoryarn:aws:iam::5xxxxxxxxxx9:role/QuickSight-Author-Role,arn:aws:iam::5xxxxxxxxxx9:saml-provider/AzureActiveDirectoryarn:aws:iam::5xxxxxxxxxx9:role/QuickSight-Reader-Role,arn:aws:iam::5xxxxxxxxxx9:saml-provider/AzureActiveDirectoryarn:aws:iam::0xxxxxxxxxx2:role/QS-Admin-AZAd-Role,arn:aws:iam::0xxxxxxxxxx2:saml-provider/AzureAd-Acct2arn:aws:iam::0xxxxxxxxxx2:role/QS-Author-AZAd-Role,arn:aws:iam::0xxxxxxxxxx2:saml-provider/AzureAd-Acct2arn:aws:iam::0xxxxxxxxxx2:role/QS-Reader-AZAd-Role,arn:aws:iam::0xxxxxxxxxx2:saml-provider/AzureAd-Acct2
- The following JSON code is an example of the
appRolesCreate a similar object to add the roles for your application:
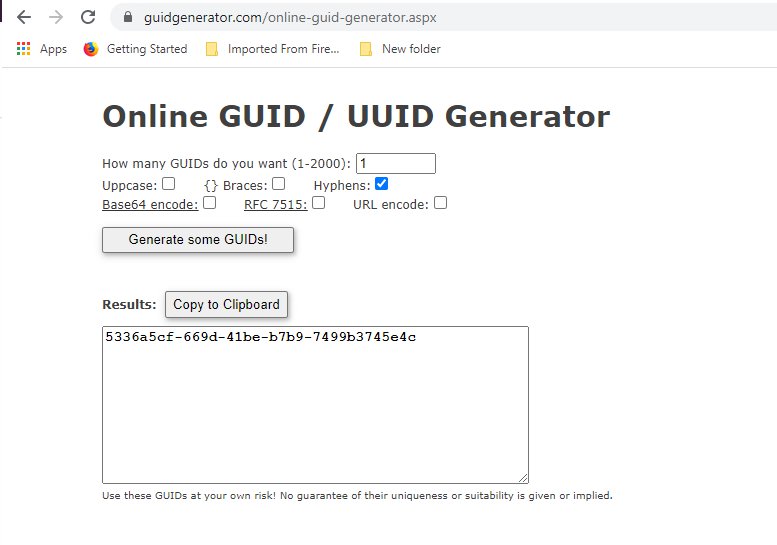
New roles must be followed by msiam_access for the patch operation. You can also add multiple roles, depending on your organization’s needs. Azure AD sends the value of these roles as the claim value in the SAML response.
When adding new roles, you must provide a new GUID for each ID attribute in the JSON payload. You can use online GUID generation tool for generating a new unique GUID per role.
- In Microsoft Graph Explorer, change the method from GET to PATCH.
- Patch the service principal object with the roles you want by updating the
appRolesproperty, like the one shown in the preceding example. - Choose Run Query to run the patch operation. A success message confirms the creation of the role for your AWS application.

After the service principal is patched with new roles, you can assign users and groups to their respective roles.
- In the Azure portal, go to the QuickSight application you created and choose Users and Groups.
- Create your groups.
We recommend creating a new group for every AWS role in order to assign a particular role to the group. This one-to-one mapping means that one group is assigned to one role. You can then add members to the group.
- After you create the groups, choose the group and assign it to the application.
Nested groups are not allowed.
- To assign the role to the group, choose the role, then choose Assign.
Test the application
In this section, you test your Azure AD SSO configuration by using Microsoft Applications.
- Navigate to Microsoft Applications.
- On the My Apps page, choose AWS Single Sign-On.

- Choose a specific role for the QuickSight account you want to use.

You’re redirected to the QuickSight console.

Summary
This post provided step-by-step instructions to configure federated SSO between a single Azure AD instance and multiple QuickSight accounts. We also discussed how to create new roles and map users and groups in Azure AD to IAM for secure access into multiple QuickSight accounts.
For information about federating from Azure AD to a single QuickSight account, see Enabling Amazon QuickSight federation with Azure AD.
About the Authors
 Srikanth Baheti is a Specialized World Wide Sr. Solution Architect for Amazon QuickSight. He started his career as a consultant and worked for multiple private and government organizations. Later he worked for PerkinElmer Health and Sciences & eResearch Technology Inc, where he was responsible for designing and developing high traffic web applications, highly scalable and maintainable data pipelines for reporting platforms using AWS services and Serverless computing.
Raji Sivasubram aniam is a Specialist Solutions Architect at AWS, focusing on Analytics. Raji has 20 years of experience in architecting end-to-end Enterprise Data Management, Business Intelligence and Analytics solutions for Fortune 500 and Fortune 100 companies across the globe. She has in-depth experience in integrated healthcare data and analytics with wide variety of healthcare datasets including managed market, physician targeting and patient analytics. In her spare time, Raji enjoys hiking, yoga and gardening.
 Padmaja Suren is a Senior Solutions Architect specialized in QuickSight. She has 20+ years of experience in building scalable data platforms for Reporting, Analytics and AI/ML using a variety of technologies. Prior to AWS, in her role as BI Architect at ERT, she designed, engineered and cloud-enabled the BI and Analytics platform for the management of large scale clinical trial data conducted across the world. She dedicates her free time on her passion project SanghWE which helps sexual trauma survivors in developing nations heal and recover.