AWS Big Data Blog
OAuth 2.0, LDAP, and HTTP auth for Amazon MQ for RabbitMQ
This is Part 2 of a three-part series on authentication and authorization for Amazon MQ for RabbitMQ. For an overview of all available methods, see Authentication and Authorization Options for Amazon MQ for RabbitMQ. For certificate-based mTLS and SSL authentication, see Part 1. For AWS Identity and Access Management (IAM) authentication, see Part 3.
When you deploy Amazon MQ for RabbitMQ in an enterprise environment, authentication quickly becomes more complex than a single broker configuration. Your organization might already have an Active Directory managing thousands of users, or a cloud identity provider handling application access, or workloads that require short-lived, token-based credentials. Maintaining a separate set of static RabbitMQ credentials alongside these systems creates operational overhead and introduces security gaps. This is especially true when users change roles, leave the organization, or when credentials need to be rotated across multiple brokers.
Amazon MQ for RabbitMQ supports OAuth 2.0, LDAP, and HTTP-based authentication backends, so you can connect your broker directly to the identity infrastructure you already use. This post explains how each approach works, highlights the key configurations, and helps you decide which one fits your use case.
Overview
This post covers three authentication and authorization integrations for Amazon MQ for RabbitMQ:
- OAuth 2.0: Token-based authentication where clients obtain short-lived tokens from an identity provider and present them to the broker as bearer credentials. The broker validates tokens using JSON Web Key Sets (JWKS) and derives permissions from token scopes.
- LDAP: Directory-based authentication where the broker delegates credential verification to an LDAP directory such as Active Directory. Users authenticate with their directory credentials, and RabbitMQ permissions map to LDAP group memberships.
- HTTP authentication backend: A flexible approach where the broker delegates authentication and authorization decisions to an external HTTP service, so you can implement custom logic or integrate with identity systems that don’t support OAuth 2.0 or LDAP natively.
All three approaches eliminate the need to manage broker-local credentials. They provide centralized user management, fine-grained access control, and audit capabilities through your existing identity infrastructure.
How OAuth 2.0 authentication works
OAuth 2.0 authentication eliminates static broker credentials by using short-lived tokens issued by an external identity provider. Instead of storing usernames and passwords in the broker, clients obtain access tokens and present them as credentials when connecting.
When a client connects to a broker configured with OAuth 2.0 authentication:
- The client requests an access token from the OAuth 2.0 identity provider, specifying the required scopes.
- The identity provider validates the client credentials and issues a signed JWT (JSON Web Token) containing the granted scopes.
- The client connects to the Amazon MQ broker and presents the JWT as the password.
- The broker retrieves the identity provider’s public keys through the JWKS endpoint.
- The broker validates the token signature, expiration, and audience claim.
- The broker extracts RabbitMQ permissions from the token scopes and grants access accordingly.
The following diagram shows the OAuth 2.0 authentication flow.
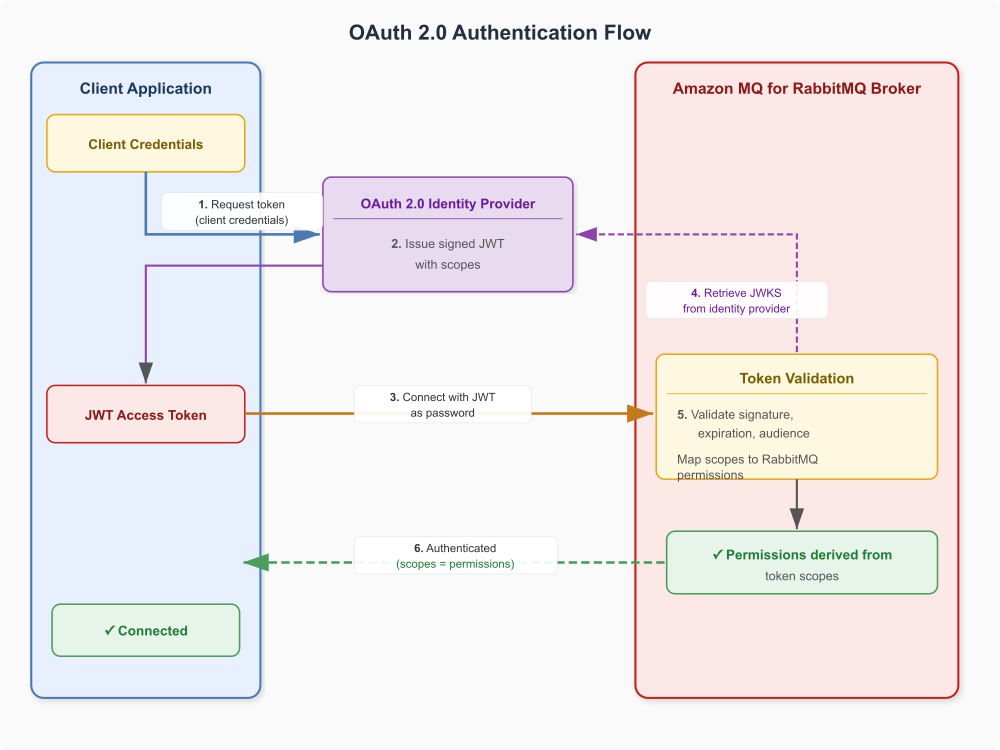
Figure 1: OAuth 2.0 authentication flow for Amazon MQ for RabbitMQ
Scope-to-permission mapping
The broker maps OAuth 2.0 scopes to RabbitMQ permissions using a configurable prefix. For example, with the resource server ID rabbitmq, the following scopes grant specific access:
| OAuth 2.0 scope | RabbitMQ permission |
rabbitmq.read:*/* |
Read access to all resources in all vhosts |
rabbitmq.write:*/* |
Write access to all resources in all vhosts |
rabbitmq.configure:*/* |
Configure access to all resources in all vhosts |
rabbitmq.read:orders/* |
Read access to all resources in the orders vhost |
rabbitmq.tag:management |
Management UI access |
rabbitmq.tag:administrator |
Administrator access |
Key configuration
The following rabbitmq.conf snippet shows the essential settings for OAuth 2.0 authentication:
The following table describes each configuration setting.
| Setting | Purpose |
auth_backends.1 = oauth2 |
Enables the OAuth 2.0 authentication backend (use auth_backends.2 = internal for the monitoring user fallback) |
auth_oauth2.resource_server_id |
Identifies this broker as a resource server. Used as the scope prefix |
auth_oauth2.preferred_username_claims.1 |
JWT claim used to extract the username for display and logging |
auth_oauth2.jwks_uri |
URL of the identity provider’s JWKS endpoint for token signature validation (named jwks_url on RabbitMQ 3.x, jwks_uri on 4.x) |
auth_oauth2.issuer |
Expected token issuer. Tokens from other issuers are rejected |
auth_oauth2.verify_aud |
Whether the broker validates the token’s aud claim against resource_server_id. Set to false for IdPs that do not emit a matching aud |
auth_oauth2.scope_prefix |
Prefix applied to scopes when mapping to RabbitMQ permissions |
Important considerations
- By default the broker validates the token’s aud (audience) claim against the
resource_server_idand rejects tokens without a match. Some identity providers (for example, Amazon Cognito) don’t emit an aud claim matching the resource server. For those, setauth_oauth2.verify_aud = false. - If your identity provider cannot issue scopes in the native RabbitMQ form (for example, it disallows the * wildcard), use
auth_oauth2.scope_aliasesentries to translate the provider’s scope names to RabbitMQ scopes such asrabbitmq.read:*/*. - Configure short-lived tokens (one hour or less) and implement token refresh logic in your client applications.
- The JWKS endpoint must be reachable from the broker’s network. For private identity providers, verify network connectivity and DNS resolution.
- On RabbitMQ 3.x the JWKS endpoint setting is
auth_oauth2.jwks_url. On RabbitMQ 4.x it isauth_oauth2.jwks_uri. Use the setting name that matches your broker engine version. - Amazon MQ automatically creates a system user named
monitoring-AWS-OWNED-DO-NOT-DELETEwith monitoring-only permissions. This user uses the internal RabbitMQ authentication system even on OAuth 2.0-enabled brokers.
How LDAP authentication works
LDAP authentication connects your RabbitMQ broker to an existing directory service such as Active Directory. Instead of managing users locally in the broker, the broker delegates authentication to the LDAP server and derives permissions from directory group memberships. This centralizes user management and lets you apply your existing password policies, account lockout rules, and audit trails to broker access.
When a client connects to a broker configured with LDAP authentication:
- The client connects to the Amazon MQ broker with a username and password.
- The broker constructs a Distinguished Name (DN) from the username using the configured
user_dn_pattern. - The broker performs an LDAP bind operation against the directory server using the constructed DN and the client’s password.
- If the bind succeeds, the broker queries the directory for the user’s group memberships.
- The broker maps group memberships to RabbitMQ permissions (vhost access, resource permissions, and management tags).
- The client is authenticated and authorized based on the LDAP query results.
The following diagram shows the LDAP authentication flow.
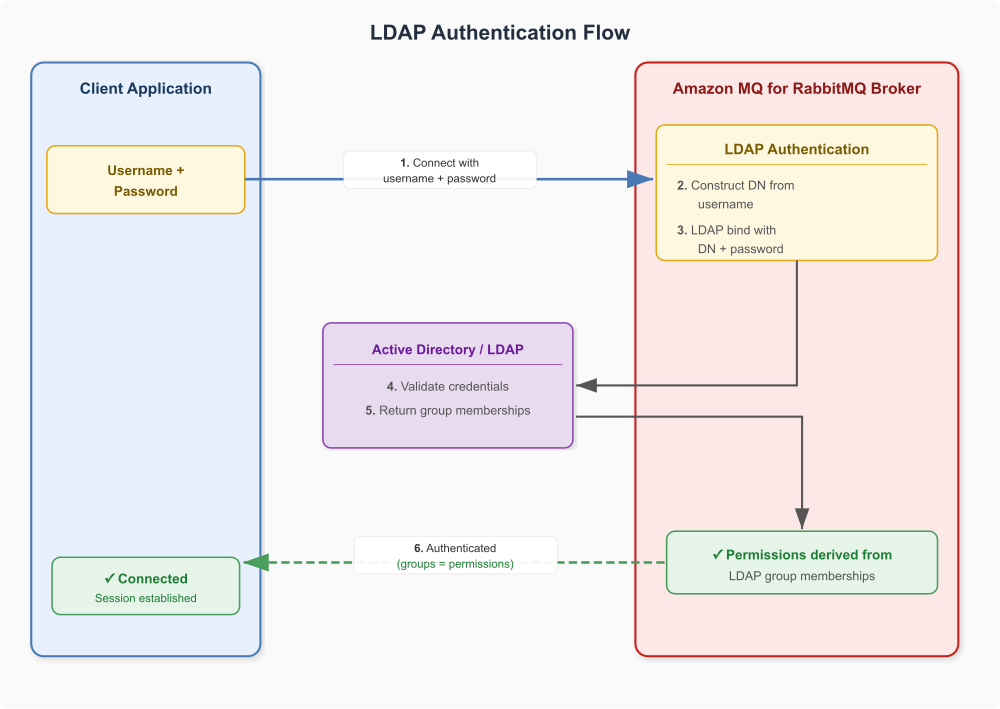
Figure 2: LDAP authentication flow for Amazon MQ for RabbitMQ
LDAP directory structure
This implementation uses a group-centric LDAP model where RabbitMQ concepts (vhosts, exchanges, queues, and tags) are represented as sub-OUs under a single groups hierarchy:
OU=rabbitmq
├── OU=users
│   ├── CN=app-orders-producer
│   └── CN=app-orders-consumer
│
└── OU=groups
    ├── OU=vhosts
    │   ├── CN=vhost-orders
    │   └── CN=vhost-payments
    │
    ├── OU=exchanges
    │   ├── CN=orders-publisher
    │   └── CN=payments-publisher
    │
    ├── OU=queues
    │   ├── CN=orders-consumer
    │   └── CN=payments-consumer
    │
    └── OU=tags
        ├── CN=rmq-admin
        └── CN=rmq-monitor
Users are assigned to groups based on their required access. For example, app-orders-producer would be a member of vhost-orders and orders-publisher, granting it access to the orders vhost and write permissions on the orders exchange.
Key configuration
The following rabbitmq.conf snippet shows the essential settings for LDAP authentication:
The following table describes each configuration setting.
| Setting | Purpose |
auth_backends.1 = ldap |
Sets LDAP as the primary authentication backend |
auth_backends.2 = internal |
Falls back to internal authentication if LDAP is unavailable |
auth_ldap.servers.1 |
LDAP server hostname or IP address |
auth_ldap.user_dn_pattern |
Template for constructing the user DN from the provided username |
auth_ldap.port |
LDAP server port; 636 for LDAPS |
auth_ldap.use_ssl |
Enables an encrypted LDAPS connection to the directory server. Amazon MQ requires that you explicitly set either auth_ldap.use_ssl = true or auth_ldap.use_starttls = true. The broker fails configuration validation if neither is set. |
auth_ldap.ssl_options.verify |
Certificate verification mode for the LDAPS connection. Verify_peer validates the server certificate |
aws.arns.assume_role_arn |
ARN of the IAM role the broker assumes to retrieve the CA certificate |
aws.arns.auth_ldap.ssl_options.cacertfile |
ARN of the CA certificate (in S3) used to validate the LDAP server’s TLS certificate |
auth_ldap.queries.tags |
Maps directory group membership to the administrator and management console tags |
auth_ldap.queries.vhost_access |
LDAP query that determines which vhosts a user can access based on group membership |
auth_ldap.queries.resource_access |
LDAP query that determines resource-level permissions (configure, write, read) based on group membership |
Important considerations
- Amazon MQ requires an encrypted LDAP connection: you must explicitly set either
auth_ldap.use_ssl = true(LDAPS on port 636) orauth_ldap.use_starttls = true(StartTLS on port 389). The broker rejects the configuration if neither is set. Unencrypted LDAP transmits credentials in plaintext, so always use one of these options to protect credentials in transit between the broker and your directory server. - The
user_dn_patternmust match your directory’s organizational structure exactly. Verify the pattern with an LDAP browser before applying it to the broker. - With Active Directory, user DNs are usually based on the display name rather than the sign-in name, so a fixed
user_dn_patternoften will not match. In that case, configure DN lookup (auth_ldap.dn_lookup_bind,auth_ldap.dn_lookup_base, andauth_ldap.dn_lookup_attribute = sAMAccountName) so the broker resolves each username to its full DN before binding. - LDAP configuration changes require a broker reboot to take effect. However, user permission changes in the directory (group membership additions or removals) take effect immediately for new connections.
- Configure the internal backend as a fallback to maintain access if the LDAP server becomes temporarily unavailable.
How HTTP authentication works
The HTTP authentication backend delegates all authentication and authorization decisions to an external HTTP service. When a client connects, the broker sends requests over HTTPS to your service, which responds with allow or deny decisions. Amazon MQ requires encrypted connections and rejects any configuration that uses a plain http endpoint. This approach provides maximum flexibility for integrating with identity systems that don’t support OAuth 2.0 or LDAP natively, or when you need custom authentication logic. The HTTP authentication backend is available on Amazon MQ for RabbitMQ version 4 and above.
When a client connects to a broker configured with HTTP authentication:
- The client connects to the Amazon MQ broker with a username and password.
- The broker sends an HTTPS POST request to the configured authentication endpoint with the username and password.
- The external authentication service validates the credentials against its identity store and responds with allow or deny.
- For each authorization check (vhost access, resource permissions, topic permissions), the broker sends additional HTTPS requests to the corresponding endpoints.
- The authentication service evaluates the authorization request and responds with allow, deny, or allow with tags.
- The client is authenticated and authorized based on the authentication service responses.
The following diagram shows the HTTP authentication flow.
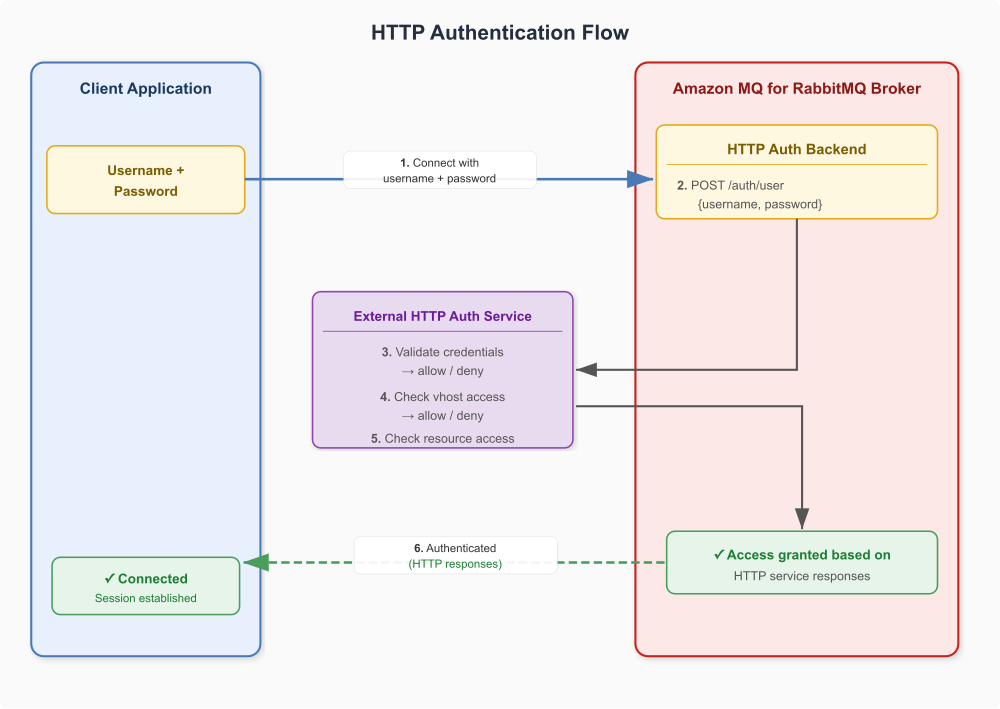
Figure 3: HTTP authentication flow for Amazon MQ for RabbitMQ
The broker sends HTTPS POST requests to four endpoints. Each endpoint must return a plain-text response:
| Endpoint | Request parameters | Expected response |
/auth/user |
username, password | allow [tag1, tag2] or deny |
/auth/vhost |
username, vhost, ip | allow or deny |
/auth/resource |
username, vhost, resource, name, permission | allow or deny |
/auth/topic |
username, vhost, resource, name, permission, routing_key | allow or deny |
Key configuration
The following rabbitmq.conf snippet shows the essential settings for HTTP authentication:
The following table describes each configuration setting.
| Setting | Purpose |
| auth_backends.1 = cache auth_backends.2 = http | Enables the HTTP authentication backend with a cache layer in front, which reduces the number of calls to your authentication service |
| auth_http.user_path | URL the broker calls to authenticate users |
| auth_http.vhost_path | URL the broker calls to check vhost access |
| auth_http.resource_path | URL the broker calls to check resource permissions (queues, exchanges) |
| auth_http.topic_path | URL the broker calls to check topic-level permissions |
| auth_http.http_method | HTTP method the broker uses to call the endpoints. Set to post |
| auth_http.ssl_options.verify | Certificate verification mode for the HTTPS connection to the auth service. Verify_peer validates the server certificate |
| auth_http.ssl_options.sni | Server Name Indication hostname sent during the TLS handshake with the auth service |
| aws.arns.assume_role_arn | ARN of the IAM role the broker assumes to securely retrieve the CA certificate |
| aws.arns.auth_http.ssl_options.cacertfile | ARN of the CA certificate the broker uses to validate the auth service’s TLS certificate |
Important considerations
- The HTTP authentication service must be highly available. If the service is unreachable, all authentication attempts fail. Consider deploying it behind a load balancer with health checks.
- HTTPS is mandatory for all authentication endpoints. The broker rejects any endpoint configured with a plain http URL, ensuring credentials are always protected in transit.
- Front the HTTP backend with the cache backend (
auth_backends.1 = cache) to reduce the number of calls to your authentication service and improve connection latency. Also keep your service’s response times low to avoid connection timeouts and degraded broker performance. - The authentication service receives plaintext passwords. Make sure the service handles credentials securely and doesn’t log them.
- The broker connects to your authentication service over TLS. Configure certificate validation with
auth_http.ssl_options.verify = verify_peer, and provide the CA certificate and the IAM role for retrieving it through theaws.arns.auth_http.ssl_options.cacertfileandaws.arns.assume_role_arnsettings.
Implementation guides
For step-by-step deployment and validation instructions, see the following resources:
- Amazon MQ for RabbitMQ OAuth 2.0 authentication – Configure OAuth 2.0 token-based authentication for Amazon MQ.
- Amazon MQ for RabbitMQ LDAP integration – Configure LDAP directory integration for Amazon MQ.
- Amazon MQ for RabbitMQ HTTP authentication backend – Configure the HTTP authentication backend for Amazon MQ.
- Amazon MQ samples repository – AWS Cloud Development Kit (AWS CDK) stacks and sample code for LDAP and OAuth 2.0 integrations.
Conclusion
This post explained how OAuth 2.0, LDAP, and HTTP authentication backends work for Amazon MQ for RabbitMQ, and when to use each one. OAuth 2.0 provides token-based, passwordless authentication with automatic credential expiration. LDAP connects your broker to existing directory infrastructure for centralized user and group management. The HTTP backend offers maximum flexibility for custom identity integrations. Used individually or in combination, these approaches eliminate broker-local credential management and provide centralized access control through your existing identity infrastructure.
In the next post in this series, we cover IAM authentication and OAuth 2.0 authorization for Amazon MQ for RabbitMQ.
For more information about Amazon MQ security, see the following resources:
- Amazon MQ Developer Guide: Security
- RabbitMQ OAuth 2.0 plugin documentation
- RabbitMQ LDAP plugin documentation
- Amazon MQ samples repository
If you have questions or feedback about this post, leave a comment in the Comments section. For troubleshooting help, visit the AWS re:Post community for Amazon MQ.