AWS Big Data Blog
Power up your analytics with Amazon SageMaker Unified Studio integration with Tableau, Power BI, and more
Organizations face challenges in accessing and analyzing governed data across multiple sources through their preferred business intelligence (BI) and analytics tools while maintaining security and governance. They need a seamless way to connect their familiar tools (like Tableau, Power BI, Excel) to Amazon SageMaker‘s data assets without compromising data governance and security protocols.
Amazon SageMaker supports authentication through the Amazon Athena JDBC driver, allowing data users to query their subscribed data lake assets via popular BI and analytics tools like Tableau, Power BI, Excel, SQL Workbench, DBeaver, and more. This integration empowers data users to access and analyze governed data within Amazon SageMaker using familiar tools, boosting both productivity and flexibility.
Customers use Amazon SageMaker Unified Studio to streamline data access and governance by enabling data users to locate and subscribe to data from multiple sources within a single project. Amazon SageMaker Unified Studio natively integrates with Amazon-specific options like Amazon Athena, Amazon Redshift, and Amazon SageMaker AI, allowing users to analyze their project governed data. With this launch of JDBC connectivity, Amazon SageMaker Unified Studio expands its support for data users, including analysts and scientists, allowing them to work in their preferred tools, whether it’s SQL Workbench, Domino, or Amazon-native solutions like Amazon Athena, while ensuring secure, governed access within Amazon SageMaker Unified Studio.
Getting Started
To get started, download and install the latest Athena JDBC driver for your tool of choice. After installation, copy the JDBC connection string from the Amazon SageMaker Unified Studio portal into the JDBC connection configuration to establish a connection from your tool. This directs you to authenticate using single sign-on (SSO) with your corporate credentials. After connecting, you can query, visualize, and share data—governed by Amazon SageMaker Unified Studio–within the tools you already know and trust.
In this post, we guide you through connecting various analytics tools to Amazon SageMaker Unified Studio using the Athena JDBC driver, enabling seamless access to your subscribed data within your Amazon SageMaker Unified Studio projects.
Solution overview
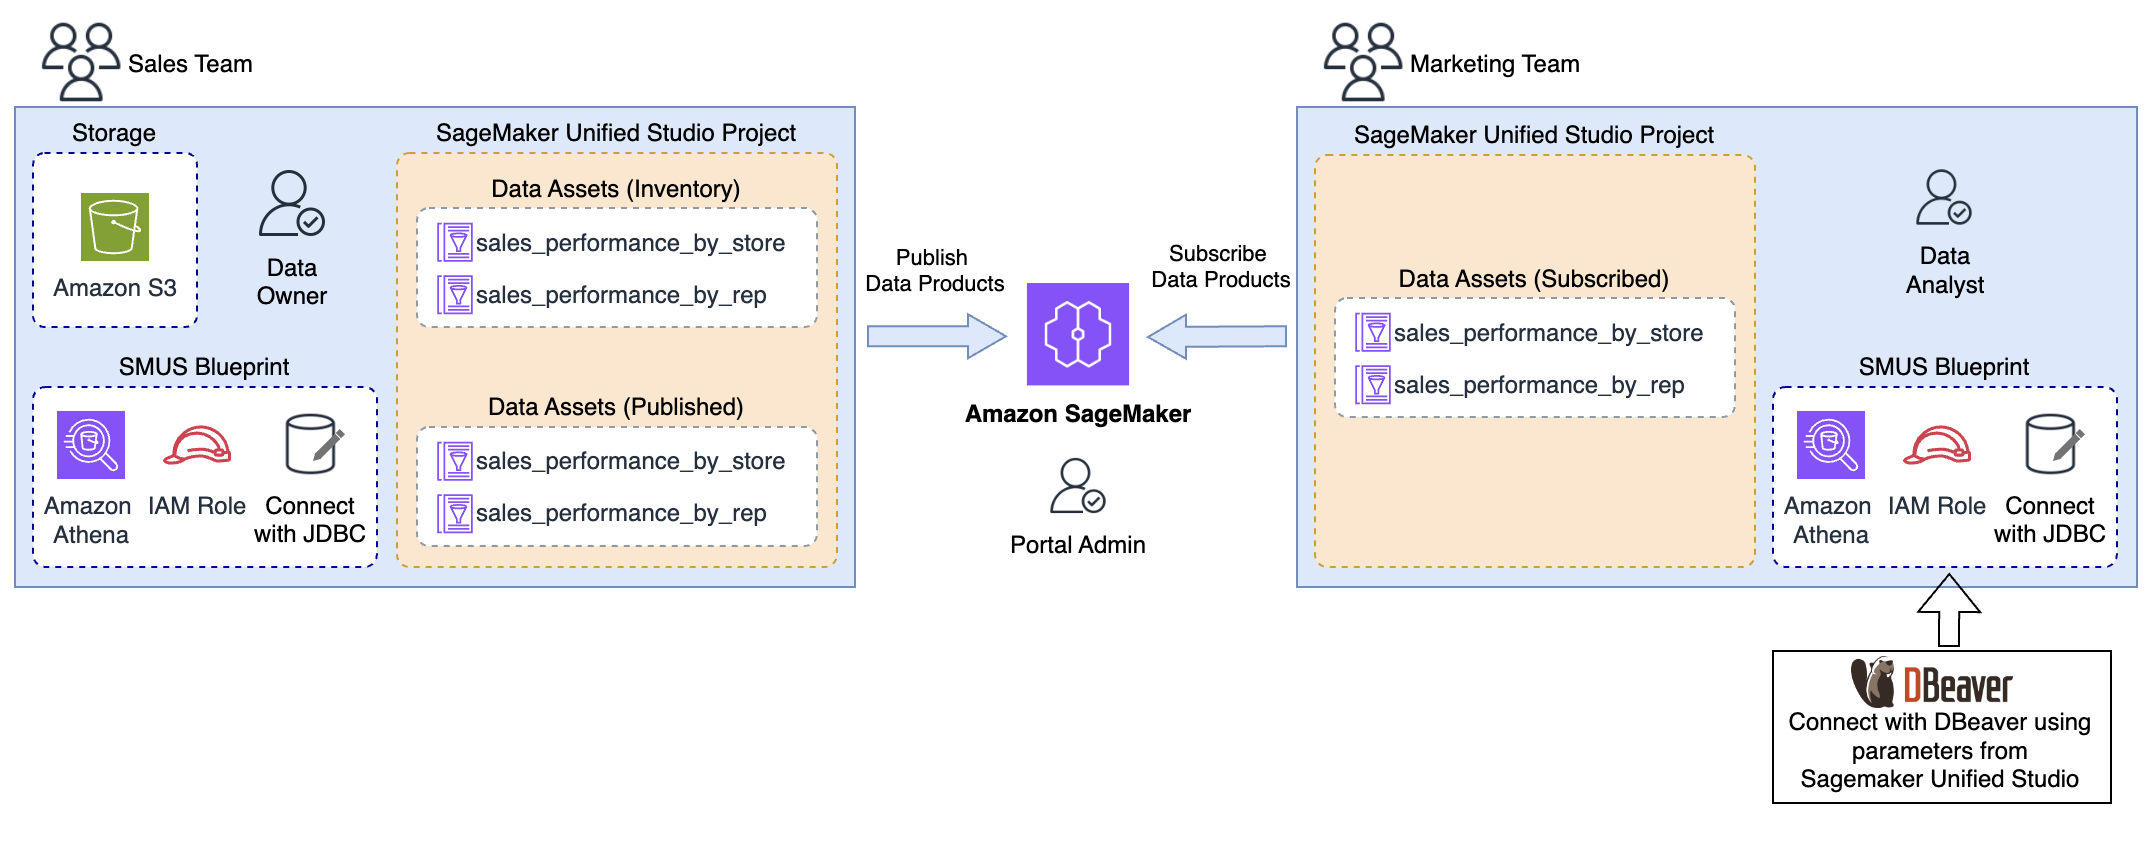
To demonstrate these capabilities, consider a use case where your marketing team wants to analyze sales data to understand patterns in sales by stores and sales representatives. To achieve this, your marketing team needs access to sales_performance_by_store, and sales_performance_by_rep data owned by the sales team. The sales team, acting as the data producer, publishes the necessary data assets to Amazon SageMaker Unified Studio, allowing the marketing team, as a consumer, to discover and subscribe to these assets.
After the subscription is approved, the data assets become available within the marketing team’s project environment in Amazon SageMaker Unified Studio. The marketing team can then use their preferred tool to perform data exploration. An example architecture of how this is done using DBeaver is shown in the following image:
Prerequisites
To follow along with this post, you need the following prerequisites in place:
- AWS account – If you don’t have an active AWS account, see How do I create and activate a new AWS account?.
- Amazon SageMaker resources – You need a domain for Amazon SageMaker, and two Amazon SageMaker project.
- Publish data assets – As the data producer from the sales team, you can now ingest individual data assets into Amazon SageMaker Unified Studio. For this use case, create a data source and import the technical metadata of two data assets – sales_performance_by_store, and sales_performance_by_rep – from AWS Glue Data Catalog. Ensure the data assets are enriched with business descriptions and published to the catalog.
Note: Here we are using tables which are in the Glue catalog but with Sagemaker Lakehouse you have the option to bring assets from other sources. - Subscribe data assets – As a data analyst from the marketing team, you can now discover and subscribe to the data assets. The data producer from the retail team reviews and approves your subscription. Upon successful fulfillment, the data assets are added to your SageMaker Unified project.
For detailed instructions for publishing and subscribing, see the Amazon SageMaker Unified Studio User Guide.
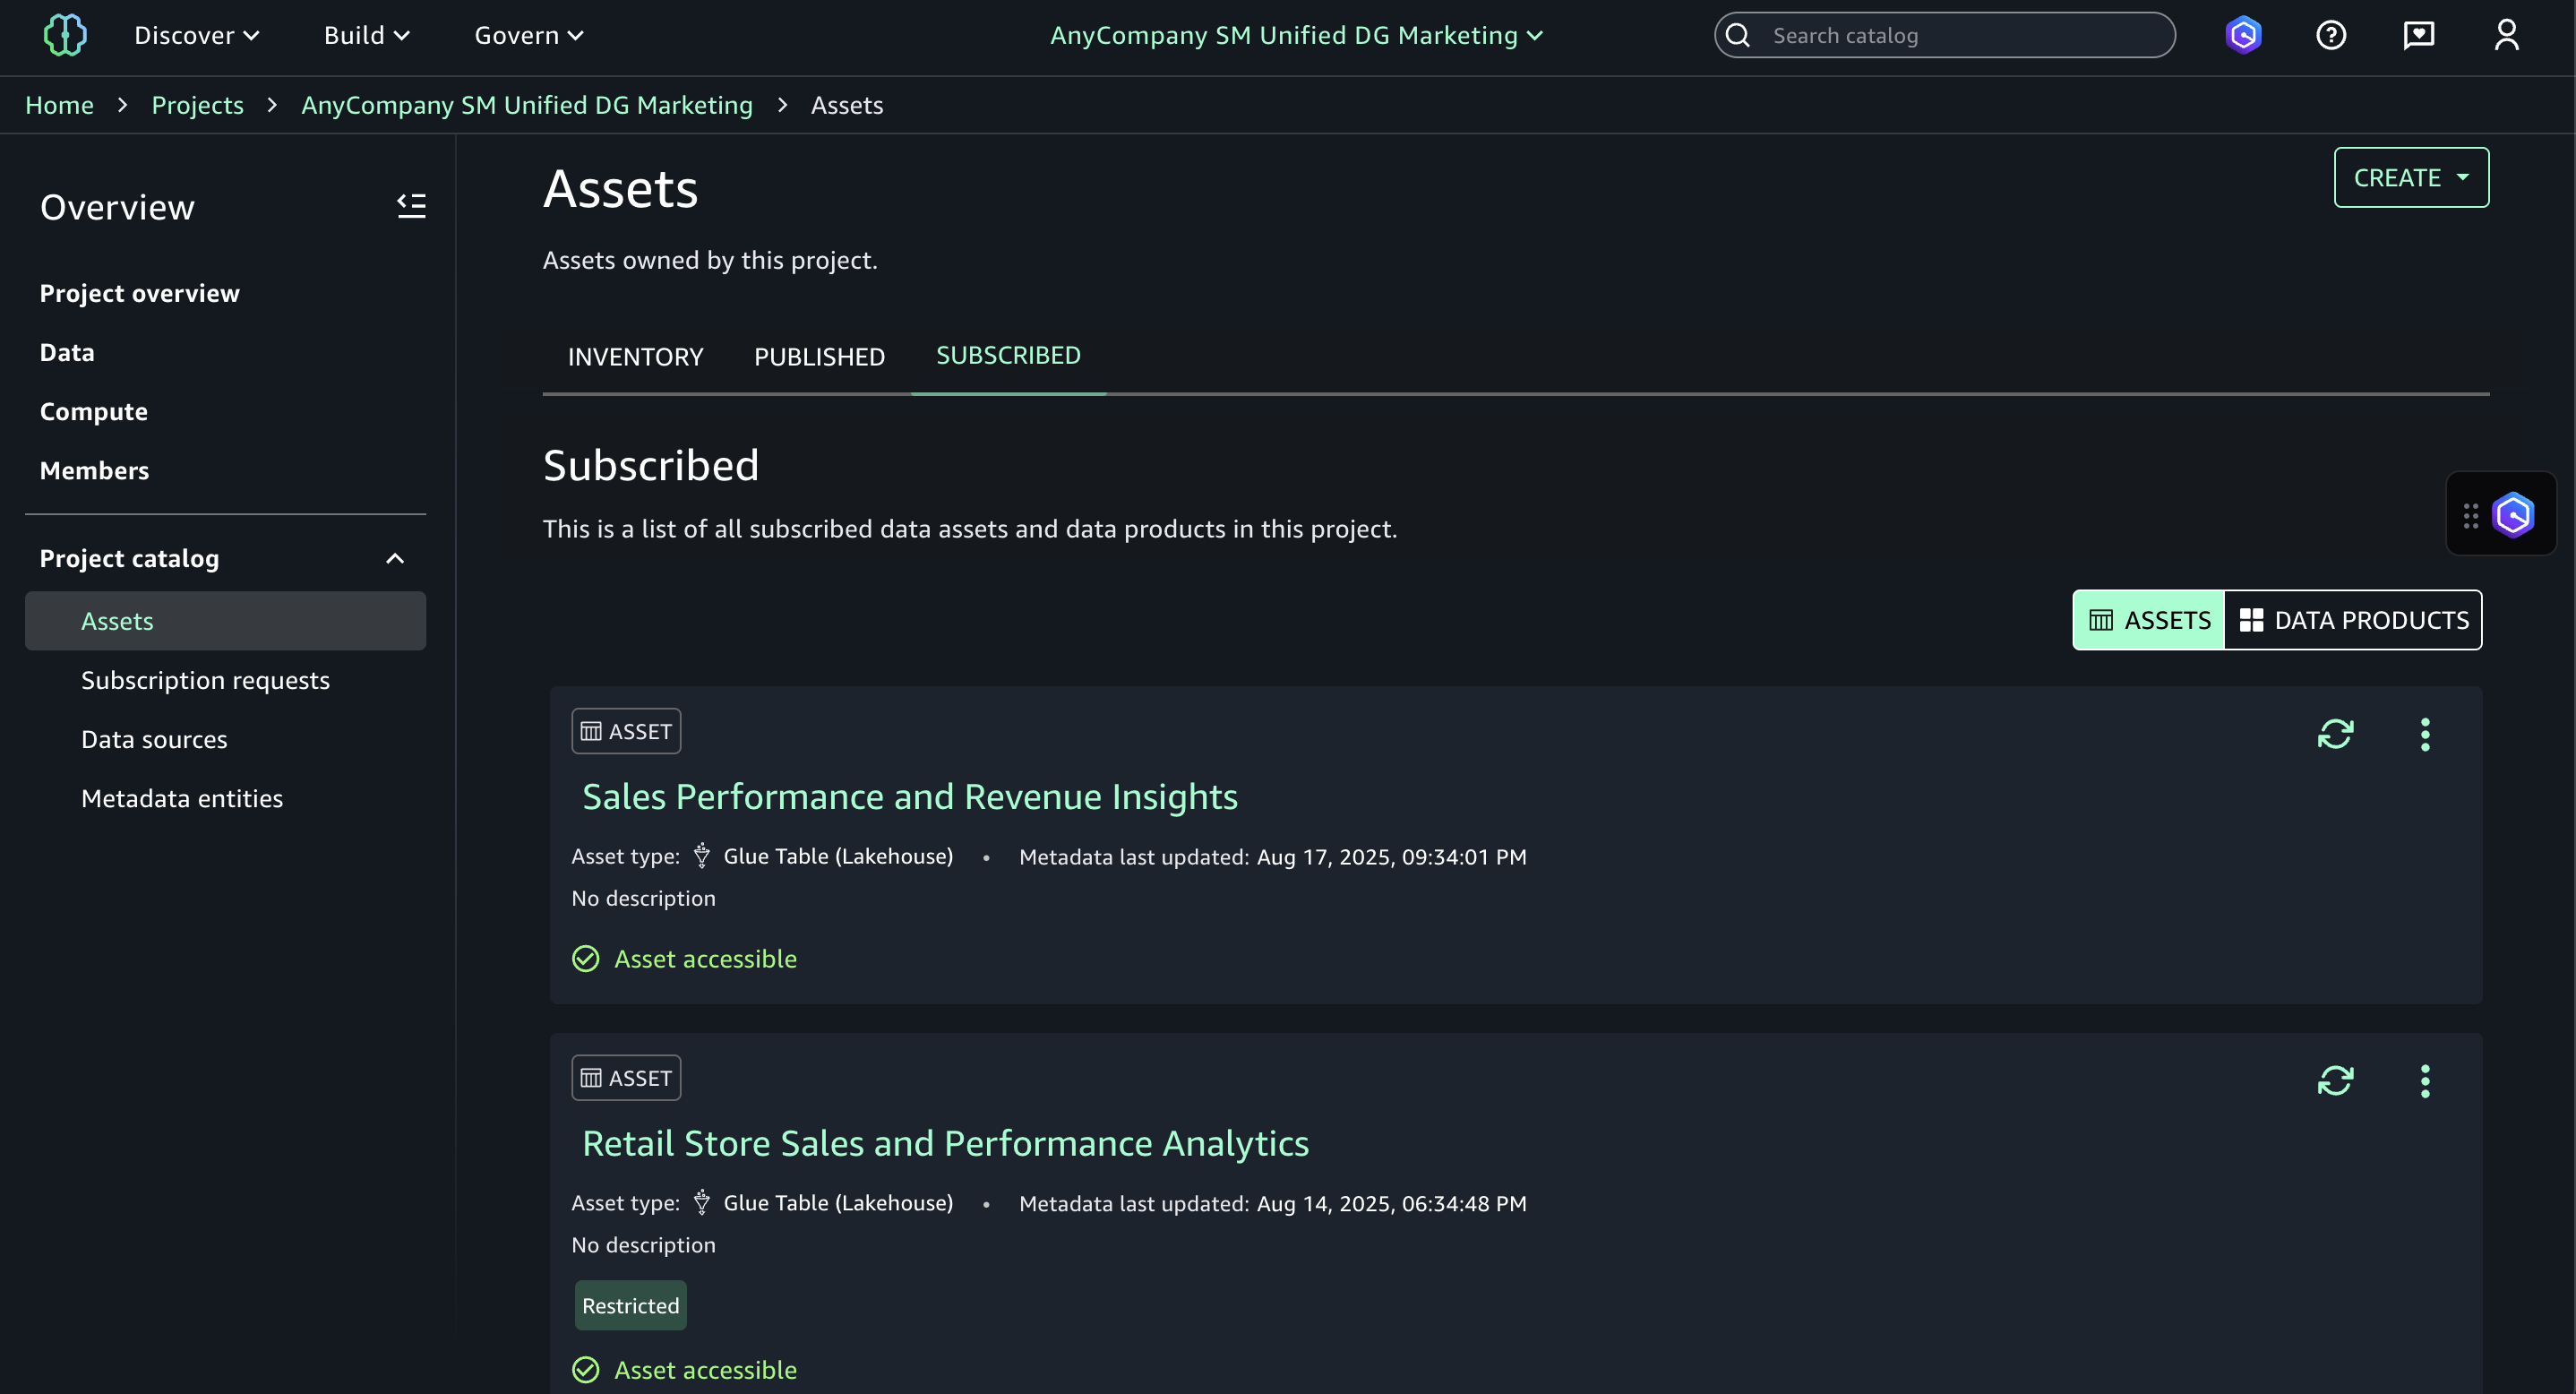
The following figure shows the subscribed assets added to the subscribed assets section in your marketing project catalog.
In the following sections, we walk you through the steps to configure DBeaver to consume the subscribed assets from Amazon SageMaker Unified Studio.
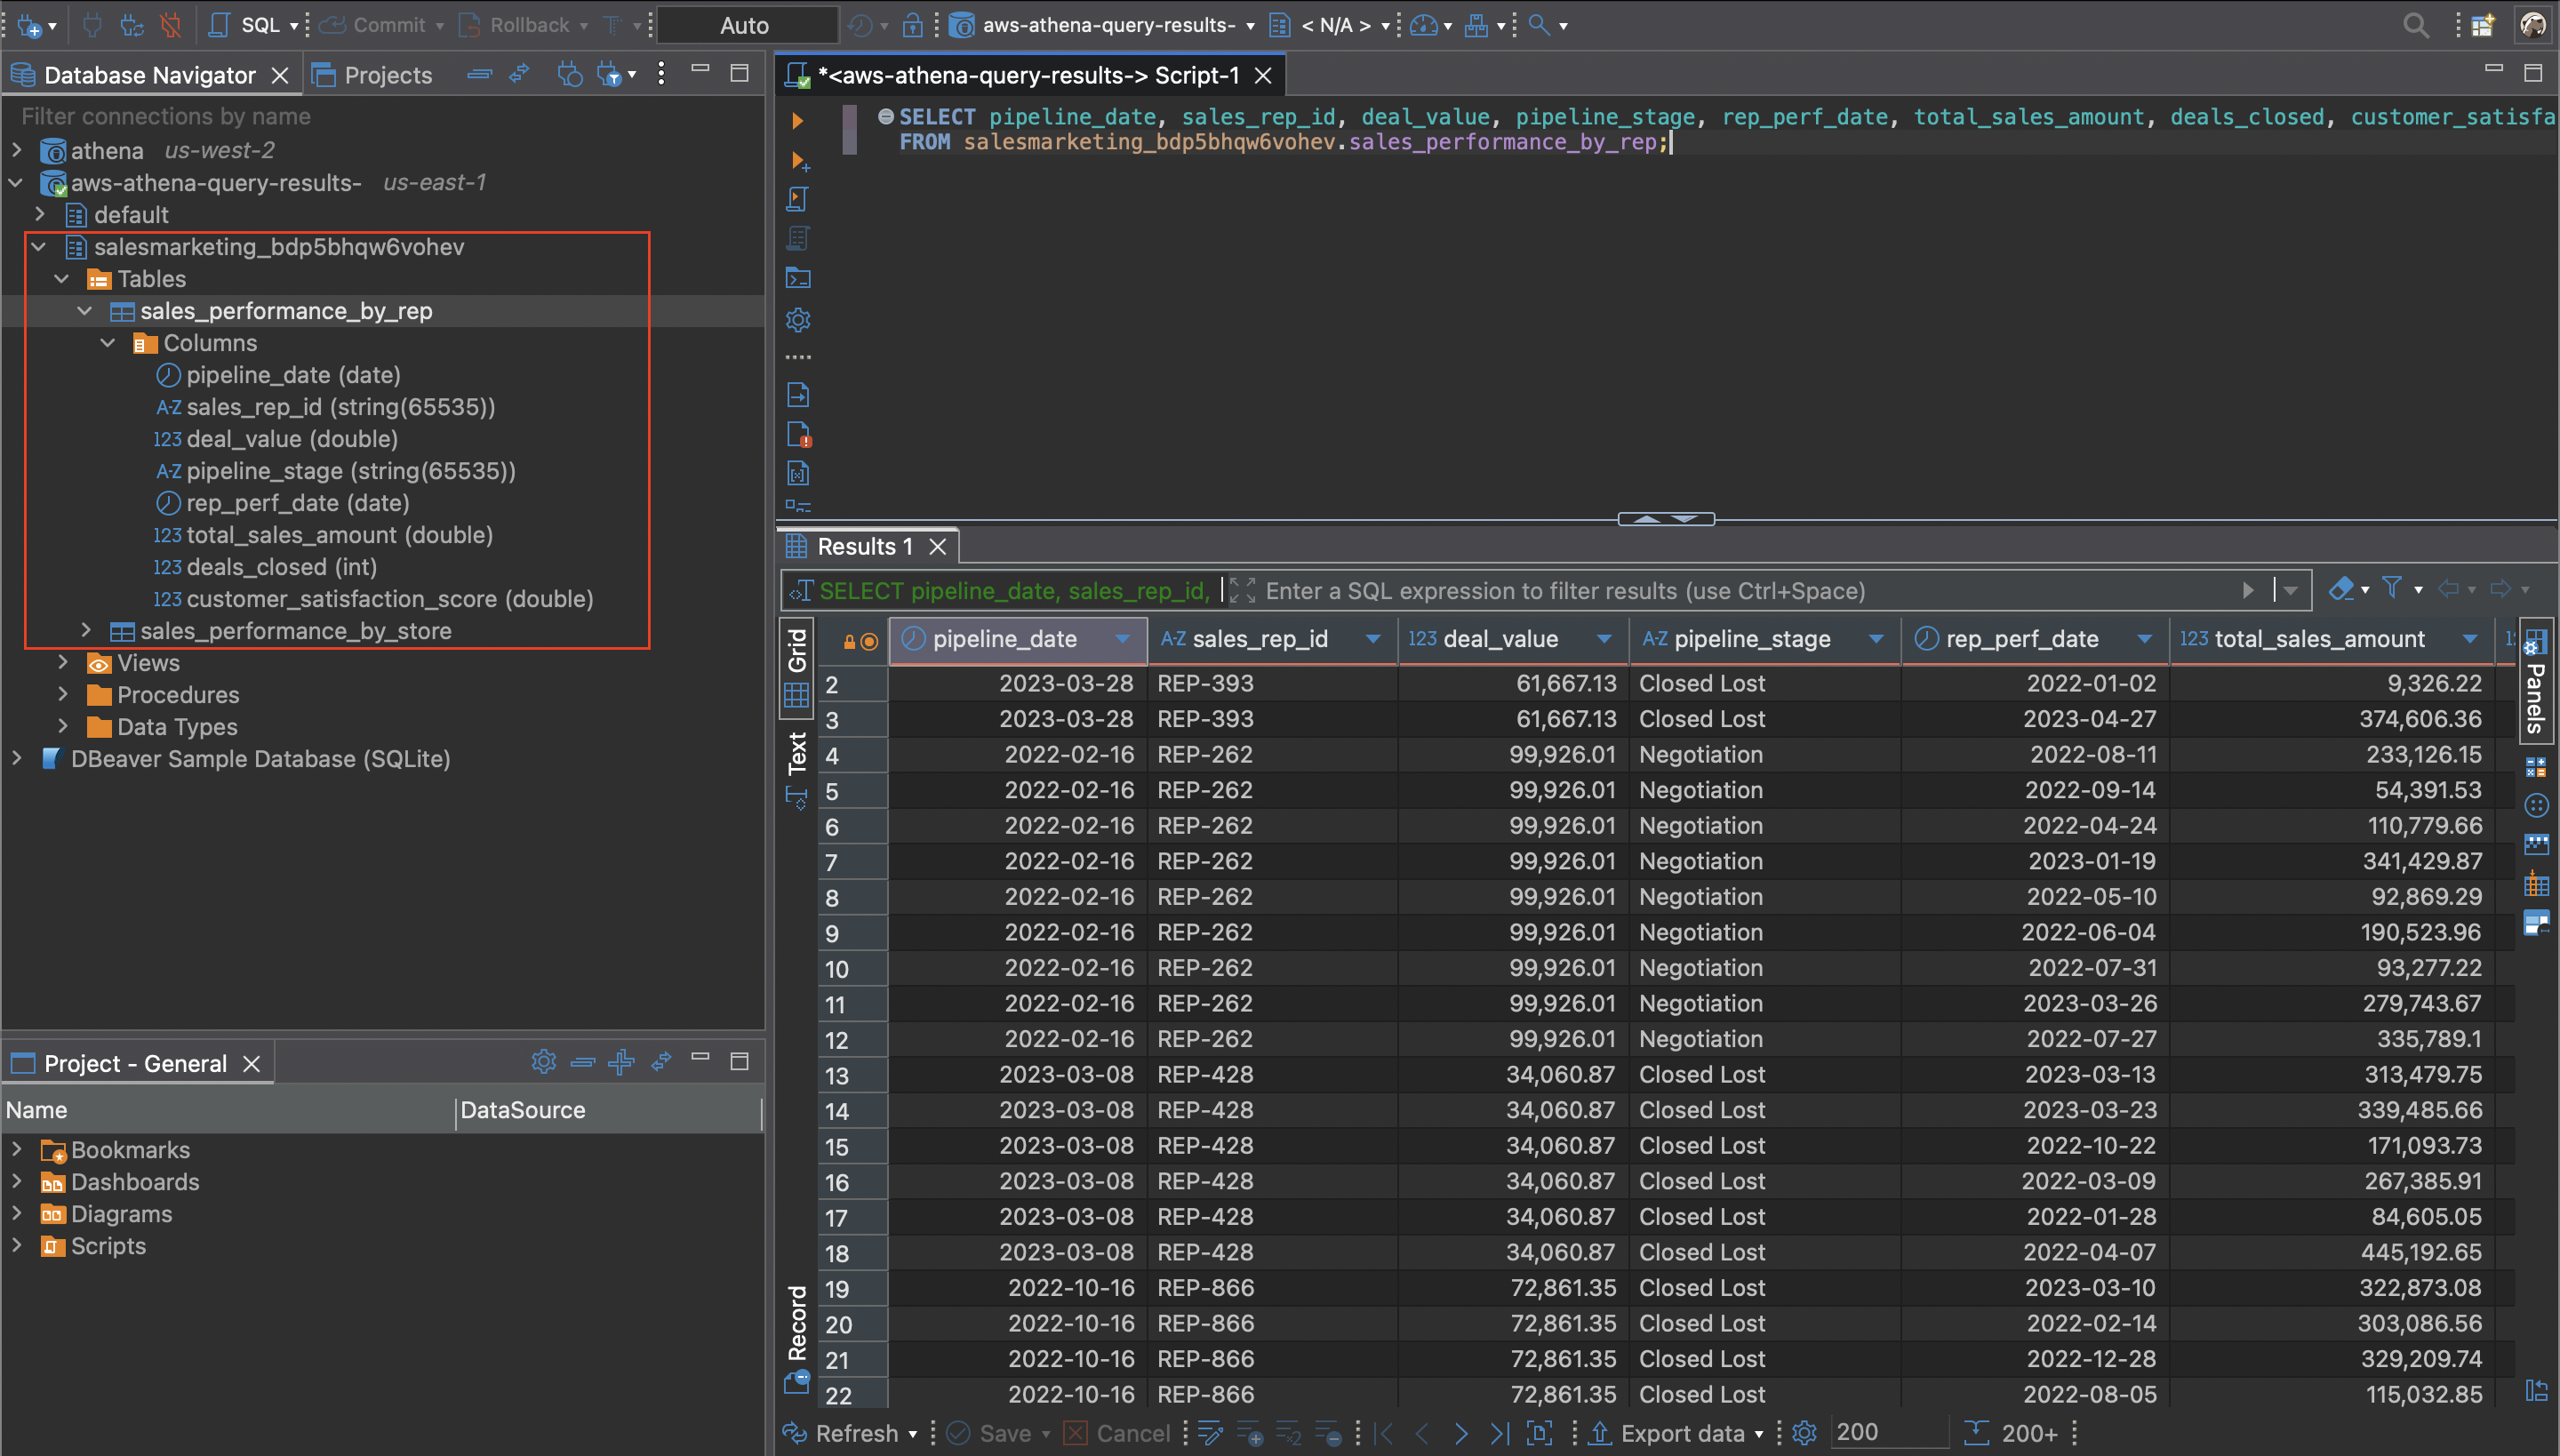
Configuring DBeaver to access subscribed data assets
In this section, you configure DBeaver to access the subscribed assets from the Marketing project
To configure DBeaver:
- Connect with JDBC: In the Amazon SageMaker Unified Studio, (1) open the Marketing project, (2) on the Project overview screen, (3) choose JDBC connection details tab.
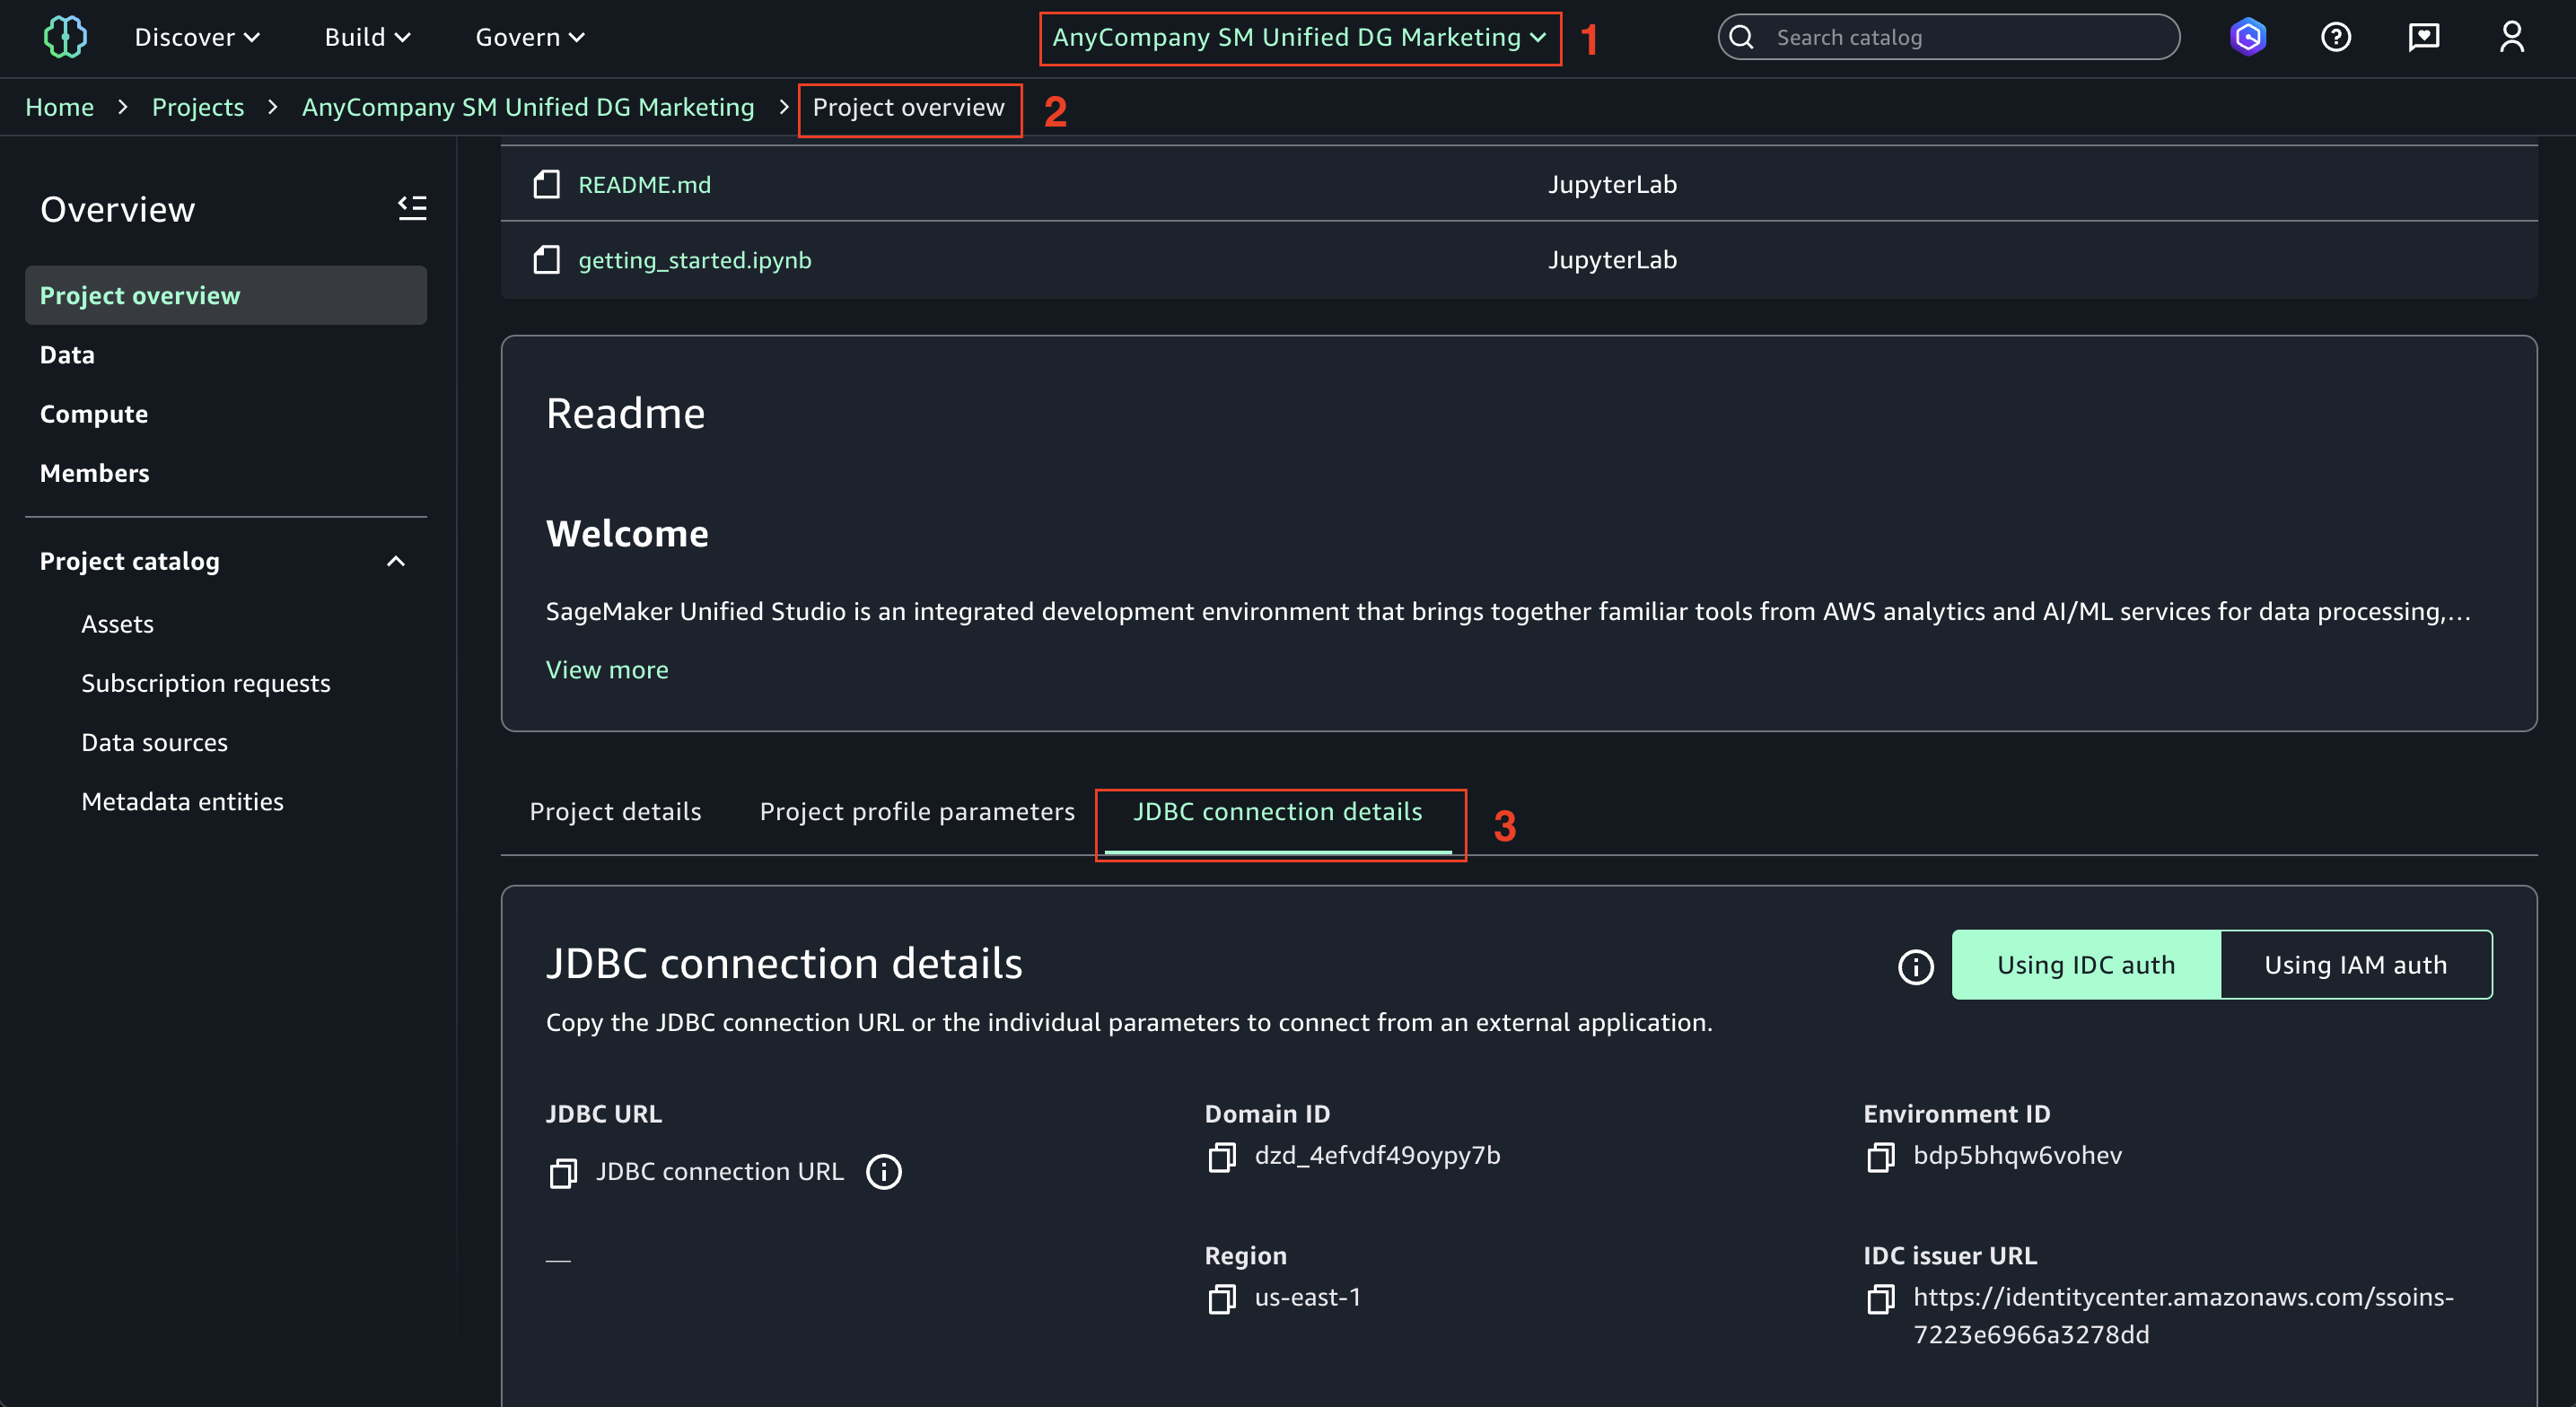
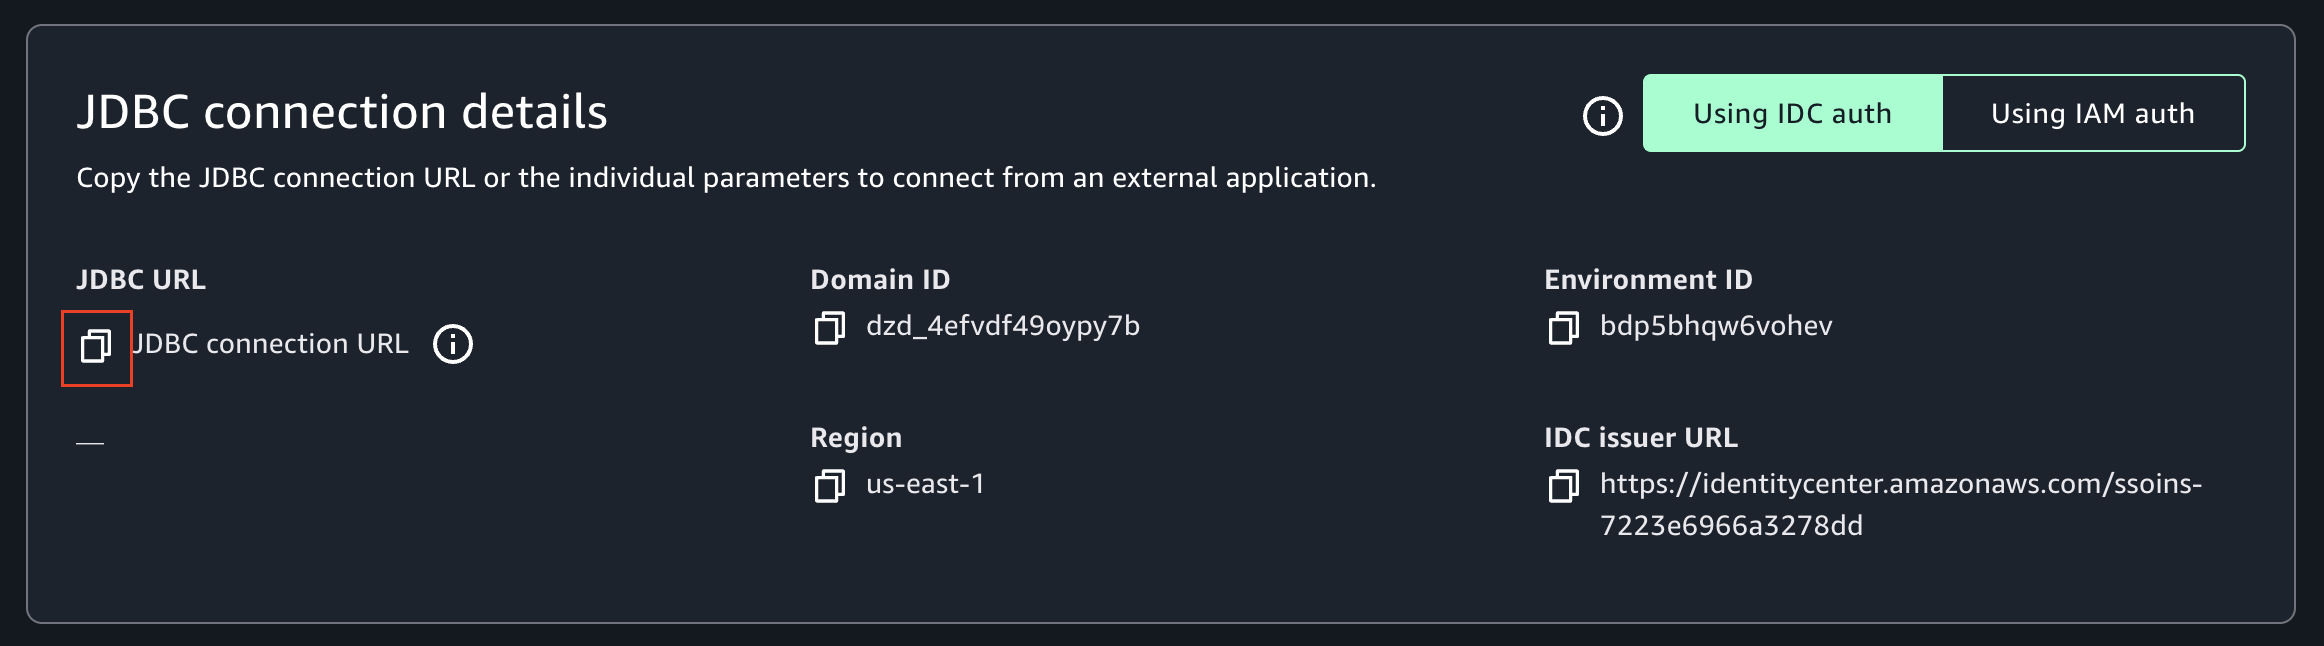
- Copy the JDBC connection URL into a text editor. The URL should have the following parameters needed for configuring the database connection in DBeaver – Domain ID, Environment ID, Region, and IDC Issuer URL.
- Download and install the latest Athena driver:
- If DBeaver has the Athena driver pre-installed, it might be the older (v2) version. To ensure compatibility with Amazon SageMaker Unified Studio, you need the latest driver (v3), which includes the necessary authentication features.
- Download the latest JDBC driver—version 3.x.
- To install the latest driver:
- Go to Database and then to Driver Manager in DBeaver.
- Select the Athena driver and choose Edit.
- Visit the Libraries tab.
- Choose Download/Update to fetch the latest driver version.
- If prompted, select the appropriate version and confirm the download.
- In the DBeaver SQL client, create a new database connection and select the Athena driver.

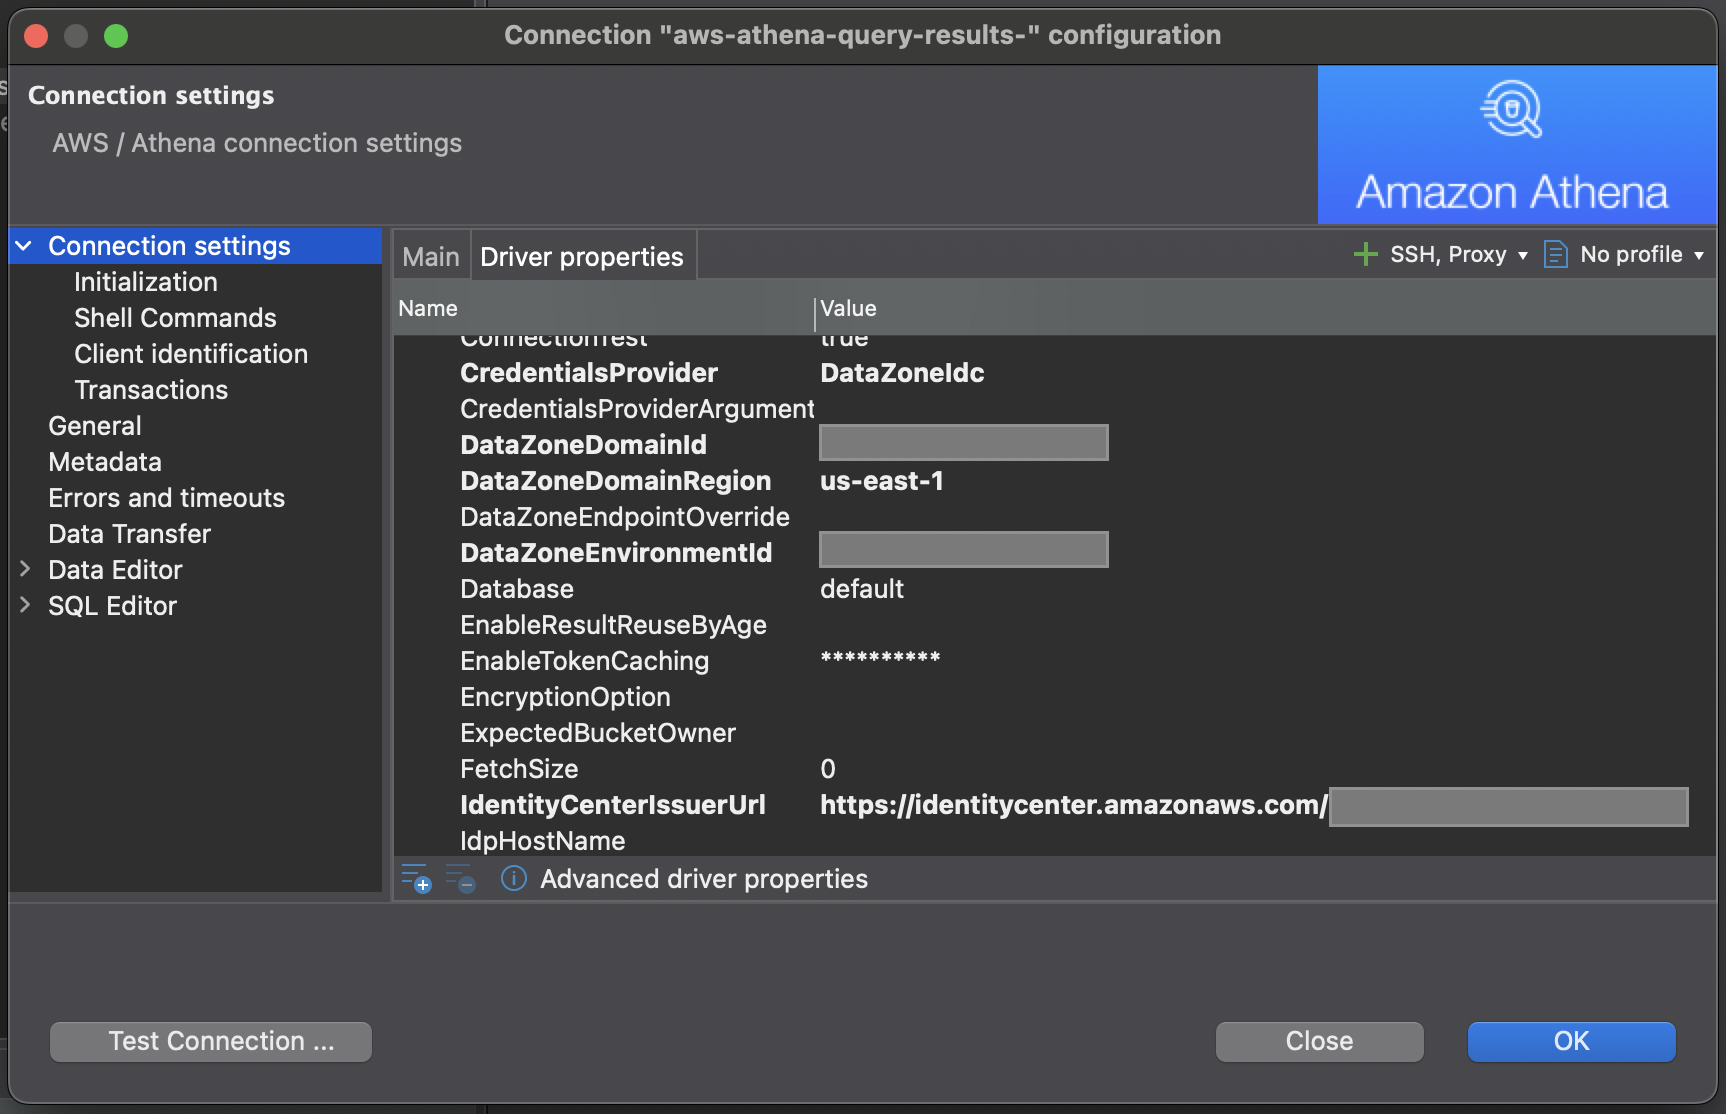
- Switch to the Driver Properties tab, enter the values of the following properties that are available in the JDBC connection URL you copied from Amazon SageMaker Unified Studio. If any of these properties are not already available, you can add them and provide their respective values.
- CredentialsProvider: The credentials provider to authenticate requests to AWS
- DataZoneDomainId: The ID of your Amazon DataZone domain
- DataZoneDomainRegion: The AWS Region where your domain is hosted
- DataZoneEnvironmentId: The ID of your DefaultDataLake environment
- IdentityCenterIssuerUrl: The issuer URL used by AWS Identity and Access Management (IAM) Identity Center for token issuance
- OutputLocation: Amazon S3 path for storing query results
- Region: The Region where the environment is created
- Workgroup: Amazon Athena workgroup of the environment
- ListenPort: Pick any four digits port number. This is the port number that listens for the IAM Identity Center response
- Choose Test Connection….
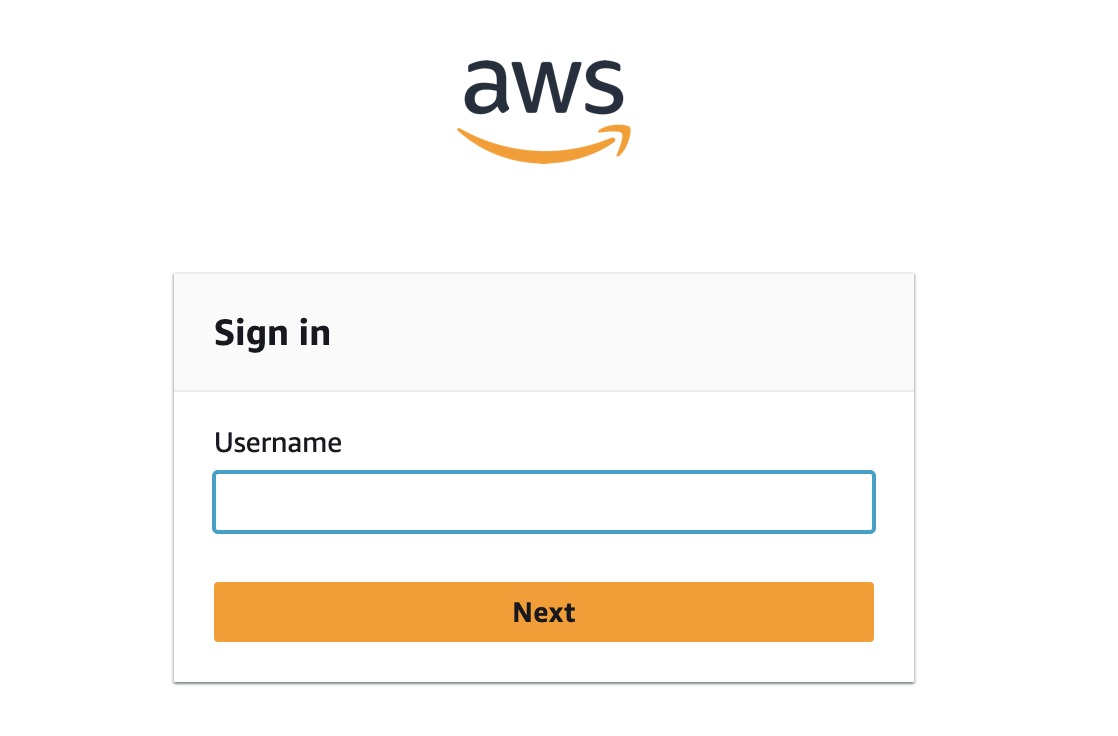
- You are redirected to the IAM Identity Center sign-in portal. Sign in with Marketing user credentials. If you’re already signed in through single sign-on (SSO), this step can be skipped.
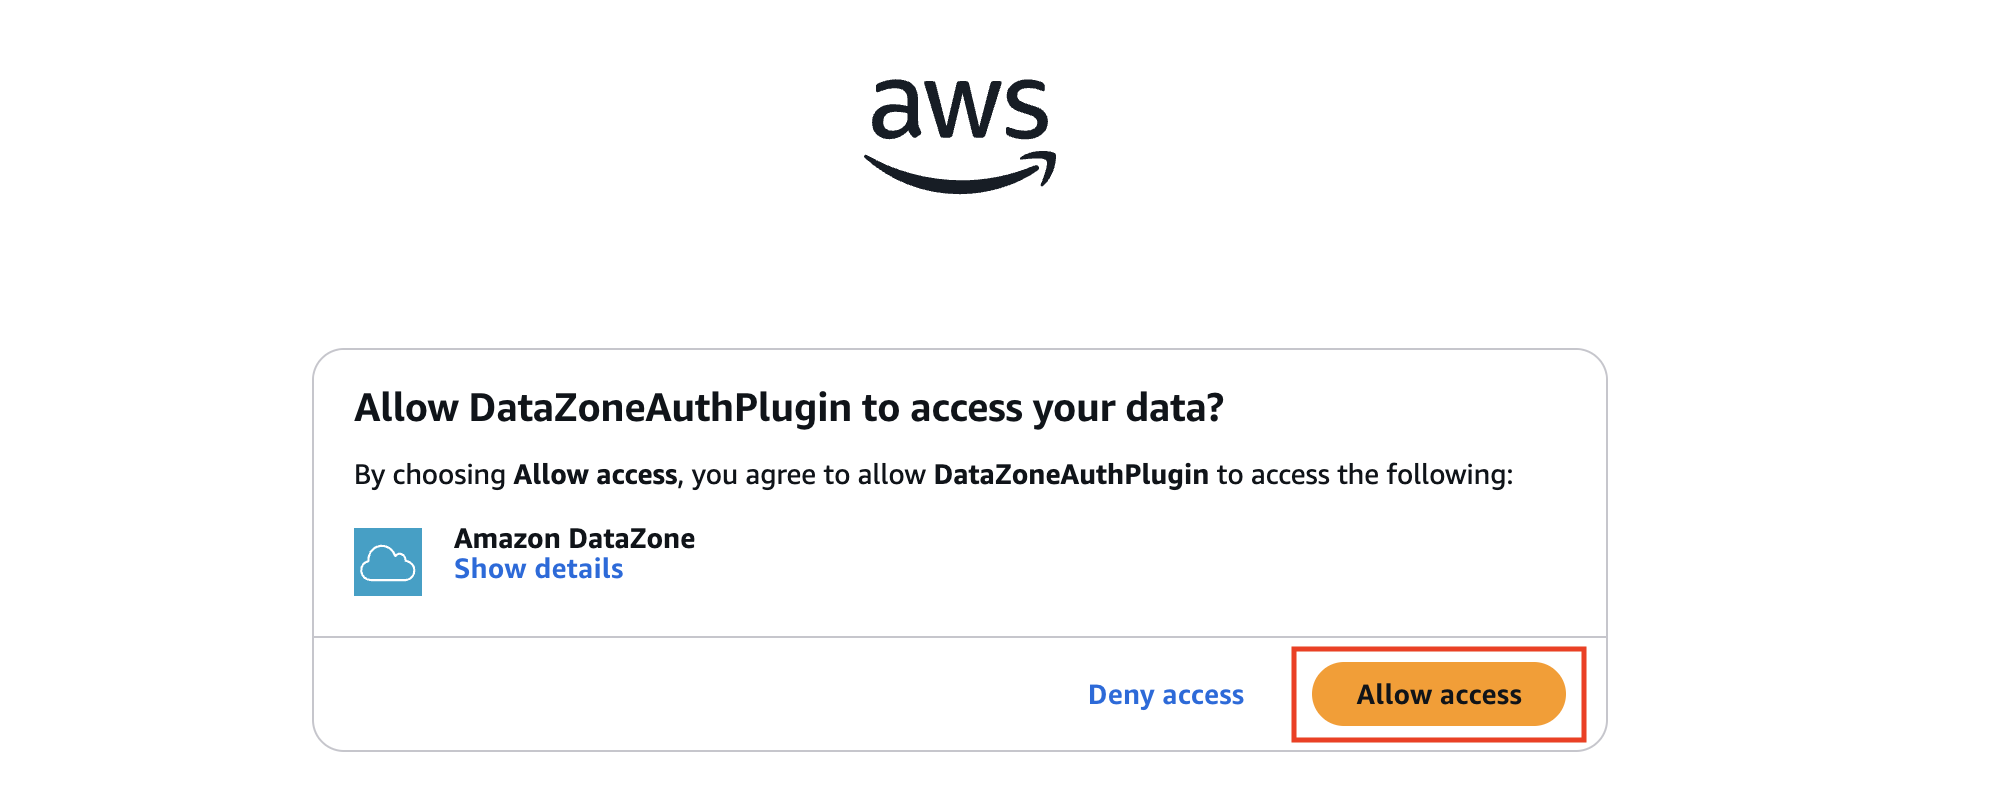
- After you sign in, if you are prompted to authorize the DataZoneAuthPlugin. Choose Allow access to authorize access to Amazon DataZone from DBeaver.
- After sign in completes, you see the following message. You can close the window and go to the DBeaver.

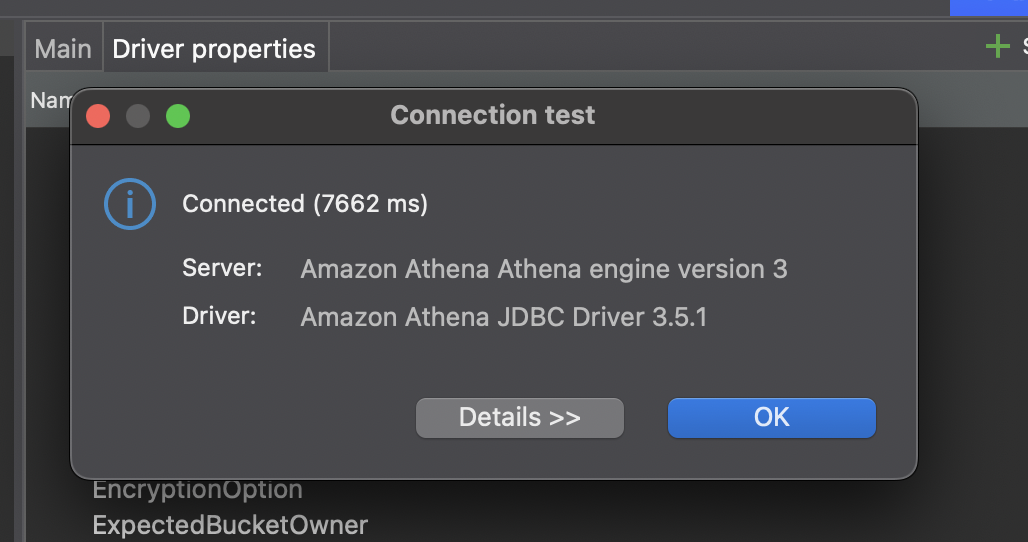
- After the connection is established, the following success message appears.
- You can now view and query all subscribed assets directly within DBeaver.
These steps might also apply to other analytics tools and clients that support JDBC connections. If you’re using a different tool, you might need to adapt these instructions accordingly to ensure proper configuration and access to Amazon SageMaker Unified Studio data assets.
Integration with other applications
You can use similar steps for other BI and analytics tools that support standard database connections.
Connect to Tableau Desktop
Use the Athena JDBC driver to connect Tableau to Amazon SageMaker Unified Studio and visualize your subscribed data.To connect to Tableau Desktop:
- Make sure that you’re using the latest Athena JDBC 3.x driver.
- Copy the JDBC driver file and place it in the appropriate folders for your operating system
- For Mac OS: ~/Library/Tableau/Drivers
- For Windows: C:\Program Files\Tableau\Drivers
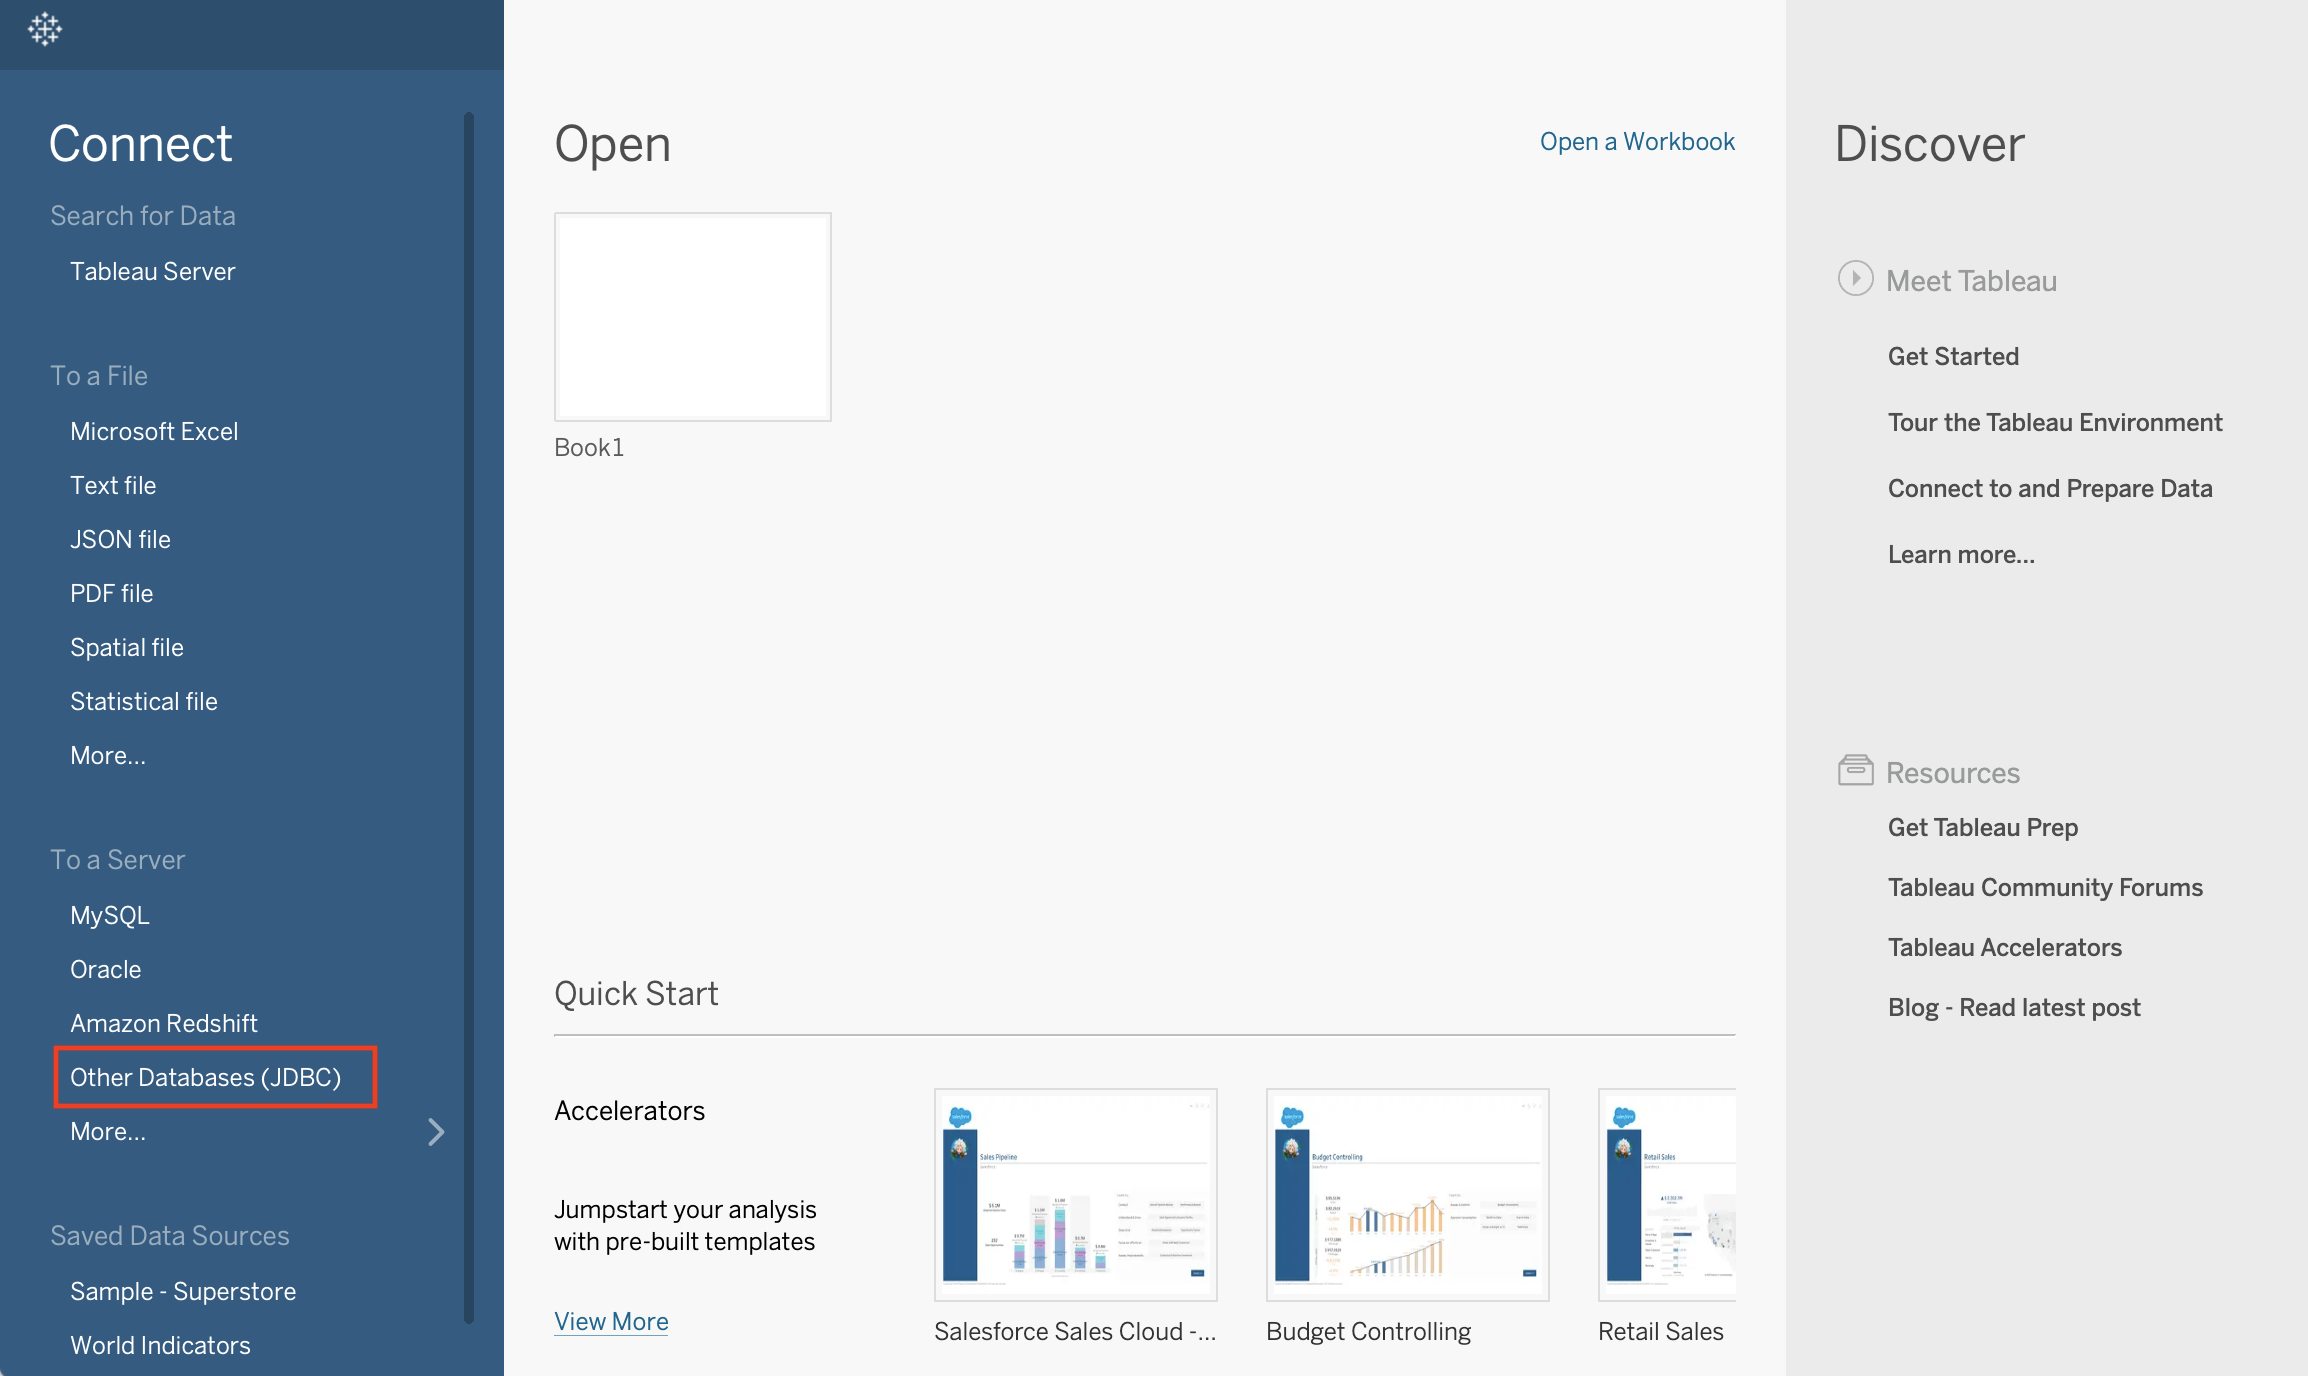
- Open Tableau Desktop. From the To a Server connection menu, select Other Databases (JDBC) to connect to Amazon SageMaker Unified Studio.
- Paste the JDBC connection URL you copied from the SageMaker Unified Studio portal into the URL. Leave other fields such as Dialect, Username, and Password blank and choose Sign in.
If you get a port is occupied error – add “;ListenPort=8055” to the URL to change the port. You can use any port number.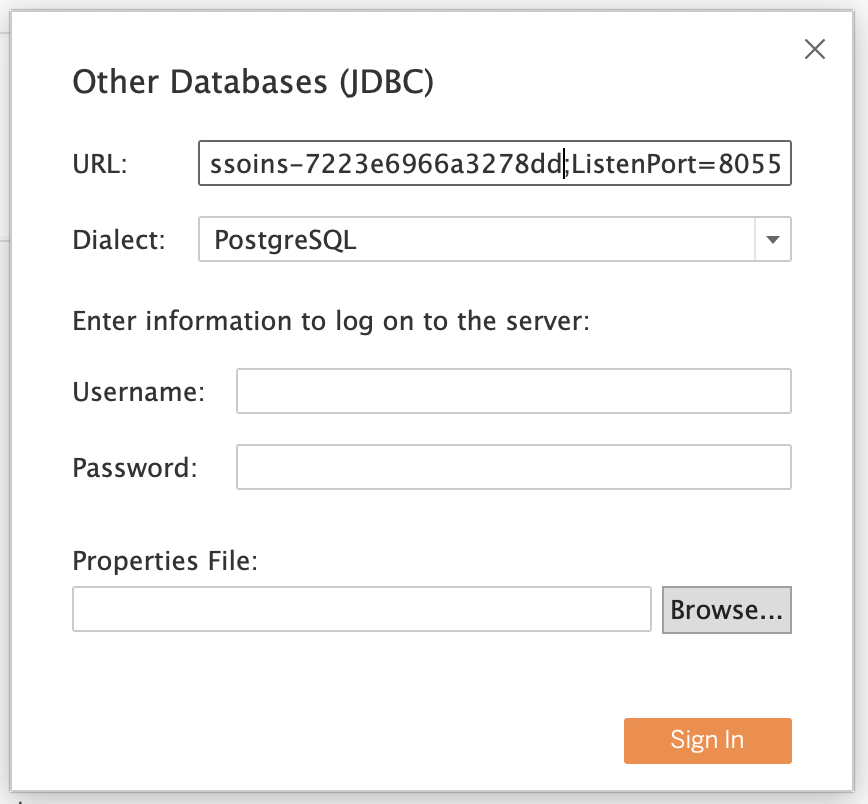
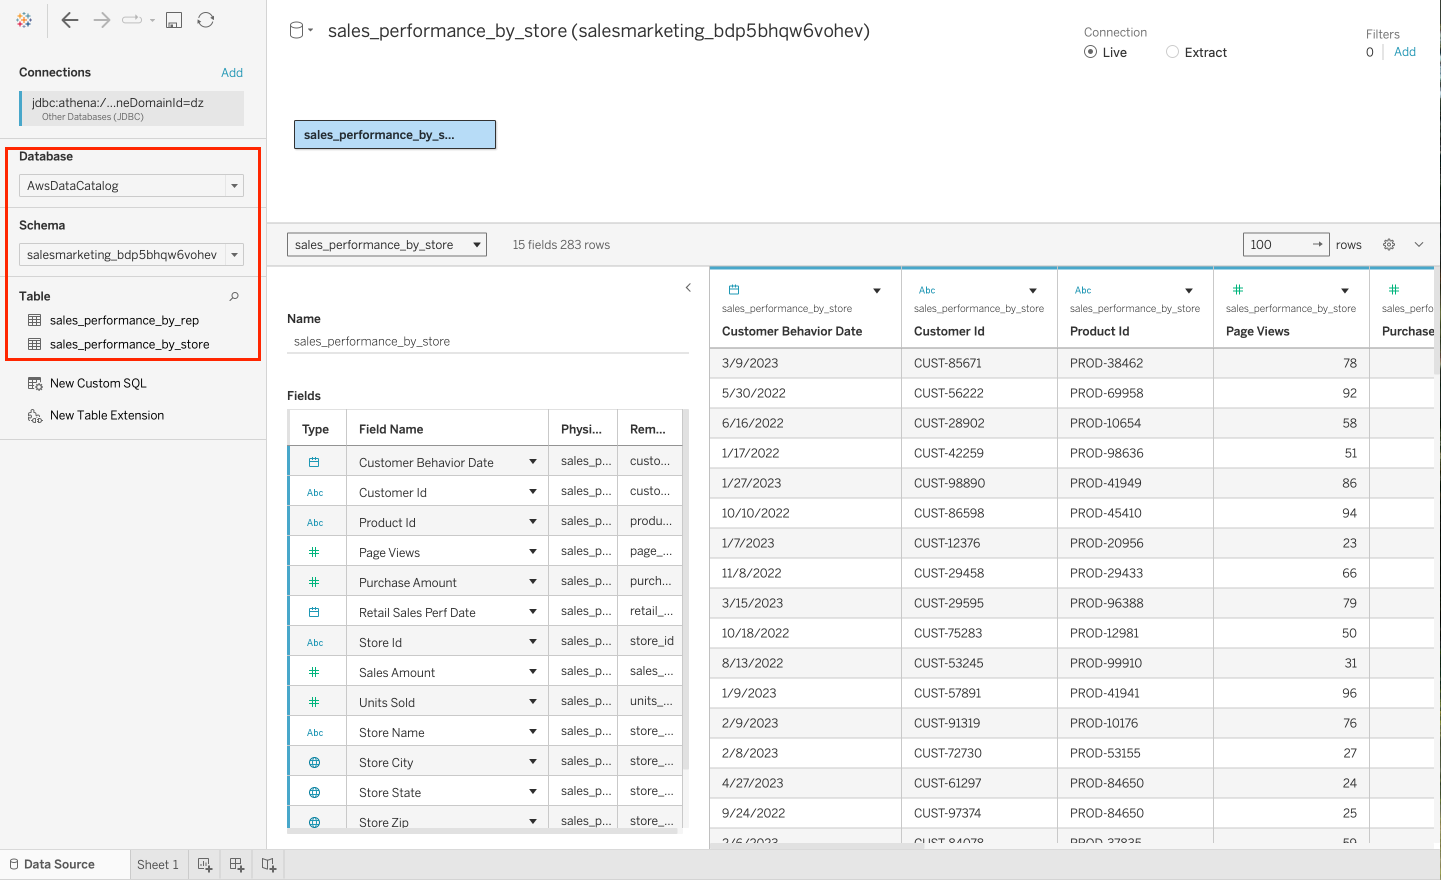
- This redirects you to authenticate with IAM Identity Center. Enter the credentials of the Identity Center user that you used to sign in to the SageMaker Unified Studio portal. Authorize the DataZoneAuthPlugin to access Amazon DataZone from Tableau. Once the connection is established with the success message, you can view your project’s subscribed data directly within Tableau and build dashboards.
Connect to Microsoft Power BI
Now, we look at connecting Amazon SageMaker Unified Studio with Microsoft Power BI on Windows.While Amazon Athena provides a native ODBC driver for connecting to ODBC-compatible tools like Microsoft Power BI, it currently doesn’t support Amazon SageMaker Unified Studio authentication. Therefore, in this post, we use an ODBC-JDBC bridge to connect Amazon SageMaker Unified Studio with Microsoft Power BI using the Athena JDBC driver, which supports SageMaker Unified Studio authentication.
In this post, we’re using the ZappySys driver as the ODBC-JDBC bridge. This is a third-party solution that requires a separate licensing fee, which isn’t included in the AWS solution. You can choose to use any other solution for ODBC-JDBC bridge.To connect to Power BI:
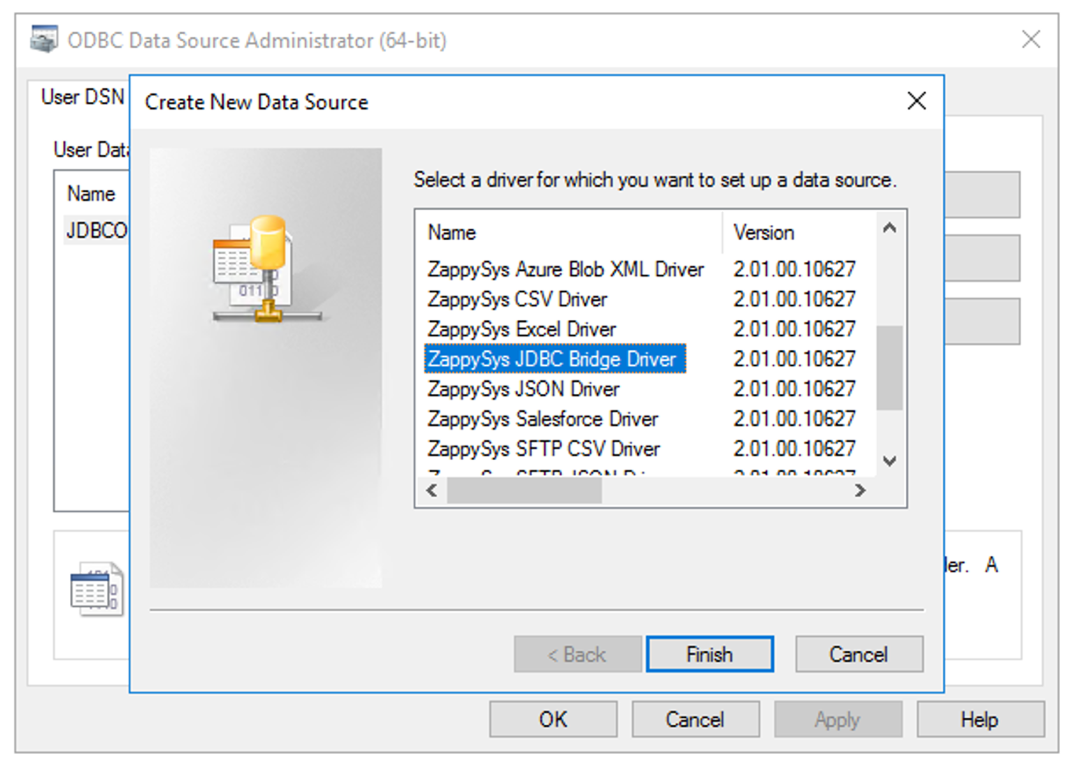
- Make sure that you have administrator privileges to run the ODBC Data Source Administrator.
- From the Windows Start menu, run the ODBC Data Source Administrator (the 64-bit version) using run as Administrator.
- Create a New Data Source with the ZappySys JDBC Bridge Driver. You are prompted to enter your connection details.
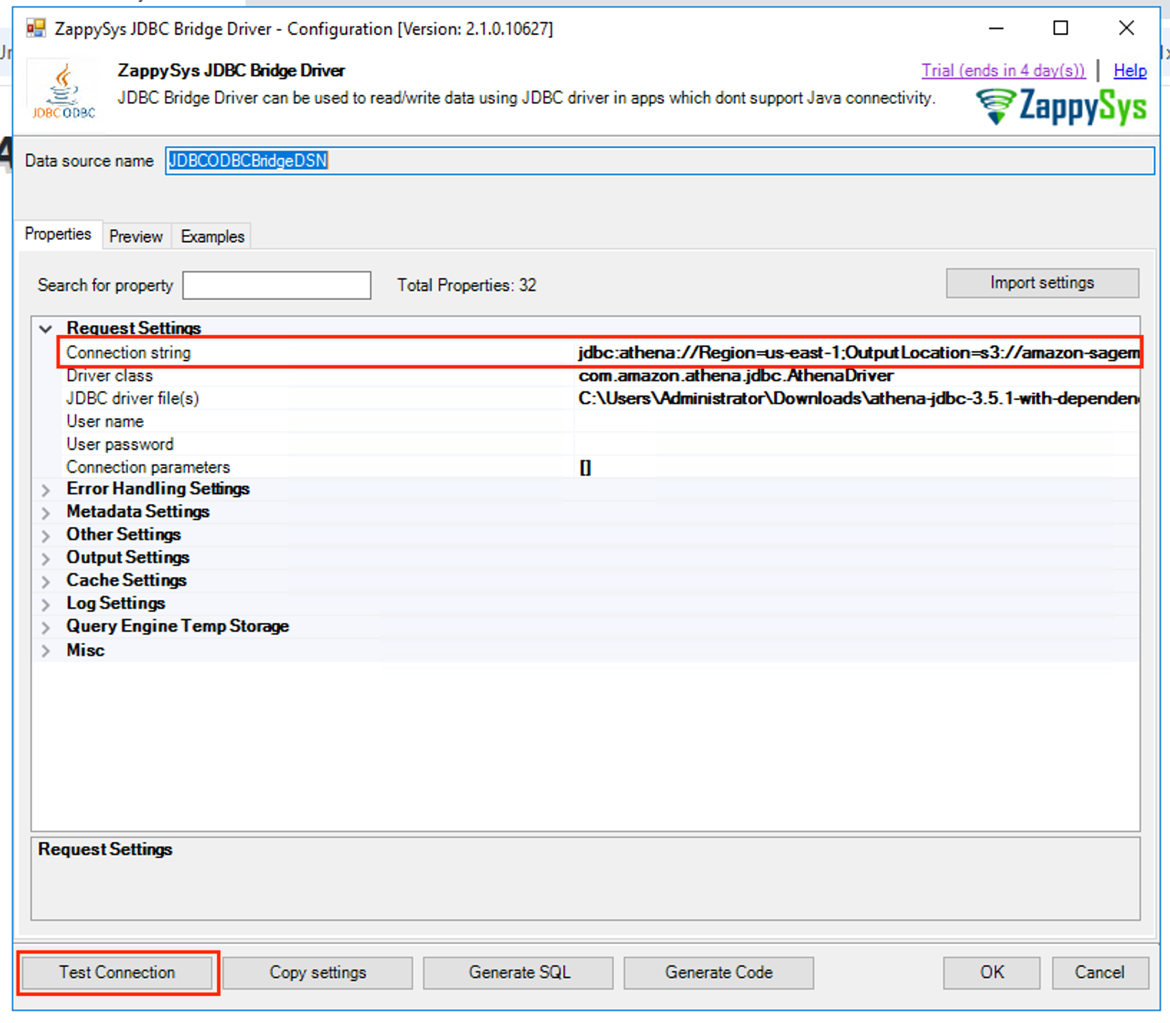
- Paste the JDBC URL you copied from the SageMaker Unified Studio portal in the Connection String, along with the driver class and JDBC driver file. Make sure that you’re using the latest Athena JDBC 3.x driver.
- Choose Test Connection. A new dialog window pops up after the connection is successful.
- This redirects you to authenticate with IAM Identity Center. Enter the credentials of the Identity Center user that you used to sign in to the SageMaker Unified Studio portal. Authorize the DataZoneAuthPlugin.
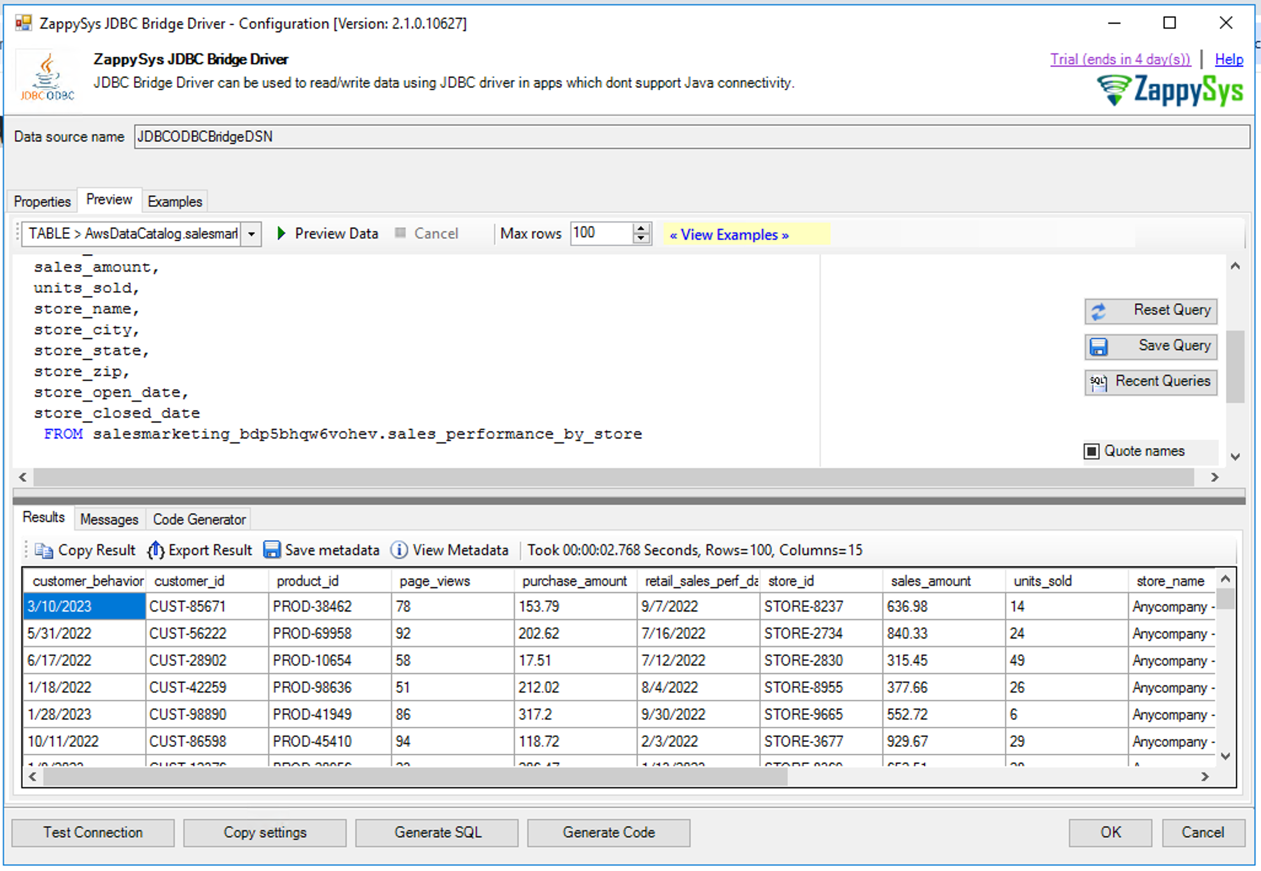
- Choose Preview tab on ZappySys JDBC Bridge Driver window and choose one of the subscribed tables to access data.
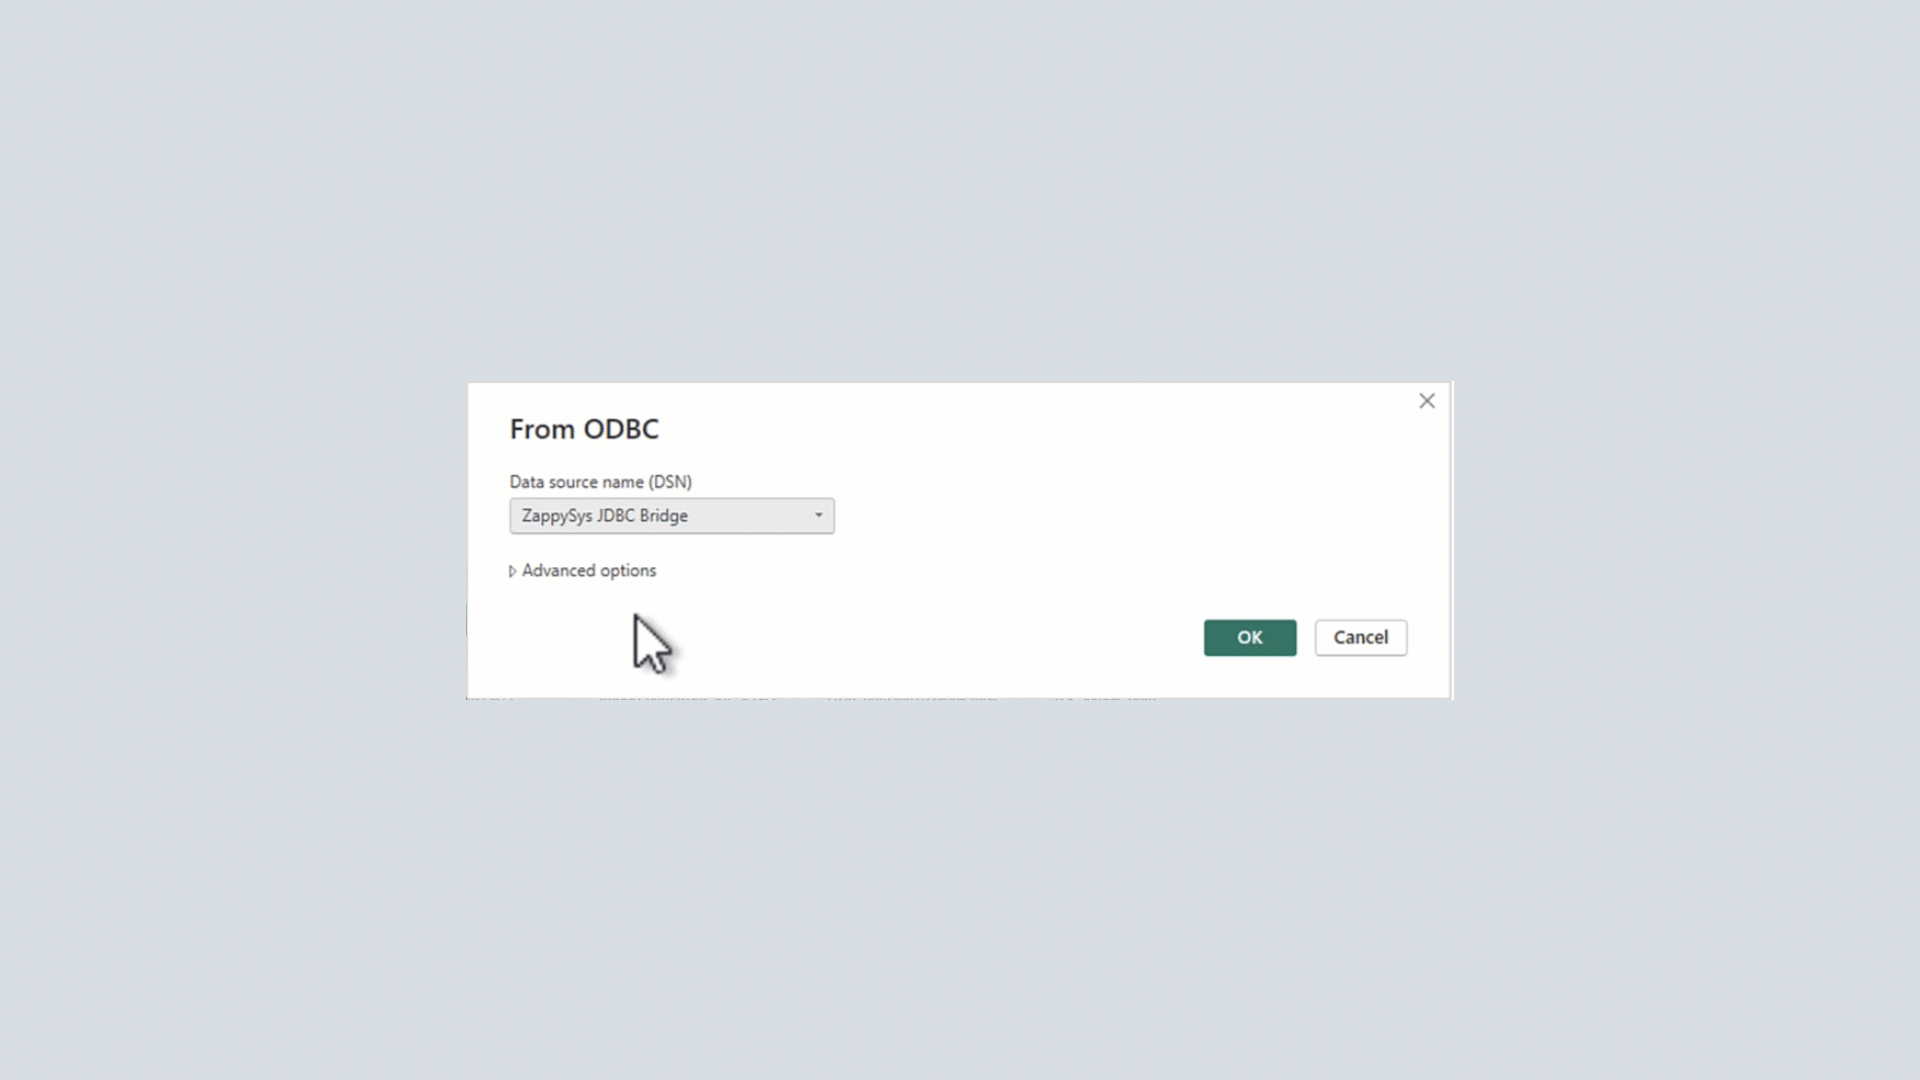
- After configuring the data source, launch Power BI. Create a blank report or use an existing report to integrate the new visuals. Choose Get Data and select the name of the data source you created. This opens a new browser window to authenticate your credentials. Allow access to authorize the DataZone Auth plugin. After authorization is complete, you can build your reports in Microsoft Power BI with the subscribed data assets.
Connect to SQL Workbench
Discover how SQL Workbench can connect to Amazon SageMaker Unified Studio for users who prefer a SQL interface to query data lake tables and views subscribed through projects in Amazon SageMaker Unified Studio.
To connect to SQL Workbench:
- Make sure that you’re using the latest Athena JDBC 3.x driver.
- Open SQL Workbench/J and choose Manage Drivers.
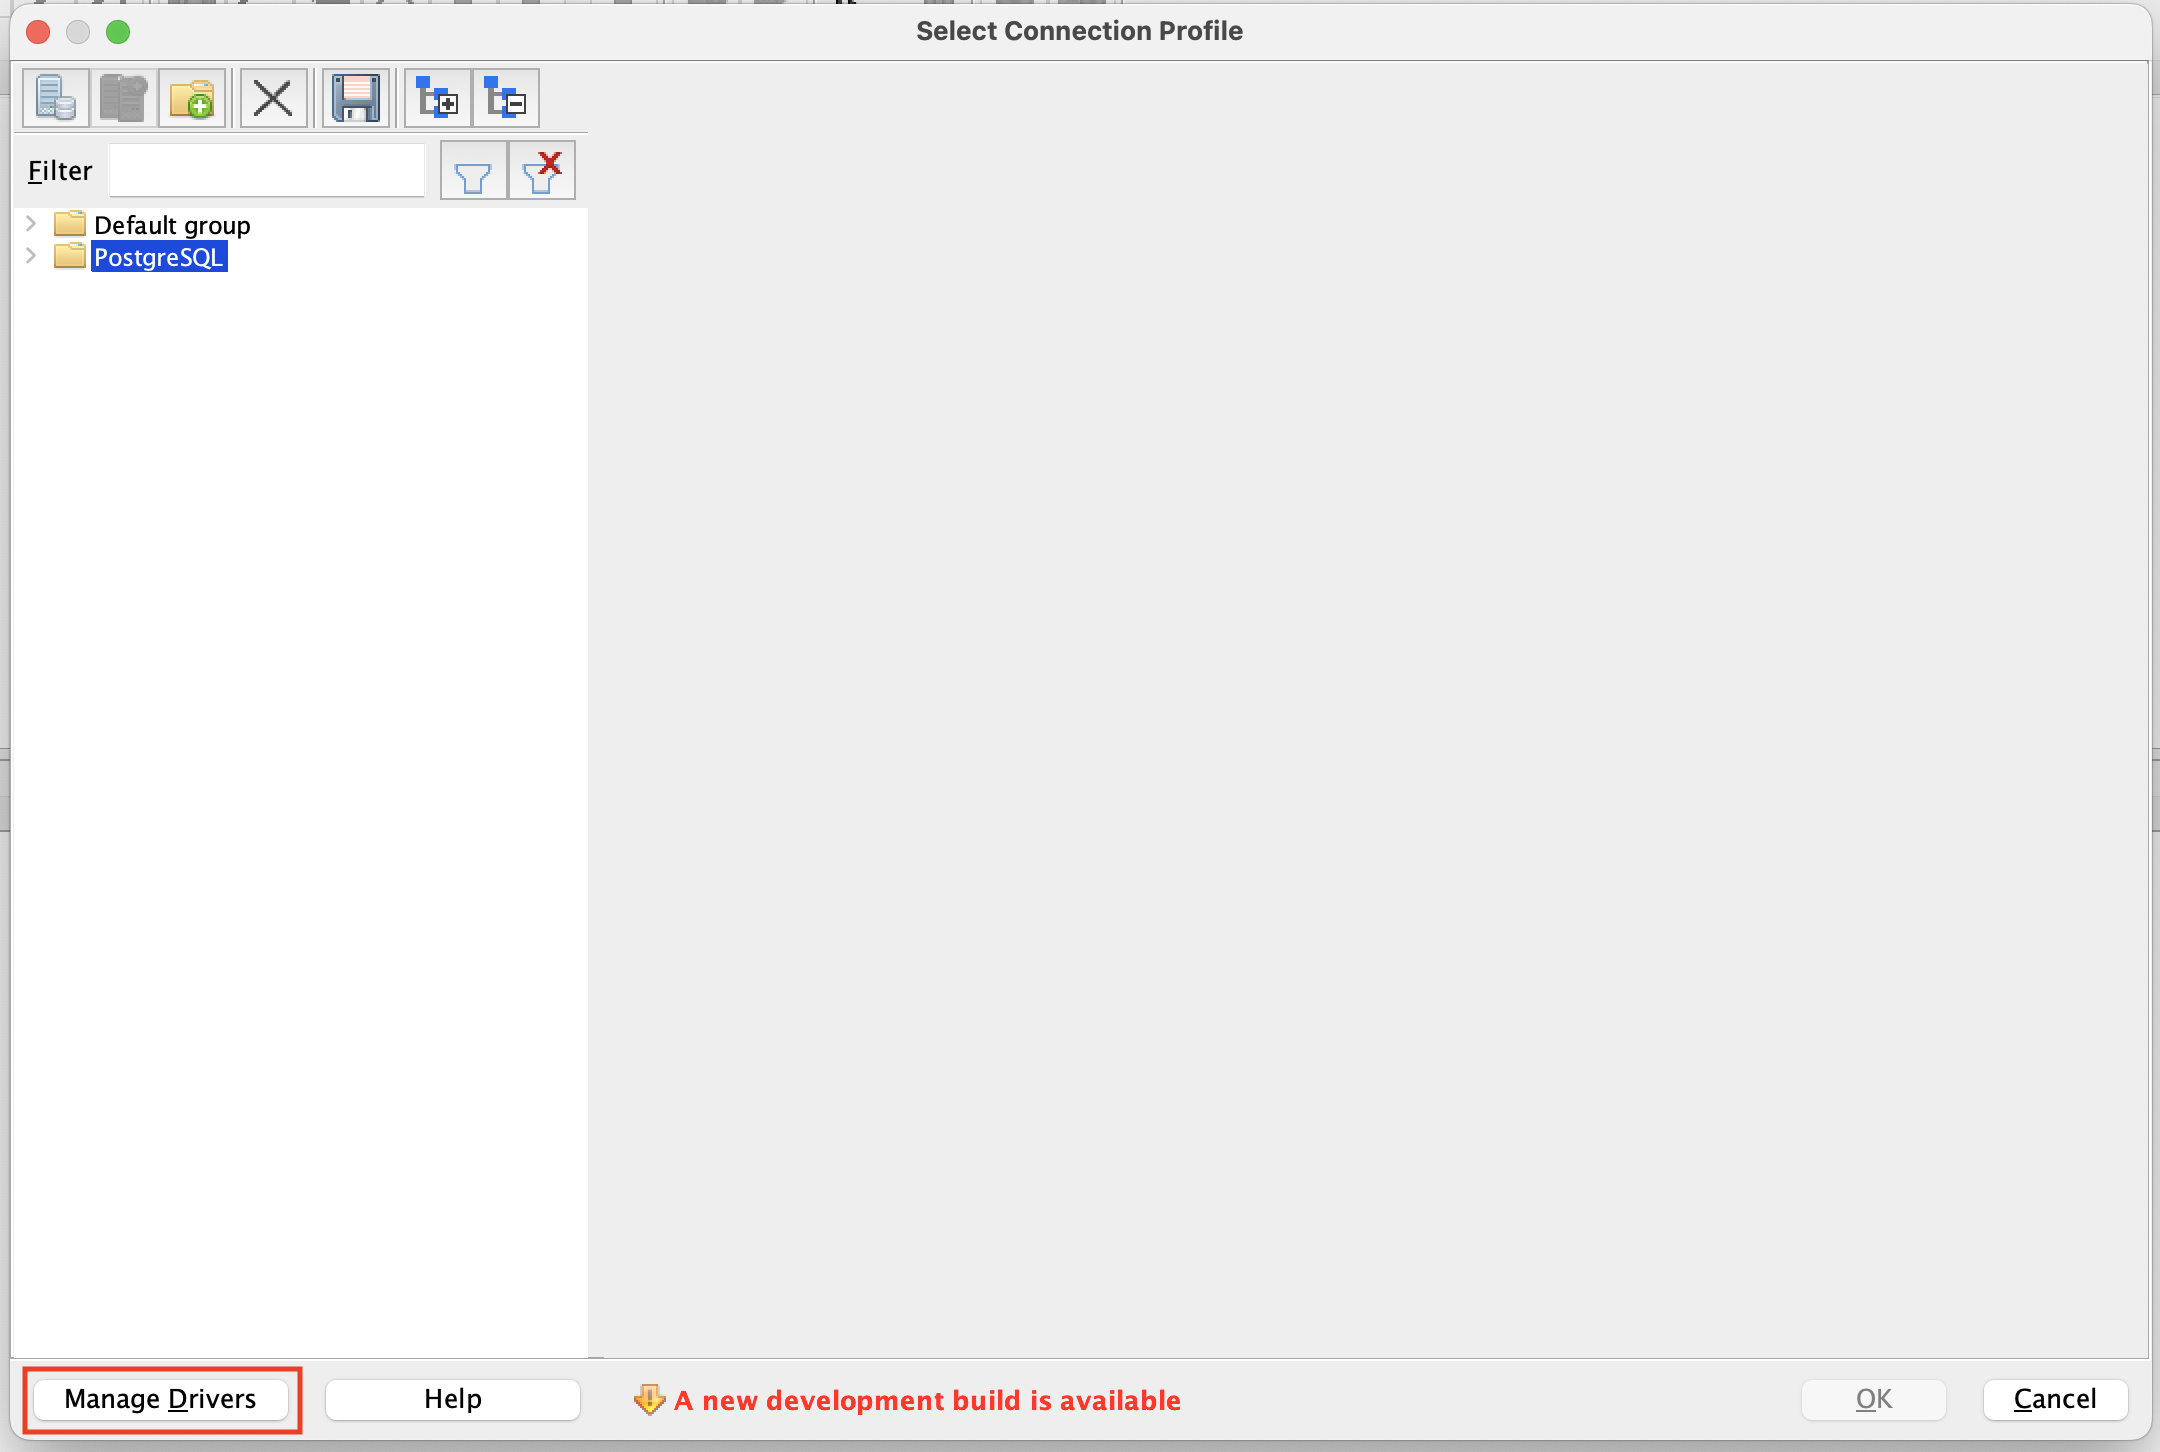
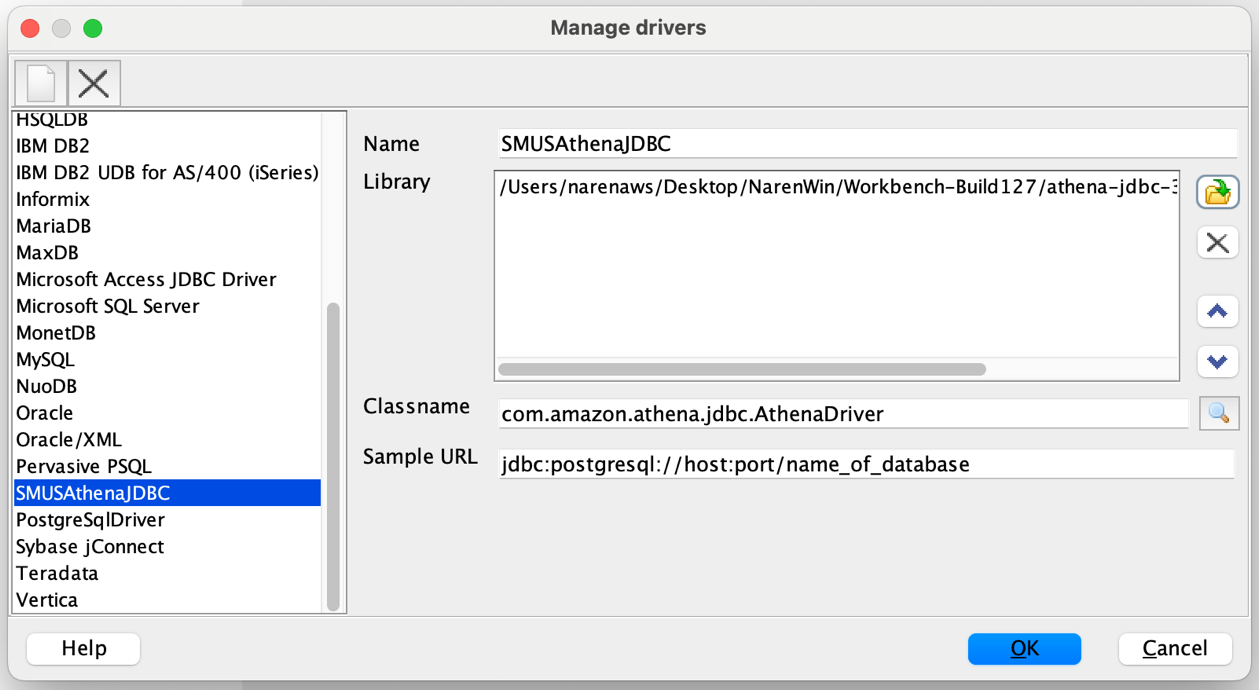
- Select the option to add a new driver. Enter a name for it, such as SMUSAthenaJDBC, and import the driver you downloaded in the previous steps.
- Create a new connection profile and enter a name it, such as smus-profile. In the Driver dropdown, select the driver you configured. For the URL, enter the string jdbc:athena://region=us-east-1; (In the example, the Virginia Region is being used). Choose Extended Properties.
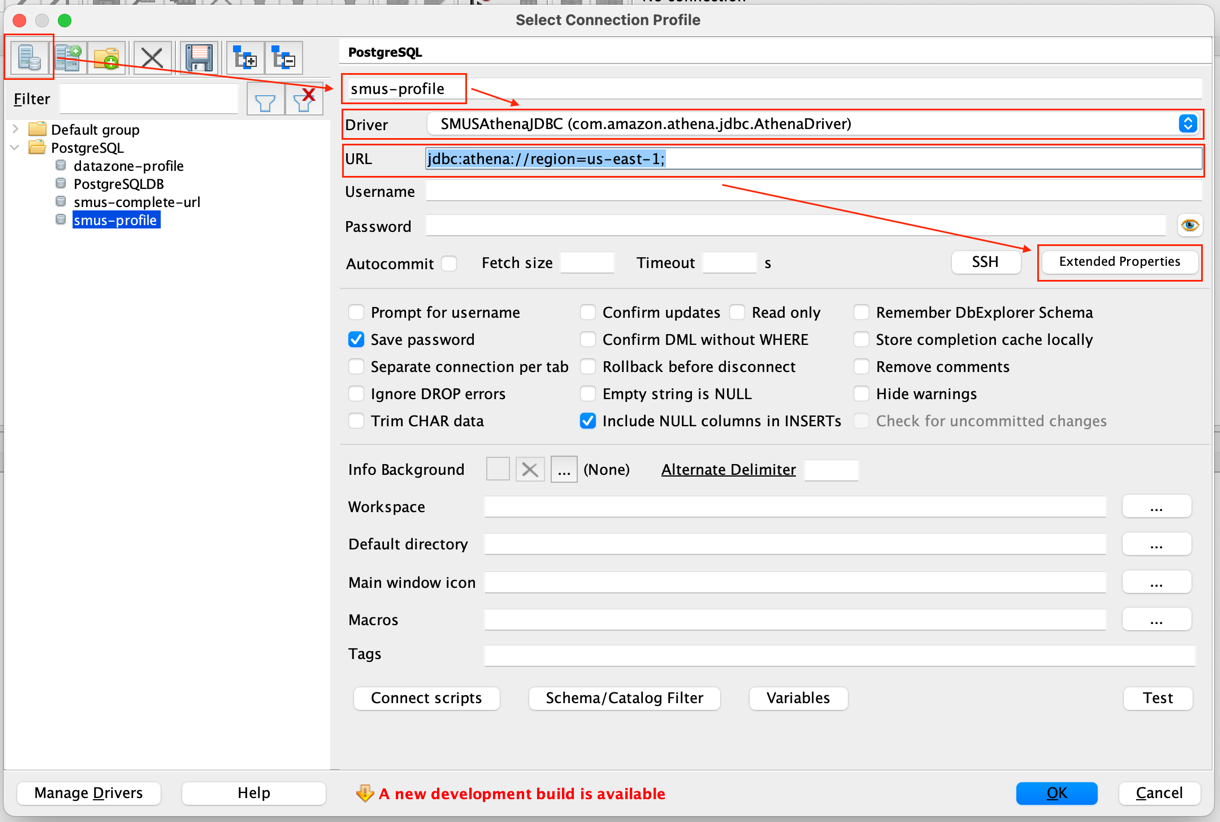
- Under Extended Properties, add the following parameters that you copied from the SageMaker Unified Studio portal. You can also include these parameters in the JDBC (URL) connection string. Choose OK.
- Workgroup
- OutputLocation
- DataZoneDomainId
- IdentityCenterIssuerURL
- CredentialsProvider
- DatazoneEnvironmentId
- DataZoneDomainRegain
Alos add “ListenPort” with any port number.

- This redirects you to authenticate with IAM Identity Center. Enter the credentials of the Identity Center user that you used to sign in to the SageMaker Unified Studio portal. Authorize the DataZoneAuthPlugin.
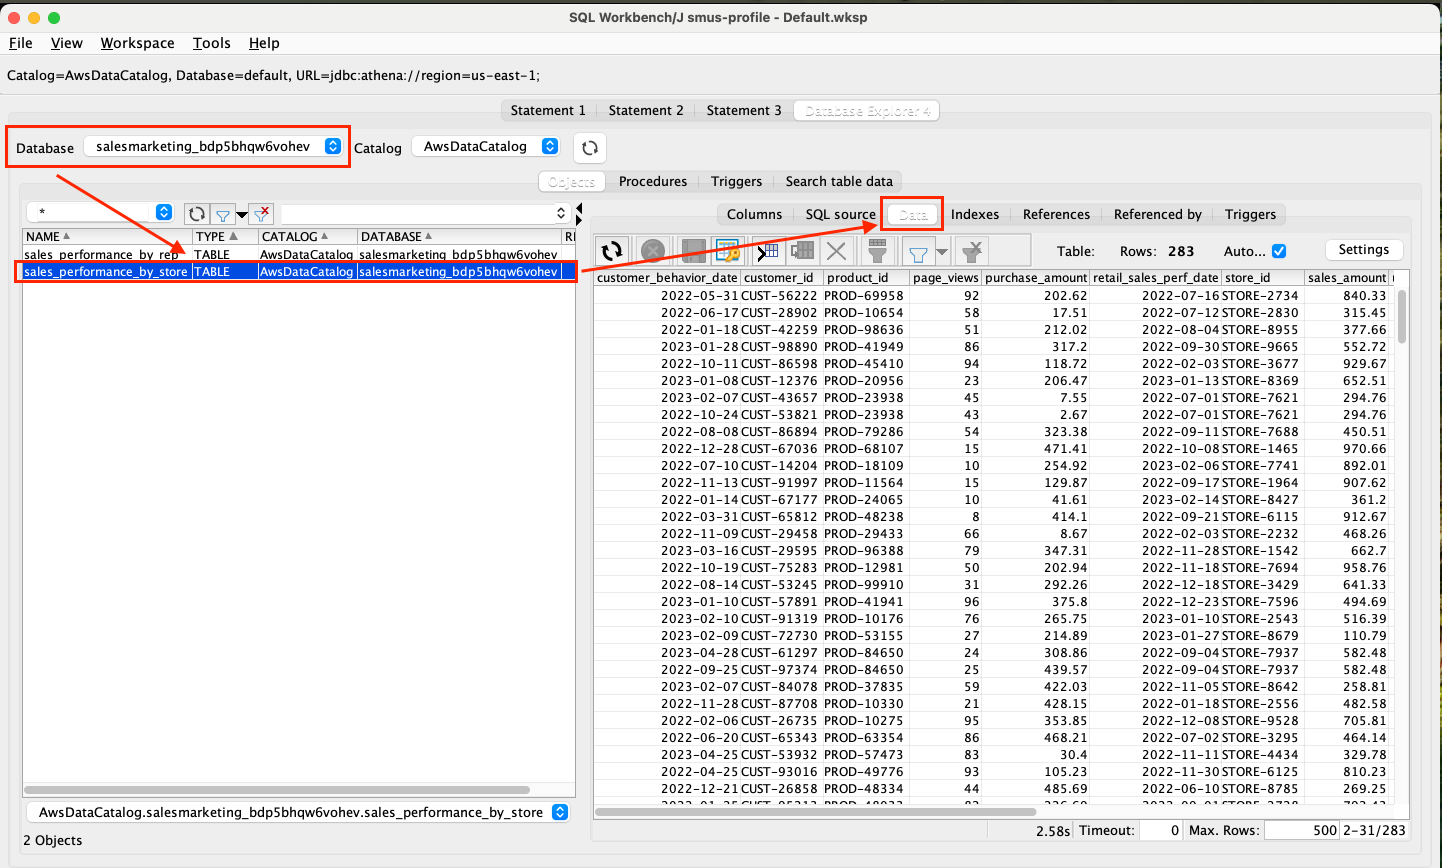
- After successful connection, in SQL Workbench/J, under Database Explorer, select the database from the marketing project of SageMaker unified studio. Choose a subscribed table. Select the Data tab to see the data in the table.
Cleanup
To ensure no additional charges are incurred after testing, be sure to delete the Amazon SageMaker Unified Studio domain. See Delete domains for instructions.
Conclusion
Amazon SageMaker Unified Studio continues to expand its offerings, providing you with more flexibility to access, analyze, and visualize your subscribed data. With support for the Athena JDBC driver, you can now use a wide range of popular BI and analytics tools, making data accessed through Amazon SageMaker Unified Studio more accessible than ever before. Whether you’re using Tableau, Power BI, or other familiar tools, the integration with Amazon SageMaker Unified Studio ensures that your data remains secure and accessible to authorized users.
The feature is supported in all AWS commercial Regions where Amazon SageMaker Unified Studio is currently available. Get started with our technical documentation.