AWS Contact Center
Best practices for measuring agent connection time in Amazon Connect Outbound Campaigns
When using Amazon Connect Outbound Campaigns with answering machine detection (AMD), contact center managers often perceive long silence periods before customers connect to agents. This perception frequently stems from measuring agent connection time incorrectly starting the timer from when the call enters the system rather than from when the customer finishes speaking. By anchoring your measurement correctly, Amazon Connect Outbound Campaigns consistently achieve agent connection times of approximately 2 seconds.
This post shows how to accurately measure agent connection time using the correct timestamp anchor, apply a structured diagnostic approach when connection times exceed targets, and optimize your contact flows for the best customer experience.
Applicability by Campaign Mode:
| Campaign Mode | AMD Used | Methodology Applies | Reason |
| Predictive | Yes (required) | Yes | Agent connects after AMD classifies the call as human; greetingEndTimestamp is available |
| Progressive (AMD enabled) | Yes | Yes | Same call flow as Predictive when AMD is active |
| Progressive (AMD disabled) | No | No | Call routes directly to the agent on answer; no voice analysis phase |
| Preview | No | No | Agent manually initiates the call and is already on the line when the customer answers |
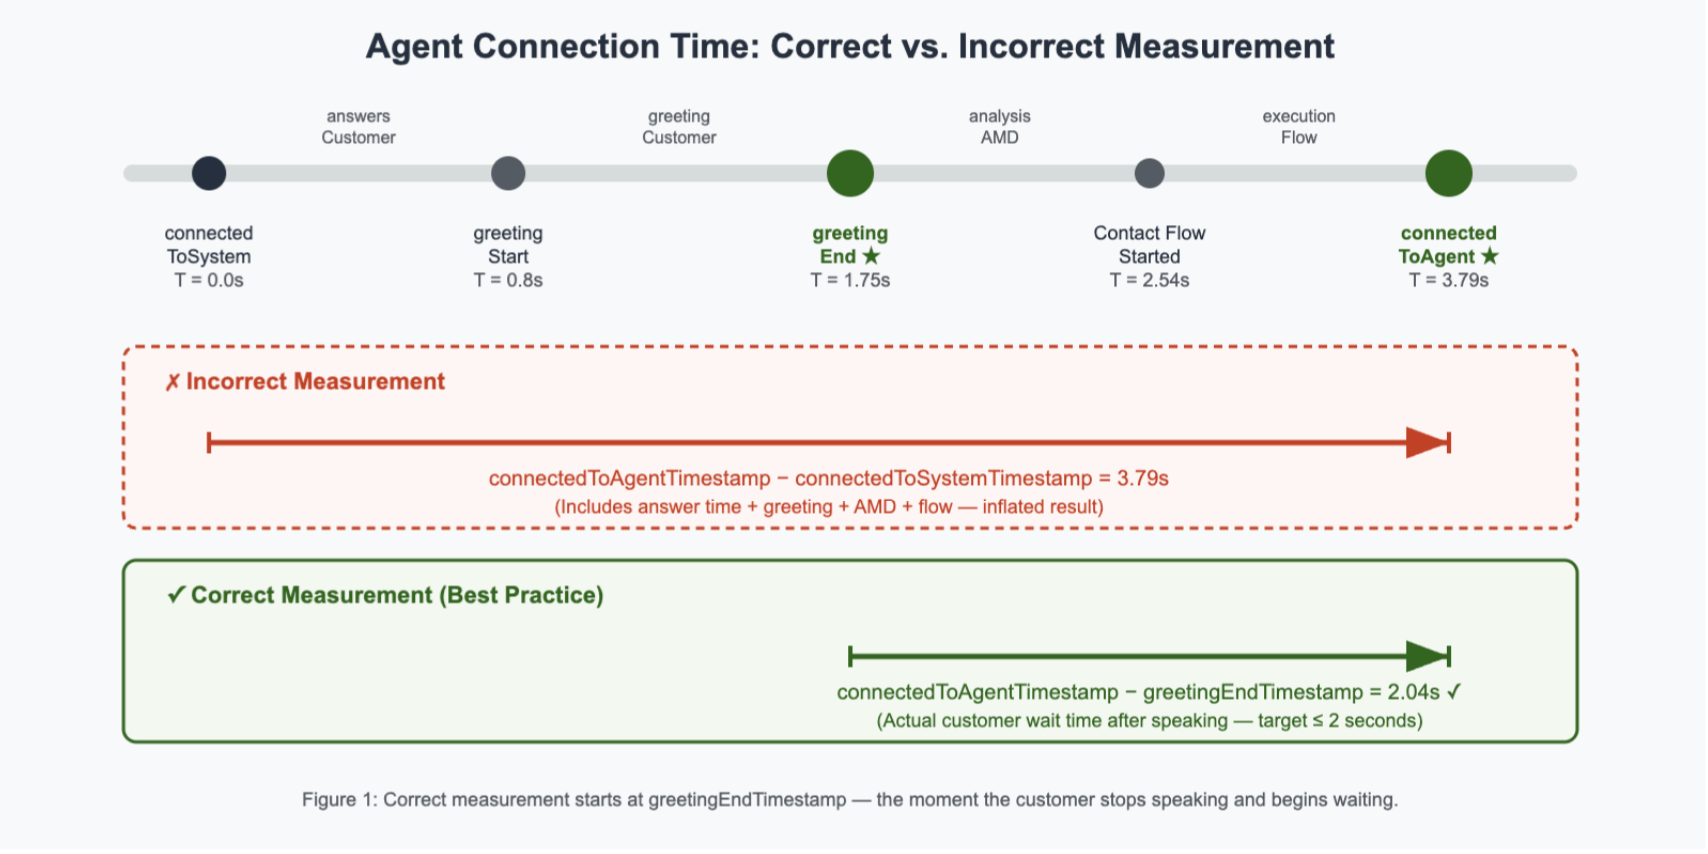 Figure 1 illustrates two approaches to measuring agent connection time. The incorrect approach measures from connectedToSystemTimestamp to connectedToAgentTimestamp, which includes the time for the customer to answer the phone and speak their greeting, resulting in an inflated measurement (e.g., 3.788 seconds). The correct approach measures from greetingEndTimestamp to connectedToAgentTimestamp, capturing only the actual wait time the customer experiences after finishing their greeting (e.g., 2.036 seconds). The diagram shows these two spans on a call timeline to highlight why starting from the correct anchor point matters for accurate performance measurement
Measure from the correct starting point
The most common measurement error is using connectedToSystemTimestamp as the starting point. This inflates perceived wait time by including factors outside your control: the time for the customer to answer the phone, their greeting duration, and Public Switched Telephone Network (PSTN) carrier latency.
The correct formula:
Agent Connection Time = connectedToAgentTimestamp − greetingEndTimestamp Target: ≤ 2 seconds
The greetingEndTimestamp marks the moment the customer finishes their first utterance and begins waiting in silence—the true start of customer wait time. The connectedToAgentTimestamp marks when the agent accepts the call, ending the wait.
| Measurement Approach | Formula | Result | Assessment |
| Incorrect (inflates latency) | connectedToAgentTimestamp − connectedToSystemTimestamp | 3.788s | Includes answer time + greeting + AMD + flow |
| Correct (best practice) | connectedToAgentTimestamp − greetingEndTimestamp | 2.036s | Actual customer wait after speaking |
After greetingEndTimestamp, two things occur before the agent connects:
- AMD analysis : Amazon Connect analyzes the voice sample to classify the call as human or machine.
- Contact flow execution: Once AMD completes, the contact flow runs and routes the call to an available agent.
Both components together should total ≤ 2 seconds. Retrieve these timestamps from Amazon Connect Contact Events via Amazon EventBridge or from Contact Trace Records (CTR) via Amazon Kinesis.
Identify what’s causing delays
When agent connection time exceeds 2 seconds, use the following three-step approach to isolate the bottleneck.
Step 1 – Measure overall connection time (Contact Events or CTR)
Retrieve the Contact ID from Amazon Connect Contact Search in the Amazon Connect console. Extract greetingEndTimestamp and connectedToAgentTimestamp, then calculate the difference. If ≤ 2 seconds, no further investigation is needed.
Step 2 – Break down flow execution (Contact Flow Logs)
Enable contact flow logs in your instance settings. Filter Amazon CloudWatch Logs by Contact ID to see block-level timestamps. Calculate:
- AMD Detection Time = Contact Flow Started − greetingEndTimestamp
- Flow Execution Time = connectedToAgentTimestamp − Contact Flow Started
If flow execution time is elevated, examine individual block deltas for synchronous AWS Lambda calls, API lookups, or complex branching logic.
Step 3 – Check audio establishment (CCP Logs)
If Steps 1 and 2 show acceptable timing but agents still report delays, examine Contact Control Panel (CCP) logs for Web Real-Time Communication (WebRTC) audio overhead using the CCP Log Parser tool.
CCP state transitions to verify:
| State Transition | Meaning |
| PendingBusy → Connected | Agent acceptance time |
| Connected → audio_input active | Customer audio stream established |
| Connected → audio_output active | Agent audio stream established |
WebRTC quality metrics thresholds:
| Metric | Threshold | Action If Exceeded |
| roundTripTimeMillis | > 300ms | Check agent network; review geographic proximity to instance region |
| jitterBufferMillis | > 50ms | Switch to wired Ethernet; check network stability |
| packetsLost | > 2% | Investigate network path; review QoS configuration and firewall rules |
| audioLevel | <= 0 when speaking | Check microphone permissions and headset connection in CCP |
Optimize for consistent performance
Apply these optimizations in order of impact:
- Enable auto-accept calls – Eliminates 0–5 seconds of manual agent acceptance delay, the single largest source of variability. Configure in CCP settings.
- Disable or minimize whisper flows – Saves 200–500ms per call. If legally required, keep to absolute minimum duration.
- Refactor synchronous Lambda calls – Move to asynchronous patterns with provisioned concurrency. Synchronous calls are the most common cause of times exceeding 2 seconds (each adds 100ms–3,000ms).
- Simplify queue flows – Reduce to a Start → Resume pattern. Each unnecessary block adds latency to the critical path.
- Enable Persistent Connection – Reduces reconnection overhead when agents accept consecutive calls.
- Position agents in the same AWS Region as your Connect instance – Use wired Ethernet connections and ensure workstations meet CCP requirements.
Conclusion
Accurately measuring agent connection time requires one key correction: start your measurement at greetingEndTimestamp, not at call initiation. This single change typically reveals that Amazon Connect Outbound Campaigns with AMD are performing significantly better than perceived. When combined with auto-accept, simplified queue flows, and optimized Lambda patterns, Amazon Connect consistently strives towards achieving the industry standard. Please ensure that the best practices outlined here are followed while implementing the outbound campaigns.
For more information, see Amazon Connect Outbound Campaigns in the Amazon Connect Administrator Guide.
About the authors
 Ashwini Mohan is a Senior Technical Account Manager for retail customers at AWS. With 10 years of cloud expertise, she specializes in infrastructure optimization and operational excellence. She works with enterprises on cost optimization strategies and cloud operations best practices to accelerate their AWS journey. Outside of work, she cherishes family time.
 Abilashkumar P C is a Sr. Specialist Solutions Architect for Applied AI at Amazon Web Services, He works with customers to design and build resilient, AI-powered solutions across contact centers and conversational AI. He is passionate about chaos engineering, and partnering with enterprises to modernize customer experiences at scale.