AWS Contact Center
Modalities and Live Sync: give agents the screen in Amazon Connect Customer
The ceiling every text-only agent hits
Your conversational agent in agentic CX designer for Amazon Connect Customer is handling a rebooking call when a traveler’s return flight gets canceled. It pulls up the booking and spots the disrupted segment before the traveler has to explain it. Then it fetches two alternatives and says this:
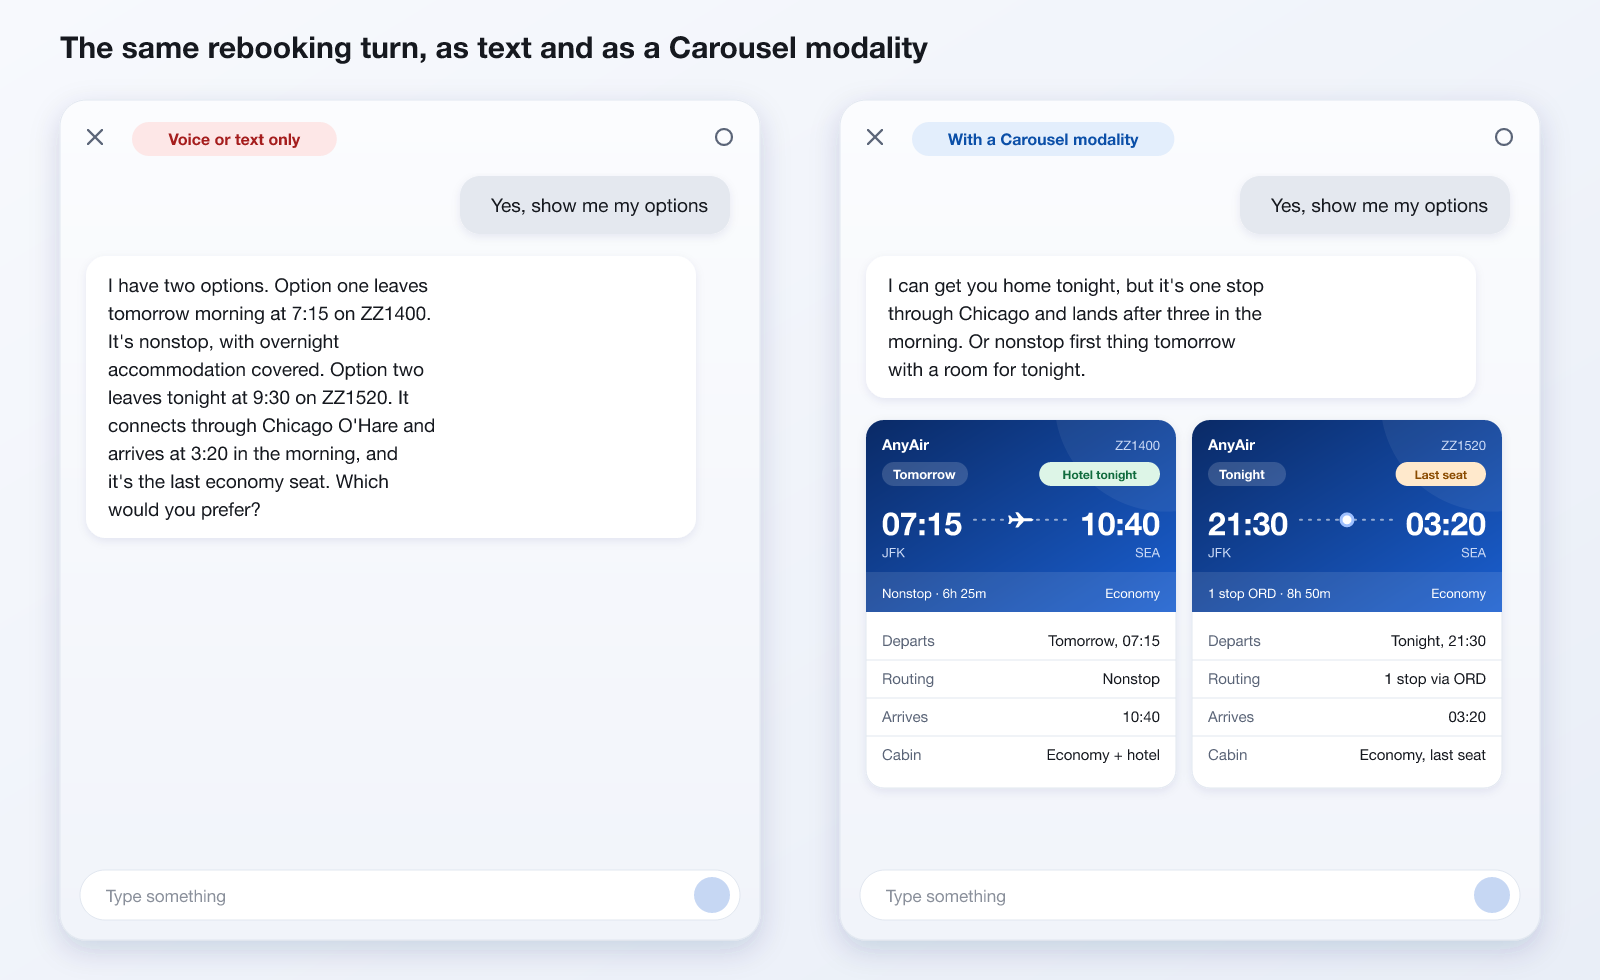
“I have two options. Option one leaves tomorrow morning at seven fifteen on ZZ1400. It’s nonstop, with overnight accommodation covered. Option two leaves tonight at nine thirty on ZZ1520. It connects through Chicago O’Hare and arrives at three twenty in the morning, and it’s the last economy seat. Which would you prefer?”
The agent did everything right. It read the record, raised the disruption unprompted, and retrieved two different answers. By the second option, the traveler has lost track of the first.
Nothing in that turn is a reasoning failure. The problem is that a sentence is the wrong container for structured information. In chat, it arrives as a wall of text nobody reads to the end. Over voice it’s worse: the detail is gone as soon as it’s spoken, and there’s no conversation panel to put it in so it can be reread. Instead, it needs to be repeated.
Now suppose the traveler has your manage-booking page open while they’re on the call, and both options are already on screen. The agent knows what they want, but it can’t touch the thing they’re looking at. So they thank the agent, hang up, and pick the option themselves.
Those are two different ceilings, and agentic CX designer has a capability for each.
In a previous post, Blend structured business logic with agentic AI to deliver delightful conversational experiences, we introduced agentic CX designer. This post goes deeper into two capabilities that extend your agent beyond text: Modalities and Live Sync.
The following image shows the same two options as a wall of text and as cards.
Two ways to reach the screen
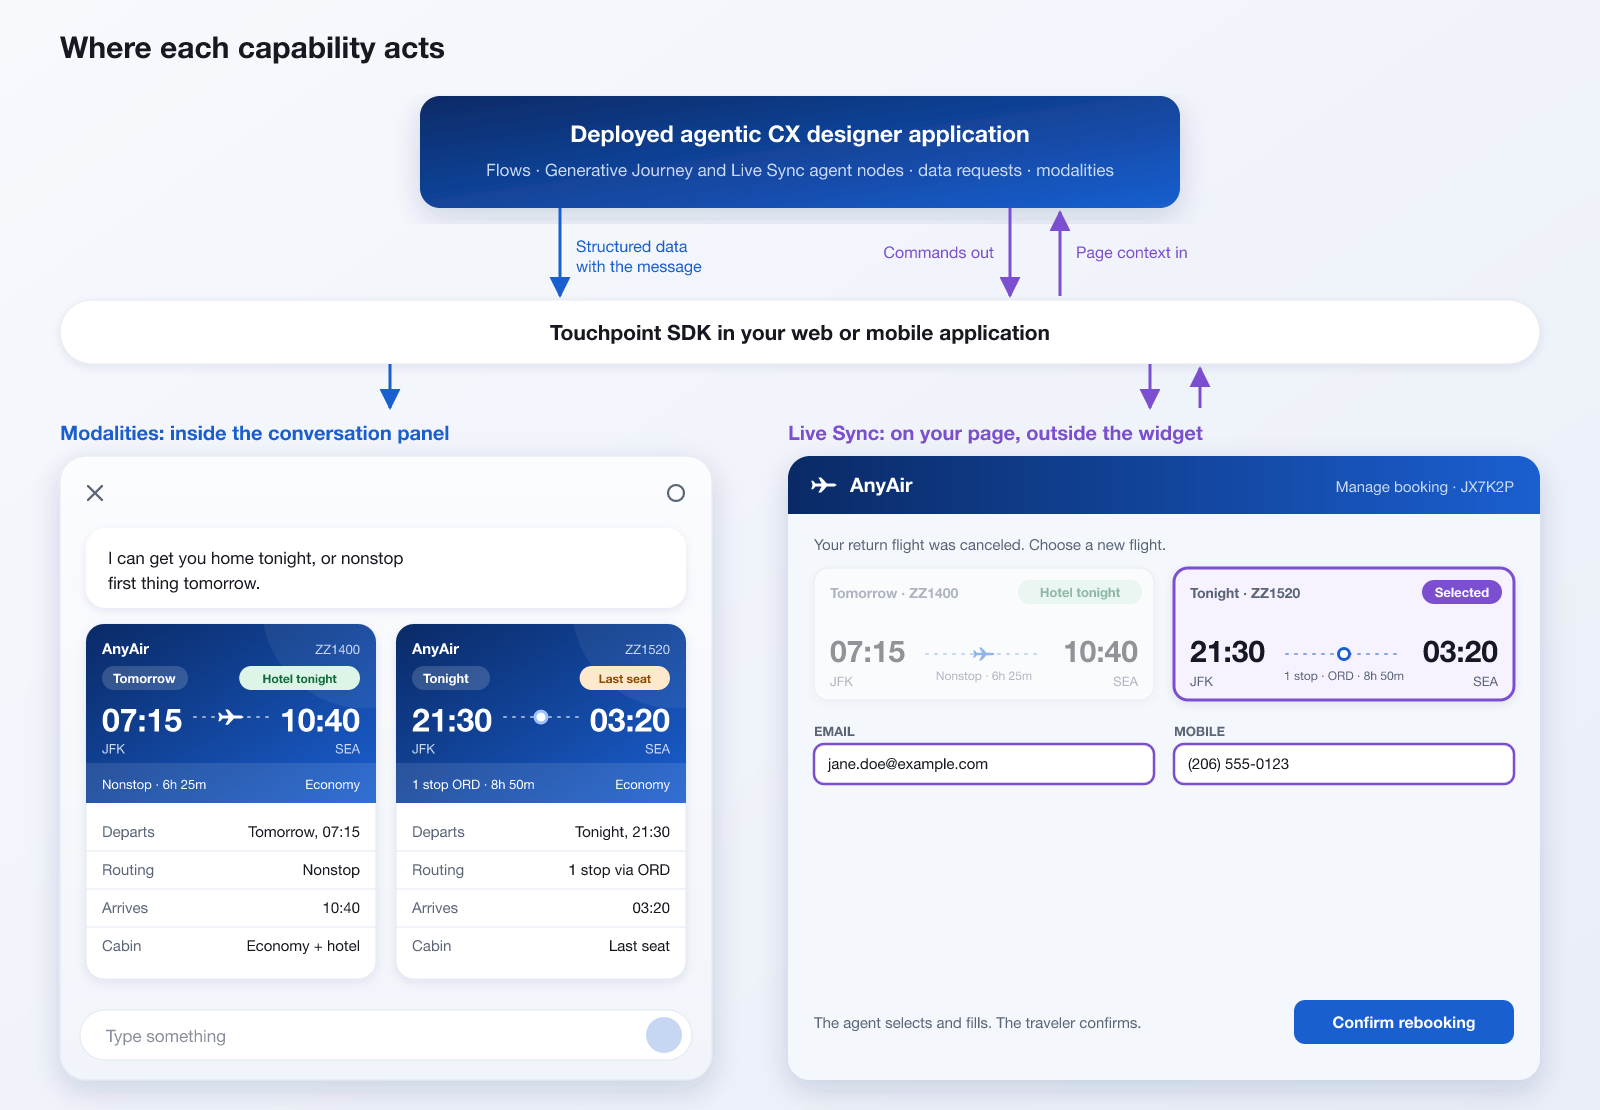
Both capabilities arrive through the same channel: the Touchpoint SDK (@amazon-connect-touchpoint/web for the web, with native SDKs for Android and iOS) running in your application. What differs is where the agent gets to act. Table 1 compares them.
| Modalities | Live Sync | |
|---|---|---|
| What it drives | UI inside the conversation panel | Elements on your existing page, outside the widget |
| Typical use | Show a list, a card, a summary, or a video; capture a date | Fill a field, select an option, filter a list, navigate |
| You provide | Data, plus a component if custom | A handler that manipulates your page |
| Direction | Application → frontend | Frontend ⇄ application, continuously |
| Cost to adopt | None for the four predefined ones | A frontend contract you design and maintain |
Table 1: Two ways to reach the screen
A modality is the agent showing you something or allowing for user interaction. Live Sync is the agent doing something. Most production journeys want both.
Neither capability gives the agent free rein over your interface. Automatic frontend context is on by default. Touchpoint reads the page’s form controls, current values, and links, and the agent can fill those fields and follow those links. You control that surface in three ways:
- Scope tags limit each custom action to the pages or UI states where it belongs.
- Customize or turn off automatic context. In the Touchpoint
liveSyncsettings,customizeAutomaticContextlets you remove fields before context is sent, andautomaticContext: falseturns it off. - Keep sensitive fields out of reach. Remove payment, password, and identity-number fields from the context so the agent can’t see or fill them.
The following diagram shows where each capability acts.
Modalities
A modality is a structured UI component that complements a text response. Your flow sends structured data alongside the message, and Touchpoint renders it as something the customer can see.
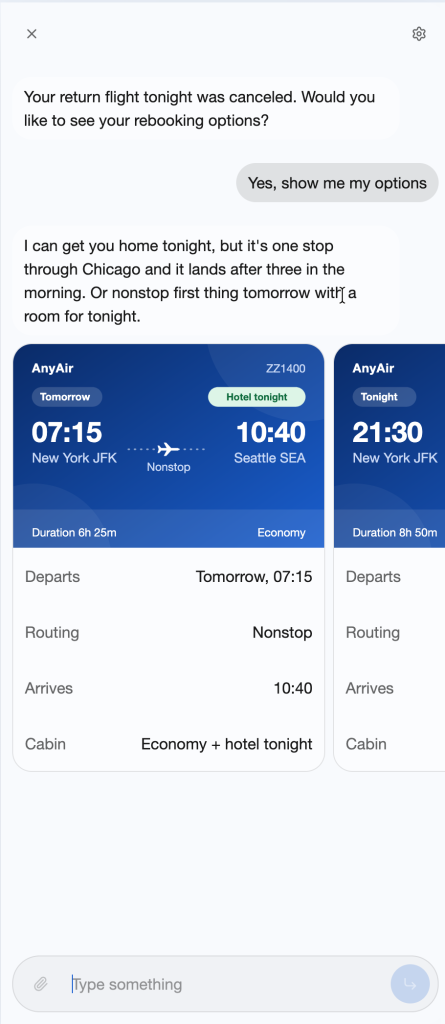
In chat, the rebooking turn becomes: “I can get you home tonight, but it’s one stop through Chicago and it lands after three in the morning. Or nonstop first thing tomorrow with a room for tonight.” The panel shows both itineraries as cards.
Reach for a modality any time a turn carries more information than a sentence carries well: a list of options, a booking reference, a comparison, a confirmation.
The pattern: fetch, reshape, present
Every modality follows three steps:
- Fetch: A data request calls your backend (for example,
getRebookOptions). - Reshape: A Transform node converts the response into the modality’s expected schema.
- Present: The modality, attached to a node, sends it to Touchpoint for rendering.
A data request response rarely matches a modality’s schema exactly. Table 2 lists the ways to reshape it.
| Method | What it does | Use it when |
|---|---|---|
| Transform node with Filter | Removes items from a list based on explicit conditions | You can state the conditions exactly |
| Transform node with Generative filter | Removes items using criteria the model interprets | The criteria are fuzzy or depend on context |
| Transform node with Map or Generative map | Maps each item in a list into the list-item schema | You’re building carousels or repeated cards |
| Transform node with Morph | Uses generative AI to reshape data into the target schema | You’re prototyping, or the response structure varies |
| Transform node with Sort | Reorders items by a field or expression | Order matters, such as earliest departure first |
| Loop node with Define node | Builds the structure deterministically from complex or nested data | You need precise control |
Table 2: Ways to reshape data for a modality
Choose a generative method when speed and flexibility matter most. Choose a deterministic one when structure, predictability, or compliance matters more.
Four predefined modalities
Touchpoint renders four modalities without any frontend code from you. Table 3 lists them.
| Modality | Shows | Mostly used for |
|---|---|---|
| Carousel | Multiple options as horizontally browsable cards | Presentation |
| Card | A single item, summary, confirmation, or preview | Presentation |
| Date input | A date picker | Capture |
| Video | An inline video player with an optional preview image | Presentation |
Table 3: Four predefined modalities
For the airline journey, that’s two attachments and zero lines of code: a Carousel for the rebooking options and a Card for the confirmation once the rebooking completes.
Here’s the carousel payload that Touchpoint renders. Each card is built from label-and-value rows:
{
  "cards": [
    {
      "id": "RBO-1",
      "thumbnail": "https://example.com/itineraries/rbo-1.png",
      "thumbnailAlt": "Tomorrow, ZZ1400, New York JFK 07:15 to Seattle SEA 10:40, nonstop, hotel tonight included",
      "rows": [
        { "label": "Departs",  "value": "Tomorrow, 07:15" },
        { "label": "Routing",  "value": "Nonstop" },
        { "label": "Arrives",  "value": "10:40" },
        { "label": "Cabin",    "value": "Economy + hotel tonight" }
      ]
    },
    {
      "id": "RBO-2",
      "thumbnail": "https://example.com/itineraries/rbo-2.png",
      "thumbnailAlt": "Tonight, ZZ1520, New York JFK 21:30 to Seattle SEA 03:20, one stop in Chicago O'Hare, last economy seat",
      "rows": [
        { "label": "Departs",  "value": "Tonight, 21:30" },
        { "label": "Routing",  "value": "1 stop via ORD" },
        { "label": "Arrives",  "value": "03:20" },
        { "label": "Cabin",    "value": "Economy, last seat" }
      ]
    }
  ]
}
The label is what the customer reads, so make it a human caption rather than a field name from your API. To show an image on a card, add a thumbnail URL and a thumbnailAlt description of the image. Without a $saveAs setting, the carousel is presentation only: the customer reads the options and answers in their own words.
The following screenshot shows the carousel in the Touchpoint conversation widget.
Try a words-only test. Turn the screen off and run the journey. If it can no longer be completed, the journey depends on the screen, and it fails for customers on voice.
Where you attach it decides when it renders
The type of node you attach a modality to sets when it appears:
- Agent nodes (Generative Journey and Live Sync), attached as a tool: The agent decides the timing. This is best for most cases.
- Basic nodes: The modality renders every time the node is reached.
- User choice and User input nodes: The modality renders the options, and the selection is the answer.
For anything beyond the predefined modalities, create a custom modality under Resources, Modalities. Mark any schema property that holds personal data as Sensitive to keep its values out of conversation logs. The Touchpoint repository covers how to register the frontend component.
Modalities let the agent show you something or offer options to select from. But what if it needs to do something on the page?
Live Sync
Live Sync is a bidirectional connection between a deployed agentic CX designer application and your web or mobile frontend. The frontend sends context in, and the application sends commands back out. It works with voice and with chat.
Back on the manage-booking page, that changes the journey’s ending. The traveler says, “Take the one that gets me home tonight,” and Live Sync highlights that option on the page. The contact details they give are filled into the form as they speak. The agent reads the choice back, and the traveler presses Confirm rebooking. When the rebooking is done, the agent points them at the new boarding pass rather than reading a reference aloud.
In this example, the traveler is on a phone call. Touchpoint runs in external mode on the page, with no widget, and binds Live Sync to the call’s contact. If the traveler talks to the agent in the Touchpoint widget instead, Live Sync binds to that contact automatically.
The following video shows Live Sync on a phone call in a related airline scenario. The agent sends a link so the traveler can see her options while she stays on the call. As they talk, it selects the flight and seat on her screen, and the booking runs only after she taps Confirm booking.
The three layers
Live Sync runs across three layers, described in Table 4.
| Layer | Where it runs | Responsible for |
|---|---|---|
| The Live Sync agent | A Live Sync agent node in your application | Understanding the customer, reasoning, deciding what should happen |
| Touchpoint | Between the two ends | Connecting the application to the frontend; carrying audio, page context, and commands |
| Your frontend | Your web or mobile application | Running the command handlers that perform interface actions |
Table 4: The three layers
Touchpoint sends page context to the agent through the Context API, automatically by default. An Agentic CX block in your Connect Customer flow invokes the deployed application for each contact.
Define the actions
You define what the agent may do on the page as actions on the Live Sync agent node. Each action has the fields in Table 5.
| Field | Rebooking example |
|---|---|
| Action name | select_rebook_option |
| Description | Use this action to highlight the rebooking option the traveler chose, from the options shown on the page. |
| Input schema | The rebooking options on the page, each with an ID and a short summary |
| Output schema | The ID of the chosen option, as a string |
| Scope tags | rebook_options |
Table 5: Fields for a Live Sync action
There’s no action that submits the rebooking. Declare only actions the customer can undo, such as filling a field, selecting, filtering, or navigating, and leave a payment, transfer, or submission to the customer’s own tap. A rebooking is hard to undo, and the agent’s choice comes from its reading of what the traveler said, so the traveler presses the button.
Register the handlers
Your frontend registers a handler for each action name with setCustomLiveSyncActions:
const optionIds = [...document.querySelectorAll(".rebook-card")].map((c) => c.dataset.optionId);

touchpoint.setCustomLiveSyncActions([
  {
    action: "select_rebook_option",
    handler: (optionId) => {
      if (!optionIds.includes(optionId)) return;
      document.querySelectorAll(".rebook-card").forEach((c) => c.classList.remove("selected"));
      document.getElementById(`option-${optionId}`).classList.add("selected");
      document.getElementById("confirm-rebooking").disabled = false;
    },
  },
]);
A few things to notice in this example:
- The handler checks the value. The Live Sync service doesn’t check the agent’s output against the schema you declared. On the web, Touchpoint passes it to your handler as it arrives. Check it against the options on the page before you act on it, and treat it as untrusted input.
- The handler selects, and the traveler submits. It highlights the option and enables the Confirm rebooking button.
- The action names match the node. If a name or schema differs, the agent sends the right intent and the frontend doesn’t know what to do with it.
For prototyping, you can also define an action in code with touchpoint.sendContext, passing its name, description, schema, and handler. Touchpoint sends everything except the handler to the agent. For production, define actions on the node so they’re reviewed and versioned with each build, and register only the handlers in the page.
Prompt tips for Live Sync
A Live Sync prompt needs five instructions that a regular voice prompt doesn’t:
- Tell the agent a screen exists. Without this, it narrates what the screen already shows. For example: “The customer can see this page. Don’t read out what it shows. Tell them what to look at and what to do next.”
- Tell it to act incrementally. For example: “Send each answer to the form as you get it, before asking the next question.” Without that, the model gathers four fields and fills the form in one burst at the end, which loses the in-sync effect.
- Tell it to hand the final step to the customer. For example: “After you select an option, read it back in one sentence and ask the customer to press Confirm rebooking. Never say the rebooking is done until the page shows it.”
- Tell it to use only the actions available right now. The set changes with each screen.
- Tell it never to claim it did something on the page unless it called the action. An agent that says “I’ve selected that for you” without invoking anything misleads the customer.
Configuring the node
The Live Sync agent node panel is similar to other agent nodes: model selection, instructions, and exit conditions. The addition is Actions, described earlier. The node routes out through exit conditions you define, such as Task complete, and through timeout, failure, and escalation paths.
You can also add the tools in Table 6 to the node.
| Tool | Use it when |
|---|---|
| Data requests | The agent must call a system the frontend doesn’t already have |
| Knowledge bases | Grounded answers from approved content |
| Flows | A structured workflow (MCP-enabled or handover) |
| Data capture | Structured slot values to collect |
| Modalities | Structured UI inside the conversation itself |
Table 6: Live Sync agent node tools
Composing them
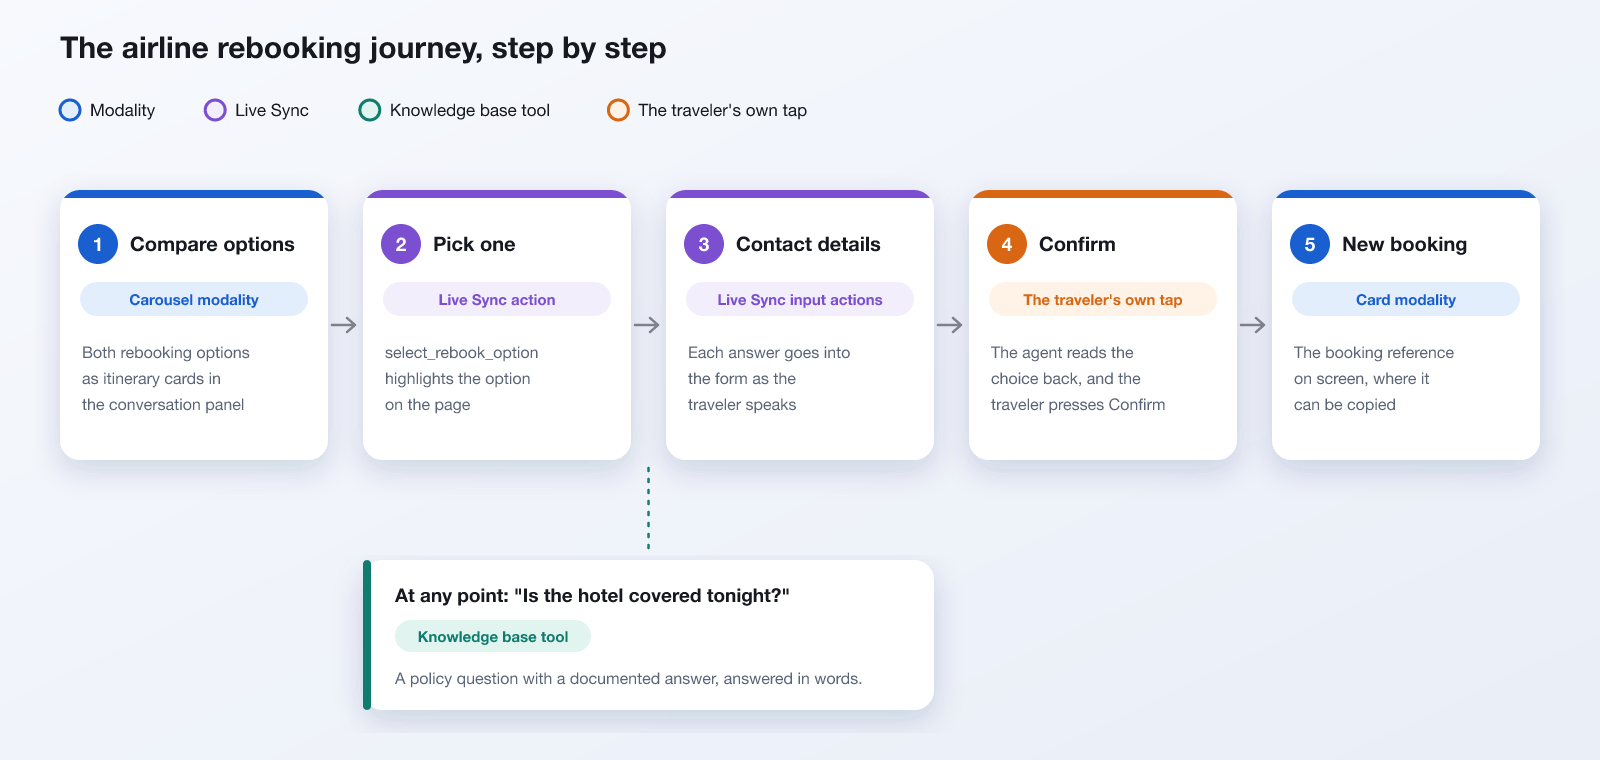
The airline journey uses both capabilities: a modality for information that belongs to the conversation, and Live Sync for information that belongs to the page. Table 7 maps each moment in the journey to the capability that handles it.
| Moment | Capability | Why that one |
|---|---|---|
| Two rebooking options that need comparing | Carousel modality | The comparison belongs to the conversation. In chat, it works whether or not the traveler is on your site |
| The traveler picks one | Live Sync actions | The options are on their page, so the selection should happen there |
| Contact details for the rebooking | Live Sync input actions | A form is on screen, so each answer goes straight into it |
| Confirmation of the new booking | Card modality | A booking reference on screen can be copied. One spoken aloud gets written down wrong |
| A question about overnight accommodation | Knowledge base tool | Not everything wants a visual. This is a policy question with a documented answer |
Table 7: Composing them (the airline journey)
The following diagram shows the journey with each step labeled by capability.
Getting started
Before you start, make sure you have the following prerequisites:
- An Amazon Connect Customer instance, with its instance ID and AWS Region.
- An agentic CX designer application that is built and deployed. Live Sync connects only to a deployed build.
- A Connect Customer flow with an Agentic CX block that invokes the deployed application.
- Touchpoint in your frontend. For the web, run
npm i @amazon-connect-touchpoint/web. For mobile apps, use the Touchpoint SDK for Android, which is in developer preview, or the Touchpoint SDK for iOS. - For chat in the Touchpoint widget, a
StartChatContactendpoint. You can deploy the StartChatContact API sample. - For voice in the Touchpoint widget, a
StartWebRTCContactendpoint. You can deploy the StartWebRTCContact sample. - For Live Sync on a phone call, no endpoint. Run Touchpoint with
input: "external"and pass the call’s contact ID. - For Live Sync, the deployment key and API key from the Access section of your application settings.
Live Sync needs no AWS credentials, only these two keys. The deployment key is the same value as the Agentic CX block’s alias, and a Live Sync script key doesn’t work in its place. The keys don’t expire on their own, so rotate them on a schedule. On the web, both keys go into your page, where anyone who views the page source can read them. They connect the page to a contact that already exists, and they don’t start contacts on their own. In a mobile app, have your backend provide the keys, so you can rotate them without an app update.
Adoption order
We suggest adopting the two capabilities in this order:
- Modalities first, presentation only. Use the predefined components, with no frontend code and no regression risk.
- Then capture, with a custom component. Pick one step where a spoken or typed answer is ambiguous, and build a component that sends the choice back as text. You own its schema, rendering, and accessibility from that point on.
- Then Live Sync, one action on one screen. Pick a place where a customer currently retypes something they just said aloud.
- Then more custom modalities, if the design needs them.
Conclusion
Your Amazon Connect Customer agent keeps the same flow and the same data, and it can now use the screen when structured information is easier to read than to hear.
To get started:
- Install Touchpoint from the Touchpoint repository on GitHub, which includes setup steps and an interactive playground. For Android and iOS apps, start from the Android or iOS repository and its security guide.
- Add a predefined modality by following Modalities in the Amazon Connect Customer Administrator Guide.
- Add your first Live Sync action by following Using the Live Sync agent node and Touchpoint in the Amazon Connect Customer documentation.
- Get hands-on with the agentic CX designer workshop.
- For the full canvas and node reference, see Agentic CX designer.
About the author
 Alex Schrameyer (he/him) is a Worldwide Applied AI Solutions Architect Lead for Agentic Experience at Amazon Web Services (AWS) based in the Chicago area. He believes that exceptional agentic experiences are the cornerstone of outstanding customer service, and focuses on architecting solutions that empower both human agents and AI agents to deliver seamless customer experiences. Alex enjoys traveling around the world, and you might find him at your local baseball stadium or theme park. |