Containers
Build deep learning model training apps using CNCF Fluid with Amazon EKS
Machine learning (ML) intensive companies face significant challenges
in efficiently managing training data. This post introduces a solution to build an ephemeral, cloud-native elastic high-throughput file system. By the end of this post, you will learn how to implement the elastic high-throughput file system using Amazon Elastic Kubernetes Service (Amazon EKS) and CNCF Fluid, set up efficient data caching mechanisms, and orchestrate training workflows using KubeRay. This post targets DevOps engineers, MLOps specialists, and infrastructure architects who are responsible for building and optimizing ML training infrastructure in cloud environments, particularly those working with Amazon EKS and looking to enhance their deep learning training pipelines. You will need one hour to read through this post and two hours for the demo implementation. The cost for the resources is approximately $4 USD per hour.
Deep learning data loading challenges and solutions
The following sections outline the deep learning data loading challenges and solutions.
Data loading bottleneck
Data loading poses a major performance bottleneck in deep learning training systems, especially in large-scale operations. This challenge stems from two key issues: the need to repeatedly access many small files, and the constant back-and-forth communication between storage and computing systems. Distributed systems, complex datasets, random data access patterns, and extensive data augmentation amplify these problems during training. The significance of this bottleneck varies across different models and datasets but consistently remains a critical concern, particularly given the high costs of GPU computing resources. This makes it essential to optimize data loading for better hardware efficiency and faster training times.
Challenges of managing parallel file systems
This section outlines the challenges of managing parallel file systems, including the work pattern, operational challenges, and the necessity of separately deploying the data caching layer.
Work pattern challenge
In deep learning environments, data scientists and researchers need high-performance storage systems to handle massive datasets (for example 100 GB-200 GB data volume for CNN/RNN model training, 200 GB+ data volume for large-scale model fine-tuning, and 1 TB around data for reinforcement learning model training), with teams of 50+ users often needing concurrent access that can demand throughput exceeding 50+ GBps during peak times. However, this demand is highly variable, with usage dropping significantly during off-peak periods or when teams focus on less data-intensive tasks. The challenge lies in the cost-inefficiency of maintaining expensive high-throughput file systems 24/7 when they’re only needed intermittently. Although the logical solution would be to provision and release these systems based on demand, traditional high-throughput file systems have lengthy setup and teardown times, especially for larger volumes. This makes dynamic scaling impractical and prevents organizations from optimizing their storage costs effectively.
Operational challenge
Parallel file systems have evolved significantly in their setup from traditional to cloud-based approaches. Although traditional on-premises installations could take hours or even days due to hardware setup and manual configuration, modern cloud services such as Amazon FSx for Lustre have dramatically shortened this to minutes through automation. However, full system readiness may still need more time, especially when importing large amounts of data. Given this complexity and time investment, organizations typically treat parallel file system deployment as a long-term strategic decision rather than a frequent operational task.
The necessity of separately deploying the data caching layer
High specs GPU servers, such as Amazon Elastic Compute Cloud (Amazon EC2) series, have local NVMe SSD cards which could be used as high throughout low latency storage media for caching data. However, in most of the cases, other consumers also consume this data, for example other model training workload, interactive analyzing workload, and HPC workload. This makes it necessary for data caching to have a separate deployment using memory resources that all common EC2 instances can offer rather than specific storage that only a few types of EC2 instances have. The separated data caching workload could run on the same cluster that hosts other workloads.
The advantages of the file system built by Amazon EKS and CNCF Fluid
- High-throughput without the high-volume of the file system: FSx for Lustre—with a minimum storage capacity of 1.2 TB in terms of SSD, and 2.4 TB increment (for detailed info, refer to FSx for Lustre POC Guidance)—can offer 50 GBps throughput with the volume of the file system at least 50 TB (using the persistent 1000). An elastic high-throughput file system built by Amazon EKS and CNCF Fluid can reach this throughput by using the capability of RAM itself. Consider Amazon EC2 C5: the RAM specs are DDR4, dual-channel, and 3200MT/s. Throughput can reach 51.2 GBps
(3200*64*2/8). Observe the following throughput calculation formula:Throughput = (Memory Speed in MT/s) * (Total Bus Width in bits) / 8 (to convert bits to bytes)
- Fast provisioning and releasing: The file system integrates fully into Kubernetes. Therefore, it can use Kubernetes fast resource orchestration capabilities. The file system can be provisioned and released in minutes. This capability makes it possible to provision the data caching cluster when needed and release it when there is no need. This greatly reduces the cost caused by maintaining a high-throughput file system.
- Ease of use and operation: If you’re an ops/user, then you need to create the data caching pods/app pods using a YAML file. Fluid takes care of the entire data caching management job. The following parts of this post give a detailed explanation.
Solution overview
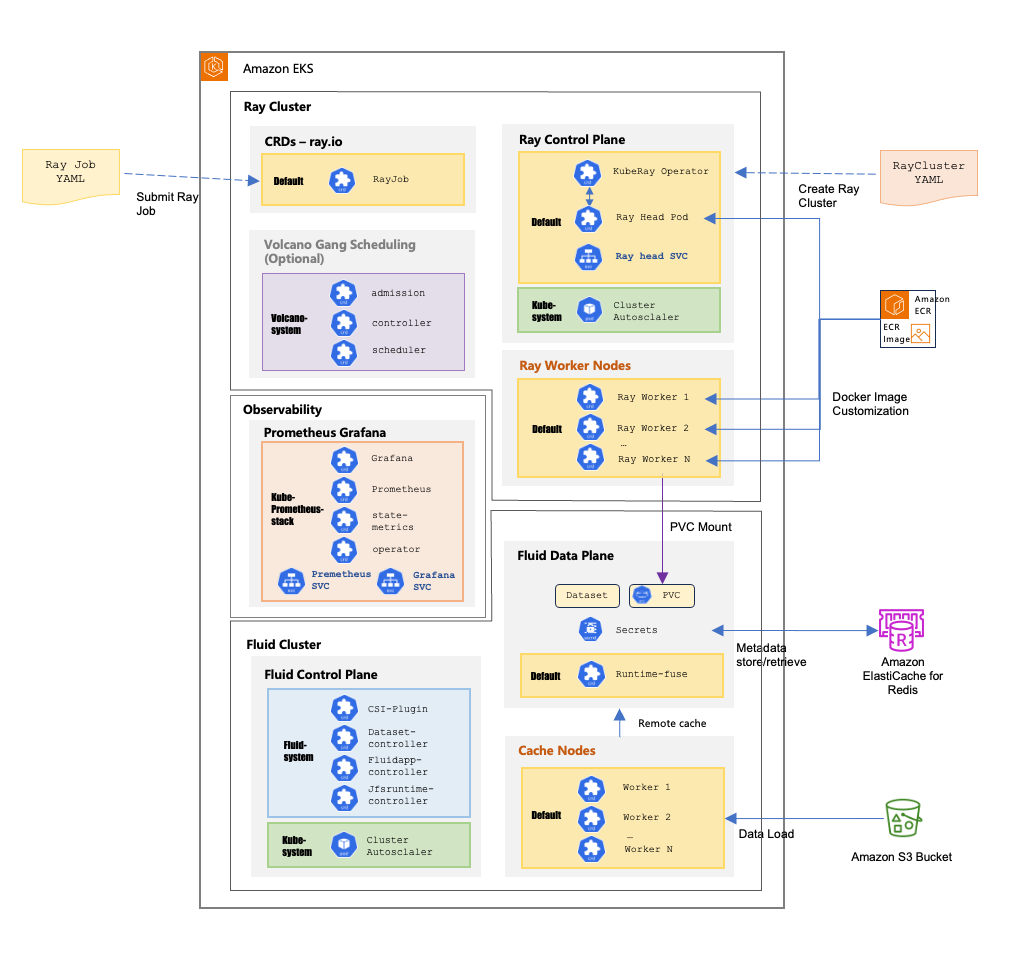
The following diagram demonstrates a comprehensive Amazon EKS architecture that integrates Ray Cluster for distributed computing with Fluid for intelligent data management. In this architecture Ray Jobs are submitted through YAML configurations to create scalable clusters managed by the KubeRay Operator with a Ray Head Pod coordinating multiple worker nodes. At the same time, the Fluid system provides a two-layer architecture consisting of a control plane managing CSI plugins and various controllers alongside a data plane handling datasets and persistent volume claims with distributed cache worker nodes that store frequently accessed data from Amazon Simple Storage Service (Amazon S3). All of this is monitored by a Kube-prometheus-stack with Prometheus collecting metrics and Grafana providing visualization dashboards, with external integrations including Amazon ElastiCache for Redis managing metadata, Amazon Elastic Container Registry (Amazon ECR) supplying customized Docker images, and a Cluster Autoscaler automatically adjusting resources based on workload demands to enable efficient distributed computing with reduced latency through local caching while maintaining dynamic scalability.
Achieve training data caching using and elastic high throughput file system using Amazon EKS and CNCF Fluid
Fluid offers a groundbreaking solution through seamless integration with Kubernetes. It provides comprehensive support for multiple file systems, such as Alluxio, JuiceFS, Curvine, Jindo, and Vineyard, while also enabling custom resource extensions. Fluid’s deep integration with Kubernetes encompasses various scheduling mechanisms, such as Cluster Autoscaler (CA), Horizontal Pod Autoscaler (HPA), Custom Pod Autoscaler (CPA), and Kubernetes Event Driven Autoscaler (KEDA). A key innovation of Fluid is its Elastic Dataset concept, which abstracts away platform-specific dependencies for application data access. This environment-agnostic approach allows Fluid to operate across diverse environments, such as native, edge, serverless Kubernetes clusters, and multi-cluster deployments. Furthermore, the Elastic Dataset feature supports detailed data characteristic definitions, such as small file handling and read/write attributes.
When it comes to implementing Fluid with various storage systems, multiple Runtime options are available in terms of high-throughput file systems on Amazon EKS. JuiceFS stands out as one compelling choice with its POSIX compliance, which is important for data analytics and processing workloads. The POSIX implementation in JuiceFS provides four essential features: 1/ atomic operations that guarantee complete success or failure of file operations, 2/ immediate visibility of writes across processes, 3/ strict metadata consistency for immediate file attribute updates, and 4/ sequential consistency that maintains the programmed order of operations. These characteristics make it particularly well-suited for workflows needing frequent human interaction and demanding data processing tasks. Moreover, Curvine, a newly open source high-performance distributed caching project built on the Rust language, integrates with Fluid and is POSIX-compatible. The project is currently in a rapidly developing phase and is worth watching.
The provisioning and releasing time of this file system could be optimized to complete within minutes, which can help support integration into daily operational workflows and help improve operational efficiency.
Achieve deep learning model training resource and workflow orchestration using Amazon EKS, KubeRay, and Ray Train
KubeRay is a powerful Kubernetes operator that seamlessly integrates Ray Clusters into Kubernetes environments, enabling efficient orchestration of distributed computing workloads. It serves as a bridge between Ray’s distributed computing capabilities and Kubernetes’ container orchestration so that organizations can use both technologies’ strengths. Users can use KubeRay to deploy, scale, and manage Ray Clusters within their Kubernetes infrastructure using Kubernetes APIs for compute, networking, and storage resources. The operator supports various deployment patterns, such as RayCluster for running distributed applications, RayJob for batch processing tasks, and RayService for serving ML models. KubeRay has built-in features, such as automatic scaling, fault tolerance, and resource management, so that it can run complex AI/ML workloads in production environments. This integration is particularly valuable for organizations looking to standardize their infrastructure on Kubernetes while using Ray’s distributed computing capabilities for AI and Python applications.
Ray Train is a specialized library within the Ray ecosystem designed to streamline and scale distributed ML training across multiple machines and GPUs. It abstracts away the complexities of distributed computing so that developers can seamlessly transition their single-machine training code to run efficiently across large clusters. The library provides robust support for various ML frameworks such as PyTorch, TensorFlow, and XGBoost, which makes it highly versatile for different AI workflows. Through its Trainer abstraction, Ray Train handles distributed training aspects such as worker process management, resource allocation, and inter-node communication. It excels in scenarios involving large models or datasets, offering both data and model parallelism capabilities to optimize training performance.
Architecture design explanation
The preceding architecture design aims to achieve resilient, agile, performant, and cost-efficient distributed model parallelism and data parallelism for deep learning model training.
EKS cluster deployment
First, a series of Terraform scripts deploy an EKS cluster, including the underlying network infrastructure: VPC, VPC endpoints, subnets, EIP, NAT Gateway, Security Groups, etc. Based on this network infrastructure, the EKS cluster is deployed with two node groups:
- Core node group: Initially consists of three m5.2xlarge EC2 instances, used as the Ray Cluster’s head nodes (entry point for submitting Ray Jobs).
- GPU node group: Initially consists of two g6.2xlarge EC2 instances, used as Ray Cluster worker nodes, forming the actual compute resource pool for executing Ray Jobs.
Both node groups are managed. If any machine fails over, then the system quickly spins up a replacement to ensure that cluster tasks continue with minimal or no disruption.
The core node group related Terraform definition is shown in the following:
core_node_group = {
    name = "core-node-group"
    description = "EKS Core node group for hosting system add-ons"
    subnet_ids = compact([for subnet_id, cidr_block in zipmap(module.vpc.private_subnets, module.vpc.private_subnets_cidr_blocks) :
        substr(cidr_block, 0, 4) == "100." ? subnet_id : null] )
    ami_type = " AL2023_x86_64_NVIDIA"
    min_size = 3
    max_size = 8
    desired_size = 3
    instance_types = ["m5.2xlarge"]
    labels = {
        WorkerType = "ON_DEMAND"
        NodeGroupType = "core"
        workload = "rayhead"
    }
    tags = merge(local.tags, {
    Name = "core-node-grp" })
}
The GPU node group related Terraform definition is shown in the following:
g6_2xl_ng = {
  name        = "g6-2xl-ng"
  description = "g6 2xlarge node group for hosting ML workloads"
  subnet_ids = [module.vpc.private_subnets[2]]
  ami_type       = " AL2023_x86_64_NVIDIA"
  instance_types = ["g6.2xlarge
  pre_bootstrap_user_data = <<-EOT
    /bin/setup-local-disks raid0
    # Install latest version of aws cli
    mkdir /awscli \
    && wget https://awscli.amazonaws.com/awscli-exe-linux-x86_64.zip -O /awscli/awscliv2.zip  \
    && unzip /awscli/awscliv2.zip -d /awscli/ \
    && /awscli/aws/install --bin-dir /usr/local/bin --install-dir /usr/local/aws-cli --update \
    && rm -rf /awscli
  EOT
  min_size     = var.g6_2xl_min_size
  max_size     = 2
  desired_size = var.g6_2xl_desired_size
  enable_efa_support = fal
  labels = {
    "vpc.amazonaws.com/efa.present" = "false"
    instance-type                   = "g6-2xl"
    provisioner                     = "cluster-autoscaler"
}
Observability tools
The EKS cluster also deploys observability tools through Terraform scripts: Prometheus for metrics collection and Grafana for metrics dashboards.
The Prometheus stack related Terraform definition is shown in the following:
enable_kube_prometheus_stack = true
kube_prometheus_stack = {
  values = [templatefile("${path.module}/helm-values/kube-prometheus.yaml", {
    storage_class_type = kubernetes_storage_class_v1.default_gp3.id
    })
  ]
  chart_version = "48.1.1"
  set_sensitive = [
    {
      name  = "grafana.adminPassword"
      value = data.aws_secretsmanager_secret_version.admin_password_version.secret_string
    }
  ],
}
JuiceFS and Fluid integration
The EKS cluster hosts JuiceFS runtime through Fluid and caches training data. The entire Fluid deployment is implemented as EKS Custom Resource Definitions (CRDs).
The Fluid project aims to implement various storage media deployment and scheduling based on Kubernetes, so that storage media can share the benefits of Kubernetes while making applications more flexible when accessing storage. Using Kubernetes CRDs for storage media deployment provides resilience, agility, and highly efficient resource allocation and release. In this case, JuiceFS is used as the storage medium. Fluid deploys jfs-data-worker pods through JuiceFSRuntime to cache training data, while defining jfs-dataset as the single data interface for upper-layer applications. JuiceFS metadata is stored in a Valkey cluster.
Fluid architecture as well as core concepts could be reviewed as shown in this GitHub link. For this case, the Fluid resource definition is shown in the following:
The JuiceFS Secret Terraform definition is shown in the following:
apiVersion: v1
kind: Secret
metadata:
  name: jfs-secret
type: Opaque
stringData:
  name: "jfs"
  metaurl: "${CACHE_URL}:6379/1"
The JuiceFS Dataset Terraform definition is shown in the following:
kubectl apply -f - <<EOF
apiVersion: data.fluid.io/v1alpha1
kind: Dataset
metadata:
  name: jfs-dataset
spec:
  accessModes:
    - ReadWriteMany
  mounts:
    - name: minio
      mountPoint: 'juicefs:///'
      options:
        bucket: $RAW_DATA_S3_URL
        storage: "s3"
      readOnly: false
      encryptOptions:
        - name: metaurl
          valueFrom:
            secretKeyRef:
              name: jfs-secret
              key: metaurl
The JuiceFS Runtime Terraform definition is shown in the following:
apiVersion: data.fluid.io/v1alpha1
kind: JuiceFSRuntime
metadata:
  name: jfs-dataset
spec:
  replicas: 1
  tieredstore:
    levels:
      - mediumtype: MEM
        path: /dev/shm
        quota: "1Gi"
        low: "0.1"
JuiceFS@Fluid data caching mechanism explanation
The following diagram shows how JuiceFS manages data caching:
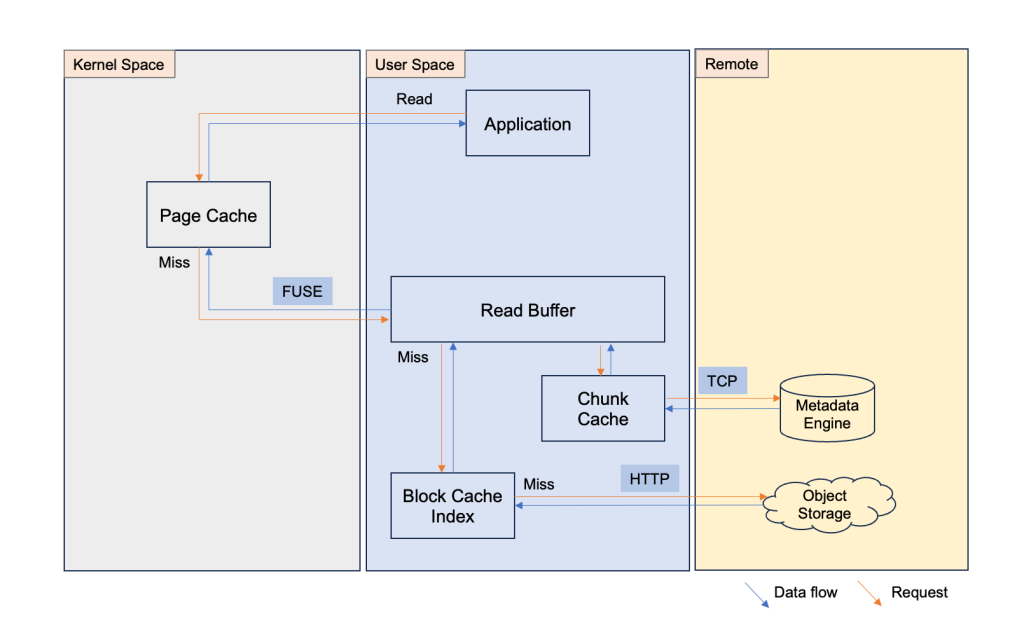
Initially, you set up a JuiceFS instance and associate the S3 bucket as the raw data backup media, and the ElastiCache for Redis instance as the metadata engine. The JuiceFS exposes itself as a mount point in the application’s file system (for example data dir under root, /data). For the first time, after you load your data into the page cache, JuiceFS automatically asyncs the data to read buffer, generates the chunking structure, and stores the metadata in Redis through TCP and the chunked raw data into Amazon S3. If there is another user who wants to use the target data at the same time, then they mount the JuiceFS file system mount point and the data is ready for use. The next time if you use this target data (the JuiceFS file system has been released, so it’s the data in cache), after setting up the JuiceFS file system and mount it in your application’s OS, then you can see the target data right under the mount point (/data). However, the data isn’t really in the page cache at that moment. When you operate the target data (read/write), JuiceFS uses the metadata to find the right target data and load the target data through block cache index, read buffer, and ultimately in page cache. Therefore, the performance of the first time reading the existing data is slower, because JuiceFS’ chunking strategy merges small files automatically during first time async the data, the data loading performance can reach 300-800 MBps or even higher, depending on the specs of the EC2 instance that is hosting the JuiceFS file system. JuiceFS offers a benchmark tool to test the performance of the JuiceFS file system. You can run juicefs bench <mount point> to get the detailed data of your JuiceFS file system. The following is the resulting snapshot of running the benchmark tool on a C5.xlarge EC2 instance.

JuiceFS@Fluid follows exactly the same working mechanism as shown in this figure. The difference is that there are secret, dataset, runtime, as well as pvc (automatically created) CRDs. Furthermore, all of the resources are running as pods in the EKS cluster. The provisioning process of JuiceFS@Fluid has been showcased previously.
Volcano Gang scheduling (optional)
Gang scheduling primarily reflects Volcano’s role in this architecture. In production environments, multiple teams often have computing needs while there’s only one resource pool. Volcano’s gang scheduling provides fine-grained resource management and job scheduling capabilities in complex multi-tenant, multi-workload environments. This establishes that distributed tasks run safely and efficiently. For the prototype showcased by this post, Volcano Gang Scheduling isn’t a prerequisite. Specifically, Volcano gang scheduling can:
- Allocate dedicated resource pools for different teams/applications
- Prevent single jobs/users from monopolizing cluster resources
- Support resource borrowing and sharing mechanisms between queues
Volcano queues are logical groupings created and configured through Volcano’s queue CRD. Gang scheduling follows the “all or nothing” principle: either all tasks in a job are scheduled together, or none are scheduled, which avoids resource waste when only some tasks can start.
The Volcano Queue CRD Terraform definition is shown in the following:
apiVersion: scheduling.volcano.sh/v1beta1
kind: Queue
metadata:
  name: ml-training
spec:
  weight: 10
  capability:
    cpu: 100
    memory: 1000Gi
    nvidia.com/gpu: 16
  reclaimable: true
  guarantee:
    cpu: 50
    memory: 500Gi
    nvidia.com/gpu: 8
Ray Cluster deployment
After the EKS cluster is set up, a Ray Cluster CRD is created by running a YAML file kubectl create -f raycluster-with-jfs.yaml. As EKS cluster CRDs, Amazon EKS hots them as running pods, including Ray head nodes and worker nodes in the default namespace. Moreover, volcano-admission, volcano-controller, and volcano-scheduler pods in the volcano-system namespace if Volcano is used.The benefits of using CRDs for Ray nodes include the following:
- Pod runtime environments can be flexibly defined through Docker images, and they aren’t limited by the OS installed on Amazon EC2.
- If the pods fail over, then the system automatically retries, ensuring task execution continues with minimal disruption
Job submission and monitoring
After the Ray Cluster is running, the Ray Jobs are defined as YAML format CRDs and submitted to the Ray Cluster through kubectl create -f rayjob-training.yaml. Submitted jobs can be monitored through the Ray dashboard to view the running status and detailed logs for potential debugging and the Prometheus and Grafana dashboards to view and monitor the system operation status.
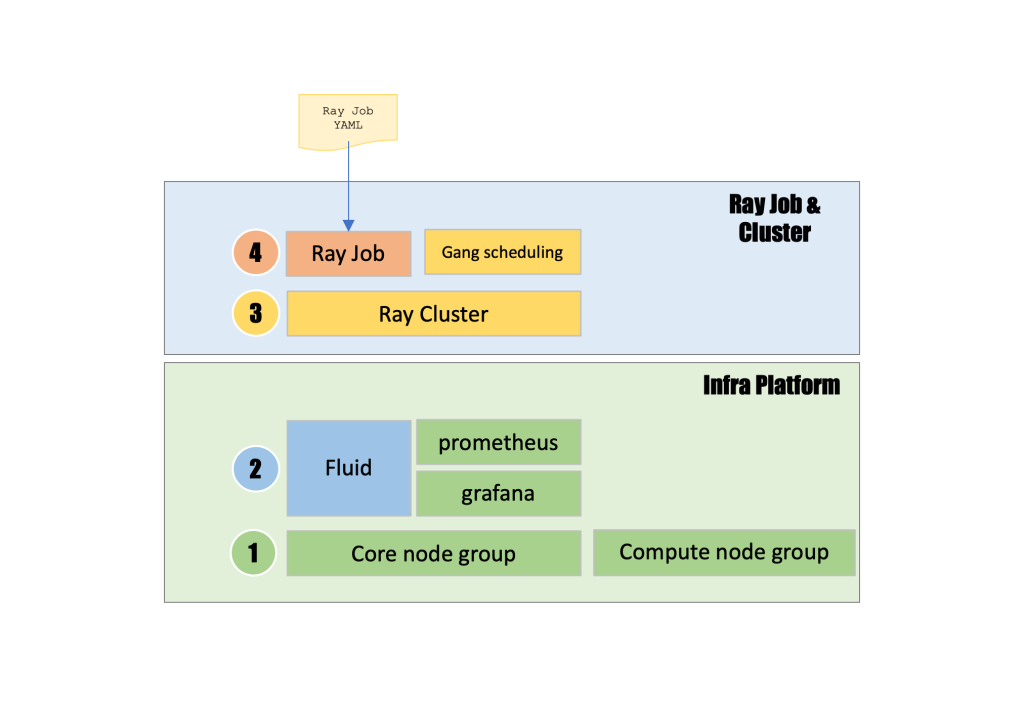
This architecture diagram depicts a layered distributed computing system where Ray Job and Cluster capabilities are built on top of an Infra Platform foundation. This demonstrates a four-layer hierarchy that begins with Ray Job YAML submission at the top (layer 4), which triggers Ray Job execution alongside Gang scheduling functionality, followed by Ray Cluster creation (layer 3) that orchestrates distributed computing workloads, all running on an underlying Infra Platform that includes Fluid (layer 2) managing intelligent data caching and resource flow between storage and compute. At the same time, Prometheus collects metrics and Grafana provides monitoring dashboards, with the foundational layer (layer 1) consisting of core node groups and compute node groups that provide the fundamental Kubernetes infrastructure. This creates a complete stack that enables scalable distributed computing with efficient data management, advanced resource scheduling, and comprehensive observability across the entire platform.
Technical implementation
The following sections outline the technical implementation for this solution.
Prerequisites
Before you begin, you need the following:
- An Amazon Web Services (AWS) account with administrator access
- AWS Command Line Interface (AWS CLI) version 2.0 or later installed and configured
- kubectl version 1.30.4 or later installed
- eksctl version 0.212.0 or later installed
- Helm version 3.18.5 or later installed
- Terraform version 1.12.2 or later installed
- Make sure that the laptop has docker.desktop app installed
- Create two S3 buckets in the target AWS Region. One is to store the raw data of JuiceFS, and the other is to store the training results of the Ray Cluster
Make sure that your account has at least one VPC, and one EIP available for provisioning the EKS cluster. Make sure that AWS CLI, kubectl, eksctl, Helm, and Terraform are installed.
Provision infrastructure on Amazon EKS
Clone the GitHub repo by running the following commands:
Update the following variables in 00_init_variables.sh according to your specific context and save the file.
Next, run the following command:
Then, run 01_install_platform.sh to set up the infra platform including VPC, subnet, NAT Gateway, etc., the EKS cluster including the core node group, and the compute node group.
It takes 20+ minutes for the resource to be provisioned and setup. After you provision the cluster, add the EKS cluster context in the MacOS jumpserver, so that the jumpserver can access the EKS cluster.
Check the status of the resources using the following command:
kubectl get nodes # there should be 5 nodes: 3 core nodes, 2 g6 2xlarge GPU nodes
kubectl get nodes command output showing five nodes; three m5.2xlarge core nodes and two g6.2xlarge GPU nodes, all in the Ready status:

Set up Fluid with JuiceFSRuntime on Amazon EKS
Check the status of Fluid. Furthermore, check the status of jfs-secret, the status of jfs-dataset, the status of jfs runtime, and the status of jfs pvc. Use the following command to check the status of jfs-secret: kubectl get secrets
The terminal console shows the status of JFS Secret jfs-secret:

Use the following command to check the status of jfs-dataset:kubectl get datasets
The terminal console shows the status of the JFS Dataset jfs-dataset:
![]()
Use the following command to check the status of JFS Runtime:kubectl get juicefsruntime
The terminal console shows the status of the JFS Runtime jfs-dataset:

Use the following command to check the status of JFS PVC:kubectl get pvc
The terminal console shows the status of the PVC jfs-dataset:
![]()
Training data preparation and caching
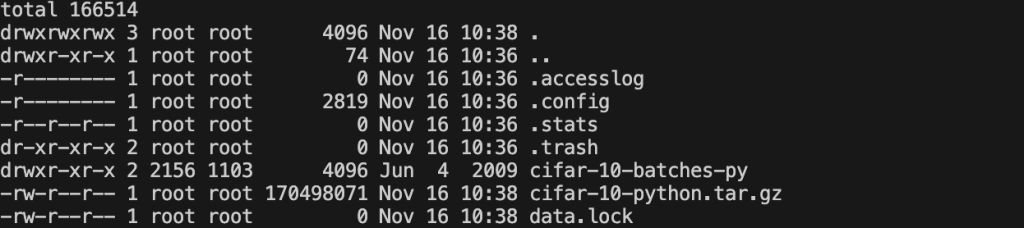
You can check the status of the training data using the following command:kubectl exec -it data-load-pod -- /bin/bash -c "cd /data && ls -la" The terminal console shows all of the files under /data of pod data-load-pod:
Amazon ECR image creation
Make sure that the docker.desktop app is opened. Build the ECR image by running 00_build_image.sh:
Initially, it takes 40–60 minutes to create the ECR image.
Create Ray Cluster
Create the Ray Cluster by running the following command:
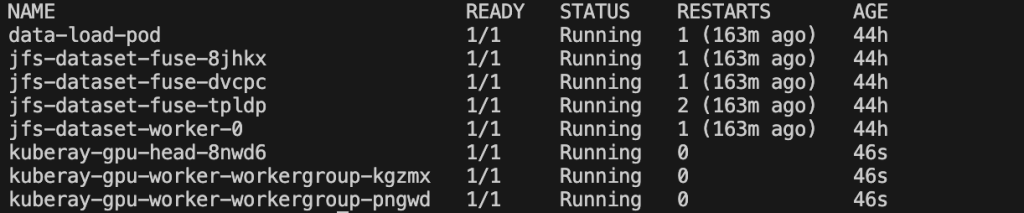
Wait 5–6 minutes for Ray Cluster pods to initialize on first creation. The 14 GB ECR image needs time to download. You can run kubectl get pods and should get the following snapshot. The terminal console shows all pods under the default namespace.
Ray Job submission
Run the following command to submit the Ray Job to the Ray Cluster just created:
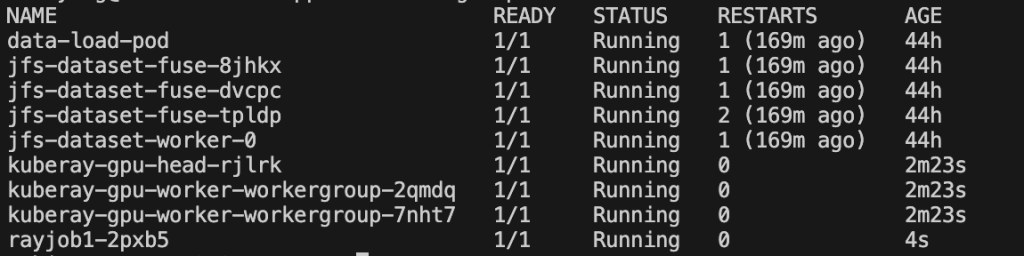
You can run kubectl get pods and get the following snapshot. The terminal console shows all of the pods under the default namespace:
Ray Job monitoring
Enable Ray Cluster dashboard using the following command: kubectl port-forward service/kuberay-gpu-head-svc 8265:8265
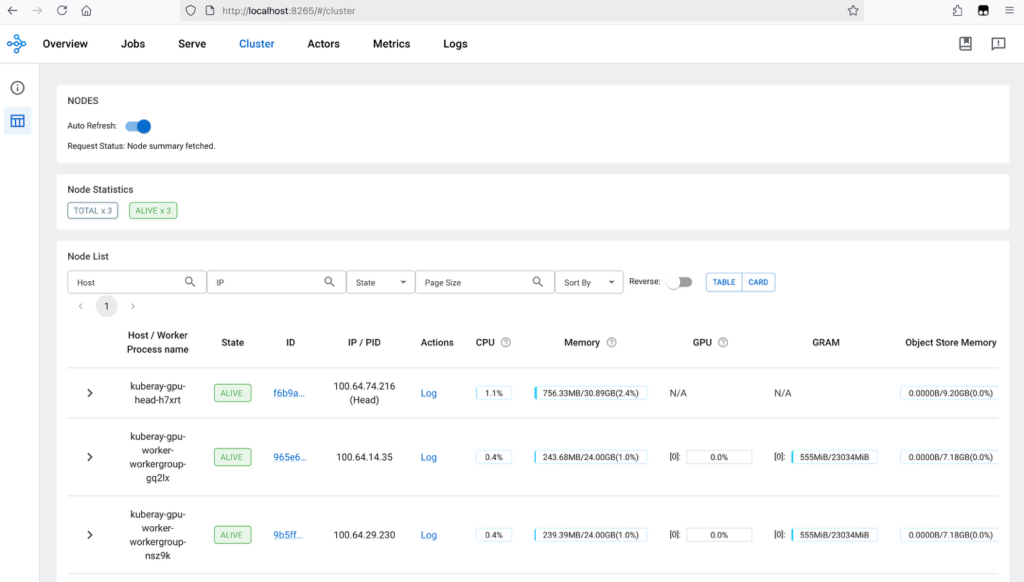
Visit localhost:8265 on the local browser. The default dashboard is the Overview dashboard. Switch to the Cluster dashboard to get the information of the Ray Cluster. The following figure shows the Ray Cluster dashboard showing three worker nodes active:
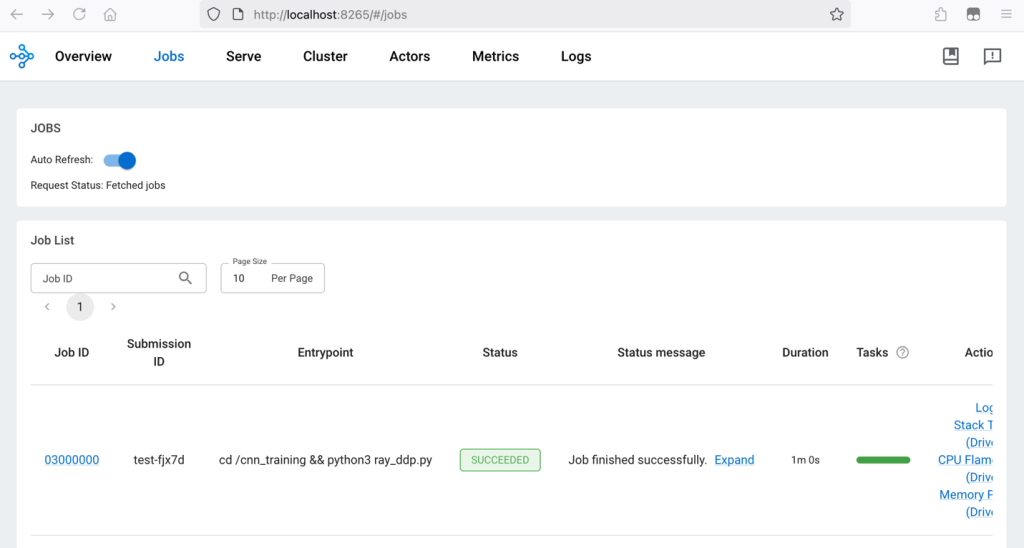
Visit localhost:8265 on the local browser and switch to the Job tab. The Ray Cluster dashboard shows that the Ray Job has finished successfully:
Observability (optional)
Enable Prometheus dashboard using the following command:kubectl port-forward svc/kube-prometheus-stack-prometheus 9090:9090 -n kube-prometheus-stack
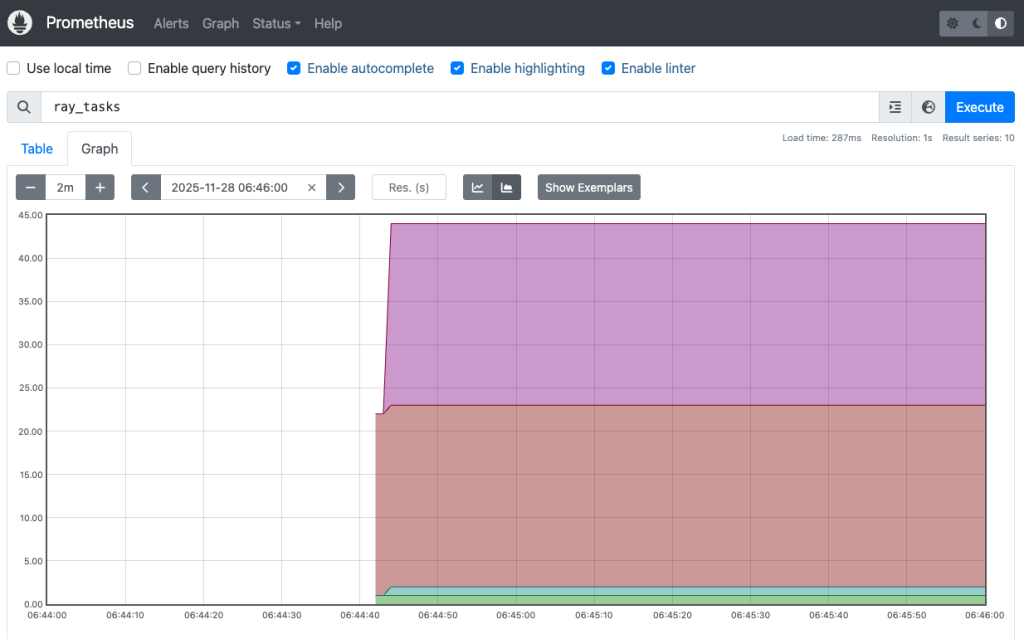
Visit localhost:9090 on the local browser, and afterward switch to Graph sheet. Find query ray_tasks in the ![]() drop down list to show the Ray tasks status. The Prometheus dashboard, shown in the following figure, shows the running timeline of Ray tasks:
drop down list to show the Ray tasks status. The Prometheus dashboard, shown in the following figure, shows the running timeline of Ray tasks:
Enable the Grafana dashboard using the following command:kubectl port-forward svc/kube-prometheus-stack-grafana 3000:80 -n kube-prometheus-stackVisit localhost:3000 on the local browser. The default login username and password can be retrieved using the following commands: kubectl get secret kube-prometheus-stack-grafana -n kube-prometheus-stack -o jsonpath='{.data.admin-user}' | base64 -dkubectl get secret kube-prometheus-stack-grafana -n kube-prometheus-stack -o jsonpath='{.data.admin-password}' | base64 -d
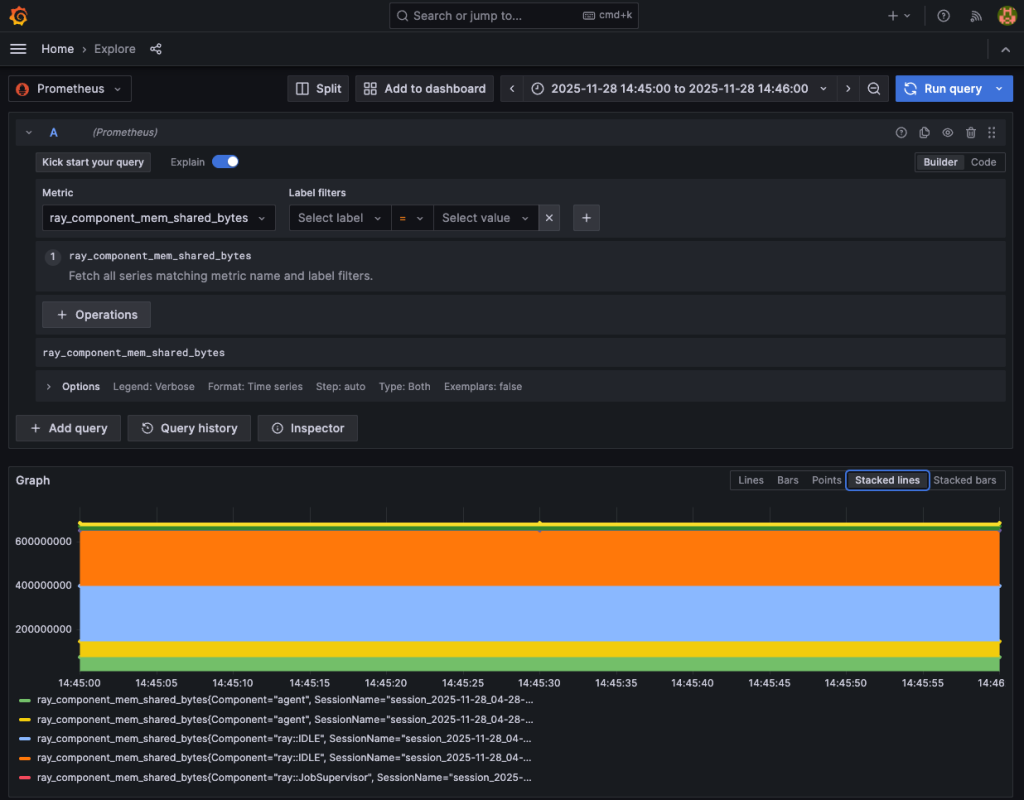
Create a new dashboard by choosing Dashboards or Explore. Choose Prometheus as the data source, then find ray_component_mem_shared_bytes in the Metric dropdown list. The Grafana dashboard shows the memory taking status of the Ray Cluster components:
Cleaning up
Failure to complete these cleanup steps results in ongoing AWS charges. The EKS cluster control plane costs ~$0.10/hour, EC2 instances cost ~$5-10/hour collectively, and other resources add more charges. Complete all cleanup steps to avoid unnecessary costs. Run cleanup.sh in the vit_tr_ray_on_gpu/infra folder to release all resources.
Delete the S3 buckets (TF_VAR_s3_bucket_name1 and TF_VAR_s3_bucket_name2) using the following commands:
If deletion fails due to versioning, add --delete-markers and --versions flags to the rm command. For MFA-protected buckets, you need the --mfa parameter. Check bucket policies that might prevent deletion.
Conclusion
This post explains and demonstrates how to build an elastic high-throughput file system using Fluid and Amazon EKS. This file system has high throughput and can offer fast data caching provisioning and releasing. This makes it ideal for organizations that want to find high performance and a cost-effective file system. Furthermore, this post demonstrates how to build an end-to-end DL training App using KubeRay and Fluid on Amazon EKS. The whole stack is a recommended approach for DevOps engineers, MLOps specialists, and AI infrastructure architects.
About the authors
 Shiyang Wei is Senior Solutions Architect at AWS. He specializes in cloud system architecture and solution design for the financial industry. Particularly, he focused on data and AI applications and the impact of regulatory compliance on cloud architecture design in the financial sector. He has over 15 years of experience in data domain development and architectural design.
 Dongdong Yang is a Specialist Solutions Architect for Containers at AWS, where he focuses on customers who are building modern AI/ML and data platforms on Amazon EKS. He has spent many years in the open-source Kubernetes, containers and cloud infrastructure space.