Containers
Streamline container image signatures with Amazon ECR managed signing
Container image security is critical for modern applications with the increasing adoption of containerized workloads. Organizations need reliable ways to verify the authenticity and integrity of their container images. Amazon Elastic Container Registry (Amazon ECR) now offers managed signing as a streamlined approach to automatically sign container images when they are pushed to the Amazon ECR repositories. This helps establish trust in your software supply chain without the usual operational burden. This post shows you how to automatically sign your container images using Amazon ECR managed signing, removing the need to maintain your own signing infrastructure. We demonstrate how to configure managed signing rules, validate image signatures, and integrate signature verification into your deployment workflows.
What is Amazon ECR Managed Signing?
You can use the new Amazon ECR managed signing feature to digitally sign container images when pushed to Amazon ECR repositories without having to maintain your own public key infrastructure (PKI). This feature integrates with AWS Signer to provide cryptographic signatures that verify image authenticity and detect tampering.
Why Image Signing Matters
Image signing uses cryptographic signatures to verify container image authenticity and integrity throughout your software supply chain. This security measure ensures that: (a) images running in production are identical to those built in your trusted CI/CD pipelines, (b) all images come from authorized sources, and (c) images haven’t been tampered with by unauthorized parties. Moreover, image signing helps organizations meet compliance requirements for software supply chain security by providing a verifiable audit trail of image authenticity. For regulated industries or organizations handling sensitive workloads, this audit capability is crucial for maintaining security compliance and governance.
How Amazon ECR Managed Signing Works
When an image is pushed to Amazon ECR with managed signing enabled, Amazon ECR automatically uses AWS Signer as the signing service. AWS Signer is an AWS-managed solution that handles the key material and certificate lifecycle management such as key and certificate generation, secure storage, and rotation. The signing process uses the AWS Identity and Access Management (IAM) credentials of the user who pushed the image, with AWS Signer verifying appropriate permissions before signing. When signed, the signature is stored in Amazon ECR repositories alongside the image.
These signatures can be verified during deployment. For Amazon Elastic Kubernetes Service (Amazon EKS) workloads, you can use Kubernetes admission controllers to automatically validate these signatures before allowing pods to run. For Amazon Elastic Container Service (Amazon ECS), you can implement signature verification using Amazon ECS service lifecycle hooks that trigger AWS Lambda functions before deployment.
This post demonstrates how to create an Amazon ECR repository with managed signing, push a container images into the repository for a signature to be created, and how to validate signatures using Amazon ECS service lifecycle hooks and Lambda.
Key benefits of Amazon ECR Managed Signing
- Streamlined signing process: Amazon ECR managed signing removes the complexity of managing signing infrastructure by automating the entire signing process when images are pushed to your repositories.
- Enhanced security: Verify the integrity and authenticity of container images throughout your deployment pipeline, so that only trusted images are deployed to your environment.
- Integrates with Amazon EKS and Amazon ECS: For Amazon EKS workloads, use native integration with Kubernetes admission controllers such as Kyverno and Ratify to automatically validate signatures before allowing pods to run. For Amazon ECS workloads, use service lifecycle hooks to verify signatures through Lambda functions during deployment.
- No client-side tooling needed: Images are automatically signed during push without more signing tools such as Cosign or Notation.
- AWS-managed cryptographic operations: Use AWS-managed signing keys and infrastructure for reliable, scalable signing.
- Centralized governance: Signing rules are configured at the registry level to enforce consistent signing policies across all your repositories, which removes the need to manage signing configuration for individual pipelines.
- Comprehensive auditability: Use fine-grained IAM permissions to control image signing access and repository authorization for principals.
The flow would be described as shown in the following diagram:
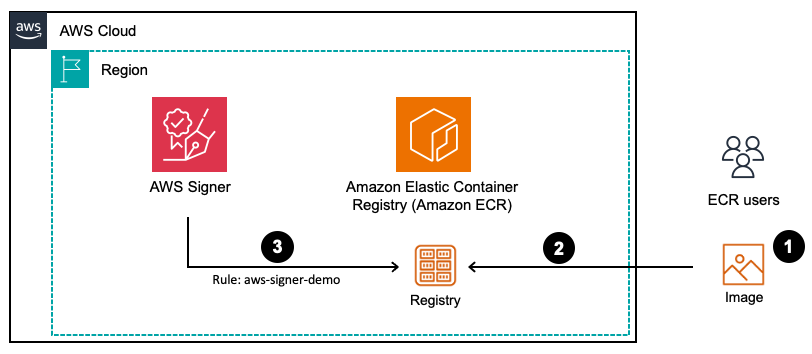
Figure 1: Flow of image signature with Amazon ECR managed signing
1.User creates a container image, tags and authenticates to Amazon ECR
2.User pushes the container image to Amazon ECR repository
3.When a signing rule matches, Amazon ECR calls AWS Signer to sign the container image using the AWS Signer profile
Prerequisites
You need the following to complete this solution:
- IAM permissions for Amazon ECR, Amazon ECS, Lambda, and AWS Signer operations
- Docker installed and configured
- Amazon Virtual Private Cloud (Amazon VPC), Public, and Private Subnets created, if needed review our recommendation
- AWS Command Line Interface (AWS CLI) version 2.31.29 or later installed and configured
- wget, or curl could be used as an alternative
- jq, a JSON parsing utility
Throughout this post, some placeholders might need to be replaced with your actual values:
AWS_ACCOUNT_ID– Try to fetch it from your current identity, but you can replace with your 12-digit AWS account ID.AWS_REGION– Replace with your AWS Region (for exampleus-west-2).VPC_ID– Replace with the VPC id.PRIVATE_SUBNETS– Replace with the private subnet IDs from your VPC.
Implementation guide
The following steps walk you through how to implement this solution.
Step 1: Set up Amazon ECR repository with managed signing
You can use Amazon ECR managed signing to configure signing rules that automatically sign container images when they are pushed to your repositories. Follow these steps to configure managed signing by providing Amazon ECR with a reference to an AWS Signer signing profile and filters that restrict which repositories should have their images signed.
For detailed information about creating an Amazon ECR repository, refer to the official AWS documentation.
- Create the repository in the Amazon ECR console.
- Choose Create Repository.
- Use aws-signer-demo-repo in Repository name.
- Choose Create.
- Create a managed signing rule in the Amazon ECR console.
- Open the Amazon ECR console. In the left navigation pane, under Private registry, choose Features & settings.
- Under Managed Signing, choose Configure.
- On the Managed Signing rules page, choose Create rule.
- Under Specify a signing profile, choose Create new AWS signing profile.
- Enter
aws_signer_demo_profileas Profile name. - Optionally, change the Signature validity period (default is 135 months).
- In the Filters section, enter
aws-signer-demo-repoas Repository filters and choose Add filter. You can use the “*” as a wildcard. - Choose Save.
- Enter
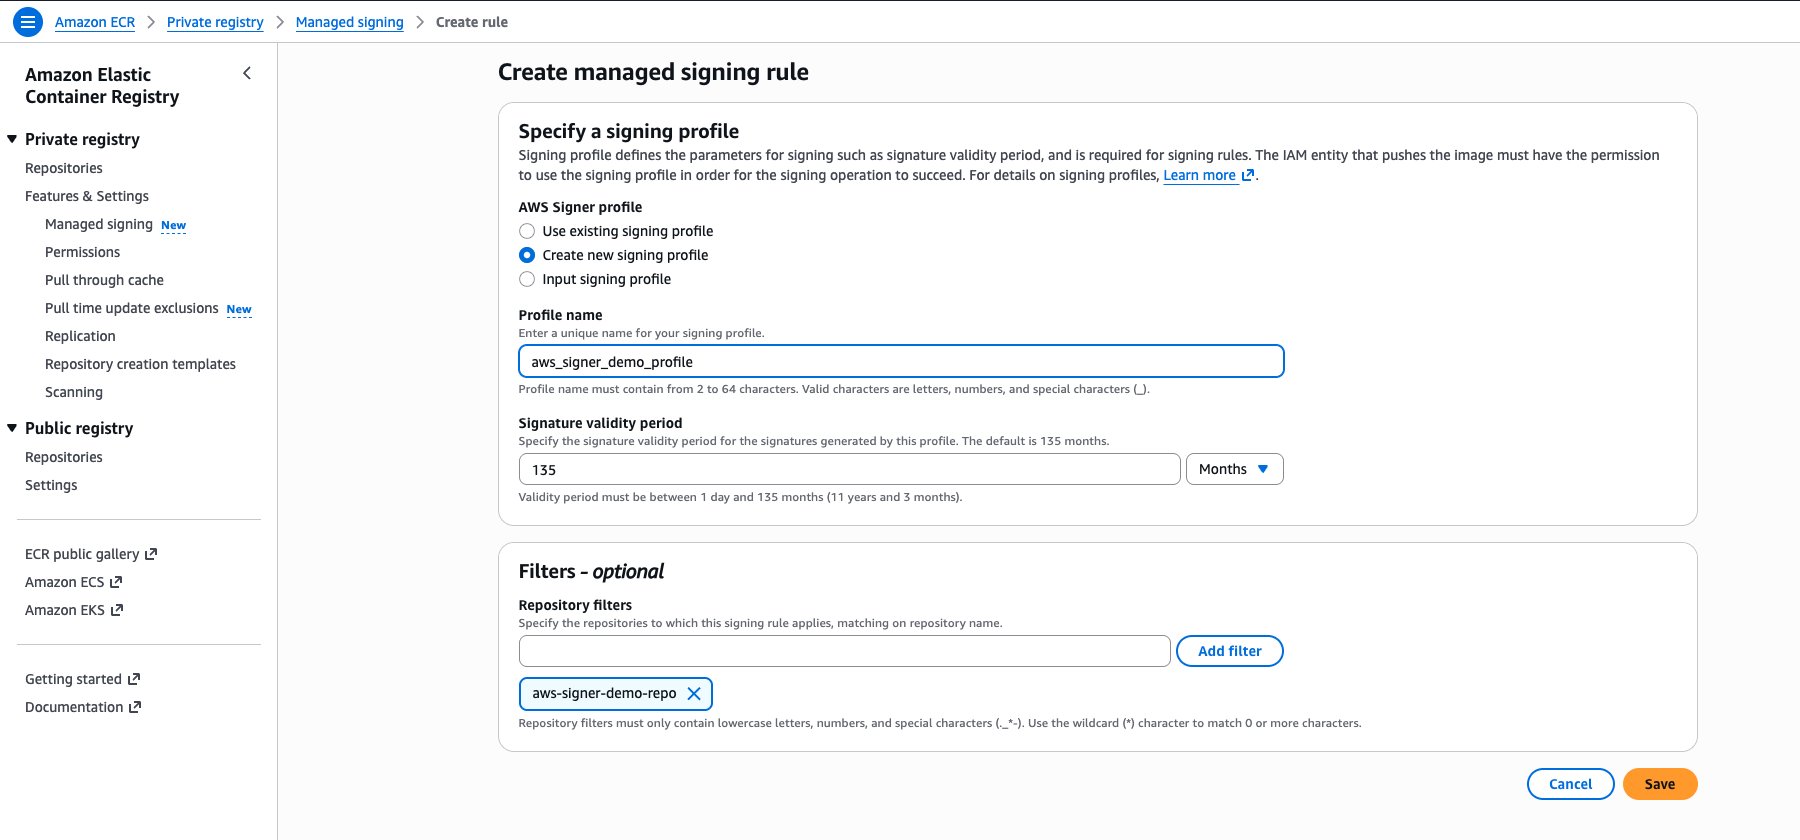
Figure 2: Console view of creating a managed signing rule
Step 2: Push container images to Amazon ECR for a signature to be generated
After your repository signing rule is configured, the image is signed as long as you have the signer:SignPayload permission using your traditional Amazon ECR workflow. You can review the permissions for push in our documentation.
In this section you create your own signed image using the base container of Amazon Linux 2023 using the following command:
When you push the image to a repository that matches a signing rule, Amazon ECR automatically signs the image using the associated AWS Signer profile. You can validate this from the console:
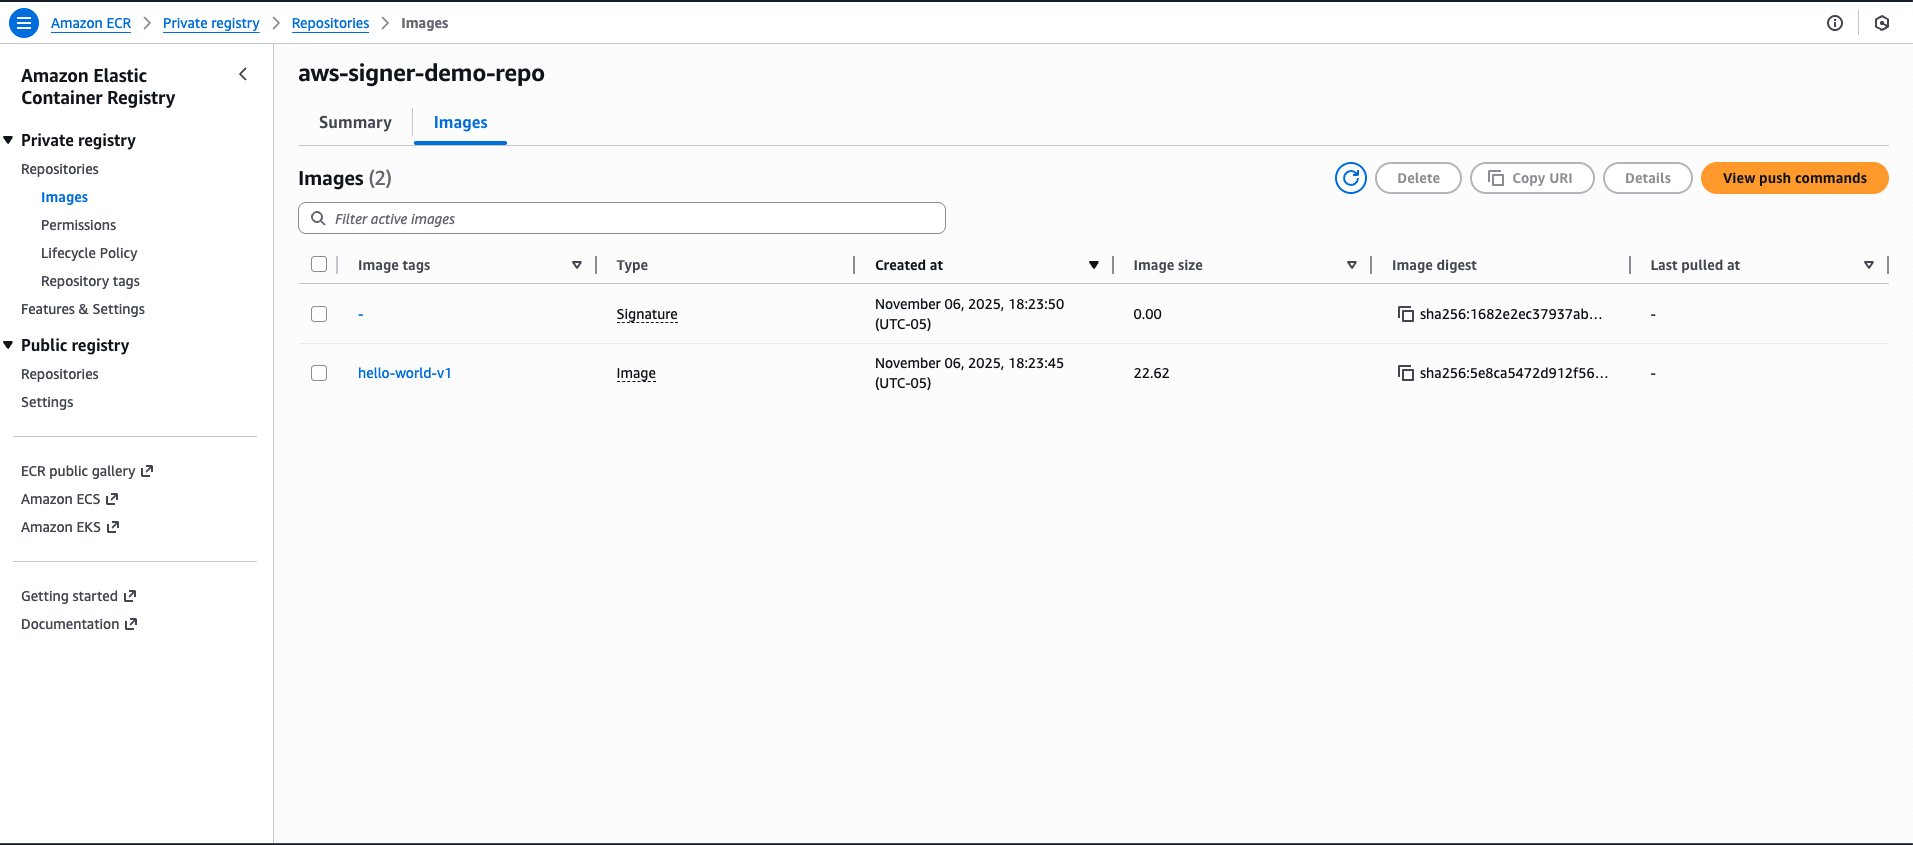
Figure 3: Console view of the signature stored in ECR repositories
At this point the images are signed with the signature available in the Notation format. From there you can configure your platform to validate and reject the image that doesn’t include the right signature. For an example of how to do this for Amazon EKS refer to this post: Announcing Container Image Signing with AWS Signer and Amazon EKS.
In the next section, we explore how to validate the signature by using the Amazon ECS service lifecycle hook.
Step 3: Create a Lambda function to validate Amazon ECS service image signature
You can use the Amazon ECS service lifecycle hook to have a Lambda function validate container image signatures during deployments. This is done before the actual image is deployed (PRE_SCALE_UP), so many people refer to this as an admission controller. The admission controller performs the following operations:
- Receives Amazon ECS service lifecycle hook events containing service revision details
- Extracts container image URIs from the Amazon ECS task definition
- Uses the Notation CLI to verify image signatures against trusted AWS Signer profiles
- Returns a success or failure status to Amazon ECS based on the signature validation results
- Supports both strict enforcement (BLOCK_ON_FAILURE) and audit-only modes (LOG_ON_FAILURE)
Follow these steps to deploy the Lambda function:
- To create the Lambda execution role and attach the necessary permissions, run the following commands:
- To create the Lambda function using AWS CLI with permission for Amazon ECS to call it, use these commands:

Figure 4: Admission-controller Lambda function in the console
Step 4: Configure Amazon ECS service lifecycle hooks
Now that you have deployed and configured the admission controller Lambda function, you can follow these steps to configure Amazon ECS to use it for signature validation during service deployments.
To create an Amazon ECS service with lifecycle hook as an admission controller, use the following commands:
At the end of this step, you should have an Amazon ECS service up and running in the ECS cluster with your image where the signature was validated successfully, as shown in the following figure.

Figure 5: Successful ECS Service deployment
How the integration works
When you create or update a service, the following sequence of steps are triggered.
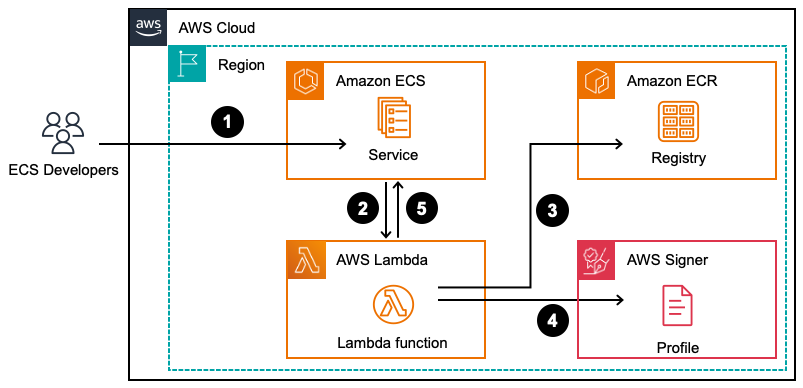
Figure 6: Flow of the ECS service admission-controller hook
- You create or update the Amazon ECS Service
- Amazon ECS triggers a PRE_SCALE_UP hook to the Admission Controller Lambda function
- The AWS Lambda function fetches the signature from the Amazon ECR repository and checks the AWS Singer profile
- The Lambda function validates the signature is not revoked
- The Lambda function returns the status to the ECS control plane for deployment to continue
Test and verify the setup
After provisioning the Amazon ECS service, examine the output with signed and unsigned images.
Verification with signed images
The following is the log from the Amazon CloudWatch Log group with BLOCK_ON_FAILURE as FAILURE BEHAVIOR.

Figure 7: Logs of successful validation
Verification with unsigned images
The following Amazon CloudWatch log output shows the failure when the image isn’t signed by the correct Signing profile.

Figure 8: Logs example of validation error
Cleaning up
To ensure that you don’t incur any cost, remove the AWS cloud resources that were provisioned.
Conclusion
Amazon ECR managed signing automatically signs container images during the push process, providing the foundational signature layer for your software supply chain. You can validate image signatures before service deployment to establish a secure and compliant software supply chain while preserving operational agility.
For Amazon EKS deployments, admission controllers such as Kyverno can enforce signature validation policies to maintain compliance standards.
For Amazon ECS deployments, service lifecycle hooks deliver a comprehensive approach to container image security validation. This lifecycle hook methodology enables flexible validation logic implementation, supporting both strict enforcement and audit-only configurations to align with your organization’s security requirements and deployment strategy.
Resources
- Announcing Container Image Signing with AWS Signer and Amazon EKS
- Extending deployment pipelines with Amazon ECS blue green deployments and lifecycle hooks
About the authors
 Josh Polkinghorn is a Senior Software Development Engineer at Amazon Web Services. He is based in Seattle.
 Mathieu Bruneau is a Containers Specialist Solutions Architect at Amazon Web Services Canada. He’s been bridging discussions between Operations and Developers teams’ way before the term DevOps became popular. Math is located in Montreal, Canada and enjoys spending time with wife and his 3 boys, either playing video games or throwing some frisbees around.
 Gaurav Gundal is a DevOps consultant with AWS Professional Services, helping customers build solutions on the customer platform. When not building, designing, or developing solutions, Gaurav spends time with his family, plays guitar, and enjoys traveling to different places.
 Huey Han is a Principal Product Manager for Amazon ECR. He is based in New York City. In his spare time, Huey enjoys martial arts.
 Sourav Kundu is a DevOps Consultant at AWS. He helps organizations securely migrate to and efficiently build on the AWS cloud using modern software engineering practices. He believes that democratizing cloud knowledge is essential for driving innovation and is committed to helping others succeed in their cloud journey.
 Sabari Sawant is a Product Marketing Manager for Kubernetes at Amazon Web Services (AWS). She helps shape and communicate AWS’ Kubernetes strategy and solutions. Sabari has been instrumental in bridging the gap between technical capabilities and business value, helping organizations understand and leverage containerized solutions effectively.