AWS Database Blog
Automate your Neo4j to Amazon Neptune migration using the neo4j-to-neptune utility
Neo4j and Amazon Neptune are both graph databases designed for online, transactional graph workloads that support the labeled property graph data model. Migrating from Neo4j to Neptune introduces several challenges, including differences in query language behavior, architectural design, and the complexity of data migration itself. Ensuring that existing Cypher queries continue to function as expected is a critical part of this process, because variations in supported syntax and semantics can create compatibility gaps.
To help teams address these issues early and streamline their overall migration journey, dedicated tools and guidance are available for validating Cypher compatibility before and during the transition. For more information about validating Cypher query compatibility when migrating from Neo4j to Neptune, see Validate Neo4j Cypher queries for Amazon Neptune migration.
In this post, we walk you through two methods to automate your Neo4j database to Neptune using the neo4j-to-neptune utility. This tool offers a fully automated end-to-end process in addition to a step-by-step manual process.
Solution overview
By demonstrating the effective use of both methods, we aim to provide you with a comprehensive understanding of how to use automated tools to suit your specific migration needs and successfully transition your graph-based workloads to the Neptune service.
The migration process generally includes the following main components:
- General information: Understanding the fundamental differences between Neo4j and Neptune
- Preparation phase: Planning and preparing for the migration
- Infrastructure provisioning: Setting up the necessary Neptune infrastructure
- Data migration: Moving data from Neo4j to Neptune
- Compatibility considerations: Understanding feature compatibility between Neo4j and Neptune
- Cypher query rewrites: Adapting Cypher queries to work with the Neptune openCypher implementation
The following architecture shows the building blocks that you need to complete the migration process:
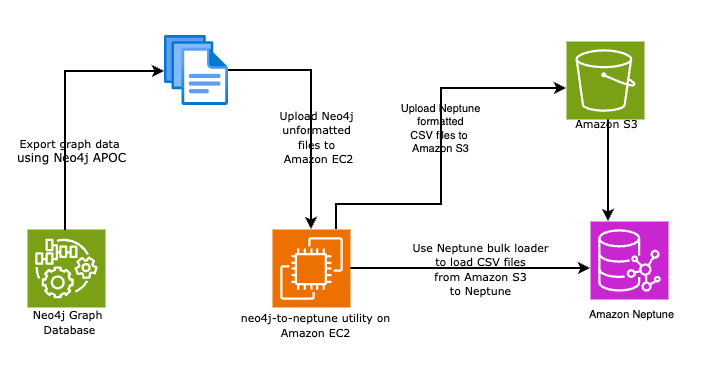
- An Amazon Elastic Compute Cloud (Amazon EC2) instance to download and install the neo4j-to-neptune utility. This instance acts both as the temporary server for staging CSV files and as a client to run AWS Command Line Interface (AWS CLI) commands, such as copying exported files to an Amazon Simple Storage Service (Amazon S3) bucket and loading data into Neptune.
- An S3 bucket from which to load data into Neptune.
- A Neptune DB cluster with one graph database instance.
Prerequisites
Before starting the migration, ensure you have the following resources:
- AWS Identity and Access Management (IAM) credentials configured for the AWS CLI.
- An S3 bucket in the same AWS Region as your Neptune cluster. See Using the Amazon Neptune bulk loader to ingest data to learn more about bulk loading data to Neptune Cluster.
- An AWS Identity and Access Management (IAM) role with appropriate permissions for Amazon S3 and Neptune.
- A Neptune database cluster.
- Add the IAM role to a Neptune cluster.
- Neo4j with APOC library installed.
- Java version 17 (jdk-17.0.12) or later.
- Build the neo4j-to-neptune utility using the following process.
Build the neo4j-to-neptune utility
You will build the neo4j-to-neptune utility using the source code from GitHub. The process involves cloning the Neptune tools repository from GitHub to create a local copy on the EC2 instance, which contains various utilities for working with Neptune, including the neo4j-to-neptune conversion tool. After cloning the GitHub repository, you use maven commands (mvn clean install) to build the utility, which cleans previous compilations, compiles the code, runs tests, and creates an executable JAR file while installing the package in your local maven repository. Set the JAVA_HOME to the JDK17 version you installed on the EC2 instance.
- Connect to an EC2 instance in your AWS account to build the neo4j-to-neptune utility. Note that using an EC2 instance isn’t mandatory—any Linux environment with the necessary dependencies is sufficient for building this utility.
- Clone then GitHub repository.
- Set the
JAVA_HOMEto the JDK17 version. - Build the utility using Maven.
- Maven will build the JAR file under the
targetfolder. You can copy the JAR file to any directory you prefer. - Copy the
neo4j-to-neptune.jarfile to the directory containing the CSV files exported from Neo4j. The CSV export process will be detailed in a subsequent section of this post.
For this post, we use the air-routes graph dataset, which models the global airline network as a graph structure. This dataset represents airports, countries, continents, and their interconnecting routes. The graph employs distinct vertex types to denote different entity categories, while edges—annotated with labels and properties—capture the relationships between these entities:
- It contains 3,748 airports
- It includes 57,645 routes between these airports
- The data is available in GraphML format as air-routes.graphml
Manual migration process
The manual migration process from Neo4j to Neptune consists of following steps:
- Export Neo4j graph data into a CSV file using the APOC export procedures.
- Convert the CSV file to Neptune format
- Upload the converted vertices and edges file to an S3 bucket.
- Bulk load to Neptune.
Export Neo4j graph data into a CSV file using the APOC export procedures
To export data from Neo4j using APOC procedures, you first need to install the APOC library in your Neo4j environment. See Installation to install the APOC library. Then, you must enable exports by adding apoc.export.file.enabled=true to your neo4j.conf configuration file. Note that this requires a complete shutdown and restart of the Neo4j instance. The actual export is performed using the apoc.export.csv.all procedure, which creates a single CSV file containing all nodes and relationships data.
It’s important to note that when executing export command, you should avoid using the {stream:true} parameter, because streaming the results to the browser and downloading them as a CSV file will result in a file that won’t be correctly processed by the conversion utility. The export file path is resolved relative to the Neo4j import directory.
Enable exports in neo4j.conf
Add the following line to enable exports to the neo4jc.conf file:
Methods for running a Neo4j APOC CSV export query
There are several methods that you can use to run a Neo4j APOC CSV export query.
- Neo4j browser:
- Paste and execute the preceding code in the Neo4j browser interface
- Most straightforward for quick testing
- Provides visual feedback
- Command Line (cypher-shell):
- Useful for automation and scripts
- Requires cypher-shell to be installed
- Can be integrated into shell scripts
- Neo4j admin tool:
- Create a file containing the query
- Good for batch operations
- Provides administrative level access
- Rest API:
- HTTP-based approach
- Useful for remote execution
- Platform-independent
Managing multi-valued property migration from Neo4j to Neptune
Neo4j allows homogeneous lists of basic types to be stored as properties on both nodes and edges. These lists can contain duplicate values.
When migrating data from Neo4j to Neptune, handling multi-valued properties requires special consideration because of differences in how these databases manage property values. Neptune has different constraints—it supports set and single cardinality for vertex properties, but only single cardinality for edge properties. This creates challenges when migrating Neo4j properties containing duplicate values to Neptune.
To manage this migration, two key parameters are available:
- Node property policy (
--node-property-policy): LeaveAsString: Preserves multi-valued properties as JSON-formatted list stringsHalt: Stops migration if multi-valued properties are foundPutInSetIgnoringDuplicates(default): Converts to Neptune set properties, removing duplicatesPutInSetButHaltIfDuplicates: Converts to set properties but stops if duplicates are found- Relationship property policy (
--relationship-property-policy): LeaveAsString(default): Stores multi-valued properties as JSON-formatted list stringsHalt: Stops migration if multi-valued properties are encountered- These parameters provide flexibility in handling property migrations while maintaining data integrity according to your specific requirements.
In this example, you use the Neo4j browser tool to run the apoc.export.csv.all command to export all the vertices and edges to a CSV file. This Neo4j database has 3,784 nodes (3,504 airports, 273 countries,7 continents) and 57,645 edges.
The export command generates a comma separated export file that contains all nodes and edges of the air routes database in the Neo4j database. The following snippet shows an example of the export file.
This format isn’t directly supported by the Neptune bulk loader, so you will use the neo4j-to-neptune utility to convert the exported CSV file into a format that can be directly imported into the Neptune database.
Convert the generated CSV file into a Neptune-supported format
Now that you have the data in an exported CSV file, you need to convert the file to a format that’s supported by Neptune.
- Upload the CSV file exported from Neo4j to the EC2 instance you configured.
- Use the neo4j-to-neptune tool to convert the CSV files into a format compatible with the Neptune bulk loader.
The neo4j-to-neptune tool generates the output as two files under the output/1754689143727 directory
The vertices.csv file:
The edges.csv file:
Output generated by the conversion utility has converted the Neo4j output file into a format supported by the Neptune bulk loader by adding an appropriate header with right comma separated nodes and edges. You are now ready to begin the process to import the data using the Neptune bulk loader. See Optimizing an Amazon Neptune bulk load to get the best performance during large bulk load operations.
Import the converted nodes and edges to Neptune database
Here are the high-level steps of the loading process:
- Copy the data files to an S3 bucket.
- Initiate a Neptune bulk load request by sending an HTTP request to the bulk loader API, passing the source file path in Amazon S3, and the bulk loader IAM role created in the prerequisites section.
Load vertices
From a command line window, enter the following to run the Neptune loader, using the correct values for your endpoint, S3 URI or path, format, and IAM role Amazon Resource Name (ARN). The format parameter can be any of the following values: csv for Gremlin, opencypher for openCypher, or ntriples, nquads, turtle, or rdfxml for RDF. For information about the other parameters, see Neptune Loader Command. The following command initiates a bulk load operation to load the vertices (nodes) data into the Neptune database using the Neptune loader API.
The response returns a unique loadId that identifies this bulk load operation. Use this identifier to monitor the load status with the following command:
Let’s break down the components:
- Command structure:
- Uses curl with
-Gflag (GETrequest). - Queries the Neptune loader endpoint with a specific load ID (
58eecccd-dd68-45b0-87ec-1a63f98a0aa1).
- Uses curl with
- Response details:
fullUri: Source S3 location of the vertices.csvfilerunNumber: Current run number (1)retryNumber: Number of retries (0)status: Final status “LOAD_COMPLETED”totalTimeSpent: 6 secondsstartTime: Unix timestamp of when the load startedtotalRecords: 54,024 records processedtotalDuplicates: 0 duplicate records foundparsingErrors: 0 parsing errorsdatatypeMismatchErrors: 0 data type mismatchesinsertErrors: 0 insertion errors
This response indicates a successful load operation with no errors, where all 54,024 records from the vertices.csv file were successfully loaded into the Neptune database.
Load edges
The following command to initiates a bulk load operation to load the relationships (edges) data into the Neptune database using the Neptune loader API.
The response returns a unique loadId that identifies this bulk load operation. Use this identifier to monitor the load status with the following command:
Verify the loaded data by querying the Neptune database. You can use Neptune Jupyter Notebooks or the AWS CLI and Data API to run cypher commands to query the number of nodes and edges.
Automated migration process
The neo4j-to-neptune utility supports an automated end-to-end process for migrating data from Neo4j to Neptune, which consists of two main steps:
- Export the CSV files from Neo4j using the APOC export procedures.
- Convert and load data to Neptune by transforming the CSV files into Neptune-supported format and performing a bulk load operation.
The convert-csv command supports an integrated bulk loading option that automatically uploads converted CSV files to Amazon S3 and initiates the Neptune bulk load process. You will use the CSV file that you exported in the previous section to demonstrate the automated conversion and bulk load process. There are two options to pass parameters to the neo4j-to-neptune.jar file:
- Pass parameters as CLI parameters
- Pass parameters as a YAML file
Option 1: Automated conversion and bulk load using CLI parameters
You can perform automated conversion and bulk loading using the following neo4j-to-neptune utility command with CLI parameters:
Let’s break down each parameter:
java -jar neo4j-to-neptune.jar convert-csv: Executes the conversion utility- Command parameters:
-i neo4j-airroutes-export.csv: Input file containing the Neo4j exported data-d output: Directory where converted files will be stored--s3-prefix neptune-data: Prefix for S3 bucket organization--parallelism OVERSUBSCRIBE: Sets maximum parallelism for bulk loading--neptune-endpoint: Specifies the Neptune cluster endpoint URL--bucket-name neo4j-to-neptune-bucket: S3 bucket where converted files will be uploaded--iam-role-arn: IAM role ARN that has permissions for S3 and Neptune access--infer-types: Automatically infers data types for properties
The utility will:
- Convert the Neo4j CSV format to Neptune format.
- Automatically upload the converted files to the specified S3 bucket.
- Initiate a Neptune bulk load operation.
- Monitor the load progress if monitoring is enabled.
The response returns a unique load ID that identifies this bulk load operation. Use this identifier to monitor the load status with the following command:
Let’s analyze the response:
- Command structure:
- Uses curl with
-Gflag to make aGETrequest. - Queries the Neptune loader endpoint with a specific load ID (
31e1c3dc-cb21-4143-a0da-437094a6aa09).
- Uses curl with
- Response analysis:
fullUri: Shows S3 location of the loaded filesrunNumber: 1 (first run)retryNumber: 0 (no retries needed)status:"LOAD_COMPLETED"(successful completion)totalTimeSpent: 14 secondsstartTime: Unix timestamp 1755284207totalRecords: 162,306 total records processed (combined vertices and edges)totalDuplicates: 0 (no duplicate records found)parsingErrors: 0 (no parsing errors)datatypeMismatchErrors: 0 (no data type mismatches)insertErrors: 0 (no insertion errors)
This response indicates a completely successful load operation where both the vertices and edges files were loaded without any errors, processing a total of 162,306 records. If you have observed any error during the load operation, you can use Neptune loader Get-Status Example to get more details.
You can verify the Neptune Graph by running this script in a Neptune Jupyter Notebook environment using the openCypher (%%oc) magic command or AWS CLI and Data API. The query performs two match operations—first counting all nodes (n) in the graph, then counting all relationships (r) between nodes. The results show that the Neptune database contains 3,748 nodes and 57,645 edges, which verifies that all the data from the Neo4j database was successfully migrated to Neptune.
Option 2: Automated conversion and bulk load using a YAML configuration file
Create a YAML configuration file named bulk-load-config.yaml with your bulk load settings.
The following command uses the neo4j-to-neptune utility with a YAML configuration file approach instead of command-line parameters.
Let’s look at the whole process.
Command components:
java -jar neo4j-to-neptune.jar convert-csv: Executes the conversion utility-i neo4j-airroutes-export.csv: Specifies the input Neo4j export file-d output: Defines the output directory for converted files--bulk-load-config bulk-load-config.yaml: Points to a YAML configuration file
Run the following command from the EC2 instance where the CSV file and neo4j-to-neptune.jar were copied:
What the process includes:
- The utility validates all bulk load parameters. If any required parameters are missing or invalid, the conversion will be aborted with a clear error message indicating which parameters are missing.
- Converts the Neo4j CSV file to the Neptune Cypher format.
- Automatically uploads the converted files to Amazon S3.
- Initiates a Neptune bulk load job.
- Monitors the progress until completion (if monitoring is enabled).
You can verify the Neptune Graph by running this script in a Neptune Jupyter Notebook environment using the openCypher (%%oc) magic command or AWS CLI and Data API. The query performs two match operations—first counting all nodes (n) in the graph, then counting all relationships (r) between nodes. The results show that the Neptune graph database contains 3,748 nodes and 57,645 edges, which verifies that all the data from Neo4j was successfully migrated to Neptune.
Clean up
To avoid incurring unnecessary charges, make sure to delete the resources you created if you no longer need them. All the following cleanup commands should be run from your local machine or EC2 instance where you have the AWS CLI installed and configured with appropriate credentials. Make sure you have the necessary permissions to delete these resources before proceeding.
- Delete Neptune resources
- First, delete your Neptune database instance:
- Delete your Neptune database cluster:
- Delete S3 objects (data files) and bucket:
- Clean up IAM resources by detaching the role policies and then removing the IAM role created for the Neptune bulk load:
- If you used an EC2 instance, you can terminate the instance using the following command:
- Remove local files created during the migration process:
Conclusion
The Neo4j to Neptune migration tool provides a robust and flexible solution for transferring data between these graph databases, offering multiple migration paths so that you can choose between a manual multi-step process or an automated end-to-end solution depending on your specific needs. The tool features extensive configuration options through both command-line parameters and YAML files, enabling fine-tuned control over the migration process, while sophisticated handling of multi-valued properties helps ensure data integrity with configurable policies for both nodes and relationships. Integration with the Neptune bulk loader simplifies the upload process through automatic Amazon S3 file management and load monitoring, and the tool performs validation checks before starting the conversion process to help prevent failed migrations because of misconfiguration. This utility streamlines the complex process of migrating from Neo4j to Neptune while providing the flexibility and control needed for enterprise-grade data migrations.
Get started today by downloading the neo4j-to-neptune utility from the AWS GitHub repository and following either the manual or automated migration approach based on your needs. Whether you’re planning a small-scale migration or an enterprise-level transformation, the neo4j-to-neptune utility provides the flexibility and control you need for a successful migration. Visit our GitHub repository to access the migration tools, begin your transition to Neptune, and experience the benefits of the fully managed graph database service it provides.