AWS Database Blog
Implementing search on Amazon DynamoDB data using zero-ETL integration with Amazon OpenSearch service
In this post, we show you how to implement search on Amazon DynamoDB data using the zero-ETL integration with Amazon OpenSearch Service. You will learn how to add full-text search, fuzzy matching, and complex search queries to your application without building and maintaining data pipelines.
Amazon DynamoDB is a great choice for applications demanding single-digit millisecond response times at scale and high-throughput operations. When combined with OpenSearch Service, applications gain powerful capabilities for complex search and analytics.Let’s explore a practical use case that demonstrates how this zero-ETL integration can enhance your application’s search capabilities.
Current state overview
AnyCompany, a fictional online marketplace specializing in eco-friendly and sustainable products, serves environmentally conscious consumers worldwide. Their application runs on an AWS serverless architecture where AWS Lambda functions handle e-commerce operations. The core transactional data such as product information and inventory details are stored in DynamoDB.
The DynamoDB table layout for AnyCompany’s products includes the following attributes:
| Attribute | Example |
| product_id (Partition Key) | Id_1 |
| name | ECO T-Shirt |
| description | Organic CottonTee |
| price | 100 |
| rating | 5 |
| category | Activewear |
| brand | AnyCompany |
| tags | organic |
| specs | {“color”:”white”,”size”:”M”} |
| stock | 48 |
| created_at | 2025-12-16T16:15:43.473864+0000 |
| updated_at | 2025-12-16T16:15:43.473864+0000 |
For write operations, AnyCompany uses DynamoDB to maintain data consistency. When updating product information, the system uses the product_id as the partition key to perform product updates. AnyCompany’s product catalog expansion has led to more complex customer search patterns, requiring the system to handle variations, misspellings, semantic queries, and faceted browsing (allowing customers to filter and narrow down products using multiple attributes like price range, brand, ratings, and product categories).
The following are search scenarios which are emerging as the company expands:
- Multi-field search – Customers need to search across multiple fields such as product name, descriptions, categories and tags simultaneously.
- Multi-range search – Customers want to filter products by multiple criteria, such as price range ($20-$50) and ratings (4-5 stars).
- Discovery and Navigation – Customers want faceted browsing to progressively refine results (using filters like category, brands) and dynamic aggregations to understand their options (such as seeing product counts by category, brand, and rating distributions).
- Fuzzy search and suggestions – Customers want their searches to work even when they make typos or spelling mistakes (for example, finding “reusable water bottle” when typing “reuseble botl”), while also receiving auto-complete suggestions as they type to help them find products more quickly.
- Semantic search – Customers often use natural language descriptions rather than exact product names. For example, searching for “biodegradable kitchen storage containers” should return relevant eco-friendly food storage products.
AWS offers zero-ETL integration between DynamoDB and OpenSearch Service to sync data between these two services. This integration enables you to complement your DynamoDB-based applications with search capabilities of OpenSearch Service to meet these search requirements, without building and maintaining custom data pipelines.
In the following examples, we discuss how OpenSearch Service complements DynamoDB for these search scenarios at AnyCompany.
Multi-field search
Customer search patterns are inherently dynamic, with customers constantly seeking new ways to search products. At AnyCompany, customers want their search query to match across multiple product attributes simultaneously, looking for matches in product names, descriptions, categories, and tags to ensure they don’t miss relevant items.
OpenSearch provides many features for customizing your search use cases and improving search relevance. For an exhaustive list, refer to Search features. OpenSearch provides a search language called query domain-specific language (DSL) that you can use to search your data.
The following is an example query that implements this functionality:
Multi range search
Building on the previous search functionality, AnyCompany’s customers often want to combine multiple filtering criteria, such as searching products within specific price ranges ($25–50) while considering specific categories and ratings.
OpenSearch Service allows you to filter search results using different methods, each suited to specific scenarios. You can apply filters at the query level, using Boolean query clauses and post_filter and aggregation level filters.
The following is an example query that implements this functionality:
Discovery and navigation
At AnyCompany, customers want to discover products through an interactive interface rather than searching for specific items. For example, a customer browsing sustainable fashion might start with a search for “Men’s Wear” and want to understand the landscape of available products. They want to see available categories, brands offering sustainable options, common price points, and product ratings. The aggregated data typically displayed as filtering options in a sidebar, allowing customers to refine their search results intuitively.
OpenSearch Aggregations allow you to analyze data and extract statistics from it. You can apply metrics aggregation to perform simple calculations, bucket aggregation to categorize sets of documents as buckets, or pipeline aggregation to chain multiple aggregations together.
The following is an example query that implements this functionality:
Fuzzy search and suggestions
At AnyCompany, customers frequently search for products with imperfect recall, often making typos while expecting real-time search suggestions that can predict their intent. For instance, typing “Omga” should tolerate typos and suggest relevant products like “OmegaWear” or “Omega Eco Essentials”. This requires a robust search system that handles spelling variations and typos while providing search suggestions to enhance the shopping experience.OpenSearch allows you to design autocomplete functionality that updates with each keystroke, provides relevant suggestions, and tolerates typos.
The following is an example query that implements this functionality:
Semantic search
At AnyCompany, customers often express their product needs in conversational language, using natural phrases like “red beach hat for summer” instead of specific product names or categories. This intuitive way of searching requires a system that understands the semantic meaning behind customer queries, not just matching keywords.
OpenSearch enables this natural search experience through vector search. The system converts both customer queries into vector embeddings – numerical representations that capture the semantic meaning of the text. This allows matching based on conceptual similarity rather than exact keyword matches.
The following is an example query that implements this functionality:
In the following sections, we show you how to implement a solution to support search functionality while maintaining your existing Amazon DynamoDB operations.
Solution overview
The following diagram illustrates the solution architecture.
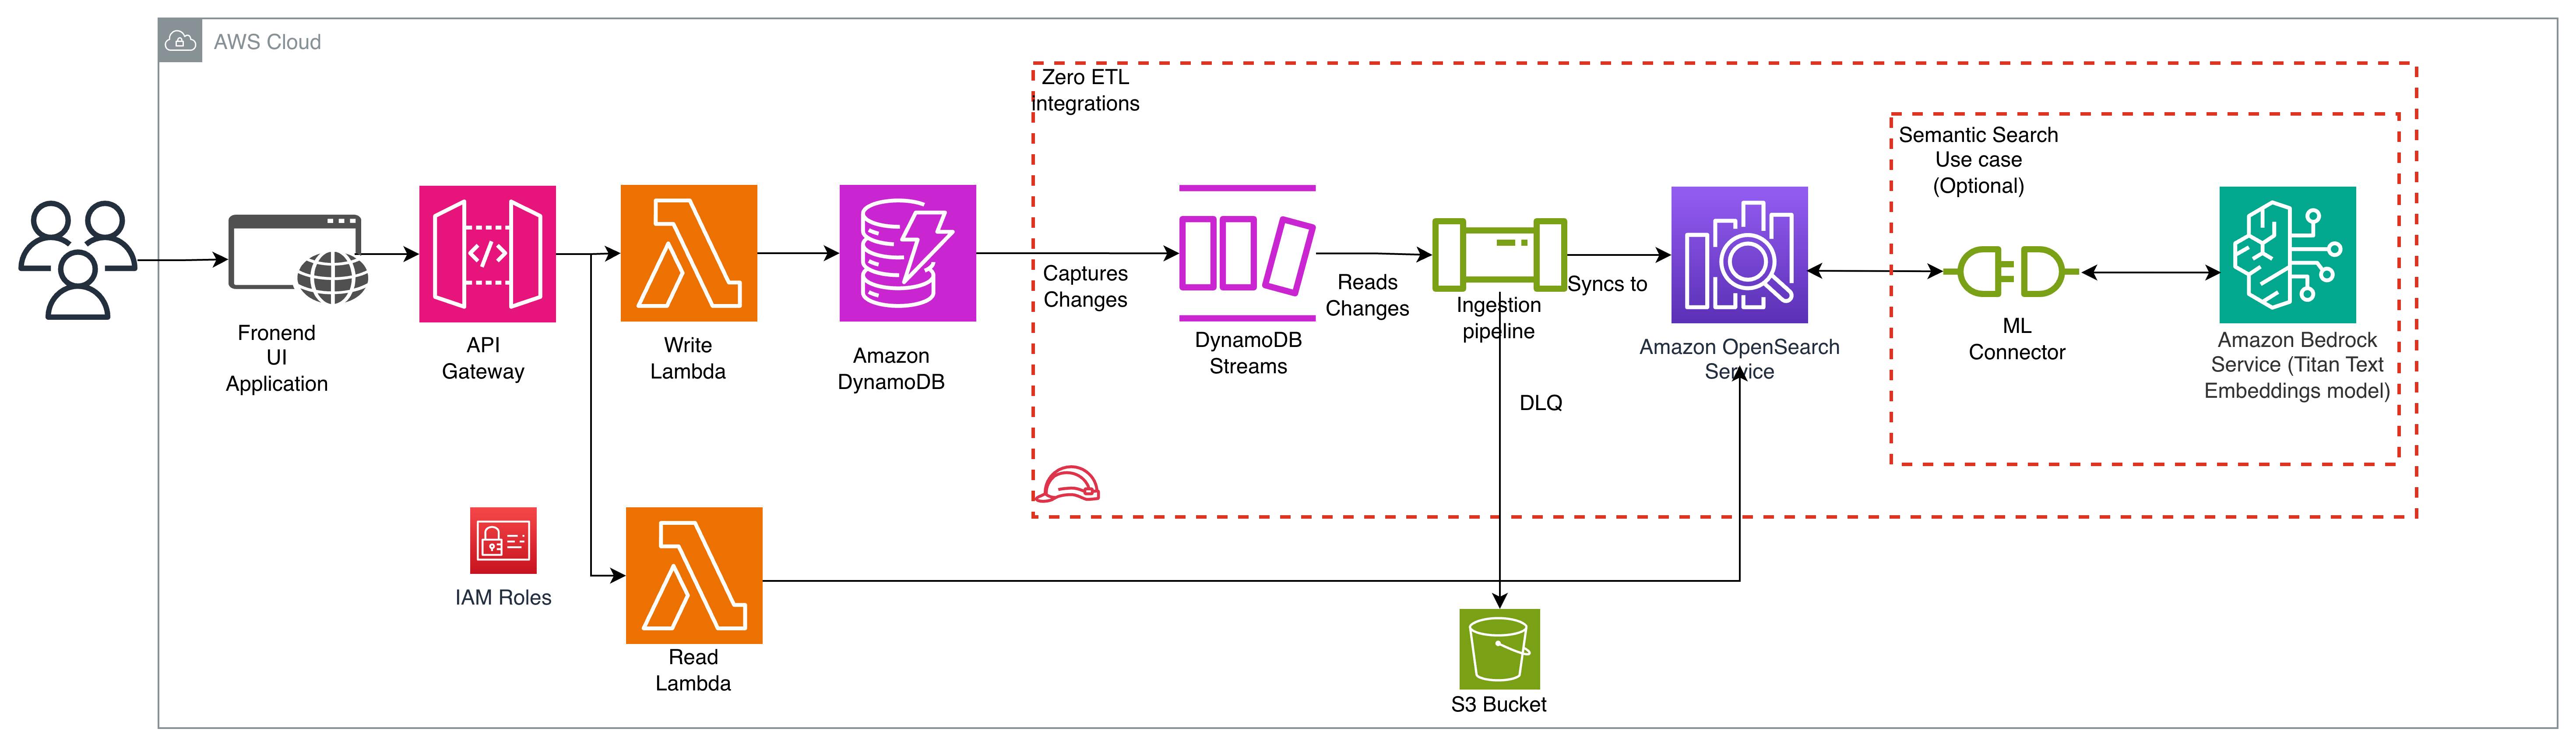
AnyCompany’s existing architecture follows a serverless pattern where Amazon API Gateway routes customer requests to an AWS Lambda function. The function performs read and write operations on their DynamoDB table, which serves as the primary data store.
To complement the existing architecture, AnyCompany implements the zero-ETL integration between DynamoDB and OpenSearch Service. The integration synchronizes data in two phases: Point-in-Time Recovery (PITR) exports existing DynamoDB data to Amazon S3 for the initial snapshot, while DynamoDB Streams captures ongoing changes for near real-time updates to OpenSearch service.
To enable remote inference needed for semantic search, you can connect OpenSearch to Amazon Bedrock’s Titan text embeddings model using an OpenSearch ML Connector.
The OpenSearch Ingestion pipeline consumes these streams, transforms the data as needed, and synchronizes it to OpenSearch Service in near-real time. You specify an Amazon Simple Storage Service (Amazon S3) bucket as a dead-letter queue (DLQ) to capture any synchronization errors.
To support search capabilities, the solution adds a new Lambda function that processes search requests using OpenSearch Service. The function uses the OpenSearch Service SDK to create a client and execute search queries. This new function works alongside the existing write Lambda function, which continues to handle existing operations.
This design allows AnyCompany to implement robust search features while preserving their e-commerce workload.
Implement a zero-ETL integration between Amazon DynamoDB and Amazon OpenSearch Service
In this section, we show how to setup a zero-ETL integration between DynamoDB and OpenSearch Service, including semantic search capabilities for enhanced search functionality.
Prerequisites
To set up this solution, you must have:
- An AWS account.
- Appropriate AWS Identity & Access Management (IAM) permissions to create and manage the following AWS resources:
- Amazon S3 General Purpose bucket for DynamoDB export and for DLQ event.
- Amazon Bedrock with Amazon Titan Embeddings G1 enabled. For more information, see Access Amazon Bedrock foundation models.
Implementation Steps
Step 1: Create a DynamoDB table
For the solution walk through purposes, we create a new DynamoDB table named ‘Products’. If you’re implementing this solution with your existing DynamoDB table, you can skip this step.Run the following AWS CLI command to create the table:
Wait until the table status changes from CREATING to ACTIVE. You can check the status with:
Step 2: Enable DynamoDB Streams and Point-in-Time Recovery (PITR)
Run the following AWS CLI commands:
Step 3: Create Your OpenSearch Domain
Run the following AWS CLI command to create the domain:
Note:
- Replace
YOUR_ACCOUNT_IDwith your actual AWS account ID - Replace
YourStrongPassword123!with a strong password (save this for logging into OpenSearch Dashboards)
Check the domain status:
Wait until the Processing field returns Status false, indicating the domain is active. Once active, note down the Endpoint (for API access) and navigate to the OpenSearch Dashboards URL (typically https://<your-endpoint>/_dashboards/) using the master username and password you created.
Step 4: Configure OpenSearch Security Settings
- Navigate to the OpenSearch Dashboards plugin for your OpenSearch Service domain. You can find the Dashboards endpoint on your domain dashboard on the OpenSearch Service console.
- From the main menu choose Security, Roles, and select the ml_full_access role.
- Choose Mapped users, Manage mapping.
- Under Backend roles, add the ARN of the Lambda role that needs permission to call your domain.
- arn:aws:iam::<account-id>:role/LambdaInvokeOpenSearchMLCommonsRole
- Select Map and confirm the user or role shows up under Mapped users.
This mapping enables the necessary permission for model integration. This role will be created in the next steps when you register the model id.
Figure 2: OpenSearch Security Settings
Step 5: Set up the Bedrock Model Integration
With Remote inference, you can host your model inferences remotely on ML services, such as Amazon SageMaker AI and Amazon Bedrock, and connect them to Amazon OpenSearch Service with ML connectors.
To ease the setup of remote inference, Amazon OpenSearch Service provides an AWS CloudFormation template in the console.
Open the Amazon OpenSearch Service console.
- In the left navigation pane, choose Integrations.
- Choose Integrate with Amazon Titan Text Embeddings model through Amazon Bedrock
- Choose Configure domain, Configure public domain.
- Provide the parameter values for “Amazon OpenSearch Endpoint” and “Model region”.
- Check “I acknowledge that AWS CloudFormation might create IAM resources“
- Choose Create stack
- After successful deployment of the stack, navigate to Outputs tab and note down the Model Id.
Figure 3: Bedrock Model Integration
Step 6: Set up the OpenSearch Ingest Pipeline
Create an ingest pipeline that uses the model in Amazon Bedrock to create embeddings from the input field description and map it to field named description_embedding.
- Navigate to the OpenSearch Dashboards URL for your domain. You can find the URL on the domain’s dashboard in the OpenSearch Service console.
- Open the left navigation panel and choose DevTools.
- Create your embedding pipeline:
Figure 4: OpenSearch Ingest pipeline Creation
Step 7: Prepare your OpenSearch Index template
Before setting up the zero-ETL integration pipeline for your use case, analyze your search requirements and design appropriate index template for optimal performance.
Consider the following guidelines:
- Analyze access patterns and determine which fields need to be searchable and select appropriate field types.
- Use keyword for exact matches like
product_idandcategory. - Use text with analyzers for full-text search capabilities.
- Use date for timestamp fields.
- Use keyword for exact matches like
- To optimize your field selection, index only necessary fields to reduce processing overhead.
- Implement custom analyzers for specialized search needs. For example, use n-gram analyzers for autocomplete functionality, which enables partial matching.
- Determine your semantic search requirements. Embed those fields that are appropriate for your business use case. Configure vector field mappings with appropriate dimensions and algorithms based on your chosen embedding model and performance requirements.
The following is an example of a mapping template:
Step 8: Setting up OpenSearch Ingestion Pipeline
- Open the DynamoDB Service console and Choose Integrations, create integration and choose Amazon OpenSearch.
- Configure source (DynamoDB table)
- Choose the DynamoDB table that will be the source of the integration from the dropdown.
- Enable Stream
- Enable Export and configure S3 Bucket, S3 region
- Configure processor (Set up processors for data transformation)
- Configure sink (OpenSearch domain):
- Choose a domain
- Enter “products” as “Index Name”.
- Choose Customized Mapping and use the template defined in Step 7.
- Enable Dead-letter queues (DLQs) for offloading failed events and making them accessible for analysis. Provide the S3 bucket name and the region.
- Configure pipeline
- Enter a unique pipeline name (across current AWS account in the current region).
- Configure the pipeline capacity as per your requirement. A single Ingestion OpenSearch Compute Unit (OCU) represents billable compute and memory units. You are charged an hourly rate based on the number of OCUs used to run your data pipelines. As a baseline, one OCU can handle up to 2 MiB per second for typical workloads. Provide the minimum and maximum OCU capacity as per your workload.
- OpenSearch Ingestion requires permissions to use other services on your behalf. Choose Create and use a new service role.
- Map the OSIS pipeline’s IAM role as a backend role in OpenSearch all_access role similar to Step 4. This enables secure, fine-grained access control for data ingestion.
- Review and create
- Review all the configurations.
- Choose Preview pipeline and review the yaml file.
- Choose Create Pipeline to create the pipeline.
Figure 5: OpenSearch Ingestion Pipeline Creation
Validation
After setting up a zero-ETL integration, you can test and validate that the data is being replicated.
- Create sample items in DynamoDB. The following is a sample shell script to create items:
- Navigate to the OpenSearch Dashboards URL for your domain. You can find the URL on the domain’s dashboard in the OpenSearch Service console.
- Open the left navigation panel and choose Dev Tools.
- Verify data flow to OpenSearch.
- Run the semantic use case query to validate your semantic requirements.
You can test all other use cases using the queries provided earlier in the post.
Figure 6: Data Validation
After you complete the pipeline setup and validate the data synchronization, refactor your application code to route search queries to OpenSearch Service while keeping transactional operations in DynamoDB.
The specific implementation depends on your application architecture and programming language. For instructions on querying OpenSearch Service using the AWS SDKs, refer to Using the AWS SDKs to interact with Amazon OpenSearch Service.
Best practices
When implementing zero-ETL integration between DynamoDB and OpenSearch Service, consider the following best practices:
- Use DynamoDB streams as the OSIS Pipeline source option, which captures only new or updated records without requiring a full initial snapshot. Once the pipeline flow is tested with streaming data, use export option to migrate the complete data.
- Use an Amazon VPC to enforce data flow through your OpenSearch Ingestion pipelines within your network boundaries, rather than over the public internet.
- Optimize your embedding generation ingest pipeline by enabling skip_existing flag to prevent redundant API calls for fields that already contain embeddings.
- Enable Amazon CloudWatch logs for your OpenSearch Service domain and OpenSearch Ingestion pipeline. This provides visibility into the entire data flow and helps identify issues quickly. Configure logging at the domain level to capture search queries, indexing operations, and cluster health metrics. For OpenSearch Ingestion pipelines, enable detailed logging to monitor data transformation and ingestion processes.
- Configure a DLQ for your ingestion pipeline. When documents fail to process due to mapping errors, transformation issues, or temporary service problems, the DLQ captures these failed records for later analysis and reprocessing. This prevents data loss and provides a recovery mechanism.
- Enable encryption at rest using AWS Key Management Service (AWS KMS) for both DynamoDB tables and OpenSearch Service domains to maintain full control over your encryption keys and meet compliance requirements.
- Enable DynamoDB deletion protection on your tables to prevent accidental deletion of critical data, providing an additional safety layer for your production workloads.
- Implement least privilege access by creating specific IAM roles and policies for each component of the integration pipeline, ensuring that services have only the permissions they need to function.
- For OpenSearch Service domain sizing recommendations including shard sizing, instance types, and deployment configurations, refer to the Amazon OpenSearch Service domain sizing guide.
Monitoring and alerting
OpenSearch Ingestion publishes metrics that are useful to monitor your pipeline performance. When monitoring your pipeline health, focus on the following key areas:
- Authentication issues that might block data ingestion.
- Document processing failures that could lead to data loss.
- Capacity bottlenecks that can slow down data processing.
- Performance degradation that affects your application’s response times.
- For Bedrock-specific monitoring, pay special attention to model invocations latency, throttling and token usage metrics.
By actively monitoring these areas, you can maintain a reliable data flow from DynamoDB to OpenSearch Service and ensure your search functionality remains responsive. Set up CloudWatch alerts for early detection of these issues, so you can take proactive action before they impact your users.
For more information and best practices for logging and monitoring, refer to Best practices for Amazon OpenSearch Ingestion and Amazon Bedrock monitoring documentation.
Cost Considerations
When planning your DynamoDB to OpenSearch Service integration using OpenSearch Ingestion, analyze your DynamoDB write throughput through Amazon CloudWatch metrics. Your DynamoDB table’s write activity generates records in DynamoDB Streams, which the OpenSearch Ingestion pipeline consumes. Understanding your minimum, maximum, and average write request units (WRUs) helps you right-size your OpenSearch Ingestion pipeline. As of this writing, an OpenSearch Ingestion pipeline can scale from 1 to 96 OpenSearch Compute Units (OCUs). As a baseline, one OCU can handle up to 2 MiB per second for typical workloads which may vary depending on your data size, pipeline transformations, and OpenSearch Service domain size and index/shard strategy.
For example, if your table processes 20,000 WRUs per second, you need a minimum of 10 OCUs to handle this throughput efficiently. Your total costs include DynamoDB Streams charges ($0.02 per 100,000 read requests), OpenSearch Service cluster costs (based on instance types and storage), and OpenSearch Ingestion pipeline costs (priced per OCU-hour) and the regular DynamoDB costs. When incorporating Amazon Bedrock for remote inference in your DynamoDB to OpenSearch pipeline, evaluate which fields require embeddings and estimate the volume of text data you’ll process. Calculate your expected token usage based on the number of records, the size of text fields, and your update frequency. The cost structure follows a pay-per-token model, which varies by the foundation model you select.
Clean up
To avoid incurring ongoing charges, delete or disable the resources you created in this solution. Follow these steps in order to clean up your AWS environment:
- Delete the CloudFormation stack:
- Open the CloudFormation console.
- Select the stack you created for model access.
- Choose Delete and confirm the deletion.
- Remove OpenSearch resources:
- Delete the OSIS pipeline by opening the Amazon OpenSearch Ingestion console and removing the pipeline.
- Delete the OpenSearch domain through the Amazon OpenSearch Service console.
- Delete the DynamoDB table (Products).
- Empty the S3 bucket used for the dead letter queue (DLQ) and DynamoDB export.
After completing these steps, verify in each service console that all resources have been properly deleted or disabled.
Conclusion
In this post, we showed you how to implement search on Amazon DynamoDB data using the zero-ETL integration with Amazon OpenSearch Service.
Through the AnyCompany example, we demonstrated how this integration addresses real-world search challenges—from handling customer typos and semantic queries to enabling faceted browsing and multi-field searches.
Get started by exploring the Amazon OpenSearch Service documentation and the DynamoDB zero-ETL integration guide to begin implementing these features in your own environment.