AWS Database Blog
Migrating data from an Amazon Aurora snapshot into Amazon Aurora DSQL
Amazon Aurora DSQL is a serverless distributed SQL database built for high availability, unlimited scale, multi-Region strong consistency, and zero infrastructure management. Aurora DSQL supports the PostgreSQL COPY command for migrating data into the database and provides a dataloader script that adapts the COPY command for use with Aurora DSQL. This method of migration must be done one table at a time, requires an intermediate compute instance to copy data from the source database into the target Aurora DSQL cluster, and doesn’t provide any means of transforming data between the source and target databases. Customers performing larger data migrations or migrations that require data type conversion, schema changes, or other types of transformation might benefit from a managed migration approach. In this post, we demonstrate how to use AWS Glue to migrate data from an Amazon Aurora database snapshot into an Aurora DSQL cluster.
Solution overview
AWS Glue is a data integration service that provides a managed parallel execution environment for Apache Spark jobs that perform Extract, Transform, Load (ETL) operations. With AWS Glue, you can write PySpark scripts that perform any data transformations that their migration requires and they can run the scripts by specifying the number and capacity of compute nodes that they want to use for their migration. The AWS Glue service manages the underlying compute infrastructure and orchestrates the distribution and parallel execution of work across the compute nodes.
We demonstrate this migration approach by moving a two-table database from Amazon Aurora PostgreSQL-Compatible Edition to Aurora DSQL using a database snapshot and AWS Glue. The following diagram shows the workflow for our migration.
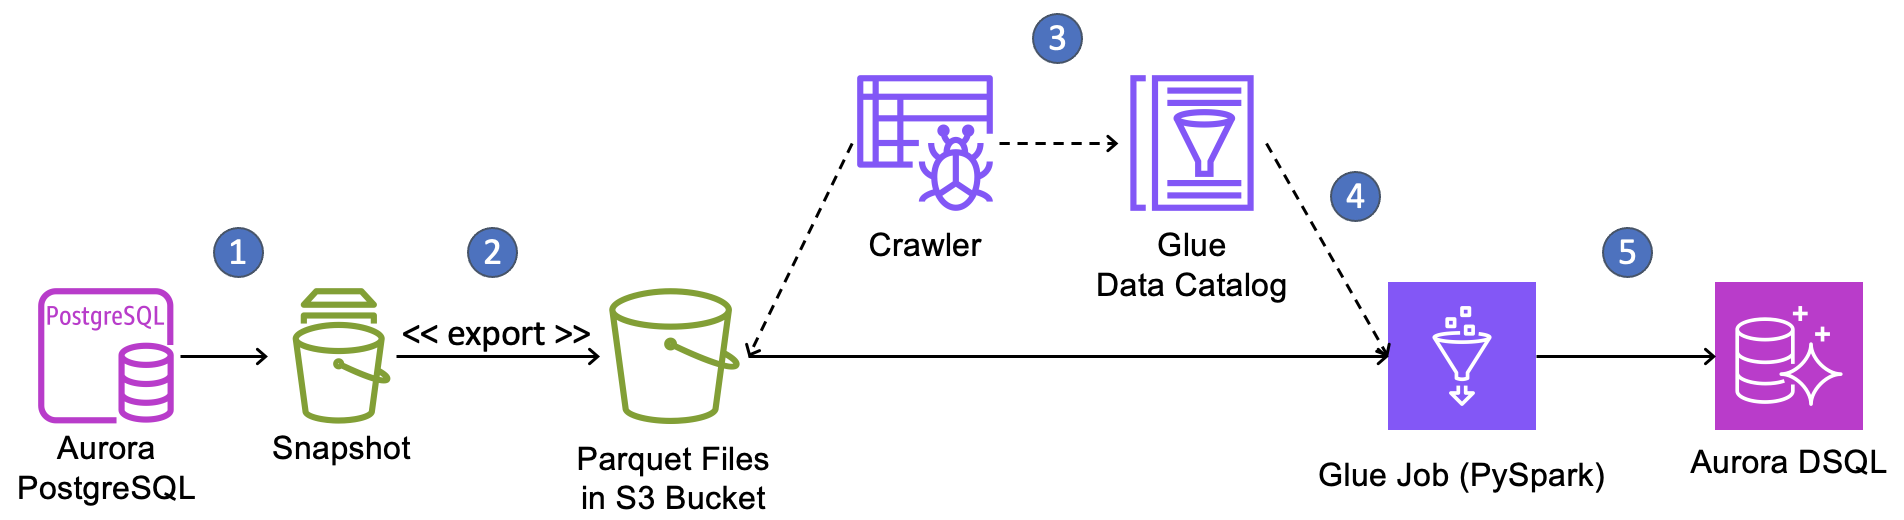
The migration workflow is as follows:
- Create a snapshot of your Aurora PostgreSQL cluster.
- Use the export-to-S3 feature of Aurora snapshots to extract data from the snapshot into an Amazon Simple Storage Service (Amazon S3) bucket in Parquet format.
- Create and execute AWS Glue crawlers to discover the Parquet files in S3, determine their schema, and record the schema and file locations in the AWS Glue Data Catalog. We will create one crawler for each table in the source database.
- Create a PySpark ETL job in AWS Glue that consults the Data Catalog to find and read files from S3, performs any required data transformations, and writes the data into Aurora DSQL.
- Run the ETL job to perform the one-time data load.
Note that Aurora DSQL only supports one database per cluster whereas Aurora clusters can host multiple databases. To migrate an Aurora cluster that hosts multiple databases, you must repeat this migration process for each database contained in the Aurora snapshot, either deploying each database onto its own Aurora DSQL cluster or migrating multiple databases into individual schemas within one single database on Aurora DSQL.
Data type conversions
The Aurora snapshot export-to-S3 process performs data conversions that will affect how data is eventually written into Aurora DSQL. Some conversions might require correction or re-conversion, which can be performed in PySpark in the AWS Glue ETL job. For example, timestamp columns from the source database will be converted to Parquet byte arrays during snapshot export and will be interpreted as character string objects when read in PySpark. These strings must be converted back to timestamp types before writing them to Aurora DSQL. To learn how the snapshot export process converts PostgreSQL data types into Parquet, see the export documentation.
Aurora DSQL doesn’t support all of the data types available in open- source PostgreSQL. For a list of all data types that Aurora DSQL supports, see the Aurora DSQL User Guide. You will need to identify which columns in your source database tables use a datatype that Aurora DSQL doesn’t support, decide how you will represent them in Aurora DSQL, and perform the conversion in the AWS Glue PySpark job. Note that these columns might also undergo conversion during the snapshot export process, so your PySpark script must account for this.
Handling primary keys
Many applications use serial integers for primary keys. This helps to automatically assign a unique identifier for new data and, in most relational databases, it places new rows close together in storage, making it more likely that recently-added rows will be placed in the buffer cache when other new, nearby rows are read. New data tends to be read more often than early data in applications and reads from cache are much faster than reads from storage, so serial identifiers often produce improved read performance for many applications.
However, Aurora DSQL doesn’t provide buffer caching and using serial integer keys at scale can create a hot storage partition because Aurora DSQL range partitioning places all new data on the same storage partition. Instead, choose a primary key that gives good distribution across range-partitioned storage. We recommend that you choose a compound key composed of a high cardinality column followed by one or more other columns where all of the columns already exist in your table. This type of key is more likely to align with how you access your data, so it won’t require additional secondary indexes. Also, it won’t require additional data transformation during migration, because you would only be changing a table definition and not the data in the table.
However, this isn’t always possible. Sometimes you must create a new primary key column to replace the old one, using either a universally unique identifier (UUID) or a randomized identifier. Converting primary keys during migration is difficult and requires foreign key relationships to be corrected. You might want to retain the early identifiers in another column to map rows between the source database and the target database for verifying the migration. All applications that interact with the database must be updated to use the new identifiers.
We convert primary keys to UUIDs and correct foreign key relationships in our example migration to demonstrate how this can be done using AWS Glue and PySpark. We retain the original primary keys in a separate column so we can map back to the source database.
Migration steps
In this section, we walk through the process of migrating the database for a fictional retail application from Aurora PostgreSQL to Aurora DSQL. Our goal in this post is to demonstrate the migration process with an example so that you might adapt it to your migration.
Our source database in Aurora PostgreSQL is called “storefront”. Storefront contains the schema sales with the following tables:
These tables aren’t particularly effective for a real storefront database, but they contain columns with a variety of data types to demonstrate how they translate into Aurora DSQL. Note that the customer_id column of the sales.orders table references the id column of the sales.customers table. For the sake of simplicity, we haven’t shown indexes and constraints.
Pre-requisites
The example migration shouldn’t be performed in a production environment. To perform the example migration, you will need an AWS account and sufficient permissions to create the resources, including AWS Identity and Access Management (IAM) roles and permissions, for the migration. As you adapt the example solution for your own migration, that work should be performed and thoroughly tested in a non-production account before migrating your production data.
You will also need access to a Unix bash shell session running locally on your workstation or on a compute instance running in your AWS environment. The workstation must have network access to the AWS account and the source and target databases and must have a recent version of the AWS Command Line Interface (AWS CLI) installed. The AWS CLI must be configured with the previously mentioned IAM role.
You should have an intermediate-level experience working with databases in the AWS environment, working with Unix shells, and working with the AWS Console and AWS services like AWS CloudFormation. Based on this assumption, we don’t provide specific instructions for setting up the source database, connecting to the databases, or setting up the workstation that you will run commands on.
The migration requires an Amazon S3 bucket, AWS Glue crawlers, an AWS Glue job, an AWS Key Management Service (AWS KMS) key, and several IAM policies and roles that grant the permissions that enable the end-to-end workflow. For the sake of convenience, these components are deployed using an AWS CloudFormation template that sets up the infrastructure and deploys the PySpark code used in the migration. The CloudFormation template and related files are available in a GitHub repo and must be downloaded to your workstation. Download the project files to your workstation with the following command:
The repository has a sub-directory called amazon-aurora-snapshots-to-dsql that contains the files listed below. This will be referred to as the project directory throughout this post.
The project contains the following files:
| stack.yml | Creates the S3 bucket, AWS KMS key, AWS Glue crawler, AWS Glue job, and related IAM policies and roles that are referenced in the following section. |
| ddl-dsql.sql | Contains SQL commands to create the require schema, tables, and indexes in the target Aurora DSQL cluster. |
| storefront.sql.zip | Contains SQL commands to create the schema and tables for the source database and to populate the tables with sample data. |
Create a new Aurora PostgreSQL cluster in a private sub-network in an Amazon Virtual Private Cloud (Amazon VPC) in your AWS account. We used PostgreSQL 17.7 for the example migration. Name the cluster “prod-cluster” and give it an initial database name of “storefront”. If you forget to set the initial database name on cluster creation, log in to the cluster and create the database by running the following SQL statement:
Create the database schema and load sample data from the bash shell by running the following commands in the project directory.
You will be prompted to enter the password of your database cluster’s “postgres” user. After the data is loaded, log into the storefront database and view the sample data with the following SQL commands:
Now that the example’s source database is ready, it’s time to perform the data migration to Aurora DSQL.
Performing the migration
First, create an Aurora DSQL cluster. Run the following commands at a Unix-like command-line to create a single-region Aurora DSQL cluster with the name “storefront” and save its endpoint and Amazon Resource Name (ARN) in new environment variables. Cluster creation will only take several seconds.
Check the status of the cluster with the following command:
Run the command a few times until the status is “ACTIVE”. When the Aurora DSQL cluster is active, connect to the cluster and create the schema and tables by running the commands in the ddl-dsql.sql file from the GitHub project.
Next, you will create a new AWS CloudFormation stack named “apg-to-dsql” using the stack.yml template file from the previously mentioned GitHub project. The stack name is important because we reference it later. The stack requires the following parameters:
| DSQLClusterEndpoint | The endpoint of the Aurora DSQL cluster that you created. You can find this value in the cluster’s details page in the AWS Console. |
| DSQLClusterArn | The ARN of the Aurora DSQL cluster that you created. You can find this value in the cluster’s details page in the AWS Console. |
| LoaderJobCapacity | The maximum capacity in AWS Glue data processing units (DPUs) that can be allocated to the DSQL loader job, from 2–100. A DPU is a relative measure of processing power that consists of four vCPUs of compute capacity and 16 GB of memory. Choose a capacity in DPUs based on the size and complexity of your migration. |
| ExportJobName | A name for the snapshot export job. This name must be unique in your account. |
| SourceDatabaseName | The name of the source database in Aurora PostgreSQL. |
| SourceSchemaName | The name of the schema to migrate from the source database. |
Run the following commands in the project directory to create the stack using default values for the sample migration.
Wait for the stack to complete. It will have several output values that are required in subsequent steps.
| KmsKeyArn | The ARN of the AWS KMS key created to encrypt the exported snapshot data. |
| SnapshotExportRoleArn | The ARN of the IAM role that the snapshot export process needs to store data in S3. |
| GlueRoleName | The name of the IAM role that gives the AWS Glue job the access it needs. |
| GlueRoleArn | The ARN of the IAM role that gives the AWS Glue job the access it needs. |
| GlueJobName | The name of the AWS Glue job. |
Run the following commands to fetch stack parameters and output values into environment variables for easy use in subsequent commands. Note that if you named your stack something other than “apg-to-dsql”, you must modify the commands to use the name that you choose for the stack.
Create the database snapshot with the following command. Note that we’re naming the snapshot “migrate-to-dsql” and our source database cluster is named “prod-cluster” as previously described. We capture the ARN of the snapshot into an environment variable called SNAPSHOT_ARN for use later.
Check the status of the snapshot with the following command:
Run the command a few times until the status is “available”, then export the snapshot with the following command:
Run the following command periodically to get the status of the export job until the job status is “COMPLETE”.
At this point, you’ve created all the infrastructure required for the migration, created a snapshot of the source database, and exported the snapshot into an S3 bucket as Parquet files. Next, you will run the AWS Glue crawlers to catalog the exported data and run the PySpark job to load the data into Aurora DSQL.
Run the AWS Glue crawlers for both exported tables from the source database with the following commands. The crawlers were created in the CloudFormation template.
Run the following commands to get the states of the crawler jobs. It might take several minutes for the crawlers to run to completion, depending on the amount of data to crawl. Run the commands every minute or so until both jobs show a status of “COMPLETED”.
When both crawler jobs have completed, run the following command to see the tables and columns that the crawlers cataloged from the exported snapshot data. The catalog will be used by the AWS Glue loader job to find the exported snapshot data in the S3 bucket.
The output should look like this:
Run the AWS Glue job by running the following command:
Run the command below to get the job’s status. Run it periodically until the job completes.
When the job completes, the data migration is done.
Verification
We will perform row counts and sum numeric columns to verify that our migration is complete and correct.
First, run the following queries in both the source Aurora PostgreSQL database and the target Aurora DSQL cluster:
Both counts should be equal. Now run the following query in both the source Aurora PostgreSQL database and the target Aurora DSQL cluster and verify that all of the counts and sums are the same:
This simplistic approach to verifying the migration won’t be sufficient for production migrations. Instead, a row-by-row comparison of every column value might be required, taking into consideration any transformations performed during the migration.
Understanding the AWS Glue Job
While there are quite a few moving parts to this migration approach, the only complicated part is the AWS Glue job, because it requires you to write the script yourself. Our AWS Glue job is straightforward, only doing a couple of data type transformations and changing integer identifiers to UUIDs, but it shows the rudiments for performing more complex migrations that you can use to build your migration script. The AWS Glue job code for this sample migration was deployed in the CloudFormation stack. To view it, go to the AWS Glue console, select ETL jobs, and choose the storefront-snapshot-dsql-loader job. That will load the script into the script editor. Let’s review the code to see what it does.
The top of the file is setup code: importing libraries, initiating API components, and fetching job configuration parameters that were set by our CloudFormation template. Here’s what that section looks like:
The next few lines of code load customer and order data from S3, using the AWS Glue catalog to find the files and understand their structure.
Now we perform a few transformations on our data. We need to convert a few data types and we will convert our table primary keys to UUIDs, retaining the old IDs under a different column name. Let’s start with the customers table.
Here, we rename the id column to “old_id”. Then we create a new column called “id“ and populate it with a newly-generated UUID value for each row. We use familiar SQL to perform these transformations and select the columns that we want to retain for subsequent steps.
We do something similar for the orders table, except we also rename the customer_id column to “old_customer_id”. The “old_customer_id” column is temporary. We will use it later to fix the foreign key relationships for the switch to UUID primary keys.
Now we fix the “order_timestamp” and “order_date” columns, converting their string values from the Parquet conversion back to actual timestamp and date types. Note the use of the to_timestamp() and to_date() functions.
Now, we will fix the foreign key relationships between orders and customers to use the new UUID primary keys and we will drop the “old_customer_id” column that we don’t want in our Aurora DSQL database. Aurora DSQL doesn’t currently enforce foreign key constraints, but it does support joins, so fixing the relationships to support efficient joins is important.
That’s it for our data conversion work. We’ve only shown some basic conversions to demonstrate the migration architecture, but PySpark is a rich language that you can use to perform any kind of transformation that your migration requires.
Now that our data is prepared, it’s time to write it to DSQL. Here’s the code to do that.
First, the code generates a token for IAM authentication. The token is used as the database password. We set a long timeout on the authentication token so that it remains valid through the migration job execution.
Next, we write the DataFrames for customers and orders to their respective tables in Aurora DSQL using a DataFrameWriter by calling write() on the DataFrame. We set the write mode on the DataFrameWriter to “append” so that Spark doesn’t attempt to create tables in Aurora DSQL. Aurora DSQL requires SSL connections, so we set “sslmode” to “require”.
The DataFrameWriter’s default behavior is to execute our inserts in multiple batches, but all in one database transaction. This will cause the AWS Glue job to fail because Aurora DSQL has a limitation of 3,000 modified rows per transaction. To get around this, we set “isolationLevel” to “NONE”. This forces the DataFrameWriter to commit after each batch. To make sure the batch size won’t violate DSQL’s limit, we set “batchsize” to “2500”.
Cleanup
Now that you’ve run the migration, verified the results, and understand the AWS Glue script, it’s time to clean-up the resources created in this article.
First, delete the CloudFormation stack by running the following command:
Run the following command every so often to get the state of the stack until the command returns the error “Stack with id apg-to-dsql does not exist”. This indicates that the stack has been deleted.
When the CloudFormation stack has been deleted, delete the Aurora DSQL cluster by running the following command:
Then, delete the database snapshot by running the following commands.
Finally, delete the Aurora PostgreSQL cluster that served as the source database in this example.
Summary
In this post, we’ve demonstrated how you can migrate data from an Aurora PostgreSQL snapshot into Aurora DSQL using AWS Glue. AWS Glue provides a managed parallel execution environment that you can use to migrate a lot of data quickly into Aurora DSQL and perform transformations on the data with a rich programming language. While the process seems complicated, the only difficult part is writing the AWS Glue script, depending on the complexity of your migration and your proficiency with PySpark. We’ve provided a base script that you can modify for your migration.
You can begin evaluating Aurora DSQL today without even having an AWS account using the browser-based playground, an ephemeral database environment that you can use to quickly explore Aurora DSQL and get hands-on in minutes.