AWS Database Blog
Migrating from SAP ASE to Amazon Aurora PostgreSQL
Enterprise customers often have legacy applications running on an older variant of databases, which impedes the applications’ scalability. In this high-speed cloud computing world, businesses are anxiously looking for solutions to migrate these databases to the cloud. Amazon Aurora is a highly available and managed relational database service with automatic scaling and high-performance features. The combination of PostgreSQL compatibility with Aurora enterprise database capabilities provides an ideal target for commercial database migrations.
In this post, we cover the best practices to migrate an on-premises SAP ASE (Sybase) database to an Aurora PostgreSQL database using AWS Schema Conversion Tool (AWS SCT) and AWS Database Migration Service (AWS DMS). We discuss the multiple phases involved in a migration:
- Preparation and assessment
- Migration
- Cutover procedures
As of this writing, AWS SCT only supports Sybase version 15.7 and 16.0. AWS DMS only supports version 12.5.3 and higher. For the latest product supported versions on Sybase, see What Is the AWS Schema Conversion Tool? and Using an SAP ASE database as a source for AWS DMS. You should also know the product limitations when Sybase is the source and the limitations for PostgresSQL as the target.
Preparing and assessing on the source database
Preparation and assessment is the initial phase. Before we start moving data, we need to monitor and analyze the source database schema for the data lifecycle. To provide the best migration solution, you need to have a better understanding on the workload, data access patterns, and data dependencies. In this post, we discuss the following areas:
- Character set
- Entity relationships
- Largest table size
- Unused tables and indexes
- Largest LOB size
- Integration with other databases or OS
Prerequisites
To complete this step, you need the following:
- A SQL client tool (for this post, we use SQL Developer)
- An entitity relationship (ER) tool to retrieve the ER
- A Sybase user with admin privileges to query the system tables. The user must have following roles:
sa_rolereplication_rolesybase_ts_role
If you rely on AWS DMS to enable Sybase replication on table (which is mandatory), you need to grant permissions to run the stored procedure sp_setreptable. Alternatively, set the extra connect attribute enableReplication=false, which means you have to manually enable sp_retreptable on the table to migrate ongoing replication changes.
Character set
To find out the default character set and sort order for your SAP ASE database, enter the following query:
Note: If your application uses a different charcter set, you can find it from your session via the checking global variable @@client_csname or @@client_csid.
PostgreSQL supports various character sets, from single byte to multiple bytes. When you create a new Aurora PostgreSQL database, the default character set is UTF8. PostgreSQL also supports automatic character set conversion for certain character set combinations. In our testing environment, we used AWS DMS to migrate an SAP ASE 12.5 database with character set ISO8859 to Aurora PostgreSQL ISO8559 with no conversion issue.
If you have a non-default character set that you want to migrate, you have to use an extra connect attribute to specify the character set being used by the source database. For example, if a customer’s default character set is UTF8, they have to specify charset=utf8 as an extra connect attribute to correctly migrate the data.
Entity relationship
If possible, reverse engineer your data model using an ER tool (such as Erwin). The ER diagram gives you a clear picture of the relationships between your database objects. When you set up an AWS DMS task, you need to migrate the dependent tables together to ensure transactional consistency.
Largest table size
Study your largest and busiest tables to find out their sizes and rate of change. This gives you an accurate estimate of where time will be spent when you do the initial data migration using the AWS DMS full load feature. You can try to parallelize the load on the table level with one task to save time. The SAP ASE server only allows one replication thread for each database, so you can only start one AWS DMS task at one time for each database. You can’t run multiple tasks, which is common when migrating other database engines. For more information, see Limitations on using SAP ASE as a source for AWS DMS.
For version 15 and later, you need to query sysobjects to list the top 10 in row count and space used. See the following code:
We need to identify tables with the TEXT, UNITEXT and IMAGE data type, because AWS DMS converts these objects to LOB. It’s always recommended to identify the size of LOB columns and choose LOB settings (limited or full mode) and max LOB size appropriately. See the following code:
For older versions, query sysindexes:
Unused tables and indexes
You first need to set up auditing on your Sybase server. You need to install a security database, restart the server, and enable auditing.
You use the sp_audit procedure to audit all the tables and indexes for select, insert, update, and delete for a data cycle of 3–30 days, depending on your application usage pattern. If you want to migrate tables that haven’t been accessed in the last 30 days, it should be fine to also include those. See the following code:
Largest LOB size
LOB typically takes the longest to migrate, unlike data types such as number and character, due to time spent encoding, storing, decoding, and retrieving them. You can use the following dynamic SQL to generate a query for each table:
After running the preceding queries, compare the results and pick the top one.
For example, we found the largest LOB column in our SAP ASE database is 119 KB. We used this number as input in our task settings with limited LOB mode. The speed of the full load is greatly improved with limited LOB mode compared to full LOB mode. For performance reasons, we recommend using limited LOB mode but increase the maximum LOB size (KB) so it’s big enough to cover the actual size you find from your query. For more information about speeding up LOB migration, see How can I improve the speed of an AWS DMS task that has LOB data?
Integration with other databases or OS
If you have remote objects or interfaces in your code, you need to replace them with other AWS services or equivalent external services.
For example, in the SAP ASE database, you may send out email using the xp_sendmail procedure. Because Aurora PostgreSQL doesn’t support email natively, you need to redesign the process. This involves using an AWS Lambda function to send email from the database. For more information, see Sending notifications from Amazon Aurora PostgreSQL.
Note: If we have database links from source database to remote server in SAP ASE, we will need to update the data. The workaround will involve redesign some of these use cases with foreign data wrappers (FDW).
Migrating the database
The two major tasks in this section are code conversion and data loading. We use AWS SCT to convert the schema objects (tables, views, procedures, functions). We then use AWS DMS to load the table data.
Converting schema and code objects from Sybase to Aurora PostgreSQL
The following screenshot shows that AWS SCT can’t convert some particular procedure or objects.
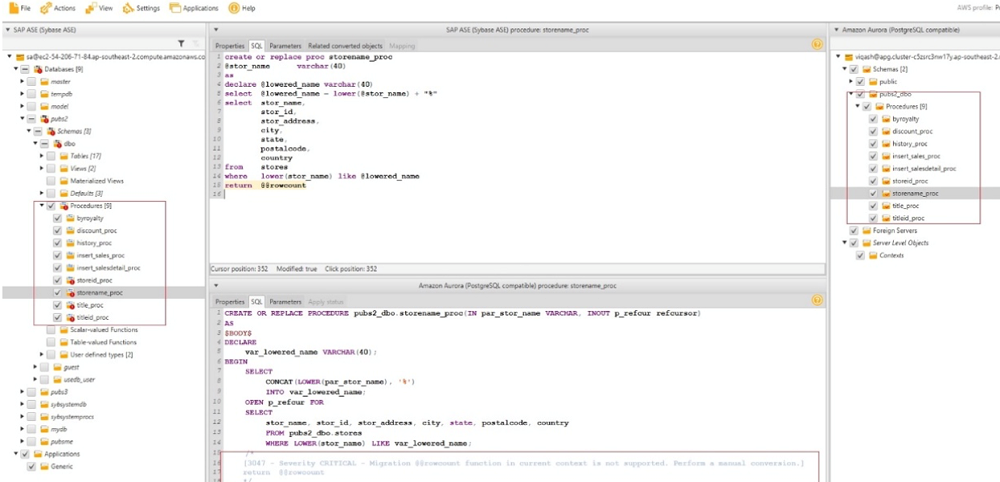
When this occurs, you see a red exclamation mark on the object that it’s failing to migrate. When you choose the failed object, you see more details about the error. For example, in this case, Postgres doesn’t support the @@rowcount function. You need to manually convert this outside of AWS SCT.
Prerequisites
Before you get started, make sure you have the following prerequisites:
- AWS SCT downloaded and installed with the required Sybase and PostgreSQL JDBC drivers to your client machine. For instructions, see Installing, Verifying, and Updating the AWS Schema Conversion Tool.
- The latest version of AWS SCT (support for Aurora Postgres version 11 started from the AWS SCT 633 build).
- A Sybase database user with select privilege on the system and user schema tables and views. If you plan to use the same user for AWS DMS migration with change data capture (CDC) later, grant
sa-roleto it. - An Aurora PostgreSQL database as your target.
- An Aurora PostgreSQL database user with superuser or proper privileges required. For more information, see Configure Your PostgreSQL Target Database.
Converting the schema
When you have the required resources, complete the following steps:
- Connect to the source and target databases and convert your schema. For instructions, see Migrate Your Procedural SQL Code with the AWS Schema Converstion Tool.
- Save the SQL scripts after you convert your schema.
- Run them in your target PostgreSQL database.
- Create tables with primary keys only.
- Add the foreign keys and secondary indexes after the full load is complete.
As of this writing, AWS SCT doesn’t support Sybase of versions older than 15.7. You have to manually convert your schema objects. For more information about data type mapping between Sybase and PostgreSQL, see Source data types for SAP ASE.
Migrating SAP ASE to Aurora PostgreSQL using AWS DMS
In this section, we walk through the steps to migrate an SAP ASE database to Aurora PostgreSQL using AWS DMS.
AWS DMS creates the schema in the target if the schema doesn’t exist. However, AWS DMS only creates the tables with primary keys. It doesn’t create foreign keys or secondary indexes. Even the default values may be missing. The best practice is to create the schema objects using the scripts AWS SCT generated in the prior step, then start AWS DMS to load table data.
Prerequisites
Before you get started, make sure you meet the prerequisites for using an SAP ASE database as a source for AWS DMS.
Regarding the sa_role permissions you need to grant, you may be reluctant to grant this role to the AWS DMS user. However, AWS DMS needs this privilege to run DBCC TRACEON(3604). The AWS DMS application turns this flag on so that the output is redirected to the AWS DMS client. DBCC TRACEON is a sysadmin right. If you don’t want to grant the sa_role directly, you can work around it by developing a trigger to grant the role at the session level.
Make sure you have foreign keys and triggers disabled in the target. Additionally, your AWS account should have privileges on AWS DMS and Amazon Relational Database Service (Amazon RDS).
Creating your replication instance
To start your migration, you first create an AWS DMS replication instance. For performance reasons, we recommend creating it in the same Region as your target Aurora database.
- On the AWS DMS console, choose Replication instance.
- Choose Create replication instance.
- Enter your desired instance configuration.
- For Instance class, you can choose from t, c, or r types. We recommend the C5 type for production due to its network and memory optimization.

- For Instance class, you can choose from t, c, or r types. We recommend the C5 type for production due to its network and memory optimization.
Creating your source endpoint
You next create a source endpoint for Sybase and test the connection using the preceding replication instance.
- On the AWS DMS console, choose Endpoints.
- Choose Create endpoint.
- For Endpoint type, select Source endpoint.
- Enter your desired endpoint configuration.
 For instructions on using an on-premises name server and using a hostname instead of IP, see Using your own on-premises name server.
 - After you create the endpoint, select it and choose Test connection from the Actions drop-down menu.
 If your SAP ASE version is 15.7 and higher and you’re willing to use TLS, you have to use ECA provider =Adaptive Server Enterprise 16.03.06.
Make sure the database port 1526 is opened to the IP range of your replication instance before you test the connection. If the firewall is open but you still experience a connection issue, please contact AWS Support.
Creating a target endpoint
You now create your target endpoint for Aurora PostgreSQL.
- On the AWS DMS console, choose Endpoints.
- Choose Create endpoint.
- For Endpoint type, select Target endpoint.
- Enter your desired endpoint configuration.


- Test the connection using the preceding replication instance.
For the connection to be successful, you must edit the security group for the RDS DB instance with PostgreSQL port 5432 open to the replication instance’s private IP or IP range. - On the Amazon RDS console, choose your Aurora PostgreSQL DB instance.
- On the Connectivity & security tab, locate your security group name under Security.

- Choose the security group link.
A new page opens to the security group interface. - Choose Inbound rules.
- Choose Edit inbound rules.
- Add the IP range of the replication instance.

Creating and starting the migration task
To create a migration task using the source and target endpoints, complete the following steps:
- On the AWS DMS console, choose Database migration tasks.
- Choose Create task.
- Provide information for the task identifier, replication instance, source database endpoint, and target database endpoint.
- For Migration type, choose Migrage existing data and replicate ongoing changes (recommended to minimize downtime).
- In the Task settings section, for Target table preparation mode, select Do nothing (assuming your tables are created in the target database already).
- For Stop task after full load completes, select Stop after applying cached changes (at this time, you enable foreign keys and triggers in the target, then resume the task).
- For Include LOB columns in replication, choose Limited LOB mode (recommended for performance reasons).
- For Maximum LOB size, enter the larger LOB size you found from the earlier query (for this use case, 199 KB).
- For Enable validation, leave deselected.
As of this writing, AWS DMS doesn’t support validation for SAP ASE migrations. - Select Enable CloudWatch logs.
This is the file that you need to monitor for task progress and errors. You can also raise the debug level when needed.

- In the Table mappings section, choose the JSON

- Delete the lines in the text box and enter your own JSON file with the table selection and transformation rules. See the following example code:
The preceding code migrates the table
tax_masterin thedboschema.
For more information, see Using table mapping to specify task settings. - In the Advanced task settings, for Create control table in target using schema, enter a target schema for these tables.
If you don’t provide a schema, your task fails with the following error: - Enable your desired control tables.
AWS DMS can create four control tables for you:
-
- Apply exceptions
- Replication status
- Suspended tables
- Replication history
.
You need to purge these tables manually if they grow too large. For more information, see Control table task settings.
- For Maximum number of tables to load in parallel, enter a number depending on your source and target database capacity.
 After you create your task, its status shows as
 Ready. When you start or resume it, the status shows asStartingand changes toRunning.

- To monitor the process, choose Task Monitoring, Table Statistics, Logs.
For more information about monitoring, see Monitoring Database Migration Service metrics and How can I enable monitoring for an AWS DMS task?
When the full load is complete, the task stops. You can take this opportunity to add or enable your foreign keys or constraints and triggers in your target. If your migration type is Migrate existing data and replicate ongoing changes, you need to resume the task so that it picks up the cached changes.
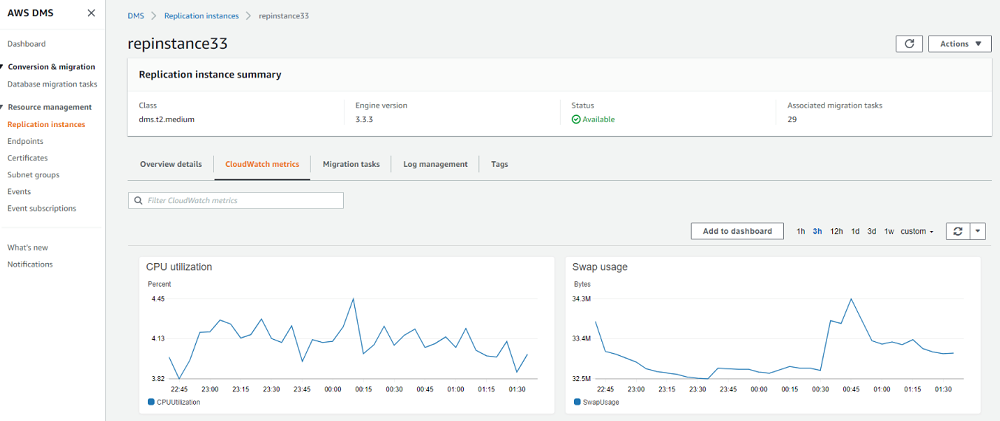
When you have tasks running, you also need to monitor the on-premises source host, your replication instance, and your target RDS. Make sure you create alarms and get notified on key metrics like CPU utilization, freeable memory, and IOPS. The following screenshot shows various Amazon CloudWatch metrics.

Cutting over to Aurora PostgreSQL
When AWS DMS finishes the full load and applies cached changes, it moves to the CDC stage. This is when you can cut over to Aurora. You run SQL queries to validate data and use AWS services to set up backup and monitor jobs.
Complete the following steps:
- Before cutover, analyze the indexes in Aurora PostgreSQL and test the performance of critical queries.
- Shut down all the application servers and stop all the client connections to SAP ASE. Close any user sessions if necessary.
- Verify target data has been synced with the source database.
- Stop the AWS DMS task.
- Create the foreign keys and secondary indexes in Aurora PostgreSQL if you didn’t create them before CDC started.
- Validate tables, views, procedures, functions, and triggers within your schema.
- In SAP ASE, all these objects are kept in the same
sysobjectsSee the following code: - In Aurora PostgreSQL, you need to count each object type by querying different system tables. For more information, see Validating database objects after migration using AWS SCT and AWS DMS.
- In SAP ASE, all these objects are kept in the same
- Validate count indexes.
- In SAP ASE, enter the following code:
- In Aurora PostgreSQL, download the script from Validating database objects after migration using AWS SCT and AWS DMS.
- Validate table column default values. During the migration process, AWS DMS may have set
NULLas default value for some columns. For this post, we created a tabletest_tablewith the default value set tonet_livefor thednamecolumn.- In SAP ASE, find the ID of the default value from
syscolumnsand feed it tosyscommentstable to generate the actual default value. See the following code:Example output may look like the following:
You then use this ID to get the actual default value for the column. See the following code:
Example output may look like the following:
- In Aurora PostgreSQL, run the following script for each table and compare your results with SAP ASE:
- In SAP ASE, find the ID of the default value from
- Validate primary keys, foreign keys, and check constraints.
- In SAP ASE, enter the following code:
The code
status=128brings upcheck constraints: - In Aurora PostgreSQL, download and run the scripts from the constraint section of Validating database objects after migration using AWS SCT and AWS DMS.
- In SAP ASE, enter the following code:
- Create the CloudWatch alarms based on your desired DB metrics, such as the following:
- CPU utilization
- Freeable memory
- DB connections
- Write latency
- Read latency
- Network metrics
For more information, see Key Metrics for Amazon Aurora and Monitoring an Amazon Aurora DB Cluster.
When an alarm triggers, a notification goes to the on-call team using Amazon Simple Notification Service (Amazon SNS).
- Add a reader node to an existing Aurora PostgreSQL cluster. By default at the storage level, Aurora replicates data across three Availability Zones in one Region. It’s fault tolerant by design. For enhanced availability, we recommend you add a reader node for a production database to automate failover in case of instance failure. You need to modify the DB cluster to enable it.
- A) On the Amazon RDS Console, choose Databases.
- B) Select your database.
- C) From the Actions drop-down menu, choose Add reader.

- D) Choose your replica source.
- E) For DB instance identifier, enter a name.

For more information about Aurora DB cluster high availability features, see High Availability for Amazon Aurora.
- Switch the application servers and other clients and jobs to the Aurora PostgreSQL database.
Conclusion
We have demonstrated the end-to-end steps for migrating an SAP ASE database to Aurora PostgreSQL using AWS DMS. These are proven and tested steps with real customer use cases. We hope this guide has provided you the basic instructions needed to perform a similar migration. We will continue writing on SAP ASE to Aurora PostgreSQL migration topics, including post-migration rollback to SAP ASE procedures.
We sincerely welcome any feedback from you!
About the Authors

Li Liu is a Database Cloud Architect with Amazon Web Services.

Samujjwal Roy is a Database Specialty Architect with the Professional Services team at Amazon Web Services. He has been with Amazon for 15+ years and has led migration projects for internal and external Amazon customers to move their on-premises database environment to AWS Cloud database solutions.