AWS Database Blog
Unlock Amazon Aurora’s Advanced Features with Standard JDBC Driver using AWS Advanced JDBC Wrapper
Modern Java applications using Amazon Aurora often struggle to take full advantage of their cloud-based capabilities. Although Aurora offers powerful features such as fast failover, AWS Identity and Access Management (IAM) authentication support, and AWS Secrets Manager integration, standard JDBC drivers weren’t designed with cloud-specific features in mind. This isn’t a limitation of open source drivers; they excel at what they were designed for and focus on database standards rather than cloud-based optimizations.
When Aurora fails over in seconds, standard JDBC drivers can take up to a minute to reconnect because of DNS propagation delays. While Aurora supports powerful features like IAM authentication and Secrets Manager integration, implementing these features with standard JDBC drivers requires complex custom code and error handling—complexity that the AWS Advanced JDBC Wrapper eliminates
This blog post shows java developers how to enhance an existing application that uses the open source standard JDBC driver with a HikariCP connection pooler by adding the AWS Advanced JDBC Wrapper (JDBC Wrapper), unlocking the capabilities of Aurora and the AWS Cloud with minimal code changes. This approach preserves all the benefits of your existing PostgreSQL driver while adding cloud-based features. The post also demonstrates one of JDBC Wrapper’s powerful features: read/write splitting.
Solution overview
The JDBC Wrapper is an intelligent wrapper that enhances your existing JDBC driver with capabilities of Aurora and the AWS Cloud. The wrapper can transform your standard PostgreSQL, MySQL, or MariaDB driver into a cloud-aware, production-ready solution. Developers can adopt the JDBC Wrapper to take advantage of the following capabilities:
- Fast failover beyond DNS limitations – The JDBC Wrapper maintains a real-time cache of your Aurora cluster topology and each database instance’s primary or replica role through direct queries to Aurora. This bypasses DNS delays entirely, enabling immediate connections to the new primary instance during failover.
- Seamless AWS authentication – Aurora supports IAM database authentication, but implementing it traditionally requires custom code to generate tokens, handle expiration, and manage renewals. The JDBC Wrapper automatically handles the entire IAM authentication lifecycle.
- Built-in Secrets Manager support – Secrets Manager integration retrieves database credentials automatically. Your application doesn’t need to know the actual password—the driver handles everything behind the scenes.
- Federated authentication – Enable database access by using organizational credentials through Microsoft Active Directory Federation Services or Okta.
- Read/write splitting using connection control – You can maximize Aurora performance by routing write operations to the primary instance and distributing reads across Aurora replicas.
Note: Read/write splitting feature requires developers to explicitly call setReadOnly(true) on connections for read operations. The driver does not automatically parse queries to determine read versus write operations. When setReadOnly(true) is called, all subsequent statements executed on that connection will be routed to replicas until setReadOnly(false) is called. This feature is explored in detail later in this post.
This post walks through a real-world transformation of java application using the JDBC Wrapper. You’ll see how an existing Java application evolves through three progressive stages:
- Stage 1: Standard JDBC driver(baseline) – The application connects directly to the Aurora writer endpoint through the standard JDBC driver, with all operations using a single database instance and relying on DNS-based failover.
- Stage 2: JDBC Wrapper with fast failover – The application uses the JDBC Wrapper to maintain an internal topology cache of the Aurora cluster, enabling fast failover through direct instance discovery while still routing all operations through the writer endpoint.
- Stage 3: Read/write splitting – The application uses the JDBC Wrapper read/write splitting feature to send write operations to the Aurora writer instance and distribute read operations across Aurora reader instances, optimizing performance through automatic load balancing.
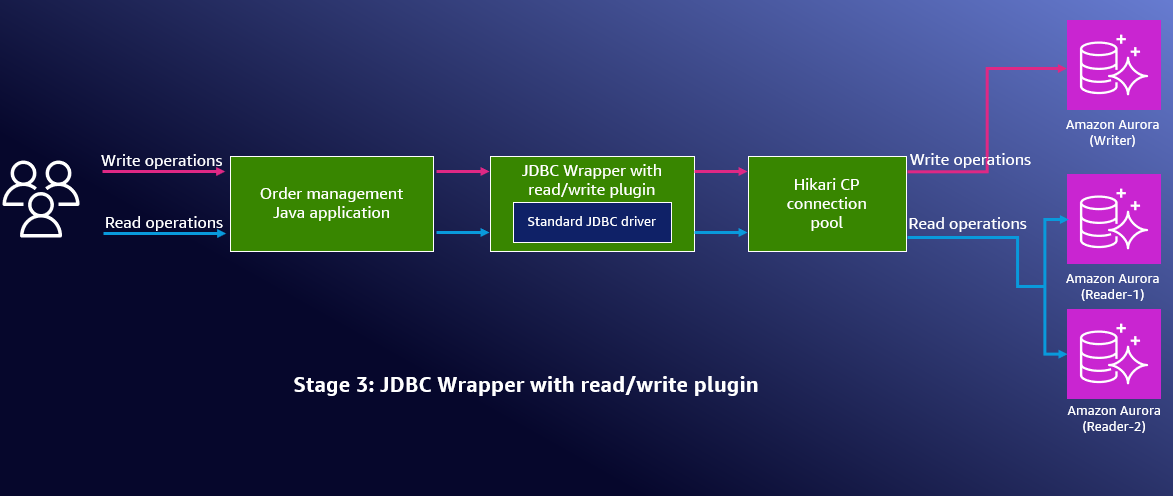
Figure 1: Architecture diagram showing Stage 3 configuration with read/write splitting enabled
Prerequisites
You must have the following in place to implement this post’s solution:
- An AWS account with permissions to create Aurora clusters
- A Linux-based machine with the following software installed to run the demo application that can connect to the Aurora cluster:
- AWS CLI version 2 configured with your credentials
- Java Development Kit 8 or later
- Gradle 8.14 or later
Infrastructure setup options
- Option A: Infrastructure as code with the AWS Cloud Development Kit (AWS CDK) (recommended)
- Additional requirements: Node.js 20 or later, Maven 3.6 or later
- AWS CDK v2 installed and configured:
- Install: npm install -g aws-cdk (AWS CDK Getting Started Guide)
- Bootstrap: cdk bootstrap (AWS CDK Developer Guide)
- IAM permissions: Your AWS credentials need the permissions specified in iam-policy-cdk.json
- Option B: Manual setup
- Aurora cluster: Create an Aurora cluster with at least one read replica
- Security group: Open port 5432 from the machine where you cloned the repository.
Implementing the Solution
Set up the development environment
In this section, you will clone the sample repository and examine the Java order management application that uses HikariCP connection pooling with a standard PostgreSQL JDBC driver
Clone the GitHub repository by using the following code:
The demo application simulates a real-world order management system that powers an online store where customers place orders, staff members update order statuses, and managers generate sales reports. This scenario demonstrates the challenge of mixed-database workloads: Some write-heavy operations need immediate consistency such as processing payments, but other read-heavy operations that use read replicas can tolerate slight delays such as when generating sales reports
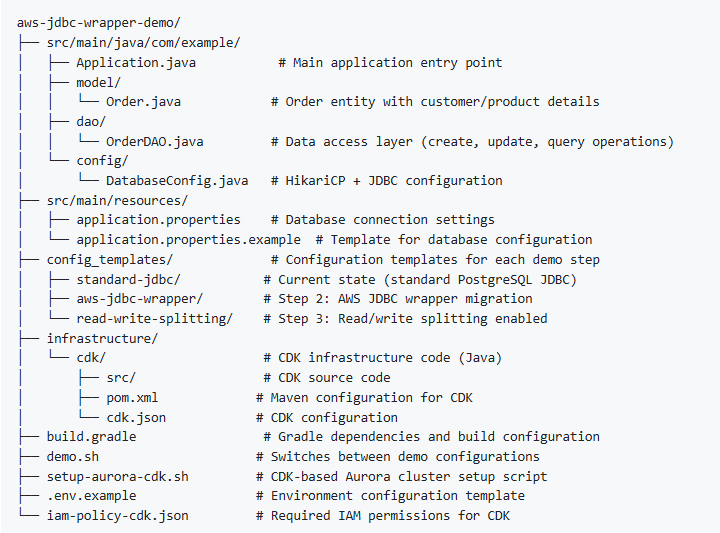
The repository has the following structure:
Now that you have the demo application code locally and understand its structure as a typical Java order management system using HikariCP and standard PostgreSQL JDBC drivers, the next step is to create the Aurora database infrastructure that the application will connect to.
Deploy the database infrastructure
You will create an Aurora cluster with two read replicas by using an automated script that uses infrastructure as code with the AWS CDK. The two read replicas are needed for demonstrating the AWS Advanced JDBC Wrapper’s read/write splitting capabilities—they provide separate instances to route read operations to while the primary instance handles write operations. If you choose not to use the provided script, you can create the cluster manually through the AWS Management Console.
Override defaults with. env (Optional)
You can override the default settings by creating a .env file if you need to use existing AWS resources (like a specific VPC or security group) or want to customize resource names. If you don’t want to use existing AWS infrastructure, you can skip this step and use the defaults.
Create an Aurora cluster
Run the setup script to create an Aurora cluster with two reader instances and the writer instance:
You will see the following output after successfully creating the cluster:
Set up application properties
The application properties file contains the database connection details that your Java application uses to connect to Aurora cluster.
If you created the cluster by using the provided AWS CDK script (option A), the script automatically created and configured src/main/resources/application.properties with your Aurora connection details. As a result, you don’t need to create or configure the application properties file because the script did this for you.
For manual setup (option B), create and configure the application properties file:
Set up the database password
If you created infrastructure by using the AWS CDK script provided (option A): The AWS CDK script automatically generates a secure password and stores it in Secrets Manager. Set up the database password environment variable by using the following commands:
If you used the manual setup (option B):
Run this command to set the password you specified when creating your Aurora cluster:
export DB_PASSWORD=<your_database_password>
Now that you have successfully deployed your Aurora cluster with read replicas and configured the application properties and database password, the next step is to test the application in three progressive stages that demonstrate the AWS Advanced JDBC Wrapper’s capabilities
Configure the application with the JDBC Wrapper
This section covers three progressive stages of configuring your Java application with the JDBC Wrapper:
- Stage 1: Standard JDBC driver (baseline) – Run the application with the standard PostgreSQL JDBC driver.
- Stage 2: JDBC Wrapper with fast failover – Configure the JDBC Wrapper with fast failover capabilities.
- Stage 3: Read/write splitting – Enable read/write splitting to distribute reads across Aurora replicas
Stage 1: Standard JDBC driver (baseline)
You’ll run the application by using the standard PostgreSQL JDBC driver to establish a baseline before enhancing it with JDBC Wrapper capabilities. Execute the application to observe standard JDBC behavior:
./gradlew clean run
The following is the sample output:
Notice in the output that both write operations (creating orders) and read operations (getting order history) show the same connection URL pattern: → WRITER jdbc:postgresql://aurora-jdbc-demo.cluster-xxxxxxx. This demonstrates standard JDBC behavior where all database operations route to the Aurora writer endpoint, meaning both transactional operations and analytical queries compete for the same writer resources—the exact problem the AWS Advanced JDBC Wrapper’s read/write splitting will solve in the next steps.
Now that you have established a baseline with the standard JDBC driver and observed how all operations route to the Aurora writer endpoint, the next step is to configure the application to use the JDBC Wrapper while maintaining the same functionality but adding cloud capabilities such as fast failover.
Stage 2: JDBC Wrapper with fast failover
Now, transform this application to use the JDBC Wrapper while maintaining the same functionality but adding capabilities such as fast failover. You will use a script to automatically apply the necessary changes to upgrade your standard JDBC application with Aurora and AWS Cloud features.Before running the script, let’s examine which changes are needed for the application to use the JDBC Wrapper:
The build.gradle (Before configured to use JDBC Wrapper):
The following configuration shows the required changes to use JDBC Wrapper capabilities. The build.gradle (After configured to use JDBC Wrapper):
The build.gradle (After configured to use JDBC Wrapper):
This change adds the AWS Advanced JDBC Wrapper library (software.amazon.jdbc:aws-advanced-jdbc-wrapper:2.5.6) alongside the existing PostgreSQL driver (org.postgresql:postgresql:42.6.0). The wrapper acts as an intermediary layer that intercepts database calls, adds specific capabilities, then delegates actual SQL operations to the PostgreSQL driver.
In addition to the code changes above, you also need to update the JDBC URL in the application.properties file, which contains the database connection settings. The following configuration illustrates the current configuration with standard JDBC:
Before configured to use JDBC Wrapper:
db.url=jdbc:postgresql://aurora-jdbc-demo.cluster-abc123.us-east-1.rds.amazonaws.com:5432/postgres
The following configuration shows the required change with the JDBC Wrapper
After configured to use JDBC Wrapper:
The aws-wrapper: prefix tells the driver manager to use JDBC Wrapper capabilities.
The DatabaseConfig.java file updates the connection configuration. The following code illustrates the current configuration with standard JDBC:
Before configured to use JDBC Wrapper:
The following code shows the required change with the JDBC Wrapper:
After configured to use JDBC Wrapper:
The preceding code switches from a direct JDBC URL configuration to using the JDBC Wrapper.. This enables fast failover capabilities and supports advanced features like read/write splitting and IAM authentication. While adding these cloud capabilities, the wrapper still delegates all actual database operations to the underlying PostgreSQL driver. This gives you Aurora’s cloud features without changing your application’s business logic.
Run the following script to apply all the above changes and then execute the application:
./demo.sh aws-jdbc-wrapper
The preceding script makes the JDBC Wrapper changes and runs the Java application. You will see the same output as before, but now it includes JDBC Wrapper capabilities:
Notice that the connection pool name has changed from StandardPostgresPool to AWSJDBCPool , and the log shows AWS JDBC Wrapper connection pool initialized, confirming that the application is now using the JDBC Wrapper. The connection type shows software.amazon.jdbc.wrapper.ConnectionWrapper wrapping the underlying org.postgresql.jdbc.PgConnection, demonstrating that the wrapper is intercepting database calls while delegating to the PostgreSQL driver.
Operations still use the Aurora writer endpoint, but now your application has fast failover capabilities without you having made any business logic changes.
Now that you have successfully configured the application to use the JDBC Wrapper with fast failover capabilities while maintaining all operations on the Aurora writer endpoint, the next step is to configure read/write splitting to distribute read operations across Aurora replicas and optimize performance
Stage 3: Enable read/write splitting
Now let’s implement the JDBC Wrapper read/write capability by enabling connection routing. With connection routing, writes go to the primary instance and reads are distributed across Aurora replicas based on reader selection strategies such as roundRobin and fastestResponse. For detailed configuration information, see Reader Selection Strategies.
Performance considerations with HikariCP using JDBC Wrapper
The demo application uses external HikariCP connection pooling to demonstrate multiple use cases. However, for production applications with frequent read/write operations, using the JDBC Wrapper’s internal connection pooling is recommended. The JDBC wrapper currently uses HikariCP to create and maintain its internal connection pools.
For a comprehensive example with performance testing using internal and external pools and compare to no read/write splitting, see the ReadWriteSplittingSample.java example, which demonstrates three approaches.
Spring Boot/Framework considerations
If you are using Spring Boot/Framework, be aware of performance implications when using the read/write splitting feature. For example, the @Transactional(readOnly = true) annotation can cause significant performance degradation because of constant switching between reader and writer connections. For detailed information about these considerations and recommended workarounds, see Limitations when using Spring Boot/Framework.
Changes needed to use read/write splitting
Let’s review the changes needed to use read/write splitting. The DatabaseConfig.java file adds the readWriteSplitting plugin.
The following code shows the existing JDBC Wrapper configuration with failover:
targetProps.setProperty("wrapperPlugins", "failover");
The updated code to allow the use of read/write splitting is:
targetProps.setProperty("wrapperPlugins", "readWriteSplitting,failover");
The OrderDAO.java file marks connections as read only to enable routing to reader instances:
the JDBC Wrapper now routes write operations to the Aurora writer endpoint (the primary instance) and read operations to Aurora reader endpoints (the replica instances).Read/write splitting plugin offers the following benefits:
- Simplified connection management – You don’t need to manage separate connection pools for read and write connections within your application. Just by setting Connection#setReadOnly() method in the application, the JDBC Wrapper automatically manages the connections.
- Flexible reader selection strategies – Choose from multiple reader selection strategies like roundRobin, fastestResponse, or least connections to optimize performance based on your specific application requirements and workload patterns
- Reduced writer load – Analytics queries no longer compete with transactions
- Better resource utilization – Read traffic distributes across multiple replicas, allowing each Aurora instance to serve its optimal workload without requiring application logic changes
Cleanup
To avoid incurring future charges, delete the resources created during this walkthrough.
If you used the AWS CDK script (Option A):
Run the following commands to delete all AWS resources:
If you created resources manually (Option B):Delete the Aurora cluster and any associated resources (security groups, DB subnet groups) using the same method you used to create them—either through the AWS Management Console or AWS CLI.
Conclusion
This post showed how you can enhance your Java application with the cloud-based capabilities of Aurora by using the JDBC Wrapper. The simple code changes shared in this post can transform a standard JDBC application to use fast failover, read/write splitting, IAM authentication, Secrets Manager integration, and federated authentication.